10
Customizing the twm Window Manager
This chapter describes the syntax of the .twmrc startup file that can be used to customize the operation of the twm window manager. It describes how to bind functions to keys, and how to define your own twm menus. An alternative .twmrc file is included.
In This Chapter:
10
Customizing the twm Window Manager
Difficult as it may be to believe, every function of the window manager described in Chapter 2 and Chapter 3 of this guide can be modified by the user. The function itself will remain the same (for example, you will still resize a window by moving the pointer over the border you want to change, and stretching or shrinking the window to the size you want), but the keys and/or menu items used to invoke the function may be completely different. The flexibility of twm allows you to redesign the Twm menu by reordering, adding and removing items, and changing key/button combinations; and to create entirely new menus. The operation of the window manager, as distributed, is controlled by a text file called system.twmrc in the directory /usr/lib/X11/twm. This file has three parts:
• A variables section, which contains various settings, such as the font with which menus should be displayed, the volume of the keyboard bell, and so on.
• A key bindings section, which defines the keys, pointer buttons, and key and pointer button combinations that will be used to invoke each window manager function (including the display of menus).
• A menus section, which defines the contents of the menus.
As users gain experience with the window manager, each can create a file called .twmrc in his or her home directory. This file can simply extend system.twmrc, resetting a variable or two, perhaps changing a key binding or adding a menu item—or it can replace it completely, changing every aspect of the way the window manager operates.
Rather than abstractly explaining the syntax of these various sections in a .twmrc file, let’s plunge right in, by looking at the system.twmrc file from the MIT X11 distribution, as shown in Example 10-1. (Note that if you are using a commercial version of X, this file may be significantly different. However, in that case, you most likely have a user’s guide specific to your system—perhaps even a customized version of this one!)
Example 10-1. The system.twmrc file from the MIT distribution
#

# $XConsortium: system.twmrc, v 1.7 89/12/01 11:23:47 jim Exp $

#

# Default twm configuration file; needs to be kept small to conserve

# string space in systems whose compilers don't handle medium-sized

# strings.
#

# Sites should tailor this file, providing any extra title buttons,

# menus, etc., that may be appropriate for their environment.  For

# example, if most of the users were accustomed to uwm, the defaults

# could be set up not to decorate any windows and to use meta-keys.

#


NoGrabServer

DecorateTransients

TitleFont "-adobe-helvetica-bold-r-normal--*-120-*-*-*-*-*-*"

ResizeFont "-adobe-helvetica-bold-r-normal--*-120-*-*-*-*-*-*"

MenuFont "-adobe-helvetica-bold-r-normal--*-120-*-*-*-*-*-*"

IconFont "-adobe-helvetica-bold-r-normal--*-100-*-*-*-*-*-*"

IconManagerFont "-adobe-helvetica-bold-r-normal--*-100-*-*-*"

#ClientBorderWidth


Color

{

    BorderColor "slategrey"

    DefaultBackground "maroon"

    DefaultForeground "gray85"

    TitleBackground "maroon"

    TitleForeground "gray85"

    MenuBackground "maroon"

    MenuForeground "gray85"

    MenuTitleBackground "gray70"

    MenuTitleForeground "maroon"

    IconBackground "maroon"

    IconForeground "gray85"

    IconBorderColor "gray85"

    IconManagerBackground "maroon"

    IconManagerForeground "gray85"

}


#

# Define some useful functions for motion-based actions.

#

MoveDelta 3

Function "move-or-lower" { f.move f.deltastop f.lower }

Function "move-or-raise" { f.move f.deltastop f.raise }

Function "move-or-iconify" { f.move f.deltastop f.iconify }


#

# Set some useful bindings.  Sort of uwm-ish, sort of simple-button-ish

#

Button1 =      : root :        f.menu         "defops"


Button1 =   m  : window|icon : f.function     "move-or-lower"

Button2 =   m  : window|icon : f.iconify

Button3 =   m  : window|icon : f.function     "move-or-raise"


Button1 =      : title :       f.function     "move-or-raise"

Button2 =      : title :       f.raiselower


Button1 =      : icon :        f.function     "move-or-iconify"

Button2 =      : icon :        f.iconify


Button1 =      : iconmgr :     f.iconify

Button2 =      : iconmgr :     f.iconify
#

# And a menu with the usual things

#

menu "defops"

{

"Twm"                  f.title

"Iconify"              f.iconify

"Resize"               f.resize

"Move"                 f.move

"Raise"                f.raise

"Lower"                f.lower

""                     f.nop

"Focus"                f.focus

"Unfocus"              f.unfocus

"Show Iconmgr"         f.showiconmgr

"Hide Iconmgr"         f.hideiconmgr

""                     f.nop

"Kill"                 f.destroy

"Delete"               f.delete

""                     f.nop

"Restart"              f.restart

"Exit"                 f.quit

}
If you wish to change the operation of the window manager, you shouldn’t change the system.twmrc file. Instead, copy it to your home directory, under the name .twmrc, and make changes to that copy. Note that settings in system.twmrc and your own local .twmrc file are not cumulative; even if you only want to make a small change, you will need to copy the whole file.
Setting .twmrc Variables
The first section of the file sets global variables. Some variables are Boolean—that is, their presence or absence “toggles” some attribute of the window manager—while others have the form:
variable value
where value is a number, a text string, keyword, or list of any of these. Variable names and keywords are case insensitive.
An example of a Boolean variable is DecorateTransients, which, if present, causes all windows to have titlebars, even if they are only intended to appear for a short time.
An example of a text string variable is:
MenuFont "-adobe-helvetica-bold-r-normal--*-120-*-*-*-*-*-*"
which names the font that should be used in all menus. Text string variables are case sensitive, and must always be surrounded by double quotes. (See Appendix E, Release 3 and 4 Standard Fonts, for lists and illustrations of fonts in the standard X11 distribution.)
An example of a numeric variable is:
IconBorderWidth 5
which sets the width of an icon’s window border in pixels.
In the following example, TitleHighlight is a keyword:
Pixmaps

{

TitleHighlight "gray1"

}
An example of a list variable is:
NoTitle { "oclock" "xclock" "xscreensaver" "zwgc" }
The available variables are described in detail on the twm reference page in Part Three of this guide, so we won’t go into detail on each of them here.
Button/Key Bindings
The second section of the .twmrc file specifies which combination of keys, pointer buttons, and title buttons (and in which context) will be used to invoke each predefined twm function. Let’s see how this works, by looking at the first few lines of the function binding section of system.twmrc.
# BUTTON/KEY =   KEYS    : CONTEXT :     FUNCTION     ACTION

Button1 =                : root :        f.menu       "defops"


Button1 =        m       : window|icon : f.function   "move-or-lower"

Button2 =        m       : window|icon : f.iconify
The first line we’ve shown is just a comment line, which is not present in the original file. It labels each of the fields in the line below. The first field is separated from the others by an equals sign; subsequent fields are separated by colons. In system.twmrc, fields are separated by tabs for clarity, making the colons (falsely) appear to be delimiters only for the context field; they could instead follow each other without intervening whitespace.
Let’s talk about each of the fields in turn.
Pointer Buttons
The first field defines which keys or pointer buttons are used to invoke the function.
twm can handle a pointer with up to five buttons, which would be named Button1, Button2, Button3, Button4, and Button5. To bind a key to a twm function, just use that key’s keysym—the name that represents the label on a key. For example, the keysym for the F1 key on a DECstation 3100 is “F1”. For more information about keysyms, see Chapter 11, Setup Clients.
Keys
The second field lists modifier keys, if any, which must be held down while invoking the specified function, twm recognizes the Shift, Control and Meta keys. (See Chapter 11, Setup Clients, for more discussion.) These names must be entered in the .twmrc file in lower case, and can be abbreviated s, c, and m.
If two keys must be held down at once, the names should be separated by a vertical bar ( | ). For example, c|s would mean that the Control and Shift keys should be pressed simultaneously. It is not permissible to bind a function to three keys at once. If the field is left blank, no key needs to be pressed while invoking the function.
Control and Shift should be familiar to most users. But what is a “Meta” key? There isn’t a key by that name on many keyboards—instead, Meta is a user-definable Control key that can be mapped to an actual key on the physical keyboard using the xmodmap client as described in Chapter 11. Most implementations of X will include a mapped Meta key. Type xmodmap without any arguments to display the map. The system.twmrc specifies the Meta key in many keyboard bindings. On workstations without a special key corresponding to Meta, you will have to use xmodmap to find out or change the definition of Meta to something reasonable.
Meta could be mapped to the Control key, although this could potentially lead to conflicts with applications that want to use the Control key. In particular, certain functions of xedit will operate strangely or not at all if Meta is mapped to Control.
If you want to map the Meta key, it is best to choose a keyboard key that’s within easy reach and is not used frequently for other applications (perhaps an Alt or Funct key). Left- or right-handedness could also be a factor in choosing a Meta key.
Some X developers warn against binding functions to the Shift key alone, since they say certain applications use it as a Control key. If you use it in twm, it will perform both functions simultaneously, which is likely to be confusing. For the same reason, you should not bind functions to buttons without modifier keys in the context of a window, as an application may want to use the pointer buttons for its own purposes.
Context
The third field defines the context—the location the pointer must be in before the function can be invoked. This field may be blank, or may contain one or more of: window, title, icon, root, frame, iconmgr, their first letters (icon is i, iconmgr is m), or all. Multiple context specifications should be separated by vertical bars.
If root is specified, it means that the pointer must be in the root (background) window, and not in any other window or icon. If the context is window, icon, title, frame, or iconmgr, the pointer must be in the specified place(s) for the function to be invoked.
The context field makes perfect sense if you consider the sample function binding.
Button2 = m : window|icon : f.iconify
f.iconify turns a window into an icon, or an icon into a window. The pointer must be in a window or an icon for the function to be used.
Function Names
The first field in a key binding contains the name of a function, followed by an equals sign.
twm has a number of predefined functions. Each of these functions has a name beginning with "f.". The meaning of most of these functions should be fairly obvious to you from the name, if not from your experience using the window manager. For example, f.resize is used to resize a window, f.move to move a window, or f.iconify to change a window to an icon.
Others are less obvious. For example, f.identify provides a summary of the name and geometry of the window it’s invoked on. Notice the function f.nop, which appears coupled with a set of empty quotes rather than a menu selection. This line in the .twmrc creates a blank line on the Twm menu, to isolate the KillWindow and Exit selections from the others. If you select the blank line, nothing happens. If you substituted f.beep for f.nop, the keyboard would beep when the blank line was selected.
Each of the functions is described in detail on the reference page for twm in Part Three of this guide.
Action
The fifth field, labeled “Action,” is typically used only for the f.menu and f.function functions, which allow you to invoke user-defined menus and functions. The fifth field specifies the name of a menu or function, whose contents are defined in the third section of the .twmrc file. If the menu or function name contains quotes, special characters, parentheses, tabs or blanks, it must be enclosed in double quotes. For consistency, you may want to always quote menu and function names. For example:
Button1 =      : root :        f.menu   "defops"

Button1 = m|s  : w|t|i|f|m :   f.menu   "defops"

Button3 =      : root :        f.menu   "utilities"
Going back to our sample function binding:
Button1 = : root : f.menu "defops"
you can now understand that the f.menu function is invoked (bringing up the menu named “defops”) by moving the pointer to the root window and pressing the left pointer button.
All of the other function definitions should be equally readable to you. Go back for a moment and review the bindings shown in the system.twmrc file in Example 10-1.
You’ll notice that it is possible to bind the same function to more than one set of keys, buttons, and/or contexts. For example, the f.iconify function can be invoked while on a window by pressing the Meta key together with the middle button on the pointer. But when the pointer is in the icon, you can invoke this function by pressing only the middle button on the pointer. The reason for this becomes obvious if you realize that when the pointer is on a window, the middle pointer button alone might have some other meaning to the application running in that window. In order to avoid conflict with other applications, twm uses the more complex key/button combination. But when the pointer is in an icon or in the root window there is no possibility of conflict, and it can take a more forgiving approach.
Defining Menus
The third section of a .twmrc file contains menu definitions. These definitions have the format:
menu  "menu_name" {

"item_name"  action

            .

            .

            .

}
The menu name must exactly match a name specified with the f.menu function.
Each item on the menu is given a label (item_name), which will appear on the menu. This is followed by the action to be performed. The action may be one of twm’s functions, or if prefixed by a ! character, it can be a system command to be executed, as if in an xterm window. The Utilities menu shown in Example 10-2 demonstrates both types of action.
Example 10-2. The Utilities menu
menu = "Utilities" {

"Identify"          f.identify

"Source .twmrc"     f.twmrc

""                  f.beep

"Check Mail"        !"/usr/bin/X11/xbiff -display $DISPLAY&"

"Clock"             !"/usr/bin/X11/oclock -display $DISPLAY &"

"New Window"        !"/usr/bin/X11/xterm -ls -display $DISPLAY &"

"Phase of Moon"     !"/usr/bin/X11/xphoon &"

""                  f.beep

"news"              !"/usr/bin/X11/xhost news.mit.edu;

                        /usr/bin/X11/xterm -title news.mit.edu

                        -e rlogin news.mit.edu &"

"mintaka"           !"/usr/bin/X11/xhost mintaka.lcs.mit.edu;

                        /usr/bin/X11/xterm -title mintaka.lcs.mit.edu

                        -e rlogin mintaka.lcs.mit.edu &"

}
New Window is accomplished by running another instance of xterm. CheckMail, Clock, PhaseofMoon, news, and mintaka are also implemented by running a system function. The other functions are accomplished simply by invoking one of twm’s predefined functions.
The Preferences menu shown in Example 10-3 simply invokes xset with a number of different options:
Example 10-3. The Preferences menu
menu  "Preferences" {

"Bell Loud"        !"xset b 80&"

"Bell Normal"      !"xset b on&"

"Bell Off"         !"xset b off&

"Click Loud"       !"xset c 80&"

"Click Soft"       !"xset c on&"

"Click Off"        !"xset c off&"

"Lock On"          !"xset led on&"

"Lock Off"         !"xset led off&

"Mouse Fast"       !"xset m 4 2&"

"Mouse Normal"     !"xset m 2 5&"

"Mouse Slow"       !"xset m 1 1&"

}
Submenus
While the menu defined by the system.twmrc file is a drastic improvement over the cluttered menus provided by uwm in previous releases of X11, it is still far from complete. We’d like to modify it to add a couple of menus which contain commands that, while still worth putting in a menu, aren’t used as frequently as the commands in the Twm menu.
For the moment, let’s assume that we want to leave the variable definitions and function key bindings alone, but want to add two submenus to the Twm menu. For example, we might copy system.twmrc to a local .twmrc file, and modify the menus section to be like the one shown in Example 10-4.
Example 10-4. Window operations divided into three menus
menu "defops"

{

"Twm"               f.title

"Iconify"           f.iconify

"Resize"            f.resize

"Move"              f.move

"Raise"             f.raise

"Lower"             f.lower

""                  f.nop

"..Utilities"       f.menu "Utilities"

"..Preferences"     f.menu "Preferences"

""                  f.nop

"Focus"             f.focus

"Unfocus"           f.unfocus

"Show Iconmgr"      f.showiconmgr

"Hide Iconmgr"      f.hideiconmgr

""                  f.nop

"Kill"              f.destroy

"Delete"            f.delete

""                  f.nop

"Restart"           f.restart

"Exit"              f.quit

}


menu "Utilities" {
"Utilities"     f.title

""              f.beep

"Identify"      f.identify

"Source .twmrc" f.twmrc

""              f.beep

"Mail Box"      !"/usr/bin/X11/xbiff -display $DISPLAY&"

"Clock"         !"/usr/bin/X11/oclock -display $DISPLAY &"

"New Window"    !"/usr/bin/X11/xterm -ls -display $DISPLAY &"

"Phase of Moon" !"/usr/bin/X11/xphoon &"

""              f.beep

"news"          !"/usr/bin/X11/xhost news.mit.edu;

                    /usr/bin/X11/xterm -title news.mit.edu

                    -e rlogin news.mit.edu &"

"mintaka"       !"/usr/bin/X11/xhost mintaka.lcs.mit.edu;

                    /usr/bin/X11/xterm -title mintaka.lcs.mit.edu

                    -e rlogin mintaka.lcs.mit.edu &"

}


menu  "Preferences" {

"Preferences"   f.title

"Bell Loud"     !"xset b 80&"

"Bell Normal"   !"xset b on&"

"Bell Off"      !"xset b off&"

"Click Loud"    !"xset c 80&"

"Click Soft"    !"xset c on&"

"Click Off"     !"xset c off&"

"Lock On"       !"xset led on&"

"Lock Off"      !"xset led off&"

"Mouse Fast"    !"xset m 4 2&"

"Mouse Normal"  !"xset m 2 5&"

"Mouse Slow"    !"xset m 1 1&"

}
To get from one menu to another, we simply define f.menu as the action for one item on the menu. No key, button, or context is defined, so we go right to the next menu when selecting that item.
Executing System Commands from a Menu
We mentioned above that it is possible to specify a system command as a menu action simply by placing an exclamation point in front of the string to be executed.
It is easy to cook up a menu that contains a miscellany of useful commands, as shown in Example 10-5.
Example 10-5. A Useful Commands menu
Button1 = : root : f.menu "Useful Commands"

             .

             .

             .

menu "Useful Commands" {

Analog clock              !"xclock -geometry 162x162-10+10&"
Digital clock             !"xclock -digital -geometry 162x37-10+174&"

Edit File                 !"xterm -e vi"

Calculator                !"xcalc -geometry 126x230-180+10&"

Mailbox                   !"xbiff -geometry 65x65-353+10&"

Display keyboard mappings !"xmodmap&"

}
As you can quickly see, you can run any window-based programs directly, but you need to run other programs using xterm’s -e option (discussed in Chapter 4, The xterm Terminal Emulator). You are limited only by your imagination in what commands you might want to put on a menu. Each command runs in its own window, but that isn’t necessarily the case, as we’ll see in a moment.
Color Menus
So far, we’ve assumed that all menus are black and white. But you can also create color menus. You can even assign different colors to the menu title, the highlighting bar (the horizontal band that follows the pointer within the menu and shows which item is selected) and the individual selections on the menu.
Colors are added to menus when they’re defined, using optional arguments. In Example 10-6, we show a “colorized” version of the Preferences menu that we defined earlier.
Example 10-6. A menu with color definitions
menu  "Preferences" ("WhiteSmoke" : "HotPink" ) {

"Preferences"   ("DarkSlateGray" : "thistle") f.title

"Bell Loud"     ("DarkSlateGray" : "bisque1") !"xset b 80&"

"Bell Normal"   ("DarkSlateGray" : "bisque1") !"xset b on&"

"Bell Off"      ("DarkSlateGray" : "bisque1") !"xset b off&"

"Click Loud"    ("DarkSlateGray" : "azure1")  !"xset c 80&"

"Click Soft"    ("DarkSlateGray" : "azure1")  !"xset c on&"

"Click Off"     ("DarkSlateGray" : "azure1")  !"xset c off&"

"Lock On"                                     !"xset led on&"

"Lock Off"                                    !"xset led off&"

"Mouse Fast"    ("DarkSlateGray" : "gold1")   !"xset m 4 2&"

"Mouse Normal"  ("DarkSlateGray" : "gold1")   !"xset m 2 5&"

"Mouse Slow"    ("DarkSlateGray" : "gold1")   !"xset m 1 1&"

}
In this example, WhiteSmoke and HotPink are the foreground and background (respectively) of a highlighted menu item. The colors defined for each menu item are the foreground and background colors (in that order) for that item when it is not highlighted. The default foreground and background colors for menu items are controlled by the variables MenuForeground and MenuBackground.
twm has eighteen variables controlling different aspects of its color:
These variables are most commonly used as arguments to the Color and Monochrome variables, as seen in Example 10-1.
Colors can be specified either with color names or hex strings, as described in Chapter 8, Command Line Options.
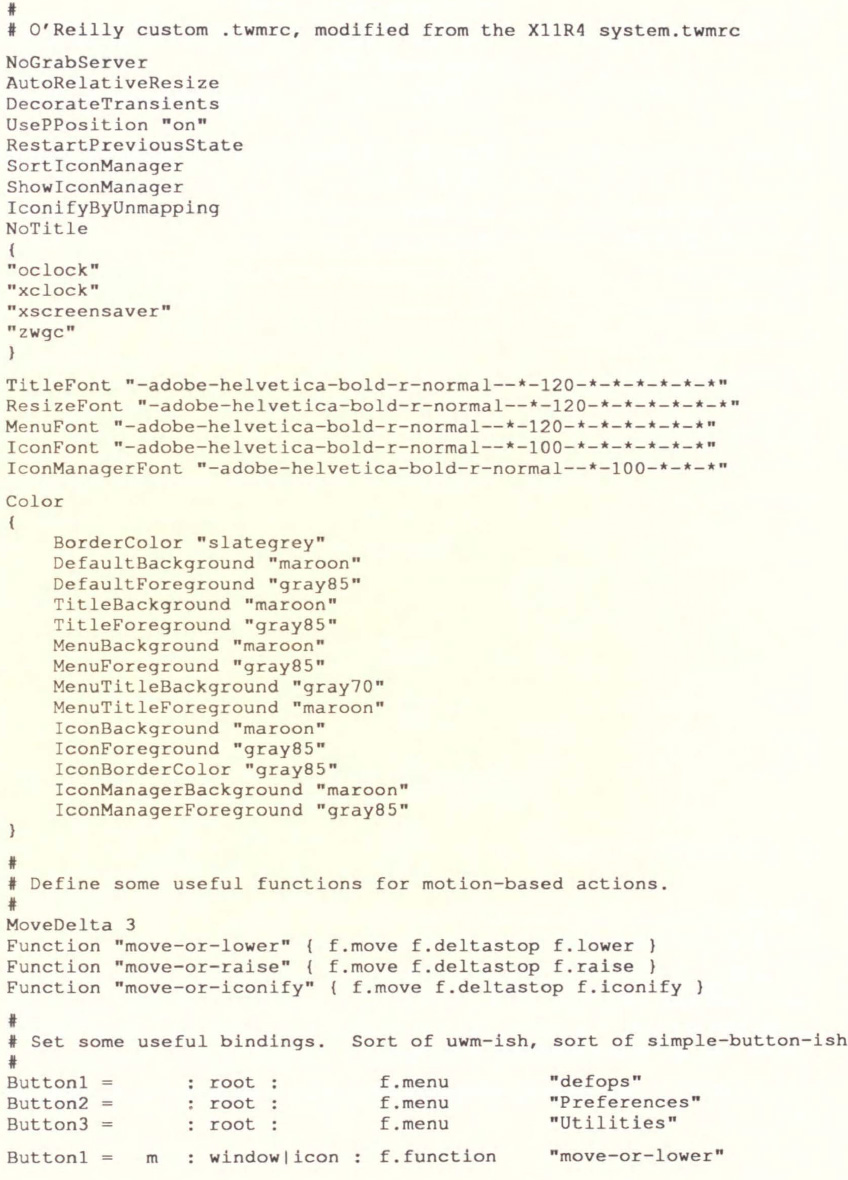
A Complete Revamp of twm
Using the various techniques described in this chapter, we’ve modified the system.twmrc file to create an interface we think is more helpful to the average user.
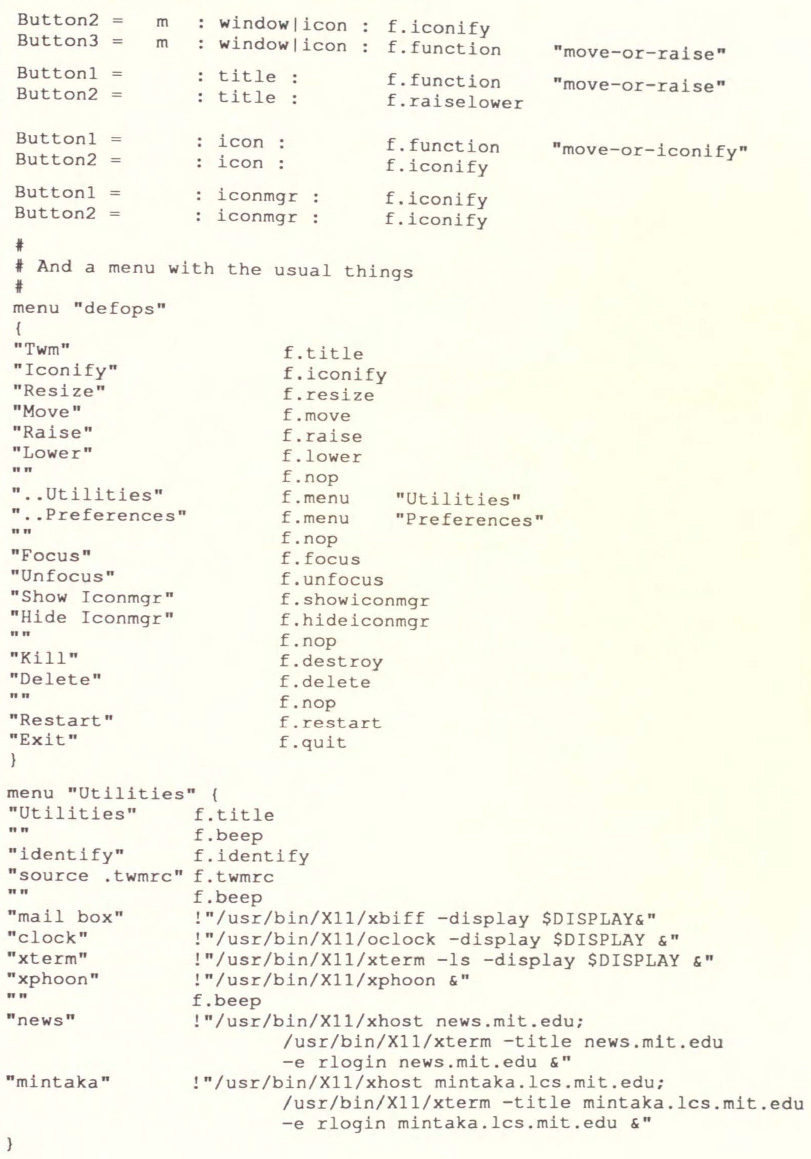
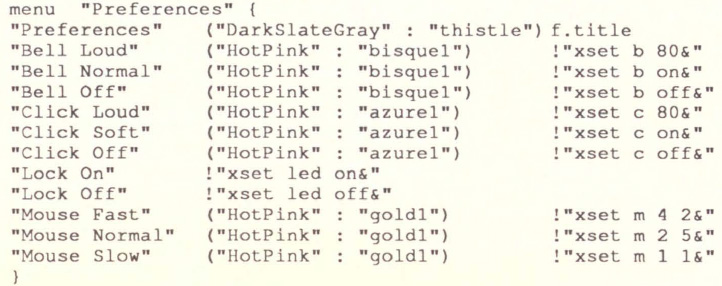
Our modified .twmrc file sets up three pull-right menus, each with a slightly different focus. The second menu offers some utilities, including oclock and xcalc, and some system commands, such as rlogin. The final menu is a Preferences menu, which sets different keyclick volumes, leds, and pointer speeds than the default.
You can test our .twmrc, shown in Example 10-7, or just use it as a touchstone to create your own.
Get X Window System User's Guide for X11 R3 and R4 of the X Window System now with the O’Reilly learning platform.
O’Reilly members experience books, live events, courses curated by job role, and more from O’Reilly and nearly 200 top publishers.

