Part Three:
Client Reference Pages
This part of the guide provides UNIX-style “man-pages” for each of the X programs. These pages are arranged alphabetically for ease of reference, and they contain detailed information (such as all options to a program) that is not covered in other parts of this guide.
Intro
Introduction
Intro – overview of reference page format.
Syntax
This section describes the command line syntax for invoking the client.
Description
This section explains the operation of the client.
Options
This section lists available command line options. In some cases, reference is made to “all of the standard X Toolkit command line options.” These X Toolkit options are listed in Chapter 8 of this guide.
Resources
This section lists the resource variable names that can be specified in an Xresources or other resource file. In some cases, reference is made to “all the core resource names and classes.” A list of the core names and classes appears on the reference page for X and in Table 8-1 in Chapter 8, Command Line Options. See Chapter 9, Setting Resources, for syntax rules and examples. For complete information, see Volume Four, X Toolkit Intrinsics Programming Manual.
Environment
If present, this section lists shell environment variables used by the client. This section does not list the DISPLAY and XENVIRONMENT variables, which are used by all clients. They are used as follows:
| DISPLAY | To get the default host and display number. |
| XENVIRONMENT | To get the name of a resource file that overrides the global resources stored in the RESOURCE_MANAGER property. |
See Also
This section lists other pages in Part Three of this guide that may also be of interest. Note that versions of these pages may have been installed in the usual on-line manual hierarchy, and may be available via the UNIX man(1) command. References such as stat(2) can be found in the standard UNIX documentation. This section may also include references to documentation on Xlib, the X Toolkit, various widgets, etc.
Bugs
If present, this section lists areas in which the author of the program thinks it could be improved. In a few cases, we’ve added additional bugs we’ve noted.
Author
The authors of the program and (generally) the reference page as well. Most of the reference pages are subject to the copyright provisions in the “Copyright” section of the X reference page. Where appropriate, additional copyrights are noted on individual pages.
Note, however, that those portions of this document that are based on the original X11 documentation and other source materials have been revised and that all such revisions are copyright © 1987, 1988, 1989 O’Reilly & Associates, Inc. Inasmuch as the proprietary revisions can’t be separated from the freely copyable MIT source material, the net result is that copying of this document is not allowed. Sorry for the doublespeak!
X
The X Window System
Name
X – a portable, network transparent window system.
Description
X is a network transparent window system developed at MIT that runs on a wide range of computing and graphics machines. The Release 4 core distribution from MIT has support for the following operating systems:
Ultrix 3.1 (Digital)
SunOS 4.0.3 (Sun)
HP-UX 6.5 (Hewlett-Packard)
Domain/OS 10.1 (HP/Apollo)
A/UX 1.1 (Apple)
AIX RT-2.2 and PS/2-1.1 (IBM)
AOS-4.3 (IBM)
UTEK 4.0 (Tektronix)
NEWS-OS 3.2 (Sony; client only)
UNICOS 5.0.1 (Cray; client only)
UNIX(tm) System V, Release 3.2 (AT&T 6386 WGS; client only)
It should be relatively easy to build the client-side software on a variety of other systems. Commercial implementations are also available for a much wider range of platforms.
The X Consortium requests that the following names be used when referring to this software:
X
X Window System
X Version 11
X Window System, Version 11
X11
X Window System is a trademark of the Massachusetts Institute of Technology.
X window system servers run on computers with bitmap displays. The server distributes user input to and accepts output requests from various client programs through a variety of different interprocess communication channels. Although the most common case is for the client programs to be running on the same machine as the server, clients can be run transparently from other machines (including machines with different architectures and operating systems) as well.
X supports overlapping hierarchical subwindows and text and graphics operations, on both monochrome and color displays. For a full explanation of the functions that are available, see Volume Four, X Toolkit Intrinsics Programming Manual and Volume Five, X Toolkit Intrinsics Reference Manual.
The number of programs that use X is growing rapidly. Of particular interest are: a terminal emulator (xterm), a window manager (twm), a display manager (xdm), mail managing utilities (xmh and xbiff), a manual page browser (xman), a bitmap editor (bitmap), access control programs (xauth and xhost), user preference setting programs (xrdb, xset, xsetroot, and xmodmap), a load monitor (xload), clocks (oclock and xclock), a font displayer (xfd), utilities for listing information about fonts, windows, and displays (xlsfonts, xfontsel, xlswins, xwininfo, xdpyinfo, xlsclients, and xprop), a diagnostic for seeing what events are generated and when (xev), screen image manipulation utilities (xwd, xwud, xpr, and xmag), and various demos (xeyes, ico, muncher, puzzle, xgc, etc.).
Many other utilities, window managers, games, toolkits, etc. are available from the user-contributed distribution. See your site administrator for details.
Starting Up
There are currently three ways of starting the X server and an initial set of client applications. The particular method used depends on what operating system you are running and on whether or not you use other window systems in addition to X.
xdm (the X Display Manager)
If you want to always have X running on your display, your site administrator can set your machine up to use the X Display Manager xdm. This program is typically started by the system at boot time and takes care of keeping the server running and getting users logged in. If you are running xdm, you will see a window on the screen welcoming you to the system and asking for your username and password. Simply type them in as you would at a normal terminal, pressing the Return key after each. If you make a mistake, xdm will display an error message and ask you to try again. After you have successfully logged in, xdm will start up your X environment. By default, if you have an executable file named .xsession in your home directory, xdm will treat it as a program (or shell script) to run to start up your initial clients (such as terminal emulators, clocks, a window manager, user settings for things like the background, the speed of the pointer, etc.). Your site administrator can provide details.
xinit (run manually from the shell)
Sites that support more than one window system might choose to use the xinit program for starting X manually. If this is true for your machine, your site administrator will probably have provided a program named “x11”, “startx”, or “xstart” that will do site-specific initialization (such as loading convenient default resources, running a window manager, displaying a clock, and starting several terminal emulators) in a nice way. If not, you can build such a script using the xinit program. This utility simply runs one user-specified program to start the server, runs another to start up any desired clients, and then waits for either to finish. Since either or both of the user-specified programs may be a shell script, this gives substantial flexibility at the expense of a nice interface. For this reason, xinit is not intended for end users.
xterm −L (started from /etc/init)
This method can be used only with Release 3 (or an earlier release) of X. Some versions of UNIX that are derived from BSD 4.3 support starting the window system and an initial xterm window from the system terminal line configuration file /etc/ttys. As with xdm, there will be a window requesting your username and password. However, this window will become your primary window and is not configurable on a per-user basis. Sites using this method should switch to xdm as xterm -L is not be supported as of Release 4.
Display Names
From the user’s perspective, every X server has a displayname of the form:
host:display.screen
This information is used by the application to determine how it should connect to the server and which screen it should use by default (on displays with multiple monitors):
host |
The name of the machine to which the display is physically connected. If the host name is not given, the most efficient way of communicating to a server on the same machine will be used. |
display |
The display number. The phrase “display” is usually used to refer to a collection of monitors that share a common keyboard and pointer (mouse, tablet, etc.). Most workstations tend to only have one keyboard, and therefore, only one display. Larger, multi-user systems, however, will frequently have several displays so that more than one person can be doing graphics work at once. To avoid confusion, each display on a machine is assigned a display number (beginning at 0) when the X server for that display is started. The display number must always be given in a display name. In this guide, the display number is also referred to as the server number (referring to the phrase display server). |
screen |
The screen number. Some displays share a single keyboard and pointer among two or more monitors. Since each monitor has its own set of windows, each screen is assigned a screen number (beginning at 0) when the X server for that display is started. If the screen number is not given, then screen 0 will be used. |
On POSIX systems, the default display name is stored in your DISPLAY environment variable. This variable is set automatically by the xterm terminal emulator. However, when you log into another machine on a network, you’ll need to set DISPLAY by hand to point to your display. For example,
% setenv DISPLAY myws:0

$ DISPLAY=myws:0; export DISPLAY
Finally, most X programs accept a command line option of –display displayname to temporarily override the contents of DISPLAY. This is most commonly used to pop windows on another person’s screen or as part of a “remote shell” command to start an xterm pointing back to your display. For example,
X servers listen for connections on a variety of different communications channels (network byte streams, shared memory, etc.). Since there can be more than one way of contacting a given server, the host name part of the display name is used to determine the type of channel (also called a transport layer) to be used The sample servers from MIT support the following types of connections:
| local | The host part of the display name should be the empty string. For example: :0, :1, and :0.1. |
| TCP/IP | The host part of the display name should be the server machine’s IP address name. Full Internet names, abbreviated names, and IP addresses are all allowed. For example: expo.lcs.mit.edu:0, expo:0, 18.30.0.212:0, bigrnachine:1, and hydra:0.1. |
| DECnet | The host part of the display name should be the server machine’s nodename followed by two colons instead of one. For example: myws: :0, big: :1, and hydra: : 0.1. |
Access Control
The sample server provides two types of access control: an authorization protocol that provides a list of “magic cookies” clients can send to request access (available as of Release 4); and a list of hosts from which connections are always accepted. xdm initializes magic cookies in the server, and also places them in a file accessible to the user. Normally, the list of hosts from which connections are always accepted should be empty, so that only clients that are explicitly authorized can connect to the display. When you add entries to the host list (with xhost), the server no longer performs any authorization on connections from those machines. Be careful with this.
The file for authorization used by both xdm and Xlib can be specified with the environment variable XAUTHORITY, and defaults to the file .Xauthority in the home directory. xdm uses $HOME/.Xauthority and will create it or merge in authorization records if it already exists when a user logs in.
To manage a collection of authorization files containing a collection of authorization records, use xauth. This program allows you to extract records and insert them into other files. Using this, you can send authorization to remote machines when you login. As the files are machine-independent, you can also simply copy the files or use NFS to share them. If you use several machines, and share a common home directory with NFS, then you never really have to worry about authorization files, the system should work correctly by default. Note that magic cookies transmitted “in the clear” over NFS or using ftp or rcp can be “stolen” by a network eavesdropper, and as such may enable unauthorized access. In many environments this level of security is not a concern, but if it is, you need to know the exact semantics of the particular magic cookie to know if this is actually a problem.
One of the advantages of using window systems instead of hardwired terminals is that applications don’t have to be restricted to a particular size or location on the screen. Although the layout of windows on a display is controlled by the window manager that the user is running (described below), most X programs accept a command line argument of the form −geometry widthxheight+xoff+yoff (where width, height, xoff, and yoff are numbers) for specifying a preferred size and location for this application’s main window.
The width and height parts of the geometry specification are usually measured in either pixels or characters, depending on the application. The xoff and yoff parts are measured in pixels and are used to specify the distance of the window from the left or right and top and bottom edges of the screen, respectively. Both types of offsets are measured from the indicated edge of the screen to the corresponding edge of the window. The x offset may be specified in the following ways:
+xoff |
The left edge of the window is to be placed xoff pixels in from the left edge of the screen (i.e., the x coordinate of the window’s origin will be xoff). xoff may be negative, in which case the window’s left edge will be off the screen. |
−xoff |
The right edge of the window is to be placed xoff pixels in from the right edge of the screen. xoff may be negative, in which case the window's right edge will be off the screen. |
The y offset has similar meanings:
+yoff |
The top edge of the window is to be yoff pixels below the top edge of the screen (i.e., the y coordinate of the window’s origin will be yoff). yoff may be negative, in which case the window’s top edge will be off the screen. |
−yoff |
The bottom edge of the window is to be yoff pixels above the bottom edge of the screen. yoff may be negative, in which case the window’s bottom edge will be off the screen. |
Offsets must be given as pairs; in other words, in order to specify either xoff or yoff both must be present Windows can be placed in the four corners of the screen using the following specifications:
+0+0 |
The upper left hand corner. |
−0+0 |
The upper right hand corner. |
−0−0 |
The lower right hand corner. |
+0−0 |
The lower left hand corner. |
In the following examples, a terminal emulator will be placed in roughly the center of the screen and a load average monitor, mailbox, and clock will be placed in the upper right hand corner:
% xterm −fn 6x10 −geometry 80x24+30+200 &

% xclock −geometry 48x48−0+0 &

% xload −geometry 48x48−96+0 &

% xbiff −geometry 48x48−48+0 &
Window Managers
The layout of windows on the screen is controlled by special programs called window managers. Although many window managers will honor geometry specifications as given, others may choose to ignore them (requiring the user to explicitly draw the window’s region on the screen with the pointer, for example).
Since window managers are regular (albeit complex) client programs, a variety of different user interfaces can be built. In Release 4, the core distribution comes with a window manager named twm, which supports overlapping windows, popup menus, point-and-click or click-to-type input models, titlebars, nice icons (and an icon manager for those who don’t like separate icon windows).
Several other window managers are available in the Release 4 user-contributed distribution: uwm, gwm, m_swm, olwm, and tekwm.
Font Names
Collections of characters for displaying text and symbols in X are known as fonts. A font typically contains images that share a common appearance and look nice together (for example, a single size, boldness, slant, and character set). Similarly, collections of fonts that are based on a common type face (the variations are usually called roman, bold, italic, bold italic, oblique, and bold oblique) are called families.
Sets of font families of the same resolution (usually measured in dots per inch) are further grouped into directories (so named because they were initially stored in file system directories). Each directory contains a database that lists the name of the font and information on how to find the font. The server uses these databases to translate font names (which have nothing to do with filenames) into font data.
The list of font directories in which the server looks when trying to find a font is controlled by the font path. Although most installations will choose to have the server start up with all of the commonly used font directories, the font path can be changed at any time with the xset program. However, it is important to remember that the directory names are on the server’s machine, not on the application’s.
The default font path for the sample server contains three directories:
/usr/lib/X11/fonts/misc
This directory contains several miscellaneous fonts that are useful on all systems. It contains a small family of fixed-width fonts in pixel heights 5 through 10, a family of fixed-width fonts from Dale Schumacher in similar pixel heights, several Kana fonts from Sony Corporation, a Kanji font, the standard cursor font, two cursor fonts from Digital Equipment Corporation, and OPEN LOOK cursor and glyph fonts from Sun Microsystems. It also has font name aliases for the fonts fixed and variable.
This directory contains fonts contributed by Adobe Systems, Inc., Digital Equipment Corporation, Bitstream, Inc., Bigelow and Holmes, and Sun Microsystems, Inc. for 75 dots per inch displays. An integrated selection of sizes, styles, and weights is provided for each family.
/usr/lib/X11/fonts/100dpi
This directory contains 100 dots per inch versions of the fonts in the 75dpi directory.
Font databases are created by running the mkfontdir program in the directory containing the source or compiled versions of the fonts (in both compressed and uncompressed formats). Whenever fonts are added to a directory, mkfontdir should be rerun so that the server can find the new fonts. To make the server reread the font database, reset the font path with the xset program. For example, to add a font to a private directory, the following commands could be used:
% cp newfont.snf ~/myfonts

% mkfontdir ~/myfonts

% xset fp rehash
The xlsfonts program can be used to list all of the fonts that are found in font databases in the current font path. Font names tend to be fairly long as they contain all of the information needed to uniquely identify individual fonts. However, the sample server supports wildcarding of font names, so the full specification:
-adobe-courier-medium-r-normal--10-100-75-75-m-60-iso8859-1
could be abbreviated as:
*-courier-medium-r-normal--*-100-*
Because the shell also has special meanings for * and ?, wildcarded font names should be quoted:
% xlsfonts -fn ’*-courier-medium-r-normal--*-100-*’
If more than one font in a given directory in the font path matches a wildcarded font name, the choice of which particular font to return is left to the server. However, if fonts from more than one directory match a name, the returned font will always be from the first such directory in the font path. The example given above will match fonts in both the 75dpi and 100dpi directories; if the 75dpi directory is ahead of the 100dpi directory in the font path, the smaller version of the font will be used.
Color Names
Most applications provide ways of tailoring (usually through resources or command line arguments) the colors of various elements in the text and graphics they display. Although black and white displays don’t provide much of a choice, color displays frequently allow anywhere between 16 and 16 million different colors.
Colors are usually specified by their commonly-used names (for example, red, white, or medium slate blue). The server translates these names into appropriate screen colors using a color database that can usually be found in /usr/lib/X11/rgb.txt. Color names are case-insensitive, meaning that red, Red, and RED all refer to the same color.
Many applications also accept color specifications of the following form:
#rgb

#rrggbb

#rrrgggbbb

#rrrrggggbbbb
where r, g, and b are hexidecimal numbers indicating how much red, green, and blue should be displayed (zero being none and ffff being on full). Each field in the specification must have the same number of digits (e.g., #rrgb or #gbb are not allowed). Fields that have fewer than four digits (e.g., #rgb) are padded out with zero’s following each digit (e.g., #r000g000b000). The eight primary colors can be represented as:
| black | #000000000000 (no color at all) |
| red | #ffff00000000 |
| green | #0000ffff0000 |
| blue | #00000000ffff |
| yellow | #ffffffff0000 (full red and green, no blue) |
| magenta | #ffff0000ffff |
| cyan | #0000ffffffff |
| white | #ffffffffffff (full red, green, and blue) |
Unfortunately, RGB color specifications are highly unportable since different monitors produce different shades when given the same inputs. Similarly, color names aren’t portable because there is no standard naming scheme and because the color database needs to be tuned for each monitor. Application developers should take care to make their colors tailorable.
Keys
The X keyboard model is broken into two layers: server-specific codes (called keycodes) which represent the physical keys, and server-independent symbols (called keysyms) which represent the letters or words that appear on the keys. Two tables are kept in the server for converting keycodes to keysyms:
Although most programs deal with keysyms directly (such as those written with the X Toolkit Intrinsics), most programming libraries provide routines for converting keysyms into the appropriate type of string (such as ISO Latin-1).
Options
Most X programs attempt to use the same names for command line options and arguments. All applications written with the X Toolkit Intrinsics automatically accept the following options:
−display [host] :server[.screen]
Specifies the name of the X server to use. host specifies the machine, server specifies the display server number, and screen specifies the screen number. Either or both the host and screen elements to the display specification can be omitted. If host is omitted, the local machine is assumed. If screen is omitted, screen 0 is assumed (and the period is unnecessary). The colon and (display) server are necessary in all cases.
−geometry geometry
Specifies the initial size and location of the application window. The −geometry option can be (and often is) abbreviated to −g, unless there is a conflicting option that begins with “g.” The argument (geometry) is referred to as a “standard geometry string,” and has the form widthx-height±xoff±yoff.
−bg color, −background color
Either option specifies the color to use for the window background.
−bd color, −bordercolor color
Either option specifies the color to use for the window border.
−bw pixels, −borderwidth pixels
Either option specifies the width in pixels of the window border.
−fg color, −foreground color
Either option specifies the color to use for text or graphics.
−fn font, −font font
Either option specifies the font to use for displaying text
−iconic |
Indicates that the user would prefer that the application’s windows initially not be visible as if the windows had been immediately iconified by the user. Window managers may choose not to honor the application’s request. |
−name |
Specifies the name under which resources for the application should be found. This option is useful in shell aliases to distinguish between invocations of an application, without resorting to creating links to alter the executable filename. |
Either option indicates that the program should simulate reverse video if possible, often by swapping the foreground and background colors. Not all programs honor this or implement it correctly. It is usually only used on monochrome displays.
+rv |
Indicates that the program should not simulate reverse video. This is used to override any defaults since reverse video doesn’t always work properly. |
−selectionTimeout
Specifies the timeout in milliseconds within which two communicating applications must respond to one another for a selection request.
−synchronous
Indicates that requests to the X server should be sent synchronously, instead of asynchronously. Since Xlib normally buffers requests to the server, errors do not necessarily get reported immediately after they occur. This option turns off the buffering so that the application can be debugged. It should never be used with a working program.
−title string
Specifies the title to be used for this window. This information is sometimes used by a window manager to provide some sort of header identifying the window.
−xnllanguage language[_territory][.codeset]
Specifies the language, territory, and codeset for use in resolving resource and other filenames.
−xrm resourcestring
Specifies a resource name and value to override any defaults. It is very useful for setting resources that don’t have explicit command line arguments.
Resources
To make the tailoring of applications to personal preferences easier, X supports several mechanisms for storing default values for program resources (e.g., background color, window title, etc.) Resources are specified as strings of the form:
appname*subname*subsubname ...: value
that are read in from various places when an application is run.
By convention, the application class name is the same as the program name, but with the first letter capitalized (e.g., Bitmap or Emacs) although some programs that begin with the letter “x” also capitalize the second letter for historical reasons. The precise syntax for resources is:
ResourceLine   =   Comment | ResourceSpec

Comment        =   "!" string | <empty line>

ResourceSpec   =   WhiteSpace ResourceName WhiteSpace ":" WhiteSpace value

ResourceName   =   [Binding] ComponentName {Binding ComponentName}

Binding        =   "." | "*"

WhiteSpace     =   {" " | "\t"}

ComponentName  =   {"a"-"z" | "A"-"Z" | "0"-"9" | "_" | "-"}

value          =   string

string         =   {<any character not including "\n">}
Note that elements enclosed in curly braces ({...}) indicate zero or more occurrences of the enclosed elements.
To allow values to contain arbitrary octets, the 4-character sequence \nnn, where n is a digit in the range of “0”−“7”, is recognized and replaced with a single byte that contains this sequence interpreted as an octal number. For example, a value containing a NULL byte can be stored by specifying “\000”.
The Xlib routine XGetDefault(3X) and the resource utilities within the X Toolkit obtain resources from the following sources:
RESOURCE_MANAGER root window property
Any global resources that should be available to clients on all machines should be stored in the RESOURCE_MANAGER property on the root window using the xrdb program. This is frequently taken care of when the user starts up X through the display manager or xinit.
application-specific files
Any application- or machine-specific resources can be stored in the class resource files located in the XAPPLOADDIR directory (this is a configuration parameter that is /usr/lib/X11/app-defaults in the standard distribution). Programs that use the X Toolkit will also look in the directory named by the environment variable XAPPLRESDIR (default value is user’s home directory) for files named Class where Class is the class name of the particular application. XAPPLOADDIR and XAPPLRESDIR configuration files are actually loaded before the RESOURCE_MANAGER property, so that the property can override the values.
XENVIRONMENT
Any user- and machine-specific resources may be specified by setting the XENVIRONMENT environment variable to the name of a resource file to be loaded by all applications. If this variable is not defined, the X Toolkit looks for a file named .Xdefaults-hostname, where hostname is the name of the host where the application is executing.
−xrm resourcestring
Applications that use the X Toolkit can have resources specified from the command line. The resourcestring is a single resource name and value as shown above. Note that if the string contains characters interpreted by the shell (e.g., asterisk), they must be quoted. Any number of −xrm arguments may be given on the command line.
Program resources are organized into groups called classes, so that collections of individual resources (each of which are called instances) can be set all at once. By convention, the instance name of a resource begins with a lowercase letter and class name with an upper case letter. Multiple word resources are concatentated with the first letter of the succeeding words capitalized. Applications written with the X Toolkit Intrinsics will have at least the following resources:
background (class Background)
Specifies the color to use for the window background.
borderWidth (class BorderWidth)
Specifies the width in pixels of the window border.
borderColor (class BorderColor)
Specifies the color to use for the window border.
Most applications using the X Toolkit Intrinsics also have the resource foreground (class Foreground). specifying the color to use for text and graphics within the window.
By combining class and instance specifications, application preferences can be set quickly and easily. Users of color displays will frequently want to set Background and Foreground classes to particular defaults. Specific color instances such as text cursors can then be overridden without having to define all of the related resources. For example,
bitmap*Dashed:  off

XTerm*cursorColor:  gold

XTerm*multiScroll:  on

XTerm*jumpScroll:  on

XTerm*reverseWrap:  on

XTerm*curses:  on

XTerm*Font:  6x10

XTerm*scrollBar:  on

XTerm*scrollbar*thickness:  5

XTerm*multiClickTime:  500

XTerm*charClass:  33:48,37:48,45−47:48,64:48

XTerm*cutNewline:  off

XTerm*cutToBeginningOfLine:  off

XTerm*titeInhibit:  on

XTerm*ttyModes:  intr ^c erase ^? kill ^u

XLoad*Background:  gold

XLoad*Foreground:  red

XLoad*highlight:  black

XLoad*borderWidth:  0

emacs*Geometry:  80x65−0−0

emacs*Background:  #5b7686

emacs*Foreground:  white

emacs*Cursor:  white

emacs*BorderColor:  white

emacs*Font:  6x10

xmag*geometry:  −0−0

xmag*borderColor:  white
If these resources were stored in a file called .Xresources in your home directory, they could be added to any existing resources in the server with the following command:
% xrdb −merqe $HOME/.Xresources
This is frequently how user-friendly startup scripts merge user-specific defaults into any site-wide defaults. All sites are encouraged to set up convenient ways of automatically loading resources.
Examples
The following is a collection of sample command lines for some of the more frequently used commands. For more information on a particular command, please refer to that command’s manual page.
% xrdb −load $HOME/.Xresources

% xmodmap −e ’keysym BackSpace = Delete’

% mkfontdir /usr/local/lib/X11/otherfonts

% xset fp+ /usr/local/lib/X11/otherfonts

% xmodmap $HOME/.keymap.km

% xsetroot −solid ’#888’

% xset b 100 400 c 50 s 1800 r on

% xset q

% twm

% xmag

% xclock −geometry 48x48−0+0 −bg blue −fg white

% xeyes −geometry 48x48−48+0

% xbiff −update 20

% xlsfonts ’*helvetica*’

% xlswins −l

% xwininfo −root

% xdpyinfo −display joesworkstation:0

% xhost −joesworkstation

% xrefresh

% xwd | xwud

% bitmap companylogo.bm 32x32

% xcalc −bg blue −fg magenta

% xterm −geometry 80x66−0−0 −name myxterm
Diagnostics
A wide variety of error messages are generated from various programs. Various toolkits are encouraged to provide a common mechanism for locating error text so that applications can be tailored easily. Programs written to interface directly to the Xlib C language library are expected to do their own error checking.
The default error handler in Xlib (also used by many toolkits) uses standard resources to construct diagnostic messages when errors occur. The defaults for these messages are usually stored in /usr/lib/X11/XErrorDB. If this file is not present, error messages will be rather terse and cryptic.
When the X Toolkit Intrinsics encounter errors converting resource strings to the appropriate internal format, no error messages are printed. This is convenient when it is desirable to have one set of resources across a variety of displays (e.g., color versus monochrome, lots of fonts versus very few, etc.), although it can pose problems for trying to determine why an application might be failing. This behavior can be overridden by setting the StringConversions-Warning resource.
To force the X Toolkit Intrinsics to always print string conversion error messages, the following resource should be placed at the top of the file that gets loaded onto the RESOURCE_MANAGER property using the xrdb program (frequently called .Xresources or .Xres in the user’s home directory):
*StringConversionWarnings: on
To have conversion messages printed for just a particular application, the appropriate instance name can be placed before the asterisk:
xterm*StringConversionWarnings: on
Bugs
If you encounter a repeatable bug, please contact your site administrator for instructions on how to submit an X Bug Report.
See Also
XConsortium(1), XStandards(1), Xau, Xserver, mkfontdir, bdftosnf, bitmap, bsdtosnf, oclock, showsnf, twm, uwm, x10tox11, xauth, xbiff, xcalc, xclock, xdpyinfo, xedit, xev, xfd, xfontsel, xhost, xinit, xkill, xload, xlogo, xlsclients, xlsfonts, xlswins, xmag, xman, xmh, xmodmap, xpr, xprop, xrdb, xrefresh, xset, xsetroot, resize, xterm, xwd, xwininfo, xwud, biff(1), mh(1), init(8), ttys(5); Volume One, Xlib Programming Manual; Volume Two, Xlib Reference Manual; Volume Four, X Toolkit Intrinsics Programming Manual; Volume Five, X Toolkit Intrinsics Reference Manual.
Copyright
The following copyright and permission notice outlines the rights and restrictions covering most parts of the standard distribution of the X Window System from MIT. Other parts have additional or different copyrights and permissions; see the individual source files.
Copyright 1984, 1985, 1986, 1987, 1988, 1989 Massachusetts Institute of Technology.
Permission to use, copy, modify, and distribute this software and its documentation for any purpose and without fee is hereby granted, provided that the above copyright notice appear in all copies and that both that copyright notice and this permission notice appear in supporting documentation, and that the name of M.I.T. not be used in advertising or publicity pertaining to distribution of the software without specific, written prior permission. M.I.T. makes no representations about the suitability of this software for any purpose. It is provided “as is” without express or implied warranty.
This software is not subject to any license of the American Telephone and Telegraph Company or of the Regents of the University of California.
Trademarks
UNIX and OPEN LOOK are trademarks of AT&T. X Window System is a trademark of MIT.
Authors
A cast of thousands. See the file doc/contributors in the standard sources for some of the names.
Xau
Authorization Routines
Name
XauFileName, XauReadAuth, XauLockAuth,
XauUnlockAuth, XauWriteAuth, XauGetAuthBy Addr −X authority database routines
Syntax
#include <Xll/Xauth.h>

typedef struct xauth {

    unsigned short         family;

    unsigned short         address_length;

    char                   *address;

    unsigned short         number_length;

    char                   *number;

    unsigned short         name_length;

    char                   *name;

    unsigned short         data_length;

    char                   *data;

} Xauth;


char *XauFileName ()


Xauth *XauReadAuth (auth_file)

    FILE *auth_file;


int XauWriteAuth (auth_file, auth)

    FILE *auth_file;

    Xauth *auth;

Xauth *XauGetAuthByAddr (family, address_length, address,

         number_length, number)

    unsigned short family;

    unsigned short address_length;

    char *address;

    unsigned short number_length;

    char *number;


int XauLockAuth (file_name, retries, timeout, dead)

    char *file name;

    int retries;

    int timeout;

    long dead;


int XauUnlockAuth (file_name)

    char *file name;


XauDisposeAuth (auth)

    Xauth *auth;
Description
XauFileName generates the default authorization file name by first checking the XAUTHORITY environment variable if set, else it returns $HOME/.Xauthority. This name is statically allocated and should not be freed.
XauReadAuth reads the next entry from auth_file. The entry is not statically allocated and should be freed by calling XauDisposeAuth.
xauWriteAuth writes an authorization entry to auth_file. It returns 1 on success, 0 on failure.
XauGetAuthByAddr searches for an entry which matches the given network address/display number pair. The entry is not statically allocated and should be freed by calling Xau−DisposeAuth
XauLockAuth does the work necessary to synchronously update an authorization file. First it makes to file names, one with −c appended to file_name, the other with −l appended. If the −c file already exists and is more than dead seconds old, XauLockAuth removes it and the associated -l file. To prevent possible synchronization troubles with NFS, a dead value of zero forces the files to be removed. XauLockAuth makes retries attempts to create and link the file names, pausing timeout seconds between each attempt. XauLockAuth returns a collection of values depending on the results:
LOCK_ERROR |
A system error occurred, either a file_name which is too long, or an unexpected failure from a system call. errno may prove useful. |
LOCK_TIMEOUT |
retries attempts failed. |
LOCK_SUCCESS |
The lock succeeded. |
XauUnlockAuth undoes the work of XauLockAuth by unlinking both the −c and −l filenames.
XauDisposeAuth frees storage allocated to hold an authorization entry.
See Also
xauth, xdm
Author
Keith Packard, MIT X Consortium.
Xserver
X Window System Server
Name
X − X Window System server.
Syntax
X [:displaynumber] [options] [ttyname]
Description
X is the generic name for the X Window System server. It is frequently a link or a copy of the appropriate server binary for driving the most frequently used server on a given machine. The sample server from MIT supports the following platforms:
| Xqvss | Digital monochrome vaxstationII or II |
| Xqdss | Digital color vaxstationII or II |
| Xsun | Sun monochrome or color Sun 2, 3, or 4 |
| Xhp | HP Topcat 9000s300 |
| Xibm | IBM AED, APA and megapel PC/RT, 8514 and VGA PS/2 model 80 |
| Xapollo | Apollo monochrome or color (Domain/OS SR10.1 or SR10.2) |
| XmacII | Apple monochrome Macintosh II |
| Xcfbpmax | Digital color DECstation 3100 |
| Xmfbpmax | Digital monochrome DECstation 3100 |
| Xtek | Tektronix 4319 (this is the only tested configuration) |
Starting the Server
The server is usually started from the X Display Manager program, xdm. This utility is run from the system boot files and takes care of keeping the server running, prompting for user-names and passwords, and starting up the user sessions. It is easily configured for sites that wish to provide nice, consistent interfaces for novice users (loading convenient sets of resources, starting up a window manager, clock, and nice selection of terminal emulator windows).
Since xdm now handles automatic starting of the server in a portable way, the −L option to xterm is now considered obsolete. Support for starting a login window from BSD 4.3-derived /etc/ttys files is no longer included as of Release 4.
Installations that run more than one window system will still need to use the xinit utility. However, xinit is to be considered a tool for building startup scripts and is not intended for use by end users. Site adminstrators are strongly urged to build nicer interfaces for novice users.
When the sample server starts up, it takes over the display. If you are running on a workstation whose console is the display, you cannot log into the console while the server is running.
Network Connections
The sample server supports connections made using the following reliable byte-streams:
Options
All of the sample servers accept the following command line options:
XDMCP-specific Options (Release 4)
You can also have the X server connect to xdm using XDMCP. Although this is not typically useful as it doesn’t allow xdm to manage the server process, it can be used to debug XDMCP implementations, and servers as a sample implementation of the server side of XDMCP. For more information on this protocol, see the XDMCP specification in docs/XDMCP/xdmcp.ms. The following options control the behavior of XDMCP:
−query host-name
Enables XDMCP and sends Query packets to the specified host.
−broadcast |
Enables XDMCP and broadcasts BroadcastQuery packets to the network. The first responding display manager will be chosen for the session. |
−indirect host−name
Enables XDMCP and sends IndirectQuery packets to the specified host.
Specifies an alternate port number for XDMCP packets. Must be specified before any -query, -broadcast or -indirect options.
−once |
Makes the server exit after the first session is over. Normally, the server keeps starting sessions, one after the other. |
−class display-class
XDMCP has an additional display qualifier used in resource lookup for display-specific options. This option sets that value; by default it is “MIT-Unspecified” (not a very useful value).
−cookie xdm−auth−bits
When testing XDM-AUTHENTICATION-1, a private key is shared between the server and the manager. This option sets the value of that private data (not that it’s very private, being on the command line).
−displayID display-id
Yet another XDMCP-specific value, this one allows the display manager to identify each display so that it can locate the shared key.
Many servers also have device-specific command line options. See the manual pages for the individual servers for more details.
Security
As of Release 4, the sample server implements a simplistic authorization protocol, MIT-MAGIC-COOKIE-1, which uses data private to authorized clients and the server. This is a rather trivial scheme; if the client passes authorization data which is the same as the server has, it is allowed access. This scheme is worse than the host-based access control mechanisms in environments with unsecure networks as it allows any host to connect, given that it has discovered the private key. But in many environments, this level of security is better than the host-based scheme as it allows access control per-user instead of per-host.
In addition, the server provides support for a DES-based authorization scheme, XDM-AUTHORIZATION-1, which is more secure (given a secure key distribution mechanism), but as DES is not generally distributable, the implementation is missing routines to encrypt and decrypt the authorization data. This authorization scheme can be used in conjunction with XDMCP’s authentication scheme, XDM-AUTHENTICATION-1 or in isolation.
The authorization data is passed to the server in a private file named with the -auth command line option. Each time the server is about to accept the first connection after a reset (or when the server is starting), it reads this file. If this file contains any authorization records, the local host is not automatically allowed access to the server, and only clients which send one of the authorization records contained in the file in the connection setup information will be allowed access. See the Xau manual page for a description of the binary format of this file. Maintenance of this file, and distribution of its contents to remote sites for use there, is left as an exercise for the reader.
The sample server also uses a host-based access control list for deciding whether or not to accept connections from clients on a particular machine. This list initially consists of the host on which the server is running as well as any machines listed in the file /etc/Xn.hosts. where n is the display number of the server. Each line of the file should contain either an Internet host-name (e.g., expo.lcs.mit.edu) or a DECnet hostname in double colon format (e.g., hydra::). There should be no leading or trailing spaces on any lines. For example:
joesworkstation
corporate.company.com
star ::
bigcpu ::
Users can add or remove hosts from this list and enable or disable access control using the xhost command from the same machine as the server. For example:
% xhost +janesworkstation |
janesworkstation added to access control list |
% xhost −star:: |
star:: removed from access control list |
% xhost + |
all hosts allowed (access control disabled) |
% xhost − |
all hosts restricted (access control enabled) |
% xhost |
access control enabled (only the following hosts are allowed)
joesworkstation
janesworkstation
corporate. company. com
bigcpu ::
Unlike some window systems, X does not have any notion of window operation permissions or place any restrictions on what a client can do; if a program can connect to a display, it has full run of the screen. Sites that have authentication and authorization systems (such as Kerberos) might wish to make use of the hooks in the libraries and the server to provide additional security.
Signals
The sample server attaches special meaning to the following signals.
| SIGHUP | Causes the server to close all existing connections, free all resources, and restore all defaults. It is sent by the display manager whenever the main user’s primary application (usually an xterm or window manager) exits to force the server to clean up and prepare for the next user. |
| SIGTERM | Cause the server to exit cleanly. |
| SIGUSRl | This signal is used quite differently from either of the above. When the server starts, it checks to see if it has inherited SIGUSRl as SIG_IGN instead of the usual SIG_DFL. In this case, the server sends a SIGUSRl to its parent process, after it has set up the various connection schemes. xdm uses this feature to recognize when connecting to the server is possible. |
Fonts
Fonts are usually stored as individual files in directories. The list of directories in which the server looks when trying to open a font is controlled by the font path. Although most sites will choose to have the server start up with the appropriate font path (using the -fp option mentioned above), it can be overridden using the xset program.
The default font path for the sample server contains three directories:
/usr/lib/XII/fonts/misc
This directory contains several miscellaneous fonts that are useful on all systems. It contains a small family of fixed-width fonts in pixel heights 5 through 10, a family of fixed-width fonts from Dale Schumacher in similar pixel heights, several Kana fonts from Sony Corporation, a Kanji font, the standard cursor font, two cursor fonts from Digital Equipment Corporation, and OPEN LOOK cursor and glyph fonts from Sun Microsystems. It also has font name aliases for the fonts fixed and variable.
/usr/lib/XII/fonts/75dpi
This directory contains fonts contributed by Adobe Systems, Inc., Digital Equipment Corporation, Bitstream, Inc., Bigelow and Holmes, and Sun Microsystems, Inc. for 75 dots per inch displays. An integrated selection of sizes, styles, and weights is provided for each family.
/usr/lib/XII/fonts/100dpi
This directory contains versions of the fonts in the 75dpi directory for 100 dots per inch displays.
Font databases are created by running the mkfontdir program in the directory containing the compiled versions of the fonts (the .snf files). Whenever fonts are added to a directory, mkfontdir should be rerun so that the server can find the new fonts. If mkfontdir is not run, the server will not be able to find any fonts in the directory.
Diagnostics
Too numerous to list them all. If run from init(8), errors are logged in the file /usr/adm/Xnmsgs.
Flies
/etc/Xn.hosts Initial access control list.
/usr/lib/XII/fonts/mise, /usr/lib/X11/fonts/75dpi, /usr/lib/XII/fonts/100dpi Font directories.
/usr/lib/XII/rgb.txt Color database.
/tmp/XII-unix/Xn UNIX domain socket
/usr/adm/Xnmsgs Error log file.
See Also
X, Xqdss(l), Xqvss(l), Xsun(l), Xapollo(l), XmacII(l), Xau, mkfontdir, twm, uwm, xauth, xdm, xhost, xinit, xset, xsetroot, xtenn, ttys(5), init(8); X Window System Protocol; Definition of the Porting Layer for the X vII Sample Server; Strategies for Porting the X vII Sample Server; Godzilla’s Guide to Porting the X VII Sample Server.
Bugs
The option syntax is inconsistent with itself and xset.
The acceleration option should take a numerator and a denominator like the protocol.
If X dies before its clients, new clients won’t be able to connect until all existing connections have their TCP TIME_WAIT timers expire.
The color database is missing a large number of colors. However, there doesn’t seem to be a better one available that can generate RGB values tailorable to particular displays.
Authors
The sample server was originally written by Susan Angebranndt, Raymond Drewry, Philip Karlton, and Todd Newman, of Digital Equipment Corporation, with support from a large cast. It has since been extensively rewritten by Keith Packard and Bob Scheifter of MIT.
appres
List Application Resources
Name
appres – list application resource database.
Syntax
appres [[classname [instancename]] [-xrm resource]
Description
Available as of Release 4, the appres client prints the resources seen by an application of the specified classname and instancename. It is used to detennine which resources a particular program would load. For example:
% apprea XTerm
would list the resources that any xterm program would load. To also match particular instance names, you can enter both an instance and class name, as in the following:
% appres XTerm myxterm
If no application class is specified, the class -NoSuchClass- (which should have no defaults) is used.
Options
appres supports the following command line option:
−xrm resource
Specifies that, in addition to the current application resources, appres should return the resource specified as an argument to -xrm, if that resource would apply to the classname or instancename. You must specify both a classname and an instancename in order to use the -xrm option. (Note that -xrm does not actually load any resources.)
Without any arguments, appres returns those resources that might apply to any application (for example, those beginning with an asterisk in your Xresources file).
See Also
X, xrdb, listres
Author
Jim Fulton, MIT X Consortium.
bdftosnf
BDF to SNF Font compiler
Name
bdftosnf – BDF to SNF font compiler for XII.
Syntax
bdftosnf [options]bdf_file
Description
bdftosnf reads a Bitmap Distribution Format (BDF) font from the specified file (or from standard input if no file is specified) and writes an XII Server Natural Format (SNF) font to standard output.
Options
-pnumber |
Forces the glyph padding to a specific number. The legal values are 1, 2, 4, and 8. |
-unumber |
Forces the scanline unit padding to a specific number. The legal values are 1, 2, and 4. |
-m |
Forces the bit order to most significant bit first. |
-1 |
Forces the bit order to least significant bit first. |
-M |
Forces the byte order to most significant byte first. |
-L |
Forces the byte order to least significant byte first. |
-w |
Prints warnings if the character bitmaps have bits set to one outside of their defined widths. |
-w |
Prints warnings for characters with an encoding of -1; the default is to silently ignore such characters. |
-t |
Expands glyphs in “terminal-emulator” fonts to fill the bounding box. |
-i |
Suppresses computation of correct ink metrics for “terminal-emulator” fonts. |
See Also
X, Xserver, Bitmap Distribution Format 2.1
bitmap
System Bitmap Editor
Name
bitmap, bmtoa, atobm – system bitmap editor and conversion utilities.
Syntax
bitmap [options]filename[WIDTHxHEIGH]
bmtoa [options]filename
atobm [options] filename
Description
bitmap allows you to create and edit small bitmaps which you can use to create backgrounds, icons, and pointers. A bitmap is a grid of pixels, or picture elements, each of which is white, black, or, in the case of color displays, a color.
The bmtoa and atobm filters conven bitmap files to and from ASCII strings. They are most commonly used to quickly print out bitmaps and to generate versions for inclusion in text The bmtoa and atobm programs are available in the standard distribution of X as of Release 3.
The window that bitmap creates has three sections (see Figure 6-1 in Part One of this guide). The largest section is the checkerboard grid, which is a magnified version of the bitmap you are editing. Squares on the grid can be set, cleared, or inverted directly with the buttons on the pointer. A menu of higher level operations, such as drawing lines and circles, is provided to the right of the grid. You can invoke these menu commands by clicking with any mouse button. Beneath the menu commands is an actual size picture of the bitmap you are editing; below this is an inverted version of the same bitmap. Each time the grid changes, the same change occurs in the actual-size bitmap and its inverse.
If the bitmap is to be used for defining a cursor, one of the squares in the image may be designated as the hot spot. This determines where the cursor is actually pointing. For cursors with sharp tips (such as arrows or fingers), this is usually at the end of the tip; for symmetric cursors (such as crosses or bullseyes), this is usually at the center.
Bitmaps are stored as small C code fragments suitable for including in applications. They provide an array of bits as well as symbolic constants giving the width, height, and hot spot (if specified) that may be used in creating cursors, icons, and tiles.
The WIDTHxHEIGHT argument gives the size to use when creating a new bitmap (the default is 16x6). Existing bitmaps are always edited at their current size.
If the bitmap window is resized by the window manager, the size of the squares in the grid will shrink or enlarge to fit.
Options: bitmap
-display [host] :server[.screen)
Allows you to specify the host, server, and screen on which to create the bitmap window. host specifies which machine to create the bitmap window on, server specifies the server number, and screen specifies the screen number. For example:
creates a bitmap window on screen 1 of server 0 on the machine your_node. If the host is omitted, the local machine is assumed. If the screen is omitted, screen 0 is assumed; the server and colon (:)are necessary in all cases.
-geometry geometry
The bitmap is created with the specified size and location determined by the supplied geometry specification. The -geometry option can be (and often is) abbreviated to -g, unless there is a conflicting option that begins with “g.” The argument to the geometry option (geometry) has the form widthx-height±xoff±yoff. If you do not specify the geometry, bitmap asks you for window placement when it starts up. See Window Geometry in Chapter 8 of this guide for details.
-help |
Prints a brief description of the allowable options. |
-bw number |
Specifies the border width in pixels of the bitmap window. Default is 3 pixels. |
-fn font |
Specifies the font to be used in the command buttons (refer to the Menu Commands section below). Default is fixed, a 6x13 pixel, mono-spaced font. |
-fg color |
Specifies the color to be used for the foreground. Default is black. |
-bg color |
Specifies the color to be used for the background. Default is white. |
-hl color |
Specifies the color to be used for highlighting. |
-bd color |
Specifies the color to be used for the window border. |
-ms color |
Specifies the color to be used for the pointer (mouse). Default is black. |
-name variable
Specifies the variable name to be used when writing out the bitmap file. The default is to use the basename of the filename command line argument
-nodashed |
Specifies that the grid lines in the bitmap window are drawn as solid lines not as dashed lines. Default is dashed lines. On some servers, dashed lines are significantly slower. |
WIDTHxHEIGHT
Two numbers, separated by the letter “x”, which specify the size of the checkerboard grid within the bitmap window (e.g., 9x13). The first number is the grid’s width; the second number is its height Default is 16x16.
Options: bmtoa
The bmtoa conversion program accepts the following options:
-chars cc |
Specifies the pair of characters to use in the string version of the bitmap. The first character is used for 0 bits and the second character is used for 1 bits. The default is to use dashes(–) for 0’s and number signs(#) for 1’s. |
Options: atobm
The atobm conversion program accepts the following options:
-chars cc |
Specifies the pair of characters to use when converting string bitmaps into arrays of numbers. The first character represents a 0 bit and the second character represents a 1 bit. The default is to use dashes (–) for 0’s and number signs(#) for 1’s. |
-name variable
Specifies the variable name to be used when writing out the bitmap file. The default is to use the basename of the filename command line argument or leave it blank if the standard input is read.
-xhot number
Specifies the X coordinate of the hot spot. Only positive values are allowed. By default, no hot spot information is included.
-yhot number
Specifies the Y coordinate of the hot spot Only positive values are allowed. By default, no hot spot information is included.
Changing Grid Squares
Grid squares may be set, cleared, or inverted by pointing to them and clicking one of the buttons indicated below. Multiple squares can be changed at once by holding the button down and dragging the cursor across them. Set squares are filled and represent 1’s in the bitmap; clear squares are empty and represent 0’s.
Button 1 (usually the left)
Changes one or more grid squares to the foreground color and sets the corresponding bits in the bitmap to 1.
Button 2 (usually the middle)
Inverts one or more grid squares. The corresponding bit or bits in the bitmap are inverted (1’s become O’s and O’s become 1’s).
Button 3 (usually the right)
Changes one or more grid squares to the background color and sets the corresponding bits in the bitmap to 0.
Menu Commands
To make defining shapes easier, bitmap provides 13 commands for drawing whole sections of the grid at once, two commands for manipulating the hot spot, and two commands for updating the bitmap file and exiting. A command button for each of these operations is located to the right of the grid.
Several of the commands operate on rectangular portions of the grid. These areas are selected after the command button is pressed by moving the cursor to the upper left square of the desired area, pressing a pointer button, dragging the cursor to the lower right hand comer (with the button still pressed), and then releasing the button. The command may be aborted by pressing any other button while dragging or by releasing outside the grid.
To invoke a command, move the pointer over that command and click any button.
The following command descriptions assume that black is the foreground color and white is the background color (the defaults).
Clear All |
Turns all the grid squares white and sets all bitmap bits to 0. This is irreversible, so invoke it with caution. |
Set All |
Turns all the grid squares black and sets all bitmap bits to 1. This is also irreversible, so invoke it with caution. |
Clear Area |
Clears a rectangular area of the grid, turning it white and setting the corresponding bitmap to 0. After you click on this command, the cursor turns into a comer cursor representing the upper-left comer of the area you want to clear. Press and hold down any mouse button while moving the mouse to the lower-right comer of the area you want to clear, then release the button. |
| While you are holding down the button, the selected area is covered with X’s, and the cursor changes to a lower-right comer cursor. If you now wish to abort the command without clearing an area, either press another mouse button, move the cursor outside the grid, or move the cursor to the left of or above the left-comer. | |
Set Area |
Turns a rectangular area of the grid black and sets the corresponding bitmap bits to 1. It works the same way as the Clear Area command. |
Invert Area |
Inverts rectangular area of the grid. It works the same way as the Clear Area command. |
Copy Area |
Copies a rectangular area from one part of the grid to another. First, you select the rectangle to be copied, in the manner described under Clear Area above. |
| Once you have selected the area to copy, the cursor changes to an upper-left comer cursor. When you press a mouse button, a destination rectangle overlays the grid; moving the mouse while holding down the button moves this destination rectangle. The copy occurs when you release the button. To cancel the copy, move the mouse outside the grid and then release the button. | |
Move Area |
Works identically to Copy Area, except it clears the source rectangle after copying to the destination. |
Overlay Area |
Lays a rectangular area from one part of the grid over a rectangular area in another part of the grid. Select the area as described under Clear Area. Overlay is not a pixel for pixel replacement: those pixels that are clear (bitmap bits set to 0) allow those pixels that are set (bitmap bits set to 1) to show through the overlay. |
The Write Output command stores bitmaps as simple C program fragments that can be compiled into programs, referred to by X Toolkit pixmap resources, manipulated by other programs (see xsetroot), or read in using utility routines in the various programming libraries. The width and height of the bitmap as well as the hot spot, if specified, are written as preprocessor symbols at the start of the file. The bitmap image is then written out as an array of characters:
#define name_width 11

#define name_height 5

#define name_x_hot 5

#define name_y_hot 2


static char name_bits[] = {

    0x91, 0x04, 0xca, 0x06, 0x84,

    0x04, Ox8a, 0x04, 0x91, 0x04

};
The variables ending with _x_hot and _y_hot are optional; they must be present only if a hot spot has been defined for this bitmap. The other variables must be present.
In place of name, the five variables are prefixed with a string derived from the name of the file specified on the original command line. Any directories are stripped off the front of the filename and any suffix (including the preceding period) is stripped off the end. Any remaining non-alphabetic characters are replaced with underscores.
For example, invoking bitmap with filename /usr/include/bitmaps/cross.bitmap produces a file with variable names cross_width, cross_height, and cross_bits (and cross_x_hot and cross_y_hot, if a hot spot is defined).
Each character in the the array contains 8 bits from one row of the image (rows are padded out at the end to a multiple of 8 to make this is possible). Rows are written out from left to right and top to bottom. The first character of the array holds the leftmost 8 bits of top line, and the last character holds the right most 8 bits (including padding) of the bottom line. Within each character, the leftmost bit in the bitmap is the least significant bit in the character.
This process can be demonstrated visually by splitting a row into words containing 8 bits each, reversing the bits each word (since Arabic numbers have the significant digit on the right and images have the least significant bit on the left), and translating each word from binary to hexadecimal.
In the following example, the array of 1’s and 0’s on the left represents a bitmap containing 5 rows and 11 columns that spells X11. To its right is is the same array split into 8 bit words with each row padded with 0’s so that it is a multiple of 8 in length (16):
10001001001            10001001 00100000

01010011011            01010011 01100000

00100001001            00100001 00100000

01010001001            01010001 00100000

10001001001            10001001 00100000
Reversing the bits in each word of the padded, split version of the bitmap yields the left hand figure below. Interpreting each word as hexadecimal number yields the array of numbers on the right:
10010001 00000100            0x91 0x04

11001010 00000110            0xca 0x06

10000100 00000100            0x84 0x04

10001010 00000100            0xBa 0x04

10010001 00000100            0x91 0x04
The character array can then be generated by reading each row from left to right, top to bottom:
static char name_bits[] = {

   0x91, 0x04, 0xca, 0x06, 0x84,

   0x04, 0x8a, 0x04, 0x91, 0x04

};
The bmtoa program may be used to convert bitmap files into arrays of characters for printing or including in text files. The atobm program can be used to convert strings back to bitmap format.
Using Bitmaps In Programs
To define a bitmap or pointer in an X program, include (#include) a bitmap file and refer to its variables. For instance, to use a pointer defined in the files this.cursor and this_mask.cursor, write:
#include "this.cursor"

#include "this mask.cursor"

XColor foreground background;

Pixmap source = XCreateBitmapFromData (display, drawable, this_bits,

   this_width, this_height);

Pixmap mask = XCreateBitmapFromData (display, drawable, this_mask_bits,

   this_mask_width, this_mask_height);

Cursor cursor = XCreatePixmapCursor (display, source, mask, foreground,

   background, this_x_hot, this_y_hot);
where foreground and background are XColor values.
Additional routines are available for reading in bitmap files and returning the data in the file in Bitmap (single-plane Pixmap for use with routines that require stipples) or full depth Pixmaps (often used for window backgrounds and borders). Applications writers should be careful to understand the difference between Bitmaps and Pixmaps so that their programs function correctly on color and monochrome displays.
For backward compatibility, bitmap will also accept X10 format bitmap files. However, when the file is written out again it will be in X11 format.
Resources
The bitmap program accepts the following resources. The foreground, background, and highlight colors are ignored unless you specify new values for all three options.
Files
Many standard bitmaps can be found in the directory /usr/include/X11/bitmaps.
Bugs
The old command line arguments aren’t consistent with other X programs.
If you move the pointer too fast while holding a pointer button down, some squares may be missed. This is caused by limitations in how frequently the X server can sample the pointer location.
There is no way to write to a file other than the one specified on the command line.
There is no way to change the size of the bitmap once the program has started.
There is no Undo command.
Author
bitmap by Ron Newman, MIT Project Athena; bmtoa and atobm by Jim Fulton, MIT X Consortium.
See Also
Chapter 6 of this guide; Volume One, Xlib Programmer’s Guide; XmuReadBitmapDataFrom-File.
Listres
—List Widget Resources
Name
listres – list resources in widgets.
Syntax
listres [options]
Description
Available as of Release 4, the listres program generates a list of a widget’s resource database. The class in which each resource is first defined, the instance and class name, and the type of each resource is listed. If no specific widgets or the -all switch are given, a two-column list of widget names and their class hierarchies is printed.
Options
listres accepts all of the standard X Toolkit command line options, along with the following:
-all |
Indicates that listres should print information for all known widgets and objects. |
-nosuper |
Indicates that resources that are inherited from a superclass should not be listed. This is useful for determining which resources are new to a subclass. |
-variable |
Indicates that widgets should be identified by the names of the class record variables rather than the class name given in the variable. This is useful for distinguishing subclasses that have the same class name as their superclasses. |
-top name |
Specifies the name of the widget to be treated as the top of the hierarchy. Case is not significant, and the name may match either the class variable name or the class name. The default is core. |
-format printf_string
Specifies the printf-style format string to be used to print out the name, instance, class, and type of each resource.
See Also
X, xrdb; Volume Four, X Toolkit Intrinsics Programming Manual; Volume Five, X Toolkit Intrinsics Reference Manual; appropriate widget documents
Bugs
On operating systems that do not support dynamic linking of run-time routines, this program must have all of its known widgets compiled in. The sources provide several tools for automating this process for various widget sets.
Author
Jim Fulton, MIT X Consortium.
mkfontdir
Create fonts.dir Files—
Name
mkfontdir – creates a fonts.dir file for each specified directory of font files.
Syntax
mkfontdir [directory-names]
Description
For each directory argument, mkfontdir reads all of the font files in the directory and searches for properties named “FONT”, or (failing that) the name of the file stripped of its suffix. These are used as font names, which are written out to the file fonts.dir in the directory, along with the name of the font file.
The kinds of font files read by mkfontdir depend on configuration parameters, but typically include SNF (suffix .snf), compressed SNF (suffix .snf.Z), BDF (suffix .bdf), and compressed BDF (suffix .bdf.Z). If a font exists in multiple formats, the most efficient format will be used.
Font Name Aliases
The file fonts.alias, which can be put in any directory of the font path, is used to map new names to existing fonts, and should be edited by hand. The format is straight forward enough, two white-space separated columns, the first containing aliases and the second containing font-name patterns.
When a font alias is used, the name it references is searched for in the normal manner, looking through each font directory in turn. This means that the aliases need not mention fonts in the same directory as the alias file.
To embed white-space in either name, simply enclose them in double-quote marks. To embed double-quote marks (or any other character), precede them with back-slash:
“magic-alias with spaces” “\“fontname\” with quotes”
regular alias fontname
If the string FILE_NAMES_ALIASES stands alone on a line, each filename in the particular directory (stripped of it’s .snf suffix) will be used as an alias for that font.
Usage
Xserver looks for both fonts.dir and fonts.alias in each directory in the font path each time the font path is set (see xset).
See Also
X, Xserver, xset
oclock
—Analog Clock
Name
oclock – display time of day in analog form.
Syntax
oclock [options]
Description
Available as of Release 4, oclock displays the current time on an analog display.
Options
-display host [:server][.screen]
Allows you to specify the host, server and screen on which to display the oclock window. host specifies the machine, server specifies the server number, and screen specifies the screen number. For example,
oclock -display your_node:0.1
specifies screen 1 of server 0 on the machine your_node. Either or both the host and screen elements to the display specification can be omitted. If host is omitted, the local machine is assumed. If screen is omitted, screen 0 is assumed (and the period is unnecessary). The colon and server are necessary in all cases.
-geometry geometry
The oclock window is created with the specified size and location determined by the supplied geometry specification. The -geometry option can be (and often is) abbreviated to -g, unless there is a conflicting option that begins with “g.” The argument to the geometry option (geometry) is referred to as a “standard geometry string,” and has the form widthx-height±xoff±yoff.
-fg color
Specifies a color for both the hands and the jewel of the clock.
-bg color
Specifies a color for the background.
-jewel color
Specifies a color for the jewel on the clock.
-minute color
Specifies a color for the minute hand of the clock.
-hour color
Specifies a color for the hour hand of the clock.
-backing { WhenMapped Always NotUseful }
Selects an appropriate level of backing store.
-bd color
Specifies a color for the window border.
-bw pixels
Specifies a width in pixels for the window border. As the Clock widget changes its border around quite a bit, this is most usefully set to zero.
-noshape
Causes the clock not to reshape itself and ancestors to exactly fit the outline of the clock.
Colors
Although the default colors for the Clock widget are black and white, the widget was designed in color; unfortunately, the toolkit makes specifying these colors in a device-independent manner difficult. If you want to see the correct colors, add the following lines to your resource file:
Clock*Background: grey

Clock*BorderColor: light blue

Clock*hour: yellow

Clock*jewel: yellow

Clock*minute: yellow
See Also
X; Volume Four, X Toolkit Intrinsics Programming Manual; Volume Five, X Toolkit Intrinsics Reference Manual
Author
Keith Packard, MIT X Consortium.
resize
—Reset Terminal for Window Size
resize – utility to set TERMCAP and terminal settings to current window size.
Syntax
resize [options]
Description
resize prints a shell command for setting the TERM and TERMCAP environment variables to indicate the current size of the xterm window from which the command is run. For this output to take effect, resize must either be evaluated as part of the command line (usually done with a shell alias or function) or else redirected to a file which can then be read in. From the C shell (usually known as /bin/csh), the following alias could be defined in the user’s .cshrc:
% alias rs ’set noglob; eval ‘resize’; unset noglob’
After resizing the window, the user would type:
% rs
Users of versions of the Bourne shell (usually known as /bin/sh) that don’t have command functions will need to send the output to a temporary file and the read it back in with the “.” command:
$  resize >/tmp/out

$  . /tmp/out
Options
The following options may be used with resize:
-u |
Indicates that Bourne shell commands should be generated even if the user’s current shell isn’t /bin/sh. |
-c |
Indicates that C shell commands should be generated even if the user’s current shell isn’t /bin/csh. |
-s [rows columns]
Indicates that that Sun console escape sequences will be used instead of the special xterm escape code. If rows and columns are given, resize will ask the xterm to resize itself. However, the window manager may choose to disallow the change.
The -u or -c must appear to the left of -s if both are specified.
Flies
| /etc/termcap | for the base termcap entry to modify. |
| -/.cshrc | user’s alias for the command. |
See Also
csh(1), tset(1), xterm
There should be some global notion of display size; termcap and terminfo need to be rethought in the context of window systems. (Fixed in 4.3BSD and Ultrix-32 1.2.)
Authors
Mark Vandevoorde (MIT-Athena), Edward Moy (Berkeley).
Copyright (c) 1984, 1985 by Massachusetts Institute of Technology.
See X for a complete copyright notice.
showsnf
—Print SNF File
Name
showsnf – print contents of an SNF file to standard output.
Syntax
showsnf [options]snf_file
Description
showsnf displays the contents of font files in the Server Natural Format produced by bdftosnf. It is usually only used to verify that a font file hasn’t been corrupted or to convert the individual glyphs into arrays of characters for proofreading or for conversion to some other format.
Options
-v |
Indicates that character bearings and sizes should be printed. |
-g |
Indicates that character glyph bitmaps should be printed. |
-m |
Indicates that the bit order of the font is most significant bit first. |
-l |
Indicates that the bit order of the font is least significant bit first. |
-M |
Indicates that the byte order of the font is most significant byte first. |
-L |
Indicates that the byte order of the font is least significant byte first. |
-pnumber |
Specifies the glyph padding of the font |
-unumber |
Specifies the scanline unit of the font |
See Also
X, Xserver, bdftosnf
Bugs
There is no way to just print out a single glyph.
twm
Tab Window Manager
Name
twm – Tab Window Manager for the X Window System.
Syntax
twm [options]
Description
twm is a window manager for the X Window System. It has been made the official window manager in the standard distribution in Release 4. twm provides titlebars, shaped windows, several forms of icon management, user-defined macro functions, click-to-type and pointer-driven keyboard focus, and user-specified key and pointer button bindings.
This program is usually started by the user’s session manager or startup script. When used from xdm or xinit without a session manager, twm is frequently executed in the foreground as the last client. When run this way, exiting twm causes the session to be terminated (i.e., logged out).
By default, application windows are surrounded by a “frame” with a titlebar at the top and a special border around the window. The titlebar contains the window’s name, a rectangle that is lit when the window is receiving keyboard input, and function boxes known as “titlebuttons” at the left and right edges of the titlebar.
Pressing pointer Button1 (usually the left-most button unless it has been changed with xmodmap) on a titlebutton will invoke the function associated with the button. In the default interface, windows are iconified by clicking (pressing and then immediately releasing) the left titlebutton (which looks like a small X). Conversely, windows are deiconified by clicking in the associated icon or entry in the icon manager (see description of the variable ShowIcon-Manager and of the function f. showiconmgr).
Windows are resized by pressing the right titlebutton (which resembles group of nested squares), dragging the pointer over edge that is to be moved, and releasing the pointer when the outline of the window is the desired size. Similarly, windows are moved by pressing in the title or highlight region, dragging a window outline to the new location, and then releasing when the outline is in the desired position. Just clicking in the title or highlight region raises the window without moving it.
When new windows are created, twm will honor any size and location information requested by the user (usually through -geometry command line argument or resources for the individual applications). Otherwise, an outline of the window’s default size, its titlebar, and lines dividing the window into a 3x3 grid that track the pointer are displayed. Clicking pointer Button1 will position the window at the current position and give it the default size. Pressing pointer Button2 (usually the middle pointer button) and dragging the outline will give the window its current position but allow the sides to be resized as described above. Clicking pointer Button3 (usually the right pointer button) will give the window its current position but attempt to make it long enough to touch the bottom the screen.
Options
twm accepts the following command line options:
-display host [:server] [.screen]
Allows you to specify the host, server and screen to connect to. host specifies the machine, server specifies the server number, and screen specifies the screen number. For example,
twm -display your_node:0.0
specifies screen 0 of server 0 on the machine your_node. Either or both the host and screen elements to the display specification can be omitted. If host is omitted, the local machine is assumed. If screen is omitted, screen 0 is assumed (and the period is unnecessary). The colon and server are necessary in all cases.
-s |
Indicates that only the default screen (as specified by -display or by the DISPLAY environment variable) should be managed. By default, twm will attempt to manage all screens on the display. |
-f twmfile |
Specifies the name of the startup file to use. By default, twm will look in the user’s home directory for files named .twmrc.num (where num is a screen number) or .twmrc. |
-v |
Indicates that twm should print error messages whenever an unexpected X Error event is received. This can be useful when debugging applications but can be distracting in regular use. |
Customization
Much of twm ’s appearance and behavior can be controlled by providing a startup file in one of the following locations (searched in order for each screen being managed when twm begins):
$HOME/.twmrc.screennumber
The screennumber is a small positive number (e.g. 0, 1, etc.) representing the screen number (e.g. the last number in the DISPLAY environment variable host:displaynum.screennum) that would be used to contact that screen of the display. This is intended for displays with multiple screens of differing visual types.
$HOME/.twmrc
This is the usual name for an individual user’s startup file.
/usr/lib/X11/twm/system.twmrc
If neither of the preceding files are found, twm will look in this file for a default configuration. This is often tailored by the site administrator to provide convenient menus or familiar bindings for novice users.
If no startup files are found, twm will use the built-in defaults described above. The only resource used by twm is bitmapFilePath for a colon-separated list of directories to search when looking for bitmap files. (For more information, see the Athena Widgets manual and xrdb).
twm startup files are logically broken up into three types of specifications: variables, bindings. and menus. The variables section must come first and is used to describe the fonts, colors, cursors, border widths, icon and window placement, highlighting, autoraising, layout of titles, warping, use of the icon manager. The bindings section usually comes second and is used to specify the functions that should be to be invoked when keyboard and pointer buttons are pressed in windows, icons, titles, and frames. The menus section gives any user-defined menus (containing functions to be invoked or commands to be executed).
Variable names and keywords are case-insensitive. Strings must be surrounded by double quote characters (e.g., “blue”) and are case-sensitive. A pound sign (#) outside of a string causes the remainder of the line in which the character appears to be treated as a comment.
Variables
Many of the aspects of twm’s user interface are controlled by variables that may be set in the user’s startup file. Some of the options are enabled or disabled simply by the presence of a particular keyword. Other options require keywords, numbers, strings, or lists of all of these.
Lists are surrounded by braces and are usually separated by whitespace or a newline. For example:
AutoRaise { "emacs" "XTerm" "Xmh" }

or

AutoRaise

{

    "emacs"

    "XTerm"

    "Xmh"

}
When a variable containing a list of strings representing windows is searched (e.g. to determine whether or not to enable autoraise as shown above), a string is considered to match a window if it is a case-sensitive prefix for the window’s name name (given by the WM_NAME window property), resource name or class name (both given by the WM_CLASS window property). The preceding example would enable autoraise on windows named “emacs” as well as any xterm (since they are of class XTerm) or xmh windows (which are of class Xmh).
String arguments that are interpreted as filenames (see the Pixrnaps, Cursors, and Icon-Directory variables later in this reference page) will prepend the user’s directory (specified by the HOME environment variable) if the first character is a tilde (~). If, instead, the first character is a colon (:), the name is assumed to refer to one of the internal bitmaps that are used to create the default titlebars symbols: :xlogo or :iconify (both refer to the X used for the iconify button), :resize (the nested squares used by the resize button), and :question (the question mark used for non-existent bitmap files).
The following variables may be specified at the top of a twm startup file. Lists of Window name prefix strings are indicated by win_list. Optional arguments are shown in square brackets:
AutoRaise { win list }
Specifies a list of windows that should automatically be raised whenever the pointer enters the window. This action can be interactively enabled or disabled on individual windows using the function f. autoraise.
Indicates that dragging out a window size (either when initially sizing the window with pointer Button2 or when resizing it) should not wait until the pointer has crossed the window edges. Instead, moving the pointer automatically causes the nearest edge or edges to move by the same amount. This allows allows the resizing windows that extend off the edge of the screen. If the pointer is in the center of the window, or if the resize is begun by pressing a titlebutton, twm will still wait for the pointer to cross a window edge (to prevent accidents). This option is particularly useful for people who like the press-drag-release method of sweeping out window sizes.
BorderColor string [{ win_color_list }]
Specifies the default color of the border to be placed around all non-iconified windows, and may only be given within a WColor or WMonochrome list. The optional win_color_list specifies a list of window and color name pairs for specifying particular border colors for different types of windows. For example:
BorderColor  "gray50"

{

    "XTerm"  "red"

    "xmh"    "green"

}
The default is black.
BorderTileBackground string [{ wincolorlist }]
Specifies the default background color in the gray pattern used in unhighlighted borders (only if NoHighlight hasn’t been set), and may only be given within a Color or Monochrome list. The optional wincolorlist allows per-window colors to be specified. The default is black.
BorderTileForeground string [{ wincolorlist }]
Specifies the default foreground color in the gray pattern used in unhighlighted borders (only if NoHighlight hasn’t been set), and may only be given within a Color or Monochrome list. The optional wincolorlist allows per-window colors to be specified. The default is white.
BorderWidth pixels
Specifies the width in pixels of the border surrounding all client window frames if ClientBorderWidth has not been specified. This value is also used to set the border size of windows created by twm (such as the icon manager). The default is 2.
Buttonindent pixels
Specifies the amount by which titlebuttons should be indented on all sides. Positive values cause the buttons to be smaller than the window text and highlight area so that they stand out. Setting this and the TitleButton-BorderWidth variables to 0 makes titlebuttons be as tall and wide as possible. The default is 1.
Indicates that border width of a window’s frame should be set to the initial border width of the window, rather than to the value of BorderWidth.
Color { colors_list }
Specifies a list of color assignments to be made if the default display is capable of displaying more than simple black and white. The colors_list is made up of the following color variables and their values: Default-Background, DefaultForeground, MenuBackground, Menu-Foreground, MenuTitleBackground, MenuTitleForeground, and MenuShadowColor.
The following color variables may also be given a list of window and color name pairs to allow per-window colors to be specified (see BorderColor for details): BorderColor, IconManagerHighlight, Border-TitleBackground, BorderTitleForeground, Title-Background, TitleForeground, IconBackground, Icon-Foreground, IconBorderColor, IconManagerBackground, and IconManagerForeground. For example:
Color

{

    MenuBackground      "gray50"

    MenuFore ground     "blue"

    BorderColor         "red" { "XTerm" "yellow" }

    TitleFore ground    "yellow"

    TitleBackground     "blue"

}
All of these color variables may also be specified for the Monochrome variable, allowing the same initialization file to be used on both color and monochrome displays.
ConstrainedMoveTime milliseconds
Specifies the length of time between button clicks needed to begin a constrained move operation. Double clicking within this amount of time when invoking f.move will cause the window only be moved in a horizontal or vertical direction. Setting this value to 0 will disable constrained moves. The default is 400 milliseconds.
Cursors { cursor_list }
Specifies the glyphs that twm should use for various pointer cursors. Each cursor may be defined either from the Cursor font or from two bitmap files. Shapes from the Cursor font may be specified directly as:
cursorname "string"
where cursorname is one of the cursor names listed below, and string is the name of a glyph as found in the file /usr/include/Xll/cursorfont.h (without the “XC_” prefix). If the cursor is to be defined from bitmap files, the following syntax is used instead:
cursorname "image" "mask"
The image and mask strings specify the names of files containing the glyph image and mask in bitmap form. The bitmap files are located in the same manner as icon bitmap files. The following example shows the default cursor definitions:
Cursors

{

     Frame        "top_left_arrow"

     Title        "top_left_arrow"

     Icon         "top_left_arrow"

     IconMgr      "top_left_arrow"

     Move         "fleur"

     Resize       "fleur"

     Menu         "sb_left_arrow"

     Button       "hand2"

     wait         "watch"

     Select       "dot"

     Destroy      "pirate"

}
DecorateTransients
Indicates that transient windows (those containing a WM_TRANSIENT_FOR property) should have titlebars. By default, transients are not reparented.
DefaultBackground string
Specifies the background color to be used for sizing and information windows. The default is white.
DefaultForeground string
Specifies the foreground color to be used for sizing and information windows. The default is black.
DontIconifyByUrunapping { win_list }
Specifies a list of windows that should not be iconified by simply unmapping the window (as would be the case if IconifyByUrunapping had been set). This is frequently used to force some windows to be treated as icons while other windows are handled by the icon manager.
DontMoveOff
Indicates that windows should not be allowed to be moved off the screen. It can be overridden by the f.forcemove function.
DontSqueezeTitle [{ win_list }]
Indicates that titlebars should not be squeezed to their minimum size as described under SqueezeTitle below. If the optional window list is supplied, only those windows will be prevented from being squeezed.
ForceIcons
Indicates that icon pixmaps specified in the Icons variable should override any client-supplied pixmaps.
FramePadding pixels
Specifies the distance between the titlebar decorations (the button and text) and the window frame. The default is 2 pixels.
IconBackground string [{ win_list }]
Specifies the background color of icons, and may only be specified inside of a Color or Monochrome list. The optional win_list is a list of window names and colors so that per-window colors may be specified. See the BorderColor variable for a complete description of the win_list. The default is white.
IconBorderColor string [{ win_list }]
Specifies the color of the border used for icon windows, and may only be specified inside of a Color or Monochrome list. The optional win_list is a list of window names and colors so that per-window colors may be specified. See the BorderColor variable for a complete description of the win_list. The default is black.
IconBorderWidth pixels
Specifies the width in pixels of the border surrounding icon windows. The default is 2.
IconDirectory string
Specifies the directory that should be searched if if a bitmap file cannot be found in any of the directories in the bitmapFilePath resource.
IconFont string
Specifies the font to be used to display icon names within icons. The default is 8×13.
IconForeground string [{ win_list }]
Specifies the foreground color to be used when displaying icons, and may only be specified inside of a Color or Monochrome list. The optional win_list is a list of window names and colors so that per-window colors may be specified. See the BorderColor variable for a complete description of the win_list. The default is black.
IconifyByUnmapping [ { win_list } ]
Indicates that windows should be iconified by being unmapped without trying to map any icons. This assumes that the user is will remap the window through the icon manager, the f. warpto function, or the TwmWindows menu. If the optional win_list is provided, only those windows will be iconified by simply unmapping. Windows that have both this and the Icon-ManagerDontShow options set may not be accessible if no binding to the TwmWindows menu is set in the user’s startup file.
IconManagerBackground string [{ win_list }]
Specifies the background colorto use for icon manager entries, and may only be specified inside of a Color or Monochrome list. The optional win_list is a list of window names and colors so that per-window colors may be specified. See the BorderColor variable for a complete description of the win_list. The default is white.
IconManagerDontShow [{ win_list }]
Indicates that the icon manager should not display any windows. If the optional win_list is given, only those windows will not be displayed. This variable is used to prevent windows that are rarely iconi.fied (such as xclock or xload) from taking up space in the icon manager.
IconManagerFont string
Specifies the font to be used when displaying icon manager entries. The default is 8×13.
IconManagerForeground string [{ win_list }]
Specifies the foreground color to be used when displaying icon manager entries, and may only be specified inside of a Color or Monochrome list. The optional win_list is a list of window names and colors so that per-window colors may be specified. See the BorderColor variable for a complete description of the win_list. The default is black.
IconManagerGeometry string [ columns ]
Specifies the geometry of the icon manager window. The string argument is standard geometry specification that indicates the initial full size of the icon manager. The icon manager window is then broken into columns pieces and scaled according to the number of entries in the icon manager. Extra entries are wrapped to form additional rows. The default number of columns is 1.
IconManagerHighlight string [{ win_list }]
Specifies the border color to be used when highlighting the icon manager entry that currently has the focus, and can only be specified inside of a Color or Monochrome list. The optional win_list is a list of window names and colors so that per-window colors may be specified. See the BorderColor variable for a complete description of the win_list. The default is black.
IconManagers { iconmgr_list }
Specifies a list of icon managers to create. Each item in the iconmgr_list has the following format:
"winname" ["iconname"] "geometry" columns
where winname is the name of the windows that should be put into this icon manager, iconname is the name of that icon manager window’s icon, geometry is a standard geometry specification, and columns is the number of columns in this icon manager as described in IconManagerGeometry. For example:
IconManagers

{

    "XTerm" "=300x5+800+5"5

    "myhost""=400x5+100+5"2

}
Clients whose name or class is “XTerm” wiii have an entry created in the “XTerm” icon manager. Clients whose name was “myhost” would be put into the “myhost” icon manager.
IconManagerShow { win_list }
Specifies a list of windows that should appear in the icon manager. When used in conjunction with the IconManagerDontShow variable, only the windows in this list will be shown in the icon manager.
IconRegion geomstring vgrav hgrav gridwidth gridheight
Specifies an area on the root window in which icons are placed if no specific icon location is provided by the client. The geomstring is a quoted string containing a standard geometry specification. If more than one Icon-Region lines are given, icons will be put into the succeeding icon regions when the first is full. The vgrav argument should be either North or South and control and is used to control whether icons are first filled in from the top or bottom of the icon region. Similarly, the hgrav argument should be either East or West and is used to control whether icons should be filled in from left from the right. Icons are laid out within the region in a grid with cells gridwidth pixels wide and gridheight pixels high.
Icons { win_list }
Specifies a list of window names and the bitmap filenames that should be used as their icons. For example:
Icons

{

    "XTerm"  "xterm.icon"

    "xfd"    "xfd_icon"

}
Windows that match “XTerm” and would not be iconified by unmapping, and would try to use the icon bitmap in the file “xterm.icon”. If Force-Icons is specified, this bitmap will be used even if the client has requested its own icon pixmap.
InterpolateMenuColors
Indicates that menu entry colors should be interpolated between entry specified colors. In the example below:
Menu "mymenu"

{

     "Title"     ("black":"red")     f.title

     "entry1"                        f.nop

     "entry2"                        f.nop

     "entry3"    ("white":"green")   f.nop

     "entry4"                        f.nop

     "entry5"    ("red":"white")     f.nop

}
The foreground colors for “entry!“ and “entry2” will be interpolated between black and white, and the background colors between red and green. Similarly, the foreground for “entry4” will be half-way between white and red, and the background will be half-way between green and white.
MakeTitle { win_list }
Specifies a list of windows on which a titlebar should be placed and is used to request titles on specific windows when WNoTitle has been set.
MaxWindowSize string
Specifies a geometry in which the width and height give the maximum size for a given window. This is typically used to restrict windows to the size of the screen. The default is 30000×30000.
MenuBackground string
Specifies the background color used for menus, and can only be specified inside of a Color or Monochrome list. The default is white.
MenuFont string
Specifies the font to use when displaying menus. The default is 8×13.
MenuForeground string
Specifies the foreground color used for menus, and can only be specified inside of a Color or Monochrome list. The default is black.
MenuShadowColor string
Specifies the color of the shadow behind pull-down menus and can only be specified inside of a Color or Monochrome list. The default is black.
MenuTitleBackground string
Specifies the background color for f.title entries in menus, and can only be specified inside of a Color or Monochrome list. The default is white.
MenuTitleForeground string
Specifies the foreground color for f.title entries in menus and can only be specified inside of a Color or Monochrome list. The default is black.
Monochrome { colors }
Specifies a list of color assignments that should be made if the screen has a depth of 1. See the description of Colors.
MoveDelta pixels
Specifies the number of pixels the pointer must move before the f.move function starts working. Also see the f.deltastop function. The default is zero pixels.
Indicates that twm’s menus should not request backing store to minimize repainting of menus. This is typically used with servers that can repaint faster than they can handle backing store.
NoCaseSensitive
Indicates that case should be ignored when sorting icon names in an icon manager. This option is typically used with applications that capitalize the first letter of their icon name.
NoDefaults
Indicates that twm should not supply the default titlebuttons and bindings. This option should only be used if the startup file contains a completely new set of bindings and definitions.
NoGrabServer
Indicates that twm should not grab the server when popping up menus and moving opaque windows.
NoHighlight [{ win_list }]
Indicates that borders should not be highlighted to track the location of the pointer. If the optional win_list is given, highlighting will only be disabled for those windows. When the border is highlighted, it will be drawn in the current BorderColor. When the border is not highlighted, it will be stippled with an gray pattern using the current BorderTileForeground and BorderTileBackground colors.
NoIconManagers
Indicates that no icon manager should be created.
NoMenuShadows
Indicates that menus should not have drop shadows drawn behind them. This is typically used with slower servers since it speeds up menu drawing at the expense of making the menu slightly harder to read.
NoRaiseOnDeiconify
Indicates that windows that are deiconified should not be raised.
NoRaiseOnMove
Indicates that windows should not be raised when moved. This is typically used to allow windows to slide underneath each other.
NoRaiseOnResize
Indicates that windows should not be raised when resized. This is typically used to allow windows to be resized underneath each other.
NoRaiseOnWarp
Indicates that windows should not be raised when the pointer is warped into them with the f.warpto function. If this option is set, warping to an occluded window may result in the pointer ending up in the occluding window instead the desired window (which causes unexpected behavior with f.warpring).
Indicates that menus should not request save-unders to minimize window repainting following menu selection. It is typically used with displays that can repaint faster than they can handle save-unders.
NoTitle [{ win_list }]
Indicates that windows should not have title bars. If the optional win_list is given, only those windows will not have titlebars. MakeTitle may be used with this option to force titlebars to be put on specific windows.
NoTitleFocus
Indicates that twm should not set keyboard input focus to each window as it is entered. Normally, twm sets the focus so that focus and key events from the titlebar and icon managers are delivered to the application. If the pointer is moved quickly and twm is slow to respond, input can be directed to the old window instead of the new. This option is typically used to prevent this “input lag,” and to work around bugs in older applications that have problems with focus events.
NoTitleHighlight [{ win_list }]
Indicates that the highlight area of the title bar, which is used to indicate the window that currently has the input focus, should not be displayed. If the optional win_list is given, only those windows will not have highlight areas. This and the SqueezeTitle options can be set to substantially reduce the amount of screen space required by title bars.
OpaqueMove
Indicates that the f.move function should actually move the window instead of just an outline so that the user can immediately see what the window will look like in the new position. This option is typically used on fast displays (particularly if NoGrabServer is set).
Pixmaps { pixmaps }
Specifies a list of pixmaps that define the appearance of various images. Each entry is a keyword indicating the pixmap to set, followed by a string giving the name of the bitmap file. The following pixmaps may be specified:
Pixmaps

{

    Title Highlight    "gray1"

}
The default for TitleHighlight is to use an even stipple pattern.
RandomPlacement
Indicates that windows with no specified geometry should should be placed in a pseudo-random location instead of having the user drag out an outline.
ResizeFont string
Specifies the font to be used for in the dimensions window when resizing windows. The default is fixed.
Indicates that twm should attempt to use the WM_STATE property on client windows to tell which windows should be iconified and which should be left visible. This is typically used to make try to regenerate the state that the screen was in before the previous window manager was shutdown.
ShowIconManager
Indicates that the icon manager window should be displayed when twm is started. It can always be brought up using the f.showiconmgr function.
SortIconManager
Indicates that entries in the icon manager should be sorted alphabetically rather than by simply appending new windows to the end.
SqueezeTitle [{ squeeze_list }]
Indicates that twm should attempt to use the SHAPE extension to make titlebars occupy only as much screen space as they need, rather than extending all the way across the top of the window. The optional squeeze_list may be used to control the location of the squeezed titlebar along the top of the window. It contains entries of the form:
"name" justification num denom
where name is a window name, justification is either left, center, or right, and num and denom are numbers specifying a ratio giving the relative position about which the title bar is justified. The ratio is measured from left to right if the numerator is positive, and right to left if negative. A denominator of 0 indicates that the numerator should be measured in pixels. For convenience, the ratio 0/0 is the same as 1/2 for center and −1/1 for right. For example:
SqueezeTitle

{

     "XTerm"     left     0      0

     "xterm1"    left     1      3

     "xterm2"    left     2      3

     "oclock"    center          00

     "emacs"     right           00

}
The DontSqueezeTitle list can be used to turn off squeezing on certain titles.
StartIconified [{ win_list }]
Indicates that client windows should initially be left as icons until explicitly deiconified by the user. If the optional win_list is given. only those windows will be started iconic. This is useful for programs that do not support an -iconic command line option or resource.
TitleBackground string [{ win_list }]
Specifies the background color used in titlebars, and may only be specified inside of a Color or Monochrome list. The optional win_list is a list of window names and colors so that per-window colors may be specified. The default is white.
TitleButtonBorderWidthpixels
Specifies the width in pixels of the border surrounding titlebuttons. This is typically set to 0 to allow titlebuttons to take up as much space as possible and to not have a border. The default is 1.
TitleFont string
Specifies the font to used for displaying window names in titlebars. The default is 8×13.
TitleForeground string [{ win_list }]
Specifies the foreground color used in titlebars, and may only be specified inside of a Color or Monochrome list. The optional win_list is a list of window names and colors so that per-window colors may be specified. The default is black.
TitlePadding pixels
Specifies the distance between the various buttons, text, and highlight areas in the title bar. The default is 8 pixels.
Unknownicon string
Specifies the filename of a bitmap file to be used as the default icon. This bitmap will be used as the icon of all clients which do not provide an icon bitmap and are not listed in the Icons list.
UsePPosition string
Specifies whether or not twm should honor program-requested locations (given by the PPosition flag in the WM_NORMAL_IDNTS property) in the absence of a user-specified position. The argument string may have one of three values: off (the default) indicating that twm should ignore the program-supplied position, on indicating that the position should be used, and non-zero indicating that the position should used if it is other than (0,0). The latter option is for working around a bug in older toolkits.
WarpCursor[{ win list}]
Indicates that the pointer should be warped into windows when they are deiconified. If the optional win_list is given, the pointer will only be warped when those windows are deiconified.
WindowRing { win_list }
Specifies a list of windows along which the f.warpring function cycles.
WarpUnmapped
Indicates that that the f.warpto function should deiconify any iconified windows it encounters. This is typically used to make a key binding that will pop a particular window (such as xmh), no matter where it is. The default is for f.warpto to ignore iconified windows.
Specifies the value to use when drawing window outlines for moving and resizing. This should be set to a value that will result in a variety of of distinguishable colors when exclusive-or’ ed with the contents of the user’s typical screen. Setting this variable to 1 often gives nice results if adjacent colors in the default colormap are distinct. By default, twm will attempt to cause temporary lines to appear at the opposite end of the colormap from the graphics.
zoom [ count ] Indicates that outlines suggesting movement of a window to and from its iconified state should be displayed whenever a window is iconified or deiconified. The optional count argument specifies the number of outlines to be drawn. The default count is 8.
The following variables must be set after the fonts have been assigned, so it is usually best to put them at the end of the variables or beginning of the bindings sections:
DefaultFunction function
Specifies the function to be executed when a key or button event is received for which no binding is provided. This is typically bound to f.nop, f.beep, or a menu containing window operations.
WindowFunction function
Specifies the function to execute when a window is selected from the Twm-Windows menu. If this variable is not set, the window will be deiconified and raised.
Bindings
After the desired variables have been set, functions may be attached titlebuttons and key and pointer buttons. Titlebuttons may be added from the left or right side and appear in the titlebar from left-to-right according to the order in which they are specified. Key and pointer button bindings may be given in any order.
Titlebuttons specifications must include the name of the pixmap to use in the button box and the function to be invoked when a pointer button is pressed within them:
LeftTitleButton "bitmapname"= function
or:
RightTitleButton "bitmapname"= function
The bitmapname may refer to one of the built-in bitmaps (which are scaled to match Tit1eFont) by using the appropriate colon-prefixed name described above.
Key and pointer button specifications must give the modifiers that must be pressed, over which parts of the screen the pointer must be, and what function is to be invoked. Keys are given as strings containing the appropriate keysym name; buttons are given as the keywords Button1-Button5:
"FP1" = modlist : context : functionButton1 = modlist : context : function
The modlist is any combination of the modifier names shift, control, and meta (which may be abbreviated as s, c, and m respectively) separated by a vertical bar (|). Similarly, the context is any combination of window, t itle, icon, root, frame, iconmgr, their first letters (iconmgr abbreviation is m), or all, separated by a vertical bar. The function is any of the f. keywords described below. For example, the default startup file contains the following bindings:
Button1  =   : root           : f.menu "TwmWindows"

Button1  = m : window | icon  : f.function "move-or-lower"

Button2  = m : window | icon  : f.iconify

Button3  = m : window | icon  : f.function "move-or-raise"

Button1  =   : title          : f.function "move-or-rai se"

Button2  =   : title          : f.raiselower

Button1  =   : icon           : f.function "move-or-iconify"

Button2  =   : icon           : f.iconify

Button1  =   : iconmgr        : f.iconify

Button2  =   : iconmgr        : f.iconify
A user who wanted to be able to manipulate windows from the keyboard could use the following bindings:
"F1"        =          all           : f.iconify

"F2"        =          all           : f.raiselower

"F3"        =          all           : f.warpring "next"

"F4"        =          all           : f.warpto "xmh"

"F5"        =          all           : f.warpto "emacs"

"F6"        =          all           : f.colormap "next"

"F7"        =          all           : f.colormap "default"

"F20"       =          all           : f.warptoscreen "next"

"Left"      = m        all           : f.backiconmgr

"Right"     = m | s    all           : f.forwiconmgr

"Up"        = m        all           : f.upiconmgr

"Down"      = m | s    all           : f.downiconmgr
twm provides many more window manipulation primitives than can be conveniently stored in a titlebar. menu, or set of key bindings. Although a small set of defaults are supplied (unless the NoDefaults is specified). most users will want to have their most common operations bound to key and button strokes. To do this, twm associates names with each of the primitives and provides user-defined functions for building higher level primitives and menus for interactively selecting among groups of functions.
User-defined functions contain the name by which they are referenced in calls to f. function and a list of other functions to execute. For example:
Function "move-or-lower"              { f.move f.deltastop f.lower }

Function "move- or-raise"             { f.move f.deltastop f.raise }

Function " move-or-iconify"           { f.move f.deltastop f.iconify }

Function "restore-colormap"           { f.colormap "default" f.lower }
The function name must be used in f.function exactly as it appears in the function specification.
In the descriptions below, if the function is said to operate on the selected window, but is invoked from a root menu, the cursor will be changed to the Select cursor and the next window to receive a button press will be chosen:
! string This is an abbreviation for f.exec string.
f.autoraise Toggles whether or not the selected window is raised whenever entered by the pointer. See the description of the variable AutoRaise.
f.backiconmgr
Warps the pointer to the previous column in the current icon manager, wrapping back to the previous row if necessary.
f.beep Sounds the keyboard bell.
f.bottomzoom
Similar to the f.fullzoom function, but resizes the window to fill only the bottom half of the screen.
f.circledown
Lowers the top-most window that occludes another window.
f.c ircleup Raises the bottom-most window that is occluded by another window.
f.colormap string
Rotates the colormaps (obtained from the WM_ COLORMAP _WINDOWS property on the window) that twm will display when the pointer is in this window. The argument string may have one of the following values: next, prev, and default.
f.deiconify Deiconifies the selected window. If the window is not an icon, this function does nothing.
f.delete Sends the WM_DELETE_ WINDOW message to the selected window if the client application has requested it through the WM_PROTOCOLS window property. The application is supposed to respond to the message by removing the indicated window. If the window has not requested WM_DELETE_ WINDOW messages, the keyboard bell will be rung indicating that the user should choose an alternative method.
f.deltastop Allows a user-defined function to be aborted if the pointer has been moved more than MoveDelta pixels. See the example definition given for Function "move-or-raise" at the beginning of the section.
f.destroy Instructs the X server to close the display connection of the client that created the selected window. This should only be used as a last resort for shutting down runaway clients.
f.downiconmgr
Warps the pointer to the next row in the current icon manger, wrapping to the beginning of the next column if necessary.
f .exec string
Passes the argument string to /bin/sh for execution. In multiscreen mode, if string starts a new X client without giving a display argument, the client will appear on the screen from which this function was invoked.
f.focus Toggles the keyboard focus of the server to the selected window, changing the focus rule from pointer-driven if necessary. If the selected window already was focused, this function executes an f.unfocus.
f.forcemove Like f.move, except that it ignores the DontMoveOff variable.
f.forwiconmgr
Warps the pointer to the next column in the current icon manager, wrapping to the beginning of the next row if necessary.
f.fullzoom Resizes the selected window to the full size of the display or else restores the original size if the window was already zoomed.
f.function string
Executes the user-defined function whose name is specified by the argument string.
f.hbzoom A synonym for f.bottomzoom.
f.hideiconmgr
Unmaps the current icon manager.
f.horizoom Similar to the f.zoom function, except that the selected window is resized to the full width of the display.
f.htzoom A synonym for f.topzoom.
f.hzoom A synonym for f.horizoom.
f.iconify Iconifies or deiconifies the selected window or icon.
f.identify Displays a summary of the name and geometry of the selected window. Clicking the pointer or pressing a key in the window will dismiss it.
f.lefticonmgr
Similar to f.backiconmgr, except that wrapping does not change rows.
f.leftzoom Similar to the f.bottomzoom function but causes the selected window is only resized to the left half of the display.
f.lower Lowers the selected window.
f.menu string
Invokes the menu specified by the argument string. Cascaded menus may be built by nesting calls to f.menu.
f.move Drags an outline of the selected window (or the window itself if the OpaqueMove variable is set) until the invoking pointer button is released. Double clicking within the number of milliseconds given by constrainedMoveTime warps the pointer to the center of the window and constrains the move to be either horizontal or vertical depending on which grid line is crossed. To abort a move, press another button before releasing the first button.
f.nexticonrngr
Warps the pointer to the next icon manager containing any windows on the current or any succeeding screen.
f.nop Does nothing and is typically used with the DefaultFunction or WindowFunction variables or to introduce blank lines in menus.
f.previconrngr
Warps the pointer to the previous icon manager containing any windows on the current or preceding screens.
f.quit Causes twm to restore the window’s borders and exit. If twm is the first client invoked from xdm, this will result in a server reset.
f.raise Raises the selected window.
f.raiselower
Raises the selected window to the top of the stacking order if it is occluded by any windows, otherwise the window will be lowered.
f.refresh Causes all windows to be refreshed.
f.resize Displays an outline of the selected window. Crossing a border (or setting AutoRelativeResize) will cause the outline to begin to rubber band until the invoking button is released. To abort a resize, press another button before releasing the first button.
f.restart Kills and restarts twm.
f.righticonrngr
Similar to f.nexticonrngr, except that wrapping does not change rows.
f.rightzoom Similar to the f.bottornzoorn function, except that the selected window is only resized to the right half of the display.
f.saveyourself
Sends a WM_SA VEYOURSELF message to the selected window if it has requested the message in its WM_PROTOCOLS window property. Clients that accept this message are supposed to checkpoint all state associated with the window and update the WM_COMMAND property as specified in the ICCCM. If the selected window has not selected for this message, the keyboard bell will be rung.
f.showiconrngr
Maps the current icon manager.
f.sorticonrngr
Sorts the entries in the current icon manager alphabetically. See the variable SortIconManager.
Assumes string is a file name. The file is read and parsed as a twm startup file. This function is intended to be used only to re-build pull-down menus. None of the twm variables are changed.
f.title Provides a centered, unselectable item in a menu definition. It should not be used in any other context.
f.topzoom Similar to the f.bottornzoom function, except that the selected window is only resized to the top half of the display.
f.twrnrc Causes the startup customization file to be re-read. This function is exactly like the f.source function without having to specify the filename.
f.unfocus Resets the focus back to pointer-driven. This should be used when a focused window is no longer desired.
f.upiconmgr Warps the pointer to the previous row in the current icon manager, wrapping to the last row in the same column if necessary.
f.version Causes the twm version window to be displayed. This window will be displayed until a pointer button is pressed or the pointer is moved from one window to another.
f.vlzoom A synonym for f.leftzoom.
f.vrzoom A synonym for f.rightzoom.
f.warpring string
Warps the pointer to the next or previous window (as indicated by the argument string, which may be next or prev) specified in the WindowRing variable.
f.warpto string
Warps the pointer to the window which has a name or class that matches string. If the window is iconified, it will be deiconified if the variable warpUnmapped is set or else ignored.
f.warptoiconmgr string
Warps the pointer to the icon manager entry associated with the window containing the pointer in the icon manager specified by the argument string. If string is empty, the current icon manager is chosen.
f.warptoscreen string
Warps the pointer to the screen specified by the argument string. String may be a number (e.g., 0 or 1), the word next (indicating the current screen plus 1, skipping over any unmanaged screens), the word back (indicating the current screen minus 1, skipping over any unmanaged screens), or the word prev (indicating the last screen visited).
f.winrefresh
Similar to the f.refresh function, except that only the selected window is refreshed.
f.zoom Similar to the f.fullzoom function, except that the only the height of the selected window is changed.
Menus
Functions may be grouped and interactively selected using pop-up (when bound to a pointer button) or pull-down (when associated with a titlebutton) menus. Each menu specification contains the name of the menu as it will be referred to by f.menu, optional default foreground and background colors, the list of item names and the functions they should invoke, and optional foreground and background colors for individual items:
Menu "menuname" [ ("deffore":"defback") ]

{

    string1 [  ("fore1":"backn")]function1

    string2 [  ("fore2":"backn")]function2

        .

        .

        .

    stringN [  ("foreN":"backN")]functionN

}
The menuname is case-sensitive. The optional deffore and defback arguments specify the foreground and background colors used on a color display to highlight menu entries. The string portion of each menu entry will be the text which will appear in the menu. The optional fore and back arguments specify the foreground and background colors of the menu entry when the pointer is not in the entry. These colors will only be used on a color display. The default is to use the colors specified by the MenuForeground and MenuBackground variables. The function portion of the menu entry is one of the functions, including any user-defined functions, or additional menus.
There is a special menu named TwmWindows which contains the names of all of the client and twm-supplied windows. Selecting an entry will cause the WindowFunction to be executed on that window. If WindowFunction hasn’t been set, the window will be deiconified and raised.
Icons
twm supports several different ways of manipulating iconified windows. The common pixmapand-text style may be laid out by hand or automatically arranged as described by the Icon-Region variable. In addition, a terse grid of icon names, called an icon manager, provides a more efficient use of screen space as well as the ability to navigate among windows from the keyboard.
Neither client-supplied icon windows nor dynamic setting of the icon pixmap are supported (icon name changes will be updated automatically).
An icon manager is a window that contains names of selected or all windows currently on the display. In addition to the window name, a small button using the default iconify symbol will be displayed to the left of the name when the window is iconified. By default, clicking on an entry in the icon manager performs f.iconify. To change the actions taken in the icon manager, use the the iconmgr context when specifying button and keyboard bindings.
Moving the pointer into the icon manager also directs keyboard focus to the indicated window (setting the focus explicitly or else sending synthetic events NoTitleFocus is set). Using the f.upicorungr, f.downiconmgr f.lefticorungr, and f.righticorungr functions, the input focus can be changed between windows directly from the keyboard.
Bugs
Lock and Mod2 through Mod5 cannot be specified as modifier contexts. The correct fix is to add lock, 1, mod1 (for completeness), mod2, mod3, mod4, mod5 to the parse and grammar tables, and add a number as a valid key type (so long as it is 1-5).
The resource manager should have been used instead of all of the window lists.
The IconRegion variable should take a list.
Double clicking very fast to get the constrained move function will sometimes cause the window to move, even though the pointer is not moved.
If IconifyByUnmapping is on and windows are listed in IconManagerDontShow but not in DonticonifyByUnmapping, they may be lost if they are iconified and no bindings to f.menu TwmWindows or f.warpto are setup.
Flies
$HOME|.twmrc.screen number

$HOME|.twmrc

|usr|lib|X11|twm|system.twmrc
Environment Variables
DISPLAY This variable is used to determine which X server to use. It is also set during f.exec so that programs come up on the proper screen.
HOME This variable is used as the prefix for files that begin with a tilde and for locating the twm startup file.
See Also
X, Xserver, xdm, xrdb
Copyright
Portions copyright 1988 Evans & Sutherland Computer Corporation; portions copyright 1989 Hewlett-Packard Company and the Massachusetts Institute of Technology. See X for a full statement of rights and permissions.
Authors
Tom LaStrange, Solbourne Computer;
Jim Fulton, MIT X Consortium;
Steve Pitschke, Stardent Computer;
Keith Packard, MIT X Consortium;
Dave Payne, Apple Computer.
uwm
X Window Manager
Name
uwm -a window manager for X.
Syntax
uwm [options]
Description
The uwm program is a window manager client application of the window server. In releases prior to 4, uwm is the standard X window manager. As of Release 4, uwm has been moved to the user-contributed part of the distribution and replaced in the standard distribution by twm.
When uwm is invoked, it searches a predefined search path to locate any uwm startup files. If no startup files exist, uwm initializes its built-in defaults.
If startup files exist in any of the following locations, it adds the variables to the default variables. In the case of contention, the variables in the last file found override previous specifications. Files in the uwm search path are:
|usr|lib|X11|uwm|system.uwmrc

$HOMEI.uwmrc
To use only the settings defined in a single startup file, include the variables, resetbindings, resetmenus, reset variables at the top of that specific startup file.
Options
-f filename Names an alternate file as a uwm startup file.
-display [host] :server[.screen]
Allows you to specify the host, server, and screen on which to run the window manager. host specifies the machine, server specifies the server number, and screen specifies the screen number. For example,
uwm -display y our_ node:O.l
specifies screen 1 on server 0 on the machine your_ node. If the host is omitted, the local machine is assumed. If the screen is omitted, the screen 0 is assumed; the server and colon(:) are necessary in all cases.
Startup File Variables
Variables are typically entered first, at the top of the startup file. By convention, resetbindings, resetmenus, and resetvariables head the list.
autoselect/noautoselect
Places the menu cursor in first menu item. If unspecified, the menu cursor is placed in the menu header when the menu is displayed.
background=color
Specifies the default background color for popup sizing windows, menus, and icons. The default is to use the WhitePixel for the current screen.
Specifies the default border color for popup sizing windows, menus, and icons. The default is to use the BlackPixel for the current screen.
borderwidth=pixels
Specifies the default width in pixels for borders surrounding icons.
delta=pixels
Indicates the number of pixels the cursor is moved before the action is interpreted by the window manager as a command. (Also refer to the delta mouse action.)
foreground=color
Specifies the default foreground color for popup sizing windows, menus, and icons. The default is to use the BlackPixel for the current screen.
freeze/nofreeze
Locks all other client applications out of the server during certain window manager tasks, such as move and resize.
grid/nogrid Displays a finely-ruled grid to help you position an icon or window during resize or move operations.
hiconpad=pixels
Indicates the number of pixels to pad an icon horizontally. The default is five pixels.
hmenupad=pixels
Indicates the number of pixels to pad each menu item to the left and right of the text
iconfont=fontname
Names the font that is displayed within icons. Font names for a given server can be obtained using xlsfonts.
maxcolors=n Limits the number of colors the window manager can use in a given invocation. If set to zero, or not specified, uwm assumes no limit to the number of colors it can take from the color map. maxcolors counts colors as they are included in the file.
mborderwidth=pixels
Indicates the width in pixels of the border surrounding menus.
normali/nonormali
Places icons created with f.newiconify within the root window, even if they are placed partially off the screen. With nonormali the icon is placed exactly where the cursor leaves it.
normalw/nonorrnalw
Places window created with f.newiconify within the root window, even if they are placed partially off the screen. With nonorrnalw the window is placed exactly where the cursor leaves it.
push=n Moves a window n number of pixels or a 1/n times the size of the window, depending on whether pushabsolute or pushrelative is specified. Use this variable in conjunction with f.pushup, f.pushdown, f.pushright, or f.pushleft.
pushabsolute/pushrelative
pushabsolute indicates that the number entered with push is equivalent to pixels. When an f.push (left, right, up, or down) function is called, the window is moved exactly that number of pixels.
pushrelative indicates that the number entered with the push variable represents a relative number. When an f.push function is called, the window is invisibly divided into the number of parts you entered with the push variable, and the window is moved one part.
resetbindings,resetmenus,resetvariables
Resets all previous function bindings, menus, and variables entries, specified in any startup file in the uwm search path, including those in the default environment. By convention, these variables are entered first in the startup file.
resizefont=fontname
Identifies the font of the indicator that displays in the comer of the window as you resize windows. See xlsfonts for obtaining font names.
resizerelative/noresizerelative
Indicates whether or not resize operations should be done relative to a moving edge or edges. By default, the dynamic rectangle uses the actual pointer location to define the new size. (Available as of Release 3.)
reverse/noreverse
Defines the display as black characters on a white background for the window manager windows and icons.
viconpad=pixels
Indicates the number of pixels to pad an icon vertically. Default is five pixels.
vmenupad=pixels
Indicates the number of pixels to pad each menu item vertically (i.e., above and below the text).
volume=n Increases or decreases the base level volume set by the xset(l) command. Enter an integer from 0 to 7, 7 being the loudest
zap/nozap
Causes ghost lines to follow the window or icon from its previous default location to its new location during a move or resize operation.
Binding Syntax
function=[control key(s)]:[context]:mouse events: "menu name"
Function and mouse events are required input. Menu name is required with the f.menu function definition only.
Function
f.beep Emits a beep from the keyboard. Loudness is determined by the volume variable.
f.circledown
Causes the top window that is obscuring another window to drop to the bottom of the stack of windows.
f.circleup Exposes the lowest window that is obscured by other windows.
f.continue Releases the window server display action after you stop action with the f.pause function.
f.focus Directs all keyboard input to the selected window. To reset the focus to all windows, invoke f.focus from the root window.
f.iconify When implemented from a window, this function converts the window to its respective icon. When implemented from an icon, f.iconify converts the icon to its respective window.
f.kill Kills the client that created a window.
f.lower Lowers a window that is obstructing a window below it.
f.menu Invokes a menu. Enclose ‘menu name’ in quotes if it contains blank characters or parentheses.
f.move Moves a window or icon to a new location, which becomes the default location.
f.moveopaque
Moves a window or icon to a new screen location. When using this function, the entire window or icon is moved to the new screen location. The grid effect is not used with this function.
f.newiconify
Allows you to create a window or icon and then position the window or icon in a new default location on the screen.
f.pause Temporarily stops all display action. To release the screen and immediately update all windows, use the f.continue function.
f.pushdown Moves a window down. The distance of the push is determined by the push variables.
f.pushleft Moves a window to the left. The distance of the push is determined by the push variables.
f.pushright Moves a window to the right. The distance of the push is determined by the push variables.
f.pushup Moves a window up. The distance of the push is determined by the push variables.
f.raise Raises a window that is being obstructed by a window above it.
f.refresh Results in exposure events being sent to the window server clients for all unobscured or partially obscured windows. The windows will not refresh correctly if the exposure events are not handled properly.
f.resize Resizes an existing window. Note that some clients, notably editors, react unpredictably if you resize the window while the client is running.
f.restart Causes the window manager application to restart, retracing the uwm search path and initializing the variables it finds.
Control Keys
By default, the window manager uses meta as its control key. It can also use ctrl, shift, lock, or null (no control key). Control keys must be entered in lowercase, and can be abbreviated as: c, l, m, s for ctrl, lock, meta, and shift, respectively.
You can bind one, two, or no control keys to a function. Use the bar (|) character to combine control keys.
Note that client applications other than the window manager use the shift as a control key. If you bind the shift key to a window manager function, you can not use other client applications that require this key.
Context
The context refers to the screen location of the pointer when a command is initiated. When you include a context entry in a binding, the pointer must be in that context or the function will not be activated. The window manager recognizes the following four contexts: icon, window, root, (null).
The root context refers to the root, or background window, A (null) context is indicated when the context field is left blank, and allows a function to be invoked from any screen location. Combine contexts using the bar (|) character.
Mouse Buttons
Any of the following mouse buttons are accepted in lowercase and can be abbreviated as l, m, or r, respectively: left, middle, right.
With the specific button, you must identify the action of that button. Mouse actions can be:
down Function occurs when the specified button is pressed down.
up Function occurs when the specified button is released.
delta Indicates that the mouse must be moved the number of pixels specified with the delta variable before the specified function is invoked. The mouse can be moved in any direction to satisfy the delta requirement.
Menu Definition
After binding a set of function keys and a menu name to f.menu, you must define the menu to be invoked, using the following syntax:
menu = "menu name" {

"item name" : "action"

       .

       .

       .

}
Enter the menu name exactly the way it is entered with the f.menu function or the window manager will not recognize the link. If the menu name contains blank strings, tabs or parentheses, it must be quoted here and in the f.menu function entry. You can enter as many menu items as your screen is long. You cannot scroll within menus.
Any menu entry that contains quotes, special characters, parentheses, tabs, or strings of blanks must be enclosed in double quotes. Follow the item name by a colon(:).
Menu Action
Window manager functions
Any function previously described (e.g., f.move or f.iconify).
Shell commands Begin with an exclamation point (!) and are set to run in the background. You cannot include a new line character within a shell command.
Text strings Text strings are placed in the window server’s cut buffer.
Strings starting with an up arrow ![]() will have a new line character appended to the string after the up arrow
will have a new line character appended to the string after the up arrow ![]() has been stripped from it
has been stripped from it
Strings starting with a bar character (|) will be copied as is after the bar character (|) has been stripped.
Color Menus
Use the following syntax to add color to menus:
menu = "menu name"(colorl:color2:color3:color4) {

"item name" :(color5 :color6) : "action"

       .

       .

       .

}
where:
color1 Foreground color of the header.
color2 Background color of the header.
color3 Foreground color of the highlighter, the horizontal band of color that moves with the cursor within the menu.
color4 Background color of the highlighter.color5 Foreground color for the individual menu item.color6 Background color for the individual menu item.
Color Defaults
Colors default to the colors of the root window under any of the following conditions:
If you run out of color map entries, either before or during an invocation of uwm. If you specify a foreground or background color that does not exist in the RGB color database of the server (see /usr/lib/X11/rgb.txt for a sample) both the foreground and background colors default to the root window colors. If you omit a foreground or background color, both the foreground and background colors default to the root window colors. If the total number of colors specified in the startup file exceeds the number specified in the maxcolors variable. If you specify no colors in the startup file.
Sample .mwmrc File
The following sample startup file shows the use of window manager options:
# Global variables

#

resetbindings;resetvariables;resetmenus

autoselect

delta=25

freeze

grid

hiconpad=5

hmenupad=6

iconfont=oldeng

menufont=timroml2b

resizefont=9x15

viconpad=5

vmenupad=3

volume=7

#

# Mouse button/key maps

#

#FUNCTION       KEYS  CONTEXT     BUTTON       MENU(if any)

#========       ====  =======     ======       ============

f.menu =        meta  :           :left down   :"WINDOW OPS"

f.menu =        meta  :           :middle down :"EXTENDED WINDOW OPS"

f.move =        meta  :w|i        :right down

f.circleup =    meta  :root       :right down

#

# Menu specifications

#

menu = "WINDOW OPS" {

"(De)Iconify":             f.iconify

Move:                      f.move

Resize:                    f.resize

Lower:                     f.lower

Raise:                     f.raise

}


menu = "EXTENDED WINDOW OPS" {

Create Window:             !"xterm &"

Iconify at New Position:   f.lowericonify

Focus Keyboard on Window:  f.focus

Freeze All Windows:        f.pause

Unfreeze All Windows:      f.continue

Circulate Windows Up:      f.circleup

Circulate Windows Down:    f.circledown

}
Restrictions
The color specifications have no effect on a monochrome system.
Files
/usr/lib/X11/uwm/system.uwmrc
$HOME/.uwmrc
See Also
X, Xserver, xset, xlsfonts
Copyright
Copyright 1985, 1986, 1987, 1988 Digital Equipment Corporation, Maynard, MA.
Author
M. Gancarz, DEC Ultrix Engineering Group, Merrimack, New Hampshire, using some algorithms originally by Bob Scheifler, MIT Laboratory for Computer Science.
x10tox11
Protocol Converter
Name
x10tox11 – X version 10 to version 11 protocol converter.
Syntax
x10tox11 [options]
Description
As of Release 4, this program is no longer included in the standard distribution of X.
x10tox11 masquerades as an X Window System Version 10 server. It enables an X Version 10 client to run unchanged under X Version 11 by converting Version 10 requests into appropriate Version 11 requests, and by converting all Version 11 events received from the server into Version 10 events. From the perspective of Version 10 clients, all Version 11 clients look like Version 10 clients; and from the perspective of Version 11 clients, all Version 10 clients look just like Version 11 clients. Hence, a Version 11 window manager can manipulate Version 10 clients.
This program does NOT use the X10 libnest ddX library. It does actual protocol translation, rather than simply using X11 graphics calls to implement X10 low level operations. As a result, it is both faster and more robust than the X10 Xnest server.
Typical Usage
The protocol converter must be run after the X11 server is running and should be run in the background:
% x10tox11 &
The program will continue to run until you intentionally kill it or the X11 server is shut down.
Options
-display [host]:server[.screen]
Allows you to specify the X11 display to which you want to be connected. host specifies the machine, server specifies the server number, and screen specifies the screen number. For example,
x10tox11 -display your_node:0.1
specifies screen 1 of server 0 on the machine your_node. Either or both of the host and screen elements to the display specification can be omitted. If host is omitted, the local machine is assumed. If screen is omitted, screen 0 is assumed (and the period is unnecessary). The colon and server are necessary in all cases.
Note that x10tox11 will always pretend to be an X10 server with the same display number as the X11 server to which it connects. For example, if the DISPLAY environment variable or the -display option specifies your_node:1.0, then x10tox11 will connect to the X11 server on your_node for display 1 and then will pretend to the the X10 server for display 1. Consequently, your X10 clients will expect to have the environment variable DISPLAY set to your_node:1 (but they should still work even if your X10 clients use your_node:1.0).
MinimumTileSize=n
Sets minimum acceptable tile size to n. There is a difference in semantics between X10’s XQueryShape and X11’s XQueryBestSize such that X11 will allow any tile size but will return the optimum whereas X10 enforced a minimum tile size. Usually this minimum tile size was 16 and this is the default for x10tox11. If you find that this makes your X10 clients break, then you can override it with this option.
help |
Prints out a usage message and exits. |
NoOverrideRedirect
Instructs x10tox11 to make every effort not to use OverrideRedirect when creating and mapping windows. Normally, x10tox11 creates all windows with the OverrideRedirect attribute set to true. Placing this option on the command line will cause x10tox11 not to use OverrideRedirect except for windows that look like they might be menus. This will allow window managers that provide titlebars to do so. Unfortunately, it is impossible to determine ahead of time what an X10 client intends to do with windows. In addition, X10 clients are known to spontaneously unmap their windows which upsets X11 window managers unless the OverrideRedirect attribute is true. Further, some X11 window managers may refuse to resize or move windows that are marked with OverrideRedirect. This may be fixed to some extent when an Inter Client Communications Convention Manual (ICCCM) is adopted by the X11 community.
See Also
X, Xserver
Bugs
There are limitations with respect to emulating Version 10 through a Version 11 server. See the file /usr/lib/X/x10tox11.help for more details.
Some window managers may refuse to move, resize, or perform any operations on X10 client windows.
If the source is compiled with certain flags, there are significant debugging facilities available. Using the help option will tell you whether debugging facilities are available. x10tox11 marks them with OverrideRedirect. See “Options” above.
Copyright
Copyright 1988, Tektronix Inc.
Permission to use, copy, modify, and distribute this software and its documentation for any purpose and without fee is hereby granted, provided that the above copyright notice appear in all copies and that both that copyright notice and this permission notice appear in supporting documentation.
Author
Todd Brunhoff, Visual Systems Laboratory, Tektronix.
Authority File Utility
xauth
Name
xauth – X authority file utility
Syntax
xauth[options][command arguments]
Description
Available as of Release 4, the xauth program is used to edit and display the authorization information used in connecting to the X server. This program is usually to extract authorization records from one machine and merge them in on another (as is the case when using remote logins or to grant access to other users). Commands (described below) may be entered interactively, on the xauth command line, or in scripts. Note that this program does not contact the X server.
Options
The following options may be used with xauth. They may be given individually (for example, -q -i) or may combined (for example, -qi):
-f authfile |
Specifies the name of the authority file to use. By default, xauth will use the file specified by the XAUTHORITY environment variable or .Xauthority in the user’s home directory. |
-q |
Indicates that xauth should operate quietly and not print unsolicited status messages. This is the default if an xauth command is is given on the command line or if the standard output is not directed to a terminal. |
-v |
Indicates that xauth should operate verbosely and print status messages indicating the results of various operations (for example, how many records have been read in or written out). This is the default if xauth is reading commands from its standard input and its standard output is directed to a terminal. |
-i |
Indicates that xauth should ignore any authority file locks. Normally, xauth will refuse to read or edit any authority files that have been locked by other programs (usually xdm or another xauth). |
-b |
Indicates that xauth should attempt to break any authority file locks before proceeding and should only be used to clean up stale locks. |
Commands
The following commands may be used to manipulate authority files:
add displayname protocolname hexkey
An authorization entry for the indicated display using the given protocol and key data is added to the authorization file. The data is specified as an even-lengthed string of hexadecimal digits, each pair representing one octet. The first digit gives the most significant 4 bits of the octet and the second digit gives the least significant 4 bits. A protocol name consisting of just a single period is treated as an abbreviation for MIT-MAGIC-COOKIE-1.
[n]extract filename displayname...
Authorization entries for each of the specified displays are written to the indicated file. If the nextract command is used, the entries are written in a numeric format suitable for non-binary transmission (such as secure electronic mail). The extracted entries can be read back in using the merge and nmerge commands. If the the filename consists of just a single dash, the entries will be written to the standard output.
[n]list [displayname...]
Authorization entries for each of the specified displays (or all if no displays are named) are printed on the standard output. If the nlist command is used, entries will be shown in the numeric format used by the nextract command; otherwise, they are shown in a textual format. Key data is always displayed in the hexadecimal format given in the description of the add command.
[n]merge[filename...]
Authorization entries are read from the specified files and are merged into the authorization database, superceding any matching existing entries. If the nmerge command is used, the numeric format given in the description of the extract command is used. If a filename consists of just a single dash, the standard input will be read if it hasn’t been read before.
remove displayname...
Authorization entries matching the specified displays are removed from the authority file.
source filename
The specified file is treated as a script containing xauth commands to execute. Blank lines and lines beginning with a sharp sign (#) are ignored. A single dash may be used to indicate the standard input, if it hasn’t already been read.
info |
Information describing the authorization file, whether or not any changes have been made, and from where xauth commands are being read is printed on the standard output. |
exit |
If any modifications have been made, the authority file is written out (if allowed), and the program exits. An end of file is treated as an implicit exit command. |
quit |
The program exits, ignoring any modifications. This may also be accomplished by pressing the interrupt character. |
help[string]
A description of all commands that begin with the given string (or all commands if no string is given) is printed on the standard output.
? |
A short list of the valid commands is printed on the standard output. |
Display Names
Display names for the add, [n]extract, [n]list, [n]merge, and remove commands use the same format as the DISPLAY environment variable and the common -display command line option. Display-specific information (such as the screen number) is unnecessary and will be ignored. Same-machine connections (such as local-host sockets, shared memory, and the Internet Protocol hostname localhost) are referred to as hostname/unix:displaynumber so that local entries for different machines may be stored in one authority file.
Example
The most common use for xauth is to extract the entry for the current display, copy it to another machine, and merge it into the user’s authority file on the remote machine:
xauth extract - $DISPLAY | rsh other xauth merge -
Environment Variables
This xauth program uses the following environment variables:
| XAUTHORITY | To get the name of the authority file to use if the -f option isn’t used. If this variable is not set, xauth will use .Xauthority in the user’s home directory. |
| HOME | To get the user’s home directory if XAUTHORITY isn’t defined. |
Bugs
Users that have unsecure networks should take care to use encrypted file transfer mechanisms to copy authorization entries between machines. Similarly, the MIT-MAGIC-COOKIE-1 protocol is not very useful in unsecure environments. Sites that are interested in additional security may need to use encrypted authorization mechanisms such as Kerberos.
Spaces are currently not allowed in the protocol name. Quoting could be added for the truly perverse.
See Also
X, Xserver, Xau, xdm
Author
Jim Fulton, MIT X Consortium.
xbiff
Mail Notification
Name
xbiff – mail notification program for X.
Syntax
xbiff[options]
Description
The xbiff program displays a little image of a mailbox. When there is no mail, the flag on the mailbox is down. When mail arrives, the flag goes up and the mailbox beeps. By default, pressing any mouse button in the image forces xbiff to remember the current size of the mail file as being the “empty” size and to lower the flag.
This program is nothing more than a wrapper around the Athena Mailbox widget.
Options
xbiff accepts all of the standard X Toolkit command line options along with the additional options listed below:
-help |
Indicates that a brief summary of the allowed options should be printed on the standard error. |
-update seconds
Specifies the frequency in seconds at which xbiff should update its display. If the mailbox is obscured and then exposed, it will be updated immediately. The default is 60 seconds.
-file filename
Specifies the name of the file which should be monitored. By default, it watches /usr/spool/mail/username, where username is your login name.
-shape |
Indicates that the mailbox window should be shaped if masks for the empty or full images are given. (Available as of Release 4.) |
-volume percentage
Specifies how loud the bell should be rung when new mail comes in.
The following standard X Toolkit command line arguments are commonly used with xbiff:
-geometry geometry
Specifies the size and location of the mailbox window. The -geometry option can be (and often is) abbreviated to -g, unless there is a conflicting option that begins with “g.” The argument to the geometry option (geometry) is referred to as a “standard geometry string,” and has the form widthxheight±xoff±yoff. If you do not specify the geometry, xbiff asks you for window placement. See “Window Geometry” in Chapter 8 of this guide for details. The default mailbox is 48 pixels on each side and is centered in the window.
-display [host]:server[.screen]
Allows you to specify the host, server, and screen on which to create the mailbox window. host specifies which machine to create the mailbox window on, server specifies the server number, and screen specifies the screen number. For example,
xbiff -display your_node:0.1
creates a mailbox on screen 1 of server 0 on the machine your_node. If the host is omitted, the local machine is assumed. If the screen is omitted, screen 0 is assumed; the server and colon(:) are necessary in all cases.
-xrm resourcestring
Specifies a resource string to be used. This is especially useful for setting resources that do not have separate command line options.
Resources
This program uses the Mailbox widget in the X Toolkit. It understands all of the core resource names and classes as well as:
checkCommand (class CheckCommand))
Specifies a shell command to be executed to check for new mail rather than examining the size of file. The specified string value is used as the argument to a system(3) call and may therefore contain I/O redirection. An exit status of zero indicates that new mail is waiting, 1 indicates that there has been no change in size, and 2 indicates that the mail has been cleared.
file (class File)
Specifies the name of the file to monitor. The default is to watch /usr/spool/mail/username, where username is your login name.
flip (class Flip)
Specifies whether or not the image that is shown when mail has arrived should be inverted. The default is true. (Available as of Release 4.)
Specifies a bitmap to be shown when new mail has arrived. (Available as of Release 4.)
fullPixmapMask (class PixmapMask)
Specifies a mask for the bitmap to be shown when new mail has arrived. (Available as of Release 4.)
emptyPixmap (class Pixmap)
Specifies a bitmap to be shown when no new mail is present. (Available as of Release 4.)
emptyPixmapMask (class PixmapMask)
Specifies a mask for the bitmap to be shown when no new mail is present. (Available as of Release 4.)
width (class Width)
Specifies the width of the mailbox.
height (class Height)
Specifies the height of the mailbox.
onceOnly (class Boolean)
Specifies that the bell is only rung the first time new mail is found and is not rung again until at least one interval has passed with no mail waiting. The window will continue to indicate the presence of new mail until it has been retrieved.
shapeWindow (class ShapeWindow)
Specifies whether or not the mailbox window should be shaped to the given fullPixmapMask and emptyPixmapMask. (Available as of Release 4.)
update (class Interval)
Specifies the frequency in seconds at which the mail should be checked.
volume (class Volume)
Specifies how loud the bell should be rung. The default is 33 percent.
foreground (class Foreground)
Specifies the color for the foreground. The default is black since the core default for background is white.
reverseVideo (class ReverseVideo)
Specifies that the foreground and background should be reversed.
Actions
The Mailbox widget provides the following actions for use in event translations:
check() Causes the widget to check for new mail and display the flag appropriately.
unset() Causes the widget to lower the flag until new mail comes in.
set() Causes the widget to raise the flag until user resets it.
The default translation is:
<ButtonPress>:unset()
See Also
X, xrdb, stat(2)
Author
Jim Fulton, MIT X Consortium;
Additional hacks by Ralph Swick, DEC/MIT Project Athena.
xcalc
X-Based Scientific Calculator
Name
xcalc – Scientific Calculator for X.
Syntax
xcalc[options]
Description
xcalc is a scientific calculator desktop accessory that can emulate a TI-30 or an HP-10C. The Release 4 version of xcalc has been rewritten to use the X Toolkit. Also as of Release 4, the number in the calculator display can be selected, allowing you to paste the result of a calculation into text.
Versions of xcalc prior to Release 4 also emulate a slide rule.
Options
xcalc accepts all of the standard X Toolkit command line options, as well as the following:
-stip,-stipple
Indicates that the background of the calculator should be drawn using a stipple of the foreground and background colors. On monochrome displays, this improves the appearance. The -stipple version of this option is available as of Release 4. The -stip option can also still be used.
-rpn |
Indicates that Reverse Polish Notation should be used. In this mode the calculator will look and behave like an HP-10C. Without this flag, it will emulate a TI-30. |
-analog |
Indicates that a slide rule should be used. (Eliminated in Release 4.) |
The following X Toolkit options are commonly used with xcalc:
-bw pixels |
Specifies the border width in pixels. |
-fg color |
Specifies the foreground color in use. |
-bg color |
Specifies the background color in use. |
-rv |
Indicates that reverse video should be used. |
-geometry geometry
The xcalc window is created with the specified size and location determined by the supplied geometry specification. The -geometry option can be (and often is) abbreviated to -g, unless there is a conflicting option that begins with “g.” The argument to the geometry option (geometry) is referred to as a “standard geometry string,” and has the form widthxheight±xoff±yoff.
-display [host]:server[.screen]
Allows you to specify the host, server, and screen on which to create the xcalc window. host specifies the machine on which to create the xcalc window, server specifies the server number, and screen specifies the screen number. For example,
xcalc -display your_node:0.1
specifies screen 1 on server 0 on the machine your_node. If the host is omitted, the local machine is assumed. If the screen is omitted, the screen 0 is assumed; the server and colon(:) are necessary in all cases.
Calculator Operations
Pointer Usage
Operations may be performed with pointer button 1 (usually the leftmost button), or in many cases, with the keyboard. Many common calculator operations have keyboard equivalents, which are called accelerators, because they facilitate data entry. There are several ways to cause xcalc to exit: pressing the AC key of the TI calculator or the ON key of the HP calculator with pointer button 3 (usually the rightmost button); typing q, Q, or Ctrl-C while the pointer is in the xcalc window.
Calculator Key Usage (TI Mode)
The number keys, the +/- key, and the +,-,•,/, and = keys all do exactly what you would expect them to. It should be noted that the operators obey the standard rules of precedence. Thus, entering “3+4*5=” results in 23, not 35. Parentheses can be used to override this. For example, “(1+2+3)*(4+5+6)=” is evaluated as “6*15=” which results in 90.
The action associated with each function are given below. These are useful if you are interested in defining a custom calculator. The action used for all digit keys is digit(n), where n is the corresponding digit, 0-9. (The actions are available as of Release 4).
The keys are described below.
Calculator Key Usage (RPN mode)
The number keys, CHS (change sign), +,-,•,/, and ENTR keys all do exactly what you would expect them to. Many of the remaining keys are the same as in TI (default) mode. The differences are detailed below. The action for the ENTR key is enter().
Blank keys were used for programming functions on the HP-10C. Their functionality has not been duplicated in xcalc.
Keyboard Equivalents (Accelerators)
If you have the pointer in the xcalc window, you can use the keyboard to enter numbers and other keys. Almost all of the calculator keys have keyboard equivalents, which are known as accelerators because they speed entry. The number keys, the operator keys, and the parentheses all have the obvious equivalents. The accelerators defined by xcalc are listed in the following table:
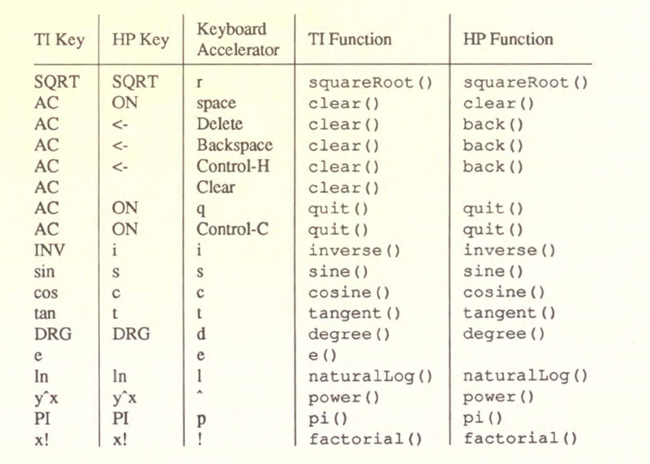

Note that the use of the e keyboard accelerator to invoke the e calculator key is Release 4 specific. In the Release 3 version of xcalc, the e keyboard accelerator corresponds to the EE calculator key.
Resources (Release 4)
rpn (class Rpn)
Specifies that the rpn mode should be used. The default is TI mode.
stipple (class Stipple)
Indicates that the background should be stippled. The default is on for monochrome displays, and off for color displays.
cursor (class Cursor)
The name of the symbol used to represent the pointer. The default is hand2.
Widget Hierarchy (Release 4)
In order to specify resources, it is useful to know the hierarchy of the widgets that compose xcalc. In the notation below, indentation indicates hierarchical structure. The widget class name is given first, followed by the widget instance name.
XCalc xcalc

       Form  ti
or rpn (the name depends on the mode) Form bevel
Form screen
Label M
Toggle LCD
Label INV
Label DEG
Label RAD
Label GRAD
Label P
                           Command  button1

                           Command  button2

                           Command  button3
and so on, ... Command button38
Command button39
Command button40
Customization (Release 4)
The application class name is XCalc.
As of Release 4, xcalc has an enormous application defaults file, which specifies the position, label, and function of each key on the calculator. It also gives translations to serve as keyboard accelerators. Because these resources are not specified in the source code, you can create a customized calculator by writing a private application defaults file, using the Athena Command and Form widget resources to specify the size and position of buttons, the label for each button, and the function of each button.
The foreground and background colors of each calculator key can be individually specified. For the TI calculator, a classical color resource specification might be:
XCalc.ti.Command.background:       gray50

XCalc.ti.Command.foreground:       white
For each of buttons 20, 25, 30, 35, and 40, specify:
XCalc.ti.button20.background:      black

XCalc.ti.button20.foreground:      white
For each of buttons 22, 23, 24, 27, 28, 29, 32, 33, 34, 37, 38, and 39:
XCalc.ti.button22.background:      white

XCalc.ti.button22.foreground:      black
Resources (Release 3)
The program uses the Xlib routine XGetDefault(3X) to read defaults, so its resource names are all capitalized.
BorderWidth Specifies the width of the border. The default is 2.
ReverseVideo
Indicates that reverse video should be used.
Stipple |
Indicates that the background should be stippled. The default is on for monochrome displays, and off for color displays. |
Mode |
Specifies the default mode. Allowable values are are rpn, analog. |
Foreground |
Specifies the default color used for borders and text. |
Background |
Specifies the default color used for the background. |
NKeyFore,NKeyBack
Specifies the colors used for the number keys.
Specifies the colors used for the operator keys.
FKeyFore,FKeyBack
Specifies the colors used for the function keys.
DispFore,DispBack
Specifies the colors used for the display.
IconFore,IconBack
Specifies the colors used for the icon.
Customization (Release 3)
If you’re running on a monochrome display, you shouldn’t need any resource file entries for xcalc. However, xcalc uses a lot of colors, given the opportunity. In the default case, it will just use two colors (Foreground and Background) for everything. This works out nicely. However, if you’re a color fanatic you can specify the colors used for the number keys, the operator (+,-,*,/,=) keys, the function keys, the display, and the icon. On a color display, you might want to try the following in TI mode:
xcalc*Foreground:          black

xcalc*Background:          lightsteelblue

xcalc*NKeyFore:            black

xcalc*NKeyBack:            white

xcalc*OKeyFore:            aquamarine

xcalc*OKeyBack:            darkslategray

xcalc*FKeyFore:            white

xcalc*FKeyBack:            #900

xcalc*DispFore:            yellow

xcalc*DispBack:            #777

xcalc*IconFore:            red

xcalc*IconBack:            white
Bugs in Release 4
In HP mode, a bug report claims that the sequence of keys 5,ENTR, and <- should clear the display, but it doesn’t.
Bugs in Release 3
The calculator doesn’t resize.
The slide rule and HP mode may or may not work correctly.
Base conversions are not easily done.
See Also
X, xrdb, and for Release 4, the Athena Widget set
Authors
John Bradley, University of Pennsylvania;
Mark Rosenstein, MIT Project Athena.
xclipboard
X Clipboard Client
Name
xclipboard – X clipboard client.
Syntax
xclipboard[options]
Description
The xclipboard program is used to collect and display text selections that are sent to the CLIPBOARD by other clients. It is typically used to save CLIPBOARD selections for later use.
Since xclipboard uses a Text Widget to display the contents of the clipboard, text sent to the CLIPBOARD may be re-selected for use in other applications.
Release 4 Specifics
The Release 4 version of xclipboard stores each CLIPBOARD selection as a separate string, each of which can be selected. Each time CLIPBOARD is asserted by another application, xclipboard transfers the contents of that selection to a new buffer and displays it in the text window. Buffers are never automatically deleted, so you’ll want to use the delete button to get rid of useless items.
xclipboard also responds to requests for the CLIPBOARD selection from other clients by sending the entire contents of the currently displayed buffer.
An xclipboard window has the following buttons across the top:
quit |
When this button is pressed, xclipboard exits. |
delete |
When this button is pressed, the current buffer is deleted and the next one displayed. |
new |
Creates a new buffer with no contents. Useful in constructing a new CLIPBOARD selection by hand. |
next |
Displays the next buffer in the list. |
previous |
Displays the previous buffer. |
Release 3 Specifics
The Release 3 version of xclipboard has the following buttons across the top:
quit |
When this button is pressed, xclipboard exits. |
erase |
When this button is pressed, the contents of the text window are erased. (The erase button is not functional.) |
Options
The xclipboard program accepts all of the standard X Toolkit command line options as well as the following:
-w |
Indicates that lines of text that are too long to be displayed on one line in the clipboard should wrap around to the following lines. |
-nw |
Indicates that long lines of text should not wrap around. This is the default behavior. |
Some of the more common Toolkit options used with xclipboard are:
-display [host]:server[.screen]
Allows you to specify the host, server and screen on which to create the xclipboard windows. host specifies the machine, server specifies the server number, and screen specifies the screen number. For example,
xclipboard -display your_node:0.1
specifies screen 1 of server 0 on the machine your_node. Either or both the host and screen elements to the display specification can be omitted. If host is omitted, the local machine is assumed. If screen is omitted, screen 0 is assumed (and the period is unnecessary). The colon and server are necessary in all cases.
-geometry geometry
The xclipboard window is created with the specified size and location determined by the supplied geometry specification. The -geometry option can be (and often is) abbreviated to -g, unless there is a conflicting option that begins with “g.” The argument to the geometry option (geometry) is referred to as a “standard geometry string,” and has the form widthxheight±xoff±yoff.
Sending and Retrieving Clipboard Contents
Text is copied to the clipboard whenever a client asserts ownership of the CLIPBOARD selection. Text is copied from the clipboard whenever a client requests the contents of the CLIPBOARD selection. Examples of event bindings that a user may wish to include in a resource configuration file to use the clipboard are:
*VT100.Translations: #override \

    Button1 <Btn3Down>:  select-end(CLIPBOARD) \n\

            <Btn2Up>:    insert-selection (PRIMARY,CLIPBOARD) \n\
Resources
This program accepts all of the standard X Toolkit resource names and classes as well as:
wordWrap (class WordWrap)
Specifies whether or not lines of text should wrap around to the following lines. The default is no. (Release 3 only.)
Widgets
In order to specify resources, it is useful to know the hierarchy of the widgets that compose xclipboard. In the notation below, indentation indicates hierarchical structure. The widget class name is given first, followed by the widget instance name.
XClipboard  xclipboard

        Form  form

                Command  quit

                Command  delete
                Command  new

                Command  next

                Command  prev

                Text     text
Bugs in Release 3
The erase button is not functional.
It would be nice to have a way of specifying the file in which the clipboard contents are saved.
Files
/usr/lib/X11/app-defaults/XClipboard Specifies required resources (as of Release 4).
See Also
X, xcutsel, xterm, individual client documentation for how to make a selection and send it to the CLIPBOARD.
Author
Ralph R. Swick, DEC/MIT Project Athena;
Chris Peterson, MIT X Consortium;
Keith Packard, MIT X Consortium.
Analog/Digital Clock
xclock
Name
xclock – continuously display the time in either analog or digital form.
Syntax
xclock[options]
Description
xclock continuously displays the time of day, either in digital or analog form. In digital form, xclock displays the time using a 24-hour clock. It also displays the day, month, and year. In analog form, xclock displays a standard 12-hour clock face. You can set up more than one clock simultaneously.
The default clock is an analog clock with a black foreground on a white background. If you want to change the clock’s appearance, type in the appropriate options. For example,
xclock -bd slateblue -fg navyblue -hl darkslategrey &
sets up a conventional 12-hour clock with a slate blue window border, navy blue tick marks, and dark slate grey hands.
By default, the clock is positioned in the upper-left corner of your background window. If you are running twm, you can place the clock using the pointer.
Options
xclock accepts all of the standard X Toolkit command line options along with the additional options listed below:
-help |
Displays a brief summary of xclock’s calling syntax and options. |
-analog |
Draws a conventional 12-hour clock face with tick marks for each minute and stroke marks for each hour. This is the default. |
-digital or -d
Displays the date and time in digital format. Note that -display must be used to specify a display.
-chime |
Indicates that the clock should chime once on the half hour and twice on the hour. |
-hd color |
Specifies the color of the hands on an analog clock. The default is black. |
-hl color |
Specifies the color of the edges of the hands on an analog clock. Only useful on color displays. The default is black. |
-padding pixels
Specifies the width in pixels of the space between the window border and any portion of the xclock display. The default is 10 pixels in digital mode and 8 pixels in analog mode.
-update seconds
Specifies the frequency in seconds with which xclock updates its display. If the xclock window is obscured and then exposed, xclock overrides this setting and redisplays immediately. A value of less than 30 seconds will enable a second hand on an analog clock. The default is 60 seconds.
The following standard X Toolkit options are commonly used with xclock:
-bg color |
Determines the background color of the window. The default is white. |
-bd color |
Determines the border color of the window. The default is black. |
-bw pixels |
Specifies the width in pixels of the border around the xclock window. The default is 2 pixels. |
-fg color |
Determines the color of the text in digital mode, and the color of the tick and stroke marks in analog mode. The default is black. |
-fn font |
Specifies the font to be used in digital mode. Any fixed width font may be used. The default is 6x10. |
-rv |
Indicates that reverse video should be simulated by swapping the foreground and background colors. |
-geometry geometry
Sets xclock window size and location according to the geometry specification. The -geometry option can be (and often is) abbreviated to -g, unless there is a conflicting option that begins with “g.” The argument to the geometry option (geometry) is referred to as a “standard geometry string,” and has the form widthxheight±xoff±yoff.
In digital mode, height and width are determined by the font in use, unless otherwise specified. In analog mode, width and height defaults are 164 pixels, unless otherwise specified. The default value for any unspecified x or y offset is -0. All values are in pixels. If you do not specify the geometry, xclock asks you for window window.
-display [host]:server[.screen]
Allows you to specify the host, server and screen on which to create the xclock window. host specifies which machine to create the xclock window on, server specifies the server number and screen specifies the screen number. For example,
xclock -display your_node:0.1
creates an xclock display on screen 1 on server 0 on the machine your_node. If the host is omitted, the local machine is assumed. If the screen is omitted, the screen 0 is assumed; the server and colon(:) are necessary in all cases.
Note that -display cannot be abbreviated to -d, which is shorthand for the -digital option.
-xrm resourcestring
Specifies a resource string to be used. This is especially useful for setting resources that do not have separate command line options.
Resources
xclock uses the Athena Clock widget It understands all of the core resource names and classes as well as:
width (class Width)
Specifies the width of the clock.
height (class Height)
Specifies the height of the clock.
update (class Interval)
Specifies the frequency in seconds at which the time should be redisplayed.
background (class Background)
Determines the background color. The default is white.
foreground (class Foreground)
Specifies the color for the tick marks and stroke marks. Using the class specifies the color for all things that normally would appear in the foreground color. The default is black since the core default for background is white.
hands (class Foreground)
Specifies the color of the insides of the clock’s hands. The default is the foreground color.
highlight (class Foreground)
Specifies the color used to highlight the clock’s hands. The default is the foreground color.
analog (class Boolean)
Specifies whether or not an analog clock should be used instead of a digital one. The default is true.
chime (class Boolean)
Specifies whether or not a bell should be rung on the hour and half hour. The default is false.
padding (class Margin)
Specifies the amount of internal padding in pixels to be used. The default is 8.
font (class Font)
Specifies the font to be used for the digital clock. Note that variable width fonts currently will not always display correctly.
reverseVideo (class ReverseVideo)
Specifies that the foreground and background colors should be reversed.
Widgets (Release 4)
In order to specify resources, it is useful to know the hierarchy of the widgets which compose xclock. In the notation below, indentation indicates hierarchical structure. The widget class name is given first, followed by the widget instance name.
xclock
XClock  xclock

    Clock  clock
Files
/usr/lib/Xll lapp-defaults/XClock
Specifies default resources (as of Release 4).
Bugs
xclock believes the system clock.
When in digital mode, the string should be centered automatically.
No way to exit the program.
See Also
X, oclock, xrdb, time(3C), Athena Clock widget
Authors
Tony Della Fera (MIT-Athena, DEC);
Dave Mankins (MIT-Athena, BBN);
Ed Moy (UC Berkeley).
xcutsel
Cut Buffer/Selection Interchange
Name
xcutsel − interchange between cut buffer and selection.
Syntax
.xcutsel [options]
Description
The xcutsel program is used to copy the current selection into a cut buffer and to make a selection that contains the current contents of the cut buffer. It acts as a bridge between applications that don’t support selections and those that do.
By default, xcutsel will use the selection named PRIMARY and the cut buffer CUT_BUFFERO. Either or both of these can be overridden by command line arguments or by resources.
An xcutsel window has the following buttons:
quit
When this button is pressed, xcutsel exits. Any selections. held by xcutsel are automatically released.
copy PRIMARY to 0
When this button is pressed, xcutsel copies the current selection into the cut buffer.
copy 0 to PRIMARY
When this button is pressed, xcutsel converts the current contents of the cut buffer into the selection.
The button labels reflect the selection and cut buffer selected by command line options or through the resource database.
When the copy 0 to PRIMARY button is activated, the button will remain inverted as long as xcutsel remains the owner of the selection. This serves to remind you which client owns the current selection. Note that the value of the selection remains constant; if the cut buffer is changed, you must again activate the copy button to retrieve the new value when desired.
Options
xcutsel accepts all of the standard X Toolkit command line options as well as the following:
–selection name
Specifies the name of the selection to use. The default is PRIMARY. The only supported abbreviations for this option are –select, –sel and –s, since the standard Toolkit option –selectionTimeout has a similar name.
–cutbuffer number
Specifies the cut buffer to use. The default is cut buffer 0.
The following X Toolkit options are commonly used with xcutsel:
–display [host]:server[.screen]
Allows you to specify the hos~ server, and screen on which to create the xcutsel window. host specifies the machine, server specifies the server number, and screen specifies the screen number. For example,
xcutsel –display your_node:0.1
specifies screen 1 of server 0 on the machine your_node. Either or both the host and screen elements to the display specification can be omitted. If host is omitted, the local machine is assumed. If screen is omitted, screen 0 is assumed (and the period is unnecessary). The colon and server are necessary in all cases.
-geometry geometry
The xcutsel window is created with the specified size and location determined by the supplied geometry specification. The -geometry option can be (and often is) abbreviated to -g, unless there is a conflicting option that begins with “g.” The argument to the geometry option (geometry) is referred to as a “standard geometry string,” and has the form widthx–height±xoff±yoff.
Resources
This program accepts all of the standard X Toolkit resource names and classes as well as:
selection (class Selection)
This resource specifies the name of the selection to use. The default is PRIMARY.
cutBuffer (class CutBuffer)
This resource specifies the number of the cut buffer to use. The default is 0.
Widget Names
The following instance names may be used when user configuration of the labels in them is desired:
sel-cut (class Command)
This is the copy selection to buffer button.
cut-sel (class Command)
This is the copy buffer to selection button.
quit (class Command)
This is the quit button.
Bugs
There is no way to change the name of the selection or the number of the cut buffer while the program is running.
See Also
X, xclipboard, xterm; Chapter 4 of this guide; text widget documentation, including Volume Four, X Toolkit Intrinsics Programming Manual
Author
Ralph R. Swick, DEC/MIT Project Athena.
xditview
Display ditroff Files
Name
xditview – display ditroff DVI files.
Syntax
xditview [options]
Description
The xditview program displays ditroff output on an X display. It uses special font metrics that match the font set distributed with Xll Release 3, so it does not require access to the server machine for font loading.
Options
xditview accepts all of the standard X Toolkit command line options along with the additional options listed below:
-help
Indicates that a brief summary of the allowed options should be printed.
-page
Specifies the page number of the document to be displayed.
-backingStore backing_store_type
Redisplay of the DVI window can take upto a second or so. This option causes the server to save the window contents so that when it is scrolled around the viewport, the window is painted from contents saved in backing store. backing_store_type can be one of Always, WhenMapped or NotUseful.
The following standard X Toolkit command line arguments are commonly used with xditview:
|
Specifies the color to use for the window background. The default is white. |
|
Specifies the color to use for the window border. The default is black. |
|
Specifies the width in pixels of the window border. |
|
Specifies the color to use for displaying text The default is black. |
|
Specifies the font to be used for displaying widget text. The default is “fixed”. |
|
Indicates that reverse video should be simulated by swapping the foreground and background colors. |
-display host [:server] [.screen]
Allows you to specify the host, server and screen on which to display the xditview window. host specifies the machine, server specifies the server number, and screen specifies the screen number. For example,
xditview –display your_node:0.1
specifies screen 1 of server 0 on the machine your_node. Either or both the host and screen elements to the display specification can be omitted. If host is omitted, the local machine is assumed If screen is omitted, screen 0 is assumed (and the period is unnecessary). The colon and server are necessary in all cases.
-geometry geometry
The xditview window is created with the specified size and location determined by the supplied geometry specification. The -geometry option can be (and often is) abbreviated to -g, unless there is a conflicting option that begins with “g.” The argument to the geometry option (geometry} is referred to as a “standard geometry string,” and has the form widthx-height±xoff±yoff.
-xrm resourcestring
Specifies a resource string to be used
Resources
This program uses the Dvi widget in the X Toolkit. It understands all of the core resource names and classes as well as:
width (class Width)
Specifies the width of the window.
height (class Height)
Specifies the height of the window.
foreground (class Foreground)
Specifies the default foreground color.
font (class Font)
Specifies the font to be used for error messages.
Using xditview with ditroff
To build a DVI file suitable for use with xditview, use the device description in devX75:
   $ cd devX75

   $ makedev DESC

   $ mkdir /usr/lib/font/devX75

   $ cp *.out /usr/lib/font/devX75

   $ ditroff -TX75 ditroff_input | xditview
See Also
X, xrdb, ditroff(1)
Bugs
xditview can be easily confused by attempting to display a DVI file constructed for the wrong device. Support for pic is not yet implemented.
Authors
Portions of this program originated in xtroff which was derived from suntroff.
Keith Packard (MIT X Consortium);
Richard L. Hyde (Purdue);
David Slattengren (Berkeley);
Malcom Slaney (Schlumberger Palo Alto Research);
Mark Moraes (University of Toronto).
xdm
X Display Manager
Name
xdm – X display manager.
Syntax
xdm [options]
Description
xdm manages a collection of X displays, both local and possibly remote — the emergence of X terminals guided the design of several parts of this system, along with the development of the X Consortium standard XDMCP, the X Display Manager Control Protocol (introduced in Release 4). It is designed to provide services similar to that provided by init, getty and login on character terminals: prompting for login/password, authenticating the user and running a “session.”
A “session” is defined by the lifetime of a particular process; in the traditional character-based terminal world, it is the user’s login shell process. In the xdm context, it is an arbitrary session manager. This is because in a windowing environment, a user’s login shell process would not necessarily have any terminal-like interface with which to connect.
Until real session managers become widely available, the typical xdm substitute would be either a window manager with an exit option, or a terminal emulator running a shell - with the condition that the lifetime of the terminal emulator is the lifetime of the shell process that it is running — thus degenerating the X session to an emulation of the character-based terminal session.
When the session is terminated, xdm resets the X server and (optionally) restarts the whole process.
Because xdm provides the first interface that users will see, it is designed to be simple to use and easy to customize to the needs of a particular site. xdm has many options, most of which have reasonable defaults. Browse through the various sections, picking and choosing the things you want to change. Pay particular attention to “The Xsession File”, which will describe how to set up the style of session desired.
Options
First, note that all of these options, except -config, specify values that can also be specified in the configuration file as resources.
-config configuration_file
Specifies a resource file which specifies the remaining configuration parameters. If no file is specified and the file /usr/lib/Xll/xdm/xdm-config exists, xdm will use it.
-daemon
Specifies true as the value for the DisplayManager.daemonMode resource. This makes xdm close all file descriptors, disassociate the controlling terminal and put itself in the background when it first starts up (just like the host of other daemons). It is the default behavior.
-debug debug_level
Specifies the numeric value for the DisplayManager.debugLevel resource. A non-zero value causes xdm to print piles of debugging statements to the terminal; it also disables the DisplayManager.daemon-Mode resource, forcing xdm to run synchronously. To interpret these debugging messages, a copy of the source code for xdm is almost a necessity. No attempt has been made to rationalize or standardize the output
-error error_log_file
Specifies the value for the DisplayManager.errorLogFile resource. This file contains errors from xdm as well as anything written to standard error by the various scripts and programs run during the progress of the session.
-nodaemon
Specifies “false” as the value for the DisplayManager.daemonMode resource.
-resources resource_file
Specifies the value for the DisplayManager*resources resource. This file is loaded using xrdb to specify configuration parameters for the authentication widget.
-server server_entry
Specifies the value for the DisplayManager.servers resource. (See “Resources” below.)
-udpPort port_number
Specifies the value for the DisplayManager.requestPort resource. This sets the port-number which XDM will monitor for XDMCP requests. As XDMCP uses the registered well-known udp port 177, this resource should probably not be changed except for debugging. (Available as of Release 4.)
-session session_program
Specifies the value for the DisplayManager*session resource. This indicates the program to run when the user has logged in as the session. (Available as of Release 4.)
-xrm resource_specification
Allows an arbitrary resource to be specified, just as most toolkit applications.
Resources
At many stages the actions of xdm can be controlled through the use of the configuration file, which is in the familiar X resource format. See Jim Fulton’s article on resource files (doc/tutorials/resources.txt) for a description of the format. Some resources modify the behavior of xdm on all displays, while others modify its behavior on a single display. Where actions relate to a specific display, the display name is inserted into the resource name between “DisplayManager”, and the final resource name segment. For example, Display-Manager.expo_0.startup is the name of the resource that defines the startup shell file on the “expo:0“ display. Because the resource manager uses colons to separate the name of the resource from its value and dots to separate resource name parts, xdm substitutes underscores scores for the dots and colons when generating the resource name. (If you are running Release 3, DisplayManager.expo.0.startup is the resource. In Release 3, xdm substitutes dots for the colons when generating the resource name.)
DisplayManager.servers
Specifies either a filename full of server entries, one per line, or a single server entry. Each entry indicates a display that should constantly be managed and that is not using XDMCP. (If the resource value begins with a slash, it is assumed to be the name of a file containing the list.) Each entry consists of at least three parts: a display name, a display class (Release 4 only). a display type, and (for local servers) a command line to start the server. (The program name should be an absolute UNIX pathname, since xdm does not search through the directories of the PATH environment variable.) Foreign servers can have a comment in place of the command line. A typical entry for local display number 0 would be:
:0 Digital-QV local /usr/bin/Xll/X :0
The display types are:
|
A local display, i.e., one that has a server program to run |
|
foreign A remote display, i.e., one that has no server program to run |
If you’re running the Release 3 version of xdm, the following display types are also acceptable:
|
A local display that has only one session run |
|
A remote display that has only one session run |
The display name must be something that can be passed in the -display option to any X program. This string is used in the display-specific resources to specify the particular display, so be careful to match the names (e.g., use :0 local /usr/bin/Xll/X :0 instead of localhost:0 local/usr/bin/Xll/X :0 if your other resources are specified as Display-Manager._0.session).
The display class portion can also be used in display-specific resources, as the class portion of the resource. This is useful if you have a large collection of similar displays (perhaps several X terminals) and would like to set resources for groups of them. When using XDMCP. the display is required to specify the display class. Your X terminal documentation should describe a reasonably standard display class string for your device.
DisplayManager.requestPort
Indicates the UDP port number which xdm uses to listen for incoming XDMCP requests. Unless you need to debug the system, leave this with its default value of 177. (Available as of Release 4.)
Error output is normally directed at the system console. To redirect it simply set this resource to any filename. A method to send these messages to syslog should be developed for systems that support it; however the wide variety of “standard” interfaces precludes any system-independent implementation. This file also contains any output directed to standard error by Xstartup, Xsession, and Xreset, so it will contain descriptions of problems in those scripts as well.
DisplayManager.debugLevel
A non-zero value specified for this integer resource will enable reams of debugging information to be printed. It also disables daemon mode which would redirect the information into the bit-bucket. Specifying a non-zero debug level also allows non-root users to run xdm which would normally not be useful. (Available as of Release 4.)
DisplayManager.daernonMode
Normally, xdm attempts to make itself into an unassociated daemon process. This is accomplished by forking and leaving the parent process to exit, then closing file descriptors and mangling the controlling terminal. When attempting to debug xdm, this is quite bothersome. Setting this resource to false will disable this feature. (Available as of Release 4.)
DisplayManager.pidFile
The filename specified will be created to contain an ASCII representation of the process ID of the main xdm process. This is quite useful when reinitializing the system. xdm also uses file locking to attempt to eliminate multiple daemons running on the same machine, which would cause quite a bit of havoc. (Available as of Release 4.)
DisplayManager.lockPidFile
Controls whether xdm uses file locking to keep multiple xdm processes from running amok. On System V, this uses the lockf library call, while on BSD it uses flock. The default value is true. (Available as of Release 4.)
DisplayManager.rernoteAuthDir
This is a directory name that xdm uses to temporarily store authorization files for displays using XDMCP. The default value is lusr/lib/Xlllxdm. (Available as of Release 4.)
DisplayManager.autoRescan
This boolean controls whether xdm rescans the configuration file and servers file after a session terminates and the files have changed. By default it is true. You can force xdm to reread these files by sending a SIGHUP to the main process. (Available as of Release 4.)
DisplayManager.removeDomainname
When computing the display name for XDMCP clients, the resolver will typically create a fully qualified host name for the terminal. Since this is sometimes confusing, xdm will remove the domain name portion of the host name if it is the same as the domain name for the local host when this vari· able is set. By default the value is true. (Available as of Release 4.)
XDM-AUTHENTICATION-1 style XDMCP authentication requires that a private key be shared between xdm and the terminal. This resource specifies the file containing those values. Each entry in the file consists of a display name and the shared key. By default, xdm does not include support for XDM-AUTHENTICATION-1 as it requires DES which is not generally distributable. (Available as of Release 4.)
DisplayManager.DISPLAY.resources
Specifies the name of the file to be loaded by xrdb as the resource database onto the root window of screen 0 of the display. This resource database is loaded just before the authentication procedure is started, so it can control the appearance of the “login” window. See “Authentication Widget Resources”, which describes the various resources which are appropriate to place in this file. There is no default value for this resource, but the conventional name is /usr/lib/Xll/xdm/Xresources.
DisplayManager.DISPLAY.xrdb
Specifies the program used to load the resources. By default, xdm uses /usr/bin/Xll/xrdb.
DisplayManager.DISPLAY.cpp
Specifies the name of the C preprocessor used by xrdb. (Available as of Release 4.)
DisplayManager.DISPLAY.startup
Specifies a program which is run (as root) after the authentication process succeeds. By default, no program is run. The conventional name for a file used here is Xstartup. See “The Xstartup File” below.
DisplayManager.DISPLAY.session
Specifies the session to be executed (not running as root). By default, /usr/bin/Xll/xterm is run. The conventional name is Xsession. See “The Xsession File” below.
DisplayManager.DISPLAY.reset
Specifies a program which is run (as root) after the session terminates. Again, by default no program is run. The conventional name is Xreset. See “The Xreset File” below.
DisplayManager.DISPLAY.openDelay
DisplayManager.DISPLAY.openRepeat
DisplayManager.DISPLAY.openTimeout
DisplayManager.DISPLAY.startAttempts
Numeric resources control the behavior of xdm when attempting to open intransigent servers. openDelay is the length of the pause (in seconds) between successive attempts. openRepeat is the number of attempts to make. openTimeout is the amount of time to wait while actually attempting the open (i.e., the maximum time spent in the connect syscall). start-Attempts (Release 4) is the number of times this entire process is done before giving up on the server. After openRepeat attempts have been made, or if openTimeout seconds elapse in any particular attempt, xdm terminates and restarts the server, attempting to connect again. This process is repeated startAttempts times, at which point the display is declared dead and disabled. Although this behaviour may seem arbitrary, it has been empirically developed and works quite well on most systems. The default values are 5 for openDelay, 5 for openRepeat, 30 for openTimeout, and 4 for startAttempts.
DisplayManager.DISPLAY.pinginterval
DisplayManager.DISPLAY.pingTimeout
To discover when remote displays disappear, xdm occasionally “pings” them, using an X connection and sending XSync requests. pinginterval specifies the time (in minutes) between each ping attempt, pingTimeout specifies the maximum amount of time (in minutes) to wait for the terminal to respond to the request. If the terminal does not respond, the session is declared dead and terminated. By default, both are set to 5 minutes. xdm will not ping local displays. Although it would seem harmless, it is unpleasant when the workstation session is terminated as a result of the server hanging for NFS service and not responding to the ping. (Available as of Release 4.)
DisplayManager.DISPLAY.terminateServer
Specifies whether the X server should be terminated when a session tenninates (instead of resetting it). This option can be used when the server tends to grow without bound over time in order to limit the amount of time the server is run. The default value is false.
DisplayManager.DISPLAY.userPath
xdm sets the PATH environment variable for the session to this value. It should be a colon separated list of directories, see sh(1) for a full description. The default value can be specified in the X system configuration file with DefUserPath, frequently it is set to :/bin:/usr/bin:/usr/bin/Xll:/usr/ucb.
DisplayManager.DISPLAY.systemPath
xdm sets the PATH environment variable for the startup and reset scripts to the value of this resource. The default for this resource is specified with the DefaultSystemPath entry in the system configuration file, but it is frequently /etc:/bin:/usr/bin:/usr/bin/Xll:/usr/ucb. Note the conspicuous absence of “.” from this entry. This is a good practise to follow for root; it avoids many common trojan horse system penetration schemes.
DisplayManager.DISPLAY.systemShell
xdm sets the SHELL environment variable for the startup and reset scripts to the value of this resource. By default, it is /bin/sh.
DisplayManager.DISPLAY.failsafeClient
If the default session fails to execute, xdm will fall back to this program. This program is executed with no arguments, but executes using the same environment variables as the session would have had. See “The Xsession File,” below. By default, /usr/bin/Xll/xtenn is used.
DisplayManager.DISPLAY.grabServer
DisplayManager.DISPLAY.grabTimeout
To eliminate obvious security shortcomings in the X protocol, xdm grabs the server and keyboard while reading the name/password. The grabServer resource specifies if the server should be held for the duration of the name/password reading, when FALSE, the server is ungrabbed after the keyboard grab succeeds, otherwise the server is grabbed until just before the session begins. The grabTimeout resource specifies the maximum time xdm will wait for the grab to succeed. The grab may fail if some other client has the server grabbed, or possibly if the network latencies are very high. This resource has a default value of 3 seconds; you should be cautious when raising it as a user can be spoofed by a look-alike window on the display. If the grab fails, xdm kills and restarts the server (if possible) and session. (Available as of Release 4.)
DisplayManager.DISPLAY.authorize
DisplayManager.DISPLAY.authName
authorize is a boolean resource that controls whether xdm generates and uses authorization for the server connections. If authorization is used, authName specifies the type to use. Currently, xdm supports only MIT-MAGIC-COOKIE-1 authorization, XDM-AUTHORIZATION-1 could be supported as well, but DES is not generally distributable. XDMCP connections specify which authorization types are supported dynamically, so auth-Name is ignored in this case. When authorize is set for a display and authorization is not available, the user is informed by having a different message displayed in the login widget By default, authorize is true; auth-Name is MIT-MAGIC-COOKIE-1. (Available as of Release 4.)
DisplayManager.DISPLAY.authFile
This file is used to communicate the authorization data from xdm to the server, using the -auth server command line option. It should be kept in a directory which is not world-writable as it could easily be removed, disabling the authorization mechanism in the server. (Available as of Release 4.)
DisplayManager.DISPLAY.resetForAuth
The original implementation of authorization in the sample server reread the authorization file at server reset time, instead of when checking the initial connection. As xdm generates the authorization information just before connecting to the display, an old server would not get up-to-date authorization information. This resource causes xdm to send SIGHUP to the server after setting up the file, causing an additional server reset to occur, during which time the new authorization information will be read. (Available as of Release 4.)
DisplayManager.DISPLAY.userAuthDir
When xdm is unable to write to the usual user authorization file ($HOME/.Xauthority), it creates a unique file name in this directory and points the environment variable XAUTHORITY at the created file. By default it uses /tmp. (Available as of Release 4.)
Controlling The Server
xdm controls local servers using POSIX signals. SIGHUP is expected to reset the server, closing all client connections and performing other clean up duties. SIGTERM is expected to terminate the server. If these signals do not perform the expected actions, xdm will not perform properly.
To control remote servers not using XDMCP, xdm searches the window hierarchy on the display and uses the protocol request KillClient in an attempt to clean up the terminal for the next session. This may not actually kill all of the clients, as only those which have created windows will be noticed. XDMCP provides a more sure mechanism; when xdm closes its initial connection, the session is over and the terminal is required to close all other connections.
Controlling xdm
xdm responds to two signals: SIGHUP and SIGTERM. When sent a SIGHUP, xdm rereads the file specified by the DisplayManager.servers resource and notices if entries have been added or removed. If a new entry has been added, xdm starts a session on the associated display. Entries that have been removed are disabled immediately, meaning that any session in progress will be terminated without notice, and no new session will be started.
When sent a SIGTERM, xdm terminates all sessions in progress and exits. This can be used when shutting down the system.
xdm attempts to mark the various sub-processes for ps(1) by editing the command line argument list in place. Because xdm can’t allocate additional space for this task, it is useful to start xdm with a reasonably long command line (15 to 20 characters should be enough). Each process that is servicing a display is marked -<Display_Name>.
Authentication Widget Resources
The authentication widget is an application which reads a name/password pair from the keyboard. As this is a toolkit client, nearly every imaginable parameter can be controlled with a resource. Resources for this widget should be put into the file named by Display-Manager.DISPLAY.resources. All of these have reasonable default values, so it is not necessary to specify any of them.
xlogin.Login.width, xlogin.Login.height, xlogin.Login.x,

xlogin.Login.y
The geometry of the login widget is normally computed automatically. If you wish to position it elsewhere, specify each of these resources.
The color used to display the typed-in user name.
xlogin.Login.font
The font used to display the typed-in user name.
xlogin.Login.greeting
A string which identifies this window. The default is “Welcome to the X Window System”.
xlogin.Login.unsecureGreeting
When X authorization is requested in the configuration file for this display and none is in use, this greeting replaces the standard greeting. Its default value is “This is an unsecure session”. (Available as of Release 4.)
xlogin.Login.greetFont
The font used to display the greeting.
xlogin.Login.greetColor
The color used to display the greeting.
xlogin.Login.namePrompt
The string displayed to prompt for a user name. xrdb strips trailing white space from resource values, so to add spaces at the end of the prompt (usually a nice thing), add spaces escaped with backslashes. (In Release 3, Control-A should work.) The default is “Login:”.
xlogin.Login.passwdPrompt
The string displayed to prompt for a password. The default is “Password:”.
xlogin.Login.promptFont
The font used to display both prompts.
xlogin.Login.promptColor
The color used to display both prompts.
xlogin.Login.fail
A message which is displayed when the authentication fails. The default is “Login Failed. please try again”.
xlogin.Login.failFont
The font used to display the failure message.
xlogin.Login.failColor
The color used to display the failure message.
xlogin.Login.failTimeout
The time (in seconds) that the fail message is displayed. The default is 30 seconds.
This specifies the translations used for the login widget See Chapter 9, Setting Resources, and Appendix G, Translation Table Syntax, for more information on translations. The default translation table for xdm is:
Ctrl<Key>H:        delete-previous-character() \n\

Ctrl<Key>D:        delete-character() \n\

Ctrl<Key>B:        move-backward-character() \n\

Ctrl<Key>F:        move-forward-character() \n\

Ctrl<Key>A:        move-to-begining() \n\

Ctrl<Key>E:        move-to-end() \n\

Ctrl<Key>K:        erase-to-end-of-line() \n\

Ctrl<Key>U:        erase-line() \n\

Ctrl<Key>X:        erase-line() \n\

Ctrl<Key>C:        restart-session() \n\

Ctrl<Key>\\:       abort-session() \n\

<Key>BackSpace:    delete-previous-character() \n\

<Key>Delete:       delete-previous-character() \n\

<Key>Return:       finish-field() \n\

<Key>:             insert-char() \
The actions that are supported by the widget are:
delete-previous-character |
Erases the character before the cursor. |
delete-character |
Erases the character after the cursor. |
move-backward-character |
Moves the cursor backward. |
move-forward-character |
Moves the cursor forward. |
move-to-begining |
(Apologies about the spelling error.) Moves the cursor to the beginning of the editable text |
move-to-end |
Moves the cursor to the end of the editable text |
erase-to-end-of-line |
Erases all text after the cursor. |
erase-line |
Erases the entire text |
finish-field |
If the cursor is in the name field, proceeds to the password field; if the cursor is in the password field, check the current name/password pair. If the name/password pair are valid, xdm starts the session. Otherwise the failure message is displayed and the user is prompted to try again. |
abort-session |
Terminates and restarts the server. |
abort-display |
Terminates the server, disabling it. This is a rash action and is not accessible in the default configuration. It can be used to stop xdm when shutting the system down, or when using xdmshell. |
Resets the X server and starts a new session. This can be used when the resources have been changed and you want to test them, or when the screen has been overwritten with system messages. |
|
insert -char |
Inserts the character typed. |
set-session-argument |
Specifies a single word argument which is passed to the session at startup. See “The Xsession File” and “Typical Usage” below. |
allow-all-access |
Disables access control in the server, this can be used when the .Xauthority file cannot be created by xdm. Be very careful when using this; it might be better to disconnect the machine from the network first. (Available as of Release 4.) |
The Xstartup File
This file is typically a shell script. It is run as “root” and should be very careful about security. This is the place to put commands which make fake entries in /etc/utmp, mount users’ home directories from file servers, display the message of the day, or abort the session if logins are not allowed. Various environment variables are set for the use of this script:
DISPLAY |
is set to the associated display name. |
HOME |
is set to the home directory of the user. |
USER |
is set to the user name. |
PATH |
is set to the value of |
SHELL |
is set to the value of |
XAUTHORITY |
may be set to a non-standard authority file (Release 4). |
No arguments of any kind are passed to the script. xdm waits until this script exits before starting the user session. If the exit value of this script is non-zero, xdm discontinues the session immediately and starts another authentication cycle.
The Xsesslon File
This is the script that is run as the user’s session. It is run with the permissions of the authorized user, and has several environment variables specified:
DISPLAY |
is set to the associated display name. |
HOME |
is set to the home directory of the user. |
USER |
is set to the user name. |
PATH |
is set to the value of |
SHELL |
is set to the user’s default shell (from /etc/passwd). |
XAUTHORITY |
may be set to a non-standard authority file (Release 4). |
At most installations, Xsession should look in $HOME for a file .xsession which would contain commands that each user would like to use as a session. This would replace the system default session. Xsession should also implement the system default session if no user-specified session exists. See “Typical Usage” below.
An argument may be passed to this program from the authentication widget using the ‘set-session-argument’ action. This can be used to select different styles of session. One very good use of this feature is to allow the user to escape from the ordinary session when it fails. This would allow users to repair their own .xsession if it fails, without requiring administrative intervention. The section “Typical Usage” demonstrates this feature.
The Xreset File
Symmetrical with Xstartup, this script is run after the user session has terminated. Run as root, it should probably contain commands that undo the effects of commands in Xstartup, removing fake entries from /etc/utmp or unmounting directories from file servers. The collection of environment variables that were passed to Xstartup are also given to Xreset.
Typical Usage
Actually, xdm is designed to operate in such a wide variety of environments that “typical” is probably a misnomer. However, this section will focus on making xdm a superior solution to traditional means of starting X from /etc/ttys or manually.
First off, the xdm configuration file should be set up. A good thing to do is to make a directory (/usr/lib/Xll/xdm comes immediately to mind) that will contain all of the relevant files. Here is a reasonable configuration file for Release 4, which could be named xdm-config:
DisplayManager.servers:          /usr/lib/Xll/xdm/Xservers

DisplayManager.errorLogFile:     /usr/lib/Xll/xdm/xdm-errors

DisplayManager.pidFile:          /usr/lib/Xll/xdm/xdm-pid

DisplayManager*resources:        /usr/lib/Xll/xdm/Xresources

DisplayManager*session:          /usr/lib/Xll/xdm/Xsession

DisplayManager._0.authorize:     true

DisplayManager*authorize:        false
If you are running the Release 3 version of xdm, the default xdm-config file looks like this:
DisplayManager.servers:          /usr/lib/Xll/xdm/Xservers

DisplayManager.errorLogFile:     /usr/lib/Xll/xdm/xdm-errors

DisplayManager*resources:        /usr/lib/Xll/xdm/Xresources

DisplayManager*startup:          /usr/lib/Xll/xdm/Xstartup

DisplayManager*session:          /usr/lib/Xll/xdm/Xsession

DisplayManager*reset:            /usr/lib/Xll/xdm/Xreset
As you can see, the xdm-config file primarily contains references to other files. Note that some of the resources are specified with “*” separating the components. These resources can be made unique for each different display, by replacing the “*” with the display name, but normally this is not very useful. See the “Resources” section for a complete discussion.
The first file, /usr/lib/Xll/xdm/Xservers, contains the list of displays to manage. Most workstations have only one display, numbered 0, so the file will look like this:
This will keep /usr/bin/Xll/X running on this display and manage a continuous cycle of sessions.
The file /usr/lib/Xll/xdm/xdm-errors will contain error messages from xdm and anything output to standard error by Xstartup, Xsession or Xreset. When you have trouble getting xdm working, check this file to see if xdm has any clues to the trouble.
The next configuration entry, /usr/lib/Xll/xdm/Xresources, is loaded onto the display as a resource database using xrdb. As the authentication widget reads this database before starting up, it usually contains parameters for that widget:
   xlogin*login.translations: #override\\e

      <Key>Fl: set-session-argument(failsafe) finish-field()\\en\\e

      <Key>Return: set-session-argument() finish-field()

   xlogin*borderWidth: 3

   #ifdef COLOR

   xlogin*greetColor: #f63

   xlogin*failColor: red

   xlogin*Foreground: black

   xlogin*Background: #fdc

   #else

   xlogin*Foreground: black

   xlogin*Background: white

   #endif
The various colors specified here look reasonable on several of the displays we have, but may look awful on other monitors. As X does not currently have any standard color naming scheme, you might need to tune these entries to avoid disgusting results. Please note the translations entry; it specifies a few new translations for the widget which allow users to escape from the default session (and avoid troubles that may occur in it). Note that if #override is not specified, the default translations are removed and replaced by the new value, not a very useful result as some of the default translations are quite useful (like <Key>: insert-char() which responds to normal typing).
The Xstartup file used here simply prevents login while the file /etc/nologin exists. As there is no provision for displaying any messages here (there isn’t any core X client which displays files), the user will probably be baffled by this behavior. I don’t offer this as a complete example, but simply a demonstration of the available functionality.
Here is a sample Xstartup script:
   #!/bin/sh

   #

   # Xstartup

   #

   # This program is run as root after the user is verified

   #

   if [ -f /etc/nologin ]; then

          exit 1
          fi

          exit 0
The most interesting script is Xsession. This version recognizes the special “failsafe” mode, specified in the translations in the Xresources file above, to provide an escape from the ordinary session:
   #!/bin/sh

   #

   # Xsession

   #


   # This is the program that is run as the client

   # for the display manager. This example is

   # quite friendly as it attempts to run a per-user

   # .xsession file instead of forcing a particular

   # session layout


   case $# in

   1)

          case $1 in

          failsafe)

                 exec xterm -geometry 80x24-0-0 -ls

                 ;;

          esac

   esac


   startup=$HOME/.xsession

   resources=$HOME/.Xresources


   #

   # check for a user-specific session and execute it

   #

   # Note: the -x flag to test is not supported in all versions of

   #      unix, check with local authorities before proceeding ...

   #

   if [ -f $startup]; then

          if [ -x $startup]; then

                 exec $startup

          else

                 exec /bin/sh $startup

          fi

     else

          #

          # a simple default session. Check to see

          # if the user has created a default resource file
          # and load it, start the universal window manager

          # and use xterm as the session control process.

          #

          if [ -f $resources ]; then

                 xrdb -load $resources

          fi

          twm &

          exec xterm -geometry 80x24+10+10 -ls

   fi
No Xreset script is necessary, so none is provided in Release 4. (The Release 3 sample Xreset file contains nothing but a comment.)
Some Other Possibilities
You can also use xdm to run a single session at a time, using the 4.3 init options or other suitable daemon by specifying the server on the command line:
% xdm -server ":0 SUN-3/60CG4 local /uar/bin/X : 0"
Or, you might have a file server and a collection of X terminals. The configuration for this could look identical to the sample above, except the Xservers file might look like:
   extol:0 VISUAL-19 foreign

   exalt:0 NCD-19 foreign

   explode:0 NCR-TOWERVIEW3000 foreign
This would direct xdm to manage sessions on all three of these terminals. See “Controlling xdm” above for a description of using signals to enable and disable these terminals in a manner reminiscent of init.
One thing that xdm isn’t very good at doing is coexisting with other window systems. To use multiple window systems on the same hardware, you’ll probably be more interested in xinit.
See Also
X, xinit, and XDMCP
Author
Keith Packard, MIT X Consortium.
xdpr
Dump Window Directly to Printer
Name
xdpr − dump an X window directly to the printer.
Syntax
xdpr [filename] [options]
Description
xdpr runs the commands xwd, xpr, and lpr(1) to dump an X window, process it for a laser printer, and print it out. This is the easiest way to get a printout of a window. xdpr by default will print the largest possible representation of the window on the output page.
The options for xdpr are the same as those for xpr, xwd, and lpr(1). The most commonly used options are described below; see the reference pages for these commands for more detailed descriptions of the many options available.
Options
|
Specifies an existing file containing a window dump (created by |
|
Specifies the name of the printer to be used. If a printer name is not specified here, xdpr (really, lpr(1)) will send your output to the printer specified by the PRINTER environment variable. Be sure that the type of the printer matches the type specified with the |
-device printer_device
Specifies the device on which the file is to be printed. Currently the following printers are supported:
|
Digital LN03. |
|
Digital LA100. |
|
HP LaserJet series and other monochrome PCL devices, such as ThinkJet, QuietJet, RuggedWriter, HP2560 series, and HP2930 series printers. (As of Release 4.) |
|
HP PaintJet (color mode). (As of Release 4.) |
|
HP PaintJet XL Color Graphics Printer (color mode). (As of Release 4.) |
|
IBMPP3812. |
|
PostScript printer. |
|
Displays the list of options known to xdpr. |
-display [host] :server[.screen]
Allows you to specify the server to connect to. host specifies the machine, server specifies the server number, and screen specifies the screen number. For example, prints a dump of an X window from screen 1 of server 0 on the machine your_node. If the host is omitted, the local machine is assumed. If the screen is omitted, screen 0 is assumed; the server and colon (:) are necessary in all cases.
xdpr -display your_ node:0.1
Any other arguments will be passed to the xwd, xpr, and lpr(1) commands as appropriate for each.
Environment Variables
PRINTER |
Specifies which printer to use by default. |
See Also
X, xwd, xpr, xwud, lpr(1)
Authors
Paul Boutin, MIT Project Athena;
Michael R. Gretzinger, MIT Project Athena;
Jim Gettys, MIT Project Athena.
xdpyinfo
Display Information Utility
Name
xdpyinfo – display information utility for X.
Syntax
xdpyinfo [option]
Description
xdpyinfo is a utility for displaying information about an X server. It is used to examine the capabilities of a server, the predefined values for various parameters used in communicating between clients and the server, and the different types of screens and visuals that are available.
Option
-display [host]:server[.screen]
Specifies the display about which xdpyinfo should display information. host specifies the machine, server specifies the server number, and screen specifies the screen number. By default, xdpyinfo displays information about all screens on the display. For example,
xdpyinfo -display your_node:0.0
displays information about all screens of server 0 of the machine your_node. If the hostname is omitted, the local node is assumed. If the screen is omitted, screen 0 is assumed. The server and colon(:) are necessary in all cases.
Sample Output (Release 4)
The following shows a sample produced by the Release 4 version of xdpyinfo when connected to a display that supports an 8 plane screen and a 1 plane screen.
name of display :     :0.0

version number :     11.0

vendor string :     MIT X Consortium

vendor release number :     4

maximum request size :   16384 longwords (65536 bytes)

motion buffer size :  0

bitmap unit, bit order, padding:   32, MSBFirst, 32

image byte order :   MSBFirst

number of supported pixmap formats:   2

supported pixmap formats:

    depth 1, bits_per_pixel 1, scanline_pad 32

    depth 8, bits_per_pixel 8, scanline_pad 32

keycode range :   minimum 8, maximum 129

number of extensions :   4

    SHAPE

    MIT-SHM

    Multi -Buffering

    MIT-SUNDRY-NONSTANDARD

default screen number:   0

number of screens :    2
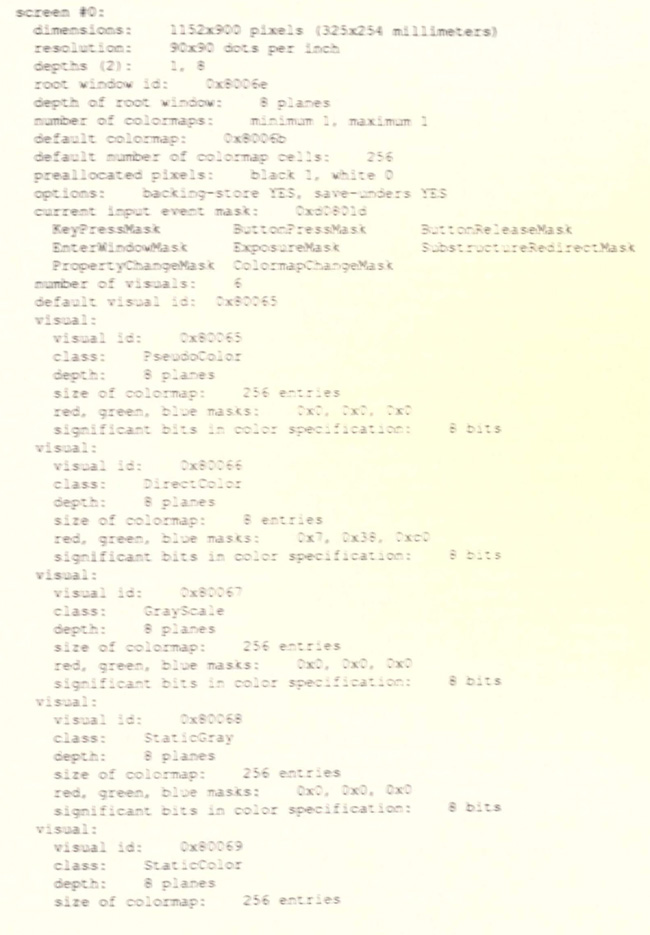
    red, green, blue masks:     0x7, 0x38, 0xc0

    significant bits in color specification:   8 bits

  visual:

    visual id:    0x8006a

    class:    TrueColor

    depth:    8 planes

    size of colormap:    8 entries

    red, green, blue masks:    0x7, 0x38, 0xc0

    significant bits in color specification:   8 bits

  number of mono multibuffer types:   6

    visual id, max buffers, depth:   0x80065, 0, 8

    visual id, max buffers, depth:   0x80066, 0, 8

    visual id, max buffers, depth:   0x80067, 0, 8

    visual id, max buffers, depth:   0x80068, 0, 8

    visual id, max buffers, depth:   0x80069, 0, 8

    visual id, max buffers, depth:   0x8006a, 0, 8

  number of stereo multibuffer types:   0


screen #1:

  dimensions:    1152x900 pixels (325x254 millimeters)

  resolution:    90x90 dots per inch

  depths (1):    1

  root window id:    0x80070

  depth of root window:    1 plane

  number of colormaps:    minimum 1, maximum 1

  default colormap:  0x8006c

  default number of colormap cells:    2

  preallocated pixels:    black 1, white 0

  options:    backing-store YES, save-unders YES

  current input event mask:   0xd0801d

    KeyPressMask         ButtonPressMask   ButtonReleaseMask

    EnterWindowMask      ExposureMask      SubstructureRedirectMask

    PropertyChangeMask   ColormapChangeMask

  number of visuals:    1

  default visual id:  0x80064

  visual:

    visual id:    0x80064

    class:    StaticGray

    depth:    1 plane

    size of colormap:    2 entries

    red, green, blue masks:    0x0, 0x0, 0x0

    significant bits in color specification:     1 bits

  number of mono multibuffer types:    1

    visual id, max buffers, depth:    0x80064, 0, 1

  number of stereo multibuffer types :   0
Sample Output (Release 3)
The following shows a sample produced by the Release 3 version of xdpyinfo when connected to a display that supports an 8 plane Pseudocolor screen as well as a 1 plane (monochrome) screen.
name of display:    empire:0.0

version number:    11.0

vendor string:    MIT X Consortium

vendor release number:    3

maximum request size:  16384 longwords (65536 bytes)

motion buffer size:  0

bitmap unit, bit order, padding:    32, MSBFirst, 32

image byte order:    MSBFirst

keycode range:    minimum 8, maximum 129

default screen number:    0

number of screens:    2


screen #0:

  dimensions :   1152x900 pixels (325x254 millimeters)

  resolution:    90x90 dots per inch

  root window id:    0x8006d

  depth of root window:    1 plane

  number of colormaps:    minimum 1, maximum 1

  default colormap:    0x80065

  default number of colormap cells:    2

  preallocated pixels:    black 1, white 0

  options:     backing-store YES, save-unders YES

  current input event mask:     0x1b8003c

     ButtonPressMask    ButtonReleaseMask         EnterWindowMask

     LeaveWindowMask    SubstructureNotifyMask    SubstructureRedirectMask

     FocusChangeMask    ColormapChangeMask        OwnerGrabButtonMask

  number of visuals:    1

  default visual id:  0x80064

  visual:

     visual id:     0x80064

     class :    StaticGray

     depth:     1 plane

     size of colormap:    2 entries

     red, green, blue masks:    0x0, 0x0, 0x0

     significant bits in color specification:    1 bits

screen #1:

   dimensions:     1152x900 pixels (325x254 millimeters)

   resolution:     90x90 dots per inch

   root window id:     0x80070

   depth of root window :    8 planes

   number of colormaps:     minimum 1, maximum 1

   default colormap :    0x80067

   default number of colormap cells:    256

   preallocated pixels:    black 1, white 0

   options:   backing-store YES, save- unders YES
   current input event mask:    0x0

   number of visuals:    1

   default visual id:  0x80066

   visual:

     visual id:    0x80066

     class:    PseudoColor

     depth:    8 planes

     size of colormap:    256 entries

     red, green, blue masks:    0x0, 0x0, 0x0

     significant bits in color specification:    8 bits
See Also
X, xwininfo, xprop, xrdb
Bugs In Release 3
Due to a bug in the Xlib interface, there is no portable way to determine the depths of pixmap images that are supported by the server.
Author
Jim Fulton, MIT X Consortium.
xedit
Text Editor for X
Name
xedit − simple text editor for X.
Syntax
xedit [options] [filename]
Description of the Release 4 Client
The Release 4 version of xedit provides a window consisting of the following four areas:
Commands Section
A set of commands that allow you to exit xedit, save the file, or load a new file into the edit window.
Message Window
Displays xedit messages. In addition, this window can be used as a scratch pad.
Filename Display
Displays the name of the file currently being edited, and whether this file is Read - Write or Read Only.
Edit Window
Displays the text of the file that you are editing or creating.
Editing (Release 4)
The Athena Text widget is used for the three sections of this application that allow text input. The characters typed will go to the Text widget that the pointer cursor is currently over. If the pointer cursor is not over a text widget then the keypresses will have no effect on the application. This is also true for the special key sequences that popup dialog widgets., so typing Control-S in the filename widget will enable searching in that widget, not the edit widget.
Both the message window and the edit window will create a scrollbar if the text to display is too large to fit in that window. Horizontal scrolling is not allowed by default, but can be turned on through the Text widget’s resources, see Athena Widget set documentation for the exact resource definition.
Commands (Release 4)
|
Quits the current editing session. If any changes have not been saved, xedit displays a warning message, allowing the user to save the file. |
|
If file backups are enabled (see “Resources”) xedit stores a copy of the original, unedited file in <prefix>file<suffix>, then overwrites the file with the contents of the edit window. The filename is retrieved from the Text widget directly to the right of the Load button. |
|
Loads the file named in the text widget immediately to the right of the this button and displays it in the Edit Window. If the currently displayed file has been modified a warning message will ask the user to save the changes, or press Load again. |
Description of the Release 3 Client
The Release 3 version of xedit provides a window consisting of the following three areas:
Lists editing commands (for example, Undo or Search).
Message Window
Displays xedit messages. In addition, this window can be used as a scratch pad.
Edit Window
Displays the text of the file that you are editing or creating.
Commands (Release 3)
|
Quits the current editing session. If any changes have not been saved, xedit displays a warning message and allows you to save the file. |
|
Stores a copy of the original, unedited file in file .BAK. Then, overwrites the original file with the edited contents. |
|
Allows the text displayed in the Edit window to be edited. |
|
Loads the specified file and displays it in the Edit window. |
|
Undoes the last edit only. |
|
Undoes each edit previous to the last edit, which must first be undone with the |
|
Advances the cursor from the beginning of the file to the text line that corresponds to the selected line number. |
|
Searches from the cursor back to the beginning of the file for the string entered in the Search input box. If you do not enter a string in the Search input box, xedit automatically copies the last string that you selected from any X application into the Search input box and searches for that string. |
|
Searches from the cursor forward to the end of the file for the string entered in the search input box. If you do not enter a string in the Search input box, xedit automatically copies the last string that you selected from any X application into the Search input box and searches for that string. |
|
Replaces the last searched-for string with the string specified in the Replace input box. If no string has been previously searched for, searches from the insert cursor to the end of the file for the next occurrence of the search string and highlights it. |
|
Repositions the cursor at the beginning of the file and replaces all occurrences of the search string with the string specified in the Replace input box. |
Options
xedit accepts all of the standard X Toolkit command line options, as well as the following:
|
Specifies the file that is to be loaded during start-up. This is the file that will be edited. If a file is not specified, xedit lets you load a file or create a new file after it has started up. |
Widgets (Release 4)
In order to specify resources, it is useful to know the hierarchy of the widgets which compose xedit. In the notation below, indentation indicates hierarchical structure. The widget class name is given first, followed by the widget instance name.
Xedit   xedit

        Paned paned

              Paned buttons

                    Command quit

                    Command save

                    Command load

                    Text    filename

              Label be_label

              Text  messageWindow

              Label labelWindow

              Text  editWindow
Resources (Release 4)
For the Release 4 version of xedit, the available resources are:
enableBackups (class EnableBackups)
Specifies that, when edits made to an existing file are saved, xedit is to copy the original version of that file to <prefix>file<suffix> before it saves the changes. The default value for this resource is “off', stating that no backups should be created.
backupNamePrefix (class BackupNamePrefix)
Specifies a string that is to be prepended to the backup filename. The default is that no string shall be prepended.
backupNameSuffix (class BackupNameSuffix)
Specifies a string that is to be appended to the backup filename. The default is to append the string “.BAK”.
Resources (Release 3)
For the Release 3 veri on of xedit, the available class identifiers are:
|
The two boxes containing command buttons. |
|
All command buttons. |
|
The two scroll bars. |
|
The two text areas. |
The available name identifiers arc:
The name identifiers for the various buttons are the same as the string on each button. The resources for individual buttons can be set using these names. All of the buttons can be affected by using the Command class. The resources for the two text windows can be modified using the names EditWindow and MessageWindow.
Beyond the standard resources, xedit’s resources are:
EnableBackups
Specifies that, when edits made to an existing file are saved, xedit is to copy the original version of that file to file.BAK before it saves the changes. If the value of this option is specified as off, a backup file is not created.
background
Specifies the background color to be displayed in command buttons. The default is white.
border
Specifies the border color of the xedit window.
borderWidth
Specifies the border width, in pixels, of the xedit window.
font
Specifies the font displayed in the xedit window.
foreground
Specifies the foreground color of the xedit window. The default is black.
geometry
Specifies the geometry (window size and screen location) to be used as the default for the xedit window. For the format of the geometry specification, see X.
internalHeight
Specifies the internal horizontal padding (spacing between text and button border) for command buttons.
internalWidth
Specifies the internal vertical padding (spacing between text and button border) for command buttons.
Key Bindings (Release 3)
Each specification included in the .XtActions file modifies a key setting for the editor that xedit uses. When defining key specifications, you must use the following resource specification:
xedit*text.EventBindings: .XtActions
Each key specification assigns an editor command to a named key and/or mouse combination and has the format:
|
|
where |
|
|
Specifies the key or mouse button that is used to invoke the named function. |
|
Specifies the function to be invoked when the named key is pressed. |
Files
/usr/lib/Xll/app-defaults/Xedit - Specifies required resources (Release 4)
-/.XtActions (Release 3 only)
/usr/lib/Xll/.XtActions (Release 3 only)
Restrictions In Release 4
There is no undo function.
Restrictions In Release 3
Large numbers of certain edit functions (for example, Undo or More) tend to degrade performance over time. If there is a noticeable decrease in response time, save and reload the file.
Bugs In Release 3
It is not clear how to select a line number for the Jump command.
The string searches do not work properly.
See Also
X, xrdb, Athena Widget set documentation
Copyright
Copyright © 1988, Digital Equipment Corporation. Copyright © 1989, Massachusetts Institute of Technology.
Author
Chris D. Peterson, MIT X Consortium.
xev
Print X Events
Name
xev − print contents of X events.
Syntax
xev[options]
Description
xev creates a window and then asks the X server to send It notices called events whenever anything happens to the window (such as being moved, resized, typed in, clicked in. etc.). It is useful for seeing what causes events to occur and to display the information that they contain.
xev is included in the Release 3 standard distribution; in Release 4, it has been moved to demos.
Options
-display [host]:server[.screen]
Allows you to specify the host, server, and screen to connect to. host specifies the machine, server specifies the server number, and screen specifies the screen number. For example,
xev -display your_node:0.1
specifies screen 1 of server 0 on the machine your_node. Either or both the host and screen elements to the display specification can be omitted. If host is omitted, the local machine is assumed. If screen is omitted, screen 0 is assumed (and the period is unnecessary). The colon and server are necessary in all cases.
-geometry geometry
The xev window is created with the specified size and location determined by the supplied geometry specification. The -geornetry option can be (and often is) abbreviated to -g, unless there is a confticting option that begins with “g.” The argument to the geometry option (geometry) is referred to as a “standard geometry string,” and has the form widthx-height±xoff±yoff.
See Also
X, xwininfo, xdpyinfo; Volume One, Xlib Programming Manual; Volume Zero, X Protocol Reference Manual.
Author
Jim Fulton, MIT X Consortium.
xfd
Font Displayer
Name
xfd − X window font displayer.
Syntax
xfd[option]-fn fontname
Description of the Release 4 Client
The Release 4 version of xfd creates a window containing the name of the font being displayed, a row of command buttons, several lines of text for displaying character metrics, and a grid containing one glyph per cell. The characters are shown in increasing order from left to right, top to bottom. The first character displayed at the top left will be character number 0 unless the -start option has been supplied in which case the character with the number given in the -start option will be used
The characters are displayed in a grid of boxes, each large enough to hold any single character in the font Each character glyph is drawn using the PolyText16 request (used by the Xlib routine XDrawString16). If the -box option is given, a rectangle will be drawn around each character, showing where an ImageText16 request (used by the Xlib routine XDrawImageString16) would cause background color to be displayed.
The origin of each glyph is normally set so that the character is drawn in the upper left hand comer of the grid cell. However, if a glyph has a negative left bearing or an unusually large ascent, descent, or right bearing (as is the case with the cursor font), some character may not appear in their own grid cells. The -center option may be used to force all glyphs to be centered in their respective cells.
All the characters in the font may not fit in the window at once. To see the next page of glyphs, press the Next button at the top of the window. To see the previous page, press Prev. To exit xfd, press Quit.
Individual character metrics (index, width, bearings, ascent and descent) can be displayed at the top of the window by pressing on the desired character.
The font name displayed at the top of the window is the full name of the font, as determined by the server. See xlsfonts for ways to generate lists of fonts, as well as more detailed summaries of their metrics and properties.
Description of the Release 3 Client
The Release 3 version of xfd creates a window in which the characters in the named font are displayed. The characters are shown in increasing order from left to right, top to bottom. The first character displayed at the top left will be character number 0 unless the -start option has been supplied in which case the character with the number given in the -start option will be used.
The characters are displayed in a grid of boxes, each large enough to hold any character in the font If the -gray option has been supplied, the characters will be displayed using the Xlib routine XDrawimageString using the foreground and background colors on a gray background. This permits determining exactly how XDrawimageString will draw any given character. If -gray has not been supplied, the characters will simply be drawn using the foreground color on the background color.
All the characters in the font may not fit in the window at once. To see additional characters, click the right mouse button on the window. This will cause the next window full of characters to be displayed. Clicking the left mouse button on the window will cause the previous window full of characters to be displayed. xfd will beep if an attempt is made to go back past the Oth character.
Note that if the font is a 8 bit font, the characters 256-511 (0x100-0x1ff in hexidecimal), 512-767 (0x200-0x2ff), etc., will display exactly the same as the characters 0-255 (0x00-0xff). xfd by default creates a window big enough to display the first 256 characters using a 16 by 16 grid. In this case, there is no need to scroll forward or backward window fulls in order to see the entire contents of a 8 bit font. Of course, this window may very well not fit on the screen.
Clicking the middle button on a character will cause that character’s number to be displayed in both decimal and hexidecimal at the bottom of the window. If verbose mode is selected, additional information about that particular character will be displayed as well. The displayed information includes the width of the character, its left bearing, right bearing, ascent, and descent. If verbose mode is selected, typing ’<’ or ’>’ into the window will display the minimum or maximum values respectively taken on by each of these fields over the entire font.
The fontname is interpreted by the X server. To obtain a list of all the fonts available, use xlsfonts.
The window stays around until the xfd process is killed or one of ’q’, ’Q’,’ ’, or Control-C is typed into the xfd window.
Options (Release 4)
The Release 4 version of xfd accepts all of the standard X Toolkit command line options, as well as the following additional options. The option -fn font is required.
|
Specifies the font to be displayed. |
|
Indicates that a box outlining the area that would be filled with background color by an |
|
Indicates that each glyph should be centered in its grid. |
|
Specifies that character number |
|
Specifies the color to be used if |
Options (Release 3)
The Release 3 version of xfd accepts the following options. The option -fn font is required.
|
Specifies the font to be displayed. |
Allows you to specify the width of the window border in pixels. |
|
|
Specifies that the foreground and background colors be switched. The default colors are black on white. |
|
Overrides a previous choice of reverse video. The foreground and background colors will not be switched. |
|
On color displays, determines the foreground color (the color of the text). |
|
On color displays, determines the background color. |
|
On color displays, determines the color of the border. |
-bf fontname
Specifies the font to be used for the messages at the bottom of the window.
-tl title
Specifies that the title of the displayed window should be title.
-in iconname
Specifies that the name of the icon should be iconname.
-icon filename
Specifies that the bitmap in file filename should be used for the icon.
|
Specifies that verbose mode should be used (i.e., extra information about the font should be displayed). |
|
Specifies that a gray background should be used. |
-start char_num
Specifies that character number char_num should be the first character displayed. (It appears in the upper left hand corner of the grid.) This option is used to view characters at arbitrary locations in the font The default is 0.
-geometry geometry
Specifes the size and location of the xfd window. The -geometry option can be {and often is) abbreviated to -g, unless there is a conflicting option that begins with “g.” The argument to the geometry option (geometry) is referred to as a “standard geometry string,” and has the form widthx-height±xoff±yoff.
-display [host]:server[.screen]
Allows you to specify the host, server and screen on which to create the xfd window. host specifies the machine on which to create the xfd window, server specifies the server number, and screen specifies the screen number. For example,
xfd -display your_node: 0.1
creates a window on screen 1 of server 0 on the machine your_node. If the host is omitted, the local machine is assumed. If the screen is omitted, the screen 0 is assumed; the server and colon(:) are necessary in all cases.
Resources (Release 4)
The Release 4 version of xfd was written with the X Toolkit Intrinsics. xfd accepts the following resources, which are accepted by most applications written with the Toolkit:
background (class Background)
Specifies the color to use for the window background.
borderWidth (class BorderWidth)
Specifies the width in pixels of the window border.
borderColor (class BorderColor)
Specifies the color to use for the window border.
foreground (class Foreground)
Specifies the color to use for text and graphics within the window.
Resources (Release 3)
The Release 3 xfd program uses the following resources:
|
Set the border width of the window in pixels. |
|
Set the border color of the window. |
|
If “on“, reverse the definition of foreground and background color. |
|
Set the foreground color. |
|
Set the background color. |
|
Set the font to be used in the body of the window (i.e., for messages). This is not the font that xfd displays; it is the font used to display information about the font being displayed. |
|
Set the name of the icon. |
|
Set the file we should look in to get the bitmap for the icon. |
|
Set the title to be used. |
Bugs In Release 4
xfd should skip over pages full of non-existent characters.
Bugs In Release 3
Character information displayed in verbose mode is sometimes clipped to the window boundary hiding it from view.
xfd should skip over pages full of non-existent characters.
See Also
X, xfontsel, xlsfonts, xrdb
Author
Release 4 version by Jim Fulton, MIT X Consortium;
Release 3 version by Mark Lillibridge, MIT Project Athena.
xfontsel
Preview and Select Fonts
Name
xfontsel − point and click interface for selecting display font names.
Syntax
xfontsel [options]
Description
Available as of Release 4, xfontsel provides a simple way to display the fonts known to your X server, examine samples of each, and retrieve the X Logical Font Description (XLFD) full name for a font.
If -pattern is not specified, all fonts with XLFD 14-part names will be selectable. To work with only a subset of the fonts, specify -pattern followed by a partially or fully qualified font name. For example,
% xfonteel -pattern *medium*
will select the subset of fonts that contain the string medium somewhere in their font name. Be careful about escaping wildcard characters in your shell.
If -print is specified on the command line the selected font specifier will be written to standard output when the quit button is activated. Regardless of whether or not -print was specified, the font specifier may be made the (text) selection by activating the select button.
Clicking any pointer button in one of the XLFD field names will pop up a menu of the currently-known possibilities for that field. If previous choices of other fields were made, only values for fonts which matched the previously selected fields will be selectable; to make other values selectable, you must deselect some other field(s) by choosing the “*” entry in that field. Unselectable values may be omitted from the menu entirely as a configuration option; see the ShowUnselectable resource, below. Whenever any change is made to a field value. xfontsel will assert ownership of the PRIMARY_FONT selection. Other applications (such as xterm) may then retrieve the selected font specification.
Clicking the left pointer button in the select widget will cause the currently selected font name to become the PRIMARY text selection as well as the PRIMARY_FONT selection. Then you can paste the string into other applications. The select button remains highlighted to remind you of this fact, and de-highlights when some other application takes the PRIMARY selection away. The select widget is a toggle; pressing it when it is highlighted will cause xfontsel to release the selection ownership and de-highlight the widget. Activating the select widget twice is the only way to cause xfontsel to release the PRIMARY_FONT selection.
Options
xfontsel accepts all of the standard X Toolkit command line options along with the additional options described below.
-display host[:server][.screen]
Allows you to specify the host, server and screen on which to display the xfontsel window. host specifies the machine, server specifies the server number, and screen specifies the screen number. For example,
xfontsel -diaplay your_node: 0.1
specifies screen 1 of server 0 on the machine your_node. If the host is omitted, the local machine is assumed. If the screen is omitted, screen 0 is assumed; the colon(:) is necessary in either case.
-pattern fontname
Specifies a subset of the available fonts, those with names that contain fontname, which can be a partial or full name.
-print
Specifies that the selected font will be written to standard output when the quit button is activated.
-sample text
Specifies the sample text to be used to display the selected font, overriding the default (the lower and uppercase alphabet and the digits 0 through 9).
Resources
The application class is XFontSel. Most of the user-interface is configured in the app-defaults file; if this file is missing a warning message will be printed to standard output and the resulting window will be nearly incomprehensible.
Most of the significant parts of the widget hierarchy are documented in the app-defaults file (normally /usr/lib/Xll/app-defaults/XFontSel).
Application specific resources:
cursor (class Cursor)
Specifies the cursor for the application window.
pattern (class Pattern)
Specifies the font name pattern for selecting a subset of available fonts. Equivalent to the -pattern option. Most useful patterns will contain at least one field delimiter, for example, *-m-* for monospaced fonts.
printOnQuit (class PrintOnQuit)
If True, the currently selected font name is printed to standard output when the quit button is activated. Equivalent to the -print option.
Widget-specific resources:
showUnselectable (class ShowUnselectable)
For each field menu, specifies whether or not to show values that are not currently selectable, based upon previous field selections. If shown, the unselectable values are clearly identified as such and do not highlight when the pointer is moved down the menu. The full instance name of this resource is fieldN.menu.options.showUnselectable, class Menu-Button.SimpleMenu.Options.ShowUnselectable; where N is replaced with the field number (starting with the left-most field numbered 0). The default is True for all but field 11 (average width of characters in font) and False for field 11. If you never want to see unselectable entries, *menu.options.showUnselectable: False is a reasonable thing to specify in a resource file.
Flies
/usr/lib/Xll/app-defaults/XFontSel - Specifies default resources.
See Also
xrdb
Bugs
Sufficiently ambiguous patterns can be misinterpreted and lead to an initial selection string which may not correspond to what the user intended and which may cause the initial sample text output to fail to match the proffered string. Selecting any new field value will correct the sample output, though possibly resulting in no matching font.
Should be able to return a font for the PRIMARY selection, not just a string.
Any change in a field value will cause xfontsel to assert ownership of the PRIMARY_FONT selection. Perhaps this should be parameterized.
When running on a slow machine, it is possible for the user to request a field menu before the font names have been completely parsed. An error message indicating a missing menu is printed to standard error, but otherwise nothing happens.
Author
Ralph R. Swick, Digital Equipment Corporation/MIT Project Athena.
xhost
Server Access Control
Name
xhost - server access control program for X.
Syntax
xhost[options]
Description
The xhost program is used to add and delete hosts to and from the list of machines that are allowed to make connections to the X server. This provides a rudimentary form of privacy control and security. It is only sufficient for a workstation (single user) environment, although it does limit the worst abuses. Environments that require more sophisticated measures should use the hooks in the protocol for passing authentication data to the server.
The server initially allows network connections only from programs running on the same machine or from machines listed in the file /etc/Xn.hosts (where n is the display number of the server). The xhost program is usually run either from a startup file or interactively to give access to other users.
Hostnames that are followed by two colons(::) are used in checking DECnet connections; all other hostnames are used for TCP/IP connections.
If no command line options are given, the list of hosts that are allowed to connect is printed on the standard output along with a message indicating whether or not access control is currently enabled. This is the only option that may be used from machines other than the one on which the server is running.
Options
xhost accepts the command line options described below. For security, the options that affect access control may only be run from the same machine as the server.
|
The given |
|
The given |
|
Access is granted to everyone, even if they aren’t on the list of allowed hosts (i.e., access control is turned oft). |
|
Access is restricted to only those machines on the list of allowed hosts (i.e., access control is turned on). |
Flies
/etc/Xn.hosts
Bugs
You can’t specify a display on the command line because -display indicates that you want to remove the machine named display from the access list.
See Also
X, Xserver
Authors
Bob Scheifler, MIT Laboratory for Computer Science;
Jim Gettys, MIT Project Athena (DEC).
xinit
Window System Initializer
Name
xinit-X Window System initializer.
Syntax
xinit [[client] options][-- [server_program]

      [-display [host]:server[.screen]] options]
Description
The xinit program is used to start the X Window System server program and a first client program (usually a terminal emulator) on systems that cannot start X directly from /etc/init or in environments that use multiple window systems. When this first client exits, xinit will kill the X server program and then terminate.
If no specific client program is given on the command line, xinit will 100k in the user’s home directory for a file called .xinitrc to run as a shell script to start up other client programs. If no such file exists, xinit will use the following xterm command line as a default:
xterm -geometry +1+1 -n login -display :0
If no specific server program is given on the command line, xinit will 100k in the user’s home directory for a file called .xserverrc to run as a shell script to start up the server. If no such file exists, xinit will use the following as a default server specification:
X : 0
Note that this assumes that there is a server program called X in the current search path. However, servers are usually named Xdisplaytype, where displaytype is the type of graphics display which is driven by the server (for example, Xsun). The site administrator should therefore make a link to the appropriate type of server on the machine (see Chapter 2, Getting Started, in Part One of this guide for details), or create a shell script that runs xinit with the appropriate server.
Note that programs run by .xinitrc and by .xserverrc should be run in the background if they do not exit right away, so that they don’t prevent other programs from starting up. However, the last long-lived program started (usually a window manager or terminal emulator) should be left in the foreground so that the script won’t exit (which indicates that the user is done and that xinit should exit).
An alternate client and/or server may also be specified on the command line. The desired client program and its arguments should be given as the first command line arguments to xinit. To specify a particular server program, append a double dash (--) to the xinit command line (after any client and arguments) followed by the desired server program.
Both the client program name and the server program name must begin with a slash (/) or a period (.); otherwise, they are treated as an arguments to be appended to their respective startup lines. This makes it possible to add arguments (for example, foreground and background colors) without having to retype the whole command line.
If an explicit server name is not given and the first argument following the double dash (--) is a colon followed by a digit, xinit will use that number as the display number instead of zero. All remaining arguments are appended to the server command line.
Note that you can start X manually by running xinit from the command line or start it automatically by adding the xinit command line to your .login or .profile file. (See Appendix A, System Management, for more information.)
Options
|
Specifies the client to be started with the server. |
server_program
Specifies the server program to be used.
-display [host]:server[.screen]
Specifies the host, server and screen on which you are initializing the X Window System. For example,
xinit -display your_node:0.1
specifies screen 1 on server 0 on the machine your_node. If the host is omitted, the local machine is assumed. If the screen is omitted, the screen 0 is assumed; the server and colon (:) are necessary in any case.
Examples
|
Will start up a server named X and run the user’s .xinitrc, if it exists, or else start an xterm. |
xinit -- /usr/bin/Xll/Xqdss :1
Is how one could start a specific type of server on an alternate display.
xinit -geometry 80x65+10+10 -fn 8x13 -j -fg white -bg navy
Will start up a server named X, and will append the given arguments to the default xterm command. It will ignore .xinitrc.
xinit -e widget.s -- Xsun -l -c
Will use the command ./Xsun -l -c to start the server and will append the arguments -e widgets to the default xterm command.
xinit rsh fasthost cpupig -display workstation: 1 -- 1 -a 2 -t 5
Will start a server named X on display 1 with the arguments -a 2 -t 5. It will then start a remote shell on the machine fasthost in which it will run the command cpupig, telling it to display back on the local workstation.
Below is a sample .xinitrc that starts a clock, several terminals, and leaves the window manager running as the “last” application. Assuming that the window manager has been configured properly, the user then chooses the Exit menu item to shut down X.
xrdb -load $HOME/.Xres

xsetroot -solid gray &

xclock -g 50x50-0+0 -bw 0 &

xload -g 50x50-50+0 -bw 0 &

xterm -g 80x24+0+0 &

xterm -g 80x24+0-0 &

twm
Sites that want to create a common startup environment could simply create a default .xinitrc that references a site-wide startup file:
   #!/bin/sh

   ./usr/local/lib/site.xinitrc
Another approach is to write a script that starts xinit with a specific shell script. Such scripts are usually named xll, xstart, or startx and are a convenient way to provide a simple interface for novice users:
   #!/bin/sh

   ./xinit/usr/local/bin/startx -- /usr/bin/Xll/Xhp :1
Environment Variables
XINITRC |
Specifies an init file containing shell commands to start up the initial windows. By default, .xinitrc in the home directory will be used. |
See Also
X, Xserver, xterm
Author
Bob Scheifler, MIT Laboratory for Computer Science.
xkill
– Kill a Client
Name
xkill – kill a client by its X resource.
Syntax
xkill [options]
Description
xkill is a utility for forcing the X server to close connections to clients. This program is very dangerous, but is useful for aborting programs that have displayed undesired windows on a user’s screen. If no resource identifier is given with - id, xkill will display a special cursor as a prompt for the user to select a window to be killed. If a pointer button is pressed over a non-root window, the server will close its connection to the client that created the window.
Options
-display [host]:server[.screen]
Allows you to specify the host, server and screen to connect to. host specifies the machine, server specifies the server number, and screen specifies the screen number. For example,
xkill -display your_node:0.1
specifies screen 1 of server 0 on the machine your_node. Either or both the host and screen elements to the display specification can be omitted. If host is omitted, the local machine is assumed. If screen is omitted, screen 0 is assumed (and the period is unnecessary). The colon and server are necessary in all cases.
-id resource
Specifies the X identifier for the resource whose creator is to be aborted. If no resource is specified, xkill will display a special cursor with which you should select a window to be killed.
-button number -button any
Specifies the number of the pointer button that should be used to select the window to kill. If the word any is specified, any button on the pointer can be used. By default, the first button in the pointer map (which is usually the leftmost button) is used.
-all |
Indicates that all clients with top-level windows on the screen should be killed. xkill will ask you to select the root window with each of the currently defined buttons to give you several chances to abort. Use of this option is highly discouraged. |
-frame |
Indicates that xkill should ignore the standard conventions for finding top-level client windows (which are typically nested inside a window manager window), and simply believe that you want to kill direct children of the root. (Available as of Release 4.) |
Resources
Button |
Specifies a pointer button number to use when selecting the window to be removed. If the word any is specified, any button on the pointer can be used. |
See Also
X, xwininfo; Volume One, Xlib Programming Manual
Author
Jim Fulton, MIT X Consortium;
Dana Chee, Bellcore.
xload
– Display Load Average
Name
xload - display system load average.
Syntax
xload [options]
Description
The xload program displays a periodically updating histogram of the system load average.
Options
xload accepts all of the standard X Toolkit command line options along with the additional options listed below:
-scale integer
Specifies the minimum number of tick marks in the histogram, where one division represents one load average point. If the load goes above this number, xload will create more divisions, but it will never use fewer than this number. The default is 1.
-update seconds
Specifies the frequency in seconds at which xload updates its display. If the load average window is uncovered (by moving windows with a window manager or by the xrefresh program), the graph will also be updated. In Release 4, the minimum amount of time allowed between updates is 1 second (the default is 5 seconds). In Release 3, the minimum amount of time allowed between updates is 5 seconds (which is also the default).
-h1 color or -highlight color
Specifies the color of the scale lines in Release 4. Specifies the color of the label and scale lines in Release 3.
-jumpscroll pixels
Specifies the number of pixels to shift the graph to the left when the graph reaches the right edge of the window. The default value is 1/2 the width of the current window. Smooth scrolling can be achieved by setting it to 1. (Available as of Release 4.)
-label string
Specifies the text string for the label above the load average. (Available as of Release 4.)
-no label |
Specifies that no label be displayed above the load graph. (Available as of Release 4.) |
The following standard X Toolkit options are commonly used with xload:
-fn fontname
Specifies the font to be used in displaying the name of the host whose load is being monitored. The default is the 6x10 pixel, fixed-width font “fixed”.
-rv |
Indicates that reverse video should be simulated by swapping the foreground and background colors. |
-geometry geometry
Specifies the size and location of the window. The -geometry option can be (and often is) abbreviated to -g, unless there is a conflicting option that begins with “g.” The argument to the geometry option (geometry) is referred to as a “standard geometry string,” and has the form widthxheight±xoff±yoff.
-display [host]:server[.screen]
Allows you to specify the host, server and screen on which to create the xload window. host specifies on which machine to create the xload window, server specifies the server number, and screen specifies the screen number. For example,
xload -display your_node:0.1
creates an xload window on screen 1 of server 0 on the machine your_node. If the host is omitted, the local machine is assumed. If the screen is omitted, screen 0 is assumed; the server and colon(:) are necessary in all cases.
-xrm resourcestring
Specifies a resource string to be used. This is especially useful for setting resources that do not have separate command line options.
Resources (Release 4)
In addition to the resources available to each of the widgets used by xload, there is one resource defined by the application itself.
showLabel (class Boolean)
If False, then no label will be displayed.
Widgets (Release 4)
In order to specify resources, it is useful to know the hierarchy of the widgets that compose xload. In the notation below, indentation indicates hierarchical structure. The widget class name is given first, followed by the widget instance name.
Resources (Release 3)
The Release 3 version of xload uses the Load widget in the X Toolkit. It understands all of the core resource names and classes as well as:
width (class Width)
Specifies the width of the load average graph.
height (class Height)
Specifies the height of the load average graph.
update (class Interval)
Specifies the frequency in seconds at which the load should be redisplayed.
scale (class Scale)
Specifies the initial number of ticks on the graph. The default is 1.
minScale (class Scale)
Specifies the minimum number of ticks that will be displayed. The default is 1.
foreground (class Foreground)
Specifies the color for the graph. Using the class specifies the color for all things that normally would appear in the foreground color. The default is black since the core default for background is white.
highlight (class Foreground)
Specifies the color for the text and scale lines. The default is the same as for the foreground resource.
label (class Label)
Specifies the label to use on the graph. The default is the hostname.
font (class Font)
Specifies the font to be used for the label. The default is “fixed.”
reverseVideo (class ReverseVideo)
Specifies that the foreground and background colors should be reversed.
See Also
X, xrdb, mem(4), Athena StripChart widget (Release 4), Athena Load widget (Release 3)
Diagnostics
Unable to open display or create window. Unable to open /dev/kmem. Unable to query window for dimensions. Various X errors.
Bugs
This program requires the ability to open and read /dev/kmem. Sites that do not allow general access to this file should make xload belong to the same group as /dev/kmem and turn on the set group id permission flag.
Reading /dev/kmem is inherently non-portable. Therefore, the routine used to read it (get_load.c) must be ported to each new operating system.
Border color has to be explicitly specified when reverse video is used.
Authors
K. Shane Hartman (MIT-LCS) and Stuart A. Malone (MIT-LCS);
with features added by Jim Gettys (MIT-Athena), Bob Scheifler (MIT-LCS), Tony Della Fera (MIT-Athena), and Chris Peterson (MIT-LCS).
xlogo
– X Window System Logo
Name
xlogo - X Window System logo.
Synopsis
xlogo [options]
Description
The xlogo program displays the X Window System logo. This program is nothing more than a wrapper around the undocumented Athena Logo widget.
Options
xlogo accepts all of the standard X Toolkit command line options, of which the following are commonly used:
-bg color |
Specifies the color to use for the background of the window. The default is white. A correct color for the background is something like maroon. |
-bd color |
Specifies the color to use for the border of the window. The default is black. |
-bw pixels |
Specifies the width in pixels of the border surrounding the window. |
-fg color |
Specifies the color to use for displaying the logo. The default is black. A correct color for the foreground is something like silver, which you can approximate with a shade of grey. |
-rv |
Indicates that reverse video should be simulated by swapping the foreground and background colors. |
-geometry geometry
The xlogo window is created with the specified size and location determined by the supplied geometry specification. The -geometry option can be (and often is) abbreviated to -g, unless there is a conflicting option that begins with “g.” The argument to the geometry option (geometry) is referred to as a “standard geometry string,” and has the form widthx-height±xoff±yoff.
-display [host] :server[.screen]
Allows you to specify the host, server and screen on which to create the xlogo window (see X). host specifies on which machine to create the xlogo window, server specifies the server number, and screen specifies the screen number. For example,
xlogo -display your_node:0.1
creates an xlogo window on screen 1 of server 0 on the machine your_node. If the host is omitted, the local machine is assumed. If the screen is omitted, screen 0 is assumed; the server and colon(:) are necessary in all cases.
Specifies a resource string to be used. This is especially useful for setting resources that do not have separate command line options.
Resources
This program uses the Logo widget in the Athena widget set. It understands all of the core resource names and classes as well as:
width (class Width)
Specifies the width of the logo.
height (class Height)
Specifies the height of the logo.
foreground (class Foreground)
Specifies the foreground color for the logo. The default depends on whether reverseVideo is specified. If reverseVideo is specified, the default is white; otherwise, the default is black.
reverseVideo (class ReverseVideo)
Specifies that the foreground and background should be reversed.
Widgets
In order to specify resources, it is useful to know the hierarchy of the widgets that compose xlogo. In the notation below, indentation indicates hierarchical structure. The widget class name is given first, followed by widget instance name.
XLogo   xlogo

    Logo   xlogo
Files
/usr/lib/Xll/app-defaults/XLogo- specifies required resources (as of Release 4).
See Also
X, xrdb
Authors
Ollie Jones of Apollo Computer and Jim Fulton of the X Consortium wrote the logo graphics routine, based on a graphic design by Danny Chong and Ross Chapman of Apollo Computer.
xlsatoms
– List Interned Atoms
Name
xlsatoms - list interned atoms defined on server.
Syntax
xlsatoms [options]
Description
Available as of Release 4. xlsatoms lists the interned atoms. By default, all atoms starting from 1 (the lowest atom value defined by the protocol) are listed until unknown atom is found. If an explicit range is given, xlsatoms will try all atoms in the range, regardless of whether or not any are undefined.
Options
-display host [:server] [.screen]
Allows you to specify the host, server and screen to connect to. host specifies the machine, server specifies the server number, and screen specifies the screen number. For example,
xlsatoms -display your_node:0.1
specifies screen 1 of server 0 on the machine your_node. Either or both the host and screen elements to the display specification can be omitted. If host is omitted, the local machine is assumed. If screen is omitted, screen 0 is assumed (and the period is unnecessary). The colon and server are necessary in all cases.
-format printf_string
Specifies a printf-style string used to list each atom <value, name> pair, printed in that order (value is an unsigned long and name is a char *). xlsatoms will supply a newline at the end of each line. The default is %ld\t%s.
-range [low]-[high]
Specifies the range of atom values to check. If low is not given, a value of 1 assumed. If high is not given, xlsatoms will stop at the first undefined atom at or above low.
-name string
Specifies the name of an atom to list. If the atom does not exist, a message will be printed on the standard error.
See Also
X, Xserver, xprop
Author
Jim Fulton, MIT X Consortium.
xlsclients
List Running Clients –
Name
xlsclients - list client applications running on a display.
Syntax
xlsclients [options]
Description
Available as of Release 4, xlsclients is a utility for listing information about the client applications running on a display. It may be used to generate scripts representing a snapshot of the the user’s current session.
Options
-display host [:server] [.screen]
Allows you to specify the host, server and screen to connect to. host specifies the machine, server specifies the server number, and screen specifies the screen number. For example,
xlsclients -display your_node:0.1
specifies screen 1 of server 0 on the machine your_node. Either or both the host and screen elements to the display specification can be omitted. If host is omitted, the local machine is assumed. If screen is omitted, screen 0 is assumed (and the period is unnecessary). The colon and server are necessary in all cases.
-a |
Specifies that clients on all screens should be listed. By default, only those clients on the default screen are listed. |
-l |
Requests a long listing showing the window name, icon name, and class hints in addition to the machine name and command string in the default listing. |
-m maxcmdlength
Specifies the maximum number of characters in a command to list. The default is 1000.
See Also
X, xprop, xwininfo
Author
Jim Fulton, MIT X Consortium.
xlsfonts
– List Available Fonts
Name
xlsfonts - list available fonts.
Syntax
xlsfonts [options] [-fn pattern]
Description
xlsfonts lists the fonts that match the given pattern. The wildcard character “*” may be used to match any sequence of characters (including none), and “?” to match any single character. If no pattern is given, “*” is assumed.
The “*” and “?” characters must be quoted to prevent them from being expanded by the shell.
Options
-display [host] :server[.screen]
Allows you to specify the host, server and screen. For example,
xlsfonts -display your_node:0.1
specifies screen 1 on server 0 on the machine your_node. If the host is omitted, the local machine is assumed. If the screen is omitted, the screen 0 is assumed; the server and colon are necessary in all cases.
-fn pattern |
Indicates that only fonts matching the specified pattern be listed. |
-l[l[l]] |
Indicates that medium, long, and very long listings, respectively, should be generated for each font |
-l |
Indicates that a long listing should be generated for each font. (Release 3) |
-m |
Indicates that long listings should also print the minimum and maximum bounds of each font. |
-c |
Indicates that listings should use multiple columns. This is the same as -n 0. |
-1 |
Indicates that listings should use a single column. This is the same as -n 1. |
-w width |
Specifies the width in characters that should be used in figuring out how many columns to print. The default is 79. |
-n columns |
Specifies the number of columns to use in displaying the output. By default, it will attempt to fit as many columns of font names into the number of characters specified by -w width. |
See Also
X, Xserver, xset, xfd, xfontsel
Bugs
Doing xlsfonts -l can tie up your server for a very long time. This is really a bug with single-threaded, non-preemptable servers, not with this program.
Author
Mark Lillibridge, MIT Project Athena;
Jim Fulton, MIT X Consortium;
Phil Karlton, SGI.
xlswins
– List Window Tree
Name
xlswins - server window list displayer for X.
Syntax
xlswins [options] [window_id]
Description
xlswins lists the window tree. By default, the root window is used as the starting point, although another window may be specified using the window_id option.
Options
-display [host]:server[.screen]
Allows you to specify the host, server and screen to connect to. host specifies the machine, server specifies the server number, and screen specifies the screen number. For example,
xlswins -display your_node:0.1
specifies screen 1 of server 0 on the machine your_ node. Either or both the host and screen elements to the display specification can be omitted. If host is omitted, the local machine is assumed. If screen is omitted, screen 0 is assumed (and the period is unnecessary). The colon and server are necessary in all cases.
-l |
Indicates that a long listing should be generated for each window. This includes a number indicating the depth, the geometry relative to the parent as well as the location relative to the root window. |
-format radix
Specifies the radix to use when printing out window IDs. Allowable values are: hex, octal, and decimal. The default is hex.
-indent number
Specifies the number of spaces that should be indented for each level in the window tree. The default is 2.
window_id |
Specifies that the starting point for the window tree listing is the window window_id. |
See Also
X, Xserver, xwininfo, xprop
Bugs
This should be integrated with xwininfo somehow.
Author
Jim Fulton, MIT X Consortium.
xmag
Magnify Screen Portions –
Name
xmag - magnify parts of the screen.
Syntax
xmag [options]
Description
The xmag program allows you to magnify portions of the screen. If no explicit region is specified, a square centered around the pointer is displayed indicating the area to be enlarged. Once a region has been selected, a window is popped up showing a blown up version of the region in which each pixel in the source image is represented by a small square of the same color. Pressing Button1 on the pointer in the enlargement window pops up a small window displaying the position, number, and RGB value of the pixel under the pointer until the button is released. Pressing the space bar or any other pointer button removes the enlarged image so that another region may be selected. Pressing q, Q, or Control-C in the enlargement window exits the program.
Options
-display host]: server[.screen]
Allows you to specify the host, server and screen to use for both reading the screen and displaying the enlarged version of the image. host specifies the machine, server specifies the server number, and screen specifies the screen number. For example,
xmag -display your_node:0.1
specifies screen 1 of server 0 on the machine your_node. Either or both the host and screen elements to the display specification can be omitted. If host is omitted, the local machine is assumed. If screen is omitted, screen 0 is assumed (and the period is unnecessary). The colon and server are necessary in all cases.
-geometry geometry
The enlargement window is created with the specified size and location determined by the supplied geometry specification. The -geometry option can be (and often is) abbreviated to -g, unless there is a conflicting option that begins with “g.” The argument to the geometry option (geometry) is referred to as a “standard geometry string,” and has the form widthxheight±xoff±yoff.
By default, the size is computed from the size of the source region and the desired magnification. Therefore, only one of -source size and -mag magfactor options may be specified if a window size is given with the -geometry option.
-source geometry
This option specifies the size and/or location of the source region on the screen. By default, a 64x64 square centered about the pointer is provided for the user to select an area of the screen. The size of the source is used with the desired magnification to compute the default enlargement window size. Therefore, only one of -geometry size and -mag magfactor options may be specified if a source size is given with this option.
-mag magfactor
This option specifies an integral factor by which the source region should be enlarged. The default magnification is 5. This is used with the size of the source to compute the default enlargement window size. Therefore, only one of -geometry size and -source geom options may be specified if a magnification factor is given with this option.
-bw pixels |
This option specifies the width in pixels of the border surrounding the enlargement window. |
-bd color |
This option specifies the color to use for the border surrounding the enlargement window. |
-bg color_or_pixel_value
This option specifies the name of the color to be used as the background of the enlargement window. If the name begins with a percent size (%), it is interpreted to be an absolute pixel value. This is useful when displaying large areas since pixels that are the same color as the background do not need to be painted in the enlargement. The default is to use the BlackPixel of the screen.
-fn fontname
This option specifies the name of a font to use when displaying pixel values (used when button 1 is pressed in the enlargement window).
-z |
This option indicates that the server should be grabbed during the dynamics and the call to XGet Image. This is useful for ensuring that clients don’t change their state as a result of entering or leaving them with the pointer. |
Resources
The xmag program uses the following X resources:
geometry (class Geometry)
Specifies the size and/or location of the enlargement window.
source (class Source)
Specifies the size and/or location of the source region on the screen.
magnification (class Magnification)
Specifies the enlargement factor.
borderWidth (class BorderWidth)
Specifies the border width in pixels.
borderColor (class BorderColor)
Specifies the color of the border.
Specifies the color or pixel value to be used for the background of the enlargement window.
font (class Font)
Specifies the name of the font to use when displaying pixel values when the user presses button 1 in the enlargement window.
See Also
X, xwd
Bugs
This program will behave strangely on displays that support windows of different depths.
Because the window size equals the source size times the magnification, you only need to specify two of the three parameters. This can be confusing.
Being able to drag the pointer around and see a dynamic display would be very nice.
Another possible interface would be for the user to drag out the desired area to be enlarged.
Author
Jim Fulton, MIT X Consortium.
xman
– Display Man Pages
Name
xman - display manual pages.
Syntax
xman [options]
Description
xman is a manual page browser. The default size of the initial xman window is small so that you can leave it running throughout your entire login session. In the initial window there are three options: Help will pop up a window with on-line help, Quit will exit, and Manual Page will pop up a window with a manual page browser in it. You may pop up more than one manual page browser window from a single execution of xman.
For further information on using xman please read the on-line help information. The rest of this manual page will discuss customization of xman.
Customlzatlon (Release 4)
xman allows customization of both the directories to be searched for manual pages, and the name that each directory will map to in the Sections menu. xman determines which directories it will search by reading the MANPATH environment variable. If no MANPATH is found then the directory is /usr/man is searched on POSIX systems. This environment is expected to be a colon-separated list of directories for xman to search.
setenv MANPATH /mit/kit/man:/usr/man
By default, xman will search each of the following directories (in each of the directories specified in the users MANPATH) for manual pages. If manual pages exist in that directory then they are added to list of manual pages for the corresponding menu item. A menu item is only displayed for those sections that actually contain manual pages.
| Directory | Section Name |
|---|---|
| man1 | (1) User Commands |
| man2 | (2) System Calls |
| man3 | (3) Subroutines |
| man4 | (4) Devices |
| man5 | (5) File Formats |
| man6 | (6)Games |
| man7 | (7) Miscellaneous |
| man8 | (8) Sys. Administration |
| manl | (l) Local |
| mann | (n) New |
| mano | (o) Old |
For instance, a user has three directories in her manual path and each contain a directory called man3. All these manual pages will appear alphabetically sorted when the user selects the menu item called (3) Subroutines. If there is no directory called mana in any of the directories in her MANPATH, or there are no manual pages in any of the directories called mano, then no menu item will be displayed for the section called (o) Old.
By using the mandesc file a user or system manager is able to more closely control which manual pages will appear in each of the sections represented by menu items in the Sections menu. This functionality is only available on a section by section basis, and individual manual pages may not be handled in this manner (Although generous use of symbolic links, ln(l), will allow almost any configuration you can imagine).
The format of the mandesc file is a character followed by a label. The character determines which of the sections will be added under this label. For instance suppose that you would like to create an extra menu item that contains all programmer subroutines. This label should contain all manual pages in both sections two and three. The mandesc file would look like this:
2Programmer Subroutines

3Programmer Subroutines
This will add a menu item to the Sections menu that would bring up a listing of all manual pages in sections two and three of the UNIX Programmer’s Manual. Since the label names are exactly the same they will be added to the same section. Note, however, that the original sections still exist.
If you want to completely ignore the default sections in a manual directory then add the line:
no default sections
anywhere in your mandesc file. This keeps xman from searching the default manual sections in that directory only. As an example, suppose you want to do the same thing as above, but you don't think that it is useful to have the System Calls or Subroutines sections any longer. You would need to duplicate the default entries, as well as adding your new one.
no default sections

1(1) User Commands

2Programmer Subroutines

3Programmer Subroutines

4(4) Devices

5(5) File Formats

6(6) Games

7(7) Miscellaneous

8(8) Sys. Administration

l(l) Local

n(n) New

o(o) Old
xman will read any section that is of the form man<character>, where <character> is an upper or lower case letter (they are treated distinctly) or a numeral (0-9). Be warned, however, that man(l) and catman(8) will not search directories that are non-standard.
Customlzation (Release 3)
xman accomodates new manual sections by the use of the environment variable MANPATH and by directory description files named mandesc. xman will search each directory specified in the environment variable MANPATH for the following subdirectories only: man0, man1, ..., man8, manl (local), and mann (new). (It usually ignores the information in man0 unless there is a mandesc file that specifically tells it not to.) These subdirectories should contain man pages. Any manual section can be renamed by an optional mandesc file.
As an example, if MANPATH was set to /usr/man:/usr/sipb/man and there was no mandesc file in /usr/man, xman would put all of the files in the default section names (e.g ., manl gets a section name of local). But if there were a mandesc file in /usr/sipb/man which contained the line ISIPB Programs, then xman would put all files in the manl subdirectory in a new section called “SIPB Programs.” xman will search the mandesc file until there are no more lines of information. This flexibility is ideal for courses that have their own manual pages.
xman creates temporary files in /tmp for all unformatted man pages and all apropos searches.
Options
xman accepts all of the standard X Toolkit command line options, as well as the following additional options:
-helpfile filename
Specifies a helpfile to use other than the default.
-bothshown |
Allows both the manual page and manual directory to be on the screen at the same time. |
-notopbox |
Starts without the top menu with the three buttons in it. |
-pagesize geometry
Sets the size and location of all the Manual Pages.
The following X Toolkit options are commonly used with xman:
-geometry geometry
Sets the size and location of the Top Menu with the three buttons in it. The top menu with the three buttons in it is created with the specified size and location determined by the supplied geometry specification. The -geometry option can be (and often is) abbreviated to -g, unless there is a conflicting option that begins with “g.” The argument to the geometry option (geometry) is referred to as a “standard geometry string,” and has the form widthxheight±xoff±yoff.
-display [host]:server[.screen]
Allows you to specify the host, server and screen on which to display the xman window. host specifies the machine, server specifies the server number, and screen specifies the screen number. For example,
xman -disp1ay your_node:0.1
specifies screen 1 of server 0 on the machine your_node. Either or both the host and screen elements to the display specification can be omitted. If host is omitted, the local machine is assumed. If screen is omitted, screen 0 is assumed (and the period is unnecessary). The colon and server are necessary in all cases.
-bw pixels or -borderwidth pixels
Specifies the width of the border for all windows in xman.
-bd color or -bordercolor color
Specifies the color of the borders of all windows in xman.
-fg color or -foreground color
Specifies the foreground color to be used.
-bg color or -background color
Specifies the background color to be used.
-fn font or -font font
Specifies the font to use for all buttons and labels.
-name name |
Specifies the name to use when retrieving resources. |
-title tit1e |
Specifies the title of this application. |
-xrm resources
Allows a resource to be specified on the command line.
Resources (Release 3 and Release 4)
The resources in this section are valid for both Release 3 and Release 4, unless otherwise indicated.
The xman program uses the following X Toolkit resources: foreground, background, width, height, borderWidth, and borderColor.
In addition, xman has application-specific resources that allow unique xman customizations.
manualFontNormal (class Font)
The font to use for normal text in the manual pages.
manualFontBold (class Font)
The font to use for bold text in the manual pages.
manualFontitalic (class Font)
The font to use for italic text in the manual pages.
directoryFontNormal (class Font)
The font to use for the directory text.
bothShown (class Boolean)
Either true or false, specifies whether or not you want both the directory and the manual page shown at start up.
directoryHeight (class DirectoryHeight)
The height in pixels of the directory, when the directory and the manual page are shown simultaneously.
topCursor (class Cursor)
The cursor to use in the top box.
The cursor to use in the help window.
manpageCursor (class Cursor)
The cursor to use in the manual page window.
searchEntryCursor (class Cursor)
The cursor to use in the search entry text widget.
pointerColor (class Foreground)
The color of all the cursors (pointers) listed above. The name was chosen to be compatible with xterm. (Available as of Release 4.)
helpFile (class File)
Use this rather than the system default helpfile.
topBox (class Boolean)
Either true or false, determines whether the top box (containing the Help, Quit and Manual Page buttons) or a manual page is put on the screen at start-up. The default is true.
verticalList (class Boolean)
Either true or false, determines whether the directory listing is vertically or horizontally organized. The default is horizontal (false).
Widgets (Release 4)
In order to specify resources, it is useful to know the hierarchy of the widgets that compose xman. In the notation below, indentation indicates hierarchical structure. The widget class name is given first, followed by the widget instance name.
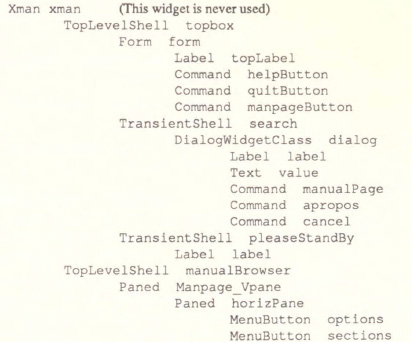
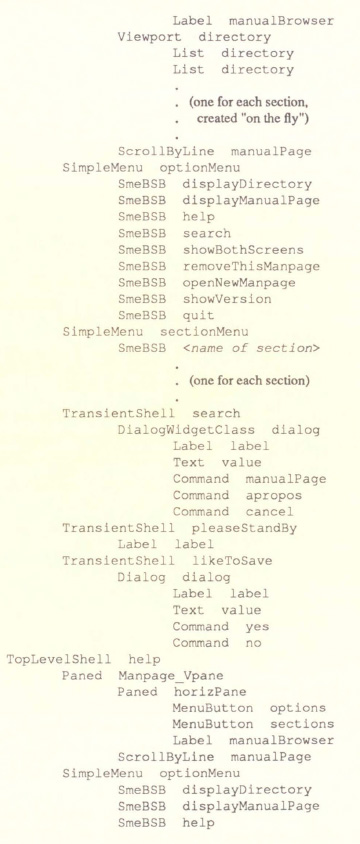
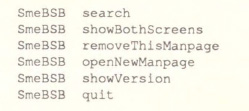
Widgets (Release 3)
In order to change the default values for widget resources you need to know widget names. Below are the names of some of the most common widgets. You can also reference widgets by class. The most common classes are Label, Cormnand, and Text.
topBox |
The top menu. |
help |
The help window. |
manualBrowser
The manual page display window.
xmanCommands
The manual page command popup menu.
xmanSections
The manual page section popup menu.
xmanSearch |
The manual page search popup menu. |
Here are a few examples of how to string all this information together into a resource specification that can be used on the command line with the -xrm flag, or added to an .Xresources or other resource file.
xman*Command.foreground: blue
All command buttons will be blue.
xman*topBox*foreground: blue
Everything in the top menu has a blue foreground.
xman*Text.border: red
All text widgets have a red border.
xman*Label.font: 9x15
All label buttons have a 9x15 font.
Global Actions (Release 4)
xman defines all user interaction through global actions. This allows the user to modify the translation table of any widget, and bind any event to the new user action. The list of actions supported by xman are:
GotoPage (page)
When used in a manual page display window, this action allows the user to move between a directory and manual page display. The page argument can be either Directory or ManualPage.
Quit() |
Can be used anywhere; exits xman. |
Search (type, action)
Only useful when used in a search popup, this action will cause the search widget to perform the named search type on the string in the search popup’s value widget. This action will also pop down the search widget. The type argument can be either Apropos, Manpage or Cancel. If an action of Open is specified then xman will open a new manual page to display the results of the search, otherwise xman will attempt to display the results in the parent of the search popup.
PopupHelp () |
Can be used anywhere; pops up the help widget. |
PopupSearch ()
Can be used anywhere, except in a help window. It will cause the search popup to become active and visible on the screen, allowing the user search for a manual page.
CreateNewManpage()
Can be used anywhere; creates a new manual page display window.
RemoveThisManpage()
Can be used in any manual page or help display window. When called it will remove the window, and clean up all resources associated with it.
SaveFormattedPage (action)
Can only be used in the likeToSave popup widget, and tells xman whether to Save or Cancel a save of the manual page that has just been formatted.
ShowVersion ()
May be called from any manual page or help display window, and will cause the informational display line to show the current version of xman.
Flies
<manpath directory>/man<character>
<manpath directory>/cat<character>
<manpath directory>/mandesc
/usr/lib/X11/app-defaults/Xman -specifies required resources (as of Release 4)
/tmp xman creates temporary files in /tmp for all unformatted man pages and all apropos searches.
Environment Variables
MANPATH
The search path for manual pages. Directories are separated by colons (e.g., /usr/man:/mit/kit/man:/foo/bar/man).
XAPPLRESDIR
A string that will have “Xman”, appended to it. This string will be the full path name of a user app-defaults file to be merged into the resource database after the system app-defaults file, and before the resources that are attached to the display. (Available as of Release 4.)
Bugs In Release 3
The -fn and -font options only specify the fonts for the command button and not the text of the manpages or directories.
Protocol error upon selecting Remove This Manpage.
See Also
X, apropos(1), catman(8), man(1), Athena Widget set
Authors
Chris Peterson, MIT X Consortium from the V10 version written by Barry Shein formerly of Boston University.
xmh
X Interface to mh (Release 4) –
Name
xmh- X window interface to the mh message handling system.
Syntax
xmh [-path mailpath] [-initial foldername] [-flag] [-toolkitoption]
Description
This reference page describes the Release 4 version of xmh, a window-oriented user interface to the Rand mh Message Handling System. The Release 3 version is described in the next reference page in this guide.
To actually do things with your mail, xmh makes calls to the mh package. Electronic mail messages may be composed, sent, received, replied to, forwarded, sorted, and stored in folders.
Please don’t be misled by the size of this document. It introduces many aspects of the Athena Widget Set, and provides extensive mechanism for customization of the user interface. xmh really is easy to use.
Options
xmh accepts all of the standard X Toolkit command line options, as well as the following:
-path mailpath
To specify an alternate collection of mail folders in which to process mail, use -path followed by the pathname of the alternate mail directory. The default mail path is the value of the Path component in $HOME/.mh_profile, or $HOME/Mail if the MH Path is not given.
-initial foldername
Specifies an alternate folder that may receive new mail and is initially opened by xmh. The default initial folder is ‘in box’.
-flag |
Causes xmh to attempt to change the appearance of its icon when new mail arrives. |
These three options have corresponding application-specific resources, named MailPath, InitialFolder, and MailWaitingFlag, which can be used in a resource file.
See X for a list of the standard Toolkit options.
Installation
The current version of xmh requires that the user is already set up to use mh, version 6. To do so, see if there is a file called .mh _profile in your home directory. If it exists, check to see if it contains a line that starts with Current-Folder. If it does, you’ve been using version 4 or earlier of mh; to convert to version 6, you must remove that line. (Failure to do so causes spurious output to standard error, which can hang xmh depending on your setup.)
If you do not already have a .mh _profile, you can create one (and everything else you need) by typing inc to the shell. You should do this before using xmh to incorporate new mail.
For more information, refer to the mh(1) documentation.
Basic Screen Layout
xmh starts out with a single window, divided into four main areas: Six buttons with pull-down command menus. A collection of buttons, one for each top level folder. New users of mh will have two folders, “drafts” and “inbox”. A listing, or Table of Contents, of the messages in the open folder. Initially, this will show the messages in “inbox”. A view of one of your messages. Initially this is blank.
xmh and the Athena Widget Set
xmh uses the X Toolkit Intrinsics and the Athena Widget Set. Many of the features described below (scrollbars, buttonboxes, etc.) are actually part of the Athena Widget Set, and are described here only for completeness. For more information, see the Athena Widget Set documentation.
Scrollbars
Some parts of the main window will have a vertical area on the left containing a grey bar. This area is a scrollbar. They are used whenever the data in a window takes up more space than can be displayed. The grey bar indicates what portion of your data is visible. Thus, if the entire length of the area is grey, then you are looking at all your data. If only the first half is grey, then you are looking at the top half of your data. The message viewing area will have a horizontal scrollbar if the text of the message is wider than the viewing area.
You can use the pointer in the scrollbar to change what part of the data is visible. If you click with the middle button, then the top of the grey area will move to where the pointer is, and the corresponding portion of data will be displayed. If you hold down the middle button, you can drag around the grey area. This makes it easy to get to the top of the data: just press with the middle, drag off the top of the scroll bar, and release.
If you click with button 1, then the data to the right of the pointer will scroll to the top of the window. If you click with pointer button 3, then the data at the top of the window will scroll down to where the pointer is.
Buttonboxes, Buttons, and Menus
Any area containing many words or short phrases, each enclosed in a rectangle or rounded boundary, is called a buttonbox. Each rectangle or rounded area is actually a button that you can press by moving the pointer onto it and pressing pointer button 1. If a given buttonbox has more buttons in it than can fit, it will be displayed with a scrollbar, so you can always scroll to the button you want.
Some buttons have pull-down menus. Pressing the pointer button while the pointer is over one of these buttons will pull down a menu. Holding the button down while moving the pointer over the menu, called dragging the pointer, will highlight each selectable item on the menu as the pointer passes over it. To select an item in the menu, release the pointer button while the item is highlighted.
Adjusting the Relative Sizes of Areas
If you’re not satisfied with the sizes of the various areas of the main window, they can easily be changed. Near the right edge of the border between each region is a black box, called a grip. Simply point to that grip with the pointer, press a pointer button, drag up or down, and release. Exactly what happens depends on which pointer button you press.
If you drag with the middle button, then only that border will move. This mode is simplest to understand, but is the least useful.
If you drag with pointer button 1, then you are adjusting the size of the window above. xmh will attempt to compensate by adjusting some window below it
If you drag with pointer button 3, then you are adjusting the size of the window below. xmh will attempt to compensate by adjusting some window above it.
All windows have a minimum and maximum size; you will never be allowed to move a border past the point where it would make a window have an invalid size.
Processing Your Mall
This section will define the concepts of the selected folder, current folder, selected message(s), current message, selected sequence, and current sequence. Each xmh command is introduced.
For use in customization, action procedures corresponding to each command are given; these action procedures can be used to customize the user interface, particularly the keyboard accelerators and the functionality of the buttons in the optional button box created by the application resource CommandButtonCount.
Selected Folder
A folder contains a collection of mail messages, or is empty.
The selected folder is whichever foldername appears in the bar above the folder buttons. Note that this is not necessarily the same folder that is being viewed. To change the selected folder, just press on the desired folder button; if that folder has subfolders, select a folder from the pull down menu.
The Table of Contents, or toe, lists the messages in the viewed folder. The title bar above the Table of Contents displays the name of the viewed folder.
The toc title bar also displays the name of the viewed sequence of messages within the viewed folder. Every folder has an “all” sequence, which contains all the messages in the folder, and initially the toc title bar will show “inbox:all”.
Folder Commands
The Folder command menu contains commands of a global nature:
| Open Folder | Displays the data in the selected folder. Thus, the selected folder also becomes the viewed folder. The action procedure corresponding to this command is XmhOpenFolder([foldername]). It takes an optional argument as the name of a folder to select and open; if no folder is specified, the selected folder is opened. It may be specified as part of an event translation from a folder menu button or from a folder menu, or as a binding of a keyboard accelerator to any widget other than the folder menu buttons or the folder menus. |
Displays the selected folder in an additional main window. Note, however, that you may not reliably display the same folder in more than one window at a time, although xmh will not prevent you from trying. The corresponding action is XmhOpenFolderinNewWindow().
| Create Folder | Creates a new folder. You will be prompted for a name for the new folder, to enter the name, move the pointer to the blank box provided and type. Sub-folders are created by specifying the parent folder, a slash, and the subfolder name. For example, to create a folder named “xmh” which is a subfolder of an existing folder named “clients”, type “clients/xmh”. Click on the Okay button when finished, or just press Return; click on Cancel to cancel this operation. The action corresponding to Create Folder is XmhCreateFolder(). |
| Delete Folder | Destroys the selected folder. You will be asked to confirm this action (see “Confirmation Windows”). Destroying a folder will also destroy any subfolders of that folder. The corresponding action is XmhDeleteFolder(). |
| Close Window | Exits xmh, after first confirming that you won’t lose any changes; or, if selected from any additional xmh window, simply closes that window. The corresponding action is XmhClose(). |
Highlighted and Selected Messages and the Current Message
It is possible to highlight a set of adjacent messages in the area of the Table of Contents. To highlight a message, click on it with pointer button 1. To highlight a range of messages, click on the first one with pointer button 1 and on the last one with pointer button 3; or press pointer button 1, drag, and release. To extend a range of selected messages, use pointer button 3. To highlight all messages in the table of contents, click rapidly three times with pointer button 1. To cancel any selection in the table of contents, click rapidly twice.
The selected messages are the same as the highlighted messages, if any. If no messages are highlighted, then the selected messages are considered the same as the current message.
The current message is indicated by a ‘+’ next to the message number. It usually corresponds to the message currently being viewed. When a message is viewed, the title bar above the view will identify the message.
Table of Contents Commands
The Table of Contents command menu contains commands which operate on the open, or viewed folder.
Incorporate New Mail
Adds any new mail received to your inbox folder, and set the current message to be the first new message. (This command is selectable only if “inbox” is the folder being viewed.) The corresponding action is XmhIncorporateNewMail().
Executes all deletions, moves, and copies that have been marked in this folder. The corresponding action is xmhCommitChanges().
| Pack Folder | Renumbers the messages in this folder so they start with 1 and increment by 1. The corresponding action is xmhPackFolder(). |
| Sort Folder | Sorts the messages in this folder in chronological order. As a side effect, this also packs the folder. The corresponding action is xmhSortFolder(). |
| Rescan Folder | Rebuilds the list of messages. This can be used whenever you suspect that xmh’s idea of what messages you have is wrong. (In particular, this is necessary if you change things using straight mh commands without using xmh.) The corresponding action is XmhForceRescan(). |
Message Commands
The Message command menu contains commands that operate on the selected message(s), or if there are no selected messages, the current message.
Compose Message
Composes a new message. A new window will be brought up for composition; a description of it is given in the Composition Windows section below. This command does not affect the current message. The corresponding action is xmhComposeMessage().
View Next Message
Views the first selected message. If no messages are highlighted, view the current message. If current message is already being viewed, view the first unmarked message after the current message. The corresponding action is XmhViewNextMessage().
View in New Window
Creates a new window containing only a view of the first selected message, or the current message, if none are highlighted. The corresponding action is XmhViewInNewWindow().
| Reply | Creates a composition window in reply to the first selected message, or the current message, if none are highlighted. The corresponding action is XmhReply(). |
| Forward | Creates a composition window whose body is initialized to be the contents of the selected messages, or the current message if none are highlighted. The corresponding action is XmhForward(). |
Use as Composition
Creates a composition window whose body is initialized to be the contents of the first selected message, or the current message if none are selected. Any changes you make in the composition will be saved in a new message in the “drafts” folder, and will not change the original message. However, this command was designed to be used within the “drafts” folder to compose message drafts, and there is an exception to this rule. If the message to be used as composition was selected from the “drafts” folder, the changes will be reflected in the original message (see “Composition Windows”). The action procedure corresponding to this command is XmhUseAsComposition().
Prints the selected messages, or the current message if none are selected. xmh normally prints by invoking the enscript(1) command, but this can be customized with the application-specific resource PrintCommand. The action procedure corresponding to this command is XmhPrint(). |
Sequence Commands
The Sequence command menu contains commands pertaining to message sequences (See “Message-Sequences”), and a list of the message-sequences defined for the currently viewed folder. The selected message-sequence is indicated by a check mark in its entry in the margin of the menu. To change the selected message-sequence, select a new message-sequence from the sequence menu.
| Pick Messages | Defines a new message-sequence. The corresponding action is XmhPickMessages(). |
The following menu entries will be sensitive only if the current folder has any message-sequences other than the “all” message-sequence.
| Open Sequence | Changes the viewed sequence to be the same as the selected sequence. The corresponding action is XmhOpenSequence(). |
Adds the selected messages to the selected sequence. The corresponding action is XmhAddToSequence().
Remove from Sequence
Removes the selected messages from the selected sequence. The corresponding action is XmhRemoveFromSequence().
Delete Sequence
Removes the selected sequence entirely. The messages themselves are not affected; they simply are no longer grouped together to define a message-sequence. The corresponding action is XmhDeleteSequence().
View Commands
Commands in the View menu and in the buttonboxes of view windows (which result from the Message command View in New Window) correspond in functionality to commands of the same name in the Message menu, but they operate on the viewed message rather than the selected messages or current message.
| Close Window | When the viewed message is in a separate view window, this command will close the view, after confirming the status of any unsaved edits. The corresponding action procedure is XmhCloseView(). |
| Reply | Creates a composition window in reply to the viewed message. The related action procedure is XmhViewReply(). |
| Forward | Creates a composition window whose body is initialized to be the contents of the viewed message. The corresponding action is XmhViewForward(). |
Use As Composition
Creates a composition window whose body is initialized to be the contents of the viewed message. Any changes made in the composition window will be saved in a new message in the “drafts” folder, and will not change the original message. An exception: if the viewed message was selected from the “drafts” folder, the original message is edited. The action procedure corresponding to this command is XmhViewUseAsComposition().
| Edit Message | Enables the direct editing of the viewed message. The action procedure is XmhEditView(). |
| Save Message | This command is insensitive until the message has been edited; when activated, edits will be saved to the original message in the view. The corresponding action is XmhSaveView(). |
Prints the viewed message. xmh prints by invoking the enscript(1) command, but this can be customized with the application-specific resource Print-Command. The corresponding action procedure is XmhPrintView(). |
Options Menu
The Options menu contains one entry.
Composition Windows
Aside from the normal text editing functions, there are six command buttons associated with composition windows:
| Close Window | Closes this composition window. If changes have been made since the most recent Save or Send, you will be asked to confirm losing them. The corresponding action is xmhCloseView(). |
| Send | Sends this composition. The corresponding action is XmhSend(). |
| New Headers | Replaces the current composition with an empty message. If changes have been made since the most recent Send or Save, you will be asked to confirm losing them. The corresponding action is XmhResetCompose(). |
Compose Message
Brings up another new composition window. The corresponding action is xmhComposeMessage().
| Save Message | Saves this composition in your drafts folder. Then you can safely close the composition. At some future date, you can continue working on the composition by opening the drafts folder, selecting the message, and using the Use as Composition command. The corresponding action is XmhSave(). |
| Insert | Inserts a related message into the composition. If the composition window was created with a Reply command, the related message is the message being replied to, otherwise no related message is defined and this button is insensitive. The message may be filtered before being inserted; see ReplyInsertFilter under “Application-specific Resources” for more information. The corresponding action is XmhInsert(). |
Accelerators
Accelerators are shortcuts. They allow you to invoke commands without using the menus, either from the keyboard or by using the pointer.
xmh defines pointer accelerators for common actions: To select and view a message with a single click, use pointer button 2 on the message’s entry in the table of contents. To select and open a folder or a sequence in a single action, make the folder or sequence selection with pointer button 2.
To mark the highlighted messages to be moved in a single action, or current message if none have been highlighted, use pointer button 3 to select the target folder. Similarly, selecting a sequence with pointer button 3 will add the highlighted or current message(s) to that sequence.
In both of these operations, the selected folder or sequence and the viewed folder or sequence are not changed.
xmh defines the following keyboard accelerators over the surface of the main window, except in the view area while editing a message:
| Meta-I | Incorporate new mail. |
| Meta-C | Commit changes. |
| Meta-R | Rescan folder. |
| Meta-P | Pack folder. |
| Meta-S | Sort folder. |
| Meta-space | View next message. |
| Meta-c | Mark copy. |
| Meta-d | Mark deleted. |
| Meta-f | Forward the selected or current message. |
| Meta-m | Mark move. |
| Meta-n | View next message. |
| Meta-p | View previous message. |
| Meta-r | Reply to the selected or current message. |
| Meta-u | Unmark. |
| Centrol-V | Scroll the table of contents forward. |
| Meta-V | Scroll the table of contents backward. |
| Control-v | Scroll the view forward. |
| Meta-v | Scroll the view backward. |
Text Editing Commands
All of the text editing commands are actually defined by the Text widget in the Athena Widget Set. The commands may be bound to different keys than the defaults described below through the X Toolkit Intrinsics key re-binding mechanisms. See the X Toolkit Intrinsics and the Athena Widget Set documentation for more details.
Whenever you are asked to enter any text, you will be using a standard text editing interface. Various control and meta keystroke combinations are bound to a somewhat Emacs-like set of commands. In addition, the pointer buttons may be used to select a portion of text or to move the insertion point in the text. Pressing pointer button 1 causes the insertion point to move to the pointer. Double-clicking button 1 selects a word, triple-clicking selects a line, quadruple-clicking selects a paragraph, and clicking rapidly five times selects everything. Any selection may be extended in either direction by using pointer button 3.
In the following, a line refers to one displayed row of characters in the window. A paragraph refers to the text between carriage returns. Text within a paragraph is broken into lines for display based on the current width of the window. When a message is sent, text is broken into lines based upon the values of the SendBreakWidth and SendWidth application-specific resources.
The following keystroke combinations are defined:
Meta-Shift Backspace
Kill previous word.
In addition, the pointer may be used to cut and paste text:
| Button 1 Down | Start selection. |
| Button 1 Motion | Adjust selection. |
| Button 1 Up | End selection (cut). |
| Button 2 Down | Insert current selection (paste). |
| Button 3 Down | Extend current selection. |
| Button 3 Motion | Adjust selection. |
| Button 3 Up | End selection (cut). |
Confirmation Dialog Boxes
Whenever you press a button that may cause you to lose some work or is otherwise dangerous, a popup dialog box will appear asking you to confirm the action. This window will contain an Abort or No button and a Confirm or Yes button. Pressing the No button cancels the operation, and pressing the Yes will proceed with the operation.
Some dialog boxes contain messages from mh. Clicking on the message field will cause the dialog box to resize so that you can read the entire message.
Message-Sequences
An mh message sequence is just a set of messages associated with some name. They are local to a particular folder; two different folders can have sequences with the same name. In all folders. the sequence “all” is predefined; it consists of the set of all messages in that folder. As many as nine sequences may be defined for each folder, including the predefined “all” sequence. (The sequence “cur” is also usually defined for every folder; it consists of only the current message. xmh hides “cur” from the user, instead placing a “+” by the current message. Also, xmh does not support the “unseen” sequence, so that one is also hidden from the user.)
The message sequences for a folder (including one for “all”) are displayed in the Sequence menu, below the sequence commands. The table of contents (also known as the “toc”) is at any one time displaying one message sequence. This is called the “viewed sequence'', and its name will be displayed in the toc title bar just after the folder name. Also, at any time one of the sequences in the menu will have a check mark next to it. This is called the “selected sequence”. Note that the viewed sequence and the selected sequence are not necessarily the same. (This all pretty much corresponds to the way the folders work.)
The Open Sequence, Add to Sequence, Remove from Sequence, and Delete Sequence commands are active only if the viewed folder contains message-sequences.
Note that none of the above actually affect whether a message is in the folder. Remember that a sequence is a set of messages within the folder, the above operations just affect what messages are in that set.
To create a new sequence, select the Pick menu entry. A new window will appear, with lots of places to enter text Basically, you can describe the sequence’s initial set of messages based on characteristics of the message. Thus, you can define a sequence to be all the messages that were from a particular person, or with a particular subject, and so on. You can also connect things up with boolean operators, so you can select all things from “weissman” with the subject “xmh”.
Hopefully, the layout is fairly obvious. The simplest cases are the easiest: just point to the proper field and type. If you enter in more than one field, it will only select messages which match all non-empty fields.
The more complicated cases arise when you want things that match one field or another one, but not necessarily both. That’s what all the “or” buttons are for. If you want all things with the subject “xmh” or “xterm”, just press the “or” button next to the “Subject:” field. Another box will appear where you can enter another subject.
If you want all things either from “weissman” or with subject “xmh”, but not necessarily both, select the “-Or-” button. This will essentially double the size of the form. You can then enter “weissman” in a from: box on the top half, and “xmh” in a subject: box on the lower part.
If you select the Skip button, then only those messages that don’t match the fields on that row are included.
Finally, in the bottom part of the window will appear several more boxes. One is the name of the sequence you’re defining. (It defaults to the name of the selected sequence when Pick was pressed, or to “temp” if “all” was the selected sequence.) Another box defines which sequence to look through for potential members of this sequence; it defaults to the viewed sequence when Pick was pressed.
Two more boxes define a date range; only messages within that date range will be considered. These dates must be entered in 822-style format: each date is of the form “dd mmm yy hh:mm:ss zzz’’, where dd is a one or two digit day of the month, mmm is the three-letter abbreviation for a month, and yy is a year. The remaining fields are optional: hh, mm, and ss specify a time of day, and zzz selects a time zone. Note that if the time is left out, it defaults to midnight; thus if you select a range of “7 nov 86” - “8 nov 86”, you will only get messages from the 7th, as all messages on the 8th will have arrived after midnight
Date field specifies which date field in the header to look at for this date range; it probably won’t be useful to anyone. If the sequence you’re defining already exists, you can optionally merge the old set with the new; that’s what the Yes and No buttons are all about. Finally, you can OK the whole thing, or Cancel it.
In general, most people will rarely use these features. However, it’s nice to occasionally use Pick to find some messages, look through them, and then hit Delete Sequence to put things back in their original state.
Widget Hierarchy
In order to specify resources, it is useful to know the hierarchy of widgets which compose xmh. In the notation below, indentation indicates hierarchical structure. The widget class name is given first, followed by the widget instance name. The application class name is xmh.
The hierarchy of the main toc and view window is identical for additional toc and view windows, except that a topLevelShell widget is inserted in the hierarchy between the application shell and the Paned widget.

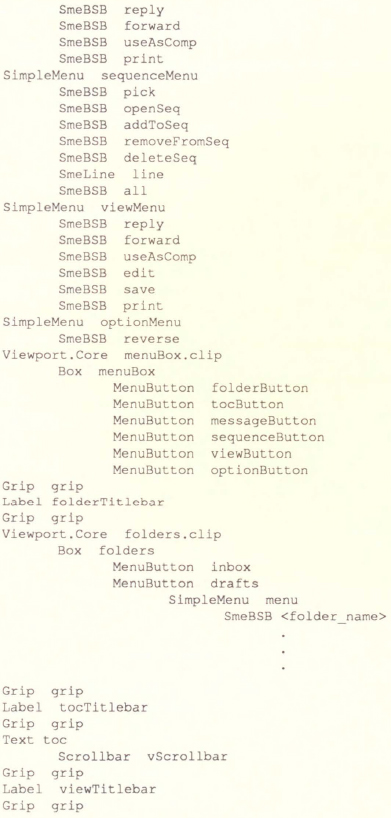
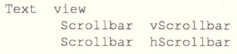
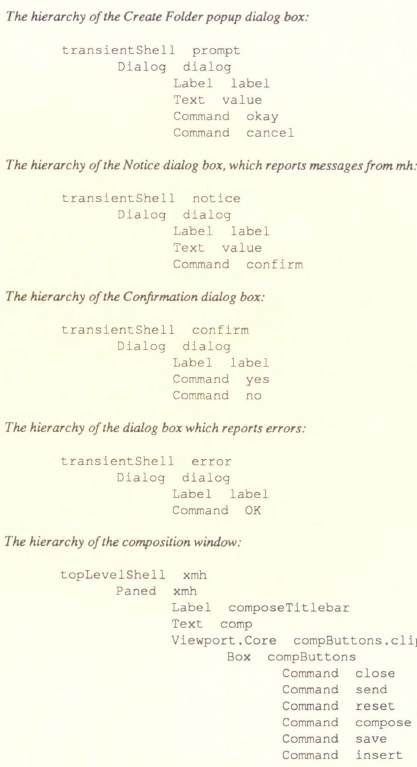
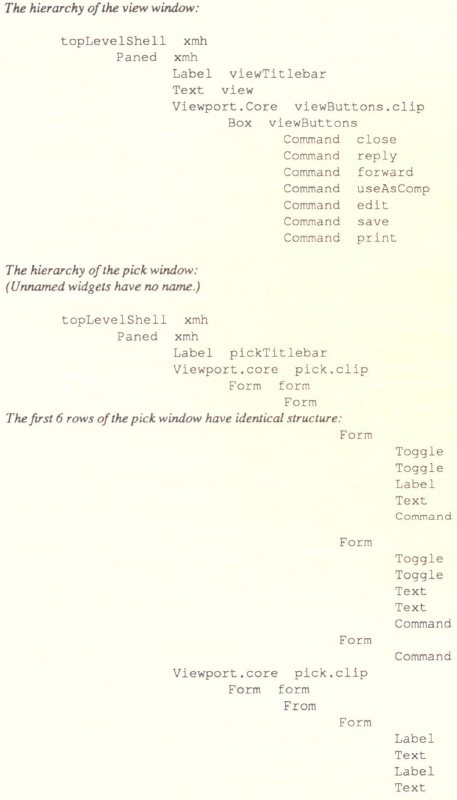
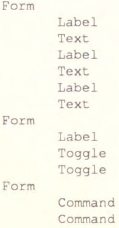
Applicatlon-specific Resources
Resource instance names begin with a lower case letter but are otherwise identical to the class name.
If TocGeometry, ViewGeometry, CompGeometry, or PickGeometry are not specified, then the value of Geometry is used instead. If the resulting height is not specified (e.g., “”, “=500”, “+0-0”), then the default height of windows is calculated from fonts and line counts. If the width is not specified (e.g.,“”, “=x300”, “-0+0), then half of the display width is used. If unspecified, the height of a pick window defaults to half the height of the display.
Any of these options may also be specified on the command line by using the X Toolkit Intrinsics resource specification mechanism. Thus, to run xmh showing all message headers,
% xmh. -xrm' *HideBoringHeaders :off'
The following resources are defined:
Banner |
A short string that is the default label of the folder, Table of Contents, and view. The default is:
xmh MIT X Consortium R4
|
BlockEventsOnBusy
Whether to disallow user input and show a busy cursor while xmh is busy processing a command. Default is true.
BusyCursor |
The name of the symbol used to represent the position of the pointer, displayed if BlockEventsOnBusy is true, when xmh is processing a time-consuming command. The default is watch. |
BusyPointerColor
The foreground color of the busy cursor. Default is XtDefault-Foreground.
How often to check for new mail, make checkpoints, and rescan the Table of Contents, in minutes. If CheckNewMail is true, xmh checks to see if you have new mail each interval. If MakeCheckpoints is true, checkpoints are made every fifth interval. Also every fifth interval, the Table of Contents is checked for inconsistencies with the file system, and rescanned. To prevent all of these checks from occurring, set CheckFrequency to 0. The default is 1.
CheckNewMail
If true, xmh will check at regular intervals to see if new mail has arrived for any of the folders. A visual indication will be given if new mail is waiting to be retrieved. Default is True. (See “Bugs”). The interval can be adjusted with the CheckFrequency.
CommandButtonCount
The number of command buttons to create in a button box in between the toc and the view areas of the main window. xmh will create these buttons with the names button1, button2 and so on, in a box with the name commandBox. The user can specify labels and actions for the buttons in a private resource file; see the section on “Actions”. The default is 0.
CompGeometry
Initial geometry for windows containing compositions.
Cursor |
The name of the symbol used to represent the pointer. Default is left_ptr. |
DraftsFolder
The folder used for message drafts. Default is drafts.
Geometry |
Default geometry to use. Default is none. |
HideBoringHeaders
If “on”, then xmh will attempt to skip uninteresting header lines within messages by scrolling them off. Default is on.
InitialFolder
Which folder to display on startup. Can also be set with the command-line option -initial. Default is inbox.
InitialIncFile
The file name of your incoming mail drop. xmh tries to construct a filename for the inc -file command, but in some installations (e.g., those using the Post Office Protocol) no file is appropriate. In this case, InitialIncFile should be specified as the empty string, and inc will be invoked without a -file argument. The default is to use the value of the environment variable MAIL, or if that is not set, to append the value of the environment variable USER to /usr/spool/mail/.
MailPath |
The full path prefix for locating your mail folders. May also be set with the command-line option, -path. The default is the Path component in $HOME/.mh_profile, or $HOME/Mail if none. |
MailWaitingFlag
If true, xmh will attempt to set an indication in its icon when new mail is waiting to be retrieved. If this option is true, then CheckNewMail is assumed to be true as well. The -flag command line option is a quick way to turn MailWaitingFlag on.
MakeCheckpoints
If true, xmh will attempt to save checkpoints of volatile information. The frequency of checkpointing is controlled by the resource CheckFrequency.
MhPath |
What directory in which to find the mh commands. If a command isn’t found here, then the directories in the user’s path are searched. Default is /usr/local/mh6. |
PickGeometry
Initial geometry for pick windows.
PointerColor
The foreground color of the pointer. Default is XtDefaultForeground.
PrefixWmAndIconName
Whether to prefix the window and icon name with “xmh: “. Default is true.
PrintCommand
What sh command to execute to print a message. Note that standard output and standard error must be specifically redirected! If a message or range of messages is selected for printing, the full file paths of each message file is appended to the specified print command. The default is “enscript>/dev/null2>/dev/null”.
ReplyInsertFilter
A shell command to be executed when the Insert button is activated in a composition window. The full path and filename of the source message is added to the end of the command before being passed to sh(1). The default filter is cat; i.e., it inserts the entire message into the composition. Interesting filters are: awk -e •{print“ “$0}’ or <mh directory>/lib/mhl -form mhl.body.
ReverseReadOrder
When true, the next message will be the message prior to the current message in the table of contents, and the previous message will be the message after the current message in the table of contents. The default is false.
SendBreakWidth
When a message is sent from xmh, lines longer than this value will be split into multiple lines, each of which is no longer than SendWidth. This value may be overridden for a single message by inserting an additional line in the message header of the form SendBreakWidth: value. This line will be removed from the header before the message is sent. The default is 85.
SendWidth |
When a message is sent from xmh, lines longer than SendBreakwidth characters will be split into multiple lines, each of which is no longer than this value. This value may be overridden for a single message by inserting an additional line in the message header of the form SendWidth: value. This line will be removed from the header before the message is sent The default is 72. |
SkipCopied |
Whether to skip over messages marked for copying when using View Next Message and View Previous Message. Default is true. |
SkipDeleted |
Whether to skip over messages marked for deletion when using View Next Message and View Previous Message. Default is true. |
SkipMoved |
Whether to skip over messages marked for moving to other folders when using View Next Message and View Previous Message. Default is true. |
StickyMenu |
If true, when popup command menus arc used, the most recently selected entry will be under the cursor when the menu pops up. Default is false. See the file clients/xmh/Xmh.sample for an example of how to specify resources for pop up command menus. |
TempDir |
Directory for xmh to store temporary directories. For privacy, a user might want to change this to a private directory. Default is /tmp. |
TocGeometry |
Initial geometry for master xmh windows. |
TocPercentage
The percentage of the main window that is used to display the Table of Contents. Default is 33.
TocWidth |
How many characters to generate for each message in a folder’s table of contents. Default is 100. Use 80 if you plan to use mhl a lot, because it will be faster, and the extra 20 characters may not be useful. |
ViewGeometry
Initial geometry for windows showing only a view of a message.
Actions
Because xmh provides action procedures which correspond to command functionality and installs accelerators, users can customize accelerators in a private resource file. xmh provides action procedures which correspond to entries in the command menus; these are given in the sections describing menu commmands. For examples of specifying customized resources, see the file clients/xmh/Xmh.sample. Unpredictable results can occur if actions are bound to events or widgets for which they were not designed.
In addition to the actions corresponding to commands, these action routines are defined:
XmhPushFolder([foldername, ... ])
Pushes each of its argument(s) onto a stack of foldernames. If no arguments are given, the selected folder is pushed onto the stack.
XmhPopFolder()
Pops one foldername from the stack and sets the selected folder.
XmhPopupFolderMenu()
Should always be taken when the user selects a folder button. A folder button represents a folder and zero or more subfolders. The menu of subfolders is built upon the first reference, by this routine. If there are no subfolders, this routine will mark the folder as having no subfolders, and no menu will be built. In that case the menu button emulates a toggle button. When subfolders exist, the menu will popup, using the menu button action PopupMenu().
XmhSetCurrentFolder()
Allows menu buttons to emulate toggle buttons in the function of selecting a folder. This action is for menu button widgets only, and sets the selected folder.
XmhLeaveFolderButton()
Insures that the menu button behaves properly when the user moves the pointer out of the menu button window.
XmhPushSequence([sequencename, ... ])
Pushes each of its arguments onto the stack of sequence names. If no arguments are given, the selected sequence is pushed onto the stack.
XmhPopSequence()
Pops one sequence name from the stack of sequence names, which then becomes the selected sequence.
XmhPromptOkayAction()
Equivalent to pressing the okay button in the Create Folder popup.
XmhCancelPick()
Equivalent to pressing the cancel button in the pick window.
Customization Using mh
The initial text displayed in a composition window is generated by executing the corresponding mh command; i.e., comp, repl, or forw, and therefore message components may be customized as specified for those commands. comp is executed only once per invocation of xmh and the message template is re-used for each successive new composition.
Files
-/Mail
-/.mh_profile - mh profile
/usr/local/mh6 - mh commands
-/Mail/<folder>/.xmhcache -scan folder
-/Mail/<folder>/.mh_sequences -sequence definitions
/tmp - temporary files
See Also
X, xrdb, mh(1), enscript(1); Athena Widget Set; Volume Four, X Toolkit Intrinsics Programming Manual; Volume Five, X Toolkit Intrinsics Reference Manual
Bugs
Printing support is minimal.
Should handle the “unseen” message-sequence.
Should determine by itself if the user hasn’t used mh before, and offer to create the .mh_profile, instead of hanging on inc.
Still a few commands missing (rename folder, remail message).
A bug in mh limits the the number of characters in .mh _sequences to BUFSIZ. When the limit is reached, the .mh_sequences file often becomes corrupted, and sequence definitions may be lost.
Except for the icon, there isn’t an indication that you have new mail.
There should be a resource, ShowOnInc, which when true, would show the current message in the view after incorporating new mail.
The CheckFrequency resource should be split into two separate resources.
WM_SAVE_YOURSELF protocol is ignored.
WM_DELETE_WINDOW protocol doesn’t work right when requesting deletion of the first toc and view, while trying to keep other xmh windows around.
Doesn’t support annotations when replying to messages.
Copyright
Copyright 1988, 1989, Digital Equipment Corporation.
Copyright 1989, Massachusetts Institute of Technology
See X for a full statement of rights and permissions.
Author
Terry Weissman, Digital Western Research Laboratory;
Modified by Donna Converse, MIT X Consortium.
xmh
X Interface to mh (Release 3)–
Name
xmh- X window interface to the mh message handling system.
Syntax
xmh [-path mailpath] (-initial foldername] [-flag] [-toolkitoption]
Description
This reference page describes the Release 3 version of xmh, a window-oriented user interface to the mh message handling system. The Release 4 version is described on the preceding reference page in this guide.
xmh consists of user-interface code only. To actually do things with your mail, it makes calls to the mh package.
Please don’t be misled by the size of this document. xmh really is easy to use!
Options
xmh accepts all of the standard X Toolkit command line options, as well as the following:
-path mailpath
To specify an alternate collection of mail folders in which to process mail, use -path followed by the pathname of the alternate mail directory. The default mail path is the value of the Path component in $HOME/.mh_profile, or $HOME/Mail if the MH Path is not given.
-initial foldername
Specifies an alternate folder that may receive new mail and is initially opened by xmh. The default initial folder is ‘inbox’.
-flag |
Causes xmh to attempt to change the appearance of its icon when new mail arrives. |
These three options have corresponding application-specific resources, named MailPath, InitialFolder, and MailWaitingFlag, which can be used in a resource file.
See X for a list of the standard Toolkit options.
Installation
The current version of xmh requires that the user is already set up to use mh, Version 6. To do so, see if there is a file called .mh_profile in your home directory. If it exists, check to see if it contains a line that starts with Current-Folder. If it does, then you’ve been using version 4 or earlier of mh; to convert to version 6, you must remove that line. (Failure to do so causes spurious output to standard error, which can hang xmh depending on your setup.)
If you do not already have a .mh_profile, you can create one (and everything else you need) by typing inc to the shell.
For more information, refer to the mh(1) documentation.
Running xmh
Run xmh as you would any other X application (e.g., xterm). It will accept a command-line display (of the form -display [host]:server[.screen] the default display is specified in the environment variable DISPLAY.
The rest of this document will probably be rather hard to follow without actually running xmh and seeing the things being described.
Basic Screen Layout
xmh starts out with a single screen. There will be 6 or 7 areas on the screen:
• A list of your folders. (New users of mh will see only “inbox” here.)
• A list of the global and folder-oriented commands.
• A list of the messages in one of your folders (initially, this will show the messages in “inbox”).
• A list of the message-oriented commands.
• A view of one of your messages. (Initially this is blank.)
• A list of commands for the message being viewed.
And, there will possibly be:
• A list of message-sequences defined for this folder. This appears just below the list of messages in this folder. (Message-sequences are discussed below; if you don’t know what they are, then you won’t have any.)
xmh and the Toolkit
xmh uses the X Toolkit. Many of the features described below (scrollbars, buttonboxes, etc.) are actually part of the Toolkit, and are described here only for completeness. For more information, see the Toolkit documentation.
Scrollbars
Some parts of the screen will have a vertical area on the left containing a grey bar. This area is a scrollbar. They are used whenever the data in a window takes up more space than can be displayed. The grey bar indicates what portion of your data is visible. Thus, if the. entire length of the area is grey, then you are looking at all your data. If only the first half is grey, then you are looking at the top half of your data.
You can use the pointer in the scrollbar to change what part of the data is visible. If you click with the middle button, then the top of the grey area will move to where the pointer is, and the corresponding portion of data will be displayed. If you hold down the middle button, you can drag around the grey area. This makes it easy to get to the top of the data: just press with the middle, drag off the top of the scrollbar, and release.
If you click with button 1, then the data to the right of the pointer will scroll to the top of the window. If you click with pointer button 3, then the data at the top of the window will scroll down to where the pointer is.
Buttonboxes
Any area consisting of many words or short phrases, each enclosed in a box, is called a buttonbox. Each box is actually a button that you can press by moving the pointer onto it and pressing pointer button 1. If a given buttonbox has more buttons in it than can fit, it will be displayed with a scrollbar, so you can always scroll to the button you want.
Adjusting the Relative Sizes of Areas on the Screen
If you’re not satisfied with the size of the various areas on the screen, they can easily be changed. Near the right edge of the border between each region is a black box, called a grip. Simply point to that grip with the pointer, press a pointer button, drag up or down, and release. Exactly what happens depends on which pointer button you press.
If you drag with the middle button, then only that border will move. This mode is simplest to understand, but is probably the least useful.
If you drag with pointer button 1, then you are adjusting the size of the window above. xmh will attempt to compensate by adjusting some window below it.
If you drag with pointer button 3, then you are adjusting the size of the window below. xmh will attempt to compensate by adjusting some window above it.
All windows have a mininum and maximum size; you will never be allowed to move a border past the point where it would make a window have an invalid size.
Selected Folder
The selected folder is whichever foldcmame is highlighted in the top buttonbox. Note that this is not necessarily the same folder that is being viewed. To change the selected folder, just press on the desired folder button.
General Commands and Folder Commands
The second buttonbox contains commands of a global nature:
| Quit XMH | Exits xmh, after first checking that you won’t lose any changes. |
Compose Message
Composes a new message. A new window will be brought up; for a description of it, see “Composition Windows,” below.
| Open Folder | Displays the data in the selected folder. Thus, the selected folder also becomes the viewed folder. |
Open Folder in New Window
Creates a new screen, and displays the selected folder in that screen. Note, however, that you may not display the same folder in more than one screen at a time.
| Create Folder | Creates a new folder. You will be prompted for a name for the new folder, to enter the name, point the pointer at the blank box provided and type. Hit the Confirm button when finished, or hit Abort to cancel this operation. |
Delete Folder |
Destroys the selected folder. You will be asked to confirm this action (see “Confirmation Windows”). |
Highlighted Messages, Selected Messages and the Current Message
It is possible to highlight a set of messages in the list of messages for the viewed folder. To highlight a message, just click on it with pointer button 1. To highlight a range of messages, click on the first one with pointer button 1 and on the last one with pointer button 3.
The selected messages are the same as the highlighted messages, if any. If no messages are highlighted, then the selected messages are considered the same as the current message.
The current message is indicated by a “+” next to the message number. It usually corresponds to the message currently being viewed.
Message Commands
The third buttonbox (fourth if you have message-sequences displayed) contains commands to deal with messages:
The following buttons will appear but will be sensitive only if the current folder has any message-sequences defined. (See “Message-Sequences.”)
Open Sequence |
Changes the viewed sequence to be the same as the selected sequence. |
Add to Sequence |
Adds the selected messages to the selected sequence. |
Remove from Sequence |
Removes the selected messages from the selected sequence. |
Delete Sequence |
Removes the selected sequence entirely. Note the messages themselves are not affected; they simply are no longer grouped together as a message-sequence. |
View Windows
The commands in these windows are the same as the message commands by the same name, except instead of affecting the selected messages, they affect the viewed message. In addition there is the Edit View button, which allows you to edit the message being viewed. While editing, the Edit View button will change to a Save View button, which should be pressed to save your edits.
Composition Windows
Aside from the normal text editing functions, there are six command buttons associated with composition windows:
Close |
Closes this composition window. If changes have been made since the most recent Save or Send, you will be asked to confirm losing them. |
Send |
Sends this composition. |
Reset |
Replaces the current composition with an empty message. If changes have been made since the most recent Send or Save, you will be asked to confirm losing them. |
Compose |
Brings up another new composition window. |
Save |
Saves this composition in your drafts folder. (If you do not have a folder named “drafts”, one will be created.) Then you can safely close the composition. At some future date, you can continue working on the composition by opening your drafts folder, selecting the message, and using the Use as Composition command. |
Insert |
Inserts a related message into the composition. If the composition window was created with a Reply button, the related message is the message being replied to, otherwise no related message is defined and this button is inactive. The message will be filtered before being inserted; see ReplyInsert-Filter under “Resources” below. |
Text Editing Commands
All of the text editing commands are actually defined by the Text widget in the X Toolkit. The commands may be bound to different keys than the defaults described below through the standard X Toolkit key re-binding mechanisms. See the X Toolkit and Athena Widgets documentation for more details.
Whenever you are asked to enter any text, you will be using a standard text editing interface. Various control and meta keystroke combinations are bound to a somewhat Emacs-like set of commands. In addition, the pointer buttons may be used to select a portion of text or to move the insertion point in the text Pressing pointer button 1 causes the insertion point to move to the pointer. Double-clicking button 1 selects a word, triple-clicking selects a paragraph, and quadruple-clicking selects everything. Any selection may be extended in either direction by using pointer button 3.
In the following, a line refers to one displayed row of characters in the window. A paragraph refers to the text between carriage returns. Text within a paragraph is broken into lines based on the current width of the window.
The following keystroke combinations are defined:
Confirmation Windows
Whenever you press a button that may cause you to lose some work or is otherwise dangerous, a window will appear asking you to confirm the action. This window will contain an Abort or No button and a Confirm or Yes button. Pressing the Abort button cancels the operation, and pressing the “Confirm” will proceed with the operation. (A very handy shortcut exists: if you press the original, offending button again, it will be interpreted as a Confirm. If you press any other command button, it will be interpreted as an Abort.)
Message-Sequences
An mh message sequence is just a set of messages associated with some name. They are local to a particular folder; two different folders can have sequences with the same name. In all folders, the sequence “all” is predefined; it consists of the set of all messages in that folder. (The sequence “cur” is also usually defined for every folder; it consists of only the current message. xmh hides “cur” from the user, instead placing a”+” by the current message. Also, xmh does not support the “unseen” sequence, so that one is also hidden from the user.)
The message sequences for a folder are displayed as buttons containing the names of the sequences (including one for “all”). The table of contents (aka “toc”) is at any one time displaying one message sequence. This is called the “viewed sequence”; if it’s not “all”, its name will be displayed in the title bar just after the folder name. Also, at any time one of the sequence buttons will be highlighted. This is called the “selected sequence”. Note that the viewed sequence and the selected sequence are not necessarily the same. (This all pretty much corresponds to the way the folder buttons work.)
The Open Sequence, Add to Sequence, Remove from Sequence, and Delete Sequence buttons are active only if the viewed folder contains message-sequences.
Note that none of the above actually effect whether a message is in the folder. Remember that a sequence is a set of messages within the folder; the above operations just affect what messages are in that set.
To create a new sequence, press the Pick button. A new window will appear, with lots of places to enter text. Basically, you can describe the sequence’s initial set of messages based on characteristics of the message. Thus, you can define a sequence to be all the messages that were from a particular person, or with a particular subject, and so on. You can also connect things up with boolean operators, so you can select all things from “weissman” with the subject “xmh”.
Hopefully, the layout is fairly obvious. The simplest cases are the easiest: just point to the proper field and type. If you enter in more than one field, it will only select messages which match all non-empty fields.
The more complicated cases arise when you want things that match one field or another one, but not necessarily both. That’s what all the “or” buttons are for. If you want all things with the subject “xmh” or “xtenn”, just press the “or” button next to the “Subject:” field. Another box will appear where you can enter another subject.
If you want all things either from “weissman” or with subject “xmh”, but not necessarily both, select the -Or- button. This will essentially double the size of the form. You can then enter “weissman” in a from: box on the top half, and “xmh” in a subject: box on the lower part.
If you ever select the Skip button, then only those messages that don’t match the fields on that row are included.
Finally, in the bottom part of the window will appear several more boxes. One is the name of the sequence you’re defining. (It defaults to the name of the selected sequence when Pick was pressed, or to “temp” if “all” was the selected sequence.) Another box defines which sequence to look through for potential members of this sequence; it defaults to the viewed sequence when Pick was pressed.
Two more boxes define a date range; only messages within that date range will be considered. These dates must be entered in 822-style format: each date is of the form “dd mmm yy hh:mm:ss zzz”, where dd is a one or two digit day of the month, mmm is the three-letter abbreviation for a month, and yy is a year. The remaining fields are optional: hh, mm, and ss specify a time of day, and zzz selects a time zone. Note that if the time is left out, it defaults to midnight; thus if you select a range of “7 nov 86”- “8 nov 86”, you will only get messages from the 7th, as all messages on the 8th will have arrived after midnight.
Date field specifies which date field in the header to look at for this date range; it probably won’t be useful to anyone. If the sequence you’re defining already exists, you can optionally merge the old set with the new; that’s what the Yes and No buttons are all about. Finally, you can OK the whole thing, or Cancel it.
In general, most people will rarely use these features. However, it’s nice to occasionally use Pick to find some messages, look through them, and then hit Delete Sequence to put things back in their original state.
Resources
As with all standard X applications, xmh may be customized through entries in the resource manager. The following resource manager entries are defined: [Note: the entry names must be entered in either all lower-case, or in the exact case shown below.]
BackGround Background color. Currently, this will effect only buttons. (Default is white.)
ButtonFont What font to use for button names. (Default is timrom 10.)
CheckNewMail
If True, xmh will check at regular intervals to see if new mail has arrived for any of the folders. A visual indication will be given if new mail is waiting to be retrieved. (Default is true.)
CompButtonLines
How many rows of buttons to display under a composition. (Default is 1.)
CompFont What font to use when composing a message. (Default is 6x13.)
CompGeometry
Initial geometry for windows containing compositions.
CompLines How many lines of a composition to display. (Default is 20.)
ConfirmFont What font to use for confirmation windows. (Default is timrom 10b.)
FolderButtonLines
How many rows of folder command buttons to display. (Default is 1.)
FolderLines How many rows of foldername buttons to display. (Default is 1.)
ForeGround Foreground color. Currently, this will effect only title bars and buttons. (Default is black.)
Geometry Default geometry to use. (Default is none.)
HideBoringHeaders
If on, then xmh will attempt to skip uninteresting header lines within messages by scrolling them off. (Default is on.)
InitialFolder
Which folder to display on startup. May also be set with the command-line option -initial. (Default is inbox.)
InitialIncFile
The filename of your incoming mail drop. xmh tries to construct a filename for the inc -file command, but in some installations (e.g., those using the Post Office Protocol) no file is appropriate. In this case, InitialIncFile should be specified as the empty string, and inc will be invoked without a -file argument
LabelFont |
What font to use for the title bars. (Default is timrom 10i.) |
MailPath |
The full path prefix for locating your mail folders. May also be set with the command-line option, -path. (Default is the Path component in $HOME/.mh_profile, or $HOME/Mail if none.) |
MailWaitingFlag
If True, xmh will attempt to set an indication in it’s icon when new mail is waiting to be retrieved. If this option is True, then CheckNewMail is assumed to be True as well. The -flag command line option is a quick way to turn MailWaitingFlag on.
MhPath |
What directory in which to find the mh commands. If a command isn’t found here, then the directories in the user’s path are searched. (Default is /usr/local/mh6.) |
PickGeometry
Initial geometry for pick windows.
PickEntryFont
What font to use for user text fields in pick windows. (Default is timrom 10.)
PickTextFont
What font to use for static text fields in pick windows. (Default is timrom 10.)
What shell command to execute to print a message. Note that standard output and standard error must be specifically redirected! If a message or range of messages is selected for printing, the full file paths of each message file is appended to the specified print command. (Default is “enscript >/dev/null 2>/dev/null”).
ReplyInsertFilter
A shell command to be executed when the Insert button is activated in a composition window. The full path and filename of the source message is added to the end of the command before being passed to sh(1). The default filter is echo; i.e., it merely inserts the name of the file into the composition. Other interesting filters arc awk -e ’{print ” “ $0}’ or /usr/new/mh.6.5/ lib/mhl -form mhl.body.
Tempdir |
Directory for xmh to store temporary directories. For privacy, a user might want to change this to a private directory. (Default is /tmp.) |
TocButtonLines
How many rows of message command buttons to display. (Default is 1.)
TocFont |
What font to use for a folder’s table of contents. (Default is 6x13.) |
TocGeometry |
Initial geometry for master xmh windows. |
TocLines |
How many messages to display in a folder’s table of contents. (Default is 10.) |
TocWidth |
How many characters to generate for each message in a folder’s table of contents. (Default is 100. Use 80 if you plan to use mhl a lot.) |
ViewButtonLines
How many rows of buttons to display under a view of a message. (Default is 1.)
ViewFont What font to use for a view of a message. (Default is 6x13.)
ViewGeometry
Initial geometry for windows showing only a view of a message.
ViewLines How many lines of a message to display. (Default is 20.)
If TocGeometry, ViewGeometry, CompGeometry, or PickGeometry are not specified, then the value of Geometry is used instead. If the resulting height is not specified (e.g., “”, “=500”, “+0-0”), then the default height is calculated from the fonts and line counts specified above. If the width is not specified (e.g., “”, “=x300”, “-0+0”), then half of the display width is used. If unspecified, the height of a pick window defaults to half the height of the display.
Any of these options may also be specified on the command line by using the standard X Toolkit resource specification mechanism. Thus, to run xmh showing all message headers,
% xmh -xrm ’*HideBoringHeaders:off’
The initial text displayed in a composition window is generated by executing the corresponding mh command; i.e., comp, repl, or forw and therefore message components may be customized as specified for those commands. comp is executed only once per invocation of xmh and the message template is re-used for each successive new composition.
Files
-/.mh _profile
See Also
X, xrdb, mh - the mh Message Handler
Bugs
Printing support is minimal.
Keyboard shortcuts for commands would be nice.
Should handle the “unseen” message-sequence.
Should determine by itself if the user hasn’t used mh before, and offer to set things up for him or her.
Still a few commands missing (rename folder, remail message).
Needs sub-folder support.
Copyright
Copyright 1988, Digital Equipment Corporation.
See X for a full statement of rights and permissions.
Author
Terry Weissman, Digital Western Research Laboratory.
xmodmap
Keyboard Modifier Utility
Name
xmodmap – keyboard and pointer modifier utility.
Syntax
xmodmap [options] [filename]
Description
xmodmap is a utility for displaying and altering the X keyboard modifier map and keymap table on the specified server and host. It is intended to be run from a user’s X startup script to setup the keyboard according to personal tastes.
With no arguments, xmodmap displays the current map.
Options
-display [host]:server[.screen]
Allows you to specify the host, server and screen to use. For example,
xmodmap -display your_ node:0.0
specifies the screen 0 on server 0 on the machine your_node. If the host is omitted, the local machine is assumed. If the screen is omitted, the screen 0 is assumed; the server and colon(:) are necessary in all cases.
-help |
Indicates that a brief description of the command Hne arguments should be printed on the standard error. This will be done whenever an unhandled argument is given to xmodmap. |
-grammar |
Indicates that a help message describing the expression grammar used in files and with -e expressions should be printed on the standard error. |
-verbose |
Indicates that xmodmap should print logging information as it parses its input. |
-quiet |
Turns off the verbose logging. This is the default. |
-n |
Indicates that xmodmap should not change the mappings, but should display what it would do, like make(1) does when given this option. (Cannot be used with expressions to change the pointer mapping.) |
-e expression
Specifies an expression to be executed. Any number of expressions may be specified from the command line.
-pm Indicates that the current modifier map should be printed on the standard output.
-pk Indicates that the current keymap table should be printed on the standard output.
-pp Indicates that the current pointer map should be printed on the standard output.
- A lone dash means that the standard input should be used as the input file.
The filename specifies a file containing xmodmap expressions to be executed. This file is usually kept in the user’s home directory and has a name like .xmodmaprc.
For compatibility with an older version, xmodmap also accepts the following obsolete single letter options:
-[SLC12345]
These options indicate that all current keys for the Shift, Lock, Control, or Mod modifier sets should be removed from the modifier map. These are equivalent to clear expressions.
-[slc] keysym
These options specify a keysym to be removed from the Shift, Lock, or Control modifier sets. These are equivalent to remove expressions.
+[slc12345] keysym
These options specify a keysym to be added to the Shift, Lock, or Control modifier sets. These are equivalent to add expressions.
Expression Grammar
The xmodmap program reads a list of expressions and parses them all before attempting to execute any of them. This makes it possible to refer to keysyms that are being redefined in a natural way without having to worry as much about name conflicts. Allowable expressions include:
keycode NUMBER= KEYSYMNAME ...
The list of keysyms is assigned to the indicated keycode (which may be specified in decimal, hex or octal and can be determined by running the xev program in the examples directory). Usually only one keysym is assigned to a given code.
keysym KEYSYMNAME = KEYSYMNAME ...
The KEYSYMNAME on the left hand side is looked up to find its current key-code and the line is replaced with the appropriate keycode expression. Note that if you have the same keysym bound to multiple keys, this might not work.
clear MODIFIERNAME
This removes all entries in the modifier map for the given modifier, where valid name are: Shift, Lock, Control, Modl, Mod2, Mod3, Mod4 and ModS (case does not matter in modifier names, although it does matter for all other names). For example, “clear Lock” will remove any keys that were bound to the lock modifier.
add MODIFIERNAME = KEYSYMNAME ...
This adds the given keysyms to the indicated modifier map. The keysym names are evaluated after all input expressions are read to make it easy to write expressions to swap keys.
remove MODIFIERNAME = KEYSYMNAME ...
This removes the given keysyms from the indicated modifier map. Unlike add, the keysym names are evaluated as the line is read in. This allows you to remove keys from a modifier without having to worry about whether or not they have been reassigned.
pointer = default
This sets the pointer map back to its default settings (button 1 generates a code of 1, button 2 generates a 2, etc.).
pointer = X Y Z
This sets the pointer map to contain the button codes X, Y and Z, where X, Y and Z are numbers. The list always starts with the first physical button.
Lines that begin with an exclamation mark(!) are taken as comments.
If you want to change the binding of a modifier key, you must also remove it from the appropriate modifier map.
Examples
Many pointers are designed such that the first button is pressed using the index finger of the right hand. People who are left handed frequently find that it is more comfortable to reverse the button codes that get generated so that the primary button is pressed using the index finger of the left hand. This could be done on a 3 button pointer as follows:
% xmodmap -e "pointer = 3 2 1"
Many editor applications support the notion of Meta keys (similar to Control keys except that Meta is held down instead of Control). However, some servers do not have a Meta keysym in the default keymap table, so one needs to be added by hand. The following command will attach Meta to the Multi-language key (sometimes labeled Compose Character). It also takes advantage of the fact that applications that need a Meta key simply need to get the keycode and don’t require the keysym to be in the first column of the keymap table. This means that applications that are looking for a Multi_key (including the default modifier map} won’t notice any change.
% keysym Multi_key = Multi_key Meta_L
One of the more simple, yet convenient, uses of xmodmap is to set the keyboard’s “rubout” key to generate an alternate keysym. This frequently involves exchanging Backspace with Delete to be more comfortable to the user. If the ttymodes resource in xterm is set as well, all terminal emulator windows will use the same key for erasing characters:
% xmodmap -e "keysym BackSpace = Delete"

% echo "XTerm*ttyModes: erase ^?" | xrdb -merge
Some keyboards do not automatically generate less than and greater than characters when the comma and period keys are shifted. This can be remedied with xmodmap by resetting the bindings for the comma and period with the following scripts:
!

! make shift-, be < and shift-. be >

!

keysym comma = comma less

keysym period = period greater
One of the more irritating differences between keyboards is the location of the Control and Shift Lock keys. A common use of xmodmap is to swap these two keys as follows:
!

! Swap Caps_Lock and Control_L

!

remove Lock = Caps_Lock

remove Control = Control_L

keysym Control_L = Caps_Lock

keysym Caps_Lock = Control_L

add Lock = Caps_Lock

add Control = Control_L
The keycode command is useful for assigning the same keysym to multiple keycodes. Although unportable, it also makes possible to write scripts that can reset the keyboard to a known state. The following script sets the backspace key to generate Delete (as shown above), flushes all existing caps lock bindings, makes the CapsLock key a control key, makes F5 generate Escape, and makes Break/Reset be a shift lock.
!

! On the HP, the following keycodes have key caps as listed:

!

!   101 Backspace

!    55 Caps

!    14 Ctrl

!    15 Break/Reset

!    86 Stop

!    89 F5

!


keycode 101 = Delete

keycode 55 = Control_R

clear Lock

add Control = Control_R

keycode 89 = Escape

keycode 15 = Caps_Lock

add Lock = Caps_Lock
See Also
X
Bugs
Every time a keycode expression is evaluated, the server generates a MappingNotify event on every client. This can cause some thrashing. All of the changes should be batched together and done at once. Clients that receive keyboard input and ignore MappingNotify events will not notice any changes made to keyboard mappings.
xmodmap should generate add and remove expressions automatically whenever a keycode that is already bound to a modifier is changed.
There should be a way to have the remove expression accept keycodes as well as keysyms for those times when you really mess up your mappings.
Authors
Rewritten by Jim Fulton, MIT X Consortium, from an earlier version by David Rosenthal of Sun Microsystems.
xpr
Print X Window Dump
Name
xpr – print an X window dump.
Syntax
xpr [options] [filename]
Description
xpr takes as input a window dump file produced by xwd and fonnats it for output on PostScript printers, the DEC LN03 or LA100, the IBM PP3812 page printer, or, as of Release 4, the HP LaserJet (or other PCL printers), or the HP PaintJet. If you do not give a file option, standard input is used. By default, xpr prints the largest possible representation of the window on the output page. Options allow you to add headers and trailers, specify margins, adjust the scale and orientation, and append multiple window dumps to a single output file. Output is sent to standard output unless you specify -output filename.
Options
-device printer_device
Specifies the device on which the file is to be printed. Currently the following printers are supported:
ln03 |
Digital LN03. |
la100 |
Digital LA100. |
ljet |
HP LaserJet series and other monochrome PCL devices, such as ThinkJet, QuietJet, RuggedWriter, HP2560 series, and HP2930 series printers. (As of Release 4.) |
pjet |
HP PaintJet (color mode). (As of Release 4.) |
pjetxl |
HP PaintJet XL Color Graphics Printer (color mode). (As of Release 4.) |
pp |
IBM PP3812. |
ps |
PostScript printer. |
The default printer, for historical reasons, is the LN03. -device lw (Apple LaserWriter) is equivalent to -device pp and is provided only for backwards compatibility.
-scale scale
Affects the size of the window on the page. The PostScript, LN03, and HP printers are able to translate each bit in a window pixel map into a grid of a specified size. For example, each bit might translate into a 3x3 grid. This is specified by -scale 3. By default, a window is printed with the largest scale that fits onto the page for the specified orientation.
-height inches
Specifies the maximum height of the page.
Specifies the maximum width of the page.
-left inches
Specifies the left margin in inches. Fractions are allowed. By default, the window is centered on the page.
-top inches |
Specifies the top margin for the picture in inches. Fractions are allowed. By default, the window is centered on the page. |
-header header
Specifies a header string to be printed above the window. Default is no header.
-trailer trailer
Specifies a trailer string to be printed below the window. Default is no trailer.
-landscape |
Prints the window in landscape mode. By default, a window is printed such that its longest side follows the long side of the paper. |
-portrait |
Prints the window in portrait mode. By default, a window is printed such that its longest side follows the long side of the paper. |
- rv |
Reverses the foreground and background colors. |
-compact |
Compresses white pixels on PostScript printers. |
-output filename
Specifies an output filename. If this option is not specified, standard output is used.
-append filename
Specifies a filename previously produced by xpr to which the window contents are to be appended.
-noff |
When specified in conjunction with -append, the window appears on the same page as the previous window. |
-splist n |
Allows you to split a window onto several pages. This might be necessary for large windows that would otherwise cause the printer to overload and print the page in an obscure manner. |
-plane number
Specifies which bit plane to use in an image. The default is to use the entire image and map values into black and white based on color intensities. (Available as of Release 4.)
-gray 2 | 3 | 4
Uses a simple 2x2; 3x3, or 4x4 gray scale conversion on a color image, rather than mapping to strictly black and white. This doubles, triples, or quadruples the effective width and height of the image. (Available as of Release 4.)
-cutoff level
Changes the intensity level where colors are mapped to either black or white for monochrome output on a LaserJet printer. (Available as of Release 4.) The level is expressed as percentage of full brightness. Fractions are allowed. (Available as of Release 4.)
-noposition |
Causes header, trailer, and image positioning command generation to be bypassed for LaserJet, PaintJet and PaintJet XL printers. (Available as of Release 4.) |
-gamma correction
Changes the intensity of the colors printed by PaintJet XL printer. The correction is a floating point value in the range 0.00 to 3.00. Consult the operator’s manual to determine the correct value for the specific printer. (Available as of Release 4.)
-render algorithm
Allows PaintJet XL printer to render the image with the best quality versus performance tradeoff. Consult the operator’s manual to determine which algorithms are available. (Available as of Release 4.)
-slide |
Allows overhead transparencies to be printed using the PaintJet and PaintJet XL printers. (Available as of Release 4.) |
Limitations
The current version of xpr can generally print out on the LN03 most X windows that are not larger than two-thirds of the screen. For example, it will be able to print out a large emacs window, but it will usually fail when trying to print out the entire screen. The LN03 has memory limitations that can cause it to incorrectly print very large or complex windows. The two most common errors encountered are “band too complex” and “page memory exceeded.” In the first case, a window may have a particular band (a row six pixels deep) that contains too many changes (from black to white to black). This will cause the printer to drop part of the line and possibly parts of the rest of the page. The printer will flash the number ‘1’ on its front panel when this problem occurs. A possible solution to this problem is to increase the scale of the picture, or to split the picture onto two or more pages. The second problem, “page memory exceeded,” will occur if the picture contains too much black, or if the picture contains complex half-tones such as the background color of a display. When this problem occurs the printer will automatically split the picture into two or more pages. It may flash the number ‘5’ on its from panel. There is no easy solution to this problem. It will probably be necessary to either cut and paste, or rework the application to produce a less complex picture.
There are several limitations on the use of xpr with the LA100: the picture will always be printed in portrait mode, there is no scaling, and the aspect ratio will be slightly off.
Support for PostScript output currently cannot handle the -append, -noff or -split options.
The -compact option is only supported for PostScript output. It compresses white space but not black space, so it is not useful for reverse-video windows.
For color images, should map directly to PostScript image support.
HP Printer Specifics (Release 4)
If no -density is specified on the command line, 300 dots per inch will be assumed for ljet and 90 dots per inch for pjet. Allowable density values for a LaserJet printer are 300, 150, 100, and 75 dots per inch. Consult the operator’s manual to determine densities supported by other printers.
If no -scale is specified the image will be expanded to fit the printable page area.
The default printable page area is 8x10.5 inches. Other paper sizes can be accommodated using the -height and -width options.
Note that a 1024x768 image fits the default printable area when processed at 100 dpi with scale=1, the same image can also be printed using 300 dpi with scale=3 but will require considerably more data be transferred to the printer.
xpr may be tailored for use with monochrome PCL printers other than the LaserJet. To print on a ThinkJet (HP2225A) xpr could be invoked as:
% xpr -density 96 -width 6.667 filename
or for black-and-white output to a PaintJet:
% xpr -density 180 filename
The monochrome intensity of a pixel is computed as 0.30*R + 0.59*G + 0.11*B. If a pixel’s computed intensity is less than the -cutoff level it will print as white. This maps light-on-dark display images to black-on-white hardcopy. The default cutoff intensity is 50% of full brightness. Example: specifying -cutoff 87.5 moves the white/black intensity point to 87.5% of full brightness.
A LaserJet printer must be configured with sufficient memory to handle the image. For a full page at 300 dots per inch approximately 2MB of printer memory is required.
Color images are produced on the PaintJet at 90 dots per inch. The PaintJet is limited to sixteen colors from its 330 color palette on each horizontal print line. xpr will issue a warning message if more than sixteen colors are encountered on a line. xpr will program the PaintJet for the first sixteen colors encountered on each line and use the nearest matching programmed value for other colors present on the line.
Specifying the -rv, reverse video, option for the PaintJet will cause black and white to be interchanged on the output image. No other colors are changed.
Multiplane images must be recorded by xwd in ZPixmap format. Single plane (monochrome) images may be in either XYPixmap or ZPixmap format.
Some PCL printers do not recognize image positioning commands. Output for these printers will not be centered on the page and header and trailer strings may not appear where expected.
The -gamma and -render options are supported only on the PaintJet XL printers.
The -slide option is not supported for LaserJet printers.
The -split option is not supported for HP printers.
See Also
xwd, xdpr, xwud, X
Copyright
Copyright 1988, Massachusetts Institute of Technology.
Copyright 1986, Marvin Solomon and the University of Wisconsin.
Copyright 1988, Hewlett-Packard Company.
See X for a full statement of rights and permissions.
Authors
Michael R. Gretzinger, MIT Project Athena;
Jose Capo, MIT Project Athena (PP3812 support);
Marvin Solomon (University of Wisconsin);
Bob Scheifler, MIT;
Angela Bock and E. Mike Durbin, Rich Inc. (grayscale);
Larry Rupp, Hewlett-Packard (HP printer support).
xprop
Display Properties for X
Name
xprop – display window and font properties for X.
Syntax
xprop [options]
Description
The xprop utility is for displaying window and font properties in an X server. One window or font is selected using the command line arguments or in the case of a window, by clicking on the desired window. A list of properties is then given, possibly with formatting information.
For each of these properties, its value on the selected window or font is printed using the supplied formatting information if any. If no formatting information is supplied, internal defaults are used. If a property is not defined on the selected window or font, “not defined” is printed as the value for that property. If no property list is given, all the properties possessed by the selected window or font are printed.
A window may be selected in one of four ways. First, if the desired window is the root window, the -root option may be used. If the desired window is not the root window, it may be selected in two ways on the command line, either by id number such as might be obtained from xwininfo, or by name if the window possesses a name. The -id option selects a window by id number in either decimal or hex (must start with 0x) while the -name option selects a window by name.
The last way to select a window does not involve the command line at all. If none of -font, - id, -name, and -root are specified, a crosshair cursor is displayed and the user allowed to choose any visible window by pressing any pointer button in the desired window. If it is desired to display properties of a font as opposed to a window, the -font option must be used.
Other than the above four options, the -help option for obtaining help, and the -grammar option for listing the full grammar for the command line, all the other command line options are used in specifing both the format of the properties to be displayed and how to display them. The -len n option specifies that at most n bytes of any given property will be read and displayed. This is useful, for example, when displaying the cut buffer on the root window which could run to several pages if displayed in full.
Normally each property name is displayed by printing first the property name, then its type (if it has one) in parentheses, followed by its value. The -notype option specifies that property types should not be displayed. The -fs option is used to specify a file containing a list of formats for properties, while the -f option is used to specify the format for one property.
The formatting information for a property actually consists of two parts, a format and a dformat. The format specifies the actual formatting of the property (i.e., is it made up of words, bytes, or longs?, etc.) while the dformat specifies how the property should be displayed.
The following paragraphs describe how to construct formats and dformats. However, for the vast majority of users and uses, this should not be necessary as the built in defaults contain the formats and dformats necessary to display all the standard properties. It should only be necessary to specify formats and dformats if a new property is being dealt with or the user dislikes the standard display format. New users especially are encouraged to skip this part.
A format consists of one of 0, 8, 16, or 32 followed by a sequence of one or more format characters. The 0. 8, 16. or 32 specifies how many bits per field there are in the property. Zero is a special case meaning use the field size information associated with the property itself. (This is only needed for special cases like type INTEGER which is actually three different types depending on the size of the fields of the property.)
A value of 8 means that the property is a sequence of bytes while a value of 16 would mean that the property is a sequence of words. The difference between these two lies in the fact that the sequence of words will be byte swapped while the sequence of bytes will not be when read by a machine of the opposite byte order of the machine that orginally wrote the property. For more information on how properties are formatted and stored, consult Volume One, Xlib Programming Manual.
Once the size of the fields has been specified, it is necessary to specify the type of each field (i.e., is it an integer, a string, an atom, or what?). This is done using one format character per field. If there are more fields in the property than format characters supplied, the last character will be repeated as many times as necessary for the extra fields. The format characters and their meaning are as follows:
a |
The field holds an atom number. A field of this type should be of size 32. |
b |
The field is an boolean. A 0 means false while anything else means true. |
c |
The field is an unsigned number, a cardinal. |
i |
The field is a signed integer. |
m |
The field is a set of bit flags, 1 meaning on. |
s |
This field and the next ones until either a 0 or the end of the property represent a sequence of bytes. This format character is only usable with a field size of 8 and is most often used to represent a string. |
x |
The field is a hex number (like ’c’ but displayed in hex - most useful for displaying window ids and the like). |
An example format is 32ica which is the format for a property of three fields of 32 bits each, the first holding a signed integer, the second an unsigned integer, and the third an atom.
The format of a dformat (unlike that of a format) is not so rigid. The only limitations on a dformat is that it may not start with a letter or a dash. This is so that it can be distingished from a property name or an option. A dformat is a text string containing special characters instructing that various fields be printed at various points in a manner similar to the formatting string used by printf. For example, the dformat “ is ($0, $1 \)\n” would render the POINT 3, -4 which has a format of 32ii as “ is (3, -4)\n”.
Any character other than a$, ?, \, or a (in a dformat prints as itself. To print out one of $, ?, \, or (preceed it by a \. For example, to print out a $, use \$. Several special backslash sequences are provided as shortcuts. \n will cause a newline to be displayed while \t will cause a tab to be displayed. \o where o is an octal number will display character number o.
A $ followed by a number n causes field number n to be displayed. The format of the displayed field depends on the formatting character used to describe it in the corrsponding format. For example, if a cardinal is described by ’c’ it will print in decimal while if it is described by a ’x’ it will be displayed in hex.
If the field is not present in the property (this is possible with some properties), <field not available> is displayed instead. $n+ will display field number n then a comma then field number n+1 then another comma then . . . until the last field defined. If field n is not defined, nothing is displayed. This is useful for a property that is a list of values.
A ? is used to start a conditional expression, a kind of if-then statement. ?exp(text) will display text if and only if exp evaluates to non-zero. This is useful for two things. First, it allows fields to be displayed if and only if a flag is set. And second, it allows a value such as a state number to be displayed as a name rather than just as a number. The syntax of exp is as follows:
exp ::= term | term=exp | !exp

term::= n | $n | mn
The ! operator is a logical “not”, changing 0 to 1 and any non-zero value to 0. = is an equality operator. Note that internally all expressions are evaluated as 32 bit numbers so -1 is not equal to 65535. = returns 1 if the two values are equal and 0 if not. n represents the constant value n while $n represents the value of field number n. mn is 1 if flag number n in the first field having format character ’m’ in the corrsponding format is 1, 0 otherwise.
Examples: ?m3(count: $3\n) displays field 3 with a label of count if and only if flag number 3 (count starts at 0!) is on. ?$2=0(True)?!$2=0(False) displays the inverted value of field 2 as a boolean.
In order to display a property, xprop needs both a format and a dformat. Before xprop uses its default values of a format of 32x and a dformat of ”= { $0+ }\n”, it searches several places in an attempt to find more specific formats. First, a search is made using the name of the property. If this fails, a search is made using the type of the property. This allows type STRING to be defined with one set of formats while allowing property WM_NAME which is of type STRING to be defined with a different format. In this way, the display formats for a given type can be overridden for specific properties.
The locations searched are in order: the format if any specified with the property name (as in 8x WM_NAME), the formats defined by -f options in last to first order, the contents of the file specified by the -fs option if any, the contents of the file specified by the environment variable XPROPFORMATS if any, and finally xprop’s built in file of formats.
The format of the files refered to by the -fs option and the XPROPFORMATS variable is one or more lines of the following form:
name format [dformat]
Where name is either the name of a property or the name of a type, format is the format to be used with name and dformat is the dformat to be used with name. If dformat is not present, “= $0+\n” is assumed.
Options
- help |
Prints out a summary of command line options. |
- grammar |
Prints out a detailed grammar for all command line options. |
- id id |
Allows the user to select window id on the command line rather than using the pointer to select the target window. This is very useful in debugging X applications where the target window is not mapped to the screen or where the use of the pointer might be impossible or interfere with the application. |
-name name |
Allows the user to specify that the window named name is the target window on the command line rather than using the pointer to select the target window. |
-font font |
Allows the user to specify that the properties of font font should be displayed. |
-root |
Specifies that X’s root window is the target window. This is useful in situations where the root window is completely obscured. |
-display [host]:server[.screen]
Allows you to specify the server to connect to. For example,
xprop -display your_node :0.1
specifies screen 1 on server 0 on the machine your_node. If the host is omitted, the local machine is assumed. If the screen is omitted, the screen 0 is assumed; the server and colon(:) are necessary in any case.
-len n Specifies that at most n bytes of any property should be read or displayed.
-notype Specifies that the type of each property should not be displayed.
-fs file Specifies that file file should be used as a source of more formats for properties.
- remove propname
Specifies the name of a property to be removed from the indicated window.
-f name format [dformat]
Specifies that the format for name should be format and that the dformat for name should be dformat. If dformat is missing, “ = $0+\n” is assumed.
-frame |
Specifies that when selecting a window by hand (i.e., if none of -name, -root, or -id are given), xprop should look at the window manager frame (if any) instead of looking for the client window. (Available as of Release 4.) |
-spy |
Indicates that xprop should examine window properties forever, looking for property change events. (Available as of Release 4.) |
Examples
To display the name of the root window: prop -root WM_NAME
To display the window manager hints for the clock: xprop -name xclock WM HINTS
To display the start of the cut buffer: xprop -root -len 100 CUT_BUFFERO
To display the point size of the fixed font: xprop -font fixed POINT_SIZE
To display all the properties of window# Ox200007: xprop -id 0x200007
Environment Variables
| XPROPFORMATS | Specifies the name of a file from which additional formats are to be obtained. |
See Also
X, xwininfo
Author
Mark Lillibridge, MIT Project Athena.
xpseudoroot
Create Pseudo Root Window
Name
xpseudoroot – create a pseudo root window.
Syntax
xpseudoroot [options]
Description
This client is available in Release 3 only. It is experimental and should be used with caution. (Please see Warning below.) xpseudoroot has been removed from the X distribution as of Release 4.
The xpseudoroot program allows you to create pseudo root windows as outlined in the Inter-Client Communications Conventions Manual. By default it just makes a copy of the normal root window, but command line options may be used to alter much of the screen-related information.
The command line argument property_name specifies the name of a property on the screen’s real root window in which to store the pseudo root information. Applications can be run within the pseudo root window by appending .property_name to the server.screen part of the display name; for example: expo:0.0.property_name.
Warning
This is experimental code for implementing pseudo root windows as specified by the Inter-Client Communications Conventions Manual. The interfaces that it provides should be considered private to the MIT implementation of Xlib and will change in the next release. The interfaces that it provides should not be incorporated into any toolkits or applications. No effort will be made to provide backward compatibility.
Options
-display [host]:server[.screen]
Allows you to specify the host, server and screen to connect to. host specifies the machine, server specifies the server number, and screen specifies the screen number. For example,
xpseudoroot -display your_ node:0.1
specifies screen 1 of server 0 on the machine your_node. Either or both the host and screen elements to the display specification can be omitted. If host is omitted, the local machine is assumed. If screen is omitted, screen 0 is assumed (and the period is unnecessary). The colon and server are necessary in all cases.
-geometry geometry
The xpseudoroot window is created with the specified size and location determined by the supplied geometry specification. The -geometry option can be (and often is) abbreviated to -g, unless there is a conflicting option that begins with “g.” The argument to the geometry option (geometry) is referred to as a “standard geometry string,” and has the form widthx-height±xoff±yoff.
Specifies a list of visuals to support on the pseudo root window. Any number of numeric visual identifiers (in hex, octal, or decimal) may be supplied using the -visuals option.
-colormap colormapid
Specifies the numeric colormap identifier to be associated with the pseudo root window.
-Colormap visualid
Specifies a numeric visual identifier to be used in creating a new colormap for the pseudo root window. If this option is given, xpseudoroot will create a new colormap from the given visual and set the black and white pixel fields to the desired colors.
-white pixel
Specifies the numeric pixel value to use for WhitePixel when creating a new colormap with -Colormap. The default is to copy the real screen’s WhitePixel.
-White colorname
Specifies the color to use when setting WhitePixel in newly created color-maps. It may be used with -white to create arbitrary WhitePixels.
-black pixel
Specifies the numeric pixel value to use for BlackPixel when creating a new colormap with -Colormap. The default is to copy the real screen’s BlackPixel.
-Black colorname
Specifies the color to use when setting BlackPixel in newly created colormaps. It may be used with -black to create arbitrary BlackPixels.
-empty
Indicates that any colormaps created with -Colormap should not have BlackPixel and WhitePixel preallocated (although the values may still be set with -black and -white). This leaves as much room as possible for running applications that would otherwise not find enough colors. This is not for general use as it guarantees that an application will be displayed in incorrect colors.
-max number |
Specifies the maximum number of installed colormaps that will be allowed on this screen. The default is to use the real screen’s value. |
-min number |
Specifies the minimum number of installed colormaps that will be allowed on this screen. The default is to use the real screen’s value. |
-backingstore when
Specifies when backing store window attributes will be honored and takes one of the following arguments: NotUseful, WhenMapped, or Always. The default is to use the real screen’s value.
Specifies whether or not this screen supports save-unders and takes one of the following arguments: yes or no.
-name string
Specifies the name to be used for the pseudo root window.
See Also
X, xdpyinfo, xwininfo, xprop; Volume One, Xlib Programming Manual
Bugs
This is a sample program that is primarily intended as a testbed for ICCCM pseudo roots. It should not be incorporated into any toolkit or application.
Author
Jim Fulton, MIT X Consortium.
xrdb
Server Resource Database Utility
Name
xrdb – X server resource database utility.
Syntax
xrdb [options] [filename]
Description
xrdb is used to get or set the contents of the RESOURCE_MANAGER property on the root window of screen 0. You would normally run this program from your X startup file.
The resource manager (used by the Xlib routine XGetDefault(3X) and the X Toolkit) uses the RESOURCE_MANAGER property to get user preferences about color, fonts, and so on for applications. Having this information in the server (where it is available to all clients) instead of on disk, solves the problem in previous versions of X that required you to maintain defaults files on every machine that you might use. It also allows for dynamic changing of defaults without editing files.
For compatibility, if there is no RESOURCE_MANAGER property defined (either because xrdb was not run or the property was removed), the resource manager will look for a file called .Xde-faults in your home directory.
The filename (or the standard input if – or no input file is given) is optionally passed through the C preprocessor with the following symbols defined, based on the capabilities of the server being used:
SERVERHOST=hostname
HOST=hostname
The hostname portion of the display to which you are connected.
WIDTH=number
The width of the default screen in pixels.
HEIGHT=number
The height of the default screen in pixels.
X_RESOLUTION=number
The x resolution of the default screen in pixels per meter.
Y_RESOLUTION=number
The y resolution of the default screen in pixels per meter.
PLANES=number
The number of bit planes (the depth) of the root window of the default screen.
CLASS=visualclass
One of StaticGray, GrayScale, StaticColor, PsuedoColor, TrueColor, DirectColor. This is the visual class of the root window of the default screen.
COLOR |
Defined only if CLASS is one of StaticColor, PsuedoColor, True-Color, or DirectColor. |
The number of significant bits in an RGB color specification. This is the log base 2 of the number of distinct shades of each primary that the hardware can generate. Note that it is usually not related to the number of PLANES.
CLIENTHOST=hostname
The name of the host on which xrdb is running. (Available as of Release 4.)
RELEASE=number
The vendor release number for the server. The interpretation of this number will vary depending on VENDOR. (Available as of Release 4.)
REVISION=number
The X protocol minor version supported by this server (currently 0).
VERSION=number
The X protocol major version supported by this server (should always be 11).
VENDOR=number
A string specifying the vendor of the server. (Available as of Release 4.)
Lines that begin with an exclamation mark(!) are ignored and may be used as comments.
Options
xrdb accepts the following options:
-help |
This option (or any unsupported option) will cause a brief description of the allowable options and parameters to be printed. |
-display [host]:server[.screen]
Allows you to specify the host, server and screen to connect to. host specifies the machine, server specifies the server number, and screen specifies the screen number. For example:
xrdb -display your_node:0.0
specifies screen 0 of server 0 on the machine your_node. If the host is omitted, the local machine is assumed. If the screen is omitted, screen 0 is assumed; the server and colon(:) are necessary in all cases.
-cpp filename
Specifies the pathname of the C preprocessor program to be used. Although xrdb was designed to use CPP, any program that acts as a filter and accepts the -D, -I, and -U options may be used.
-edit filename
Indicates that the contents of the RESOURCE_MANAGER property should be edited into the given file, replacing any values already listed there. This allows you to put changes that you have made to your defaults back into your resource file, preserving any comments or preprocessor lines.
-backup string
Specifies a suffix to be appended to the filename used with -edit to generate a backup file.
-Dname [=value]
Is passed through to the preprocessor and is used to define symbols for use with conditionals such as #ifdef.
-Uname Is passed through to the preprocessor and is used to remove any definitions of this symbol.
-Idirectory
Is passed through to the preprocessor and is used to specify a directory to search for files that are referenced with #include.
Files
Generalizes ~/.Xdefaults files.
See Also
X, XGetDefault(3X), Xlib Resource Manager
Bugs
The default for no arguments should be to query, not to overwrite, so that it is consistent with other programs.
Authors
Phil Karlton, rewritten from the original by Jim Gettys. Copyright 1988, Digital Equipment Corporation.
xrefresh
Refresh X Screen
Name
xrefresh – refresh all or part of an X screen.
Syntax
xrefresh [options]
Description
xrefresh is a simple X program that causes all or part of your screen to be repainted. This is useful when system messages have displayed on your screen. xrefresh maps a window on top of the desired area of the screen and then immediately unmaps it, causing refresh events to be sent to all applications. By default, a window with no background is used, causing all applications to repaint “smoothly.” However, the various options can be used to indicate that a solid background (of any color) or the root window background should be used instead.
Options
-white |
Use a white background. The screen just appears to flash quickly, and then repaints. |
-black |
Use a black background (in effect, turning off all of the electron guns to the tube). This can be somewhat disorienting as everything goes black for a moment. |
-solid color
Use a solid background of the specified color. Try green.
-root |
Use the root window background. |
-none |
This is the default. All of the windows simply repaint. |
-geometry geometry
Specifies the portion of the screen to be repainted. The -geometry option can be (and often is) abbreviated to -g, unless there is a conflicting option that begins with “g.” The argument to the geometry option (geometry) is referred to as a “standard geometry string,” and has the form widthxheight±xoff±yoff.
-display [host]:server[.screen]
Allows you to specify the server and screen to refresh. For example, host specifies the machine, server specifies the server number, and screen specifies the screen number. For example,
xrefresh -display your_node:0.1
specifies screen 1 of server 0 on the machine your_node. If the host is omitted, the local machine is assumed. If the screen is omitted, screen 0 is assumed; the server and colon (:) are necessary in all cases.
Resources
The xrefresh program uses the routine XGetDefault(3X) to read defaults, so its resource names are all capitalized.
Black, White, Solid, None, Root
Determines what sort of window background to use.
Geometry |
Determines the area to refresh. Not very useful. |
See Also
X
Bugs
It should have just one default type for the background.
Author
Jim Gettys, Digital Equipment Corp., MIT Project Athena.
xset
Display and Keyboard Preferences
Name
xset – user preference utility for X.
Syntax
xset [options]
Description
xset is used to set various user preference options of the display and keyboard.
Options
Note that not all X implementations are guaranteed to honor all of these options.
-display [host]:server[.screen]
Allows you to specify the host, server, and screen for which to set preferences. host specifies the machine, server specifies the server number, and screen specifies the screen number. For example,
-display your_node:0.1 &
specifies screen 1 of server 0 on the machine your_node. If the host is omitted, the local machine is assumed If the screen is omitted, screen 0 is assumed; the server and colon (:) are necessary in all cases.
b |
Controls bell volume, pitch, and duration. The b option accepts up to three numerical parameters (volume, pitch, and duration), a preceding dash (−), or an on/off flag. If no parameters are given, or the on flag is used, the system defaults will be used. If the dash or off are given, the bell will be turned off. If only one numerical parameter is given, the bell volume will be set to that value, as a percentage of its maximum. Likewise, the second numerical parameter specifies the bell pitch, in hertz, and the third numerical parameter specifies the duration in milliseconds. Note that not all hardware can vary the bell characteristics. The X server will set the characteristics of the bell as closely as it can to the user’s specifications. |
-bc |
Controls bug compatibility mode in the server, if possible. The option with a preceding dash (-) disables the mode; the option alone enables the mode. |
bc
The need for this option is determined by the following circumstances. Various pre-R4 clients pass illegal values in some protocol requests, and pre-R4 servers did not correctly generate errors in these cases. Such clients, when run with an R4 server, will terminate abnormally or otherwise fail to operate correctly. Bug compatibility mode explicitly reintroduces certain bugs into the X server, so that many such clients can still be run.
This mode should be used with care; new application development should be done with this mode disabled. Be aware that the server must support the MIT-SUNDRY-NONSTANDARD protocol extension in order for this option to work.
-fp path or fp- path
The -fp and fp- options remove elements from the current font path. path must be a directory or comma-separated list of directories.
+fp path or fp+ path
The +fp and fp+ options prepend and append elements to the current font path, respectively. path must be a directory or comma-separated list of directories.
These settings will be reset to default values when you log out.
See Also
X, Xserver, xmodmap, xrdb, xsetroot
Authors
Bob Scheifler, MIT Laboratory for Computer Science;
David Krikorian, MIT Project Athena (Xll version).
xsetroot
Set Root Window Characteristics
Name
xsetroot – root window parameter setting utility.
Syntax
xsetroot[options]
Description
xsetroot allows you to tailor the appearance of the root (background) window on a display. You can experiment with xsetroot until you find a look that you like, then put the xsetroot command that produces it into your X startup file. If you do not specify any options or you specify -def. the window is reset to its defaults. The -def option can be specified along with other options and only the non-specified characteristics will be reset to the default state.
Options
xsetroot accepts the following options.
Only one of the background color/tile changing options (-solid,-gray,-grey,-bitmap, or -mod) may be specified at a time. color can be specified as a color name or an RGB value.
-help |
Displays a brief description of the allowable options. |
-def |
Resets unspecified attributes to the default values; the background to the gray mesh background and the pointer to the hollow X pointer. If you specify def and other options, only the non-specified options are reset to their defaults. |
-cursor cursorfile maskfile
Specifies the cursor shape to use as the root window pointer. The cursorfile and maskfile are bitmaps made with the bitmap client. Refer to Chapter 6, Graphics Utilities, for more information on creating bitmaps. The mask file may need to be all black until you are accustomed to the way masks work. The default root window pointer is an X cursor.
-cursor_name standard_cursor_name
Changes the root window cursor to one of the standard cursors from the cursor font See Appendix D for a list and pictures of the Standard Cursors. To specify a cursor name as an argument to a command line option, the xc_prefix must be stripped from the name. (This option is available as of Release 4.)
-bitmap filename
Uses the bitmap specified in the file to set the window pattern. The entire background is made up of repeated tiles of the bitmap. You can make your own bitmap files using the bitmap client or you can use those available with X, in the directory |usr|include|Xll|bitmaps. The default is gray mesh.
-mod x y |
Makes a plaid-like grid pattern on your screen. x and y are integers ranging from 1 to 16. Zero and negative numbers are taken as 1. |
Creates a grey background.
-fg color |
Sets the foreground color of the root window. Foreground and background colors are meaningful only in combination with -cursor, -bitmap, or -mod. The default is black. |
-bg color |
Sets the background color of the root window. Foreground and background colors are meaningful only in combination with -cursor, -bitmap, or -mod. The default is white. |
-rv |
Reverses the foreground color and the background color when used with another option such as -mod. -rv without another specified option returns the root (background) window to the default state. |
-solid color
Sets the root window color. The default is gray mesh.
-name string
Sets the name of the background window to string. There is no default value. Usually, a name is assigned to a window so that the window manager can use a text representation when the window is converted to an icon. This option also allows a client to refer to the root window by name.
-display [host]:server[.screen]
Allows you to specify the host, server, and screen of the root window. host specifies the machine, server specifies the server number, and screen specifies the screen number. For example,
% xsetroot -display your_node:0.1
specifies screen 1 of server 0 on the machine your_node. If the host is omitted, the local machine is assumed. If the screen is omitted, screen 0 is assumed; the server and colon (:) are necessary in all cases.
See Also
X, xset, xrdb
Author
Mark Lillibridge, MIT Project Athena.
xstdcmap
Define Standard Colormaps
Name
xstdcmap – X standard colormap utility.
Syntax
xstdcmap [options]
Description
Available as of Release 4, the xstdcmap utility can be used to selectively define standard colormap properties. It is intended to be run from a user’s X startup script to create standard colormap definitions in order to facilitate sharing of scarce colormap resources among clients. Where at all possible, colormaps arc created with read-only allocations.
Options
The following options may be used with xstdcmap:
-display host[:server][.screen]
Allows you to specify the host, server and screen to connect to. host specifies the machine, server specifies the server number, and screen specifies the screen number. For example,
xstdcmap -display your_node:0.1
specifies screen 1 of server 0 on the machine your_node. Either or both the host and screen elements to the display specification can be omitted. If host is omitted, the local machine is assumed. If screen is omitted, screen 0 is assumed (and the period is unnecessary). The colon and server are necessary in all cases.
See Also
X
Author
Donna Converse, MIT X Consortium.
xterm
Window Terminal Emulator
Name
xterm – Window Terminal emulator.
Syntax
xterm [options]
Description
The xterm program is a terminal emulator for the X Window System. It provides DEC VT102 and Tektronix 4014 compatible terminals for programs that can’t use the window system directly. If the underlying operating system supports terminal resizing capabilities (for example, the SIGWINCH signal in systems derived from BSD 4.3), xterm will use the facilities to notify programs running in the window whenever it is resized.
The VT102 and Tektronix 4014 terminals each have their own window so that you can edit text in one and look at graphics in the other at the same time. To maintain the correct aspect ratio (height/width), Tektronix graphics will be restricted to the largest box with a 4014’s aspect ratio that will fit in the window. This box is located in the upper left area of the window.
Although both windows can be displayed at the same time, one of them is considered the active window for receiving keyboard input and terminal output. This is the window that contains the text cursor and whose border highlights whenever the pointer is in either window. The active window can be chosen through escape sequences, the VT Options menu in the VT102 window, and the Tek Options menu in the 4014 window.
The Release 4 version of xterm provides four menus that allow you to manipulate the VT102 and Tektronix windows: Main Options, VT Options, Tek Options, and VT Fonts. The first three menus are available (with slight variations) in Release 3, but have the names xterm, Modes, and Tektronix. The VT Fonts menu is available as of Release 4.
Options
xterm accepts all of the standard X Toolkit command line options along with the additional options described below. Note that if the option begins with a + instead of a −, the option is restored to its default value. (Specifying the default with +option can be useful for overriding the opposite value in an .Xresources file or other prior resource specification.)
-help |
Causes xterm to print out a verbose message describing its options. |
−132 |
Causes the VT102 DECCOLM escape sequence, which switches between 80 and 132 column mode, to be recognized, enabling the xterm window to resize properly. By default, the DECCOLM escape sequence is ignored. (See Appendix C for more information on xterm escape sequences.) |
(This option can be turned on and off from the xterm VT Options menu, described below.) |
|
−ah/+ah |
−ah specifies that xterm should always highlight the text cursor and window borders. By default, xterm will display a hollow text cursor whenever the focus is lost or the pointer leaves the window. +ah sets the default. |
Specifies the width of the inner border (the distance between the outer edge of the characters and the window border) in pixels. The default is two pixels.
−c |
Specifies that the xterm window should receive console output. This is not supported on all systems. |
−cc characterclassrange:value[,...]
Sets classes indicated by the given ranges for use in selecting by words. See “Specifying Character Classes” below.
−cn/+cn |
−cn indicates that newlines should not be cut in line mode selections.+cn indicates that newlines should be cut in line mode selections. (-cn and +cn are available as of Release 4.) |
−cr color |
Specifies the color to use for the text cursor. The default is to use the same foreground color that is used for text |
−cu/+cu |
−cu enables the curses fix. Several programs that use the curses(3x) cursor motion package have some difficulties with VT102-compatible terminals. The bug occurs when you run the more program on a file containing a line that is exactly the width of the window and which is followed by a line beginning with a tab. The leading tabs are not displayed. This option causes the tabs to be displayed correctly. |
+cu indicates that xterm should not work around this curses bug. |
|
(This option can be turned on and off from the VT Options menu, described below.) |
−e command [arguments]
Specifies the command (and its arguments) to be run in the xterm window. It also sets the window title and icon name to be the name of the program being executed if neither -T or -n are given on the command line. The -e option, command and the arguments must appear last on the xterm command line, for example, xterm -rv -e more bigfile &.
−mc milliseconds
Specifies the maximum time between multi-click selections. (Available as of Release 4.)
The following X Toolkit options are commonly used with xterm:
−geometry geometry
xterm takes this geometry specification for the VT102 window. The -geometry option can be (and often is) abbreviated to −g, unless there is a conflicting option that begins with “g.” The argument to the geometry option (geometry) is referred to as a “standard geometry string,” and has the form widthxheight±xoff±yoff.
-display [host]:server[.screen]
By default, xterm obtains the host, server, and screen to use from the environment variable DISPLAY. However, you can also specify them using the -display option. host specifies which machine to create the window on, server specifies the server number, and screen specifies the screen number. For example,
xterm -display your_node:0.1
specifies that an xterm be created on screen 1 of server 0 on the machine your_ node. If the host is omitted, the local machine is assumed. If the screen is omitted, screen 0 is assumed; the server and colon (:) are necessary in all cases.
-bd color |
Sets the color of the border. Default of the highlighted border is black. Default of the unhighlighted border is gray. |
-bg color |
Sets the background color of the xterm window. Default is white. |
-bw pixels |
Specifies the width of the xterm window border in pixels. Default is one pixel. |
-fg color |
Sets the color of the text (foreground). Default is black. |
-fn font |
Uses the specified font instead of the default font (fixed). You can use any fixed-width font. |
-iconic |
Causes xterm to display an xterm icon rather than an xterm window when it starts up. |
-name name |
Specifies the application name under which resources are to be obtained, rather than the default executable filename. name should not contain “.” or “*” characters. |
-title string
Specifies the window title string, which may be displayed by window managers if the user so chooses. The default title is the command line specified after the -e option, if any, otherwise the application name.
-rv |
Reverses the foreground and background colors. |
(This option can be turned on and off from the VT Options menu, described below.) |
-xrm resourcestring
Specifies a resource string to be used with this instance of the application. This is especially useful for setting resources that do not have command line option equivalents.
The following command line arguments are provided for compatibility with older versions (prior to Release 3). They may not be supported in the next release as the X Toolkit provides standard options that accomplish most of the same tasks. The -L option has been eliminated in Release 4.
Resources
The program understands all of the core X Toolkit resource names and classes as well as:
iconGeometry (class IconGeometry)
Specifies the preferred size and position of the application when iconified. It is not necessarily obeyed by all window managers.
termName (class TermName)
Specifies the terminal type name to be set in the TERM environment variable.
title (class Title)
Specifies a string that may be used by the window manager when displaying this application.
ttyModes (class TtyModes)
Specifies a string containing terminal setting keywords and the characters to which they may be bound. (In Release 3, this resource is ignored when -L is given since getty resets the terminal. The -L option has been eliminated in Release 4.) Allowable keywords include: intr, quit, erase, kill, eof, eol, swtch, start, stop, brk, susp, dsusp, rpmt, flush, weras, and lnext. Control characters may be specified as ^char (e.g., ^c or ^u), and ^? may be used to indicate delete. This is very useful for overriding the default terminal settings without having to do an stty every time an xterm is started.
utmpInhibit (class UtmpInhibit)
Specifies whether or not xterm should try to record the user’s terminal in /etc/utmp.
sunFunctionKeys (class SunFunctionKeys)
Specifics whether or not Sun Function Key escape codes should be generated for function keys instead of standard escape sequences.
The following resources are specified as part of the vt100 widget (class VT100):
allowSendEvents (class AllowSendEvents)
Specifies whether or not synthetic key and button events (generated using the X protocol SendEvent request) should be interpreted or discarded. The default is false meaning they are discarded. Note that allowing such events creates a very large security hole. (Available as of Release 4.)
alwaysHighlight (class AlwaysHighlight)
Specifies whether or not xterm should always display a highlighted text cursor. By default, a hollow text cursor is displayed whenever the pointer moves out of the window or the window loses the input focus.
boldFont (class Font)
Specifies the name of the bold font to use instead of overstriking the normal font.
c132 (class C132)
Specifies whether or not the VT102 DECCOLM escape sequence should be honored. The default is false.
charClass (class CharClass)
Specifies comma-separated lists of character class bindings of the form [low-]high:value. These are used in determining which sets of characters should be treated the same when doing cut and paste. See “Character Classes” below.
curses (class Curses)
Specifies whether or not the last column bug in the cursor should be worked around. The default is false.
background (class Background)
Specifies the color to use for the background of the window. The default is white.
foreground (class Foreground)
Specifies the color to use for displaying text in the window. Setting the class name instead of the instance name is an easy way to have everything that would normally appear in the “text” color change color. The default is black.
cursorColor (class Foreground)
Specifies the color to use for the text cursor. The default is black.
eightBitInput (class EightBitInput)
Specifies whether or not eight-bit characters should be accepted. The default is true. (Available as of Release 4.)
Specifies the name of the normal font.
font1 (class Font1)
Specifies the name of the first alternate font. This font is toggled using the Tiny menu item on the VT Fonts menu. (Available as of Release 4.)
font2 (class Font2)
Specifies the name of the second alternate font. This font is toggled using the Small menu item on the VT Fonts menu. (Available as of Release 4.)
font3 (class Font3)
Specifies the name of the third alternate font. This font is toggled using the Medium menu item on the VT Fonts menu. (Available as of Release 4.)
font4 (class Font4)
Specifies the name of the fourth alternate font. This font is toggled using the Large menu item on the VT Fonts menu. (Available as of Release 4.)
geometry (class Geometry)
Specifies the preferred size and position of the VT102 window.
internalBorder (class BorderWidth)
Specifies the number of pixels between the characters and the window border. The default is 2.
jumpScroll (class JumpScroll)
Specifies whether or not jump scroll should be used. The default is true.
logFile (class Logfile)
Specifies the name of the file to which a terminal session is logged. The default is XtermLog.xxxx (where xxxx is the process ID of xterm).
logging (class Logging)
Specifies whether or not a terminal session should be logged. The default is false.
logInhibit (class LogInhibit)
Specifies whether or not terminal session logging should be inhibited. The default is false.
loginShell (class LoginShell)
Specifies whether or not the shell to be run in the window should be started as a login shell. The default is false.
marginBell (class MarginBell)
Specifies whether or not the bell should be run when the user types near the right margin. The default is false.
multiClickTime (class MultiClickTime)
Specifies the maximum time in milliseconds between multi-clock select events. The default is 250 milliseconds. (Available as of Release 4.)
multiScroll (class MultiScroll)
Specifies whether or not scrolling should be done asynchronously. The default is false.
nMarginBell (class Column)
Specifies the number of characters from the right margin at which the margin bell should be run, when enabled.
pointerColor (class Foreground)
Specifies the color of the pointer. The default is XtDefaultForeground color.
pointerColorBackground (class Background)
Specifies the background color of the pointer. The default is XtDefaultBackground color. (Available as of Release 4.)
pointerShape (class Cursor)
Specifies the name of the shape of the pointer. The default is “xterm.”
reverseVideo (class ReverseVideo)
Specifies whether or not reverse video should be simulated. The default is false.
reverseWrap (class ReverseWrap)
Specifies whether or not reverse-wraparound should be enabled. The default is false.
saveLines (class SaveLines)
Specifies the number of lines to save beyond the top of the screen when a scrollbar is turned on. The default is 64.
scrollBar (class ScrollBar)
Specifies whether or not the scrollbar should be displayed. The default is false.
scrollInput (class ScrollCond)
Specifies whether or not output to the terminal should automatically cause the scrollbar to go to the bottom of the scrolling region. The default is true.
scrollKey (class ScrollCond)
Specifies whether or not pressing a key should automatically cause the scrollbar to go to the bottom of the scrolling region. The default is false.
scrollLines (class ScrollLines)
Specifies the number of lines that the scroll-back and scroll-forw actions should use as a default. The default value is 1. (Available as of Release 4.) (See “Actions.”)
signalInhibit (class SignalInhibit)
Specifies whether or not the entries in the Main Options menu for sending signals to xterm should be disallowed. The default is false.
Specifies the preferred size and position of the Tektronix window.
tekInhibit (class TekInhibit)
Specifies whether or not Tektronix mode should be disallowed. The default is false.
tekSmall (class TekSmall)
Specifies whether or not the Tektronix mode window should start in its smallest size if no explicit geometry is given. This is useful when running xterm on displays with small screens. The default is false. (Available as of Release 4.)
tekStartup (class TekStartup)
Specifies whether or not xterm should start up in Tektronix mode. The default is false.
titeInhibit (class TiteInhibit)
Specifies whether or not xterm should remove ti or te termcap entries (used to switch between alternate screens on startup of many screen-oriented programs) from the TERMCAP string.
translations (class Translations)
Specifies the key and button bindings for menus, selections, “programmed strings,” etc. See “Actions” below.
visualBell (class VisualBell)
Specifies whether or not a visible bell (i.e., flashing) should be used instead of an audible bell when Control-G is received. The default is false.
waitForMap (class WaitForMap)
Specifies whether or not xterm should wait for the initial window map before starting the subprocess. The default is false. (Available as of Release 4.)
The following resources are specified as part of the tek4014 widget (class Tek4014):
width (class Width)
Specifies the width of the Tektronix window in pixels.
height (class Height)
Specifies the height of the Tektronix window in pixels.
fontLarge (class Font)
Specifies the large font to use in the Tektronix window. (Available as of Release 4.) This font is toggled using the Large Characters item on the Tek Options menu.
font2 (class Font)
Specifies font number 2 to use in the Tektronix window. (Available as of Release 4.) This font is toggled using the #2 Size Characters item on the Tek Options menu.
Specifies font number 3 font to use in the Tektronix window. (Available as of Release 4.) This font is toggled using the #3 Size Characters item on the Tek Options menu.
fontSmall (class Font)
Specifies the small font to use in the Tektronix window. (Available as of Release 4.) This font is toggled using the Small Characters item on the Tek Options menu.
As of Release 4, the resources that can be specified for the various menus are described in the documentation for the Athena SimpleMenu widget. The name and classes of the entries in each of the menus are listed below.
The mainMenu (title Main Options) has the following entries:
securekbd (class SmeBSB)
Invokes the secure () action.
allowsends (class SmeBSB)
Invokes the allow-send-events (toggle) action.
logging (class SmeBSB)
Invokes the set-logging (toggle) action.
redraw (class SmeBSB)
Invokes the redraw() action.
linel (class SmeLine)
A separator.
suspend (class SmeBSB)
Invokes the send-signal(suspend) action on systems that support job control.
continue (class SmeBSB)
Invokes the send-signal(cont) action on systems that support job control.
interrupt (class SmeBSB)
Invokes the send-signal(int) action.
hangup (class SmeBSB)
Invokes the send-signal(hup) action.
terminate (class SmeBSB)
Invokes the send-signal(term) action.
kill (class SmeBSB)
Invokes the send-signal(kill) action.
line2 (class SmeLine)
A separator.
Invokes the quit() action.
The vtMenu (title VT Options) has the following entries:
scrollbar (class SmeBSB)
Invokes the set-scrollbar(toggle) action.
jumpscroll (class SmeBSB)
Invokes the set-jumpscroll(toggle) action.
reversevideo (class SmeBSB)
Invokes the set-reverse-video(toggle) action.
autowrap (class SmeBSB)
Invokes the set-autowrap(toggle) action.
reversewrap (class SmeBSB)
Invokes the set-reversewrap(toggle) action.
autolinefeed (class SmeBSB)
Invokes the set-autolinefeed(toggle) action.
appcursor (class SmeBSB)
Invokes the set-appcursor(toggle) action.
appkeypad (class SmeBSB)
Invokes the set-appkeypad(toggle) action.
scrollkey (class SmeBSB)
Invokes the set-scroll-on-key(toggle) action.
scrollttyoutput (class SmeBSB)
Invokes the set-scroll-on-tty-output(toggle) action.
allow132 (class SmeBSB)
Invokes the set-allow132(toggle) action.
cursesemul (class SmeBSB)
Invokes the set-cursesemul(toggle) action.
visualbell (class SmeBSB)
Invokes the set-visualbell(toggle) action.
marginbell (class SmeBSB)
Invokes the set-marginbell(toggle) action.
altscreen (class SmeBSB)
This entry is currently disabled.
line1 (class SmeLine)
A separator.
softreset (class SmeBSB)
Invokes the soft-reset() action.
Invokes the hard-reset() action.
line2 (class SmeLine)
A separator.
tekshow (class SmeBSB)
Invokes the set-visibility(tek,toggle) action.
tekmode (class SmeBSB)
Invokes the set-terminal-type(tek) action.
vthide (class SmeBSB)
Invokes the set-visibility(vt,off) action.
The fontMenu (title VT Fonts) has the following entries:
fontdefault (class SmeBSB)
Invokes the set-vt-font(d) action.
font1 (class SmeBSB)
Invokes the set-vt-font(1) action.
font2 (class SmeBSB)
Invokes the set-vt-font(2) action.
font3 (class SmeBSB)
Invokes the set-vt-font(3) action.
font4 (class SmeBSB)
Invokes the set-vt-font(4) action.
fontescape (class SmeBSB)
Invokes the set-vt-font(e) action.
fontsel (class SmeBSB)
Invokes the set-vt-font(s) action.
The tekMenu (title Tek Options) has the following entries:
tektextlarge (class SmeBSB)
Invokes the set-tek-text(1) action.
tektext2 (class SmeBSB)
Invokes the set-tek-text(2) action.
tektext3 (class SmeBSB)
Invokes the set-tek-text(3) action.
tektextsmall (class SmeBSB)
Invokes the set-tek-text(s) action.
line1 (class SmeLine)
A separator.
Invokes the tek-page() action.
tekreset (class SmeBSB)
Invokes the tek-reset() action.
tekcopy (class SmeBSB)
Invokes the tek-copy() action.
line2 (class SmeLine)
A separator.
vtshow (class SmeBSB)
Invokes the set-visibility(vt, toggle) action.
vtmode (class SmeBSB)
Invokes the set-terminal-type(vt) action.
tekhide (class SmeBSB)
Invokes the set-visibility(tek, toggle) action.
The following resources are useful when specified for the Athena Scrollbar widget (scrollBar, class ScrollBar):
thickness (class Thickness)
Specifies the width in pixels of the scrollbar.
background (class Background)
Specifies the color to use for the background of the scrollbar.
foreground (class Foreground)
Specifies the color to use for the foreground of the scrollbar. The “thumb” of the scrollbar is a simple checkerboard pattern alternating pixels for foreground and background color.
The Release 3 version of xterm uses the menu widget, which accepts the following resources:
menuBorder (class MenuBorder)
Specifies the size in pixels of the border surrounding menus. The default is 2.
menuFont (class Font)
Specifies the name of the font to use for displaying menu items.
menuPad (class MenuPad)
Specifies the number of pixels between menu items and the menu border. The default is 3.
Emulations
The VT102 emulation is fairly complete, but does not support the blinking character attribute nor the double-wide and double-size character sets. termcap entries that work with xterm include “xterm”, “vt102”, “vt100” and “ansi”. xterm automatically searches the termcap file in this order for these entries and then sets the TERM and the TERMCAP environment variables. Note that the “xterm” termcap entry distributed with X is not automatically installed. You must add it to /etc/termcap yourself.
Many of the special xterm features (like logging) may be modified under program control through a set of escape sequences different from the standard VT102 escape sequences. (See Appendix E, xterm Control Sequences, in this guide.)
The Tektronix 4014 emulation is also fairly good. Four different font sizes and five different line types are supported. The Tektronix text and graphics commands are recorded internally by xterm and may be written to a file by sending the COPY escape sequence (or through the Tektronix menu; see below). The name of the file will be “COPYyy-MM-dd.hh:mm:SS”, where yy, mm, dd, hh, mm and ss are the year, month, day, hour, minute and second when the COPY was performed (the file is created in the directory xterm is started in, or the home directory for a login xterm).
Pointer Usage
Once the VT102 window is created, xterm allows you to select text and copy it within the same or other windows.
The selection functions are invoked when the pointer buttons are used with no modifiers, and when they are used with the Shift key. The assignment of the functions described below to keys and buttons may be changed through the resource database; see “Actions” below.
Pointer button one (usually the left) is used to save text into the cut buffer. Move the cursor to the beginning of the text, and then hold the button down while moving the cursor to the end of the region and release the button. The selected text is highlighted and is saved in the global cut buffer and made the PRIMARY selection when the button is released. Double-clicking selects by words. Triple-clicking selects by lines. Quadruple-clicking goes back to characters, etc. Multiple-click is determined by the time from button up to button down, so you can change the selection unit in the middle of a selection. If the key/button bindings specify that an X selection is to be made, xterm will leave the selected text highlighted for as long as it is the selection owner.
Pointer button two (usually the middle) ‘types’ (pastes) the text from the PRIMARY selection, if any, otherwise from the cut buffer, inserting it as keyboard input.
Pointer button three (usually the right) extends the current selection. (You can swap “right” and “left” everywhere in the rest of this paragraph.) If pressed while closer to the right edge of the selection than the left, it extends/contracts the right edge of the selection. If you contract the selection past the left edge of the selection, xterm assumes you really meant the left edge, restores the original selection, then extends/contracts the left edge of the selection. Extension starts in the selection unit mode that the last selection or extension was performed in; you can multiple-click to cycle through them.
By cutting and pasting pieces of text without trailing new lines, you can take text from several places in different windows and form a command to the shell, for example, or take output from a program and insert it into your favorite editor. Since the cut buffer is globally shared among different applications, you should regard it as a ‘file’ whose contents you know. The terminal emulator and other text programs should be treating it as if it were a text file, i.e., the text is delimited by new lines.
The scroll region displays the position and amount of text currently showing in the window (highlighted) relative to the amount of text actually saved. As more text is saved (up to the maximum), the size of the highlighted area decreases.
Clicking button one with the pointer in the scroll region moves the adjacent line to the top of the display window.
Clicking button three moves the top line of the display window down to the pointer position.
Clicking button two moves the display to a position in the saved text that corresponds to the pointer’s position in the scrollbar.
Unlike the VT102 window, the Tektronix window does not allow the copying of text. It does allow Tektronix GIN mode, and in this mode the cursor will change from an arrow to a cross. Pressing any key will send that key and the current coordinate of the cross cursor. Pressing button one, two, or three will return the letters ‘I’, ‘m’, and ‘r’, respectively. If the Shift key is pressed when a pointer button is pressed, the corresponding upper case letter is sent To distinguish a pointer button from a key, the high bit of the character is set (but this bit is normally stripped unless the terminal mode is RAW; see tty(4) for details).
Menus
The Release 4 version of xterm has four different menus, titled Main Options, VT Options, Tek Options, and VT Fonts. The first three menus are available in Release 3 under the names xterm, Modes, and Tektronix. The VT Fonts menu is available as of Release 4.
Many of the menu items have been also been renamed in Release 4; however, most items have not changed in functionality. The following sections describe the items available on the Release 3 and 4 menus. In the sections describing the various menu items, if an item has simply been renamed, the Release 3 name appears in parentheses after the Release 4 name.
Each menu pops up under the correct combinations of key and button presses. Most menus are divided into two sections, separated by a horizontal line. The top portion contains various modes that can be specified. A check mark appears next to a mode that is currently active. Selecting one of these modes toggles its state. The bottom portion contains command entries; selecting one of these performs the indicated function. The menus are described in detail in the following sections.
Main Options Menu (Release 3: xterm Menu)
The Main Options menu (formerly xterm) is displayed when the Control key and pointer button one are simultaneously pressed in an xterm window. The modes section contains items that apply to both the VT102 and Tektronix windows. The modes can also be set by command line options when invoking xterm, or by entries in a resource startup file like Xresources (see Chapter 9, Setting Resources). The menu selections enable you to change your mind once xterm is running.
All of the commands on this menu (except for Redraw Window) send a signal that is intended to affect the xterm process (Send INT Signal, Send TERM Signal, etc.). Given that your operating system may recognize only certain signals, every menu item may not produce the intended function.
Four of these commands (Send HUP Signal, Send TERM Signal, Send KILL Signal, and Quit) send signals that are intended to terminate the xterm window. In most cases, you can probably end an xterm process simply by typing some sequence (such as Control-D or exit) in the window. Of course, the menu options may be helpful if the more conventional ways of killing the window fail.
Main Options Menu Mode Toggles (On/Off)
| Visual Bell | Causes your terminal window to flash whenever an event occurs that would ordinarily cause your terminal bell to ring. This item appears on the equivalent Release 3 menu (the xterm menu) only. In Release 4, it has been renamed Enable Visual Bell and moved to the VT Options menu. |
| Secure Keyboard | Ensures that all keyboard input is directed only to xterm. Used when typing in passwords or other sensitive data in an unsecure environment. (See “Security” later in this reference page.) |
Allow SendEvents (Release 4 only)
Causes synthetic key and button events (generated using the X protocol SendEvent request) to be interpreted. Note that allowing such events creates a very large security hole.
Log to File (Release 3: Logging)
Logs xterm input/output into a file in your home directory called XtermLog.xxxxx where xxxxx represents the process ID number of the xterm process. Logging allows you to keep track of the sequence of data and, therefore, is particularly helpful while debugging code.
To display the data contained in the log file, at the xterm window prompt, type:
more XtermLoq.xxxxx
The output file is sent to your xterm window.
Be sure to turn Log to File off before displaying the log file in the xterm window. When Log to File is on, anything in the window is appended to the end of the log file. If you display the log file while logging is on, you will get into a continuous loop, much as if you typed cat * > file.
To find out the exact name of the log file, list the contents of your home directory, looking for a log file with an appropriate time and date. Note that if you turn logging on in multiple xterm windows, there will be multiple log files.
Main Options Menu Commands
Redraw Window (Release 3: Redraw)
Redraws the contents of the window. (If you are using the uwm window manager, you can also do this with the Redraw selection of the uwm WindowOps menu. Or you can refresh the entire screen with the xrefresh client or the Refresh Screen selection of the WindowOps menu. See Appendix B, Using the uwm Window Manager.)
Send STOP Signal (Release 3: Suspend program)
Suspends a process (sends the SIGTSTP signal to the process group of the process running under xterm, usually the shell). If your system supports job control, you may also be able to suspend the process by typing Control-Z. If your system does not support job control, this menu item won’t work either.
Send CONT Signal (Release 3: Continue program)
Continues a process that has been suspended (technically speaking, this menu item sends the SIGCONT signal to the process group of the process running under xterm, usually the shell). The Send CONT Signals item is especially useful on systems with job control if you accidentally type Control-Z and suspend a process.
Send INT Signal (Release 3: Interrupt program)
Interrupts a process (sends the SIGINT signal to the process group of the process running under xterm, usually the shell).
Send HUP Signal (Release 3: Hangup program)
Hangs up the process (sends the SIGHUP signal to the process group of the process running under xterm, usually the shell). This usually ends up killing the xterm process, and the window disappears from the screen.
Send TERM Signal (Release 3: Terminate program)
Terminates the process (sends the SIGTERM signal to the process group of the process running under xterm, usually the shell). This usually ends up killing the xterm process, and the window disappears from the screen.
Send KILL Signal(Release 3: Kill program)
Kills the process (sends the SIGKILL signal to the process group of the process running under xterm, usually the shell). This ends up killing the xterm process, and the window disappears from the screen.
| Quit | Like Send HUP Signal, Quit sends the SIGHUP signal to the process group of the process running under xterm, usually the shell. This usually ends up killing the xterm process, and the window disappears from the screen. |
| Quit is separated from the earlier commands by a horizontal line, so it’s easier to point at. Sending a SIGHUP signal with Quit is also slightly more gentle to the system than using Send KILL Signal. |
See signal(3C) in the UNIX Programmer’s Manual for more information on what each signal does.
VT Options Menu (Release 3: Modes Menu)
The VT Options menu (formerly Modes) menu sets various modes in the VT102 emulation and is displayed when the Control key and pointer button two are pressed in the VT102 window.
In the command section of this menu, the soft reset entry will reset scroll regions. This can be convenient when some program has left the scroll regions set incorrectly (often a problem when using VMS or TOPS-20). The full reset entry will clear the screen, reset tabs to every eight columns, and reset the terminal modes (such as wrap and smooth scroll) to their initial states just after xterm has finish processing the command line options.
VT Options Menu Mode Toggles (On/Off)
Most of these modes can also be set by command line options when invoking xterm, or by entries in a resource startup file like .Xresources (see Chapter 9, Setting Resources). The menu selections enable you to change your mind once xterm is running.
Enable Scrollbar (Release 3: Scrollbar)
Causes a scrollbar to appear on the left-hand side of the xterm window. Off by default.
Enable Jump Scroll (Release 3: Jump Scroll)
Causes the window to move text several lines at a time rather than line by line. On by default.
Enable Reverse Video (Release 3: Reverse Video)
Reverses the foreground and background colors. Off by default.
Enable Auto Wraparound (Release 3: Auto Wraparound)
Wraps the text or data to the next line automatically when the cursor reaches the window border on input. On by default.
Enable Reverse Wraparound (Release 3: Reverse Wraparound)
Allows the cursor to wrap around from the leftmost column to the rightmost column of the previous line. Allows you to backspace to the previous line and overstrike data or erase data with the space bar. Off by default.
Enable Auto Linefeed (Release 3: Auto Linefeed)
Generates a linefeed automatically. This is useful if you are using a program that generates a carriage return without dropping down a line on your screen. Off by default. (This option is usually not needed on UNIX systems.)
Enable Application Cursor Keys (Release 3: Application Cursor Mode)
Generates ANSI escape sequences rather than standard cursor movement when you use the arrow keys. This option may be useful when working with certain applications. Off by default.
The following table lists the ANSI characters generated by application cursors.
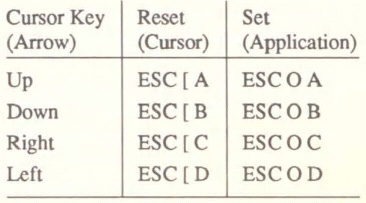
Enable Application Keypad (Release 3: Application Keypad Mode)
Generates a control function rather than a numeric character when you use the numeric keypad. Off by default.
Scroll to Bottom on Key Press
Indicates that pressing a key while using the scrollbar causes the cursor to be repositioned at the bottom of the scroll region. For example, if you have scrolled up the window to see past history, as soon as you begin typing your next command the cursor jumps to the bottom of the screen. Off by default.
Scroll to Bottom on Tty Output
Indicates that receiving output to the window (or pressing a key, if stty echo has been specified), while using the scrollbar causes the cursor to be repositioned at the bottom of the scroll region. In Release 4, on by default. (In Release 3, off by default; on automatically if the window has a scrollbar.) This mode can be toggled off, but is generally desirable to have.
Allow 80/132 Column Switching (Release 3: Allow 80/132 switching)
Allows xterm to recognize the DECCOLM escape sequence, which switches the terminal between 80 and 132-column mode. The DECCOLM escape sequence can be included in a program (such as a spreadsheet) to allow the program to display in 132-column format. See Appendix E, xterm Control Sequences, for more information. Off by default.
Enable Curses Emulation (Release 3: Curses Emulation)
Enables the curses fix. Several programs that use the curses cursor motion package have some difficulties with VT102-compatible terminals. The bug occurs when you run the more program on a file containing a line that is exactly the width of the window and that is followed by a line beginning with a tab. The leading tabs may disappear. This mode causes the tabs to be displayed correctly. Off by default.
Enable Visual Bell
Causes your terminal window to flash whenever an event occurs that would ordinarily cause your terminal bell to ring. This item appears as Visual Bell on the Release 3 xterm menu. In Release 4, it has been renamed Enable Visual Bell and moved to the VT Options menu.
Enable Margin Bell (Release 3: Margin Bell)
Turns on the margin bell. Off by default.
Tek Window Showing
Shows the current contents of the Tektronix window; you cannot input to that window until you choose Switch to Tek Mode. Off by default. This item is a mode toggle on the equivalent Release 3 menu (Modes). In
Release 4, it has been renamed and moved to the commands section, as described below.
Show Alternate Screen (Release 3: Alternate Screen)
Informs you that you are looking at the alternate screen. You cannot select this mode from the menu. If a check mark appears beside this mode, you are viewing the alternate screen. Off by default.
VT Options Menu Commands
These commands can only be invoked from the menu; there are no alternative ways to perform the same functions.
Do Soft Reset (Release 3: Soft Reset)
Resets the terminal scroll region from partial scroll (a portion of the window) to full scroll (the entire window). Use this command when a program has left the scroll region set incorrectly.
Do Full Reset (Release 3: Full Reset)
Clears the window, resets tabs to every eight columns, and resets the terminal modes such as auto wraparound and jump scroll to their initial states.
Show Tek Window (Release 3: Tek Window Showing)
Shows the current contents of the Tektronix window; you cannot input to that window until you choose Switch to Tek Mode. Off by default. The Release 3 item appeared in the mode toggles section of the menu; the item has been renamed and moved to the commands section in Release 4.
Switch to Tek Mode (Release 3: Select Tek Mode)
Brings up a Tektronix window. You can input to this window.
Hide VT Window
Removes the VT window but does not destroy it. It can be brought back by choosing Select VT Mode from the Tek Options menu.
Tek Options Menu (Release 3: Tektronix Menu)
The Tek Options menu (formerly Tektronix) sets various modes in the Tektronix emulation, and is displayed when the Control key and pointer button two are pressed in the Tektronix window. The current font size is checked in the modes section of the menu. The PAGE entry in the command section clears the Tektronix window.
Tek Options Menu Mode Toggles (On/Off)
These modes can only be set from the Tek Options menu.
| Large Characters #2 Size Characters #3 Size Characters Small Characters |
Selecting one of these four options sets the point size of text displayed in the Tektronix window. The four options are mutually exclusive. |
| VT Window Showing | Shows the current contents of the VT102 window; you cannot input to that window until you choose Switch to VT Mode. This item is a mode toggle on the equivalent Release 3 menu (Tektronix). In Release 4, it has been renamed and moved to the commands section, as described below. |
Tek Options Menu Commands
| PAGE | Clears the Tektronix window. |
| RESET | Closes down the Tektronix window. |
| COPY | Writes a file of the Tektronix text and graphics commands. |
Show VT Window (Release 3: VT Window Showing)
Shows the current contents of the VT102 window; you cannot input to that window until you choose Switch to VT Mode. The Release 3 item appeared in the mode toggles section of the menu; the item has been renamed and moved to the commands section in Release 4.
Switch to VT Mode (Release 3: Select VT Mode)
Makes the associated VT102 window active for input.
Hide Tek Window
Removes the Tektronix window but does not destroy it. It can be brought back by choosing Switch to Tek Mode from the VT Options Menu menu.
VT Fonts Menu (Release 4)
Added in Release 4, the VT Fonts menu enables you to change the VT102 display font dynamically. The menu is displayed when the Control key and pointer button three are pressed in the VT102 window. All items on the menu toggle different display fonts. The items are mutually exclusive. A checkmark appears on the menu next to the current font.
| Default Tiny Small Medium Large |
Selecting one of these five options sets the point size of text displayed in the VT102 window. The Default font is the font specified when the xterm was run. |
| Escape Sequence | Allows you to select a font previously toggled using an escape sequence. See Chapter 5, Font Specification, for the escape sequence to use. |
| Selection | Allows you to toggle a font whose name you’ve previously selected with the pointer or using the select button of the xfontsel client. See Chapter 5, Font Specification, for more information. |
Security
X environments differ in their security consciousness. MIT servers, run under xdm, are capable of using a “magic cookie” authorization scheme that can provide a reasonable level of security for many people. If your server is only using a host-based mechanism to control access to the server (see xhost), then if you enable access for a host and other users are also permitted to run clients on that same host, there is every possibility that someone can run an application that will use the basic services of the X protocol to snoop on your activities, potentially capturing a transcript of everything you type at the keyboard. This is of particular concern when you want to type in a password or other sensitive data. The best solution to this problem is to use a better authorization mechanism that host-based control, but a simple mechanism exists for protecting keyboard input in xterm.
The Main Options menu (see “Menus” above) contains a Secure Keyboard entry which, when enabled, ensures that all keyboard input is directed only to xterm (using the GrabKeyboard protocol request). When an application prompts you for a password (or other sensitive data), you can enable Secure Keyboard using the menu, type in the data, and then disable Secure Keyboard using the menu again. Only one X client at a time can secure the keyboard, so when you attempt to enable Secure Keyboard it may fail. In this case, the bell will sound. If the Secure Keyboard succeeds, the foreground and background colors will be exchanged (as if you selected the Enable Reverse Video entry in the VT Options menu); they will be exchanged again when you exit secure mode. If the colors do not switch, then you should be very suspicious that you are being spoofed. If the application you are running displays a prompt before asking for the password, it is safest to enter secure mode before the prompt gets displayed, and to make sure that the prompt gets displayed correctly (in the new colors), to minimize the probability of spoofing. You can also bring up the menu again and make sure that a check mark appears next to the entry.
Secure Keyboard mode will be disabled automatically if your xterm window becomes iconified (or otherwise unmapped), or if you start up a reparenting window manager (that places a title bar or other decoration around the window) while in Secure Keyboard mode. (This is a feature of the X protocol not easily overcome.) When this happens, the foreground and background colors will be switched back and the bell will sound in warning.
Character Classes
Clicking the middle mouse button twice in rapid succession will cause all characters of the same class (e.g., letters, white space, punctuation) to be selected. Since different people have different preferences for what should be selected (for example, should filenames be selected as a whole or only the separate subnames), the default mapping can be overridden through the use of the charClass (class CharClass) resource.
This resource is simply a list of range: value pairs where the range is either a single number or low-high in the range of 0 to 127, corresponding to the ASCII code for the character or characters to be set. The value is arbitrary, although the default table uses the character number of the first character occurring in the set.
The default table is:
static int charClass[128] = {

/* NUL  SOH  STX  ETX  EOT  ENQ  ACK  BEL */

    32,   1,   1,   1,   1,   1,   1,   1,

/*  BS   HT   NL   VT   NP   CR   sO   SI */

     1,  32,   1,   1,   1,   1,   1,   1,

/* DLE  DC1  DC2  DC3  DC4  NAK  SYN  ETB */

     1,   1,   1,   1,   1,   1,   1,   1,

/* CAN   EM  SUB  ESC   FS   GS   RS   US */

     1,   1,   1,   1,   1,   1,   1,   1,

/*  SP    !    "    #    $    %    &    , */

    32,  33,  34,  35,  36,  37,  38,  39,

/*   (    )    *    +    ,    -    .    / */

    40,  41,  42,  43,  44,  45,  46,  47,

/*   0    1    2    3    4    5    6    7 */

    48,  48,  48,  48,  48,  48,  48,  48,

/*   8    9    :    ;    <    =    >    ? */

    48,  48,  58,  59,  60,  61,  62,  63,

/*   @    A    B    C    D    E    F    G */

    64,  48,  48,  48,  48,  48,  48,  48,

/*   H    I    J    K    L    M    N    O */

    48,  48,  48,  48,  48,  48,  48,  48,

/*   P    Q    R    S    T    U    V    W */

    48,  48,  48,  48,  48,  48,  48,  48,

/*   X    Y    Z    [    \    ]    ^    _ */

    48,  48,  48,  91,  92,  93,  94,  48,

/*   '    a    b    c    d    e    f    g */

    96,  48,  48,  48,  48,  48,  48,  48,

/*   h    i    j    k    l    m    n    o */

    48,  48,  48,  48,  48,  48,  48,  48,

/*   p    q    r    s    t    u    v    w */

    48,  48,  48,  48,  48,  48,  48,  48,

/*   x    y    z    {    |    }    ~  DEL */

    48,  48,  48, 123, 124, 125, 126,   1};
For example, the string “33:48,37:48,45-47:48,64:48” indicates that the exclamation mark, percent sign, dash, period, slash, and ampersand characters should be treated the same way as characters and numbers. This is very useful for cutting and pasting electronic mailing addresses and UNIX filenames.
Actions (Release 4)
It is possible to rebind keys (or sequences of keys) to arbitrary strings for input, by changing the translations for the vt100 or tek4014 widgets. Changing the translations for events other than key and button events is not expected, and will cause unpredictable behavior. In Release 4, the following actions are provided for using with the vt100 or tek4014 translations resource:
bell ([percent])
Rings the keyboard bell at the specified percentage above or below the base volume.
ignore()
Ignores the event but checks for special pointer position escape sequences.
insert()
A synonym for insert-seven-bit().
insert-seven-bit()
Inserts the 7-bit USASCII character or string associated with the keysym that was pressed.
insert-eight-bit()
Inserts the 8-bit ISO Latin-I character or string associated with the keysym that was pressed.
insert-selection(Sourcename [, ... ])
Inserts the string found in the selection or cut buffer indicated by sourcename. Sources are checked in the order given (case is significant) until one is found. Commonly-used selections include: PRIMARY, SECONDARY, and CLIPBOARD. Cut buffers are typically named CUT_BUFFERO through CUT_BUFFER7.
keymap(name)
Dynamically defines a new translation table whose resource name is name with the suffix Keymap (case is significant). The keymap name None restores the original translation table.
popup-menu(menuname)
Displays the specified popup menu. Valid names (case is significant) include: main-Menu, vtMenu, fontMenu, and tekMenu.
secure()
Toggles the secure keyboard mode described in the Security section, and is invoked from the Secure Keyboard entry in mainMenu.
select-start()
Begins text selection at the current pointer location. See the section on “Pointer Usage” for information on making selections.
select-extend()
Tracks the pointer and extends the selection. It should only be bound to motion events.
select-end(destname [, . . . ])
Puts the currently selected text into all of the selections or cutbuffers specified by dest-name
select-cursor-start()
Similar to select-start, except that it begins the selection at the current text cursor position.
select-cursor-end (destname [, ... ] )
Similar to select-end, except that it should be used with select-cursor-start.
set-vt-font (d/1/2/3/4/e/s [,normalfont [, boldfont]])
Sets the font or fonts currently being used in the VT102 window. The first argument is a single character that specifies the font to be used: d or D indicates the default font (the font initially used when xterm was started); 1 through 4 indicate the fonts specified by the font 1 through font 4 resources; e or E indicates the normal and bold fonts that may be set through escape codes (or specified as the second and third action arguments, respectively); and i or I indicates the font selection (as made by programs such as xfontsel) indicated by the second action argument.
start-extend ()
Similar to select-start except that the selection is extended to the current pointer location.
start-cursor-extend()
Similar to select - extend except that the selection is extended to the current text cursor position.
string (string)
Inserts the specified text string as if it had been typed. Quotation is necessary if the string contains whitespace or non-alphanumeric characters. If the string argument begins with the characters “0x”, it is interpreted as a hex character constant.
scroll-back(count [,units])
Scrolls the text window backward so that text that had previously scrolled off the top of the screen is now visible. The count argument indicates the number of units (which may be page, half page, pixel, or line) by which to scroll.
scroll-forw (count [,units])
Scrolls is similar to scroll-back except that it scrolls the other direction.
allow-send-events (on/off/toggle)
Sets or toggles the allowSendEvents resource and is also invoked by the allowsends entry in mainMenu.
set-logging(on/off/toggle)
Toggles the logging resource and is also invoked by the logging entry in the main-Menu.
redraw ()
Redraws the window and is also invoked by the redraw entry in mainMenu.
send-signal (signame)
Sends the signal named by signame (which may also be a number) to the xterm subprocess (the shell or program specified with the -e command line option) and is also invoked by the suspend, continue, interrupt, hangup, terminate, and kill entries in mainMenu. Allowable signal names are (case is not significant): suspend, tstp (if supported by the operating system), cont (if supported by the operating system), int, hup, term, and kill.
Sends a SIGHUP to the subprogram and exits. It is also invoked by the quit entry in mainMenu.
set-scrollbar(on/off/toggle)
Toggles the scrollbar resource and is also invoked by the scrollbar entry in vtMenu.
set-jumpscroll (on/off/toggle)
Toggles the jumpscroll resource and is also invoked by the jumpscroll entry in vtMenu.
set-reverse-video (on/off/toggle)
Toggles the reverseVideo resource and is also invoked by the reversevideo entry in vtMenu.
set-autowrap (on/off/toggle)
Toggles automatic wrapping of long lines and is also invoked by the autowrap entry in vtMenu.
set-reversewrap (on/off/toggle)
Toggles the reverseWrap resource and is also invoked by the reversewrap entry in vtMenu.
set-autolinefeed (on/off/toggle)
Toggles automatic insertion of linefeeds and is also invoked by the autolinefeed entry in vtMenu.
set-appcursor (on/off/toggle)
Toggles the application cursor key mode and is also invoked by the appcursor entry in vtMenu.
set-appkeypad (on/off/toggle)
Toggles the application keypad mode and is also invoked by the appkeypad entry in vtMenu.
set-scroll-on-key (on/off/toggle)
Toggles the scrollKey resource and is also invoked from the scrollkey entry in vtMenu.
set-scroll-on-tty-output (on/off/toggle)
Toggles the scrollTtyOutput resource and is also invoked from the scrollttyoutput entry in vtMenu.
set-allowl32 (on/off/toggle)
Toggles the c132 resource and is also invoked from the allow132 entry in vtMenu.
set-cursesemul (on/off/toggle)
Toggles the curses resource and is also invoked from the cursesemul entry in vtMenu.
set-visual-bell (on/off/toggle)
Toggles the visualBell resource and is also invoked by the visualbell entry in vtMenu.
set-marginbell (on/off/toggle)
Toggles the marginBell resource and is also invoked from the marginbell entry in vtMenu.
set-altscreen (on/off/toggle)
Toggles between the alternative and current screens.
soft-reset()
Resets the scrolling region and is also invoked from the softreset entry in vtMenu.
hard-reset ()
Resets the scrolling region, tabs, window size, and cursor keys and clears the screen. It is also invoked from the hardreset entry in vtMenu.
set-terminal-type (type)
Directs output to either the vt or tek windows, according to the type string. It is also invoked by the tekmode entry in vtMenu and the vtmode entry in tekMenu.
set-visibility (vt/tek,on/off/toggle)
Controls whether or not the vt or tek windows are visible. It is also invoked from the tekshow and vthide entries in vtMenu and the vtshow and tekhide entries in tekMenu.
set-tek-text (1arge/2/3/sma11)
Sets font used in the Tektronix window to the value of the resources tektextlarge, tektext2, tektext3, and tektextsmall according to the argument. It is also by the entries of the same names as the resources in tekMenu.
tek-page ()
Clears the Tektronix window and is also invoked by the tekpage entry in tekMenu.
tek-reset ()
Resets the Tektronix window and is also invoked by the tekreset entry in tekMenu.
tek-copy ()
Copies the escape codes used to generate the current window contents to a file in the current directory beginning with the name COPY. It is also invoked from the tekcopy entry in tekMenu.
The Tektronix window also has the following action:
gin-press(l/L/m/M/r/R)
Sends the indicated graphics input code.
The default bindings in the VT102 wubdiw are:
Shift      <KeyPress>      Prior:              scroll-back(1, halfpage)\n\

Shift      <KeyPress>      Next:               scrol1-forw(1, halfpage)\n\

Shift      <KeyPress>      Select:             select-cursor-start ()\
                                               select-cursor-end (PRIMARY, CUT BUFFER0) \n\

Shift      <KeyPress>      Insert:             insert-selection (PRIMARY,CUTBUFFER0) \n\

           ~Meta           <KeyPress>:         insert-seven-bit()\n\

           Meta            <KetPress>:         insert-eight-bit()\n\

Ctrl       ~Meta           <BtnlDown>:         popup-menu (mainMenu) \n\

           ~Meta           <BtnlMotion>:       select-start()\n\

           ~Meta           <BtnlMotion>:       select-extend()\n\

~Ctrl      ~Meta           <Btn2Down>:         popup-menu(vtMenu)\n\

~Ctrl      ~Meta           <Btn2Down>:         ignore ()\n\

~Ctrl      ~Meta           <Btn2Up>:           insert-selection (PRIMARY, CUT BUFFER0) \n\

Ctrl       ~Meta           <Btn3Down>:         popup-menu(fontMenu)\n\

~Ctrl      ~Meta           <Btn3Down>          start-extend()\n\

           ~Meta           <Btn3Motion>:       select-extend()\n\

           ~Ctrl           ~Meta               <BtnUp>:

                           <BtnDown>:          bell (0)
The default bindings in the Tektronix window are:
               ~Meta      <KeyPress>:     insert- seven-bit()\n\

               Meta       <KeyPress>:     insert-eight-bit()\n\

Ctrl           ~Meta      <BtnlDown>:     popup-menu(mainMenu)\n\

Ctrl           ~Meta      <Btn2Down>:     popup-menu(tekMenu)\n\

Shift          ~Meta      <BtnlDown>:     gin-press(L)\n\

               ~Meta      <BtnlDown>:     gin-press (l) \n\

Shift          ~Meta      <Btn2Down>:     gin-press(M)\n\

               ~Meta      <Btn2Down>:     gin-press (m)\n\

Shift          ~Meta      <Btn3Down>:     gin- press (R)\n\

               ~Meta      <Btn3Down>:     gin-press(r)
Below is a sample how of the keymap () action is used to add special keys for entering commonly-typed works:
*VTlOO.Translations: #override <Key>F13: keymap (dbx)

*VTlOO.dbxKeymap . translations : \


<Key>    F14:    keymap (None) \n \

<Key>    F17:    string ("next") string (0x0d) \n\

<Key>    F18:    string ("step") string(0x0d)\n\

<Key>    F19:    string("continue") string(0x0d) \ n\

<Key>    F20:    string("print ") insert-selection (PRIMARY,CUT_BUFFERO)
Actions (Release 3)
It is possible to rebind keys (or sequences of keys) to arbitrary strings for input, by changing the translations for the vt100 or tek4014 widgets. Changing the translations for events other than key and button events is not expected, and will cause unpredictable behavior.
The actions available for key translations are:
insert ()
Processes the key in the normal way; i.e., inserts the ASCII character code corresponding to the keysym found in the keyboard mapping table into the input stream.
string (string)
Rebinds the key or key sequence to the string value; that is, inserts the string argument into the input stream. Quotation is necessary if the string contains whitespace or non-alphanumeric characters. If the string argument begins with the characters "Ox", it is interpreted as a hex character constant and the corresponding character is sent in the normal way.
keymap (name)
Takes a single string argument naming a resource to be used to dynamically define a new translation table; the name of the resource is obtained by appending the string Keymap to name. The keymap name None restores the original translation table (the very first one; a stack is not maintained). Upper/lower case is significant.
insert-selection (name[,name] ...)
Retrieves the value of the first (leftmost) named selection that exists or cut buffer that is non-empty and inserts the value into the input stream. name is the name of any selection, for example, PRIMARY or SECONDARY, or the name of a cut buffer: CUT_BUFFERO, ..., CUT_BUFFER7. Upper/lower case is significant.
For example, a debugging session might benefit from the following bindings:
*VT100.Translations: #override <Key>F13: keymap(dbx)

*VT100.dbxKeymap.translations: \

    <Key>F14:  keymap(None) \n\

    <Key>Fl7:  string("next") string(0x0d) \n\

    <Key>Fl8:  string("step") string(0x0d) \n\

    <Key>Fl9:  string("continue") string(0x0d) \n\

    <Key>F20:  string{"print") insert-selection(PRIMARY, CUT_BUFFERO)
Within the VT100 widget the key and button bindings for selecting text, pasting text, and activating the menus are controlled by the translation bindings. In addition to the actions listed above under Key Translations, the following actions are available:
mode-menu ()
Posts one of the two mode menus, depending on which button is pressed.
select-start()
Unselects any previously selected text and begins selecting new text
select-extend ()
Continues selecting text from the previous starting position.
start-extend ()
Begins extending the selection from the farthest (left or right) edge.
Ends the text selection. name is the name of a selection, or the name of a cut buffer into which the text is to be copied. xterm will assert ownership of all the selections named and will copy the text into each of the cut buffers. Upper/lower case is significant.
ignore ()
Quietly discards the key or button event
bell([volume])
Rings the bell at the specified volume increment above/below the base volume.
The default bindings are:
                 <KeyPress>:     insert ( ) \n \

Ctrl     ~Meta   <BtnlDown>:     mode-menu()\n\

         ~Meta   <BtnlDown>:     select-start( ) \n\

         ~Meta   <BtnlMotion>:   select-extend ()\n\

Ctrl     ~Meta   <Btn2Down>:     mode-menu () \n\

~ctrl    ~Meta   <Btn2Down>:     ignore()\n\

         ~Meta   <Btn2Up>:       insert-selection(PRIMARY,CUT_BUFFERO) \n \

~ctrl    ~Meta   <Btn3Down>:     start-extend ( )\n\

         ~Meta   <Btn3Motion>:   select-extend () \n\

         ~Meta   <BtnUp>:        select-end(PRIMARY, CUT_BUFFERO) \ n \

                 <BtnDown>:      bell(0)
An Obsolete Feature: Starting xterm from Jnlt
Warning: This feature is now obsolete. It is not supported in Release 4. If Release 3 is running at your site, this method may still be in use. However, sites using this method should switch to xdm instead.
On operating systems such as BSD 4.3 and Ultrix, the server and initial login window are normally started automatically by init(8).
By convention, the pseudo-terminal with the highest minor device number (e.g., devttyqf and devptyqf) is renamed for the lowest display number (e.g., devttyv0 and devptyv0). Machines that have more than one display can repeat this process using ttyqe for ttyvl, and so on.
Once the pseudo-terminals are in place, a line similar to the following may be added to letclttys (replacing Xqvss with the appropriate server and putting it all on one line):
ttyv0 "/usr/bin/X11/xterm -L -geom 80×24+1+1 -display : 0"

xterm on secure window="/usr/bin/Xll/Xqvss :0"
Sites that used to run X10 should note that the colon in the server display number is required.
Although the release will install both the X server and xterm in /usr/bin/Xll by default, many sites choose to make a copy of both of these programs on the root partition (usually in /etc) so that they may still be used even if the partition containing /usr/bin/Xll isn’t mounted.
Some versions of init have relatively small program name buffer sizes and treat all sharp signs as comment delimiters. Sites that wish to list large numbers of options on the xterm line will need to write a small shell script to execute the long xterm line. The best solution, of course, is to usexdm.
Other Features
xterm automatically highlights the window border and text cursor when the pointer enters the window (selected) and unhighlights them when the pointer leaves the window (unselected). If the window is the focus window, then the window is highlighted no matter where the pointer is.
In VT102 mode, there are escape sequences to activate and deactivate an alternate screen buffer, which is the same size as the display area of the window. When activated, the current screen is saved and replaced with the alternate screen. Saving of lines scrolled off the top of the window is disabled until the normal screen is restored. The termcap entry for xterm allows the visual editor vi to switch to the alternate screen for editing, and restore the screen on exit
In either VT102 or Tektronix mode, there are escape sequences to change the name of the windows and to specify a new log file name.
Environment
xterm sets the environment variables TERM and TERMCAP properly for the size window you have created. It also uses and sets the environment variable DISPLAY to specify which bitmap display terminal to use. The environment variable WINOOWID is set to the X window ID number of the xterm window.
Bugs
The class name is XTerm instead of Xterm.
The -L option is no longer needed since the display manager, xdm, handles logging in much more cleanly. No more trying to match colors in /etc/ttys or worrying about an unwanted login window. (The -L option has been removed in Release 4.)
xterm will hang forever if you try to paste too much text at one time. It is both producer and consumer for the pty and can deadlock.
Variable-width fonts are not handled reasonably.
This program still needs to be rewritten. It should be split into very modular sections, with the various emulators being completely separate widgets that don't know about each other. Ideally, you'd like to be able to pick and choose emulator widgets and stick them into a single control widget.
The focus is considered lost if some other client (e.g., the window manager) grabs the pointer; it is difficult to do better without an addition to the protocol.
There needs to be a dialog box to allow entry of the log file name and the COPY filename.
Many of the options are not resettable after xterm starts.
The Tek widget does not support key/button re-binding.
See Also
X, resize, pty(4), tty(4); Appendix E, xterm Control Sequences
Authors
Far too many people, including:
Loretta Guarino Reid (DEC-UEG-WSL), Joel McCormack (DEC-UEG-WSL), Terry Weissman (DEC-UEG-WSL), Edward Moy (Berkeley), Ralph R. Swick (MIT-Athena), Mark Vande voorde (MIT-Athena), Bob McNamara (DEC-MAD), Jim Gettys (MIT-Athena), Bob Scheifler (MIT X Consortium), Doug Mink (SAO), Steve Pitschke (Stellar), Ron Newman (MIT-Athena), Jim Fulton (MIT X Consortium), Dave Serisky (HP).
Window Image Dumper
xwd
Name
xwd – place window images in a dump file.
Syntax
.xwd [options]
Description
xwd stores window images in a specially formatted window dump file. This file can then be read by various other X utilities for redisplay, printing, editing, formatting, archiving, image processing, etc. The target window is selected by clicking the mouse in the desired window. The keyboard bell is rung once at the beginning of the dump and twice when the dump is completed.
Options
-help |
Prints out the ‘Usage:’ command syntax summary. |
-nobdrs |
Specifies that the window dump should not include the pixels that compose the X window border. This is useful when the window contents are included in a document as an illustration. |
-out file |
Allows you to specify the output file on the command line. The default outputs to the standard output (stdout). |
-xy |
Applies to color displays only. The –xy option selects ‘XY’ pixmap format dumping instead of the default ‘Z’ pixmap format. |
-root |
Makes a dump of the entire root window. |
-add value |
Specifies a signed value to be added to every pixel. |
-frame |
Indicates that the window manager frame should be included when manually selecting a window. (Available as of Release 4.) |
-display [host]:server[.screen]
Allows you to specify the host, server and screen to connect to. host is the machine, server is the server number and screen is the screen number. For example,
xwd -display your_node:0.1 &
specifies screen 1 on server 0 on the machine your_node. If the host is omitted, the local machine is assumed. If the screen is omitted, the screen 0 is assumed; the server and colon(:) are necessary in all cases.
Files
| XWDFile.h | X Window Dump File format definition file. |
See Also
X, xdpr, xpr, xwud
Author
Tony Della Fera, Digital Equipment Corp., MIT Project Athena;
William F. Wyatt, Smithsonian Astrophysical Observatory.
Window Information Utility
xwininfo
Name
xwininfo – window information utility for X.
Syntax
xwininfo[options]
Description
xwininfo is a utility for displaying information about windows. Depending on which options are choosen, various information is displayed. If no options are choosen, -stats is assumed.
The user has the option of selecting the target window with the mouse (by clicking any mouse button in the desired window) or by specifying its window id on the command line with the -id option. Or instead of specifying the window by its id number, the -name option may be used to specify the window by name. There is also a special -root option to quickly obtain information on the root window.
Options
-display [host]:server[.screen]
Allows you to specify the host, server and screen to connect to. host specifies the machine, server specifies the server number, and screen specifies the screen number. For example,
xvininfo -display your_node:0.1 &
specifies screen 1 of server 0 on the machine your_node. If the host is omitted, the local machine is assumed. If the screen is omitted, screen 0 is assumed; the server and colon(:) are necessary in all cases.
Examples
The following is a sample summary taken with no options specified.
xwininfo ==> Please select the window you wish

         ==> information on by clicking the

         ==> mouse in that window.


xwininfo ==> Window id: 0x30000f (xterm)


         ==> Upper left X: 0

         ==> Upper left Y: 0
         ==> Width: 578

         ==> Height: 316

         ==> Depth: 1

         ==> Border width: 1

         ==> Window class: InputOutput

         ==> Colormap: 0x80065

         ==> Window Bit Gravity State: NorthWestGravity

         ==> Window Window Gravity State: NorthWestGravity

         ==> Window Backing Store State: NotUseful

         ==> Window Save Under State: no

         ==> Window Map State: IsUnviewable

         ==> Window Override Redirect State: no

         ==> Corners: +0+0 -572+0 -572-582 +0-582
Bugs
Using -stats and -bits together shows some redundant information.
See Also
X, xprop
Author
Mark Lillibridge, MIT Project Athena.
xwud
Window Image Displayer
Name
xwud – X window image displayer.
Syntax
xwud [options]
Description
xwud is an X Window System window image undumping utility. xwud allows X users to display a window image saved in a specially formatted dump file, such as one produced by xwd.
The Release 4 version of xwud allows you to specify the coordinates at which this image is displayed using the -geometry option. If you are using the Release 3 version of xwud, the window image will appear at the coordinates of the original window from which the dump was taken.
Options
-help |
Prints out a short description of the allowable options. |
-in file |
Allows the user to explicitly specify the input file on the command line. The default is to take input from standard input. |
-display [host]: server[.screen]
Allows you to specify the host, server and screen to connect to. host specifies the machine, server specifies the server number, and screen specifies the screen number. For example,
xwud -display your_node:0.1
specifies screen 1 on server 0 on the machine your_node. If the host is omitted, the local machine is assumed. If the screen is omitted, the screen 0 is assumed; the server and colon(:) are necessary in all cases.
-geometry geometry
The xwud window is created with the specified size and location determined by the supplied geometry specification. The -geometry option can be (and often is) abbreviated to -g, unless there is a conflicting option that begins with “g.” The argument to the geometry option (geometry) is referred to as a “standard geometry string,” and has the form widthx-height±xoff±yoff. (This option is available for use with xwud as of Release 4.)
Typically, you will only want to specify the position and let the size default to the actual size of the image.
-plane number
Selects a single bit plane of the image to display. Planes are numbered with zero being the least significant bit. This option can be used to figure out which plane to pass to xpr for printing. (Available as of Release 4.)
-raw |
Forces the image to be displayed with whatever color values happen to currently exist on the screen. This option is mostly useful when undumping an image back onto the same screen that the image originally came from, while the original windows are still on the screen, and results in getting the image on the screen faster. (Available as of Release 4.) |
-rv |
If a bitmap image (or a single plane of an image) is displayed, this option forces the foreground and background colors to be swapped. This may be needed when displaying a bitmap image which has the color sense of pixel values “0” and “1” reversed from what they are on your display. (Available as of Release 4.) |
-std map_type
Causes the image to be displayed using the specified Standard Colormap. The property name is obtained by converting the type to upper case, prepending “RGB_”, and appending “_MAP”. Typical types are best, default, and gray. See xstdcmap for one way of creating Standard Colormaps. (Available as of Release 4.)
-vis vis_type_or_ID
Allows you to specify a particular visual or visual class. The default is to pick the “best” one. A particular class can be specified: StaticGray, GrayScale, StaticColor, PseudoColor, DirectColor, or True-Color. Or Match can be specified, meaning use the same class as the source image. Alternatively, an exact visual ID (specific to the server) can be specified, either as a hexadecimal number (prefixed with “0x”) or as a decimal number. Finally, “default” can be specified, meaning to use the same class as the colormap of the root window. Case is not significant in any of these strings. (Available as of Release 4.)
-inverse |
Applies to monochrome window dump files only. If selected, the window is undumped in reverse video. This is mainly needed because the display is ’write white’, whereas dump files intended eventually to be written to a printer are generally ’write black’. (Available in Release 3 only.) |
Files
XWDFile.h |
X Window Dump File format definition file. |
Bugs In Release 3
Does not attempt to do color translation when the destination screen does not have a colormap exactly matching that of the original window.
See Also
X, xdpr, xpr, xstdcmap, xwd
Author
Release 4 version by Bob Scheifler, MIT X Consortium;
Release 3 version by Tony Della Fera, Digital Equipment Corp. and MIT Project Athena, and William F. Wyatt, Smithsonian Astrophysical Observatory.
Get X Window System User's Guide for X11 R3 and R4 of the X Window System now with the O’Reilly learning platform.
O’Reilly members experience books, live events, courses curated by job role, and more from O’Reilly and nearly 200 top publishers.

