3
Using the twm Window Manager
This chapter describes twm, the standard window manager distributed with X. Additional information on customizing the operation of twm is provided in Chapter 10.
In This Chapter:
Shuffling the Window Stack: Raise and Lower
Raising Windows (bringing in front of others)
Lowering Windows (sending behind others)
Removing a Window: Delete and Kill
Button Control of Window Manager Functions
Using twm to Place Other Clients
3
Using the twm Window Manager
The twm window manager is primarily a window manipulation tool. It allows you to:
• Size and position client windows on the screen interactively.
• Move windows around the screen.
• Change the size of windows.
• Lower windows (send them to the back of others).
• Raise windows (bring them to the front of others).
• Convert windows to icons and icons to windows.
• Remove windows.
The twm window manipulation functions can be invoked in four ways:
• Using the titlebar.
• Using the Twm menu.
• By combinations of keyboard keys and pointer buttons.
• Automatically, when a client is started (to allow you to size and place the client window on the screen).
This chapter discusses each of these subjects in detail, but first we’ll take a look at starting twm.
Starting the Window Manager
As described in Chapter 2, Getting Started, you start twm from the command line by typing:
% twm &in an xterm window. If xdm (the display manager) is starting X on your system, the twm window manager is probably started automatically when you log on. It may also be started automatically from an .xinitrc file. (See Appendix A, System Management, for details.) When twm is started, you will see it add a titlebar to each window. Titlebars are useful; we’ll say more about them in the next section.
Note also that you can run xterm or other X clients without running a window manager. twm allows you to size and place client windows on the screen, but you can also use command line options to do this. However, there is no easy way to change the size or location of windows on the screen without a window manager.
Title bars
When twm starts up, it places a titlebar on every window on the screen. This titlebar contains the name of the window (“xterm,” for example), two buttons, and a region that is highlighted when the input focus is in the associated window.
The titlebar provides convenient access to the most commonly used window manager functions: iconify, resize, raise, and lower. Iconify allows you to shrink an unneeded window so that it’s out of your way. Resize allows you to change the size of a window. Raise and lower change the window’s position with respect to other windows that may be partially or completely covering it. All this without having to bring up a menu or type modifier keys! (See Figure 3-1 for a closer look at the titlebar.)
From the titlebar, you can:
• Iconify the window, by clicking the first pointer button (usually the leftmost) in the left-hand command button in the titlebar (it’s marked with an X).
• Resize the window, by pressing the first pointer button in the right-hand command button in the titlebar (which contains a group of nested squares). Then, while holding down the first pointer button, move the pointer across the border you want to move. Drag the pointer to move the border the desired amount and then release the pointer button.
• Raise the window to the top of the stack, by clicking the first pointer button on the titlebar.
• Lower the window to the bottom of the stack, by clicking the middle pointer button on the titlebar.
• Move the window, by pressing and holding down the left pointer button on the titlebar, dragging the window to a new location, and releasing the pointer button.
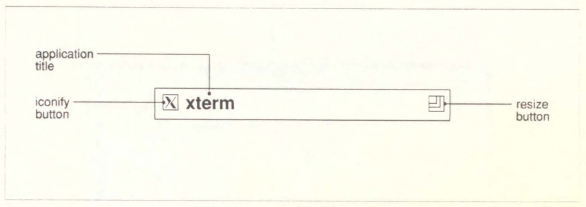
Figure 3-1. Anatomy of a twm titlebar
These functions can also be invoked from a menu and will be discussed more thoroughly in the next section.
The Twm Menu
twm’s Twm menu gives you access to many of the most frequently used window manipulation functions. In the standard version of twm shipped by MIT, you bring up this menu by moving the pointer to the root window and holding down the left pointer button. The Twm menu and the menu pointer appear as shown in Figure 3-2.
The following pages explain the functions of the Twm menu. Remember that all of the window manager functions are customizable. Items can be added to or deleted from this menu, and new menus can be defined by modifying the .twmrc window manager startup file, as described in Chapter 10, Customizing the twm Window Manager. The current chapter describes the window manager as it is shipped with the standard release of the X Window System from the MIT X Consortium.
To bring up the Twm menu, move the pointer to the root window and hold down the left button on the pointer. To select a menu item, continue to hold down the left button and move the pointer to the desired menu item. A horizontal band, or highlighting bar, follows the pointer. When you’ve highlighted the desired menu item, release the button. The selected function will be executed.

Some of the functions on the menus can be invoked simply by pressing a combination of pointer buttons and keyboard keys. We discuss these “keyboard shortcuts” as appropriate when discussing each menu function, and summarize them in Table 3-1 later in this Chapter. Some of these shortcuts make use of the “Meta” modifier key. See Chapter 11, Setup Clients, for a discussion of how to determine which key on your keyboard serves as the Meta key. (For the Sun-3 keyboard, for example, Meta is either of the keys labeled “Left” or “Right”)
Displaying Windows as Icons
If you want to make more space available on your screen, you can convert a window into an icon. An icon is a small symbol that represents the application window. You can also convert the icon back into a window, as shown in Figure 3-3 and Figure 3-4.
To convert a window to an icon:
1. Bring up the Twm menu.
2. Select Iconify with the menu pointer. The pointer changes to the target pointer.
3. Move the target pointer to the desired window.
4. Click the left button. The window is converted to an icon.
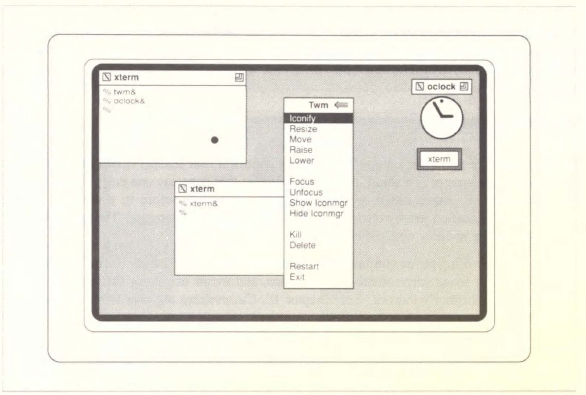
Figure 3-3. The login window is about to become an icon

Figure 3-4. The login window is about to be deiconified
To display an icon as its original window, simply click the left button on the icon. twm has a couple of advanced techniques for managing icons. One, the Icon Manager, will be discussed in the next section. The other, the Icon Region, is documented in the twm man page.
The Icon Manager
The Show Iconmgr and Hide Iconmgr menu items control a twm feature called the Icon Manager. The Icon Manager is a small, menu-like window that contains one entry for each window on the screen. An iconified window will have a small X before it; a window can be iconified and deiconified just by clicking on its entry in the Icon Manager. The Icon Manager also highlights the window with the current input focus.
By using the Icon Manager in conjunction with the variable IconifyByUnmapping, you can keep all your icons conveniently in one place, and avoid searching for icons that have been hidden under other windows. See Chapter 10, Customizing the twm Window Manager, for information on setting variables in twm.
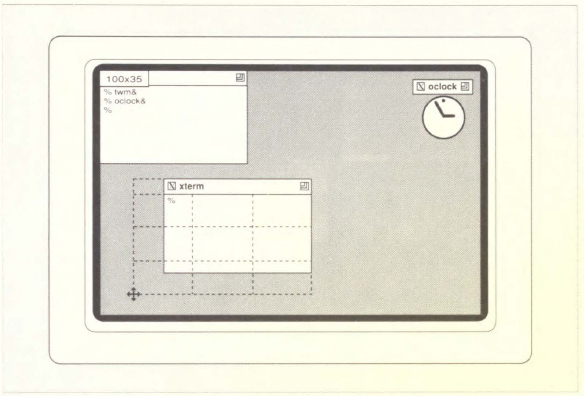
Resizing Windows
The Resize menu item resizes an existing window. See Figure 3-5. To resize a window:
1. Bring up the Twm menu.
2. Select Resize with the menu pointer. The pointer changes to the cross pointer.
3. Move the cross pointer to the window you want to resize. Place it near the border you want to move. The opposite border remains in its current position.
4. Hold down any button.
5. Move the pointer across the border you want to change, then move the window’s border to obtain the desired window size. As you resize the window, a digital readout appears opposite the pointer showing the window size in pixels. (For the xterm client, size is in characters and lines.) Release the button.
Resizing an xterm window will not change the dimensions of the text currently in the window. (If you make the window smaller, for instance, some of the text may be obscured.) However, if the operating system supports terminal resizing capabilities (for example, the SIGWINCH signal in systems derived from BSD 4.3), xterm will use these facilities to notify programs running in the window whenever it is resized. As you continue to work, perhaps starting an editing session, the program will use the entire window. If you resize during an editing session, the text editing program may not know about the new size, and may operate incorrectly. Simply quitting out of the editor and starting another session should solve this problem.
If your resized xterm window does not seem to know its new size, you may be working with an operating system that does not support terminal resizing capabilities. Refer to the discussion of the resize client in Chapter 4, The xterm Terminal Emulator, (and to the resize reference page in Part Three of this guide) for alternative solutions.
Moving Windows and Icons
The Move menu item moves a window or an icon to a new location. When you use this function, an outline, not the entire window or icon, tracks the pointer movement to the new location. See Figure 3-6. To move a window:
1. Bring up the Twm menu.
2. Select Move with the menu pointer. The pointer changes to the cross pointer.
3. Move the cross pointer to the desired window or icon. Hold down any button. Move the pointer and a window outline appears. This outline tracks the pointer movement.
4. Move the cross pointer with the window outline to the desired location on your screen.
5. Release the button. The window will move to the new location.
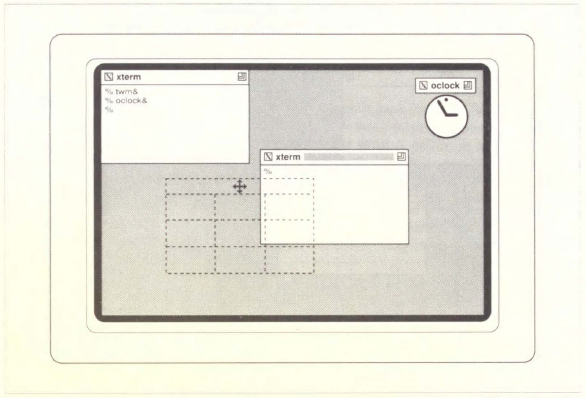
Figure 3-6. Moving windows or icons
You can also move a window or icon simply by moving the pointer to the window or icon you want to move, then pressing the right pointer button while holding down the Meta key. The pointer at first changes to a small image of an icon. You can now let go of the Meta key. Then, as you drag the pointer while holding down the button, the pointer changes to a cross, while the window or icon changes to outline form. Drag the outline to the new location, and let go of the right button. The window will be redrawn in the new location.
Shuffling the Window Stack: Raise and Lower
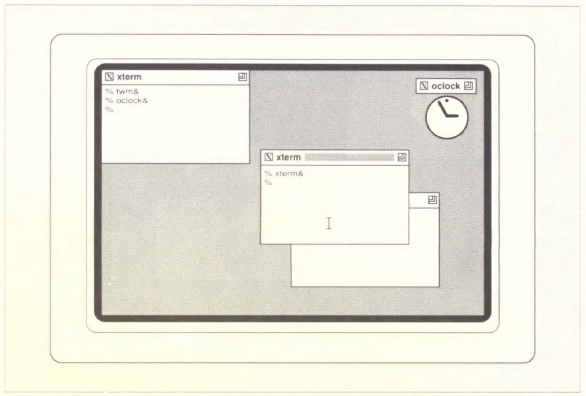
Under the X Window System, windows can overlap each other. When windows overlap, one or more windows may be fully or partially hidden behind other windows (see Figure 3-7). You can think of these windows as being stacked on top of each other much the way papers are stacked on a desk. twm can control the stacking order of the windows by lowering a particular window to the bottom of the stack or raising it to the top.
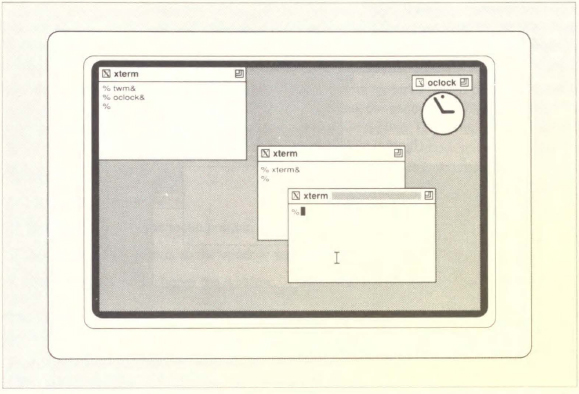
Figure 3-7. One xterm window overlapping another
Raising Windows (bringing in front of others)
The Raise menu item places a window at the top of a window stack. See Figure 3-8. To bring a window to the front:
1. Bring up the Twm menu.
2. Select Raise with the menu pointer. The pointer changes to the target pointer.
3. Move the target pointer to the desired window.
4. Click any button. The window is raised to the top of the stack.
Lowering Windows (sending behind others)
The Lower menu item places a window at the bottom of a window stack. To place a window at the bottom:
1. Bring up the Twm menu.
2. Select Lower with the menu pointer. The pointer changes to the target pointer.
3. Move the target pointer to the appropriate window.
4. Click any button. The desired window is placed behind all windows except the root window.
To raise or lower a window without using the menu:
• To raise a window, move the pointer so that the cursor is within the titlebar of the window you want to raise, then click the left pointer button. The window is raised.
• To lower a window, move the pointer so that the cursor is within the titlebar of the window you want to lower, then click the middle pointer button. The window is lowered.
Changing Keyboard Focus
Normally, keyboard input goes to whichever window the pointer is currently in. The Focus option causes keyboard input to go only to a selected window (the focus window) regardless of the position of the pointer.
Focusing can be useful if you are working in one window for an extended period of time, and want to move the pointer out of the way. It also prevents the annoying situation in which you inadvertently knock the pointer out of the window while typing. (This can be very important for touch typists who look infrequently at the screen while typing!)
To choose a focus window:
1. Bring up the Twm menu.
2. Select Focus with the menu pointer. The pointer changes to the target pointer.
3. Move the target pointer to the window you want to choose as the focus window.
4. Click any button to choose the window.
The titlebar of the focus window will remain highlighted, no matter where you move the pointer.
In order to take the focus away from the selected window (and reactivate “pointer focus”), select Unfocus. The keyboard focus will once again follow the pointer into any window.
Removing a Window: Delete and Kill
The Delete and Kill menu items provide two different ways of terminating a client window. Most windows can be removed in ways that do not harm relevant processes. Delete is one of these ways. It simply requests that the client close itself down gracefully.
Like other methods of “killing” a program (such as the xkill client), the Kill menu item can adversely affect underlying processes. Kill is intended to be used primarily after more conventional methods of removing a window have failed.
To remove a window:
1. Bring up the Twm menu.
2. Select Delete with the menu pointer. The pointer changes to the skull and crossbones pointer.
3. Move the pointer into the window you want to terminate.
4. Click any pointer button.
The window should go away. It may, instead, beep and remain on your screen. You have a stubborn window, which can be killed in the following way:
2. Select Kill with the menu pointer. The pointer changes to the skull and crossbones pointer.
3. Move the pointer into the window you want to terminate.
4. Click any pointer button.
The window will go away.
Refer to the section on xkill in Chapter 7, Other Clients, for a more complete discussion of the hazards of killing a client and a summary of alternatives.
Restarting the Window Manager
The Restart menu item restarts the window manager. This may occasionally become necessary if the window manager functions improperly. To stop and restart the window manager:
1. Bring up the Twm menu.
2. Select Restart with the menu pointer.
You may also want to restart the window manager if you edit your .twmrc configuration file to change the functionality of twm. See Chapter 10, Customizing the twm Window Manager, for more information.
Note that when the window manager is stopped, all icons revert to windows. This happens because the window manager is what allows windows to be iconified. When the window manager is restarted, you can iconify the windows again.
Exiting the Window Manager
The Exit menu item stops the window manager. You may want to stop twm in order to start another window manager. To stop twm:
1. Bring up the Twm menu.
2. Select Exit with the menu pointer.
The window manager is stopped. All icons revert to windows.
Button Control of Window Manager Functions
Table 3-1 summarizes the keyboard and titlebar shortcuts for window management functions. The first column lists the desired function; the second, the required location for the pointer; and the third, the button-key combination. In this column, “click” means to press and immediately release the specified pointer button; “down” means to press and hold the pointer button, and “drag” means to move the pointer while holding down the pointer button. In all cases, you can let go of the keyboard key as soon as you have pressed the appropriate pointer button.
Note that these key “bindings” can be changed in your .twmrc file, as described in Chapter 10. The combinations described in the table work for the system.twmrc file.
Table 3-1. Keyboard Shortcuts for Window Manager Functions
| Function | Pointer Location | Keyboard Shortcut |
| move | title bar | First pointer button down and drag |
| move | window or icon | Meta key, right pointer button down and drag |
| resize | “nested squares” titlebutton | Any pointer button down, cross desired border, and drag |
| raise | title bar | First pointer button click |
| raise | window or icon | Meta key, third pointer button click |
| lower | title bar | Second (middle) pointer button click |
| lower | window or icon | Meta key, first pointer button click |
| iconify | “X” titlebutton | Any pointer button click |
| iconify | window | Meta key, second pointer button click |
| deiconify | icon | Second pointer button click |
Twm menu |
root | First pointer button down |
Customizing twm
The twm window manager is a powerful tool that can perform many more functions than are described in this chapter. You can customize twm using the .twmrc file in your home directory. Customizing this file, you can:
• Define your own twm menus.
• Bind functions to keyboard key/pointer button combinations.
• Issue command strings to the shell.
For details on customizing, and an example of a modified .twmrc file, see Chapter 10, Customizing the twm Manager.
Some of My Keystrokes are Missing
If you are running Release 4, especially if you are running on a small or slow system, you may notice that the system can’t keep up with the movement of the pointer. You may move from one window to another and begin typing, only to find that your first few characters were entered into the original window, or dropped into intervening windows.
This annoying problem is caused by a subtle interaction between the operating system, the X server, and the window manager. It is unlikely to be fixed in the near future, but twm provides a workaround: setting the variable NoTitleFocus in your .twmrc file should keep the bug from popping up. See Chapter 10 for information on creating a .twmrc file and setting variables.
Get X Window System User's Guide for X11 R3 and R4 of the X Window System now with the O’Reilly learning platform.
O’Reilly members experience books, live events, courses curated by job role, and more from O’Reilly and nearly 200 top publishers.

