8
Command Line Options
This chapter describes command-line options that are common to most clients. Some arguments to command-line options can also be specified as the values of resource variables, described in Chapter 9. For example, the format of a geometry string or a color specification is the same whether it is specified as an argument to an option or as the value of a resource definition.
In This Chapter:
Alternative Release 4 Color Databases
Hexadecimal Color Specification
How Many Colors are Available?
Starting a Client Window as an Icon
8
Command Line Options
X allows the user to specify numerous (very numerous!) command line options when starting most clients. The command line options for each client are detailed on the reference pages in Part Three of this guide.
As a general rule, all options can be shortened to the shortest unique abbreviation. For example, -display can be shortened to -d if there is no other option beginning with “d.” (Note that while this is true for all the standard MIT clients, it may not be true of any random client taken off the net.)
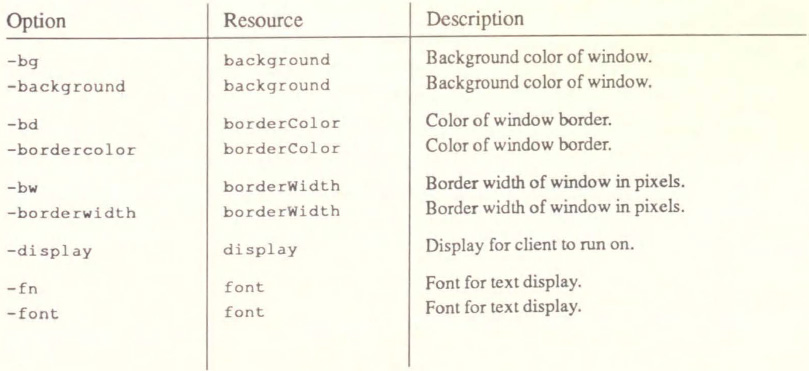
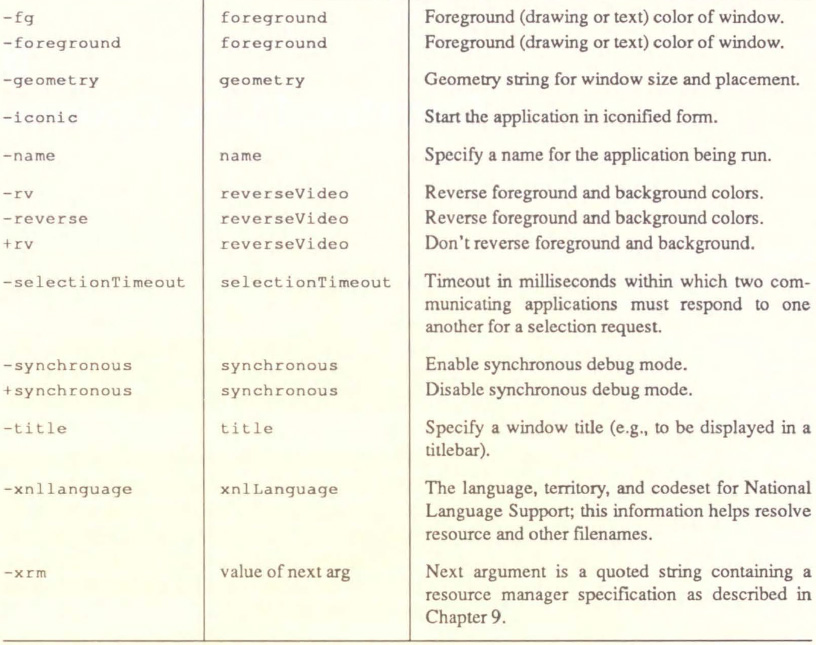
In addition to certain client-specific options, all applications built with the X Toolkit accept certain standard options, which are listed in Table 8-1. (Some non-Toolkit applications may also recognize these options.) The first column gives the name of the option, the second the name of the resource to which it corresponds (see Chapter 9, Setting Resources), and the third a brief description of what the option does. This chapter discusses some of the more commonly used Toolkit options and demonstrates how to use them. (For the syntax of the other Toolkit options, see the X reference page in Part Three of this guide.)
The options -selectionTimeout and -xnllanguage are available as of Release 4.
Though all Toolkit options are preceded by a minus sign, client-specific options may or may not require it. See the reference page for each client in Part Three of this guide for the syntax of all options.
Which Display to Run On
Generally, the results of a client program are displayed on the system where the client is running. However, if you are running a client on a remote system, you probably want to display the results on your local server.
An option of the form:
-display [host] : server[.screen]
can be used to tell a client which server to display results on.
The host specifies on which machine to create the window, the server specifies the server number, and the screen specifies the screen number. Note that the server parameter always begins with a colon (a double colon after a DECnet node*), and that the screen parameter always begins with a period. If the host is omitted or is specified as unix, the local node is assumed. If the screen is omitted, screen 0 is assumed.
xterm and other X clients normally get the host, server, and screen from the DISPLAY environment variable. (In most configurations, DISPLAY will be set to the local host, server 0 and screen 0.)
However, you may want to specify the host, server, and screen explicitly. You can do this for all clients by resetting the value of the DISPLAY variable, or for a single invocation of a client by using the -display option.
For example:
% xterm -display other_node: 0.0 &
creates an xterm window on screen 0 of server 0 on the machine named other_node.
Although much of the current X Window System documentation suggests that any of the parameters to the -display option can be omitted and will default to the local node, server and screen 0, respectively, we have not found this to be true. In our experience, only the host and screen parameters (and the period preceding screen) can be omitted. The colon and server are necessary in all circumstances.
The -display option can be abbreviated as -d.
Title and Name
The name of the program (as known to the server) and the title of the window can be specified on the command line. The -title option allows you to specify a text string as the title of the application’s window. If your application has a titlebar, or if the window manager you are using puts titlebars on windows, this string will appear in the titlebar. Window titles can be useful in distinguishing multiple instances of the same application.
The -name option actually changes the name by which the server identifies the program. Changing the name of the application itself (with the -name option) affects the way the application interprets resource files. This option is discussed further in Chapter 9, Setting Resources. If a name string is defined for an application, that string will appear as the application name in its icon.
If you display information about currently running windows using the xwininfo or xlswins client, title strings will appear in parentheses after the associated window ID numbers. (If there is no title string, but there is a name string, the name string will be displayed.)
You can also use the xwininfo client to request information about a particular window by title, or name, if no title string is defined, using that application’s own -name option. See the xlswins and xwininfo reference pages in Part Three and the section “Window and Display Information Clients” in Chapter 7, Other Clients, to learn more about these clients.
Window Geometry
All clients that display in a window take a geometry option that specifies the size and location of the client window. The syntax of the geometry option is:
-geometry geometry
The -geometry option can be (and often is) abbreviated to -g, unless there is a conflicting option that begins with “g.”
The parameter to the geometry option (geometry), referred to as a “standard geometry string,” has the form:
widthxheight±xoff±yoff
The variables, width, height, xoff (x offset), and yoff (y offset) are values in pixels for many clients. However, application developers are encouraged to use units that are meaningful to the application. For example, xterm uses columns and rows of text as width and height values in the xterm window.
You can specify any or all elements of the geometry string. Incomplete geometry specifications are compared to the resource manager defaults and missing elements are supplied by the values specified there. If no default is specified there, and twm is running, the window manager will require you to place the window interactively.
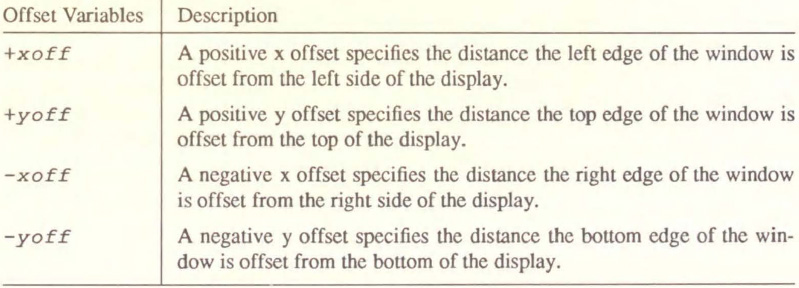
The values for the x and y offsets and their effects are shown in Table 8-2.
Table 8-2. Geometry specification x and y offsets
For example, the command line:
% xclock -geometry 125x125-10+10 &
places a clock 125x125 pixels in the upper-right corner of the display, 10 pixels from both the top and right edge of the screen.
For xterm, the size of the window is measured in characters and lines. (The default size is 80 characters wide by 24 lines long.) If you wanted to use a large VT100 window, 120 characters wide by 40 lines long, you could use the following geometry specification:
% xterm -geometry 120x40-10+350 &
This command places the large xterm window in the lower-right comer, 10 pixels from the right edge of the screen and 350 pixels from the top of the screen. Figure 8-1 illustrates window offsets.
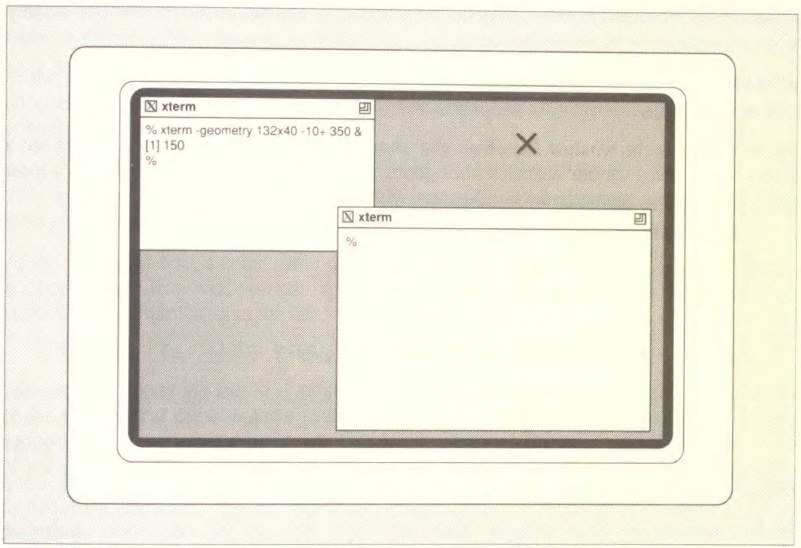
Figure 8-1. Window offsets
Several clients, including xterm, allow you to set the size and position of the icon or alternative window using resource variables (in an .Xdefaults or other resource file). See the appropriate client reference pages in Part Three of this guide for a complete list of available resources. Refer to Chapter 9, Setting Resources, for instructions on how to set resources.
You should be aware that, as with all user preferences, you may not always get exactly what you ask for. Clients are designed to work with a window manager, which may have its own rules for window or icon size and placement. However, priority is always given to specific user requests, so you won’t often be surprised.
Border Width
Many clients also allow you to specify the width of the border to be placed around the window. The border width is specified in pixels. For example:
% xterm -bw 10 &
sets a border of 10 pixels around the xterm window.
You will have to experiment to get a feeling for the translation between the number of pixels and actual sizes and distances. It will vary, depending on the type of workstation you are using.
If you are experimenting with geometry measurements, use the xwininfo client to display information about windows on the screen.
At the command line prompt in an xterm window, type:
% xwininfo
and then click on the window for which you want to display information. You should see a display which gives various characteristics about the window in question. The statistics most relevant to window geometry are listed below, with some typical readings:
Upper left X: 572

Upper left Y: 582

Width: 578

Height: 316

Depth: 1

Border width: 1

Corners: +572+582  -0+582  -0-0  +572-0
All numerical information is in pixels, except depth, which is in bits per pixel. (See the discussion of color later in this chapter for the significance of window depth.) The upper left X and Y coordinates are particularly useful for setting the location of a window using the geometry option. Upper left X corresponds to the positive x offset (+xoff) and upper left Y corresponds to the positive y offset (+yoff).
The four comers are listed with the upper left comer first and the other three clockwise around the window (i.e., upper right, lower right, lower left). The upper left comer (first in the list) always gives the positive x and y offsets for the window. In other words, the upper left comer specification is the +xoff+yoff part of the geometry string.
The width and height in pixels are somewhat less useful, since the geometry option to xterm requires that these figures be specified in characters and lines. The readings above are for a standard size xterm window using a 12 point Roman Courier font. However, you will undoubtedly become accustomed to thinking in terms of pixels by specifying the geometry of other clients.
See the xwininfo reference page in Part Three and the section “Window and Display Information Clients” in Chapter 7, Other Clients, for more details.
Color Specification
Many clients have options that allow you to specify the color of the window border, background, and foreground (the color text or graphic elements will be displayed in). These options generally have the form:
-bg color Sets the background color.
-fg color Sets the foreground color.
-bd color Sets the border color.
By default, the background of an application window is usually white and the foreground black, even on color workstations. You can specify a new color using either the color names listed in a system file called rgb.txt or hexadecimal values representing colors.
In the next section, we’ll take a look at some of the colors available in the rgb.txt file. For now, let’s consider the syntax of a command line specifying an xterm to be displayed in three colors:
% xterm -bg lightblue -fg darkslategrey -bd plum &
This command creates an xterm window with a background of light blue, foreground of dark slate grey, and window border of plum (all colors are available in both Releases 3 and 4).
At the command line, a color name should be typed as a single word (for example, darkslategrey). However, you can type the words comprising a color name separately if you enclose them in quotes, as in the following command line:
% xterm -bg "light blue" -fg "dark slate grey" -bd plum &
As we’ll see, the rgb.txt file contains variants of the same color name (for example, “navy blue” and “NavyBlue,” or “grey” and “gray”) to allow a range of spelling, spacing, and capitalization on the command line.
Some clients allow additional options to specify color for other elements, such as the cursor, highlighting, and so on. See the appropriate client reference pages in Part Three of this guide for details.
The rgb.txt File
The rgb.txt file, usually located in /usr/lib/X11, is supplied with the standard distribution of X and consists of predefined colors assigned to specific text names.
A corresponding compiled file called rgb.dir contains the definitions used by the server; this machine-readable file serves as a color name database, and is discussed more fully in Appendix A, System Management. The rgb.txt file is the human-readable equivalent.
Release 4 Color Names
The default rgb.txt file shipped with Release 4 of X contains 738 color name definitions. This number is slightly deceptive, since as we’ve said, a number of the color names are merely variants of another color name (differing only in spelling, spacing and capitalization).
Still, the number of colors available in Release 4 is more than double the number available in Release 3. Some of the Release 4 colors are entirely new (like snow and misty rose), but many are just slightly different shades of colors available in prior releases.
For example, the Release 3 rgb.txt file includes the color sea green. The Release 4 rgb.txt file offers the following shades of that color:
light sea green

sea green

medium sea green

dark sea green

SeaGreen1

SeaGreen2

SeaGreen3

SeaGreen4

DarkSeaGreen1

DarkSeaGreen2

DarkSeaGreen3

DarkSeaGreen4
Each of these names corresponds to a color definition. (This list does not include the variants SeaGreen, LightSeaGreen, MediumSeaGreen, and DarkSeaGreen, which also appear in the file.) As you can see, some of these shades are distinguished in the fairly traditional way of being called “light,” “medium,” and “dark.” The light, medium, and dark shades of a color can probably be distinguished from one another on virtually any monitor.
Beyond this distinction, there are what might be termed “sub-shades;” gradations of a particular shade identified by number (SeaGreen1, SeaGreen2, etc.). Numerically adjacent subshades of a color may not be clearly distinguishable on all monitors. For example, SeaGreen1 and 2 may look very much the same. (You certainly would not choose to create a window with a SeaGreen1 background and SeaGreen2 foreground! On the other hand, subshades a couple of numbers apart are probably sufficiently different to be used on the same window.)
By supplying many different shades of a single, already fairly precise color like sea green, X developers have tried to provide definitions that work well on a variety of commonly-used monitors.* You may have to experiment to determine which colors (or shades) display best on your monitor.
The color names in the Release 4 rgb.txt file are too numerous to list here. Although there are no literal dividers within the file, it can roughly be considered to fall into three sections:
__________
*The color database shipped with prior releases of X was originally designed to display optimally on the vt240 series terminals manufactured by Digital Equipment Corporation.
Rather than list every color in the rgb.txt file, we’ve compiled the following table of representative colors. We’ve chosen some of the more esoteric color names. Naturally, all of the primary and secondary colors are available also.
Section 1:
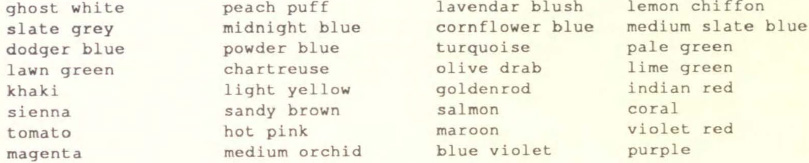
Section 2:

Section 3:
grey0 (gray0) through grey100 (gray100)
If you want to look more closely at the rgb.txt file, you can open it with any text editor. As an alternative, you can also display the contents of the file using the showrgb client. showrgb seems to do nothing more than cat(1) the file to your terminal window. Given the size of the file, it’s necessary to pipe the command’s output to a paging program, such as pg(1) or more(1).
% showrgb | more
See Appendix A, System Management, for information on customizing color name definitions.
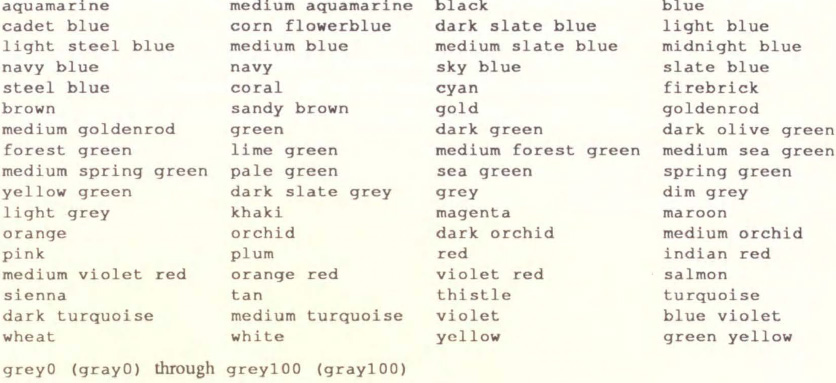
Release 3 Color Names
The following are the default color names shipped with Release 3 of the X Window System. Again, this list does not include the many variants of these names.
Alternative Release 4 Color Databases
In addition to the standard color database described above, Release 4 also includes three other databases that can be compiled by your system administrator. These files can be found in the general release in the directory ./rgb/others.
| raveling.txt | Designed by Paul Raveling, this database rivals the default database in size and scope, but has been tuned to display optimally on Hewlett-Packard monitors. |
| thomas.txt | Based on the Release 3 database, this file has been modified by John Thomas of Tektronix to approximate the colors in a box of Crayola Crayons. |
| old-rgb.txt | This is nothing more than the Release 3 database. |
Hexadecimal Color Specification
You can also specify colors more exactly using a hexadecimal color string. You probably won’t use this method unless you require a color not available by using a color name. In order to understand how this works, you may need a little background on how color is implemented on most workstations.
The RGB Color Model
Most color displays on the market today are based on the RGB color model. Each pixel on the screen is actually made up of three phosphors: one red, one green, and one blue. Each of these three phosphors is excited by a separate electron beam. When all three phosphors are fully illuminated, the pixel appears white to the human eye. When all three are dark, the pixel appears black. When the illumination of each primary color varies, the three phosphors generate a subtractive color. For example, equal portions of red and green, with no admixture of blue, makes yellow.
As you might guess, the intensity of each primary color is controlled by a three-part digital value—and it is the exact makeup of this value that the hexadecimal specification allows you to set.
Depending on the underlying hardware, different servers may use a larger or smaller number of bits (from 4 to 16 bits) to describe the intensity of each primary. To insulate you from this variation, most clients are designed to take color values containing anywhere from 4 to 16 bits (1 to 4 hex digits), and the server then scales them to the hardware. As a result, you can specify hexadecimal values in any one of the following formats:
#RGB

#RRGGBB

#RRRGGGBBB

#RRRRGGGGBBBB
where R, G, and B represent single hexadecimal digits and determine the intensity of the red, green, and blue primaries that make up each color.
When fewer than four digits are used, they represent the most significant bits of the value. For example, #3a6 is the same as #3000a0006000.*
What this means concretely is perhaps best illustrated by looking at the values that correspond to some colors in the color name database. We’ll use 8-bit values—two hexadecimal digits for each primary. The following definitions are the hexadecimal equivalents of the decimal values for some of the colors found in the rgb.txt file:
#000000     black

#FFFFFF     white

#FF0000     red

#00FF00     green

#0000FF     blue

#FFFF00     yellow

#00FFFF     cyan

#FF00FF     magenta

#5F9EA0     cadet blue

#6495ED     cornflower blue

#ADD8E6     light blue

#B0C4DE     light steel blue

#0000CD     medium blue

#000080     navy blue

#87CEED     sky blue

#6A5ACE     slate blue

#4682B4     steel blue
__________
*If you are unfamiliar with hexadecimal numbering, see the Glossary for a brief explanation, or a basic computer textbook for a more extended discussion.
As you can see from the colors given above, pure red, green, and blue result from the corresponding bits being turned full on. All primaries off yields black, while all nearly full on gives white. Yellow, cyan, and magenta can be created by pairing two of the other primaries at full intensity. The various shades of blue shown above are created by varying the intensity of each primary—sometimes in unexpected ways.
The bottom line here is that if you don’t intimately know the physics of color, the best you can do is to look up existing colors from the color name database and experiment with them by varying one or more of the primaries till you find a color you like. Unless you need precise colors, you are probably better off using color names.
How Many Colors are Available?
The number of distinct colors available on the screen at any one time depends on the amount of memory available for color specification. (The xdpyinfo client provides information about a display, including the number of colors available at one time. See Chapter 7, Other Clients, and the xdpyinfo reference page in Part Three for details.)
A color display uses multiple bits per pixel (also referred to as multiple planes or the depth of the display) to select colors. Programs that draw in color use the value of these bits as a pointer to a lookup table called a colormap, in which each entry (or colorcell) contains the RGB values for a particular color.* As shown in Figure 8-2, any given pixel value is used as an index into this table—for example, a pixel value of 16 will select the sixteenth colorcell.
Why is this technical detail important? Because it explains several issues that you might encounter in working with color displays.
First, the range of colors possible on the display is a function of the number of bits available in the colormap for RGB specification. If eight bits is available for each primary, then the range of possible colors is 2563 (somewhere over 16 million colors). This means that you can create incredibly precise differences between colors.
However, the number of different colors that can be displayed on the screen at any one time is a function of the number of planes. A four-plane system can index 24 colorcells (16 distinct colors); an eight-plane system can index 28 colorcells (256 distinct colors); and a 24-plane system can index 224 colorcells (over 16 million distinct colors).
If you are using a four-plane workstation, the fact that you can precisely define hundreds of different shades of blue is far less significant than the fact that you can’t use them all at the same time. There isn’t space for all of them to be stored in the colormap at one time, or any mechanism for them to be selected even if they could be stored.
__________
*There is a type of high-end display in which pixel values are used directly to control the illumination of the red, green, and blue phosphors, but far more commonly, the bits per pixel are used indirectly, with the actual color values specified independently, as described here.
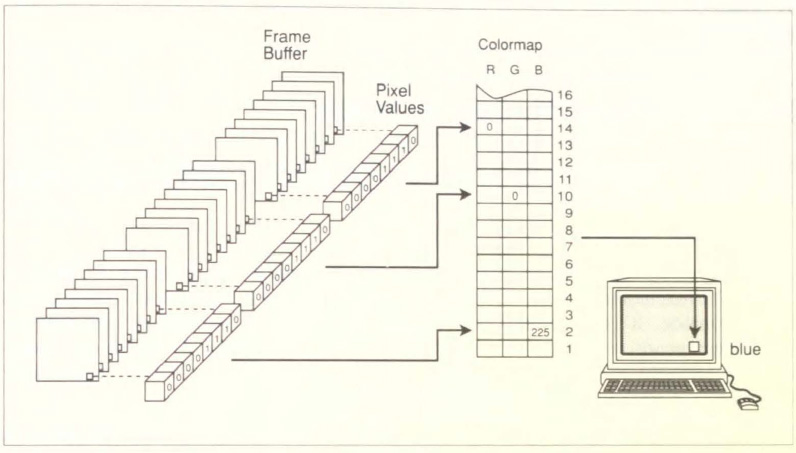
Figure 8-2. Multiple planes used to index a colormap
This limitation is made more significant by the fact that X is a multi-client environment. When X starts up, usually no colors are loaded into the colormap. As clients are invoked, certain of these cells are allocated. But when all of the free colorcells are used up, it is no longer possible to request new colors. When this happens, you will usually be given the closest possible color from those that have already been allocated. However, you may instead be given an error message and told that there are no free colorcells.
In order to minimize the chance of running out of colorcells, many programs use “shared” colorcells. Shared colorcells can be used by any number of applications, but they can’t be changed by any of them. They can only be deallocated by each application that uses them, and when all applications have deallocated the cell, it is available for setting one again. Shared cells are most often used for background, border, and cursor colors.
Alternately, some clients have to be able to change the color of graphics they have already drawn. This requires another kind of cell, called private, which can’t be shared. A typical use of a private cell would be for the pallete of a color mixing application. Such a program might have three bars of each primary color, and a box which shows the mixed color. The primary bars would use shared cells, while the mixed color box would use a private cell.
In summary, some programs define colorcells to be read-only and shareable, while others define colorcells to be read/write and private.
To top it off, there are even clients that may temporarily swap in a whole private colormap of their own. Because of the way color is implemented, if this happens, all other applications will be displayed in unexpected colors.
In order to minimize such conflicts, you should request precise colors only when necessary. By preference, use color names or hexadecimal specifications that you specified for other applications.
Starting a Client Window as an Icon
The -iconic command line option starts the client window in iconified form. To start an xterm window as an icon, type:
% xterm -iconic &
This can be especially useful for starting the login xterm window. As described in Chapter 2, Getting Started, terminating the login xterm window kills the X server and all other clients that are running. It’s always possible to terminate a window inadvertently, by selecting the wrong menu option or typing the wrong key sequence. If your login xterm window is automatically iconified at startup, you are far less likely to terminate the window inadvertently and end your X session.
For most clients, the size and position of the icon can be set using resource variables in an .Xdefaults or other resource file. (This is highly recommended if you are starting the login xterm window as an icon.) See the appropriate client reference pages in Part Three for a complete list of available resources. Refer to Chapter 9, Setting Resources, for instructions on how to set resources.
Specifying Fonts on the Command Line
Many clients allow you to specify the font to be used when displaying text in the window. (These are known as screen fonts and are not to be confused with printer fonts.) For clients written with the X Toolkit, the option to set the display font is -fn. For example, the command line:
% xterm -fn fontname &
creates an xterm window in which text will be displayed with the font named fontname.
Chapter 5, Font Specification, describes the available screen fonts and font naming conventions.
Reverse Video
There are three options to control whether or not the application will display in reverse video—that is, with the foreground and background colors reversed. The -rv or -reverse option is used to request reverse video.
The +rv option is used to override any reverse video request that might be specified in a resource file (see Chapter 9, Setting Resources). This is important, because not all clients handle reverse video correctly, and even those that do usually do so only on black and white displays.
Get X Window System User's Guide for X11 R3 and R4 of the X Window System now with the O’Reilly learning platform.
O’Reilly members experience books, live events, courses curated by job role, and more from O’Reilly and nearly 200 top publishers.

