2
Getting Started
This chapter shows you how to begin working if X is already running on your system and how to start the X server manually if X is not running. It also provides preliminary instructions for starting the window manager, twm, and the xterm terminal emulator.
In This Chapter:
If X is Being Started Automatically
Starting the First xterm Window
Bringing Up the Window Manager
Starting a Second xterm Window
How a Client Looks and Behaves: Application Defaults
2
Getting Started
This chapter introduces the basics of using X: starting the server and creating the first terminal window; starting the window manager; adding additional windows; exiting. While it is written as a tutorial, you do not necessarily have to follow along at a workstation.
Before you can begin using the X Window System, you must do three things:
• Start the X server.
• Start at least one instance of the xterm terminal emulator.
• Start a window manager. (Though you can run X without a window manager, this is fairly limiting.)
Depending on how X is configured on your system, some or all of these steps may be performed for you automatically. First, this chapter explains how you can tell if X is being started automatically and how to begin working if it is. Then this chapter describes how to start X manually. Later sections show you how to exit from an xterm window and how to start additional client programs.
If X is Being Started Automatically
Depending on how X is being run on your system, the initial screens you see and the way you log in will be slightly different.
If you log in at a prompt displayed on the full screen, your workstation may automatically start the server and open up the first xterm window. If this is the case, your screen should then look something like Figure 2-1.
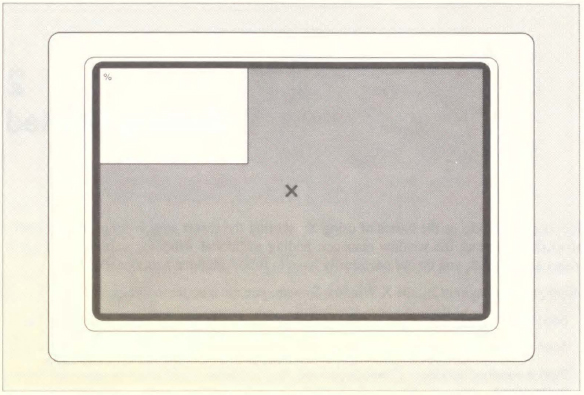
Figure 2-1. Workstation with login xterm window on the root window
If the display manager, xdm, is running X on your system, you may see a window similar to Figure 2-2 when you turn on your terminal.
Log in just as if you were using a standard alphanumeric terminal. The screen should then display the first xterm window, as in Figure 2-1.
Without any user customization, the display manager executes a standard login “session,” providing the first xterm window and starting the window manager. If the window manager is running, you will see a titlebar on your window, displaying the name of the window (“xterm”).
If the twm window manager is running, skip to the section “Starting a Second xterm Window” later in this chapter for information on starting additional windows and other clients. If the window manager is not running, skip to the section “Bringing Up the Window Manager” later in this chapter for instruction on how to start it.
On BSD 4.3 systems, there is another method to bring up X automatically (from the /etc/ttys system file). This method has been phased out in Release 4. However, if your system is set up to use this method, when the power is turned on, your workstation should automatically start the server and open up an xterm window in which you can log in. If this is the case, your screen should look something like Figure 2-3.
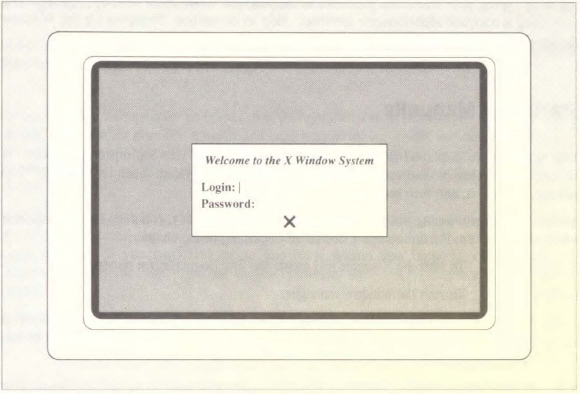
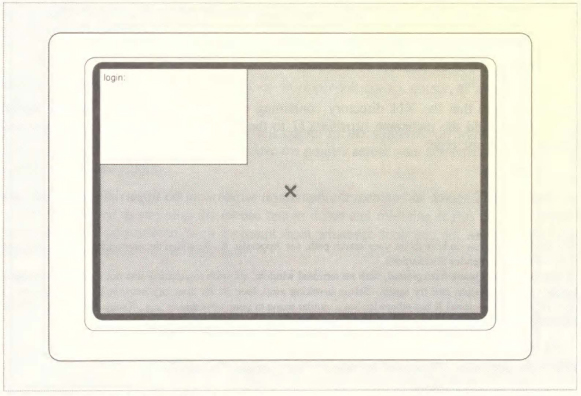
Figure 2-3. xterm window with login prompt
Log in by typing your name and password at the prompts in the xterm window, just as if you were using a standard alphanumeric terminal. Skip to the section “Bringing Up the Window Manager” later in this chapter.
Starting X Manually
If no windows are displayed on the workstation screen (i.e., if your login prompt appears on the full screen), log in, and read on. If another windowing system (such as Sun View™) is running, first kill it, and then read on.
To start X manually (using the standard X distribution from MIT), you must run two separate programs to perform the three steps listed at the beginning of the chapter:
% xinit |
To start the X server and create the first (login) xterm window. |
% twm & |
To start the window manager. |
In the following discussion, we’ll assume that you are bringing up the X Window System manually. In Appendix A, System Management, we’ll show you how to set things up so that X comes up automatically.
X is very easy to customize. There are countless command options as well as startup files that control the way the screen looks or even what menus a program displays. If you are “trying out” X using someone else’s system or login account, things may not work as described here. (See Chapters 8 through 11 for information on customizing the X environment.)
Starting the First xterm Window
First, make sure that the X11 directory containing executable programs is in your search path.* If not, add the pathname /usr/bin/X11 to the path set in your .profile or .login file. Then at the prompt, type:
% xinitxinit starts the X server and creates the first xterm window in the upper-left corner of your display.†
Bringing Up the Window Manager
Make sure that the pointer is in the xterm window, so that the I-beam cursor is displayed. Start the twm window manager by typing:
% twm &The screen will momentarily go blank; then the window will be redisplayed, this time with a titlebar. The titlebar provides a quick and easy way to move, resize, and otherwise manipulate windows on the screen. The window manager also allows you to position client windows on the screen, as illustrated by the placement of the xterm window described in the next section.
Note that it is important to run twm in the background by placing an ampersand (&) at the end of the command line, so that you can continue to enter additional commands into the xterm window. If you neglected to do this on a system that supports job control, type Control-Z to suspend twm, then use the bg command (see csh(1)) to place it in the background.
If the system you’re on does not support job control, interrupt the process with Delete or Control-C and start over.
Starting a Second xterm Window
If you want to open a second xterm window, type the following command at the prompt in the first xterm window:
% xterm &After a few moments, the pointer becomes an upper-left-corner cursor, as shown in Figure 2-4.
This corner cursor represents the upper-left corner of the window you want to place. The cursor tracks pointer movement as you move the pointer across your screen and allows you to position the xterm window.
Move the corner cursor to the desired position on your screen and click the left mouse button. (A click is defined as pressing the mouse button down and releasing it.) A new xterm window appears on your screen, with a prompt from whatever shell you are using. Figure 2-5 shows how your screen might look now.
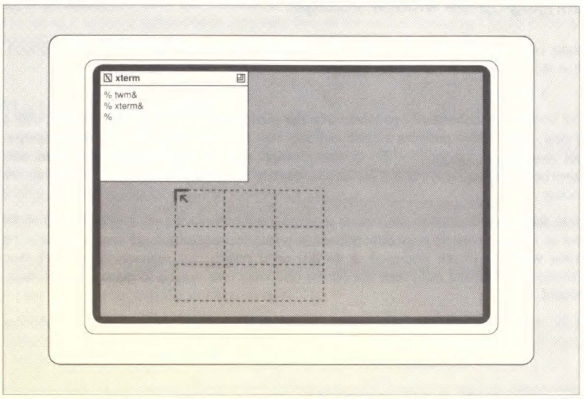
Figure 2-4. Placing a second xterm window
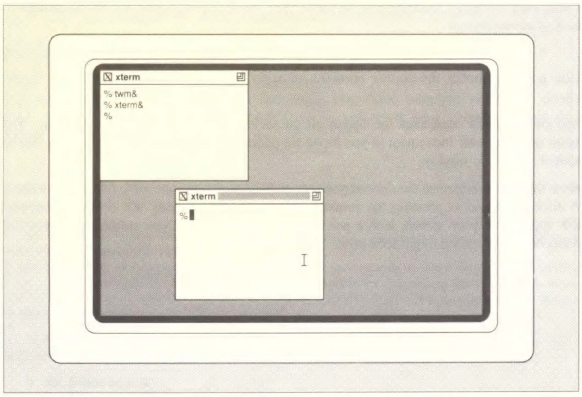
Figure 2-5. Two xterm windows
You can switch back and forth between windows simply by moving the pointer from one to the other.
If you have inadvertently positioned the second xterm window in front of the first one, don’t be concerned. Just use the front window for now. Chapter 3, Using the twm Window Manager, provides information on resizing and moving windows.
Notice how the text cursor, titlebar, and border in each xterm window are highlighted when you move the pointer into that window. Whatever you type will appear in the window with the highlighted titlebar. Try starting a command in both windows. For example, start up vi or another text editor in the second xterm window. Notice how you can switch back to the first window to type a new command, simply by moving the pointer—even if you leave vi in insert mode or some other command in the process of sending output to the screen. Whatever process was running in the window you left will continue to run. If it needs input from you to continue, it will wait.
Exiting from an xterm Window
When you are through using an xterm window, you can remove it by typing whatever command you usually use to log off your system. Typically, this might be exit or Control-D. You can also terminate an xterm window by selecting Hangup, Terminate, Kill, or Quit from the xterm menu. (These menu options send different signals to the xterm process. Depending on what signals your operating system recognizes, some of the options may not work as intended. See Chapter 4, The xterm Terminal Emulator, for more information.)
Be aware that terminating the login xterm window (the first xterm to appear) kills the X server and all associated clients. (If xdm is running X, the server will be reset, but only after all client processes have been killed.) Be sure to terminate all other xterm windows before terminating the xterm login window. Also, be sure that if you are in an editor such as vi that you save your data before you terminate the window
In fact, it may be wise to iconify the login window (shrink it into a small symbol, or icon, on the screen) and use other xterm windows instead, so that you don’t inadvertently terminate it. See Chapter 3, Using the twm Window Manager, for a discussion of how to do this.
Alternatively, you can enter:
% set ignoreeofin the login window. Then typing exit becomes the only way you can terminate the window. Note that some C shell implementations have an autologout variable, which will automatically terminate the shell if there is no activity for a given period of time.
If your C shell supports this feature, be sure to disable it in the login xterm window using the following command:
% unset autologoutSpecial Keys
Most workstations have a number of “modifier” keys, so called because they modify the action of other keys.
Three of these modifier keys should be familiar to any user of a standard ASCII terminal or personal computer—Shift, Caps Lock, and Control. However, many workstations have additional modifier keys as well. A PC has an “Alt” key, a Macintosh™ has a “fan” key, a Sony workstation has keys named “Nfer” and “Xfer,” and a Sun workstation has no less than three additional modifier keys, labeled “Left,” “Right,” and “Alternate.”
Because X clients are designed to run on many different workstations, with different keyboards, it is difficult to assign functions to special keys on the keyboard. A developer can’t count on the same key always being present!
For this reason, many X clients make use of “logical” modifier keynames, which can be mapped by the user to any actual key on the keyboard.
Up to eight separate modifier keys can be defined. The most commonly used (after Shift, Caps Lock, and Control) has the logical keyname “Meta.”
We’ll talk at length about this subject in Chapter 11, Setup Clients, but we wanted to warn you here. When we talk later in this book about pressing the “Meta”, key, you should be aware that there is not likely to be a physical key on the keyboard with that name. For example, on one workstation, the Meta key might be labeled “Alt” and, on another, “Funct.” And as we’ll show in Chapter 11, you can choose any key you want to act as the Meta key.
Unfortunately, X provides no easy way to find out which key on your keyboard has been assigned to be the Meta key. You don’t need to know this right away … but when you do, please turn to the discussion of key mapping in Chapter 11, Setup Clients, for information on how you can find out.
How a Client Looks and Behaves: Application Defaults
The way the xterm client looks (and, to some extent, behaves) is partially determined by a system-wide file of application defaults. Several clients have application defaults files that determine certain of the client’s features. Applications defaults files generally reside in the directory /usr/lib/X11/app-defaults and are named for the client application. For xterm, the application defaults specify such things as the labels for menu items, the fonts used to display menu items, and the shape of the pointer when it’s in an xterm window.
In describing the appearance and behavior of clients in this guide, we assume all of the standard application defaults file are present on your system and accessible by the client programs. If, by some chance, a client’s application defaults file has been edited or removed from your system, the client may not look or behave exactly as we describe it. If a client application appears substantially different than it is depicted in this guide, you may be using a different version of the program or the application defaults may be different. Consult your system administrator.
Within an application defaults file, defaults are set using variables called resources. Almost every feature of every client program can be controlled by a resource variable. The resource variables specified in a client’s application defaults files are usually just a subset of a greater number of resources that can be set.
As we’ll see in Chapter 9, Setting Resources, you can override the system-wide defaults and control additional features of a client by specifying your own resources in a file in your home directory.
Starting Other Clients
You can start other X clients just like you can start another instance of xterm. At the command line prompt in any xterm window, type the name of the client followed by an ampersand to make the client run in the background. For example, by typing:
% oclock &you can cause a window displaying a clock to be placed on the screen. (The oclock client is available as of Release 4. If you are running an earlier release of X, the only clock program available is xclock.) First an upper-left corner cursor will appear, just as it did when you created a second xterm window. Move the corner cursor to the position you would like the clock to appear, and then click the left mouse button. Figure 2-6 shows the oclock display, placed in the upper-right corner of the screen.
Unfortunately, the developers of oclock neglected to provide an easy way to remove it. One way to remove the oclock display is to identify and kill the process using the standard UNIX process control mechanisms. To find the process ID for oclock, go to an xterm window and type:
% ps -aux | grep oclockat a system prompt. Under System V, type:
% ps -e | grep oclockat a system prompt. The resulting display should look something like this:
128  p0  0:00  oclock
142  p0  0:00  grep oclock
The number in the first column is the process ID. Type:
% kill process _id
The oclock display will be removed, and you will get the message:
Terminated oclockYou can also remove the oclock display using other methods intended to “kill” the client process. These methods and their liabilities are discussed in Chapter 7, Other Clients.
If you are running Release 2 or 3 of X, the xclock client must also be removed using the UNIX kill command (or another method of killing a client, as described in Chapter 7). As of Release 4, xclock can also be removed by a gentler method, namely, the Delete item of the Twm menu. See Chapter 3, Using the twm Window Manager, for more information about Delete.
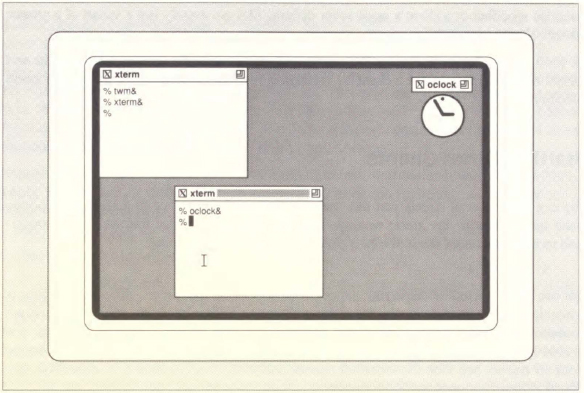
Figure 2-6. The oclock display
Running a Client on Another Machine
Remember that X also allows you to run a client on another machine, while displaying the client’s window on the local machine. A client you may wish to run on another machine is xload, which is used to keep track of the system load average. By default, xload polls the system for the load average at five-second intervals and displays the results in a simple histogram.
If you are running processes on more than one machine, it’s useful to gauge the level of activity on the systems in question. This information should help you judge when to start processes and monitor how your processes are impacting system resources.
Say you’re running clients both on the local machine (let’s call it host1) and on another machine (host2). On the local display, you can have two xload windows, one showing activity on host1 and one showing activity on host2.
To create an xload window monitoring activity on host1, use the command:
% xload &The cursor changes to an upper-left corner cursor, allowing you to place the window.
Then run an xload process on host2 using a remote shell (rsh), and display the results in a window on host1:
% rsh host2 'xload -diaplay host1:0' &Again, you place the window using the pointer.
The -display option tells xload to create its window on the local display (host1). The syntax and use of this option is discussed more fully in Chapter 8, Command Line Options.
Figure 2-7 shows the resulting host1 display: two xload windows, the top window monitoring activity on the local system and the bottom one monitoring activity on the remote system.
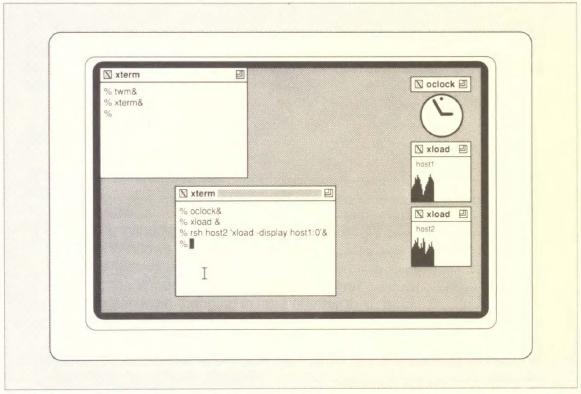
Figure 2-7. Monitoring activity on two systems with xload
If you frequently need to access a remote system, you may want to run an xterm on that system using a remote shell and display the window on the local system. For instance, the following command runs an xterm on a remote Sony NEWS workstation (with the hostname sony) and displays on the local Sun-3 (with the hostname sun):
% rsh sony 'xterm -diaplay sun:0' &Where to Go From Here
There are many useful client programs supplied with the X Window System. Details of how to use the two most important of these clients, the twm window manager and the xterm terminal emulator are provided in the next two chapters. Clients to list and display fonts are described in Chapter 5. Chapter 6 describes several graphics utilities available with X. An overview and tutorial for other clients is provided in Chapter 7. All clients are described in detail in a reference page format in Part Three of this guide.
You should read at least the chapter on twm before starting up any other clients. You can then go on to read more about xterm in Chapter 4 or about other clients in Chapters 5 through 7.
_______________
*For more information on how to set your search path, see Appendix A. Note that the appropriate pathname to add may be different in vendor distributions.
†xinit produces a blank background, with no terminal window, software installation was not completed correctly. Reboot your workstation and try again. Before invoking xinit, look in the directory /usr/bin/X11 for a file whose name begins with a capital X but otherwise has a similar name to your workstation (e.g., Xsun). When you find one that seems a likely possibility, try the following command:
% xinit -- XnameIf that works, link Xname to X, and xinit will thereafter work correctly. For example:
% cd /usr/bin/X11
% ln Xsun X
Get X Window System User's Guide for X11 R3 and R4 of the X Window System now with the O’Reilly learning platform.
O’Reilly members experience books, live events, courses curated by job role, and more from O’Reilly and nearly 200 top publishers.

