Chapter 4. Setting Up Your Environment
Unlike desktop web development, where you’re likely to create and test your work on the same device, mobile development generally requires creating and managing several development environments.
Setting Up a Development Environment
Before starting our mobile web markup work, let’s take a look at some of the best tools, IDEs, and emulators available for our use. In Chapter 13, we’ll take a deeper look at testing and debugging and cover advanced techniques and tools.
Working with Code
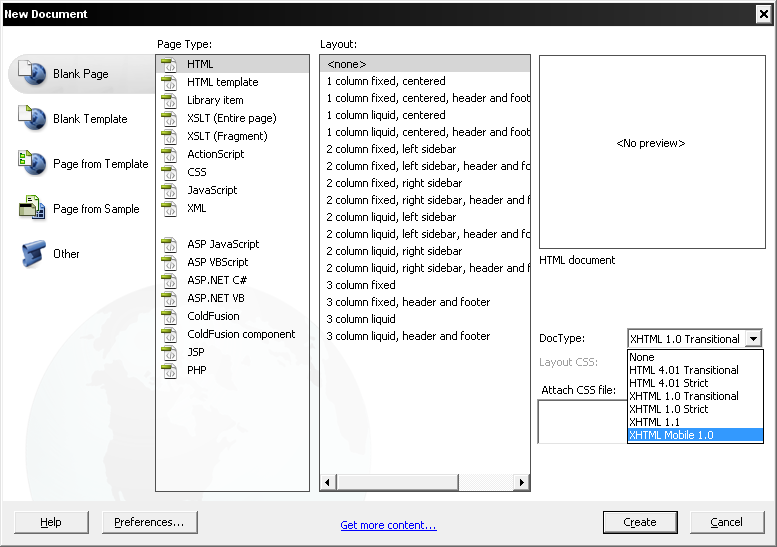
For coding our markup, JavaScript, and CSS, we can use almost any web tool available in the market, including Adobe Dreamweaver, Microsoft Expression Web, Aptana Studio, or even a text editor. Some tools, like Dreamweaver (since the CS4 version), work better with mobile markup and allow us to validate against mobile web standards. In this editor, when we create a new document we can choose XHTML Mobile as the document type, as shown in Figure 4-1.
We will see in the following pages that it may be useful not to use too many of an editor’s visual design features. In mobile web development, it is often easier and cleaner to work directly with the code.
Emulators and Simulators
The most useful tools for our work will be emulators and simulators. Generally speaking, an emulator is a piece of software that translates compiled code from an original architecture to the platform where it is running. It allows us to run an operating system and its native applications on another operating system. In the mobile development world, an emulator is a desktop application that emulates mobile device hardware and a mobile operating system, allowing us to test and debug our applications and see how they are working. The browser, and even the operating system, is not aware that it is running on an emulator, so we can execute the same code that will execute on the real device.
Note
We should also add to our mobile development environments classic tools for project and configuration management, like bug tracking, version control, and project management tools.
Emulators are created by manufacturers and offered to developers for free, either standalone or bundled with the Software Development Kit (SDK) for native development.
There are also operating system emulators that don’t represent any real device hardware but rather the operating system as a whole. These exist for Windows Mobile and Android.
On the other hand, a simulator is a less complex application that simulates some of the behavior of a device, but does not emulate hardware and does not work over the real operating system. These tools are simpler and less useful than emulators. A simulator may be created by the device manufacturer or by some other company offering a simulation environment for developers. As the simulator does not simulate all the device features, we can also find tools that will not be helpful for mobile web development but rather for other technologies, like Java ME. In mobile browsing, there are simulators with pixel-level simulation, and others that neither create a skin over a typical desktop browser (e.g., Firefox or Safari) with real typography nor simulate their rendering engines.
For mobile web development, we will find emulators from Nokia, Symbian, BlackBerry, Android, Palm Pre, and Windows Mobile and simulators from Apple for the iPhone (though only for Mac OS X). A multiple mobile browser simulator is available from Adobe, called Device Central, but we will not find any help from Sony Ericsson, LG, Motorola, or Samsung with their proprietary OSs (used on their low- and mid-end devices).
Some browser-based emulators, like the Opera Mini emulator, are also available.
An up-to-date list of emulator download URLs can be found at http://www.mobilexweb.com/go/emulators.
Note
As the emulators have the same operating system and applications as the real devices, we will need to wait for the OS to load before opening a web page.
Android emulator
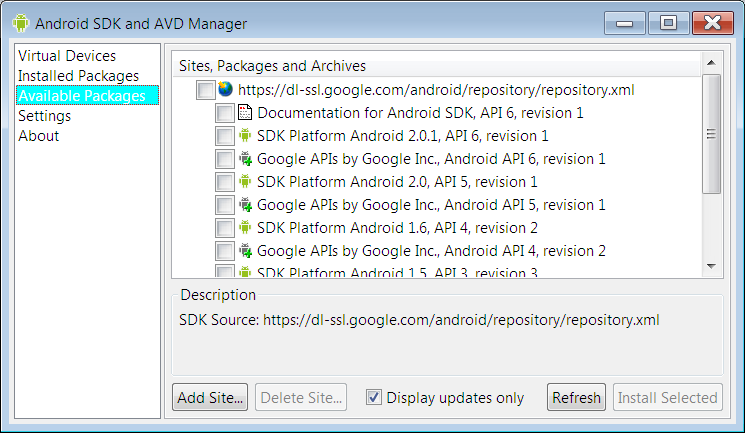
The Android emulator, shown in Figure 4-2, is available in conjunction with the SDK to create native Java applications for Android. You can download it for free from http://developer.android.com; the base SDK and the different Android OS versions are available separately. The Android emulator is available for Windows, Mac OS X, and Linux. Once you’ve downloaded it, create a folder for the contents on your hard drive and unzip the package.
In the folder where you extracted the package, there is an
android terminal command on Mac OS
X/Linux and an SDK Setup.exe
application for Windows that opens the Android SDK and AVD
Manager, where you can download and configure Android
platforms after installing the base SDK.
Warning
If you get errors while trying to retrieve “Available Packs” in the Android SDK and AVD Manager, you can go to Settings, click the option “Force https:// sources to be fetched using http://”, and then click Apply.
Opening the Android emulator can be a little tricky the first time. You can open it from an IDE such as Eclipse, but first you need to install the Android plug-in and create a native empty application. Alternatively, you can open the emulator from a console window (Terminal or the command prompt, depending on the operating system) or from the SDK and AVD Manager.
Warning
After you’ve had the Android SDK installed for a while, you may want to update it and install a new package. If you receive an XML error while doing this, you may have an outdated version of the AVD manager. Just go to the website and download the SDK again.
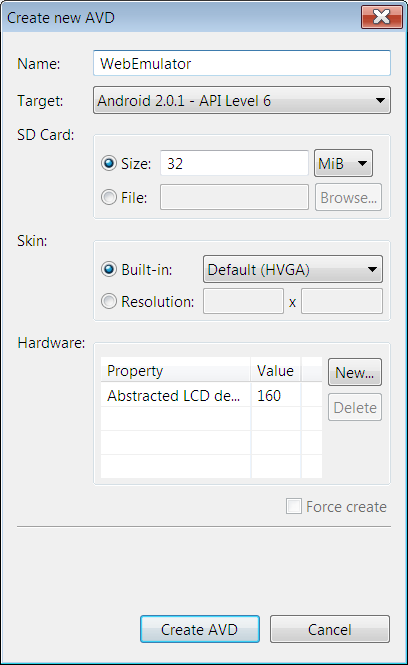
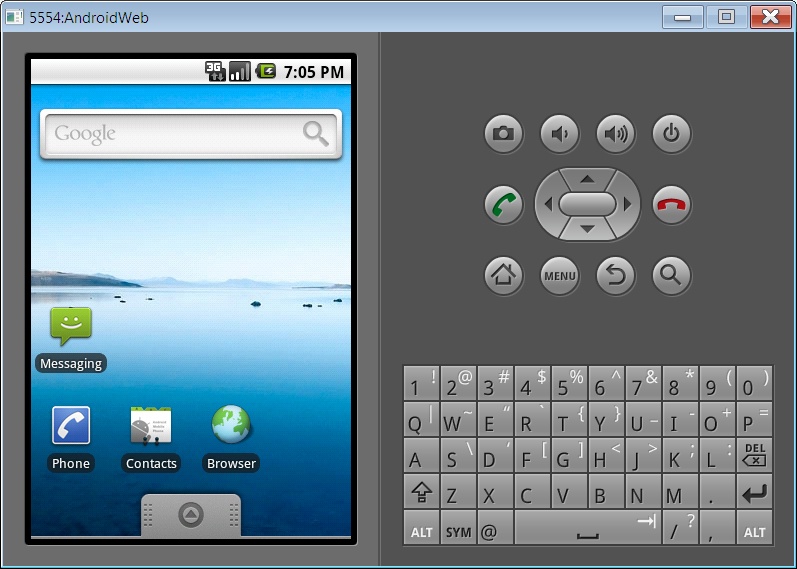
Once you’ve installed a platform, you need to create a new Virtual Device using the SDK and AVD Manager. Creating a new device involves selecting the target (of the installed platforms), defining a name, and specifying the size of the SD card, the screen size, and other optional hardware features, as you can see in Figure 4-3. One you’ve created the device, you can go to Virtual Devices and click Launch to reach a result like the one shown in Figure 4-4.
You can also install new tools from vendors, like the Droid device for Motorola. In the Motorola case, you need to download the MotoDev Studio for Android, available for free at http://developer.motorola.com.
Note
Motorola will simplify the SDK install process and emulator launch if you download MotoDev Studio for Android IDE first. It will ask you to download and configure the SDK and platforms automatically.
With the emulator opened, you can open a mobile website by finding the browser using your mouse (remember that almost all Android devices are touch capable) and typing the URL in its location bar. Up to Android 2.0, the emulator doesn’t support opening local files, so you’ll need to set up a local web server (e.g., Apache) or upload your files to a web server on the Internet.
Warning
If you want to load a local web server in the Android emulator, you can’t use localhost or 127.0.0.1 because the browser will point the request to Android itself. There is a special IP address available to point to the host computer: 10.0.2.2.
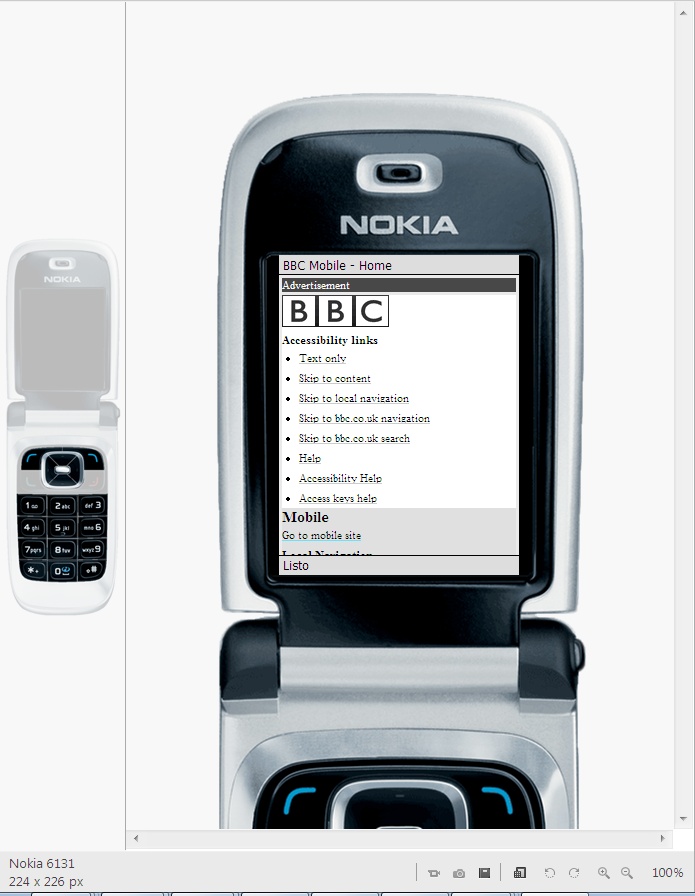
Nokia emulators
Nokia has always had the better emulators, since the beginning of mobile web development. Instead of one emulator per device, you’ll find one emulator for each version of each platform. You can download emulators for Series 40 (mid- and low-end devices) and for S60 (Symbian smartphones) at http://www.forum.nokia.com. In some cases there are also specific model emulators with specific features, like for the Nokia N97 (an S60 5th edition device with home screen widgets, a feature we will cover in Chapter 12).
Note
Nokia also has a tool called the Nokia Mobile Browser Simulator, developed in 2003 to test mobile websites for old WAP 1.0 devices and the first WAP 2.0 ones. Today, this tool is still available but deprecated; we don’t need it.
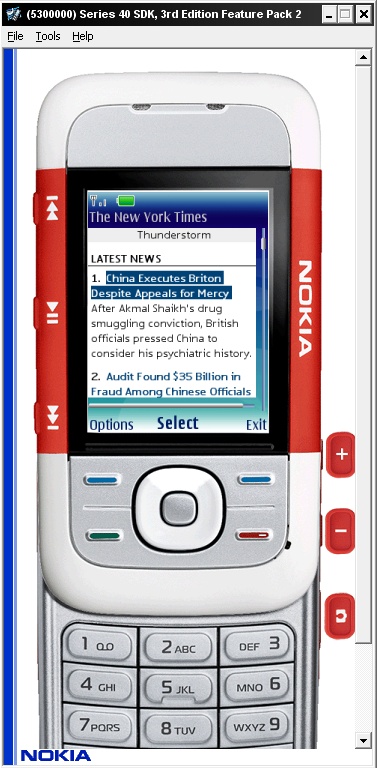
Unfortunately, Series 40 and S60 Nokia emulators, like that shown in Figure 4-5, are available only for the Windows operating system, and some of the old ones have problems with Windows Vista and Windows 7. It is a good idea to install at least the last three emulators for each platform; for example, Series 40 6th edition, Series 40 5th edition FP1 (Feature Pack 1), and Series 40 3rd edition FP2.
If you need to emulate a Nokia device, first find the correct platform version for that device at http://forum.nokia.com/devices and then download the emulator for that platform. Nokia guarantees (and it works almost all the time) that every device based on the same platform version has the same browser and rendering engine and even the same hardware features.
Note
There isn’t a Maemo or MeeGo emulator for testing mobile websites, but you can download MeeGo for netbooks from http://www.meego.com and run it on a virtual machine.
The Nokia emulators will add shortcut icons to your Start menu, so it will be easy to find them. Once you’ve launched the emulator, you can open the browser and type in the URL or use the shortcut File→Open, which allows you to type or paste a URL or browse for a file in your local filesystem. The emulator will open the browser automatically.
Warning
Some of the latest S40 emulators have predictive text input active by default, and this will deactivate the usage of your desktop QWERTY keyboard to type. Before using them, you’ll need to disable predictive input.
Nokia S40 emulators support the use of localhost or 127.0.0.1 to connect with your desktop host computer.
iPhone simulator
Only available for Mac OS X, the iPhone Simulator, shown in Figure 4-6, offers a free simulation environment including Safari. It is not an emulator, so it does not really provide a hardware emulation experience and is not a true performance indicator. However, it is perfectly suitable for seeing how your website is rendering and how your code is working. It’s especially convenient for loading local or remote files by typing in the URL field using your desktop keyboard.
The iPhone Simulator is included with the SDK for native development, available for free at http://developer.apple.com/iphone. The SDK may take a while to download, because it’s more than 2 GB. You can download the latest version of the operating system, in which case you can switch between versions using the Hardware→Version menu option. With the Simulator, you can also select if you want to simulate an iPhone or an iPad.
Warning
At the time of this writing, there is no way to emulate the real iPhone browser on Windows or Linux machines. In Chapter 13 we will cover alternatives to emulation that can help even on Windows machines.
Once the emulator is open, you can open the Safari application and type a URL in the address bar. To open a local file, use the file:/// protocol in the address field (for example, file:///Users/myUser/Desktop/test.html to open an HTML file on the desktop of the myUser user).
Note
The most accurate iPhone experience on Windows can be found using the MobiOne emulator, which includes a Visual Designer. It is available for free at http://www.genuitec.com/mobile and it includes a WebKit browser emulating most of the iPhone extensions. It also supports a Palm webOS skin.
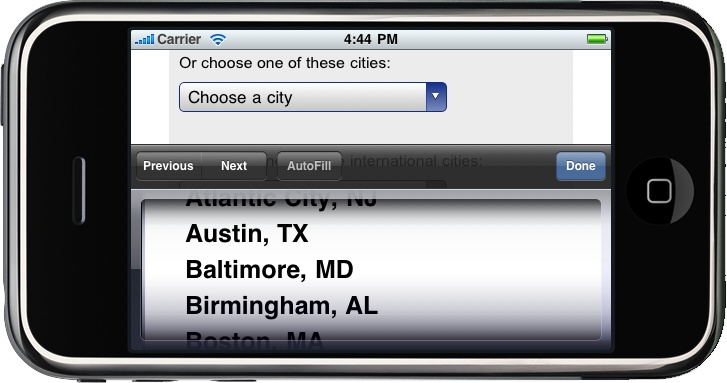
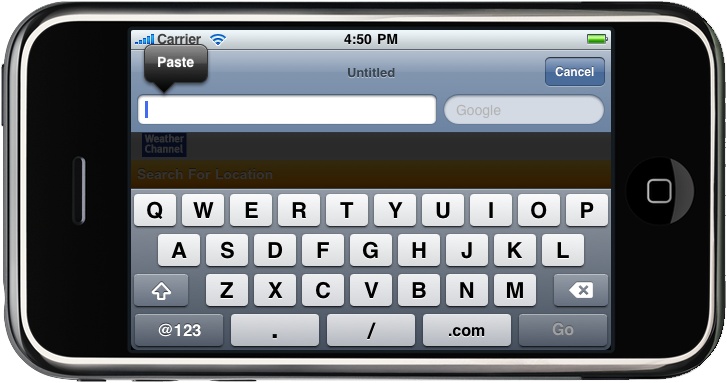
Pasting a URL from the clipboard can be a little tricky from iOS 3.0. When you paste text using the keyboard or the Edit menu, the text will be pasted into the iPhone’s internal clipboard. You then need to paste it again using the iPhone’s gesture, tapping once over the text input and selecting Paste from the contextual menu, as shown in Figure 4-7.
Palm emulator
Palm has been in the emulator market for more than 10 years and has always had great support for these tools. We have already talked about the history of Palm and Palm OS; in this book we will cover only the new webOS, the operating system available since Palm Pre. You can download the Palm Mojo SDK, which includes the Palm emulator, from http://developer.palm.com. It is available for Windows, Mac OS X, and Linux. To use it, you must have Sun VirtualBox, a free virtualization tool available from http://www.virtualbox.org, installed on your machine. If everything goes OK, you can open the Palm emulator from the Start menu, the command line/Terminal, or your applications list.
Note
If you want to download and install old Palm OS (now Garnet OS) SDKs and simulators, you can find them at http://www.accessdevnet.com. This is the developer’s site for ACCESS, the current owner of Garnet OS and the NetFront browser.
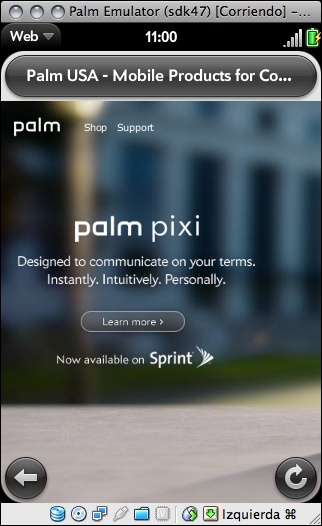
In the Palm emulator, you can open the applications menu with your mouse and choose Web to type a URL. This emulator can be a little confusing at first because it doesn’t support an onscreen keyboard (see Figure 4-8); we only see the screen of the device.
To help you get started, Table 4-1 lists some keyboard shortcuts that will be helpful for using the emulator.
Key | Description |
Alt (Windows, Linux), Option (Mac) | Option key |
End | Opens (or closes) the launcher |
Esc | Back action (generally goes back to the previous card/window) |
Home | Minimizes (or maximizes) the current card (window) |
Left and right arrow | Switches between applications |
Warning
If you have a MacBook laptop like me, you will not find the End or Home keys on your keyboard. In the Palm emulator, you can use Function-right arrow and Function-left arrow for the same functionality.
The Palm emulator, like Android’s, doesn’t support simple local file opening. You’ll need to use a local web server and use the internal VirtualBox IP address to access the host server.
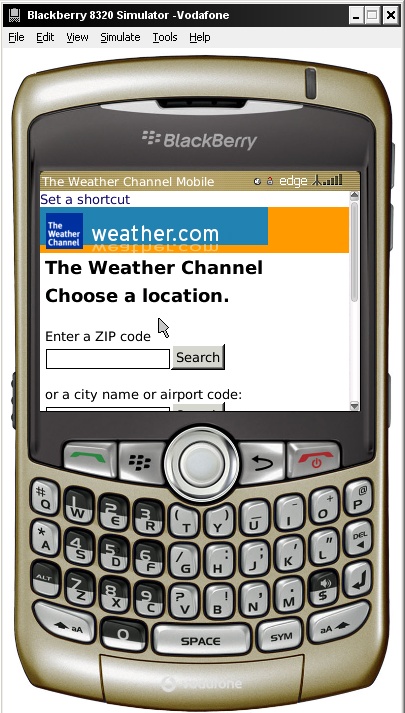
BlackBerry simulators
Research in Motion (RIM), vendor of the popular BlackBerrys, has done a great job with emulators, with one only problem: it is very difficult to decide which one to download and use. Dozens of different installers are available at http://www.blackberry.com/developers; you can download the proxy server, plug-ins for Eclipse and Visual Studio for web developers, and the simulators. All the tools are compatible only with the Windows operating system.
The first requirement is to download the BlackBerry Email and MDS Services Simulator Package. This proxy allows any simulator to access the network and emulates email services and an enterprise server. Before opening a browser, you need to start this service on your computer.
The BlackBerry Smartphone Simulators are available at http://na.blackberry.com/eng/developers/resources/simulators.jsp. The first step is to select the smartphone you want to emulate (for example, BlackBerry Tour 9630) and choose either the carrier you want (or Generic), or the OS version.
You can also click the “view all BlackBerry Smartphone Simulator downloads” link and select the appropriate version of the BlackBerry simulator from the list of more than 20 available choices, starting with version 3.6. Every version has a choice of simulators available for many combinations of BlackBerry device and operator firmware. For example, if you choose version 4.2, you can download a BlackBerry 8100 simulator with one of the following operator options:
Operator-less
Cingular Wireless
Vodafone
TIM
Telefonica
Rogers Wireless
T-Mobile USA
Orange
O2
In addition, there are different versions of the operating system available for the same device and for the same operators. You can either select the operator-agnostic firmware (Generic) or the firmware for a specific operator to download. One example of a BlackBerry simulator is shown in Figure 4-9.
A list of the devices available per version is shown in Table 4-2.
Simulator version | Some devices available (with many operators for each one) |
5.0.0 | Tour (9630), Curve (8530), Storm (9500, 9530), Storm 2 (9520, 9550), Bold (9700) |
4.7.1 | Tour (9630) |
4.7.0 | Storm (9500, 9530) |
4.6.1 | Curve (8350i, 8900, 8520, 8230), Bold (9000) |
4.6.0 | Pearl (8220, 8230), Bold (9000) |
4.5.0 | Pearl (8100, 8110, 8120, 8130), Curve (8300, 8310, 8330), 8800, 8820, 8830, 8880, 8700 |
4.3.0 | Pearl (8110, 8120, 8130), Curve (8330) |
4.2.2 | 8707, 8820, 8830, Curve (8300, 8310, 8320) |
4.2.1 | Pearl (8100), 7130, 8707, 8700, 8800 |
4.2 | Pearl (8100) |
4.1 | 8700, 8707, 7130, 8703, 8707, 7290, 7250, 7130, 7100 |
Once you’ve installed your emulator, remember to open the BlackBerry MDS Services Simulator before using it. Launch the emulator, open the browser, and type the URL you want to access, and you’ll see something like Figure 4-9. These emulators don’t support local files or accessing them through localhost; you can use the local IP address of your desktop if you’re on a network or the public IP address if you are connected directly to the Internet.
Windows Mobile emulators
You can download Windows Mobile emulators along with Visual Studio 2008 or 2010, or without the IDE in standalone mode. The emulator isn’t available with the free Express versions of Visual Studio, and they work only on Windows-based computers.
You will need to download:
The Microsoft Device Emulator
Windows Mobile emulator images or images from manufacturers
Virtual PC 2007 for Internet connectivity
ActiveSync (only for Windows XP or 2003 Server) or Windows Mobile Device Center (only for Windows 7, Vista, or 2008 Server)
All these packages are available for free at http://www.msdn.microsoft.com/windowsmobile.
If you’re using a version prior to 6.0, shortcut icons will not automatically appear in the Start menu after installation. You will need to locate the installation folder (e.g., c:\Program Files\Microsoft Device Emulator\1.0) and execute the Emulator Device Manager (the file dvcemumanager.exe).
The Emulator Device Manager lists all the installed images; you can right-click on one and select Connect from the context menu. However, your work is not finished yet.
One of the most common problems with Windows Mobile emulators is that the Internet connection doesn’t work out of the box. You need to do some setup before connecting to the network. To connect the emulator with the network, follow these steps:
With the emulator opened, right-click it in the Device Manager and select Cradle.
In the Device Manager, choose File→Configure. On the Network tab, check “Enable NE2000 PCMCIA network adapter and bind to.”
Press OK to save your changes and create a bridge between your real network and a virtual network in the emulator.
In the emulator, go to the network settings. The location may change between Windows Mobile versions, but it should be found near Start menu→Settings→Connections. Choose Network Cards and select The Internet from the drop-down list.
Repeat this process for each emulator.
Open a champagne bottle and enjoy.
Note
If you have installed Visual Studio, you can create an empty Smart Device solution (for Windows Mobile or PocketPC) and run it. The emulator will open without any other issue.
Windows Phone emulator
Remember that starting in 2010, Microsoft will stop evolving the Windows Mobile operating system and replace it with Windows Phone 7. The whole platform is new, including the mobile browser. To install the Windows Phone emulator you should use Visual Studio 2010 (you can use the free version, called Visual Studio 2010 Express for Windows Phone). It includes the emulator, and you can also use Internet Explorer. To install it, you will need Windows Vista or Windows 7. A multitouch screen is required to emulate multitouch over the emulator.
You can download it for free from http://www.microsoft.com/express.
i-mode HTML simulator
If Japanese people are likely to use your website, you should consider testing it for NTT DoCoMo i-mode devices. Fortunately for people like me, who do not read Japanese, the company has created an English version of its website containing almost all the relevant development information. A simulator for its devices is also available for Windows.
You can download the i-mode HTML Simulator and the i-mode HTML Simulator II from http://www.nttdocomo.co.jp/english/service/imode/make/content/browser/html. The first one is suitable for simulation of devices released prior to May 2009, and the second one is for the second generation of devices, starting in May 2009.
Note
The Fire Mobile Simulator (http://www.firemobilesimulator.org) is a Firefox plug-in simulator for the three main operators in Japan, DoCoMo, Au, and Softbank. The page and plug-in are in Japanese, but an online translator such as Google Translate (http://translate.google.com) will give you all the information you need.
Opera Mobile emulator
In 2010, Opera released the first emulator for its Opera Mobile browser, available for Mac OS X, Linux, and Windows. The emulator runs the exact same code as the mobile version, so it is accurate. In addition to the browser, the package includes an Opera Widgets Mobile Emulator, a desktop version of the widget engine available for Symbian and Windows Mobile, discussed in Chapter 12. With this emulator you can also debug your mobile web applications using Dragonfly, a debugging service for Opera that we will cover in Chapter 13.
You can download the emulator for free at http://www.opera.com/developer/tools. You can also download the Opera Debug Menu, a set of shortcuts to Opera’s developer-focused features, from the same URL.
Openwave simulator
We have already talked about Openwave, a browser installed on many low- and mid-end devices from a variety of vendors before 2008. The company has since been acquired by Myriad Group, but we can still download different versions of the simulator at http://developer.openwave.com.
Adobe Device Central
I really like Adobe and many of its products. I even manage an official Adobe User Group. However, while Adobe Device Central (the tool that provides mobile emulation for Flash and for mobile websites) is great for Flash Lite emulation, it’s not so good for websites.
The tool is included with Adobe Dreamweaver, Adobe Flash Professional, and some of the suites and has an updated list of devices, including their screen sizes and Flash Lite capabilities. However, for browser emulation it is just a miniature WebKit browser on the desktop. It doesn’t provide real (or almost similar) simulation in terms of typography, browser bars, and markup rendering.
To simulate a website as shown in Figure 4-10, open the HTML source in Dreamweaver and select File→Preview→Device Central or, from version CS5, use File→Open.
Comparison
Table 4-3 shows how the different platform emulators and simulators allow us to access files and the clipboard on our host machines.
Platform | Able to open local files | Accesses host’s local server via | Supports copy/paste from host |
Android | No | 10.0.2.2 | No |
Nokia S40 and S60 | Yes | localhost | Yes |
iPhone | Yes | localhost | Yes (two-phase for 3.0) |
BlackBerry | No | Network IP address | No |
Palm webOS | No | Virtual Box IP address | No |
Windows Mobile | No | Virtual PC IP address | No |
Note
For emulators without URL pasting abilities, you can generate a free mobile-optimized short URL for easy typing on a mobile device or in an emulator at http://www.mobiletinyurl.com.
Online simulators
Online simulators are another option for exploring the mobile web.
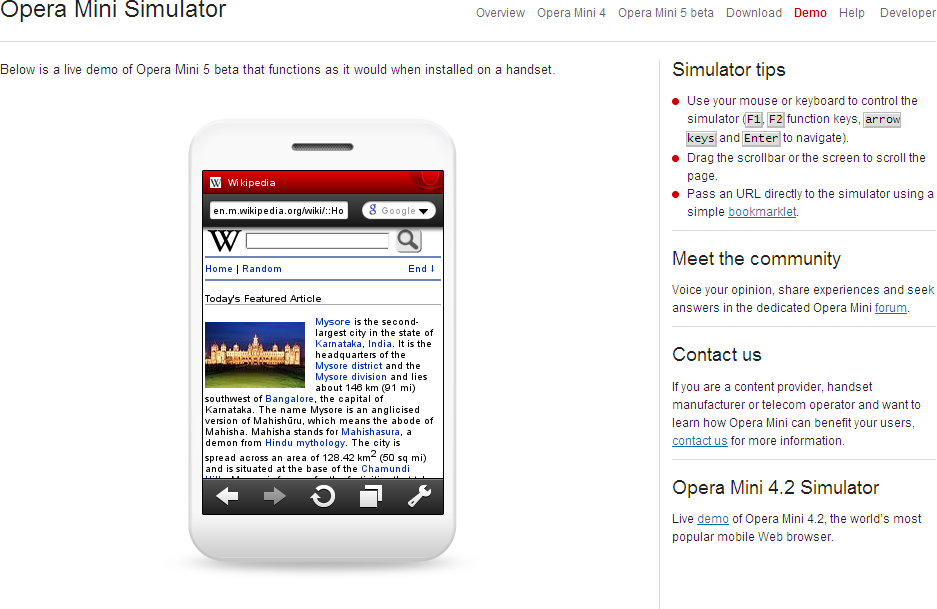
Opera Mini Simulator
At http://www.opera.com/mini/demo, you can enjoy a full Opera Mini simulation in a Java applet (see Figure 4-11). This URL is for the latest version of the software (at the time of this writing, 5.0), but you can also find simulators for previous versions, like 4.2 at http://www.opera.com/mini/demo/?ver=4.
Note
Remember that Opera Mini and other user-installable browsers are available as normal native or Java ME applications, so you can use any emulator to download them. The Nokia, Windows Mobile, and BlackBerry emulators are great for this purpose.
Opera also offers an emulator for Opera Mobile that works on Windows, Mac OS X, and Linux and can be downloaded for free at http://www.opera.com/developer/tools.
ready.mobi
The website http://ready.mobi has a great testing tool that we will cover later in this book (see Chapter 13). It also has an online simulator for some older devices, such as the following:
Nokia N70
Samsung Z105
Sony Ericsson K850i
Motorola v3i
Sharp GX-10
Note
When using the Nokia, BlackBerry, Symbian, Windows Mobile, and Android emulators, we can install over them browsers that are available for free, such as Opera Mini, Bolt, Opera Mobile, and the UC Browser.
iPhone web simulation
Some websites, such as http://www.testiphone.com and http://www.iphonetester.com, try to simulate the iPhone browser, but the experience isn’t the real thing; they are just iframes with the skin of the iPhone.
Note
We will get deeper into the creation of a testing environment in Chapter 13, moving beyond emulators and simulators.
Production Environment
The mobile production environment, surprisingly, doesn’t differ too much from a classic web environment. Although many web hosting companies used to offer a “premium WAP hosting” option (obviously, more expensive than the non-mobile options), there is no need for any such distinction.
Web Hosting
To get started, you will need a web server with your favorite platform installed. It should support either static or dynamic files on all platforms you plan to work with (PHP, ASP.NET, Java, Ruby, Python, etc.). Cloud hosting (via a service like Amazon EC2, Google App Engine, Aptana Cloud, or Microsoft Azure) will work well, too.
You will need to have permissions to manage MIME types on the server. We will talk about this in Chapters 5 and 10, but for now, just remember that it will allow you to make compatible mobile websites more easily.
Domain
Which domain alternative should you use? I have no answer for this; you will have to decide for yourself. You can create a subdomain of your desktop website (if you have one), like m.mydomain.com, or you can use the main entry point (mydomain.com or www.mydomain.com), or you can buy a .mobi domain from any registrar (fees start at $10 per year). My only recommendation is that, whatever decision you make, you should try to have the other options available and set up a 301 HTTP Redirect to the domain you’ve chosen. I’ve tried myself many times to guess a mobile URL using m.<anysite>.com or <anysite>.mobi, and you should support that user behavior.
Warning
No matter which mobile domain you will be using, remember to create a 301 HTTP Redirect to the chosen one from all the possibilities (m.yourdomain, wap.yourdomain, mobile.yourdomain, and, if possible, yourdomain.mobi). You don’t want to lose visitors because they couldn’t guess your mobile address.
Error Management
You’ll need to ensure that your error pages will be mobile compatible. You should be able to configure the default error pages for most common HTTP error codes, like 404 (Page not Found) and 500 (Internal Server Error), on your server. These files must be mobile compatible; we don’t want to waste traffic for the user on a server error or deliver pages that aren’t compatible with low-end devices. If you’re not sure how to configure the default error pages, ask your server provider.
If you are providing both the desktop and mobile versions of your website from the same domain, you should create a dynamic code to detect whether the device accessing your site is a mobile or not. In the case of a 500 error, deliver a very simple HTML page for both desktop and mobile users; you won’t know whether the problem was in your dynamic platform.
Note
Facebook uses a main mobile site, http://m.facebook.com, but also delivers special URLs for some platforms (for example, http://touch.facebook.com for touch devices, http://iphone.facebook.com for iPhones, and http://zero.facebook.com for basic phones). You should provide only one URL and deliver appropriate content from that, as we will see in Chapter 10.
Statistics
Statistics about mobile website usage are typically the same as those for desktop usage, but a mobile-friendly tool will be very helpful in understanding mobile-specific features. You can log requests on the server for later processing with a log analysis tool, or you can use a third-party tool for help in your statistics management. We will cover mobile-friendly statistical tools in Chapter 14.
Get Programming the Mobile Web now with the O’Reilly learning platform.
O’Reilly members experience books, live events, courses curated by job role, and more from O’Reilly and nearly 200 top publishers.

