Chapter 4. The Pre as Phone
Whatever else the Pre may be—and it’s many things, as you’ll see in the following chapters—at its core, it’s a phone. And because it’s a smartphone, the Pre is loaded with features that standard cellphones lack, such as the ability to call phone numbers embedded in a web page, or to find contacts and phone numbers with just a few keystrokes.
In this chapter, you’ll learn to use your Pre to make and receive calls, add contacts via the Phone program, set up and use voicemail, assign ringtones, and more.
Make a Phone Call
The Pre gives you a whopping six ways to make a phone call, using everything from a traditional dial pad to embedded phone numbers.
Dialing
You can dial a number using the Pre’s physical keyboard, which slides out from under the phone, or with the Pre’s onscreen “virtual” dial pad, called the dial pad, which responds to your touch.
From the keyboard
If you prefer tactile feedback when you dial a number, your only option is the Pre’s physical keyboard. It integrates a standard set of keys into its traditional QWERTY layout, with the numbers 0 through 9 piggybacking on letter keys and highlighted in orange.
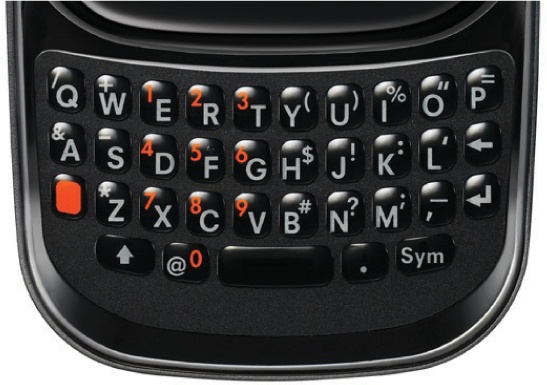
Dialing from the keyboard offers one big advantage over the Pre’s on-screen dial pad: You don’t have to open the Pre’s phone program before you start dialing. The Pre is a smart phone, after all, and when you start dialing from the keyboard in Card view or from the Launcher, the Pre knows you’re entering a phone number. It pops up a window displaying the number as you type, and when you’re done, you just tap the number to dial.
Note
As the phone calls one of your contacts, it displays a picture of the person you’re calling, providing his or her mug is in that person’s profile (see Add Pictures to Contacts).
Once you dial a number, the Pre checks it against your Contacts list. If it finds a match, it displays a link to that person’s profile. You can tap the link to go to the profile, to get an alternate phone number, for example.
Use the Dial Pad
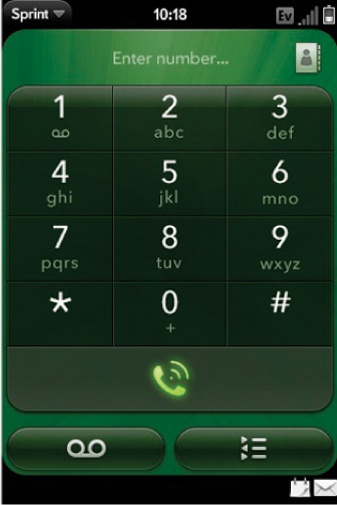
You can enter a phone number using the Pre’s onscreen dial pad, too. First, open the Phone application by tapping the Quick Launch panel’s phone icon.

The dial pad uses a standard dialing configuration and has three buttons underneath.
Tip
The Pre’s onscreen keys are large enough so you can dial with one hand. Just grip the Pre in your palm, and let your thumb do the number-tapping.
The largest of the three (running the width of the dial pad) has a phone icon; tap it to connect your calls.
The smaller button on the left, which looks like a pair of upside-down eyeglasses, takes you to voicemail, which you’ll learn about later in this chapter (on Go to Voicemail).
The button on the right opens your call history, a list of all the calls you made or received. (You’ll learn how to make calls from the Call History screen in a moment.) From the Call History screen, tap the dial pad button to return to the dial pad. (It’s in the same place the Call History button was.)
To make a call, enter the phone number using the dial pad (as soon as you start entering a number, the voicemail and Call History buttons disappear). With every key strike, the Pre emits a beep and displays the corresponding number in the window above the dial pad. If you make a mistake, tap the onscreen backspace key to remove the last digit. To delete the entire number, hold down the onscreen backspace key.
Tip
You can copy and paste (see Search the Pre (and Beyond)) numbers from other applications, like Memo and Contacts, into the dial pad.
When you finish entering the number, tap the phone icon to place your call.
Tip
If you get a busy signal and want to try calling again, open the Phone application and tap the phone icon ![]() . When you do, the number or name of the person you last dialed appears above the dial pad. Simply tap the same phone icon again to call the number. This redial shortcut is handy when you’re trying to get through to a talk show’s call-in line or to vote for your favorite singer on American Idol.
. When you do, the number or name of the person you last dialed appears above the dial pad. Simply tap the same phone icon again to call the number. This redial shortcut is handy when you’re trying to get through to a talk show’s call-in line or to vote for your favorite singer on American Idol.
Automated Dialing
Of course, typing even 10 digits seems so 20th-century. Your Pre can automate dialing in a number of ways. As you’ll learn in the next few pages, you can call from your Call History or Contacts list, use a speed-dial number, or tap a number in a web page.
Note
Thanks to its proximity sensor (see The Battery), you won’t inadvertently tap any buttons on the Pre’s screen when you hold the phone to your ear. The screen temporarily shuts down and automatically wakes up when you put the phone down.
By Call History
As you learned above, the Call History screen lists all the calls you’ve made, fielded, or missed. To see this list, go to the Quick Launch panel and tap the phone icon, and then tap the Call History button.
You can tell what kind of call each item in the list is by the color and direction of the arrow beside each phone number. Calls that you made have a green arrow that points right, calls you received have a blue arrow that points left, and calls you missed have a broken red arrow.
Tip
To see just your missed calls so you can prioritize callbacks, tap Missed Calls at the top of the Call History list.
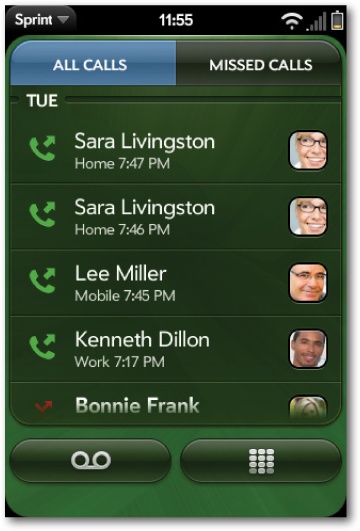
You’ll probably see different kinds of entries, too: some that are just phone numbers, others that are names instead of numbers, others that say “Blocked number,” and still others that are names accompanied by photographs. The kind of entry you see depends on what’s in your Contacts list, because your Pre checks phone numbers against that list. So if a call comes in from someone in your Contacts list, the Pre displays the name of the person and a photograph of her—if you’ve added one to her profile, that is—instead of her phone number.
To call any of the numbers in this list, simply tap the number or name.
Dial by Contact
The last chapter taught you how to import and create profiles in your Contacts list. You can call anyone on that list by pulling up their profile page and tapping one of their phone numbers (mobile, work, home, and so on). You can get to a person’s contact screen three ways:
Universal search. In Card view or the Launcher, start typing the first or last name of the person you want to call. You can also type the initials of the person you want to call or a nickname (like “Dad”) that you’ve added to the person’s profile. Matching names pop up as you type, and you can select a name any time (the name you want often appears before you finish typing) by tapping it. Once you do, that person’s contact info comes up, listing all his phone numbers. Tap the one you want to call.
From within the Phone application. You can call up the Contacts screen by tapping the
 icon in the upper-right corner of the screen, just above the dial pad. This isn’t your full master Contacts list; only contacts with phone numbers turn up here. You can flick or scroll through the list, but that’s not a very quick way to find a number. It’s faster to use the Pre’s handy search box at the top of the list—start typing in a first or last name, and the list displays only items that match what you enter.
Open the Contacts application. As always, you can open Contacts from the Quick Launch panel to see all your contacts. You won’t see a search box when the program opens, but if you start pressing letters on the keyboard, one appears onscreen. Start typing in the name of the person you want to find.
Add contacts via the Phone program
You can add people to your Contacts list from the phone program in several ways.
To create a contact based on a call you made or received, go to the Call History screen (see Automated Dialing). If the Pre hasn’t matched a number with your Contacts list, it displays the number with a silhouette and a + sign beside it. That’s your invitation to add that person to your Contacts list; Unlink a Profile has the details about how to do that.
You can create a contact as you’re making a call, too. Do one of the following:
After you type a number into the dial pad, tap the “Add to Contacts” button at the bottom of the screen. (This button replaces the usual buttons—shown on Use the Dial Pad—the moment you tap a number.) The Pre takes you to a screen with three options:
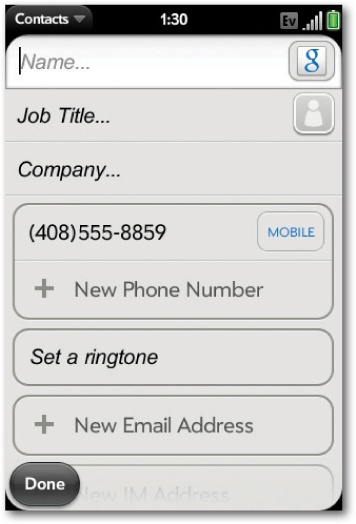
If the contact is new, tap Save As New and enter the name, title, company, email address, and other profile info on the screen that appears. The phone number you typed in to make the call is already filled in. You can add other phone numbers to the profile as well.
If want to add the number to one of your existing contacts, tap “Add to Existing”, and then tap the person’s name when the Contacts list pops up.
Tap Dismiss if you change your mind.
While you’re on a call to a new number, the silhouette of a person with a + sign appears beside the number. Tap it and follow the process listed above to save a new contact, add to an existing one, or cancel.
Use Speed Dial
Save yourself some time and effort by assigning speed-dial keys to people you talk to frequently. That way, you only have to enter a few keystrokes to call them—the Pre automatically opens the Phone program and dials the number.
Note
You can’t use the 1 key to speed-dial anyone. The Pre reserves this key for speed-dialing your voicemail account.
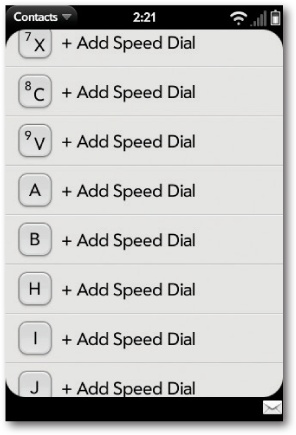
You can assign speed-dial keys to a maximum of 26 people. Here’s how:
Open Contacts (in the Quick Launch panel, tap the Contacts icon).
Use universal search (see Search the Pre (and Beyond)) to find the person’s name, or scroll to his name and open his profile.
Open the application menu in the upper-left corner of the screen.
Tap Set Speed Dial. A profile screen showing the contact’s phone numbers pops up. Tap the phone number you want to assign to the speed-dial key.
Assign an available speed-dial key from the list that appears. You may have to scroll through the list to find the key you want.
Reassign a speed-dial key
You can only have 26 speed-dial numbers, one for each letter of the alphabet. If you run out, congratulations on having so many friends! You can always reassign a key if you start calling someone else more than the person that key is dedicated to now. Simply repeat the steps above for your new contact. Once you type in the already-reserved speed-dial key, the Pre double-checks that you want to make the switch.
Don’t feel obligated to keep a person on speed dial if you don’t call him very often. In Contacts, pull up the profile for the person who’s about to lose his speed-dialing status, open the application menu, and tap Set Speed Dial. Then tap the onscreen listing that appears with the phone number that has a speed-dial key (you don’t tap the actual key on the keyboard). Tap the Remove Speed Dial button that appears above a list of all the letters already assigned to people and available as speed-dial keys.
Call a speed-dial number
To call someone with a speed-dial number, go to Card view, the Launcher, or the Phone program, and then press and hold the speed-dial key you assigned to that person. An instant later, the Pre dials the number. Easy, huh?
Tip
If you tap but don’t hold a speed-dial key, you still have the option of speed-dialing the person. That’s because once you tap a key, the Pre goes into universal search mode. So if you tap, say, the G key, the Pre displays a list that includes the person you assigned that speed-dial key to, along with things like Google Maps.
Dial from a Web Page or Email Message
Your Pre’s designed to dial phone numbers that appear in web pages, text messages, and email messages. If the number is underlined on the Pre’s screen, the phone recognizes it. Tap it and the Pre opens the Phone program and enters the number; tap the phone icon to make the call.
9-1-1 Calls
If your Pre is locked (see Unlock the Pre) and you’ve set it up so you have to enter a four-digit PIN or more secure password to unlock it (Troubleshooting Tests tells you how to do that), but you’re in trouble and need to dial 9-1-1, you don’t have to go through the rigmarole of entering the security code to start dialing. You can quickly place that emergency call: Just press the power button to wake up the phone, and either slide the keyboard out, or drag the padlock up to unlock the screen (you don’t need to enter your PIN or password). The Pre displays a button labelled “Emergency Call.” Tap it and the Pre opens the dial pad with 9-1-1 already entered. Tap the phone icon ![]() to make the call.
to make the call.
Intra-Office Dialing
If you call coworkers from your office phone by dialing a four-digit extension, you can enjoy the same privilege with your Pre. You just need to set up your Pre so that, when you enter a four-digit number and press the Call button, it adds the area code and the exchange (the first three numbers of a phone number) before it dials that four-digit extension, saving you a lot of typing.
For example, if the phone number for Joe in Accounting is 1-212-555-1234, you can tell the Pre that when you enter 1234 (his extension) and then tap the phone icon ![]() , you want it to add the first six digits of the number (212555). From that point on, when you enter 1234 and tap the
, you want it to add the first six digits of the number (212555). From that point on, when you enter 1234 and tap the ![]() icon, the Pre dials 1-212-555-1234 (it adds the first 1 automatically). Here’s how:
icon, the Pre dials 1-212-555-1234 (it adds the first 1 automatically). Here’s how:
Open the Phone program by tapping the phone icon in the Quick Launch panel.
Open the program’s application menu by tapping the upper-left corner of the screen, and then tap Preferences. The phone dialer screen moves aside, and the Phone Preferences card slides up to replace it.
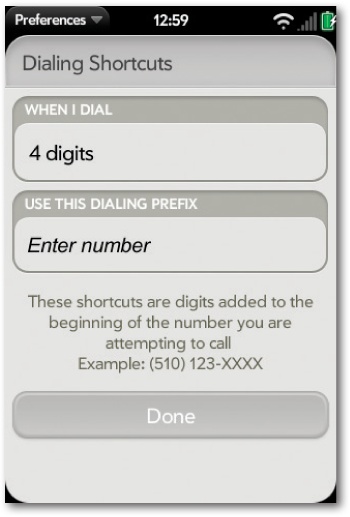
In the Dialing Shortcuts box, tap “Add new number”. The Dialing Shortcuts screen pops up.
Tap the When I Dial box, and tell the Pre how many digits you’ll enter when you want it to automatically dial a full number. In the example above, you’d enter 4 here because you want the Pre to dial Joe’s full number when you type in his four-digit extension (1234). You can trigger a dialing shortcut with a minimum of four digits and a maximum of seven.
In the Use This Dialing Prefix box, enter the digits that you want the Pre to dial when you enter a shortcut number. For Joe’s number, you want your phone to dial his area code and exchange before it dials his extension, so you enter 212555 (you don’t need to enter the 1 because the Pre adds that to the beginning of the number automatically). If you chose a different number in the When I Dial box in step 4, you’ll need to enter fewer numbers here.
Tap Done. From now on you’ll save your fingers some work.
Overseas Calling
In the U.S., your Pre works on a speedy CDMA (Code Division Multiple Access) cellular network run by Sprint. Sprint has made roaming arrangements with overseas phone companies, so you can call friends in Paris or wherever, and you can call home to the U.S. while you travel abroad. (See Advanced Phone Settings for more about roaming.) You’ll pay handsomely for the privilege, of course.
Voice calls from Brazil to the U.S., for example, cost $1.99 per minute, while voice calls from China to the States are $2.99 per minute. And you can pay as much as $4.99 per minute to call the States from Vietnam. Taxes and surcharges may be tacked on by the host country, too. See http://tinyurl.com/mslp89 for details on traveling internationally.
Tip
If international rates take too big a chunk out of your budget, consider renting a phone while you travel abroad.
You’ll pay through the nose to make the odd call from the U.S. to these or other countries on the Pre as well, though rates aren’t quite as onerous. Calls to Brazil are $1.49 to $1.71 per minute (depending on whether you’re calling a landline or mobile phone). Calls to China and Vietnam are $1.49 to $1.52 per minute. If you regularly call overseas, consider Sprint’s $4-per-month International Long Distance Plan, which lowers the per-country rates considerably. Sprint also has a plan catering to folks who frequently call Mexico. For details on all the international rate plans from the U.S, go to http://tinyurl.com/lzwx73.
Of course, in many overseas areas, you’ll still be able to exploit WiFi for a data connection, though data rates can also be oppressive. (Check the websites mentioned above for details.) And as of this writing, you can’t exploit an internet connection to make cheap calls back to the U.S. using VOIP (Voice over Internet Protocol) technology.
If you call overseas from the U.S., type the + sign at the beginning of the number, and the Pre automatically adds the 011 prefix. Then add the country code (found on the Sprint sites or Google), city or area code, and finally the local number. (If you’re making a call from somewhere else in the world where the dialing prefix differs, you need to type in the whole number, since the 011 prefix won’t apply.)
Incoming Calls
With a Pre, you rarely have to answer a call without knowing who’s on the other end. If a custom ringtone (see below) doesn’t reveal who the caller is, a picture on the screen just might. Knowing who the caller is, you can decide whether to answer a call or let it go to voicemail.
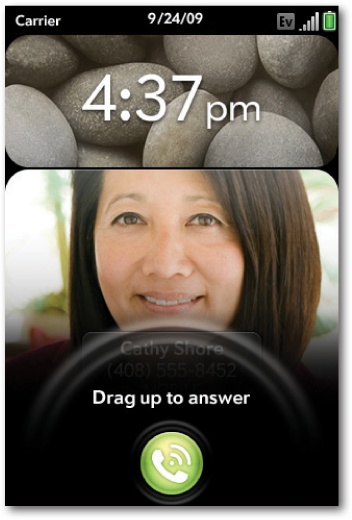
Answer a Call
When someone calls you, all the info the Pre knows about that person (her name, number, a photo, and so on) shows up on the Pre’s screen. If you want to talk to the person, you can field a call three ways:
If the screen is dark, you have two options: Drag up the green phone icon that appears on the bottom of the screen (similar to the way you unlock the phone), or slide open the keyboard. Either way, to confirm that you’ve just answered the call, the Pre displays the call screen shown on Phone Features.
If you’re working on the phone, a green Answer icon and a red Ignore icon pop up along with the caller’s name and number (if known), along with her picture (if you have one on the Pre). This info takes over the bottom half of the screen; the upper half is reserved for whichever application you were using before the call came in. If the name, number, and caller ID info aren’t known, the same icons appear with the words “Unknown Caller” or “Blocked Number”. This type of notification grabs a far narrower slice of the bottom of the screen. Either way, tap the green icon to answer the call; when you’re done, press the red button to hang up.
If you have the Pre’s earbuds on (see Set Up a Palm Profile), press the Answer/End Call button on the headset cord to take the call. The Pre pauses whatever you’re listening to or watching when you make or receive a call, and picks up the beat where you left off when you hang up. (You use this same button for call waiting—see Manage More Than One Call at a Time). If you use third-party headphones, you have to answer the call by tapping the phone icon.
When you answer with a wired headset, a headphone icon appears in the bottom-left corner of the call screen. Tap that icon to switch to the speakerphone (see Manage More Than One Call at a Time) or to a TTY machine (see The Calendar).

Ignore a Call
If a call comes in that you don’t want to take, you can send it to voicemail in several ways:
Let it ring. After about 30 seconds, the call goes to voicemail. This strategy’s only downside is that you have to put up with the ringer for half a minute, which can seem like hours if you’re trying to concentrate on something else.
Press the center button. The phone goes silent on your end, but your caller continues to hear the phone ring until the call goes to voicemail a half-minute later.
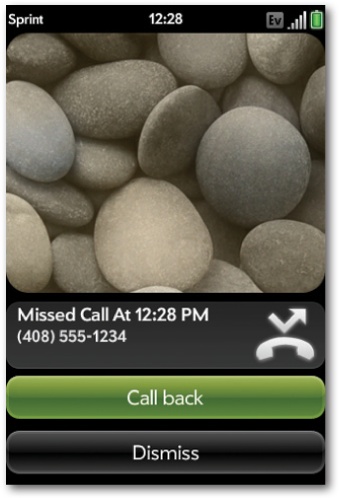
In both the above cases, the Pre displays a Missed Call notification with the caller’s name, phone number, and picture (if available). You can tap the large green “Call back” button to do just that, or the gray-and-black Dismiss button to get rid of the notification. (If the Pre doesn’t recognize the caller, you only see the Dismiss button.) If you don’t do anything, these notifications eventually turn into small icons on the right side of the notifications area. Tap an icon to summon details of the call.
If you tap the notifications area above the “Call back” or Dismiss buttons, the Pre displays the caller’s contact info so you can choose how to respond (by email, text, or by calling a specific number).
Press the red hang-up button, or press the power button twice. This time the call goes to voicemail and you’ll get an Ignored Call notification that disappears after a few seconds.
Go to Voicemail
When someone leaves you a message, the Pre displays a voicemail icon in the notifications area. The icon includes a blue circle with a number in it, which tells you how many messages await your attention.

To listen to your messages, tap the voicemail icon below the dial pad, or press the 1 key on the Pre’s keyboard.
Set up voicemail
The first time you access voicemail, a friendly automated voice guides you through the setup process. You need to:
Choose an easy-to-remember but hard-to-guess four- to seven-digit passcode.
Record your first and last name.
Record a greeting.
Decide whether you want to enter a passcode each time you call voicemail from your Pre or to bypass this security feature and go directly to your messages. Either way, you have to enter your passcode when you check voicemail from another phone.
Listen to voicemail
The Pre’s voicemail system works like most others—voice prompts guide you through your messages one by one.
Note
If the Pre is lacking anywhere compared with the iPhone, it’s in voicemail. The iPhone has a clever feature called Visual Voicemail that displays the names and numbers of the people who’ve left you messages, so you can review the list without calling in to voicemail to listen to your messages. And you can select any message you want to listen to, rather than having to review them in chronological order. You can’t do either of those things on the Pre.
To listen to a message, tap 1. You can repeat the message (tap 1-1), save it (tap 9), or delete it (tap 7). When you call into voicemail, you have other options, too: You can change your greeting by tapping 3, or tap 4 to go into a “personal options” menu to do things like rerecord your name or change your voicemail password.
Phone Features
Once you connect to a call, the Pre’s screen changes to include additional on-call options.
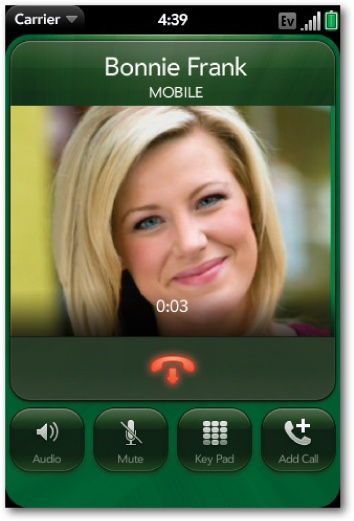
The first three are pretty self-explanatory:
Audio. Free up your hands or let another person in on the conversation with the Pre’s built-in speakerphone. Tap the onscreen Audio button to turn the feature on or off.
Mute. Tapping Mute turns the Pre’s microphone off so a caller can’t hear your end of the conversation. Tap Mute again to turn the mic back on.
Key pad. You’ll encounter more menus to navigate automated directories than you ever will walking through the restaurant section of a mall. To wend your way through, you need to press a variety of touch tones. That’s where the Pre’s Key Pad button comes in. Even if you dialed out using the dial pad, it disappears once the call goes through. To bring it back, tap the Key Pad button (even though Palm calls the onscreen dialer a “dial pad” everywhere else, it calls it a “key pad” here).
Manage More Than One Call at a Time
There’s a fourth icon that appears onscreen when you’re on a call: the Add Call icon ![]() . It’s a little more complex than the other three, because it opens the door to several types of calls.
. It’s a little more complex than the other three, because it opens the door to several types of calls.
Here are your options:
Take a second call. If another call comes in while you’re on the phone, the Pre sounds a call-waiting beep. To take the new call and put the original caller on hold, tap the green phone icon. Or you can tap the red button
 to send the call to voicemail; or simply ignore the beeps, and the call goes to voicemail in 30 seconds.
If you decide to take the second call, you can switch between the two. When you tap the green phone icon to answer the second call, the Pre splits the main screen vertically and displays the first caller’s name and number on top, and the second caller’s name and number on the bottom. You can tell which person you’re talking to because you’ll see a clock timing the call next to the active line’s number, and the words “On hold” next to the other person’s number.
To switch between them, tap the double arrows that appear on the screen between the two calls, or tap the words “On hold”. Either way, the person you were just talking to gets put on hold, and the other caller now has your undivided attention.
Make a conference call. Suppose you take a call from your boss, and now you need to coordinate plans with a colleague. Maybe you want to talk to them individually, or make this into a conference call. While still talking to your boss, tap the Add Call button. The familiar dial pad appears, and you can keep on chatting by speakerphone. Dial the second number and then tap
 . When that caller picks up, the Pre places your boss on hold. Now you have two options: You can either tap End All Calls to hang up on both people, or make this into a conference call so everyone can chat. To merge the calls, tap the upward-pointing Conference button. The words “Conference Call” appears onscreen.
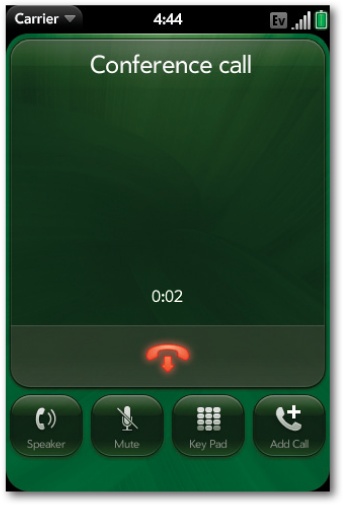
When everyone has gotten a word in edgewise, you can end the call by tapping the red End button. Or, if one of the callers hangs up, you’re back to chatting with the other person.
Multitask During a Call
Your Pre is a mean multitasking machine, but—at least while you’re on the phone—it has its limits. That’s because Sprint’s networks don’t permit what’s called “simultaneous voice and data,” which means you can’t carry on a conversation and send email messages, surf the Web, or send photos at the same time.
Sprint’s network handles your voice, but your “data” (the email messages, web page requests, photos, and so on) needs its own line of communication. And there’s only one place your Pre can get that second line: in a WiFi hotspot (see Wireless Hotspots). Find one of those and you can chat and check your email, browse the Web, and share vacation photos (see Share Photos) all at once.
Tip
The only time you have to be in a WiFi hotspot to send and receive data is when you’re on the phone. If you’re not using the phone, the Pre can use the voice line for data.
There’s one exception to the multitasking limit: text messages (Texting). Since text messages use the voice network, you can send and receive texts while you talk, without the need for a WiFi connection.
Send a Message to the Person You’re Talking To
Sometimes when you’re on a call, you want to share a document like a Word file or a photo. Rather than wait until you hang up, you can tap the center button to enter Card view (Card View: Your Programs at a Glance), open Contacts from the Quick Launch panel, and then tap the name of the person you’re talking to. This opens his profile, where you can tap the appropriate contact option to send him a text message or email.
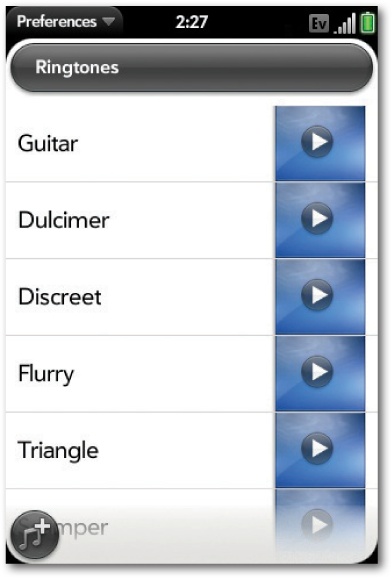
Ringtones
The Pre comes with 10 ringtones, including an old telephone ring, a rain dance, and a dulcimer. You can choose one of these as your standard ring, create your own custom ringtones, or assign specific rings to people.
Assign a Ringtone to All Calls
Here’s how to pick which sound you want the Pre to use as the standard ring:
Open the Launcher and tap Sounds & Ringtones. The icon looks like a loudspeaker.
Tap the name of the ringtone that’s listed under Ringer Switch On. (If this is your first visit to Sounds & Ringtones, the “Pre” ringtone is listed—it sounds like wind chimes.) When you tap it, you’re taken to a screen that lists all the ringtones on your Pre, with a checkmark next to the selected tone.
To listen to a ringtone, tap the play button to the right of its name. You can stop the preview by tapping the stop button that replaces the play button.
Once you find a ringtone you like, tap its name to select it. The Pre brings you back to the main Sounds & Ringtones screen, which now lists the ringtone you picked.
To control how loud the ring is, drag the Ringtone Volume slider in the middle of the Sounds & Ringtones screen (dragging right makes it louder, left quieter). The Pre plays your ringtone as you drag, so you can find just the right volume.
Select a Ringtone from Your Music Collection
Ten ringtones isn’t a whole lot to choose from. Happily, Palm lets you use any of the audio (music) files on your Pre as a ringtone.
To do so, follow steps 1 and 2 above. On the Ringtones screen, tap the “Add a Ringtone” icon in the bottom-left corner of the screen (it looks like two musical notes with a + sign next to them). The Pre lists all your audio files.
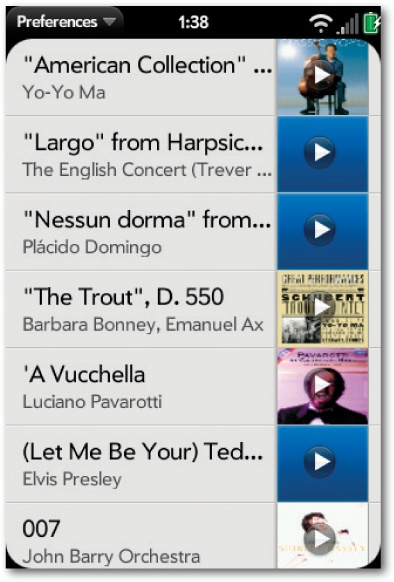
Scroll up or down the list until you find one you like, tap the play button to preview it, and then tap the song’s name to make it your ringtone.
Tip
You can copy ringtones from your desktop PC to your Pre via the USB connector (see Volume Control). Imported ringtones get stored with all your other ringtones and don’t appear in the music library (see Playlists on the Pre).
Assign Ringtones to Contacts
Some songs make great ringtones for friends and family (He Ain’t Heavy He’s My Brother and Mamma Mia spring to mind). To assign a ringtone to one of your contacts, follow these steps:
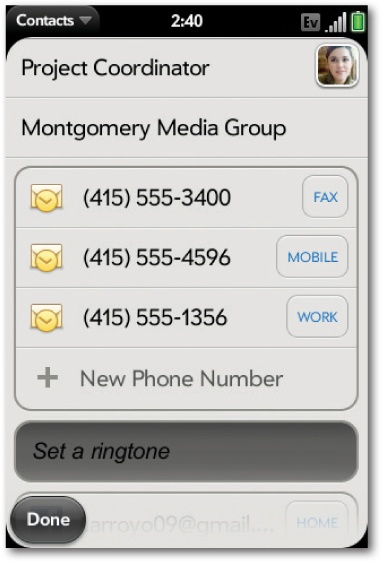
If you change your mind and want to unassign or reassign a ringtone, just follow steps 1 and 2 again, and then tap the box showing the ringtone you assigned. Then either tap Change Ringtone and pick a new tone from the ringtone list, or tap Delete Ringtone to unassign it from that person. Finally, tap Done. If you delete a custom ringtone from a contact, the Pre uses your standard ringtone for him or her.
Silence Your Phone
When you’re in a movie theater or meeting, you don’t want your phone to make a sound. To shut off the ringer, slide the ringer switch (on top of the phone) to the right until you can see red underneath the switch. Now if someone calls you, the Pre won’t make a ringing sound.
Depending on how you’ve got things set up in Sounds & Ringtones, the phone may still vibrate, even when the ringer is off. If you want the phone to vibrate when the ringer is off and a call comes in, open the Launcher and go to Sounds & Ringtones. Then drag the Vibrate switch to the On position. Keep in mind that people may hear (and get annoyed by) the buzzing sound the phone makes when it vibrates.
Hands-Free Calling
“Bluetooth” may sound like a tragic dental condition, but it’s actually a cool technology that lets you receive phone calls on a wireless headset, so you can do things like keep your hands on the wheel while driving. (As of this writing, the Pre doesn’t have voice dialing, so you can’t place a call using a Bluetooth headset.)
Bluetooth devices communicate with the Pre from as far as 30 feet away, though it’s hard to imagine many circumstances where your Pre would be that far away. If you’re walking along with a Bluetooth headset clipped to your ear, the Pre is likely in your pocket or handbag. In the car, you might put it in the glove compartment or on the seat next to you.
Tip
You can listen to music on your Pre with a wireless stereo Bluetooth headset, but not with a mono model.
You see Bluetooth in action all the time, most notably when you spot someone in a car or walking down the street who seems to be talking to himself until you spy a little earpiece on his ear. To become one of those people, you need to set up your Pre to work with a Bluetooth headset, earpiece, or car kit that you buy separately. This section explains how to configure one.
Note
If you’re strapped for cash and don’t want to shell out for a Bluetooth headset, you can at least receive calls using the corded earbuds that come with the Pre. Just press the button on the cord when a call comes in, and you can chat hands-free. (Unfortunately, you can’t place calls using the earbuds.)
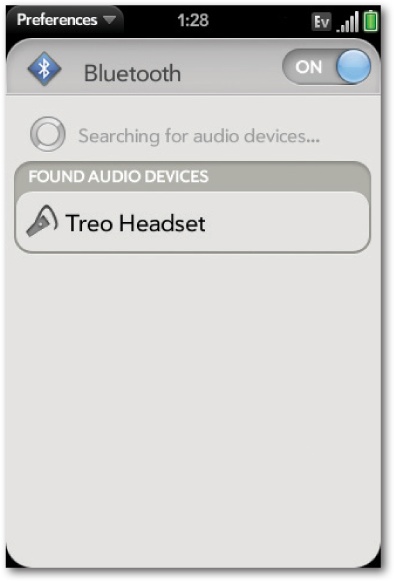
Add a Bluetooth Device
Before you can use a Bluetooth headset, you need to “pair” it with your Pre, that is, establish an exclusive relationship between the two. Otherwise, anyone wandering around with a Bluetooth device could answer your phone, eavesdrop on your calls, or call Bora Bora on your dime.
Note
The Pre is compatible with lots of different Bluetooth headsets and car kits. Check out http://tinyurl.com/kqjyql for a list.
The exact pairing process depends on what kind of Bluetooth device you get, but here’s a general overview:
Turn on your Bluetooth earpiece by following the manufacturer’s instructions. Once it’s on, the earpiece starts emitting a silent signal that your Pre can detect.
On the Pre, tap the upper-right corner of the screen to summon the connection menu.
In the menu, tap Bluetooth→“Turn on Bluetooth”. The tiny Bluetooth indicator
 appears.
Tap the upper-right corner of the screen to bring up the connection menu again.
In the menu, tap Bluetooth Preferences→“Add device”. This tells your Pre to “listen” for Bluetooth signals like the one coming from the earpiece.
The Pre displays a list of Bluetooth devices it finds; tap on the one you want to pair with your Pre. When you do that, the Pre displays a spinning circle as it goes about its mating dance, and the Bluetooth earpiece may respond, perhaps by blinking or lighting up.
After your Pre and the earpiece get to know each other, the Pre may prompt you to enter a passcode. If not, the devices are already paired, so you can skip to the next step.
Some Bluetooth devices come with preset passcodes that you need to enter to pair the device. Others let you make up your own passcode. Check the instructions that came with your device to see what it requires. If you need to enter a pre-set passcode, read the instructions to find out where to find the passcode and how to enter it.
You’ll know the devices are paired when you see a little phone icon next to the earpiece’s name on the Pre. You can now answer calls with your earpiece—check the manufacturer’s instructions to learn how.
Tip
Some Bluetooth car kits give you the option of adding your contacts from the Pre to the car’s in-dash display, making it easy to call these people. When you set up this kind of system, you may see a notification on the Pre asking if you want to upload your contacts; if you do, tap Allow. (To delete these contacts from the car’s computer, check the car kit’s instructions.)
End Your Bluetooth Relationship
All good things come to an end, and at some point you may decide to ditch your Bluetooth earpiece or car kit for a new model. You have two ways to make your Pre bid farewell to a Bluetooth device.
First, go to a list of your Bluetooth devices. Tap the Bluetooth icon in the Launcher, and then tap the switch so that Bluetooth is on. You can also tap the connection menu in the upper-right corner of the Pre’s screen, tap Bluetooth→Bluetooth Preferences, and then tap the switch so that Bluetooth is on. The Pre displays a list of all the Bluetooth devices your Pre knows about. From there you can:
Delete a device. To permanently “unpair” a Bluetooth device (so your Pre no longer recognizes it), find the one you want to remove and drag it off the screen to the right. When the Pre asks for confirmation, tap Delete to make the divorce final, or Cancel if you change your mind.
Tip
This kind of divorce isn’t necessarily forever. If you have second thoughts, you can always rekindle the relationship, and pair up the devices again by following the instructions on Add a Bluetooth Device.
Disconnect from a Bluetooth device. Though you can have more than one Bluetooth device paired with your Pre, you can only use one such device at a time, which is where this option comes in handy: It’s more like a temporary separation than a divorce. From the list of Bluetooth devices, tap the currently connected device to disconnect it so you can pair another Bluetooth device. Or tap an already-paired Bluetooth device on the list to make it the active one. Later, if you want to summon the device you just disconnected back into service, just tap its name in this list—you don’t need to pair it again.
Advanced Phone Settings
You can further fine-tune thwe way your phone works by adjusting the following settings. To see them, open the Phone application, and then go to the application menu and tap Preferences. You’ll see a screen with the following settings:
Phone Number. No surprise here: This section of the screen displays the number people can use to call your Pre.
When Typing in Key Pad. Normally, when you have the dial pad open but type in numbers from the keyboard, the Pre displays only numbers in the dial pad. If you turn on Show Contact Matches, the Pre displays both numbers and letters when you dial from the keyboard, and it automatically searches your Contacts list for matches.
Dialing. The Pre usually plays a short tone when you type a number, no matter how long you press the key. When that’s the case, you see the word “Short” in this section of the Phone Preferences screen. If you want the Pre to play longer tones (so the tone plays until you release the key), tap Short, and in the list that appears, tap Long. You might need this option to communicate with a computer that recognizes touch tones, like those irritating customer-service voice menus some companies use.
Dialing Shortcuts. As discussed on Intra-Office Dialing, these are shortcuts to the office prefixes you may dial at work.
Network. As you know, your Pre uses Sprint’s nationwide network. If you travel outside Sprint’s calling area (you can check its rough boundaries on the map at http://tinyurl.com/n4yoef), Sprint hands off your call to a carrier that services that area, so your calls go through that company’s network instead. This is known as roaming (because you “roam” away from your regular carrier). As of this writing, you don’t have to pay extra to roam within the U.S. under Sprint’s Pre wireless plans (see Activate Your Pre), but travelling overseas is a whole different ball of wax, as you learned earlier in this chapter (Overseas Calling).
If Sprint does get around to charging for roaming and you want to keep costs down by exclusively using the Sprint network, go to this section of the Phone Preferences screen and tap Voice Network. In the list that pops up, tap Sprint Only. Now your Pre makes and accepts calls only when you’re within Sprint’s coverage area. If you change your mind, or need to make a call from outside Sprint’s boundaries, simply change this setting back to Automatic.
This section of the screen also has a Data Roaming item. Data roaming refers to stuff you do besides place phone calls—browse the web, for example, or send or receive email. Turning on the Data Roaming setting lets you do these things even when you’re outside Sprint’s coverage area. To do that, tap Data Roaming, and in the list that appears, tap Enabled.
Accessibility. People who are deaf, hard of hearing, or have other language or speech barriers use TTY or TDD phones. You can use some of these devices with the Pre by plugging them into the headset jack. To use such a device, move the switch next to TTY/TDD on the Phone Preferences screen from Off to On. (Note that when you connect this kind of device, you disable the Pre’s audio modes, including the ability to hold the phone up to your ear and hear callers.)
Network Settings. From time to time, Sprint may update your phone. You’ll receive notifications when updates are available. But if you want to manually check for updates, then tap Update Network Settings here.
Preferred Roaming List. If you’re taking the Pre outside your home service area and have to select a roaming carrier, tap Update PRL to get what Sprint considers your best possible service options. Contact Sprint with questions about how often you might want to update the list.
Voicemail Count Reset. As noted earlier, sometimes the Pre is a little slow about setting your voicemail count back to zero. To do so manually, press this button.
What’s My Number?
You call other people all the time, but you rarely call yourself, so you might just forget your own number. If you find yourself in that spot, don’t worry. As explained in the previous section, you can find your number near the top of the Phone Preferences screen (to get there, open the Phone program, go to the application menu, and tap Preferences).
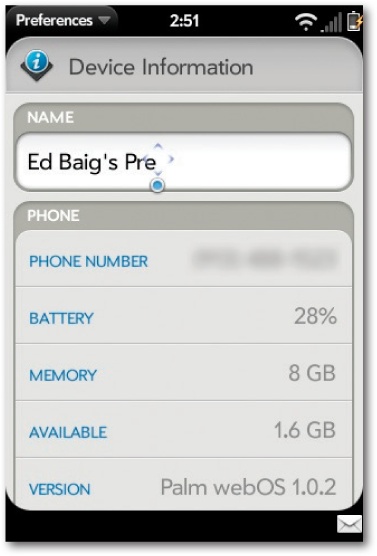
Another option is to go to the Launcher and tap the Device Info icon, which looks like a white letter i in a blue circle. The Device Information screen that appears displays your number right near the top.
Get Palm Pre: The Missing Manual now with the O’Reilly learning platform.
O’Reilly members experience books, live events, courses curated by job role, and more from O’Reilly and nearly 200 top publishers.

