Chapter 1. Tour the Pre
If you’re like most Pre owners, you’re more than ready to put your new phone to work. In fact, you probably already cracked the box, charged the battery, and started calling and texting friends. Who can blame you? The Pre’s an alluring package.
But before you dive in much further, it’s worth taking a few minutes to learn your way around. Throughout this book, and as long as you own your Pre, you’ll need to know where things like the “gesture area” and the Quick Launch panel are, and what they do.
In this chapter, you’ll discover what all the inviting buttons on the Pre do, take a look at the keyboard, tour the many parts of the touchscreen, and learn the basics of interacting with your new phone. So get ready—your tour’s about to begin.
What Comes in the Box
If you haven’t already pulled the Pre out of its handsome black-and-white box and peeked at its contents, here’s the lowdown:
Get Started guide. For a little fold-up pamphlet, this guide is surprisingly useful and worth keeping nearby, if only as a quickie reference to the finger movements, or gestures (see Touchscreen vs. Gesture Area), that help you navigate the Pre. The guide also shows you how to turn on, activate, and set up the Pre; open and move among applications (programs); and make a call, among other things. The guide comes in both English and Spanish versions.
Features guide. If you hadn’t already bought the Pre, you’d think this was an advertisement for most of the things you can do with it, including GPS navigation, Sprint TV, picture messaging, and more. This guide gives you a quick overview of how to get started with these and other applications.
License agreements, warranties, and safety and legal info. Unless you’re a lawyer, it’s hard to imagine you’ll actually take the time to read these disclaimers, not that it’s a bad idea to look them over. (If you do read them, you’ll learn—among other things—how Sprint calculates bills and that if you use third-party applications on the Pre, the application may collect or require Sprint to disclose your personal information.) And if the teeny-tiny type size is any indication, you’re even less likely to read the warranty info that’s included.
AC adapter and USB cable. You use the AC adapter with the USB cableto recharge your Pre (see The Battery). You also use the USB cable to sync files between thePre and your PC or Mac (see Add Media to the Pre), and even to connect to Apple’s popular iTunes jukebox software to bring songs from your computer to the Pre (providing that option is still available; see the Note on Sync Music and Video Files).
Stereo headset. The standard-size (3.5mm) stereo headset has a switch on the cord for answering calls and a little microphone for getting your voice heard. And of course you can use the headset to listen to music or watch a video instead of piping those sounds through the Pre’s built-in speaker. When you do so, the switch on the cord toggles between play and pause.
Pouch. Your Pre is a beautiful little pocket computer. The soft black and (on the interior) orange pouch that’s provided to keep it from getting dinged or scratched is functional, but isn’t going to win any beauty contests. If style matters, you’ll probably want to shop around for something that’s better looking, perhaps even the leather case that Palm peddles as an accessory.
Recycling mailer. Sprint includes a postage-paid pouch you can use to recycle the wireless phone you’re replacing with your spiffy new Pre. It’s an eco-friendly thing to do, and the proceeds from the program benefit a good cause, Internet safety for kids.
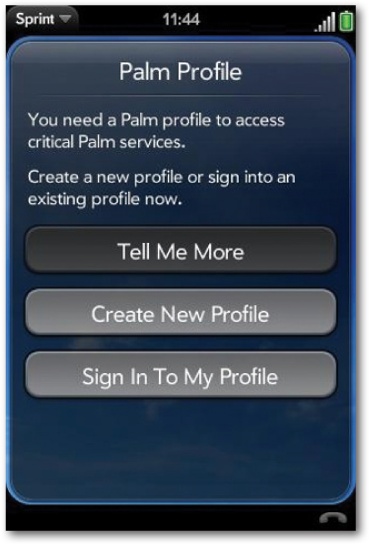
Set Up a Palm Profile
Before you can use your Pre, you have to set up what’s called a “Palm Profile” on Palm’s website. The Profile stores details about your Pre, your name and email address, and, more importantly, provides the following services:
Automatic backups. Every day, Palm backs up your Pre, including applications you download from the App Catalog (see Appendix B). That means that if your Pre is ever lost, stolen, or damaged, your data is in a safe place and can be restored.
Updates. From time to time, Palm fixes bugs or adds features to the Pre’s operating system, which is called webOS (see The Pre from the Outside). When you have a Profile, Palm automatically downloads these updates to your Pre, though (within limits) you choose when to install them (see System Updates).
Remote wipes. If you ever lose your Pre, you can remotely erase all your personal information before the bad guys get it by logging into your Profile from another computer.
Setting up a Palm Profile is simple: When you turn on the phone for the first time, you see a series of screens that ask for your name, a password, the answer to a security question (like “What was your first car?” or “Where did your parents meet?”), and your email address. Palm uses this information to create your Profile and sends a verification message to the email address you entered. Open the email, click the link in it, and you’ve got yourself a Palm Profile.
You can change your profile info any time, either at the Palm Profile website (http://tinyurl.com/kors3m) or on the Pre itself (the Pre sends the updated info to the website). To change it on the Pre, go to the Launcher and tap Backup→Preferences→Palm Profile. Enter your password and then tap anything you want to change.
Tip
You can find links to all the websites mentioned in these pages on this book’s Missing CD page at www.missingmanuals.com.
The Pre’s New Foundation
Palm wanted the Pre to do almost everything that a desktop PC can do. Two of its requirements for the smartphone reflected that mindset: The Pre had to multitask—to run more than one program at a time (so you could surf the Web and get emails at the same time, for example)—and the Pre had to stay always connected to the Web, because most people use the Internet as part of their daily lives.
Palm succeeded on both counts. The Pre is a smartphone with impressive capabilities. But to let it do all that cool stuff, Palm needed a serious controlling program at the Pre’s core (the program at the heart of every computer, including the Pre, is called the operating system). Since no multitasking, always-connected operating system existed for smartphones, Palm built its own, from the ground up. They called it webOS.
When you use your Pre, you don’t interact directly with webOS, so you won’t find a chapter devoted to it in this book. But it’s good to know what webOS is, because it’s responsible for nearly everything you do on the Pre—from multitasking to dynamically updating web pages and email inboxes. In addition, if you ever need to call customer support, representatives may refer to webOS, as may email messages from Palm.
The Pre from the Outside
The Pre’s case looks sleek and seamless, but it houses a number of buttons, switches, and other components like the speaker, camera, and flash. It also houses the keyboard, one of the Pre’s defining characteristics. This section looks at what you’ll find on the outside of the Pre.
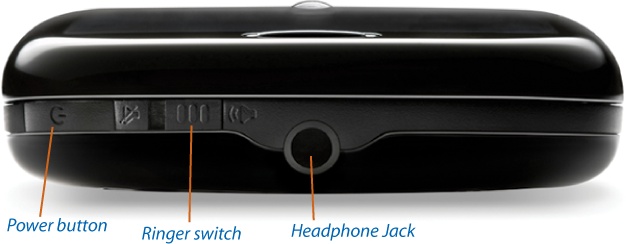
The Power Button
The Pre’s power button curves around the upper-right corner of the phone’s case.
It handles several tasks:
On/Off. No surprise here: This button powers up and turns off your Pre. “Off” in this case means completely shut down—you can’t make or receive calls or do anything but turn the Pre back on.
To turn the Pre on, press and hold the power button for 2 seconds. Palm’s pulsing white logo appears on the screen for as long as 90 seconds as the Pre powers up and loads the main screen (see The touchscreen).
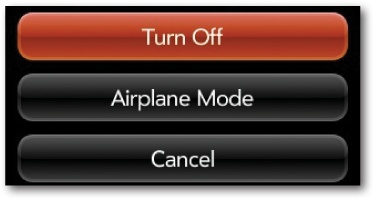
To turn the Pre off, press and hold the power button for 5 seconds. After that, you’ll see three options on the screen; tap the one you want.
Turn Off. Select this option to shut down the Pre. The screen goes dark, and your incoming calls go directly to voicemail. If you’re not going to use your Pre for a couple of days, choose this option to preserve battery life.
Airplane mode. This option turns off all the Pre’s wireless features—the phone itself, the Internet connection (see Sprint Mobile Broadband), and any Bluetooth devices you paired with your Pre, like a wireless headset (see Add a Bluetooth Device). In Airplane mode, you can’t communicate with the outside world, but you can still use the Pre’s programs—to play music and games, consult your calendar, or watch a movie, for example.
Tip
In Airplane mode, you can manually turn on WiFi (Network menu) and Bluetooth (Network menu), but you can’t use the phone.
Cancel. Pick this option if you change your mind and want to return to the main screen. (You can also return to the main screen by pressing the center button; see Gesture area.)
Sleep/Wake. Press the power button for just an instant to put the Pre in Sleep mode. The screen goes dark and the phone consumes very little power, but it keeps working in the background, accepting email messages, updating open web pages, and so on. The Pre wakes up when you press the power button again.
It also wakes up when you get a phone call. The screen displays the caller’s phone number (and a picture of the caller if you have his or her photo in your Contacts list—see Add Pictures to Contacts). You can either answer the call or ignore it (see Chapter 4 for the details).
Tip
You can also wake the Pre by opening the keyboard (The Keyboard).
Silence the ringer. If you want to stop an incoming call from ringing, press the power button once when the call comes in.
Send a call to voicemail. If you want to send an incoming call directly to voicemail, press the power button twice in quick succession.
Unlock the Pre
When you put the Pre to sleep or leave it idle for more than 30 seconds, the screen locks so that you don’t accidentally press any buttons. That way, you won’t run up a 45-minute phone bill by calling halfway across the world as the phone jostles around in your pocket.
Tip
You can change the Pre’s auto shutdown time to 1 minute, 2 minutes, or 3 minutes by going to the Launcher (see below) and tapping Screen & Lock→Screen, then tapping “Turn off after”, and then choosing the interval you want.
To wake up the Pre, press the power button. A yellow circle with a lock in it at the bottom of the screen lets you know that the screen is locked. To unlock it, drag the icon from the bottom of the screen to the center of the screen.

Tip
For added security, you can make your Pre ask for a PIN or password before it unlocks. Troubleshooting Tests explains how to set that up.
Note
If you like, you can get event notifications (see Quick Launch panel) even with the Pre locked. Go to the Launcher (The Launcher), tap Screen & Lock→Show When Locked, and then tap On. (You still have to unlock the phone to open programs, like Email, related to any notifications.)
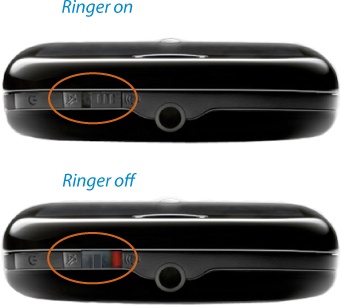
Ringer On/Off Switch
Slide this switch to the right to turn off the ringer and notification sounds, like the ones that play when you miss a call, get an email, or receive an instant message (Delete Messages and Conversations). This switch doesn’t silence music, video playback, or clock alarms, however.
Tip
Here’s a quick way to check the ringer status: When the ringer is off, the area under the switch is red instead of black.
The ringer switch serves another purpose: move it back and forth three times while holding down the power button to reset the phone, as described on Erase and Restore Your Pre.
Note
Even with the ringer off, your Pre isn’t completely silent if you set it to vibrate when a call comes in (see Incoming Calls). When you get a call, you (and your neighbors) just might detect a buzzing sound. To go totally noise-free, make sure you turn off the Pre’s Vibrate mode (see Silence Your Phone).
Headset Jack
The Pre comes with a standard 3.5mm headphone jack, the kind found on almost every cellphone and MP3 player, so your favorite set of headphones will work fine with the Pre. But the headset that comes with the Pre has one advantage: Its cord has a built-in phone button and microphone, so you can answer a call by pressing the headset button, and talk to the caller using the headset’s built-in mic.
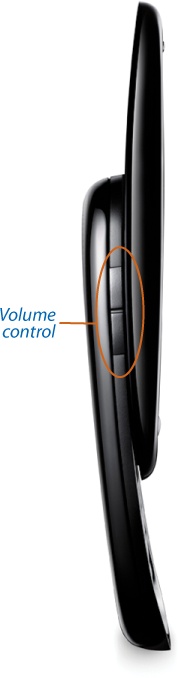
Volume Control
The rocker button on the left side of the Pre lets you adjust the volume of the Pre’s speaker, earpiece, and headphones.
USB Connector
The right side of the Pre houses a micro-USB connector, hidden away under a plastic cover. This is where you plug in the Pre’s USB cable to recharge the battery (see The Battery) or to sync your Pre with your PC (see Sync with a Desktop PC).
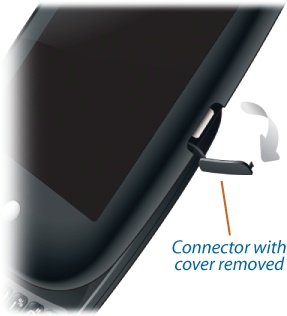
To get to the connector, you have to dig your fingernail underneath the plastic tab that covers it and lift the tab off. It’s easier if you slide open the phone first.
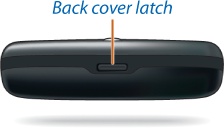
The Back-Cover Latch
You’ll find a single latch smack dab in the middle of the otherwise barren bottom of the Pre. Press it to remove the back cover. You have only three reasons to do this: to replace a dead battery (or to swap out a depleted battery for one that’s charged), to replace the back cover if you buy the Pre’s Touchstone charging accessory (see Replace the Battery), and to find your Pre’s serial number.
Camera and Flash
The Pre has a digital camera with a flash. With a resolution of 3 megapixels, it’s a decent cellphone camera. The flash triggers automatically in low light (unless you turn that feature off). Chapter 9 has all the details.
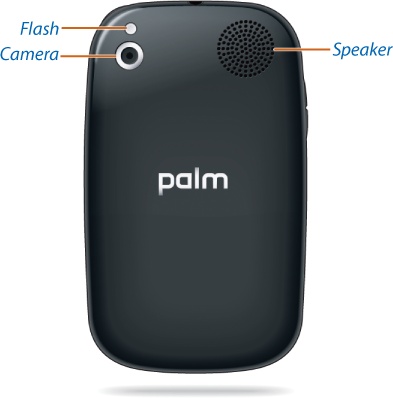
Speaker
You’ll never mistake the Pre’s speaker for hi-fi audio—it’s barely a step above a 1960s transistor radio. But it’s good enough to serve as a ringer, work for speakerphone calls, and play sounds to remind you of appointments.
The Keyboard
Apple’s iPhone has an onscreen keyboard, but many people prefer physical keys when they want to bang out emails or answer text messages. So Palm included a keyboard on the Pre, cleverly concealed behind the touchscreen.
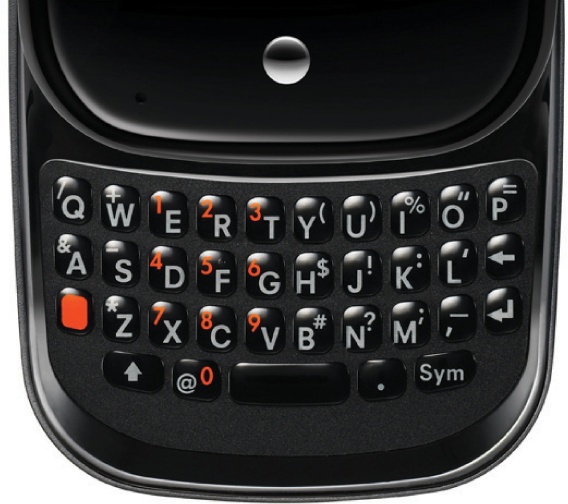
To get to it, place your thumb on the screen, wrap your fingers around the back of the case, and gently push your thumb up so the keyboard slides out from the bottom. Chapter 2 has more about using the keyboard.
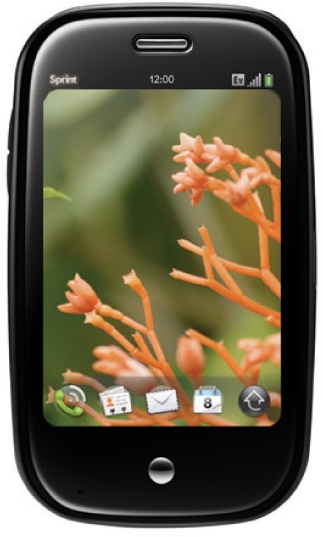
The Face of the Pre
The front of the Pre has both a touchscreen and a gesture area—the two primary ways you communicate with the phone—as well as a physical button. It’s also where you’ll find the phone’s earpiece and microphone.

The Touchscreen
Your Pre’s screen is touchy—but in a good way: It responds to finger taps and movements, which is how you tell the Pre what to do. So the touchscreen isn’t just a display, it’s also your mouse and telephone dial pad. Try it—tap the phone icon ![]() , and the dial pad pops up.
, and the dial pad pops up.
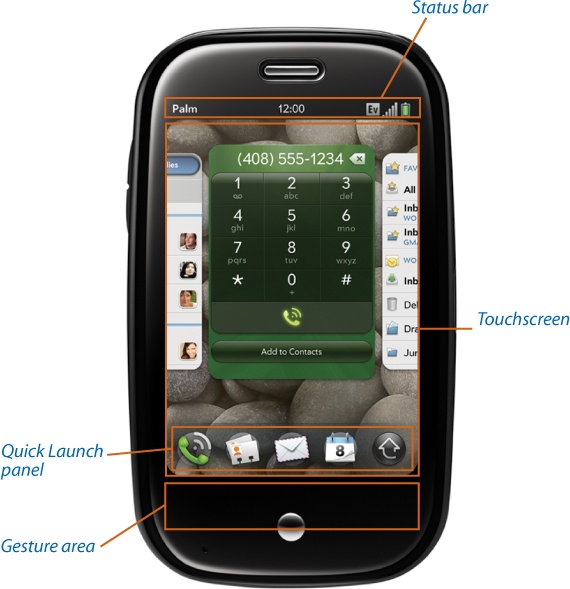
The screen is divided into five sections:
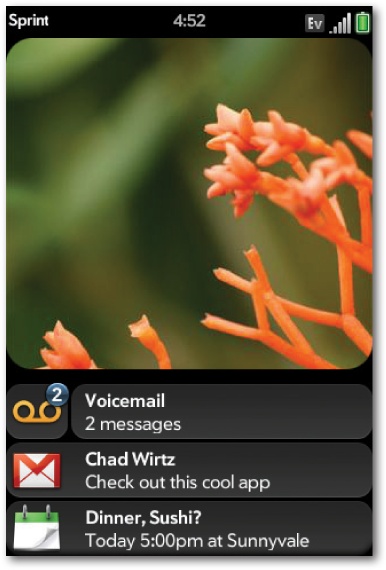
Status bar. This narrow strip at the top of the screen gives you info like the name of the program you’re working with, the time, how much charge your battery has left, and more. It’s covered in detail on the next page.
Touchscreen. The touchscreen displays open programs and responds to finger taps and gestures. For more on the touchscreen, flip to The touchscreen.
Quick Launch panel. This section near the bottom of the touchscreen gives you easy access to the four most widely used applications on the Pre—the phone, your Contacts lists (Work with Contact Information), the email program (Set Up Your Email Accounts), and the calendar program—along with a shortcut to the Launcher (see The Launcher).
Notifications area. You won’t see this section at the bottom of the screen until you get a message letting you know about a missed call, an incoming message, a soon-to-expire battery, or some other event (see Notifications and Updates for details). When you have a lot of these alerts, the section expands and covers the Quick Launch shortcuts.
Gesture area. This invisible, black, touch-sensitive area extends from the bottom of the touchscreen halfway down the center button, and spans the width of the screen. As Gesture area explains, this stretch of real estate is where you perform the “back” gesture, one of the finger techniques you’ll use most frequently. Chapter 2 covers all the gestures in detail.
Center button. This button brings you to the Pre’s Card view, explained on The Concept of Cards.
The status bar
No matter what program you use, you’ll almost always see the Pre’s status bar, an area at the top of the screen that displays a series of icons. (If you’re in an application, such as when you view a web page, where turning the Pre sideways puts it into the landscape mode, the status bar goes undercover; press one of the volume keys [see Volume Control] to bring it back.) Here’s what you see in the status bar, from left to right:
Application name. The status bar’s leftmost corner displays the name of the program you’re currently using. Tapping the name summons the application menu, which lets you access features and options like cutting, copying, and pasting within that program. If you open the Photo program, for example, the word “Photo” appears here. Three exceptions: If you’re using the phone, don’t have any applications open, or are in Card view (see The Concept of Cards), the word “Sprint” appears here instead. When you first turn on your phone or come out of Airplane mode (The Power Button), you’ll see the word “Searching” here for a little while, as the Pre looks for a wireless signal. And if your Pre can’t find a Sprint network to connect to, you’ll see the words “No Service.”
10:47. Time of day. This one’s self-explanatory: It shows the current time.
 Bluetooth. This symbol appears when you connect your Pre to a Bluetooth device, like a wireless headset for phone calls or a “hands-free” car phone system (see Silence Your Phone).
 WiFi indicator. As you’ll learn in Chapter 7, the Pre connects to the Internet in one of three ways: through a wireless hotspot (Wireless Hotspots) or through one of Sprint’s two cellphone networks. This icon appears when you’re connected to a wireless (WiFi) hotspot. The more “sound waves” you see, the stronger the signal. WiFi is the fastest Internet connection you can have on the Pre.
 or
or  R Network type. If you’re not connected to a WiFi hotspot, you’ll see one of these symbols, which means you’re connected to the web via one of Sprint’s wireless networks. Sprint’s 1x (Sprint Mobile Broadband) network is the slower of the two. With any luck, you’ll be connected via Sprint’s far faster network, EvDo (Sprint Mobile Broadband). And if you see an R as well, you’re roaming outside Sprint’s coverage area. To surf the web, exchange email, or do any other non-phone task, you need to see one of these icons or the WiFi indicator.
 Cell signal. This lets you know how strong your cell signal is. Don’t let the fact that there are five bars fool you: If one or more are grayed out, you have a weaker signal. Ideally, you want all five bars gleaming white. If you’re outside Sprint’s area of coverage, the bars are not only grayed out, they also have an X over them.
 Airplane mode. The plane icon tells you you’re in Airplane mode (see The Power Button). All your wireless signals—for the phone and for Internet access—are off, so you won’t see a WiFi or cell signal in the status bar.
 Battery meter. If the meter is green and filled up, you’ve got a full charge. When the icon turns red, it’s time to juice up the battery.
The touchscreen
The Pre’s main display area, called the touchscreen, is where the action is most of the time. It’s the Pre’s equivalent of a PC’s desktop—it displays open programs and serves as the conduit for communications between you and the Pre. It’s one of the two places that responds to the finger gestures that tell the Pre what to do (the other is the gesture area; see Gesture area).
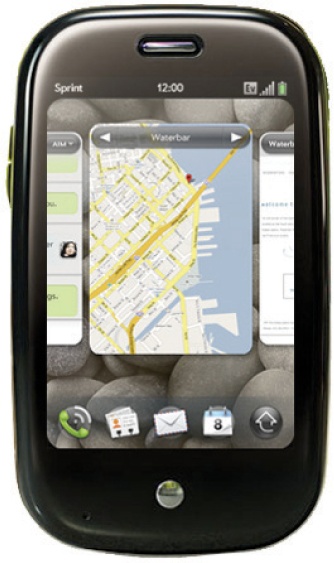
If you have a program open, the touchscreen displays a miniature screen shot of the program, which Palm calls an activity card. If you have several programs open, the touchscreen displays a set of cards, one beside the other, as in the image below. Palm calls this overview look at open programs the Card view. To work within one of the programs, tap its card. The application takes over the touchscreen and you’re ready to get to work.
Quick Launch panel
As mentioned on The Touchscreen, the Quick Launch panel gives you shortcuts to the programs you use most often. Think of it as Palm’s version of the Windows Toolbar or the Mac OS X’s Dock.

The panel has five shortcuts: for the phone ![]() , your Contacts list
, your Contacts list ![]() (see Work with Contact Information), the email program
(see Work with Contact Information), the email program ![]() (see Set Up Your Email Accounts), and the calendar program
(see Set Up Your Email Accounts), and the calendar program ![]() (see The Calendar) in that order. The fifth link takes you to the Launcher
(see The Calendar) in that order. The fifth link takes you to the Launcher ![]() , a master list of all the programs installed on your Pre (including the Quick Launch panel and its icons). You can remove or replace any of the Quick Launch panel icons (see Customize Quick Launch) except the one for the Launcher, because you’ll always need a way to get to the Launcher.
, a master list of all the programs installed on your Pre (including the Quick Launch panel and its icons). You can remove or replace any of the Quick Launch panel icons (see Customize Quick Launch) except the one for the Launcher, because you’ll always need a way to get to the Launcher.
Notifications area
The Pre lets you know when you receive or miss a call, get an email, get a program update, and on several other occasions.
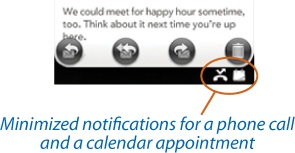
Notifications, discussed in detail on Notifications and Updates, give you just enough information to clue you in on whether you have to drop what you’re doing and act on something immediately. They typically combine a line or two of text with an icon; sometimes, though, they’re just tiny icons. For example, a notification may let you know that you have an email with the subject “Urgent, Please Reply,” or that you missed a call from your boss.
After a few seconds, most alerts you ignore shrink down to icons in the bottom-right corner of the notifications area (see Notifications and Updates). Tap one of those icons to get more info.
Gesture area
As you learned earlier, the Pre interprets finger movements, which Palm calls gestures, as commands. You perform these gestures in two places—on the touchscreen and in what Palm calls the gesture area, a region just below the main display.
While you can use gestures in both these areas, some are interpreted differently depending on where you do them. For instance, swiping your finger from right to left in the gesture area issues the Back command. Doing the same thing on the touchscreen advances you from one application to the next. See Touchscreen vs. Gesture Area in Chapter 2 and Finicky Gestures in Appendix C for more about the gesture area.
The Center Button
Pressing the lone button on the front of the Pre (shown on The Touchscreen) changes what you see on the touchscreen. If you’re working within an application, for example, pressing the center button brings you back to Card view. If you’re in Card view and you press the center button, the center card becomes your working program and takes over the screen.
The Launcher
As mentioned above, the Pre provides links to every program on your phone in a program library Palm calls the Launcher. You get to the Launcher by pressing its icon ![]() , which is the only permanent member of the Quick Launch panel. To open an application in the Launcher, tap its icon.
, which is the only permanent member of the Quick Launch panel. To open an application in the Launcher, tap its icon.
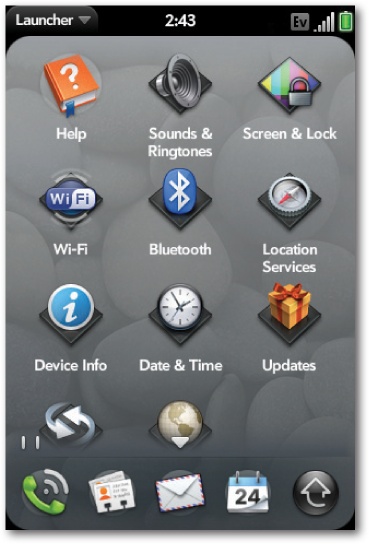
Many of the Pre’s programs—its web browser, its MP3 player, and its camera, for example—are discussed in depth later in the book. But other, smaller programs and settings you find here deserve special mention:
Clock. You can choose whether you want to see a digital or analog-style clock and set an alarm. A little alarm notification at the bottom of the touchscreen reminds you when you’ve set an alarm. (You can select this notification and swipe it off the screen—System Updates tells you how to do that—and the alarm will still go off.)
Calculator. Need to figure out a meal tip? Help Junior with his homework? This application lets you do simple arithmetic. Press the space bar to summon the square root and percentage keys that aren’t shown when you first open the calculator.
Doc View and PDF View. These applications let you look at Microsoft Office files (Doc View) and Adobe PDF files (PDF View) that arrive attached to email messages or that you add to your Pre through a USB connection (see Copy Media Files from Your Computer). As of this writing, you can’t edit these documents, but DataViz, a software company that works closely with Palm, is developing a program to let you do so.
Date & Time. Choose between a 12- or 24-hour time format. You can also have the Pre automatically set your time zone clock by turning "Network time zone” on. Or turn “Network time zone” off and manually choose a time zone from a list of cities and countries around the world. The latter option can come in handy if you’re traveling but want to stay on your home body-clock, or if you’re staying put but want to be simpatico with clients in Asia.
Device Info. Tap this icon to see a raft of info about the Pre itself: how much memory the device has and how much is free, the amount of battery life left, your phone number, and so on. You can also find the Pre’s serial number here. If you ever have a problem with your Pre, someone in Palm’s support department may ask you to open this screen.
Updates. Sprint occasionally updates the Pre’s operating system, webOS (see System Updates), to fix problems or add features. Sprint notifies you when an update comes out, but if you’re a Type A personality, you can check for them manually here. If there are updates to the programs you downloaded through the App Catalog (see Meet the Mall), you can fetch those here, too.
Backup. Once you set up a Palm Profile (see Set Up a Palm Profile), Palm automatically backs up all the information on your Pre each day. You can request an immediate backup here by tapping “Back up now.”
Language. You can operate your Pre in either English or Español.
Sprint. This is a shortcut to Sprint’s website, where you can see a list of frequently asked questions about the Pre or view instructional videos.
App Catalog. Though it is still in beta (test) mode at the time of this writing, Palm’s App Catalog (see Appendix B) is the place to sample, rate, buy, and download third-party programs. (They’re called third-party programs because they’re created by companies and individuals other than Palm.) Among the dozen or so applications available when the Pre debuted: Pandora Internet radio, Fandango movie show times, The New York Times, and Classic, which makes your Pre act like one of Palm’s earlier devices, such as the Treo or Palm Pilot. New applications are being added all the time. Click this icon to see what’s out there.
The Prescient Pre
Your Pre knows which way you’re holding it (vertically or horizontally, up to your ear or down at your side) and puts that knowledge to good use. Three high-tech sensors tell the Pre which way is up:
Proximity sensor. When you bring the phone up to your ear during a phone call, the Pre darkens the display to save power and keep your cheek cool. (It doesn’t do this when you use the speakerphone, however.) It also disables the touchscreen to prevent any inadvertent button-tapping.
Accelerometer. When you turn the Pre from vertical to horizontal, the screen orientation changes from portrait to landscape mode. Try it with web pages and pictures.
Light sensor. If you’re in a dimly lit room, the Pre dims the display to save battery power.
The Battery
Your Pre’s battery comes partially charged, but eventually you’ll have to juice it up yourself. And you may have to replace a battery, either to swap it with a fully charged spare or when the original battery no longer holds a charge. This section tells you how.
Recharge the Battery
You recharge the Pre’s battery two ways:
AC adapter. Plug the small end of the Pre’s USB cable into the phone’s micro-USB connector (see Volume Control) and the other end into the AC adapter. Then plug the adapter into a wall socket. The Pre briefly displays a “Charging Battery” message in the notification area to let you know it’s powering up. A full charge takes up to two and a half hours, Palm says.
Tip
If you unscrew the top of the AC adapter, you can switch from a plug that works in North America to one that works in Europe, Australia, and Argentina, though you’ll also have to buy an international power charger. You can get one from Palm for about $40 at http://tinyurl.com/n92ubn.
USB cable. Connect the small end of the cable into the Pre’s micro-USB connector, and plug the large end into a standard USB slot on your PC. It takes longer to charge the Pre this way, about 41/2 hours. If your phone is off when you recharge it via the USB cable, the Pre doesn’t display a charging message.
Another way to juice up your battery is with Palm’s Touchstone Charging Kit, which costs $70 from Palm (though you might find it for less online). The Touchstone charges the Pre when you place the phone on top of the dock—it generates an electromagnetic field via a set of internal coils, and magnets hold the phone in place. You replace the Pre’s stock back cover with an “inductive” one that transmits the charge. From then on, you don’t have to fiddle with AC adapters or USB cables (though you do have to plug in the Touchstone, of course).
The Pre gets charged at the same rate as if you’d plugged it into the wall, and the dock tilts the screen toward you so you can see notification messages.
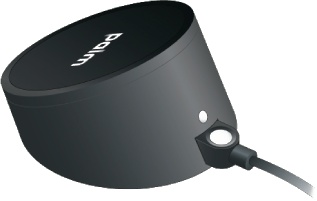
The Touchstone has a few other tricks: If your Pre is lying on the dock when a call comes in, the phone automatically answers when you pick it up. And if you’re on a call and place the Pre on the dock, the speakerphone automatically comes on. When lying on the Touchstone, the Pre displays a clock with a digital readout.
Replace the Battery
Unlike the iPhone, the Pre has a battery you can swap out or replace. But getting at it is a slightly tricky maneuver that involves pressing and letting go of the back-cover release (see Camera and Flash), and then sliding your thumbnail between the cover and the phone as you lift the cover up by its sides. To remove the old battery, lift it out by grabbing the tab at the top. Then insert the new battery, and snap the cover back on.
Tip
When pushing the back-cover release to lift the cover off, stick a fingernail in just under the cover to pop the bottom open and then run your fingernail along the sides to completely dislodge it. You can also try sticking a credit card between the back cover and the phone to yank it off.
If you use your Pre constantly, you may want to buy a spare battery (about $50) so you can always have a fully charged one on hand. The Appendix on Battery Issues has tips for preserving battery life.
Get Palm Pre: The Missing Manual now with the O’Reilly learning platform.
O’Reilly members experience books, live events, courses curated by job role, and more from O’Reilly and nearly 200 top publishers.

