As you create more projects, your workspace gets cluttered. Eventually, the Package Explorer contains dozens of projects, old and new, and you’ve got to scroll to get to the ones you want.
Deleting a project does
not
necessarily delete the actual files used for the project.
When you want, you can add the project back. For example, to remove
the FirstApp project, just right-click it, and
click Delete. Eclipse will display the Confirm
Project Delete dialog box, as shown in Figure 1-20.
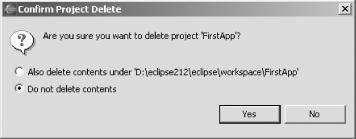
Make sure the “Do not delete contents” radio button is selected, and then click Yes to remove the project from Eclipse. The project will disappear from the Package Explorer.
Tip
Clicking the other radio button in this dialog will make Eclipse delete all the files and their contents in the project, so don’t do that if you want to use the project again later.
If you want to work with the project again, just import it back into
the workspace. Right-click the Package Explorer and open the Import
dialog by selecting Import from the context menu, or by selecting
File→ Import. Select Existing Project into Workspace and
click Next. In the next pane, click the Browse button, select the
FirstApp folder, and click OK.
Click Finish to import the FirstApp project
again. The project reappears in the workspace. Removing projects from
the workspace like this and importing them again as needed is the
easiest way to reduce workspace clutter. We’ll take
a longer look at this issue in Chapter 3, when
we start handling working sets.
Recipe 3.17 on creating working sets.
Get Eclipse Cookbook now with the O’Reilly learning platform.
O’Reilly members experience books, live events, courses curated by job role, and more from O’Reilly and nearly 200 top publishers.

