With Word 2007, Microsoft completely overhauled its world-famous electronic typewriter. Gone were menus that buried commands two or more levels deep. In their place were tabs and the ribbon, a dynamic, turbo-charged toolbar that put the most common tasks out in plain view as easy-to-find buttons. Word 2010 improves on this model, letting you work with documents even more efficiently and giving you easy-to-find, detailed information about your document with Backstage view.
This chapter gets you up to speed—fast—with Word 2010 basics. Learn where everything is onscreen; find out how to create, save, and open documents; and check out the different ways to view your creations. Whether you’re looking for a quick refresher or a step-by-step guide to getting started with Word, you’ll find it here.
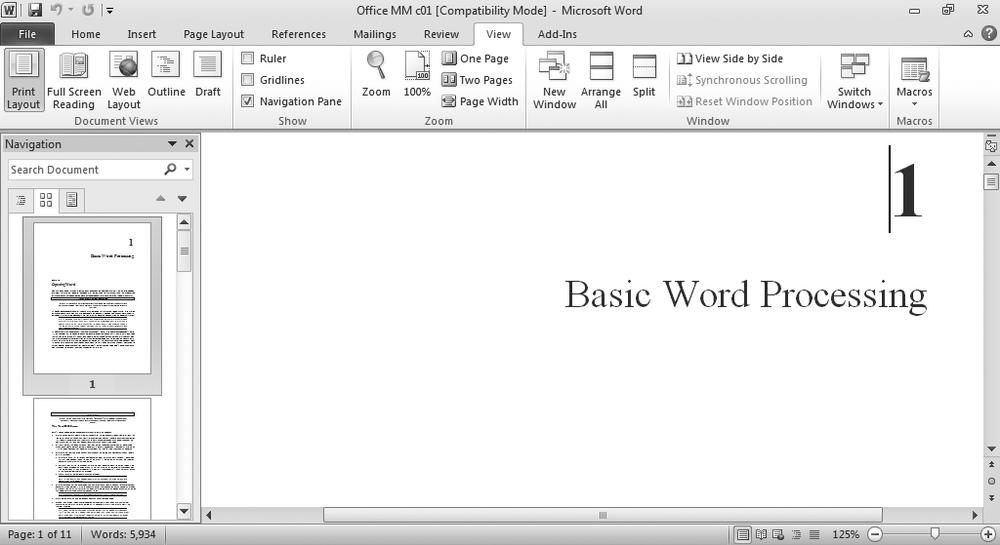
You can open Word in several different ways, depending on how you installed it, but the most common method is clicking the lower-left Windows Start button. From the menu that appears, select All Programs→Microsoft Office→Microsoft Word 2010. Word opens, displaying the screen shown in Figure 1-1.
If you’ve opened Word recently, it appears as an option on the Start menu; if that’s the case, save yourself some menu burrowing and just click Start→Microsoft Word 2010. You can also open Word by opening a document you’ve been working on. In Windows 7, click Start→Documents, and then select the one you want from the Documents library. Alternatively, click Start and then click the right-pointing arrow next to Microsoft Word 2010. This opens a list of documents you’ve saved recently; make your pick and Word launches automatically.
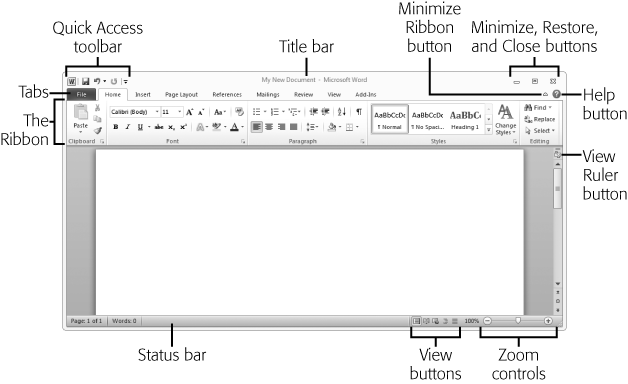
Figure 1-1. The Word 2010 screen features the ribbon, which gathers together related buttons for common tasks. Click any tab’s name—File, Home, and so on—to change the ribbon to show buttons related to that tab.
If your computer has Windows Vista, then click Start→Recent Items to see a list of all the files you’ve worked with recently; choose a Word document from the list to open Word.
Tip
In Windows 7 and Vista, you can pin (permanently affix) a program you use regularly to the Start menu, making it easy to find. Click Start, right-click the program you want to pin (such as Word), and then select Pin to Start Menu from the shortcut menu that appears. Pinned programs always appear at the top of the Start menu, above a horizontal line that separates them from recently used (but unpinned) programs. In Windows 7, you can also pin a program to the taskbar, giving you one-click access to the program.
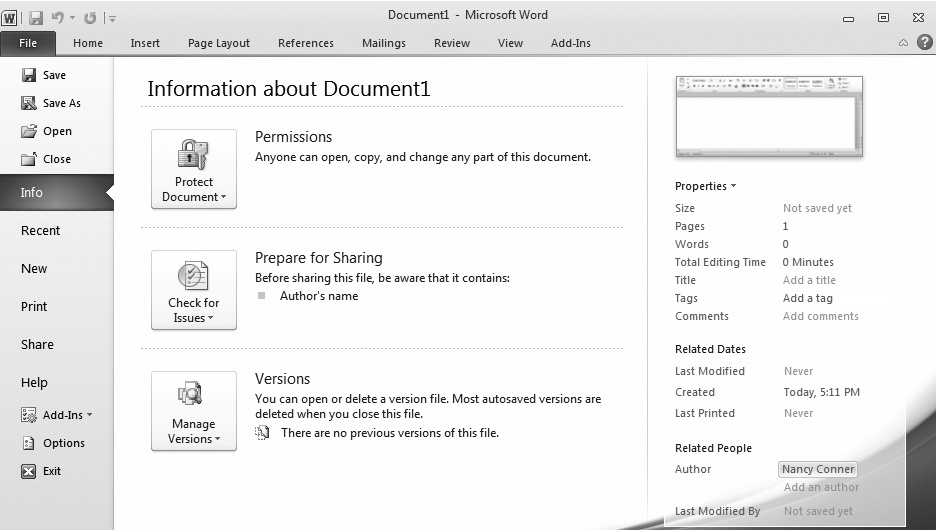
If you’re a Word 2007 veteran, the biggest change you’ll notice in the Word screen—and you’ll notice it right away—is that the upper-left Office button has disappeared. Replacing it is the File tab, a blue tab on the left side of the screen. (It’s always blue, no matter which tab you’ve selected.) The File tab brings back a souped-up version of the File menu you may remember from earlier versions of Word. Clicking this tab gives you what Microsoft calls the Backstage view of your document, shown in Figure 1-2; what you see on the main part of the screen depends on which menu item you select. You’ll be seeing more about Word’s Backstage view as you read on, but it’s more or less what you’d expect: choices that let you open, print, share, and so on.
Here’s a quick guided tour of the Word 2010 screen, starting in the upper left:
The Word button. Clicking this tiny W-in-a-box opens a menu that lets you resize the Word window or close the program entirely.
Quick Access toolbar. No matter which tab you select, the Quick Access toolbar remains visible at the top of the screen, giving you easy access to frequently used buttons. The standard icons on this toolbar are Save, Undo, and Redo, but you can customize it with your own personal faves. (Customizing the Quick Access Toolbar tells you how.)
Title bar. Across the top of the screen, the middle section shows you the name of this document—handy when you’re working on several files at once. If the document is one you just created, the title bar shows Document1 or Document2 (and so on), until you’ve saved and named your work.
Minimize, Restore, and Close buttons. These upper-right buttons give you a one-click way to work with the currently open window:
Minimize. Click this to make your document disappear from the screen without closing the file. Word shrinks your document down to nothing but leaves its button on the taskbar. To summon it again, click that taskbar button.
Restore Down/Maximize. This resizes the window that displays your document. When the button shows two overlapping windows, then the Word screen is at full size; click the button to shrink the window. When the button shows a single window (as in Figure 1-1), the window isn’t taking up the full screen; click the button to maximize the window.
Tip
You can resize the Word window by hand so it’s exactly the size you want. Click the Restore Down button to make the window smaller. Then position the mouse pointer along the window’s border so it becomes a two-headed arrow. Click and, while holding down the mouse button, drag the window to the size you want. Then let go of the mouse button.
Close. Click this button to close the current window.
Minimize Ribbon button. The ribbon (described below) takes up a fair chunk of screen space. If you want to see more of your document as you work on it, click the upper-right Minimize Ribbon button. When you do, the ribbon disappears, leaving just the tabs across the top of the screen. To bring the ribbon back, click the button again—or simply click whichever tab you want to use.
Help button. Click the Help button when you want to search or browse through Microsoft’s built-in Word help center.
Ribbon. The ribbon shows the most commonly used buttons associated with a certain task. Each task gets its own tab name, listed along the top of the ribbon:
Home. This tab gathers together buttons you’ll use most often as you write, divided into these sections: Clipboard (Four Ways to Move Text), Font (Text Formatting: Font, Size, and Style), Paragraph (Paragraph Formatting: Aligning, Indenting, Spacing), Styles (Formatting Power with Styles), and Editing (Finding and Replacing Text).
Insert. Modern documents hold more than words and paragraphs. This tab has buttons for inserting just about anything you might want: Pages (Inserting Page Breaks), Tables (Creating a Table), Illustrations (Inserting Images), Links (Helping Readers Navigate Your Document), Header & Footer (Inserting Headers, Footers, and Page Numbers), Text (for special text effects, Fun with Fonts and Art That’s Smart and Inserting a Text Box), and Symbols (Formatting a bulleted list).
Page Layout. Here’s where you format your writing canvas and, if you want, give it a theme, with buttons in these sections: Themes (Themes: The Way to Better Designs), Page Setup (Formatting a Document), Page Background (Using the Page Background Section), Paragraph (Paragraph Formatting: Aligning, Indenting, Spacing), and Arrange (Wrapping Text Around an Image). That last item has commands for positioning images and graphics in your document.
References. This tab helps you work with long, formal documents, thanks to these sections: Table of Contents (Creating a Table of Contents), Footnotes (Footnotes and Endnotes), Citations and Bibliography (Citations and Bibliographies), Captions (Inserting a Screenshot), Index (Creating an Index), and Table of Authorities, which sounds like where you don’t want to sit at a school banquet but is actually a list of references common in legal documents.
Mailings. One of the great advantages of word processing is how easy it makes mass mailings. This tab makes sending out a mailing even easier, thanks to the buttons in these sections: Create (Printing Envelopes for printing envelopes and Printing Labels for labels), Start Mail Merge (Merging Names and Addresses with Documents), Write & Insert Fields (Do-It-Yourself Mail Merge with the Mailings Tab’s Buttons), Preview Results (Do-It-Yourself Mail Merge with the Mailings Tab’s Buttons), and Finish (Do-It-Yourself Mail Merge with the Mailings Tab’s Buttons).
Review. The buttons on this tab help you check your document to make sure it’s correct before sending it out into the world. It also groups together some super-helpful collaboration tools. Here’s what’s on it: Proofing (Checking Spelling and Grammar), Language (Word’s Built-in Research Tools), Comments (Saving a Document to SharePoint), Tracking (Tracking Changes), Changes (Accepting or Rejecting Changes), Compare (Comparing Documents), Protect (Combining Documents), and OneNote (Using OneNote with Other Office Programs).
View. Click the View tab for different ways of looking at your document as you work on it. Here you’ll find Document Views (Different Ways to View Your Work); Show to show or hide the ruler (The Word 2010 Screen), table gridlines, and the Navigation pane (Searching with the Navigation Pane); Zoom (Page view in the Navigation pane); and Window (Working with Multiple Windows).
Add-Ins. Add-ins are programs that beef up Word’s ability to work even harder for you, adding custom commands and specialized features. For example, your company might add a special template for certain documents. If your copy of Word has any add-ins, they appear on this tab.
Click any tab, and the ribbon changes to show the sections and buttons on that tab.
Tip
Some sections of the ribbon have more options than the ribbon can show. When that’s the case, you see a pop-out icon, which looks like a square with a diagonal arrow pointing outward, in the section’s lower-right corner. Click the icon to open a dialog box that gives you all the options for that section.
View Ruler button. Word’s ruler measures your document and shows indenting and tabs. To display it (or hide it again), click this button on the right side of the document window.
Scroll bars. Just as you’d expect: These babies let you navigate up and down through your document.
Status bar. Across the bottom of the Word screen is the status bar, which gives you information about the current document. Standard info includes what page you’re on and how many pages and words make up the document; you can also customize the status bar (Customizing the Status Bar tells you how).
View buttons. As Different Ways to View Your Work explains, Word can display your document in one of five different views: Print Layout, Full Screen Reading, Web Layout, Outline, and Draft. You can select any of these views from the View tab, or just click one of these buttons on the right-hand side of the status bar.
Zoom level button. This button shows you whether you’re viewing the text in the document at normal size (100%), larger, or smaller. Click the button to open the Zoom dialog box (Using the Zoom dialog box) and adjust the text viewing size.
Zoom controls. To increase or decrease text size even faster than clicking the Zoom button, use this slider—just drag the pointer to the left or right. Slide to the left to zoom out (making text smaller); slide to the right to zoom in (making text bigger). For more about zooming, see Page view in the Navigation pane.
If you’ve used earlier versions of Word, you know how much faster you can work by keeping your hands on the keyboard. (That way, you can just keep typing, rather than having to reach for the mouse, move it around, click a few times, reposition your fingers—and then repeat the whole ordeal each time you need a command.) So you may have learned certain keyboard shortcuts, such as Ctrl+C for copy and Ctrl+V for paste. You’ll be pleased to know that these shortcuts work are alive and kicking in Word 2010.
Starting with Word 2007—and continuing in Word 2010—Microsoft has revamped the keyboard shortcut system, and it stars the Alt key. No longer do you have to remember dozens of keystroke combinations. Just click Alt, and Word shows you which key to press to perform the task you want, as shown in Figure 1-3. For example, if you want to choose a task from the File menu, press Alt, then F (you don’t have to hold the keys down at the same time) to open that menu. Similarly, to do something on the Review tab, press Alt, then R. Each option on the menu or ribbon is labeled with its own shortcut key, so you know what to press next.
To hide the labels, simply press Alt again or click anywhere on the screen.

It doesn’t get much easier: Just open Word from the Start menu, and a fresh, new, blank document, called Document1, appears with a blinking cursor at the beginning of the first line. All you need to do is start typing.
Note
Opening Word directly from the Start menu creates a new blank document. But if you’ve already opened Word (or if you opened Word by opening an existing document), then you need to use one of the methods below to create a new document.
To create a new document after you’ve opened Word, use any of these methods:
The sections that follow show you how.
If you’ve already got Word open and want to create a new document, simply press Ctrl+N (think N for new). Doing so opens a window with a new blank document. Or follow these steps:
Click File→New (Alt, F, N).
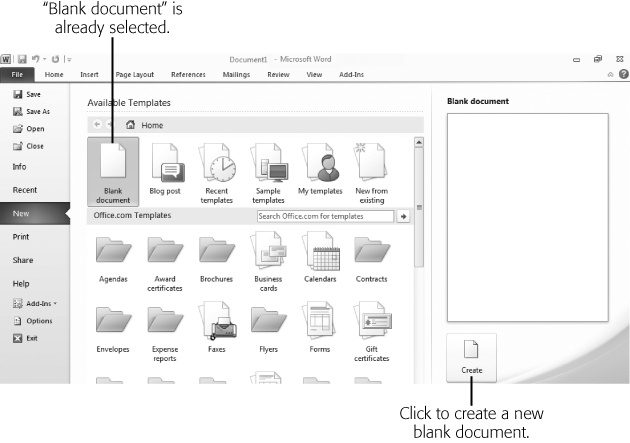
The Available Templates pane opens with “Blank document” already selected, as shown in Figure 1-4. In the right pane, Word previews what the blank document you’re creating will look like. It’s a big, empty rectangle, just like a blank page.
In the right pane, under the blank document, click Create (or, if you’ve got keyboard shortcuts turned on, press N). Alternatively, you can double-click “Blank document”.
Word creates a new blank document. You’re good to go.
Imagine you return from lunch to find an email from the boss in your inbox: “We need 15 award certificates for tonight’s banquet. Attached is the list of recipients and awards.”
Oh, great. You have an idea of what an award certificate looks like, but you’ve never made one before—let alone 15. Never fear. Word comes to the rescue with a huge variety of prebuilt templates. A template is a reusable model for a document, with specialized formatting already built in. For an award certificate, for example, the template already has formatting to make it horizontal (landscape orientation) and to center and space the text. Use the template as a starting point, tweak it to meet your needs, add your information—and you’re done. You’ll have the stack of award certificates printed out in no time. (Chapter 5 tells you everything you need to know about printing documents.)
Tip
Word 2010 comes with some templates built right in, but Microsoft keeps a much larger selection of Word templates online at http://office.microsoft.com. You can find and download these templates right from Word, so for the widest selection make sure your computer is connected to the Internet before creating a new document using a template.
To create a new document from a template, follow these steps:
Click File→New (Alt, F, N).
The Available Templates pane (Figure 1-4) opens. Templates take up most of this pane.
Click “Sample templates” to see the ones preloaded in Word. (If you’ve recently created a document using a template, you can also look in “Recent templates” or “My templates”.) If you’re connected to the Internet, look in the Office.com Templates section for a wide variety of all kinds of templates: Find a category that fits the template you want, and click that category. (If the category is a folder, it holds more than one template.)
Word shows you the available templates in whatever category you chose.
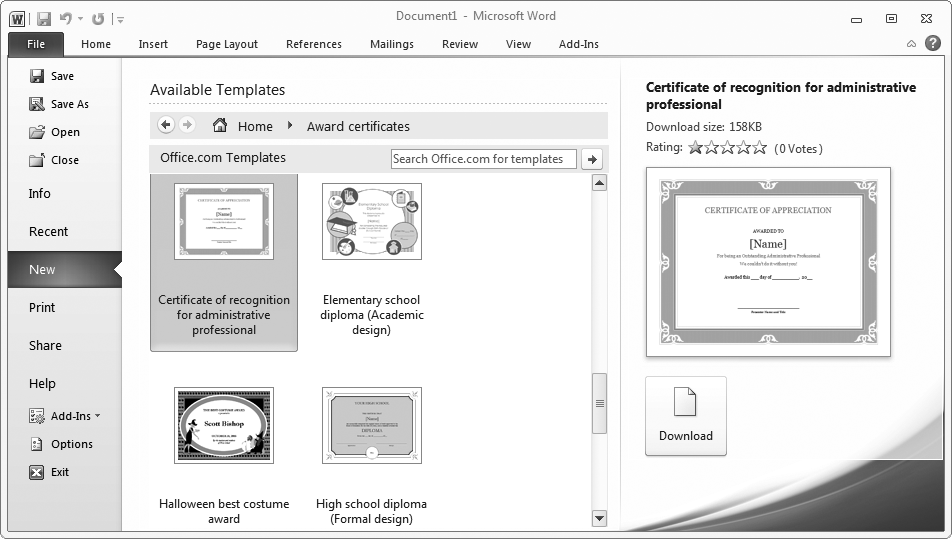
To see what any template looks like, click it.
Word previews the template in the right pane, as shown in Figure 1-5.
To use a template as the basis for your new document, click the Create button (for a preloaded template) or the Download button (to get the template from Office.com).
Word creates a new document using the template you chose. Now you can type your own information into the template.
If there’s a document format you use frequently—such as a meeting agenda, a report, a memo, whatever—you can use an existing version of that document to create a brand new one. For example, say it’s your job to create the agenda for the weekly departmental meeting. Instead of starting from scratch each week, just use an agenda you’ve already created as the basis for a new one. The format and some placeholder text are already there; just fill in the new information—and save yourself a lot of time. Here’s how:
Click File→New (Alt, F, N).
Word opens the Available Templates pane.
Click “New from existing” (keyboard shortcut: Press X).
The New from Existing Document dialog box opens, showing folders and documents, as you can see in Figure 1-6.
Navigate to the document you want. Double-click a folder to open it and see the documents it contains. Double-click the document you want to use to create your new document (or click the document to select it, and then click the Create New button). Alternatively, if you know the name of the document you want, type its name into the “File name” box and click Create New.
Word opens the document you selected—but as a new document. If you selected “Agenda 10-14-10”, for example, Word doesn’t show that filename in the title bar. Instead, it shows “Document2” (the number will vary, depending on how many new files you’ve created this session). Word has made a copy of Agenda 10-14-10, so any changes you now make happen to the new file, not to the original on which Word based the copy. Type in whatever new information you want, and then save the document with a new name (the next section tells you how).

This part’s easy. Just place your fingers on the keyboard and type away. The cursor, a blinking vertical line, shows where the text will appear as you type. You can move the cursor with the mouse (put the mouse pointer where you want it, and then click to make the cursor jump there) or by using the arrow keys and navigation keys (Page Up, Page Down, Home, and End).
As you type, Word automatically moves to the next line when you reach the end of the current one (this is called wrapping). To start a new paragraph, press Enter.
If you make a mistake, use the Backspace and Delete keys to erase characters. Backspace deletes the character immediately to the left of the cursor, and Delete deletes the character immediately to the right of the cursor. Or you can select text (holding down the mouse button, drag the cursor across the text you want to select) and then press either Backspace or Delete to make that text disappear. You can also delete text by typing new text over it: Select what you want to delete, and then type its replacement text.
Tip
Flip to Selecting and Moving Text to learn the many different ways you can select text in Word.
After you’ve created a document and typed in some text, you need to save your work. Whether you’re retaining the document for posterity or because you want to work on it again later, the advice is the same: Save early, save often. In order to do so, you need to first give it a name and tell Word where to store it. Word offers a bunch of different ways to perform this safety dance, and this section explains ‘em all.
You can use your computer’s mouse or your laptop’s touchpad to save a document using Word’s menu commands. When you’re ready, use one of these methods:
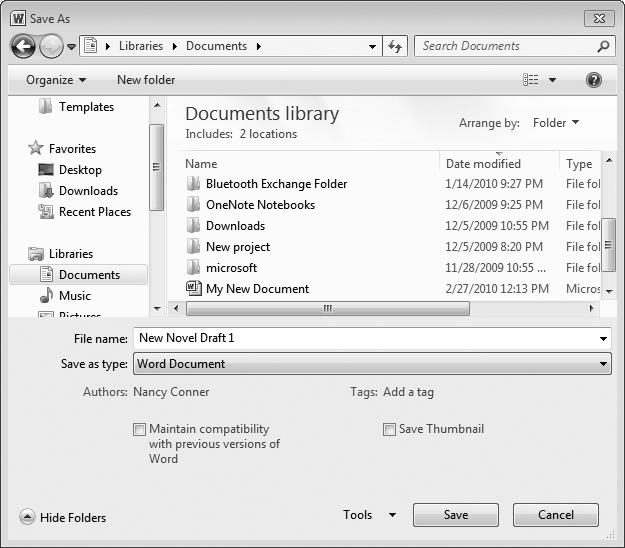
On the Quick Access toolbar, click Save. The Save button looks like an old-fashioned floppy disk (um, maybe it’s time for a new icon designer?). If you click this button to save a document that you haven’t yet saved, Word opens the Save As dialog box shown in Figure 1-7. If you’ve already named the document and saved it once, Word does a quick save of the document as it exists right now, no dialog box required.
Click File→Save. This opens the Save As dialog box (Figure 1-7), where you can name and save the file. If you’ve already saved the file at least once, Word saves the file without opening the dialog box.
Click File→Save As. Whether or not you’ve already saved the document, this opens the Save As dialog box (Figure 1-7). This option is handy when you want to save a previously saved file with a new name or in a different file format. For example, if you opened up your novel-in-progress (a filed called, say, “Vampires.docx,” and proceeded to add a new lead villain, you could use Save As to create a new file called “Wolves and Vampires.docx.” That way you preserve the first vampire-only version and create a separate dual-beast version.
If you want to do a quick save to make sure Word is keeping up with you as you type, using keyboard shortcuts is the way to go; just press a couple of keys and get on with your typing. You can quickly save a document using any one of these keyboard shortcuts:
Press Ctrl+S. If you haven’t yet saved the document, this opens the Save As dialog box (Figure 1-7). If you’ve already saved it, this key combination saves the current version of your document.
Press Alt, 1. This is the same as clicking the Save button on the Quick Access toolbar.
Press Alt, F, S. This is the same as clicking File→Save.
Press Alt, F, A. This is the same as clicking File→Save As.
However you open the Save As dialog box, here’s how to use it:
Open the Save As dialog box using one of the methods described earlier.
The dialog box looks like the one in Figure 1-7.
In the left pane, double-click the folder where you want to store the document.
The center pane shows all the documents in that folder.
In the “File name” text box, type in a name for your document.
Word uses the first few words of your document to guess at a name, but you can call the document whatever you want.
From the “Save as type” menu, select the file type you want for this document. The box on File Types in Word explains about file types. Click Save.
Word saves your document.
Tip
If you save a lot of documents in a format other than Word’s standard .docx format, you can choose that format as the default. Click File→Options (Alt, F, I) and then choose Save. In the “Save documents” section, use the “Save files in this format” dropdown list to choose the file type you want as your standard. Click OK. From now on, Word saves all your documents as this type, unless you tell it otherwise when you save.
When you’re done working on a document, Word gives you several different ways to close it:
Click the X in the upper right.
Click the upper-left Word button, then select Close.
Press Alt, F, C.
Press Alt+F4.
If your document has unsaved changes, Word shows a dialog box asking if you want to save those changes. Make your pick:
Save. This tells Word to save the changes and close the document.
Don’t Save. When you click this button, Word discards your changes and closes the document.
Note
A new feature in Word 2010 helps you avoid forehead smacks when you accidentally close a document without saving your changes. If you choose Don’t Save when closing your document and Word has autosaved the document at least once, it temporarily hangs onto the autosaved version as a draft (for a week), just in case you change your mind and want it later.
To see whether there’s a saved version of a document you closed without saving, click File→Recent (Alt, F, R). At the bottom of the screen, click Recover Unsaved Documents. You see the Open dialog box (Figure 1-8) with a list of all the recent documents you saved without closing. Select the document you want, and click Open to open it. If you want to keep the draft this time, save it in the usual way (Saving a Document).
Cancel. If you change your mind and don’t want to close the document right now, this button keeps the document open so you can continue to work on it.
Say you’re working on a report. You created the document, typed in some text, saved it, and closed it when you left work for the day. The next morning, you’re ready to crack it open again. Here’s how to find the document you want and open it, so you can get back to work:
Click File→Open. (Ctrl+O or Alt, F, O.)
The Open dialog box, shown in Figure 1-8, appears.
Navigate to the folder and file you want to open.
When you double-click a folder, Word displays its contents in the center pane. Select a file by clicking its name.
Click Open.
Word opens the document.
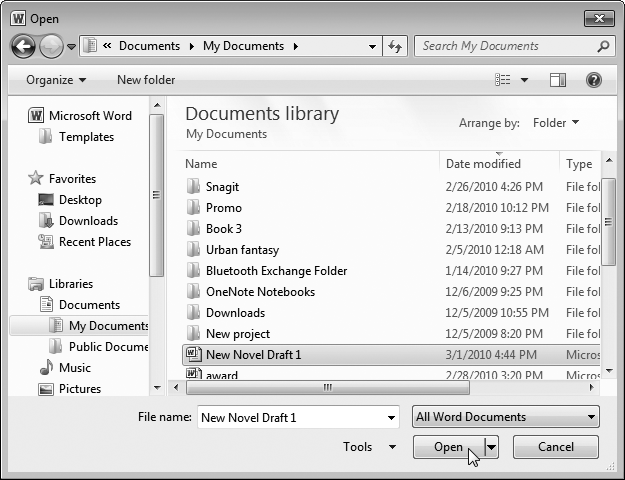
Figure 1-8. To open a document, navigate to the file you want and click the lower-right Open button.
Tip
For a shortcut to opening a document you’ve worked with recently, click File→Recent (Alt, F, R) to see a list of recent files. Click any file (or, if you’re using keyboard shortcuts, type its number) to open the document.
When you open a document in the way just described, you open it as a normal document that you can read and edit in Word. But you also have a few other options. To see them, follow steps 1 and 2 above, then click the downward-pointing arrow to the right of the Open button. These are your choices:
Open. This opens the document as usual, so that you can read and edit it.
Open Read-Only. When you select this option, you can read the document but not make any changes to it.
Open as Copy. This copies the file and opens that duplicate, rather than the original. If the original file had the title “Smith Report,” the new file gets named “Copy(1)Smith Report.” (When you save the new file, you can give it whatever name you like.)
Open in Browser. If you saved a document as a web page (Closing a Document), then you can open it in a web browser (like Internet Explorer or Firefox) instead of in Word.
Open with Transform. When you open an XML file (Closing a Document) in Word, this command determines which data makes it into the Word document. The Transform option works like a filter: If the Transform can’t work with some of the data in the file you open, then that data doesn’t make it to the open file. You might use Transform to create a list of products and prices, for example, automatically filtering out the data you don’t want instead of doing it by hand. When you use Open with Transform to open an XML document, click the Transform button to choose the Transform you want to apply.
Open in Protected View. When you open a file from an iffy source, like the Internet or an email attachment from someone you don’t know, this option opens a read-only copy that can’t run any malicious code that might harm your computer.
Note
When you open a document you downloaded from the Internet or got as an email attachment, Word automatically opens the file in Protected view, telling you this via a yellow bar above the document. If you trust the document’s source, click the yellow bar’s Enable Editing button to work with it in the normal way.
Open and Repair. If you can’t open a file because Word tells you it’s been damaged, try this option.
Show Previous Versions. When you choose this option, Word searches for earlier versions of the file and displays them in a list. Select a version from the list, and click Open to open the older version. See Comparing Documents for more about comparing different versions of a document.
Word gives you numerous options for viewing your document, so you can choose the view that lets you work best on the task at hand. If you’re writing the first draft of a report, for example, you want to focus on what you’re writing, and you might choose Draft view. Later, when you’re ready to print the report, you might switch to Print Layout view to make sure the margins, headers, and page numbers look the way you want them to on the page. Or if the report is long, with lots of headings and subheadings, and you want to check how it’s shaping up, Outline view gives you a high-level look at its organization. These are just some of the ways you can view a document in Word—read on to learn about them all.
To look at a document in one of Word’s views, click the View tab, shown in Figure 1-9, and then choose the view you want. Or click a view in the lower-right part of the screen—they open the same views. Going from left to right, these are Word’s view options:
Print Layout (Alt, W, P). This layout is the standard view for a Word document, the one you see when you start the program and the one most folks use. It shows the document laid out like a physical page, including the edges of the page, margins, headers and footers, page numbers, and so on. This what-you-see-is-what-you-print view lets you make sure the document looks the way you want it before you send it to the printer (Getting Started with Printing).
Full Screen Reading (Alt, W, F). In Full Screen Reading View, the ribbon, its tabs, the status bar, and the scroll bars all disappear so you can concentrate on the text. The view also zooms out so you see a full page on the screen. To navigate through the pages, click the arrows at the top of the screen or in the lower-left and -right corners of the pages. To switch from this view back to Print Layout view, click the upper-right Close button. (Clicking Close doesn’t close the document, only this view.)
Web Layout (Alt, W, L). To see how your document would look as a web page, choose this view. It removes page breaks and shows text and images as they’d appear if you posted this document on the Web—as one long scrolling page.
Outline (Alt, W, U). This view gives you an overview of your document, collapsing it into outline format. Outline view emphasizes headings and subheadings and treats paragraphs like subsections—so you need to use it in a document that has headings, or this view won’t make much sense. This view can be useful when you’re working on a long document; switch to Outline view to see the document’s sections and check its organization, then go back to Print Layout or Draft view to work on the text.
Draft (Alt, W, E). If you want to focus on what you’re writing—not how it will look on the page—try Draft view. This view fits more text on the screen because it doesn’t show margins, headers, footers, or page numbers, and it marks page breaks with a dotted line. Draft view does show other formatting, however, like font and line spacing, so you can see what you’re doing if you apply, for example, italics or underlining.
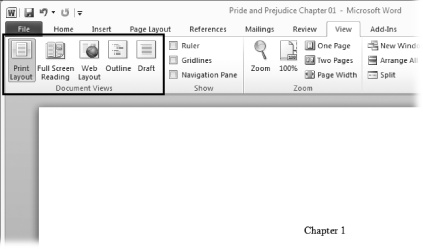
Figure 1-9. Your options for viewing a document appear on the left side of the View tab. The tiny illustration on each button gives you an idea of what the view looks like.
New to Word 2010 is the Navigation pane, which provides a high-level map of your document. To turn on the Navigation pane, click View (Alt, W). In the ribbon’s Show section, turn on the Navigation Pane checkbox. This opens the Navigation pane on the left side of your screen, as shown in Figure 1-10.
If your document has headings to introduce sections and subsections, click the Navigation pane’s Outline tab to see just those headings in the pane, as shown in Figure 1-10. Each heading is a button you can click to jump to that section in your document. It’s a fast way to find your way through a long document.
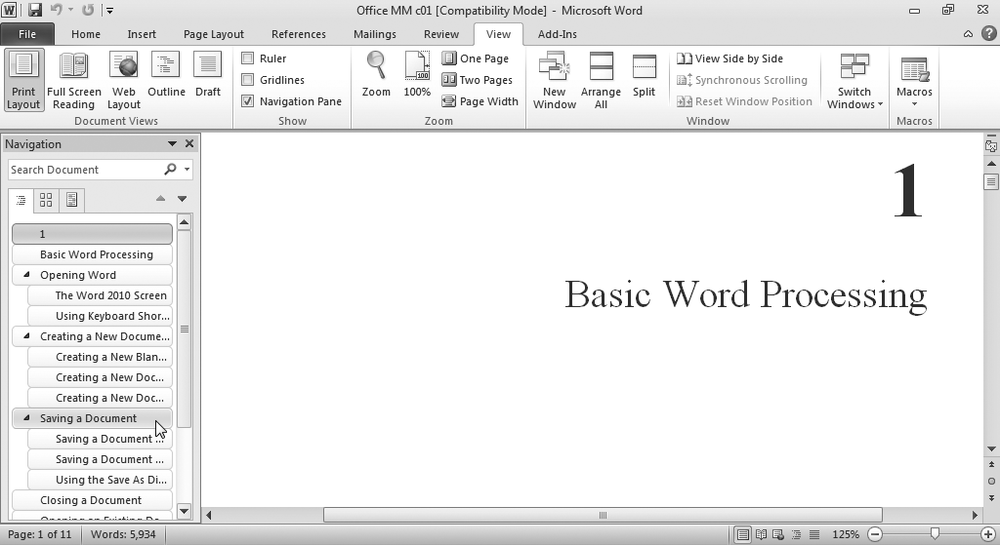
Figure 1-10. The Navigation pane helps you find what you’re looking for with a high-level view of your document. In Outline view (shown here), click any heading to jump to that section in the document. To close the Navigation pane, click its upper-right X or turn off the View tab’s Navigation Pane checkbox.
To find and jump to a particular page, click the Navigation pane’s middle tab. The pane switches to a view that lets you browse your document page by page, as shown in Figure 1-11. Pages in the pane appear in Print Layout view and are numbered; click any page to move to that page in the document.
Tip
The Navigation pane is also home to Word 2010’s supercharged new search function. Read more about how to find a word or phrase in your document on Finding and Replacing Text.
You don’t have to get a headache squinting at the screen, trying to make out words written in a teensy-tiny font. And neither do you have to spend time scrolling back and forth to read lines written in a large font. Instead, just zoom in or out to make the text the perfect size for your peepers. Zooming doesn’t change the font size; it just gives you a close-up or bird’s-eye view of the words on your pages. This section will have you zooming in and out in no time.
The Zoom slider appears in the lower-right corner of the Word screen. A pointer indicates the current magnification. When the pointer is in the middle of the slider, the document is at 100 percent. But you can make the text appear larger or smaller:
To magnify the text, click the pointer and, holding the down the mouse button, drag the pointer to the right. As you drag, the text gets bigger. When it reaches the size you want (the maximum on the slider is 500 percent), let go of the mouse button. The text remains the size you’ve selected.
To reduce the text, click the pointer and hold down the mouse button as you drag the pointer to the left. The farther left you go, the smaller the text gets, all the way down to 10 percent. When it’s the size you want, let go of the mouse button.
The Zoom slider is great for quick adjustments in and out. If you prefer, you can also zoom using the Zoom dialog box, shown in Figure 1-12, which gives you more options and more precision. To open it, click View→Zoom (Alt, W, Q). Or you can click the current zoom percentage in the lower-right part of the screen (it’s just to the left of the Zoom slider).
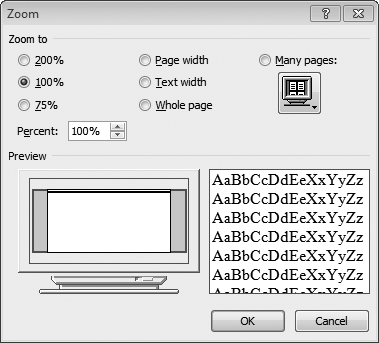
Figure 1-12. Use the Zoom dialog box to zoom in and out with precision, or to show multiple pages on the screen.
In the Zoom dialog box, you’ve got a couple of different ways to change your view:
By percentage. Word offers three popular zoom settings: 200 percent, 100 percent, and 75 percent. Turn on the radio button for the size you want. Or set the size in the Percent box: Click the up and down arrows to change magnification, or double-click the number in the box and type in the percentage you want. Click OK to zoom.
By width/size. If thinking in terms of percentages makes your head hurt, you can zoom using one of these plain-English options instead:
Page width. Choose this to make the page as wide as possible on your screen (you can still see the page’s margins).
Text width. This option makes the text even bigger than page width by showing lines of text but not margins or the edges of the page.
Whole page. Choose this if you want to shrink down the text to display a single page, from top to bottom and left to right, on the screen. You may not be able to read the text at this size, but (believe it or not) you can still edit it.
Many pages. With this option, you can display multiple pages on the screen at one time. Click the button underneath “Many pages” (it shows a computer monitor displaying multiple pages) to select how many pages you want to see. When you click that button, a menu opens showing two rows of four pages across, as shown in Figure 1-13. Move the mouse pointer to select the number of pages you want, and then click it.
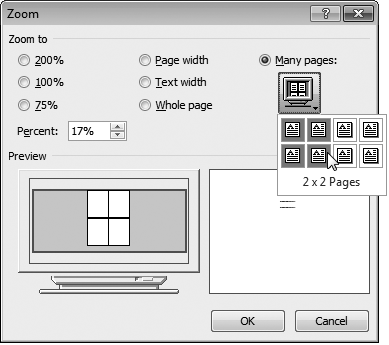
Figure 1-13. To see multiple pages at once on your screen, use the mouse to choose the number of pages and the layout you want to see.
As you make choices in the Zoom dialog box, the Preview section gives you an idea of the size of the text and how the page will appear on your monitor. When everything looks good, click OK to apply your selection.
Using multiple windows can speed up your work exponentially. Instead of having to switch back and forth between two different windows showing two different Word documents, you can show them both on the same screen. That way, you can compare different drafts of the same document or easily copy text from one document into another. You work with multiple windows from the View tab’s Window section, shown in Figure 1-14. Click View (Alt, W) and then choose one of these options:
New Window (Alt, W, N). This opens another copy of the current document in a new window, which can come in handy when you’re working on a long document and you need to see two different sections of it at the same time. For example, if Section 3 develops a topic you touched on briefly in Section 1, you might want to see both sections at the same time to make sure they’re in sync. When you open the same document in a new window, you can move through each one independently and any change you make to the document in one window also happens in the other. Nice.
Arrange All (Alt, W, A). When you’re working with two windows, it takes a lot of mouse-clicking to jump back and forth between them. It’d be a lot easier to see both windows on the same screen, and that’s what the Arrange All button is for. When you click it, Word resizes the windows for all open documents and shows them on the same screen, as shown in Figure 1-15. Each resized document window gets the same amount of screen space. To devote the full screen to any one window again, click its upper-right Maximize button.
Split (Alt, W, S). Use the Split button to divide a document’s window horizontally, giving it an upper and a lower scroll bar. After you’ve split the screen, use the scroll bars to move through each part of the document independently—for example, hold your place in the document’s Introduction while you check that Chapter 2 covers the all topics it’s supposed to. When you click Split (or press Alt, W, S), Word draws a horizontal line across the screen. Use the mouse to position the line where you want the screen to split, and then click there. Word splits the screen and creates a second scroll bar. To go back to a single screen, click View→Remove Split (Alt, W, S).
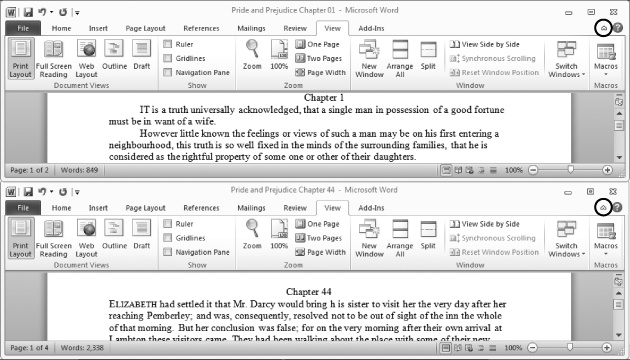
View Side by Side (Alt, W, B). When you choose this option, Word resizes your documents’ windows and displays them side by side, as shown in Figure 1-16. When you view your documents this way, Word automatically turns on synchronous scrolling (View→Window→Synchronous Scrolling or Alt, W, ZW, VS), so that when you scroll through one window, the other window scrolls right along with it. (If you don’t want synchronous scrolling, you can toggle it off by clicking View→Window→Synchronous Scrolling or pressing Alt, W, ZW, VS.) While the windows are side by side, you can resize them if you want, perhaps making one larger to see a little more of its text. To restore the side-by-side windows to their original sizes, click View→Window→Reset Window Position (Alt, W, ZW, T).

Tip
When you use New Window to open the same document in two different windows, use Arrange All or View Side by Side to see both windows on the same screen.
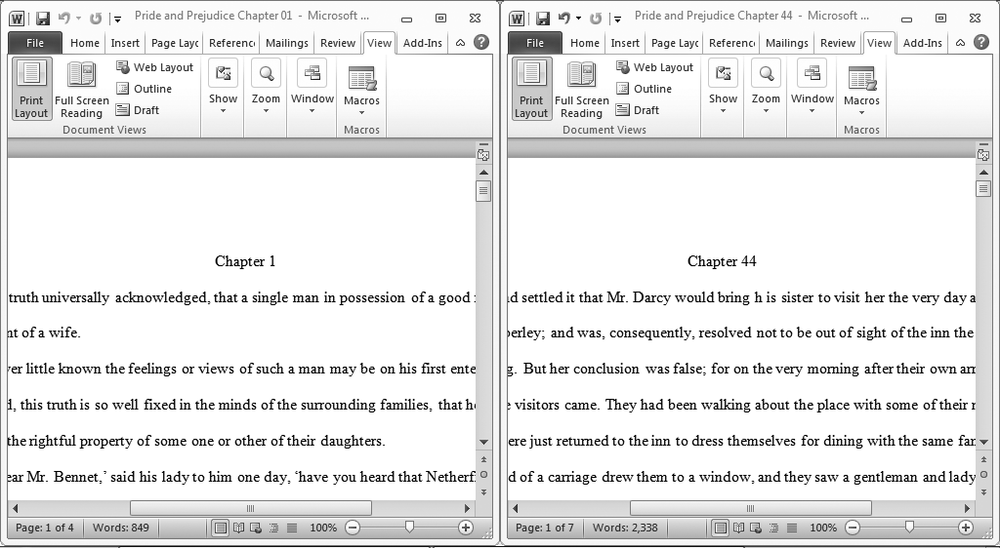
Figure 1-16. When you view two documents side by side, Word squeezes the ribbon so you can still see all its sections. Click the arrow in any section to see its buttons.
Note
When Word arranges two document windows side by side, it has to squeeze the ribbon so everything fits. In Side by Side view, you won’t see all the buttons for each section of the ribbon. To see the buttons for a particular section, click the down arrow beneath the section’s name, and Word opens the toolbar for that section. And if you’re using keyboard shortcuts, there’ll be an extra command in the sequence to open the section before you can choose a button.
Get Office 2010: The Missing Manual now with the O’Reilly learning platform.
O’Reilly members experience books, live events, courses curated by job role, and more from O’Reilly and nearly 200 top publishers.

