By this point, you are going to be sorting through all types of information and data. As you did with the feedback you received through the pre-App Store development of your app, you should be funneling all of this feedback to make sense of it. This could be as simple as directing customers to a single support email address and internally managing a spreadsheet, or leveraging some number of tools that you implemented to interact with customers and track issues (as discussed in Chapter 5). The point is that after you monitor and collect this feedback, to make smart decisions about how to keep customers engaged you are going to need to prioritize and synthesize it all to make it actionable.
You’ve probably noticed that the qualitative insight supports the quantitative data and vice versa. It’s unlikely, for instance, that you had tens of thousands of downloads when your app launched, only to receive all negative reviews. You will, however, sometimes find anomalies or aberrations between the two, and when you do, you should hone in on why that’s the case.
To help make that happen, you need to have the same customer-focused mindset you had from the outset of this process and throughout your app’s existence. You may have a strong vision and instinct about what should happen with your ongoing app development, but keep listening to and learning from your customers. That’s particularly true of your most strident critics, who might tweet some frustration about your app or write a scathing review about it. Now, you should recognize that your app will never please all customers, and sometimes, no matter what you do, you won’t win over critics. But for each critic who is turned from a foe to a fan, your app will become that much better and less susceptible to these sorts of critiques.
I recommend that you facilitate discussions with some of your customers at least on a monthly basis once your app is in the App Store. These discussions should be prompted by you and could focus on how your customers are using your app, what they like and dislike about it, and what’s missing in it, and inquiring about what new apps they are using (whether competitive, complementary, or just interesting). These conversations don’t necessarily need to be as formal as what you did during the customer interviews. Your purpose with them is to ensure that you continue to have opportunities to listen to and learn from customers so that you can keep delivering on the promise of your application.
A very “cheap” way, at least in terms of actual development costs, to show your commitment to customers and keep them engaged is to obsessively answer their support questions and feature requests. I can’t tell you the number of times I’ve seen App Store reviews that talked about a developer’s responsiveness (e.g., “The developer responded to my email within 15 minutes”) or that were subsequently edited because a developer implemented a feature a customer requested. In many ways, even if your app is not perfect, you will earn goodwill with customers when providing them with outstanding support and being attentive to their needs.
When it comes to support specifically, set a goal for how long it should take you to respond to an inbound query. If you determine this to be five hours, for example, it doesn’t mean you will necessarily solve the problem within that time (unless that’s possible). Instead, you’ll at least acknowledge that you received the request and are working on it. If you have a dedicated support email inbox, you might want to create an auto-reply, indicating your support hours and typical response time. Third-party customer support solutions such as ZenDesk and Tender will automatically assign a ticket to a customer issue and send the customer an email from a template you create.
It is worth reiterating that one benefit of support solutions is that customers will always have visibility into the status of their issue(s). Giving customers this type of real-time transparency helps set their expectation regarding response times while also providing them the confidence that their inquiries are indeed being tracked. Whether through email, Twitter, or other channels, do your best not to keep your customers hanging. Although that’s always been true, it’s particularly important in an “on-demand” world.
Altering the App Store listing for your app can have a positive impact on the interest in your app by highlighting press reviews (see Figure 9-7), awards, or new and upcoming features. You can change a number of items in the App Store without submitting an actual app update (i.e., a new binary) to Apple. The allowable changes include editing the App Store description, URLs (application and support), contact email address, application icon and screenshots, and price. Changing these elements may seem trivial, but they can have a big effect individually and even more so when combined. You can edit these items by selecting Manage Your Applications from the home page of iTunes Connect, choosing the desired app, and then clicking the Edit Information button.
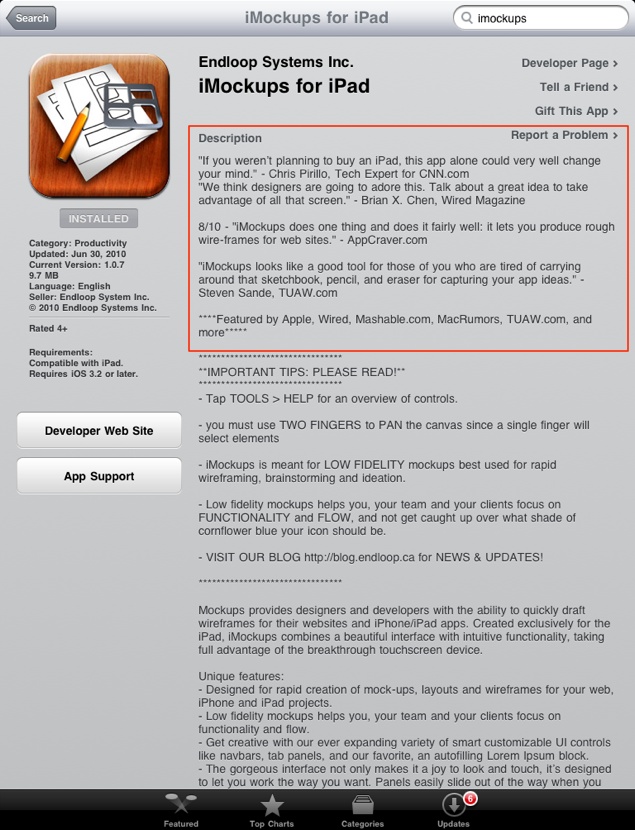
As touched on in Chapter 8, some of the more useful changes you can make include incorporating quotes from customers and reviewers in your App Store description, including “What’s Coming” in the App Store description to highlight the features you are working on, or testing different pricing points, whether as a promotion or to find what spurs the most demand. Click Save Changes at the bottom of the screen, and the changes will usually appear within several hours on the App Store.
For the most part, submitting updates for your app is the best way to keep your customers engaged. These updates may respond to customer feature requests and criticisms, fix bugs, or simply execute on your vision and roadmap for your app. In all cases, these updates will show that you are actively maintaining the app and are committed to improving it. Of course, you’ll need to identify what goes into an update, test and get feedback on an update, and subsequently submit the update to Apple. Much of that will flow from what you’ve done to this point in the development of your app, but I’ll outline some update-specific information now.
There are many different ways to approach how you release updates for your app. Some developers release updates weekly while others may take months. There’s no right or wrong way to do it necessarily. What’s more important is to be clear about what you are working on and be consistent on when you indicate you are going to release your updates.
A good way to approach setting the scope of your updates is to add to and reprioritize your app’s backlog features from your roadmap with the qualitative and quantitative feedback you have for your app (see the section Creating your initial roadmap in Chapter 5). If “feature X” is the most requested item from customers but it’s currently ranked low on the backlog, its importance should be reassessed. Similarly, if your analytics indicate that customers are not using a particular feature that you were planning to expand, you might consider spending your energies elsewhere.
You’re going to need to constantly balance working on more significant features with resolving critical issues or getting easy wins in your app. If your app is currently crashing under certain common conditions, you’ll need to focus all your attention on getting that update submitted immediately. Similarly, if a large amount of customer feedback concerns complaints about the size of a button, you can easily resolve that and thereby reduce noise for you while making customers happy. As discussed previously, you can categorize these types of updates with either bug fix or minor version number changes (e.g., 1.0.1 or 1.1) when you submit the update to Apple.
As I wrote before, readjusting your roadmap based on feedback is something you’ll do frequently. It matches the same paradigm you used to initially build your app; you’ll continue to start with your own assumptions and then validate them against customer input and the data you have at your disposal.
It’s a good practice to test your updates the same way you did leading up to the initial release of your app. In fact, you may have learned a thing or two after launching your app, so be sure to incorporate those lessons as you begin testing your update internally and with customers.
As with the pre-App Store version of your app, you’ll need to test your update with customers who have provided their UDIDs. If you still have some of the 100 device spaces left in the iOS Provisioning Portal, you may want to add some new customers. In either case, you’ll still need to follow the ad hoc distribution process to put your update into your customers’ hands (see the section UDID in Chapter 6) for them to test it outside the App Store.
You should only send your app update to customers who previously agreed to continue testing your app. When you send it to them, as you did during the beta testing, let them know what is new, updated, fixed, or outstanding. These release notes will also be used when you submit your update to Apple.
Getting an update for your app submitted to Apple is relatively straightforward. To submit your update, you’ll need the following information:
- Version Number
Try to adhere to the major version.minor version.bug fix paradigm (see the Release Numbering sidebar in Chapter 5). This number should match what your developer specified inside your updated app’s binary.
- Name
You are allowed to change the application name when submitting a new binary. There’s a good chance there’s no reason to, but you may want to experiment with a more descriptive name. For example, I tested “Tweeb - Twitter analytics” versus “Tweeb” and saw varying impacts on downloads.
- Keywords
Keywords are another element that is editable when you submit a new binary. As with your application name, you should experiment as needed.
- What’s New in this Version
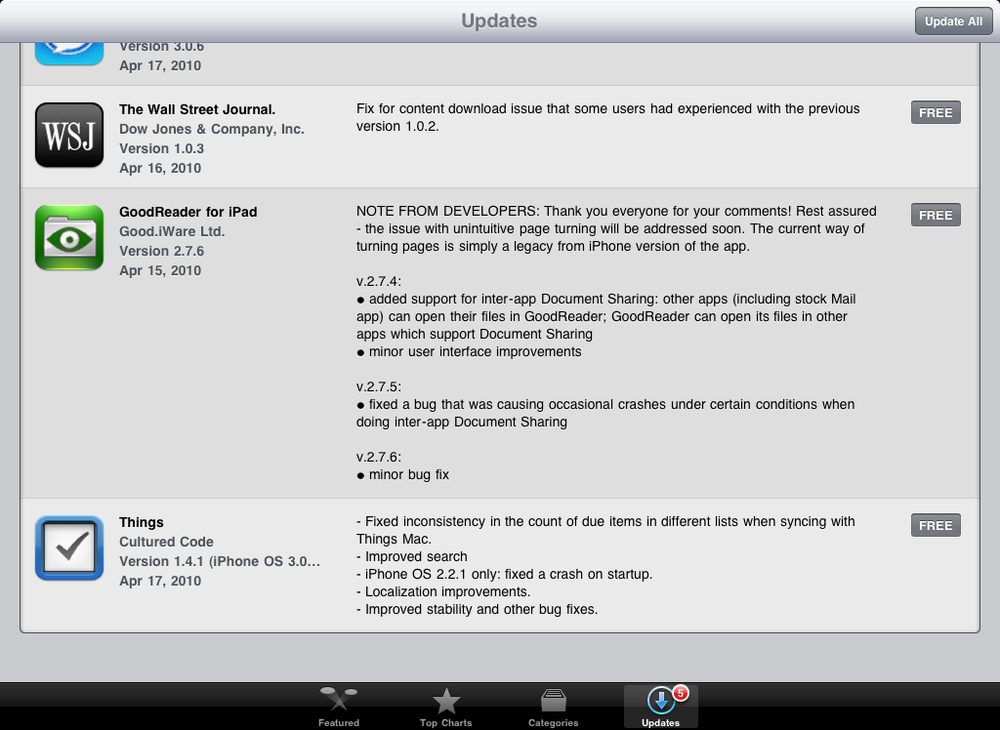
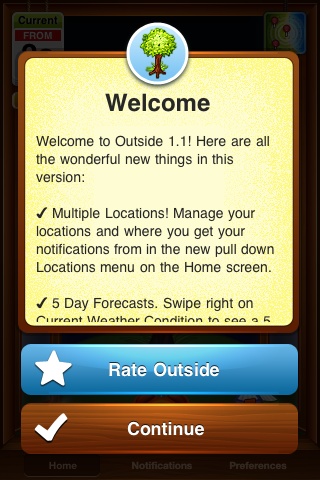
These are your release notes. They will appear to those who have already installed your app in the Updates area of the App Store. If you have a Universal app, group this information by application version (i.e., iPhone and iPad). Also, use categories to help identify new features versus bug fixes. I recommend using “New,” “Updated,” and “Fixed.” Some developers include the release notes from the past several updates, which is especially useful if updates are being produced regularly. You may also consider including this information in the app itself (see Figure 9-8 and Figure 9-9).
- Updated Application Binary
This represents the binary for your app update. Ensure that your developer uses the same credentials that created the initial app (technically, the same distribution provisioning profile) when building the binary update. Again, the version number in the binary should also match what you are submitting in the Version Number section in iTunes Connect.
Once you have this information available, you will again select Manage Your Applications from the home page of iTunes Connect and choose the desired app. From there, click the Add Version button under the Versions section of that particular app’s App Summary screen. The next screen will only request the Version Number and What’s New in this Version information. If you also want to edit the Name or Keywords, you’ll need to revisit the newly created entry (click the View Details button for this version—New Version—of your application on the App Summary screen) and edit either the Version Information section for the application name or the Metadata section for the keywords. Submit the updated binary through the Application Uploader, as you did when first submitting the app (see the App Summary and binary upload section in Chapter 7).
Upon your update being approved, you will receive a fresh set of 50 promo codes (awesome!) and a reset of your ratings for the current version of the app (not so awesome!). The ratings reset can temporarily impact your download and sales numbers, but if your update is seen as valuable to customers, they should rebound within a week or so. This cycle means you should largely focus your updates on critical bug fixes or major feature releases. For another perspective, check out Apple’s guidance on how frequently to submit app updates (https://developer.apple.com/ios/appstore/managing.html#submit).
It is important to share what you are working on with your app in all of the usual channels. This includes not only editing your App Store description, as mentioned earlier, but also sharing this progress on Twitter, your blog, your website, your email newsletter, and similar outlets.
If you haven’t figured it out yet, the same strategies you’ve used throughout the marketing and development process will continue to be useful. This can include teaser previews of new screens or features, reaching out to review sites when you are about to launch a major update, or distributing promo codes.
Considering the two extremes of either engaging with customers too much or being completely absent, you are better off with the first over the second. Apps that go months without any updates and no communication from developers are usually considered abandoned. Existing customers will let prospective customers know of that perception and scare off downloads by discussing your lack of interaction and updates in their reviews. Don’t let that happen.
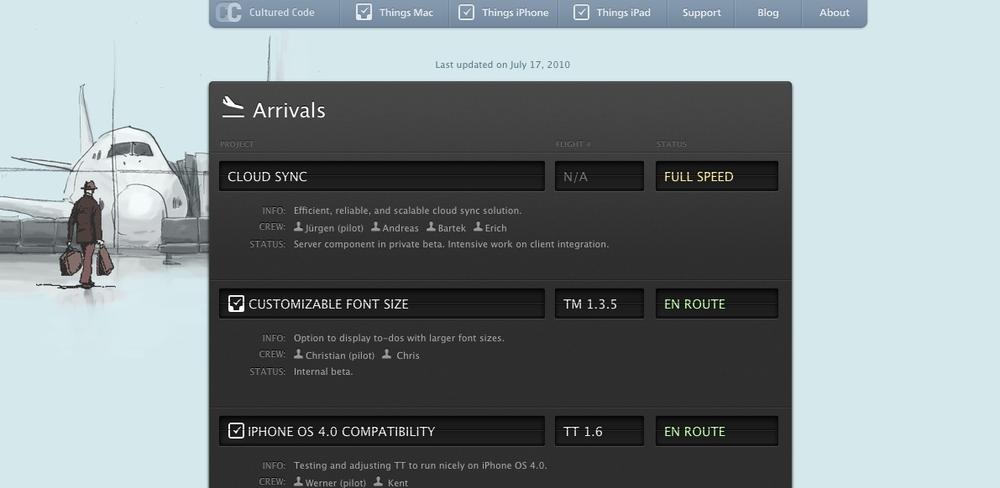
Cultured Code’s “Arrivals”
If you really want to be aggressive in informing your customers about what you are working on, take a look at Cultured Code’s “Arrivals” (http://culturedcode.com/status/; see Figure 9-10). Maker of the popular task management software Things (available on the iPhone, iPad, and Mac), Cultured Code created a highly visible (and visual) status page of the features that are soon “arriving” across its different apps.
Get App Savvy now with the O’Reilly learning platform.
O’Reilly members experience books, live events, courses curated by job role, and more from O’Reilly and nearly 200 top publishers.

