To bring the initial version of your app into the App Store, and to keep making progress on it beyond that point, you need a plan. In the technology world, this plan is often referred to as a roadmap. There are many different philosophies and approaches to creating a roadmap; I’m going to distill what I consider the core of that for you by sharing how I develop an app roadmap.
Before I do that, though, I want you to understand that you should always consider your roadmap as only a guide. Building an app that is driven by customer feedback means your roadmap needs to be fluid and flexible, constantly influenced and adjusted by what you hear from customers. Readjusting your roadmap based on feedback matches the same paradigm you are using to initially build your app; you’ll continue to start with your own assumptions (i.e., the features for a release from your roadmap) and then validate them against customer input and the data you have at your disposal.
The roadmap of your app consists of your app’s releases. A release consists of a distinct set of features for your app, where a feature is a specific function your app performs. A release is also commonly referred to as a version of your app. Most often, the first release or version of your app that you submit to Apple will be “1.0.” After the initial release of your app, Apple refers to the subsequent versions you submit as updates. Thus, in most cases, “release,” “version,” and “update” can be used interchangeably.
Verbiage aside, there are three key aspects of a roadmap:
Outlining the initial universe of features for your app
Breaking down these features into specific tasks
Appropriately prioritizing these features, and subsequently the tasks related to the features, into their respective releases
Compared to the third item, you’ll find the first two are much more operational in nature.
Before you can strategically assess what features should be assigned to a specific release of your app, you need to outline all the features that have been rolling around in your head. You probably wrote some of them down somewhere, but they are still likely not fully defined. You can infer features from the competing factors from your strategy canvas, assumptions you’ve validated with customers, and any wireframes you created. So, your first job is to use those materials and whatever else you’ve been thinking about but never verbalized to create a list of what you consider to be the features of your app.
At this stage, you don’t need to get fancy about where you capture your “features,” but I recommend that you use some sort of digital means instead of pen and paper so that you can more easily manipulate and share them. I write “features” because it doesn’t matter if it really is a feature, a task or item that is related to a feature, or just some idea you have about your app. What’s most important at this point is to get these items listed quickly and without worrying about how to structure or categorize them.
Here is the initial list of features I created with my team for AudioBookShelf. Note that I’m a little more experienced in this process, so I grouped these features into categories as part of this process. Once you’ve listed what you consider your features, try to do the same.
- Orientation
Landscape only
- Bookshelf
Discovery through scrolling across bookshelf and seeing spines
Books show age (e.g., antique versus glossy) and width based on book length
Typography on books varies
Explore different styles (e.g., leather-bound); color important
- Book Info
Cover/Title
Description
Author
Narrator
Length
- Book Player
Chapter browser
Play/pause/stop
Rewind/fast forward (5s; 15s; 30s; 1 min; 5 min; etc.)
Volume control
Chapter forward/back
Bookmark
Speed x2
Note
Another way to think about features is to consider the screens you might have in your app and develop your list based on what each screen requires.
For many reasons, associating features with a release—and in particular, your first release—is not a trivial exercise. Beyond the more obvious question of how to determine which features will go in which release, it will be extremely tempting to always try to squeeze in one more feature. For now, you need some guidance on how to begin thinking about what features should be included in the first version of the app you submit to the App Store.
Although other factors can influence the set of features you include in the first version of your app, here are a number of common elements, starting with the most important:
- Customer feedback
You have a great starting point for knowing what customers consider the key features of your app. From your customer interviews, you discovered what problems or situations your customers are most frustrated with, as well as what they are hoping you can solve for them in your app. With your initial wireframes and feature list, you can use any of the channels you have available (e.g., email) to further discuss what your customers consider to be important.
Remember that anytime you discuss features with customers, don’t focus on the feature itself. Instead, talk about their problems, wants, and needs and relate that back to your solutions (features) and the benefits you plan to offer them through your app.
- Why they’ll buy
One way to further distinguish the most critical features of your app is to determine which ones would compel your customers to purchase your app. Beyond pushing these features to the top of your list, those who are pursuing In App Purchases will begin to identify what features should be paid upgrades.
- Core functions
Some number of basic features will be required for your app to function. If they are not present, your app will be inoperable. For instance, if you are connecting to an external web service, this may include logging in to it from your app with a username and password. For AudioBookShelf, at a minimum the playback controls of play, pause, and stop were required for the audiobook to work.
- Complexity
Features vary in how easy or difficult they are to implement. A feature’s level of complexity will impact how long it takes you to build it. Whoever is designing and developing your app will need to determine the time required to build features. Don’t assume that design-intensive features are necessarily development-intensive, or vice versa.
At this point, you and your team may not have a sense of the exact effort required to build a particular feature, and that’s fine. It’s more important to get a general sense by categorizing the difficulty of features relative to each other. A useful metaphor commonly used in the wider software development community is the “t-shirt sizing” method, whereby you might label a feature as S, M, L, or XL depending on how difficult it will be to build. It will be unlikely, for example, for you to deliver four XL features in one release, unless you have a large number of development resources available.
These initial complexity estimates will be refined as your features are broken down into actual design and development tasks.
- Cost
You’re not building your app independent of costs. You can have a monetary cost of a budget you or your company has specified for your app, a scheduling cost of needing to get your app into the App Store by a certain date, or a combination of both. Obviously, the complexity of the features will have a direct impact on cost; pursue the most customer-important, simplest, and least costly features first.
Based on the aforementioned factors, the feature list for the first version of your app should be taking shape. To further understand what features will make it into the 1.0 release of your app, you need to get a better handle on the level of effort required to build each feature you’ve identified. That will occur by you and your team breaking down the features into tasks.
By breaking down a feature into a short, descriptive task, you’ll have a more comprehensive understanding of whether it can be built in a couple of hours or a couple of days. The t-shirt sizing you did will help you get started. An S feature, for example, may have only one task associated with it, whereas an L feature could have five or more. Defining these tasks and subsequently understanding how long a particular feature might take to build will require close collaboration with your team members.
The motivation for the more detailed level-of-effort estimates you’ll receive from defining these tasks is that time will be an overarching factor for every release you submit. As described earlier, time itself is a constraint, but it also will equate to dollars spent and dollars lost. The longer you don’t submit the first version of your app to Apple, the more time competitors have to launch a similar app or improve an existing one. You’ll risk losing downloads or sales, and potentially compromising the purpose of why you started building this app. That doesn’t mean you should rush your app to Apple, but if your estimates are showing that your first app will take three months to build, it’s time to remove some features from the first version.
Note
It’s not uncommon for proven, experienced developers, especially of games or larger apps, to take three months to build and launch an app. Even in their case, it’s a risky proposition to take that long to get an app to the App Store.
Be aggressive with pushing features out of your initial release during your roadmap planning. It’s better to cut them now than it is to start building them, only to realize that they will prevent you from getting into the App Store in a timely manner.
Although it’s a broad and sweeping recommendation, I’m going to urge you to ensure that your initial release requires no more than eight weeks of design and development time. If you can reduce the amount of time you spend on the first version, you minimize the risk of your app sinking into an abyss of never launching. So, consider those eight weeks as not a goal, but rather the absolute maximum amount of time you should allocate for that first release. This should hold true even if you are submitting your first app to the App Store. In fact, I’d argue that it’s OK to spend up to eight weeks on an initial release only if it’s your first app. More experienced developers should strive for two to four weeks.
Now that you’ve identified the features for your first release and the remaining unassigned features for your app, and you’ve allocated time to build the first version of your app, you can begin to construct your roadmap. My preference for maintaining an app’s roadmap is to use a table format in a spreadsheet or wiki. Wherever you maintain your roadmap, realize that it is distinct from the tools you will use to manage the progress of the app, and that it is focused on vision and not execution.
If you choose to maintain your roadmap in a spreadsheet, note that typically the columns of the spreadsheet are dedicated to the versions of the app planned, with the first row being the version number, the second being the Apple submission date, and the third being the tentative release date (see Chapter 7 for details regarding what Apple calls the “Availability Date”). At this point, you only need two columns. The first column will be labeled “1.0” (or whatever you choose as the initial version number for your app), and will include all the features you’ve identified for this release. The second column will be labeled “Backlog” and will include a prioritized list of the remaining features you’ve outlined for your app (see Figure 5-1).
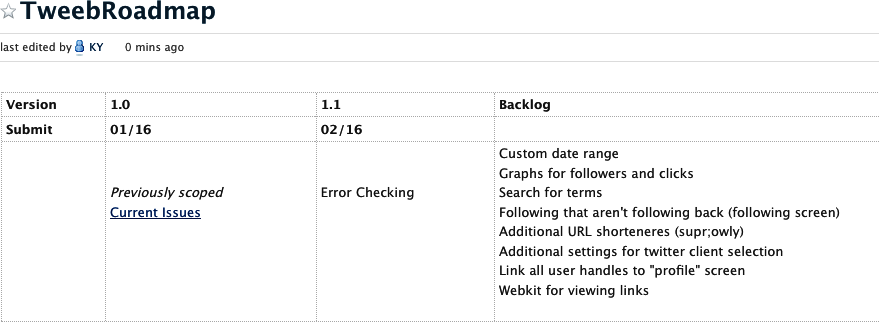
Figure 5-1. An early Tweeb roadmap, maintained in a wiki powered by the online collaboration tool PBworks (http://pbworks.com/)
Going forward, you will add new columns for new releases (updates), transferring backlog features into them or creating new ones based on customer feedback and other factors (“scoping” updates is covered in Chapter 9). You can visit http://kenyarmosh.com/appsavvy to get a sample roadmap spreadsheet.
Having outlined the features of your app, you should take this opportunity to create a better description of your app. Not only will this enable you to more clearly discuss your app with customers, contacts, friends, and family, but also, and more importantly, this description will become part of your marketing assets and will be used in such places as your website and the App Store.
The first part of your description should be a short tagline that quickly communicates the essence of your app. It doesn’t have to be a complete sentence, and instead can be more of a blurb. Here are a handful of examples for you:
Tweeb – Twitter stats in the palm of your hand
AudioBookShelf – Listen to History’s Treasured Masterpieces on Your iPhone
Outside – Reinventing the Weather Forecast
Digital Post – Newspaper for iPad
Grades – Roadmap to an A
As part of this step, you may also want to begin exploring some app names. As you can see from the preceding app samples, as well as from other top apps in the App Store, simple and straightforward names are better. Even Robocat’s creatively named weather app, Outside, still communicates what it is about. The other benefit for simpler names is that they will be more memorable and searchable—through search engines, beyond the App Store.
Additional factors to consider when thinking about your app’s name include checking the availability of website domains (use http://instantdomainsearch.com/ and http://www.bustaname.com/ to speed that process) and Twitter handles. A popular way to overcome the availability limitations is to append the word “app” to the end of the desired name. For example, here are the domains and Twitter handles for the apps mentioned earlier: http://www.tweebapp.com/ and @tweebapp, http://outsideapp.com/ and @outsideapp, and http://gradesapp.com/ and @gradesapp. You don’t necessarily need an app-specific Twitter handle if you’ve decided to use your personal Twitter account to engage customers.
After you have the tagline, you’ll want to expand it to a three- or four-sentence description. Prospective customers will read this information immediately after looking at your app’s name and tag line. This description should capture your app’s key differentiators. Here are descriptions for Tweeb and Digital Post:
Tweeb
Tweeb is a Twitter analytics and Twitter follower management app for the iPhone and iPod touch. It’s the only app that provides a simple, digestible, and comprehensive view of how you’re doing on Twitter.
Digital Post
A variety of top news sources have been pre-selected & filtered including AP, Reuters, AFP, Christian Science Monitor, McClatchy, Politico and more. No need to add or manage RSS feeds, Digital Post always stays up-to-date with the top news stories!
The final part of your description should detail five to seven specific features about your app. You don’t need to list every feature. Just highlight the ones your customers have told you are the most significant and compelling. Here’s what I included for Tweeb:
Tweeb
On-demand stats that always includes fresh, up-to-date data.
Clean, crisp, and intuitive “Summary” dashboard with trends for tweets, followers, buzz, and clicks.
Quickly view your recent tweets, manage those you follow (“friends”), and post from your favorite Twitter client in the “Me” tab.
See if what you are tweeting is creating any “Buzz” by checking out those who are mentioning or retweeting you. Tweeb supports Twitter retweets and will also show you who is retweeting you.
Better understand follower engagement by viewing click data for tweets that include bit.ly or j.mp links in the “Clicks” tab.
Since your app doesn’t exist yet, make your tag line, description, and features aspiring. Spending a small amount of time detailing these items now will help you to focus on what you want the core of your app to be as you move through the rest of the design and development process.
Get App Savvy now with the O’Reilly learning platform.
O’Reilly members experience books, live events, courses curated by job role, and more from O’Reilly and nearly 200 top publishers.

