You might think the bedroom is the last place in the house you want a computer, and almost everyone would agree, but the hacks in this chapter enable you to benefit from computer-based automation without having to turn your sanctuary into an office.
In fact, bedroom-related hacks are among the subtlest, and most interesting, in this book. You’ll learn how your home can gently urge you from bed in the morning [Hack #47], help you navigate a dark house during the middle of the night [Hack #49], and play pleasing chimes [Hack #53]. These hacks are sure to delight your whole family.
Create a set-it-and-forget-it alarm clock for each individual in your home. It goes off only on workdays, and even can nag a reluctant riser to make sure she gets up.
How many times have you gone to bed, only to have to get up a few minutes later to double-check that you set the alarm clock? Or, how about that early-morning weekday alarm setting you always forget to turn off, disrupting your blissful Saturday morning slumber? And what about those days when you need to get up extra early? You find yourself setting and resetting the alarm clock several times a week.
Those days are in the past if you have a smart home, with just a few prerequisites:
A house that knows who is at home [Hack #70]
A whole-house sound system [Hack #28] or a computer in the bedroom
A motion detector [Hack #6]
If you don’t have all these pieces yet, you can adapt the hack to meet your needs and equipment. The key is a simple script that you schedule to execute at the time you want to wake up:
	if (status of "holiday today") = false then
		if (status of "gordon home") is true then
			turnoff "Gone To Bed"
			say "Gordon. Wake up! It's time to arise! get up! get up! get up!"

			if (time delta of "MBR Bath Motion") is greater than 5 * minutes then
				execute script "Gordon alarm" in 4 * minutes -- reschedule myself
			end if
		end if
	end if
This script is called Gordon Alarm. You’ll need a personalized copy for each person in your household for whom you want to set an alarm. Each script is set up as a repeating event. If you need to wake up earlier on certain days, simply add additional scheduled events that fit your schedule. For example, if you get up early for a morning swim every other day, schedule an event at 5:00 a.m. for Mondays, Wednesdays, and Fridays and another at 5:45 a.m. for Tuesdays and Thursdays.
To provide more sleep time on holidays, the script checks the Holiday Today variable before doing anything else. If this evaluates to true, the script exits silently. You maintain the state of the holiday variable manually. I have a Palm Pad [Hack #5] at my bedside to turn it on or off.
Tip
Instead of using the script to check a Holiday Today variable, another good technique is simply to suspend execution of the alarm scripts completely when holiday mode is activated. This makes the alarm scripts slightly simpler, but you have to remember to maintain the holiday mode script to suspend each of the appropriate alarms, so I prefer to have each script check the global variable.
You could use iCal or a similar calendar program that enables you to execute a script for events. When you add a holiday or vacation day to your calendar, set up an alarm action that runs a script. The script turns on the holiday variable in your home automation software. See “Remember Important Events” [Hack #25] for examples of running scripts using calendar software.
After checking to see if it’s a holiday, the script determines who is at home [Hack #70]. If the individual is checked out of the house, the alarm exits silently. If your spouse travels, this is probably the best feature of the script—no more fiddling with the alarm clock to make sure you’ve turned it off when she’s on the road.
Next, the script turns off the Gone To Bed script [Hack #48], which in turn enables voice announcements and turns on the appropriate lighting if it’s still dark outside. If you don’t have to do anything first thing in the morning, simply omit this step from the script.
Text-to-speech is used to announce the alarm. Have the computer say whatever it is that will get you motivated, and that it lasts long enough to ensure you wake up. If your speakers are controlled with an appliance module [Hack #3], be sure to turn them on before making the announcement:
say "Gordon. Wake up! It's time to arise! get up! get up! get up!"
If you’re a light sleeper, the alarm has done its job and you’re ready to start your day. If you’re slow to wake, like I am, you’ll need a little more prodding:
if (time delta of "MBR Bath Motion") is greater than 5 * minutes then	execute script
"Gordon alarm" in 4 * minutes -- reschedule this script
end if
The script does this by watching the MBR Bath Motion
motion detector that I have mounted on the ceiling of the master bathroom. It checks to see if this motion detector has been activated in the last five minutes, and if it has not, the script reschedules itself to run again four minutes later. In other words, the alarm goes off every four minutes until it sees that I have gotten up and into the shower. Note the logic in the script: because the motion detector doesn’t discriminate about who is in the bathroom, I have it speak the alarm before checking for motion. This ensures that my alarm doesn’t get skipped because my wife is up already and has triggered the motion detector recently. However, this logic also means the alarm nearly always goes off twice: the first time, when I get up, and again four minutes later. If that annoys you, you could set up another state variable to keep track of whether the alarm has gone off already today.
If you’re interested in how much sleep you’re getting at night, modify this script to calculate the elapsed time between turning Gone To Bed on and off. You can announce or log results during the alarm, or even create a graph [Hack #92] to show your boss how overworked you are. See “Calculate Elapsed Time” [Hack #97] for an easy way to calculate the elapsed time.
When it’s time to go to bed, have your house turn off all the lights, check to make sure things are secure, and ready your motion detectors to light the way should someone get up for a drink of water.
There’s nothing like having your house shut itself down for the night. Instead of spending your final waking moments traipsing around turning off lights, have your computer do it for you. You can have it set your alarm system [Hack #80], check to see if you left any windows open [Hack #78], make sure the garage door is closed [Hack #56], and announce tomorrow’s weather [Hack #28].
You do all this by writing a script that takes care of each task for you. The easiest way to trigger the script is to keep a Palm Pad [Hack #5] on your nightstand. For example, let’s look at my XTension On script [Hack #17] for the unit the Palm Pad controls, named Gone To Bed.
The first few steps in the script check some important conditions and alert me to things that I want to be aware of before drifting off to sleep:
	if (status of "Holiday") is true then
		say "Tomorrow is a holiday, the wake-up alarms are turned off."
	end if
First, if the holiday state [Hack #24] is turned on, an announcement is made to remind me that the morning’s wake-up alarms won’t be executed [Hack #47]. If the next day really is a holiday or vacation day, hearing this announcement always brings a smile to my face in anticipation of sleeping in. If it’s not a day off, a button on the nearby Palm Pad enables me to turn off the holiday state so that the morning alarms will be triggered.
Another variable that can cause the morning alarms to be skipped is if someone is out of town. For example, if my wife is away on business, her alarm won’t go off. By making another announcement about who is gone [Hack #70], I get to confirm that the alarm status is set correctly for the next morning:
	if (status of "Gale Home") is false then
		set sayString to "Gale is gone."
		say sayString
	end if

	if (status of "Gordon Home") is false then
		set sayString to "Gordon is gone."
		say sayString
	end if
Finally, just one more state to check; the oft-forgotten garage door [Hack #55]:
	if (status of "Garage Door") is true then
		say "The garage door might be open!"
	end if
If you’ve integrated weather information into your system, such as the current outdoor temperature [Hack #64], this would be a good time to make those announcements, too. It might seem like a lot of chatter is occurring with these steps, but by keeping the phrases short and focusing on what you really care to know when going to bed, you can limit the total announcements to just a few seconds of informative speech. Speaking of speech:
turnoff "Speech Allowed"
As the final step in this phase, a flag is set to indicate that no further announcements should be made. This is checked by the script triggered by the outside motion detectors, such as the one at the front door [Hack #74]. I’ve learned through experience that announcing “Front Door Motion” in the middle of the night because a cat has walked too close to the front door is a rather rude awakening, not to mention very unpopular with my wife [Hack #14]. If Speech Allowed is off, the detector simply puts an entry in the log instead of making a commotion.
Now comes the part you’ll quickly grow to love. The script begins turning off the lights and putting the home into nighttime mode:
turnoff "First Flr Lights"
All the lights on the first floor go off first, accomplished by sending the Off command to the group I’ve defined in my home automation software [Hack #95]. Several lights are in this group, so it takes a few seconds for the X10 commands to be sent to each light individually, but it’s only one command in the script.
I want the lights in the garden to go off a little later because I enjoy the soft light they cast against the drawn window shades in the bedroom, so the following script schedules an event that will turn off the Outside Lights group after 25 minutes:
turnoff "Outside Lights" in 25 * minutes
That takes care of the yard and the first floor of my home. I handle the second floor a little differently:
	if (status of "Guest Home") is false then
		turnoff "Second Flr Lights"
	else

		turnoff "Loft Lamp 1"
		turnoff "Office Light"
		turnoff "Stairway Light"
		turnoff "MBR Globe"
	end if
On most nights, the second floor lights are also turned off by addressing a group. However, if we have houseguests [Hack #70], units are addressed individually so that the lamps near the guest bedroom are not turned off. The script leaves those lamps to be controlled the old-fashioned way: manually, by our guests.
Finally, the air cleaner in the master bedroom is switched on, providing some white noise and filtered air for us all night long:
turnon "Air Cleaner"
Additionally, because I know this is the last step in the script, hearing the air cleaner come on confirms for me that the house has finished transitioning to nighttime mode.
Now that the house is in nighttime mode, as tracked in the home automation software by the Gone To Bed unit, any inside motion detector that gets triggered will turn on a nearby light to quarter-brightness for five minutes:
	If (Status of "Gone To Bed") is true then
		brighten "kitchen light" to 50 for 5 * minutes
	end if
This provides a nice soft light for seeing your way to the bathroom or kitchen, or to check on the kids.
You might want to have other scripts check nighttime mode, too. For example, you can skip a script that gets the latest outdoor temperature [Hack #64] while you’re asleep, as you won’t need the information at that time.
The Gone To Bed state needs to get reset in the morning so that your motion detectors, and other units or actions that use the variable, will behave correctly. On weekdays, the state is reset by the morning wake-up alarms [Hack #47]. For resetting the state on weekends or holidays, when the wake-up alarms are turned off, a script runs every day at 8:30 a.m. to reset the home to daytime mode:
	If (status of "Gone To Bed") is true then
		Turnoff "Gone To Bed"
	End if
The script first checks to see if an earlier alarm already reset Gone To Bed. This allows the script to run every day and properly reset the state on holidays and vacation days that occur during the middle of the week, as well as weekends.
When Gone To Bed is turned off, its Off script is executed. The first thing it checks is whether it’s daylight, using the variable XTension maintains automatically based on local sun times:
	if (daylight) is false then
		turnon "Stairway Light"
		dim "Garden Window" to 50
		dim "MBR Globe" to 60
	end if
	turnon "Speech Allowed"
	say "Good Morning!"
	execute script "Speak time & weather"
If the sun isn’t up yet, a few lights are turned on or dimmed to half-brightness. Then, Speech Allowed is turned back on, and “Good Morning” is announced along with the current time and weather conditions.
Next, the script once again examines if we have houseguests before deciding which additional lights should be controlled:
	if (status of "Guest Home") is true then
		turnon "Garden Window"
		turnon "LFT Lamp 1"
		turnon "MBR Globe"
		turnon "Outside Lights"
	else
		turnon "First Flr Lights"
		-- turn on all upstairs lights except two
		block unit "Office Light"
		block unit "Phone Lamp"
		turnon "Second Flr Lights"
		unblock unit "GBR Lamp 1"
		unblock unit "Office Light"

		--turn on all outside lights, except the rope light
		block unit "Outside Rope"
		turnon "Outside Lights"
		unblock unit "Outside Rope"
	end if
Take a close look at what happens if Guest Home is false. All the lights in the First Floor group are turned on except for the Office Light and the Phone Lamp, which are blocked from being controlled before the group is turned on [Hack #95]. Immediately after turning on the group, the units are unblocked so that they’re ready for commands later in the day. This is a handy technique for when you want to control most of the members of a group, but not all of them.
With that, everything is reset and the house and home automation system are ready for another day.
If certain variables need to be reset daily, such as high temperatures or the number of phone calls you’ve received, the On or Off scripts for Gone To Bed are a convenient means for taking care of these kinds of housekeeping tasks. If you have an X10-controlled thermostat, add steps to the Gone To Bed scripts that set the temperature for nights and mornings [Hack #41].
If you get up from bed in the middle of the night to get a drink, the only thing worse than feeling your way in the dark is turning on a bright light that might blind you and wake others. A better idea is to have your home automation system gently light your way, then turn everything back off a few minutes later.
If you have indoor motion detectors [Hack #10], you can use them to turn on lights that illuminate your way for late-night jaunts to the kitchen or bathroom. This is also a great way to help guests, children, or the elderly feel safer when they venture out of bed after the household has gone to sleep.
With a home automation system that knows when you’ve gone to bed [Hack #48], it’s simple to add a few lines to the detector’s On script so that it can react appropriately when it’s turned on by someone walking near it:
	if (status of "Gone To Bed") is true and ((time delta of "Upstairs Motion")
	is greater than 8 * minutes) and (daylight) is false then
			dim "Stairway Light" to 40 for 10 * minutes
	end if
The script checks to see if the Gone To Bed flag has been turned on, if it has been more than eight minutes since this motion detector was last triggered, and if it’s after sunset. If all these conditions are true, the unit Stairway Light is set to 40% brightness for 10 minutes.
The script examines the detector’s time delta, a built-in property for any unit in XTension [Hack #17], because the motion detector will send an On command nearly continuously while it sees motion. Checking this property allows the script to ignore all of these extra events instead of turning on the light every time one is received. This simple approach to time-filtering reduces the number of X10 commands sent, and in this case, prevents multiple events from being scheduled to turn off the lights 10 minutes later.
Due to the inherent delay in detecting motion [Hack #10] and sending the X10 commands, it’s a good idea to illuminate areas before the person who is walking will reach them. You can use multiple motion detectors to determine where the person is heading [Hack #85], or you can guess and turn on lights for only a brief period so that they’re not burning needlessly for a long time:
	if (status of "Gone To Bed") is true and ((time delta of "Upstairs Motion")
	is greater than 8 * minutes) and (daylight) is false then
			dim "Stairway Light" to 40 for 10 * minutesdim "Garden Window" to 45 for 5 * minutes
	end if
In this example, the motion detector is located at the top of the stairway, so the light over the garden window near the bottom of the stairway is switched on, under the assumption that the person who triggered the detector is about to go downstairs. If you have a second motion detector downstairs, you could use that one to confirm that your guess was correct and to keep the light on longer, but certainly, having an unneeded light come on for just a few minutes won’t be too bothersome.
Instead of turning on the lights at full brightness in the morning, have them come to a lower level that slowly decreases as sunrise approaches.
It’s 3:00 in the morning and my girlfriend has to get up for work, but I don’t need to get up for several more hours. When she arises, the motion detector in the bathroom will turn on the light for her automatically, but at that hour, there’s nothing worse than having a light snap on to full brightness. Neither of us wants that to happen!
This script provides for kinder, gentler morning light by starting out with less-than-full brightness, then gradually turning the lights off as sunrise approaches. So, if it’s midnight, the light level is set to about 50%. Then it’s slowly ramped down until, at dawn, it’s no longer on.
The script that handles this process is an attachment script [Hack #88] for Indigo [Hack #18]. It adds a function named DimADevice(), which any Indigo AppleScript can call to calculate the appropriate brightness level for any light.
The appropriate brightness level of the light is calculated every time the motion detector in the bathroom is triggered.
	using terms from application "Indigo"
		on DimADevice(DeviceName)
			tell application "Indigo"
				set EarlyCurrentDate to (date string of (current date)) & " 12:
	00:00 AM"
				set CurrentDateSunrise to (calculate sunrise for date EarlyCurrentDate)
				set CurrentDateSunset to (calculate sunset for date EarlyCurrentDate)
The script begins by creating a variable, EarlyCurrentDate, which can be used for time calculations. It does this by getting the system date and adding a timestamp of midnight. This creates a reference date that’s used for Indigo’s sunrise and sunset calculations. With the results of these calculations in hand, CurrentDateSunrise and CurrentDateSunset, we start deciding the appropriate brightness setting:
	if (current date) > CurrentDateSunrise and (current date) <CurrentDateSunset then
		--It's daytime so lights are at 100%set DimPercent to 100
	else
If the system’s current time is not between the calculated sunrise and sunset times, the script continues:
	if the day of (current date) is the (day of (calculate sunset for (current
	date))) and (current date) > (calculate sunrise for (current date)) then
				set theSunset to (calculate sunset for
(current date))
				set theSunrise to calculate sunrise for
((current date)
+ (1 * days))
				else
				set theSunset to (calculate sunset for
((current date) - (1 * days)))
	set theSunrise to calculate sunrise for (current date)
				end if
This script might be running before or after midnight. If it’s before, the sunrise time we care about is the next sunrise (i.e., tomorrow morning). If the script is running after midnight, the sunset time we need is yesterday’s, not today’s:
			set Totalsecs to theSunrise - theSunset
			set CurrentSecs to theSunrise - (current date)
			set DimPercent to (CurrentSecs / Totalsecs) * 100
			if DimPercent < 10 then DimPercent = 10
	end if
	log DimPercent
Some simple math calculates the percentage of darkness (nighttime) that’s remaining and sets DimPercent to match. If less than 10% of the night remains, DimPercent is set to 10% because most lights can’t be dimmed to such a low level and still remain visibly on. For your lights, you might need to set this to another value, such as 25%, if they’re not particularly responsive to low brightness levels.
		if (on state of device DeviceName) is false and (value of
	variable "isDaylight" as boolean) is false then
	if (supports dimming of device DeviceName) is true then
	brighten DeviceName to (DimPercent as integer)
	else
	turn on DeviceName
	end if
	end if
	end tell
		end DimADevice
	end using terms from
The preceding code checks to see if the device we’re about to dim can, in fact, be dimmed. If it can’t, it’s simply turned on instead. It also checks the status of isDaylight, a variable maintained by Indigo that indicates if it’s after sunrise. If the script finds that it’s sunrise, DimPercent is discarded and no command is sent to the light.
To call this script, I set up a trigger action for the motion detector in the bathroom. The trigger’s action is an embedded AppleScript that calls the attachment handler, passing the name of the bathroom light device that I want dimmed to the appropriate level, as shown in Figure 4-1.
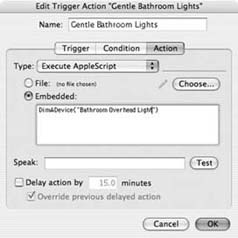
If you have multiple lights that you want to control with this motion detector, simply call the handler again, passing the name of each device.
Instead of getting jolted from sleep with a rude alarm, wake up gently by gradually increasing the brightness of your bedside lamp.
Some sleep research suggests that the best way to wake up in the morning is to do so slowly, with a light that gets progressively brighter, reaching full strength at the time when you want to arise. It’s said that this can even eliminate the need for an alarm; you will just naturally wake up with the simulated sunrise. If this idea appeals to you, you can use your home automation system to try it out without having to buy a special alarm clock (http://www.dreamessentials.com/a_clocks_sunrise.aspx; $110).
To set up a simulated sunrise, you use scheduled events that send gradually increasing Dim commands to your bedside lamp at regular intervals. Here’s a script that accomplishes this using XTension [Hack #17]:
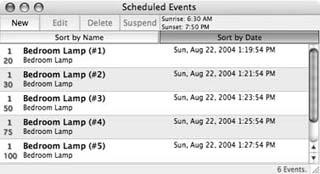
	dim "Bedroom Lamp" to 10
	dim "Bedroom Lamp" to 20 in 3 * minutes
	dim "Bedroom Lamp" to 30 in 5 * minutes
	dim "Bedroom Lamp" to 50 in 7 * minutes
	dim "Bedroom Lamp" to 75 in 9 * minutes
	dim "Bedroom Lamp" to 100 in 11 * minutes
Save this as a global script and schedule it to execute 11 minutes before the time you want to awake. When the script runs, it schedules all the events necessary to gradually adjust the light. Figure 4-2 shows the Scheduled Events window as it appears immediately after the script runs, with all the associated events waiting in the queue.
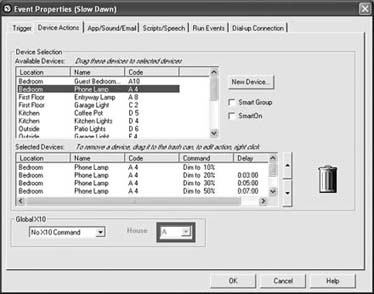
If you use HomeSeer [Hack #19], you set up a simulated sunrise by creating an event with multiple actions, each delayed by an appropriate amount of time, as shown in Figure 4-3.
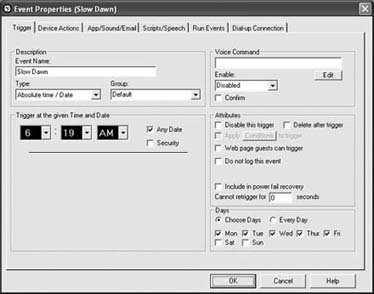
Remember that when you define the event, you can select which days it is active, such as weekdays only (as shown in Figure 4-4), and that you’ll want it to start prior to the time you want to awake. That is, if you have programmed the light to take 11 minutes to reach full brightness, start the event 11 minutes prior to your usual alarm time.
You will want to experiment with how early you begin the process of brightening the light, as well as how much it changes at each step. In addition to your own personal preferences, you’ll need to take into account that some lamp modules might not visibly change brightness very much when told to increase by a small increment. That is, you might not be able to notice the difference when a lamp is set to 80% or 85% brightness.
A light that slowly dims, instead of brightens, is a nice way to end the day, too. It can also be a nice signal for your child’s room; her lights turn down as bedtime approaches. You implement a simulated sunset using the same technique as a sunrise, of course: just turn down the lights with every iteration.
Combine this technique with “Educate Your Alarm Clock” [Hack #47] to create an alarm that goes off only when you’re at home, along with other nice touches. If you keep a Palm Pad [Hack #5] near your bed, you even can add a snooze command that resets the brightening light. (See HomeSeer’s hs.RemoveDelayedEvent command for an easy way to remove events that have been scheduled already.)
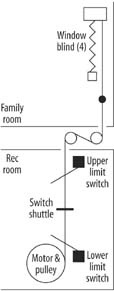
An inexpensive motor and some clever pulley assemblies enable you to automate the opening and closing of window blinds.
I designed and built a system that uses two motors to control the eight window blinds I have in my two-story family room. The system consists of pulleys placed under the floor, limit switches, gear motors, and the electronic circuitry needed to control the system.
Tip
Visit http://www.edcheung.com/automa/blinds.htm to view an animated picture of the blinds in action.
Here are the advantages of this design:
You can remove the hardware without scarring the home.
You still can operate the blinds manually, using the traditional method.
The motors and machinery are hidden from view.
I accomplished this by hiding the hardware in the recreation room in the basement, directly below the family room, as shown in Figure 4-5.
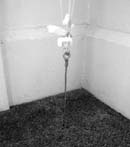
The only unusual thing you can see from the family room is a steel cable connected to the pull cords and running into the floor, through a hole in the carpet. An S hook connects the steel cable to the pull cords through an eyelet (as shown in Figure 4-6) so that you can disconnect the pull cords easily from the motor drive for manual use.
I purchased two gear motors from Grainger Industrial Supply (http://www.grainger.com). The motors I use are similar to item #2L003 ($43). With a 6-inch-diameter pulley, they can provide 30 lbf of pull on the steel cable. I previously measured that about 21 lbf was needed to pull the blinds when they are in the almost fully open position (i.e., when the amount of weight on the pull cord is the highest). Each motor controls four blinds.
Tip
You also can use modified cordless drill motor assemblies. I’ve seen other designs use these, and they work well for blind control.
An important consideration is that we have HunterDouglas (http://www.hunterdouglas.com) dual-cell Duette blinds. The blinds do not lock into position when the cord is pulled straight down. Locking occurs only when you pull the cord sideways. Thanks to this, the motor can raise or lower the blinds freely, without having to disengage a cord lock.
Two limit switches govern the distance that each cable can travel. One is near the ceiling and the other is near the floor, in the recreation room in the basement. The motor stops when the shuttle hits the limit switch; then it can go only in the opposite direction. Figure 4-7 shows the motor and limit switch assembly.
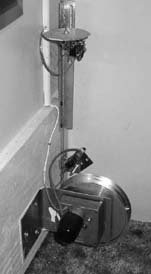
Note the limit switch at the top of Figure 4-7. It is mounted on a bracket with a long slot so that you can adjust the shuttle travel. Above the switch is the shuttle. A third limit switch is right next to the pulley.
I control the system using X10. Each motor is connected to an appliance module [Hack #3]. Sending an On command causes the motor to run, and the associated four blinds to open, until the shuttle hits the limit switch. Sending an Off command causes the motor to reverse direction. When an On command is sent to a third address, both motors halt, enabling me to set the blinds to any position.
We have been using this system for several years, and it performs reliably. Because the motors are one floor below, the moving blinds create little sound. The only problem we’ve experienced is that occasionally (about twice per year), one of the cord locks will stick while the system is trying to lower the blinds. In that case, we need to release and close the blind manually.
—Edward Cheung
The classic Westminster chimes ring forth from your home automation system.
All of us crave it, but only a select few of us obtain it. I’m referring to acceptance of our home automation hobby by our spouses, of course—the elusive SAF [Hack #14]. We can wax quite eloquently of the benefits of computer-controlled lighting [Hack #16], talking CID [Hack #27], driveway vehicle detectors [Hack #54], and automated sprinklers [Hack #65]. But seldom do we get more than a glazed look in return. Well, here’s a simple hack that will add a touch of class to your home, and might get a smile from your better half.
All you need is a computer in a room where it can be heard easily (or, ideally, a whole-house audio system) and some quality chime recordings. In fact, the hardest part is finding a quality recording of the chimes—you’ll need each hour’s chime in a separate sound file. A search at the HomeSeer message board (http://ubb.HomeSeer.com/) will turn up many to choose from, or visit the Smart Home Hacks web site (http://hacks.oreilly.com/smarthomehks) for pointers to appropriate files.
Before we set up HomeSeer [Hack #19] to play at the proper times, first let’s cover the script that plays the chimes. We want the chimes to play only between the hours of 8:00 a.m. and 9:00 p.m. (Try that with a grandfather clock!) So, the first thing the script does is to make sure it’s between those hours. If it’s not, no chimes are played and no one will be disturbed:
	sub main()
	dim h
	dim prior_volume_level_left
	dim prior_volume_level_right
	dim chime_volume_level
	dim start_time
	dim end_time
	chime_volume_level = 3

	if now() > cdate(date() & " 7:15:00 AM") and now() < cdate(date() &  " 9:
	05:00 PM") then
Tip
Note the space in the code between the time and AM or PM; it’s necessary for the comparison to work correctly.
Next, examine the hour of the current time (h) and reduce it to a 12-hour clock, if necessary. That is, if the hour is 18, change it to 6 so that the correct sound file will play:
		h = datepart("h", now())
		h = cint(h)
	 if h > 12 then h = h –12
The script saves the current sound volume settings so that they can be restored later, then calls the hs.setvolume function to adjust the volume of the right and left channels to a lower level so that the bells aren’t too loud:
	prior_volume_level_left = hs.getvolume(0,0)
	prior_volume_level_right = hs.getvolume(1,0)
	hs.setvolume chime_volume_level,chime_volume_level,0
A simple select statement plays the correct sound file, based on the hour value. HomeSeer’s hs.PlayWavFile expects a complete path to the WAV file to play, so this script assumes the sound files are stored in the HomeSeer\ sounds directory:
	select case h
		  case 1
			hs.PlayWavFile "sounds\One.wav"
	      case 2
			hs.PlayWavFile "sounds\Two.wav"
          case 3
			hs.PlayWavFile "sounds\Three.wav"
          case 4
			hs.PlayWavFile "sounds\Four.wav"
		  case 5
			hs.PlayWavFile "sounds\Five.wav"
		  case 6
			hs.PlayWavFile "sounds\Six.wav"
		  case 7
			hs.PlayWavFile "sounds\Seven.wav"
		  case 8
			hs.PlayWavFile "sounds\Eight.wav"
		 case 9
			hs.PlayWavFile "sounds\Nine.wav"
		 case 10
			hs.PlayWavFile "sounds\Ten.wav"
		 case 11
			hs.PlayWavFile "sounds\Eleven.wav"
		 case 12
			hs.PlayWavFile "sounds\Twelve.wav"
   	   end select
Finally, the sound volume is restored to its previous setting:
	  hs.setvolume prior_volume_level_left,prior_volume_level_right,0
end if
   end sub
Next, create a HomeSeer event [Hack #19] that executes this script. I have it trigger at the top of every hour; it exits without playing the chimes if the time is outside the time range specified in the script.
My family really enjoys our virtual Big Ben, and my sons actually learned to count (to 12) by listening to it. Most importantly, though, my wife actually likes this feature of our home automation system. Who could ask for more?
Instead of coding the time range that you want the bells to play in the script, you can set up a more sophisticated event to execute the script. Figure 4-8 shows a recurring event that triggers once an hour, at 00 minutes, between the hours of 8:00 a.m. and 9:00 p.m (the “Apply Conditions to trigger” option limits its actions).
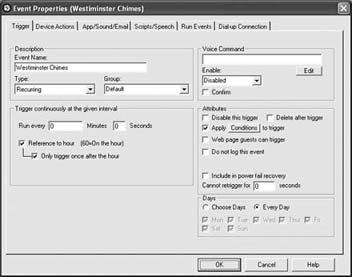
Using this technique, you can create additional conditions under which to silence the bells, such as when you’re not at home [Hack #70] or have gone to bed for the night [Hack #48].
—David Kindred
Get Smart Home Hacks now with the O’Reilly learning platform.
O’Reilly members experience books, live events, courses curated by job role, and more from O’Reilly and nearly 200 top publishers.

