Getting started with home automation can feel like entering a strange, new world. Familiar things such as light switches and electrical outlets take on new roles and capabilities. You hear about house codes, controllers, and sensors that can tell when someone has entered a dark room. And what in the world is a Powerflash? Before you can create your own smart home, you’ll need to educate yourself.
The hacks in this chapter form the foundation upon which you’ll build your smart home. Start at the beginning and get the basics of what does what, or dive into the middle and discover something surprising. You’ll learn how to turn on lights [Hack #2], take control of your appliances [Hack #3], and find automation equipment that’s masquerading at your local hardware store [Hack #23].
But before you get sucked in too far, it’s a good idea to prepare both your house [Hack #12] and your housemates [Hack #14] for the adventure upon which you’re about to embark. With these hacks in hand, you’re sure to get off on the right foot.
To send commands to X10 devices, you need to know their addresses. Here are the basics of deciding which addresses to use and how to set them.
The X10 protocol works by sending commands—using the power line in your home—to modules that know how to listen for and respond to requests to turn on, turn off, or brighten the lamp or appliance which they’re controlling. A lot of careful timing and engineering are involved to send and receive the commands, but all you really need to know is that each module understands which commands to react to and which ones to ignore.
Here’s how it works. Unlike the Postal Service, which (hopefully) delivers mail directly to your address, X10 crudely broadcasts its commands far and wide, throughout your entire electrical system. It’s up to each module to continuously listen for commands and discern whether each one is meant for it. To facilitate this, every X10 command is prefaced by an address. If the command’s address matches that of the module, the module acts on the command; otherwise, it ignores it and waits to see if the next command is meant for it instead.
An X10 address is made up of two parts: a
house code, whose value is A through P; and a
unit code, whose value is 1 through 16. Together, these form a complete address. For example, the appliance module that you use to control the lava lamp in the den might have an X10 address of B5. Therefore, to turn on the lava lamp, you send the command B5 On. This module will ignore commands prefaced with any other address.
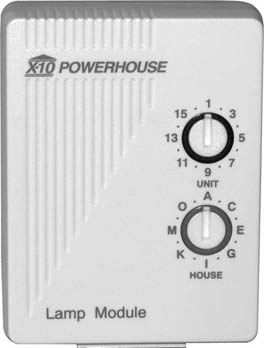
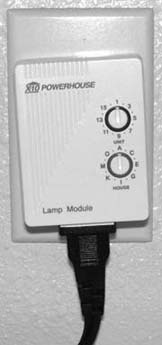
Each X10 module needs to be configured to listen for its address. You set the house and unit codes separately, usually by turning dials on the front of the module, as shown on the lamp module in Figure 1-1. In this example, the module is set to address A1.
You program some modules, such as Smarthome LampLinc (http://www.smarthome.com/2000sc.html; $13), by sending a series of commands over the power line [Hack #13]. Still others, such as X10 motion detectors, require you to push and hold buttons inside the unit to set their addresses. Regardless of how you do it, all X10 modules require you to configure their addresses; just be sure to keep the instructions [Hack #22] that come with the modules in case you decide to change their settings later.
The ability to choose from 16 house and 16 unit codes allows for up to 256 individual X10 addresses. That’s probably a lot more units than you’ll need, even in the largest homes, because each module doesn’t necessarily need its own unique address. For example, you might want to set all your hallway lights to C12 because it’s unlikely you’ll need to control them individually. Because each module is listening for its commands, all of them will respond in unison to a single command, such as C12 On. Having several lights responding at once can be a nice effect and can simplify your system greatly.
It’s a good idea to give some thought to how you will allocate the house codes you use in your system. It’s often convenient to set modules that are in proximity to each other to the same house code. For example, all the lamp modules on the second floor of my home might be assigned to house code B. This makes it possible to turn on every light upstairs in an emergency by sending an All Lights On B command, and it means I need only a single transceiver for wireless control of my lights [Hack #5].
If you will be using wireless controllers, such as the Palm Pad, it’s important to give some thought to the unit codes, too. The Palm Pad, and its wired sibling the minicontroller, have only eight buttons. That is, they can send commands to unit codes 1 through 8, or unit codes 9 through 16, depending on how you have them configured. It can be annoying to have to change the setting on a Palm Pad just to send commands to different modules, so try to stick to unit codes within the same ranges to save you some hassles.
Another good reason to plan which unit codes you’ll be utilizing is that every X10 motion detector takes up two addresses [Hack #6]. You need to account for this when programming your motion detectors; otherwise, you’ll end up quite confused. A good way to keep track of all this is to maintain a spreadsheet of your units and their addresses. Or, if you’re more visually inclined, you can use a map, as shown in Figure 1-2.
During the last several years of X10 usage, the culture of home automation enthusiasts has discovered some X10 addressing folklore and techniques that might be helpful. Due to the fragility of transmitting data on electrical power lines, and the limited bandwidth available to do so, some addresses seem more susceptible to problems than others. It’s said, for example, that electrical noise introduced by motors turning on and off (such as your furnace blower) can mimic an M1 On command. In fact, if you dig deeply enough into the collective wisdom of the community, you’ll find some that contend the entire M house code is unreliable, due to the technical details and timing necessary to send that particular X10 code. I’ve never experienced it myself, but then, because so many other house codes are available, I don’t use M at all.
Another, more pragmatic tip is to avoid using the address A1. It’s simply too common because it’s both the default address for many modules and the address that a non-savvy neighbor, who unknowingly has purchased an X10-based wireless doorbell, is likely to use. Better still, if you don’t assign any modules to use A1 and suddenly you start seeing that address in your system’s log, you know either a module has forgotten its address due to a bad battery or failing electronics, or your neighbor has discovered X10 and it might be time to consider a signal blocker [Hack #86].
Although you definitely should consider which addresses you’ll use before diving in, rest assured that eventually you’ll change them around anyway. As your system grows you’ll think of new ways to organize your units, or you might buy an X10 thermostat that takes up an entire house code just for itself [Hack #41], so never consider your addressing scheme a permanent arrangement.
If you’re new to home automation, the best way to start is with a few lamp modules.
Lamp modules are the basic building block of home automation, and it’s not unusual for a smart home to have one connected to nearly every lamp in the house. Lamp modules can vary in appearance, but, essentially, all of them look like the one shown in Figure 1-1 [Hack #1].
Setting up a lamp module is very simple. Set the address you want this module to respond to by turning the house and unit code dials [Hack #1] on the front of the unit. Then plug a lamp into the front of the module and plug the module into a wall outlet. You’ll want to put it into the bottom plug so the module doesn’t block the rest of the outlet. If you need to use the top plug for some reason, plug the module into a short extension cord, instead of directly into the outlet, so the bottom outlet remains clear.
Next, turn on the lamp’s switch. If it doesn’t turn on, don’t be alarmed; just turn the switch until it does. We’ll talk about why this is necessary in a moment. Now, send an Off command to the module’s address using a Palm Pad [Hack #5] or minicontroller [Hack #4]. If this is the first time you’ve seen X10 in action, don’t feel self-conscious as you stand there and make it go on and off repeatedly; it’s nearly impossible to resist.
Next, try changing the light’s brightness. The lamp module is unique in its ability to brighten and dim whatever is connected to it. To do this, press the On button on the Palm Pad or minicontroller, and then press the Dim/Bright switch. In a second or two, you’ll see the lamp react. Whee!
Warning
This ability to brighten and dim is why you should use the lamp module only to control lights. Never use it with an appliance, a fan, halogen or fluorescent lights, or a lamp that has a built-in dimmer. For these items, use an appliance module [Hack #3] instead.
Most lamp modules have a feature called local sense or local control. This enables you to use the lamp’s switch to turn it on and off, but you’ll notice that you might have to turn the switch twice before it takes effect. The extra turn is sometimes necessary—depending on the type of module you’re using—for it to detect that you’re trying to control the lamp locally. Note, however, that if you turn the lamp off at the switch, the lamp module will never be able to turn it on. So, making sure the lamp’s switch is on is the very first step in troubleshooting why a light won’t turn on when you tell it to. No worries, though: as you get used to living in an automated home, you’ll soon get out of the habit of turning on lights manually, and you’ll eventually think of doing so as quaint and old-fashioned.
The only drawbacks to lamp modules are that they’re not very attractive, and you can’t use them to control lights that don’t plug into the wall, such as overhead lighting. If either of these limitations becomes bothersome, you might want to replace your electrical outlets and switches with built-in modules [Hack #14].
You don’t have to plug the lamp module directly into a wall outlet; you can use it with an extension cord. This makes it easier to use a lamp module in hard-to-reach areas, and it is a great technique for controlling Christmas lights. For outdoor use, you’ll want to be sure to keep the lamp module dry [Hack #59].
If you want to automate a fan, coffeepot, or radio, use an appliance module. Thanks to their versatility, appliance modules are an integral component of a smart home.
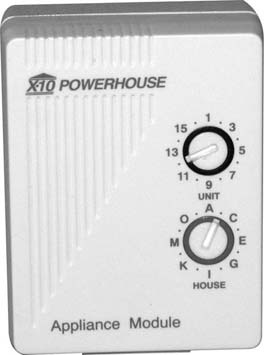
In many ways, the X10 appliance module fulfills the promise of a Jetsonian future. You can turn fans, radios, coffeepots, garden lights, and popcorn makers into your obedient servants with the addition of this little module. Although nearly identical in appearance to the lamp module [Hack #2], the appliance module is a lot more versatile. You can use it to control nearly anything that turns on or off.
Warning
Although you can use an appliance module to control a lamp, albeit without the ability to control the brightness, never ever use a lamp module to control an appliance. If the lamp module is dimmed accidentally, the appliance might overheat and cause a fire.
The appliance module doesn’t understand many X10 commands; it responds only to On or Off. To set the module’s address, use the house and unit dials [Hack #1] on the front of the module. For example, the module shown in Figure 1-3 is set to the address B12.
After you’ve set the address, simply plug the module into a wall outlet and plug the appliance that you want to control into the module’s plug receptacle. Then, make sure the appliance’s switch is turned to the on position.
Send an X10 On command [Hack #4], and a moment later you’ll hear a click, followed by your appliance springing to life.
Tip
Unlike lamp modules, some appliance modules don’t have a local control feature that enables you to turn on the appliance by using its switch. If an appliance module does have this feature, you can turn it on by turning it on, off, and then on again. If not, you’ll need to either disconnect the appliance module or send an X10 command to the module.
You can’t control some appliances using this module because they don’t have a switch that stays in the on position when the power to the appliance is turned off. That’s how the appliance module works: it controls the flow of electricity to the connected appliance. When the module is off, it’s as if you’ve unplugged the appliance from the wall. If the appliance you want to control has a soft power switch—one that is controlled electronically instead of physically—it won’t work with an appliance module. If you’re not sure you can tell the difference, here’s how to test it. Turn on the appliance, and then unplug it from the wall. Wait a few seconds, and then plug it in again. If the appliance comes back on when you reconnect the power, it will work with an appliance module. If it remains off, you’re out of luck and will need to figure out some other way [Hack #11] to control the appliance.
You’ll also want to make sure the appliance you’re connecting doesn’t exceed the rated range of the module. Appliance modules typically support up to 15 amps or 300 watts, but check the label on your module to make sure. Modules are also available with two- or three-pin electrical plugs, so make sure you get one that matches the type of plug used by the appliance you’re controlling. You also can get modules that work with 220-volt appliances, and sometimes these heavy-duty modules are necessary for 100-volt appliances that draw a lot of current, such as vacuum cleaners.
The most common question that arises about the appliance module is how to make it quieter. The loud click (some say it’s a clack) is the sound of its heavy-duty relay switch turning on or off. You’ll just have to learn to live with it, although if it bothers you too much, you might consider using a Smarthome ApplianceLinc (http://www.smarthome.com/2002s.html) instead of the standard X10 module; the ApplianceLinc makes less noise. Or, adjust your attitude and recognize that the click provides confirmation that the signal was received and acted upon. See, now the click is a feature, not a problem!
For more information about putting an appliance module to use, see “Brew Your Morning Coffee” [Hack #37].
The computer you use for home automation often will be sending commands to your X10 devices. But when you want to send a command yourself, to turn on a light or change a setting, for instance, you’ll need an X10 controller.
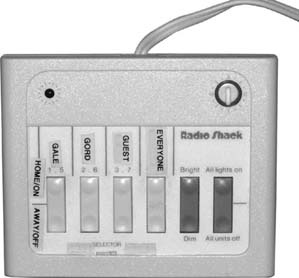
The most common way to send an X10 command is to use a minicontroller, which is a small box (shown in Figure 1-4) that plugs into a wall outlet and has an array of switches that send On and Off signals to X10 addresses.

Tip
It’s called a minicontroller because it has four buttons that, when combined with the selector switch at the bottom of the unit, can address only 8 units—half of the 16 possible units in a given house code. This is something to keep in mind when you’re selecting the module addresses you want to use; if you spread the addresses out too far, you’ll need two controllers to easily send them all commands. Or, buy a maxi-controller instead.
Set the dial on the minicontroller to a house code, and then press one of the numbered buttons to send a command. For example, with the house code set to H, press in the top of the first button to send H1 On, press the second button to send H2 On, and so on down the line. To send a Dim command to a lamp module, first press the On button for the lamp you want to control, and then press Dim or Bright.
Minicontrollers are useful for sending commands directly to a module, such as a lamp, but they’re better used to communicate with your home automation software, where a single button press can kick off a script that does a whole series of events. For example, you might use a bedside minicontroller to signal that you’ve gone to bed for the night [Hack #48], which causes the house to turn off all the lights, check for open doors, and lower the thermo-stat—all from pressing just one little button. Now that’s automation!
Minicontrollers are very handy and it’s a good idea to keep one or two around the house. Occasionally, you’ll want to send an X10 command to adjust something in your home. Perhaps a light is too bright, or it’s a cloudy day and you want a lamp on before sunset. Or, you might have a houseguest to whom you want to give an easy way to control some key areas, such as the hallway lights near the guest bath. All of these are good reasons to use a minicontroller or its wireless brethren, the Palm Pad [Hack #5].
Wireless remote controls are handy power tools for home automators, but you need to understand their quirks to get the most out of them.
In addition to modules that plug into your electrical system, several wireless devices work with X10-based systems. All wireless X10 devices work by transmitting a radio frequency (RF) signal to a nearby receiver that’s plugged into an AC outlet. The receiver translates the command and issues it to the power line so that other devices, including your computer and its home automation software, can see it. These devices are called transceivers. Ultimately, it’s still necessary to put the commands on the power line—that’s the core modus operandi of X10, after all—but the ability to initiate a command without a connecting wire is a great freedom.
The most common wireless X10 devices are motion detectors [Hack #6], keychain-size remote controls, and Palm Pad remote controls.
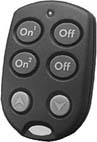
Tiny key-chain remotes, such as the one shown in Figure 1-5, enable you to send On or Off commands for one or two addresses. A watch battery powers them, so the range is limited, but it’s still pretty good given their tiny power requirements. In most styles of key-chain remotes, you set the address that the first set of buttons control, and the second set of buttons are programmed automatically for the next incremental unit. That is, if you set the first buttons to transmit A4 On and A4 Off, the other buttons will send A5 On and A5 Off. You’ll want to keep this unalterable relationship in mind when assigning addresses to your devices.
Key-chain remotes are handy for scattering about the house, such as at your bedside, for a convenient way to send a command. They’re also lightweight and easy to mount on the wall or under a table edge with double-stick tape.
Tip
Keep the programming instructions [Hack #22] that come with your remote. To set the remote’s address, you’ll have to press different combinations of the buttons, and the instructions vary between different models.
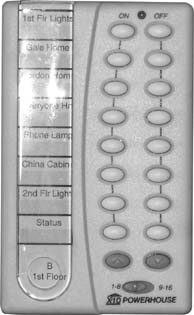
The Palm Pad remote is very versatile, but not very attractive, as you can see in Figure 1-6. It enables you to send commands to all 16 addresses in a single house code [Hack #1]. You set the house code for the remote and then press the On or Off buttons for each address you want to control. For example, set the house code dial to N, and then press the third On button to send N3 On.
You also can use the Palm Pad to set the brightness level for lamp modules. First, press an On button; then press the Dim or Bright button at the bottom of the remote. The commands will be sent automatically to the last device to which you sent the On command.
Tip
If you have FileMaker Pro, download a Palm Pad label template from the XTension web site (http://www.shed.com/xtension/pplabels.sit.hqx).
You’ll notice that the Palm Pad has only eight buttons. So, how can it send to 16 addresses? The secret is the slider switch at the bottom of the unit. Slide it to one side and the buttons send to addresses 1 through 8; slide it the other way and the buttons send to addresses 9 through 16. This is a handy way to cram a lot of functionality into a single Palm Pad, but in order for it to work correctly, you’ll need a transceiver capable of receiving all the unit codes, as discussed later in this hack.
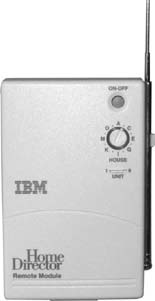
Transceivers (such as the one shown in Figure 1-7) are an essential link in wireless X10. In fact, they do all the real work, and without one, the remote control is useless. The transceiver plugs into a wall outlet and silently waits for a signal from a remote control, motion detector, or other wireless device. When the signal comes in, the transceiver translates it into an X10 command and transmits it on the power line so that other X10 devices, such as lamp modules, can respond to it. Additionally, most transceivers feature collision avoidance. That is, before they send the command to the power line, they’ll listen to make sure another device isn’t already transmitting an X10 command. This makes your wireless devices more reliable. But when combined with the inherent wireless delay, as detailed in the following section, this can slow down the transmission of wireless commands.
An important thing to know about transceivers is that you need one, and only one, for every house code that your wireless devices will be using. For example, if you have two Palm Pads, one set for house code A and the other for house code L, you’ll need two transceivers: one to listen for A commands and the other set for house code L. Additionally, some transceiver models can listen for commands to units 1 through 8, or they can listen for 9 through 16, but not the entire unit range at the same time. You determine which range they listen for by setting a slide switch on the transceiver.
Some models also include a built-in appliance module [Hack #3] with a pushbutton switch on the front of the transceiver that enables you to turn the appliance plug on or off manually. This can be handy, but modules that have this will dedicate the first unit code to the appliance connection— either unit 1 or unit 9, depending on the range of addresses for which they’re set to listen. You can control the appliance plug wirelessly, but with some models, the transceiver does not send the command to the power line; it simply toggles its built-in unit and swallows the command. This means you cannot use that unit code for another purpose, nor can you track its state using your home automation software. Again, consult the specifications for your transceiver.
Warning
Transceivers have good reception range, but if you’re having trouble receiving wireless commands, avoid the temptation of using two transceivers that are set for the same house code. If both transceivers occasionally receive the same wireless signals, both will try to handle it, and that can cause problems that are tricky to diagnose. Instead, add a transceiver set to a different house code and reprogram the nearby wireless devices to match. Or, if you want to get fancy, remap commands received on one house code so that they appear to have originated on another [Hack #94].
One thing you’ll notice about wireless commands is that they seem slower than commands sent using wired controllers. That’s because of the time it takes for the transceiver to receive the command and then send it to the power line. This is in addition to the inherent delay [Hack #1] in sending and receiving X10 commands. The extra delay can be exacerbated if there’s a lot of wireless traffic at the same time (from multiple motion detectors, for example). In this case, the transceiver has to wait for the power line to clear to avoid signal collisions. In the end, you’ll notice at least an additional 1.5-second delay—sometimes a little longer. That doesn’t sound like much, but when you’re standing in a dark room waiting for the lights to come on, it seems like an eternity.
To mitigate this delay, you can replace your transceivers with a direct-to-computer wireless receiver [Hack #83]. Or, position your motion detectors so that the signal is received before you reach the location where you need the lights [Hack #85].
A key element in any smart home, motion detectors enable your system to react to you and your visitors as you move about your house.
The X10 wireless motion detector is a beautiful thing in the world of home automation. It’s small, inexpensive, and incredibly useful when it comes to creating a smart home. Nothing does a better job of impressing your friends than the lights coming on automatically when you enter a room and turning off after you’ve left. And that’s just the tip of the iceberg for what you can do with these beauties.
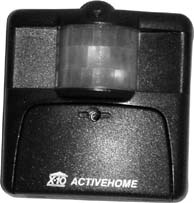
A typical motion detector, the X10 MS-14A Eagle Eye, is shown in Figure 1-8. About 2.5 inches square and powered by two AAA batteries, the MS-14A (http://www.smarthome.com/4086.html; $20) is mounted easily on the wall or ceiling with double-stick tape. When the detector senses motion, it sends a signal wirelessly, so you’ll need an X10 transceiver [Hack #5] nearby to receive and convert the signal to an X10 command for your computer and other modules to see.
The detector’s transmitting range is about 25 feet, but that varies depending on the strength of the batteries and the construction of your home. If you have a stucco home, for example, the detector’s signal won’t penetrate walls easily, so you might need to put the transceiver in the same room as the detector. Also, keep in mind that the transmitting range will drop off as the detector’s batteries weaken. This can lead to troubleshooting confusion when you can see that the LED on the detector indicates it’s seeing motion, yet no signal is being sent—a prime indicator that it’s time to change the batteries.
Motion detectors use passive infrared (PIR) to sense when something around them is moving. They see the world in terms of temperature, and they detect motion by watching for moving patterns of warmth. When you walk into a room, you might feel like a living, breathing being; but to a PIR detector, you’re just a moving blob of body heat. Don’t take it personally; it treats everyone the same way.
When the detector notices the blob (you), it sends a signal that is picked up by the transceiver, which then passes an On command to your other X10 modules and your computer [Hack #16]. There are two things to keep in mind about this. If your body temperature isn’t very different from the ambient room temperature, the detector will have a harder time detecting your presence. For example, if it is 98 degrees in your garage on a summer day, and you walk into your house with your approximately 98-degree body temperature, the motion detector might miss your entrance but will probably pick you up after you’ve walked a few steps. This brings up the second key point. They’re called motion detectors for good reason; if you walk into a room and stop, waiting for the light to come on, don’t expect them to trigger. You’ll get better results if you take a few steps into the room, so the detector can better see you for the hot mass you really are.
Once the detector has figured out you’re in the room, it sends an On command about every 10 seconds until you leave or stand still. This can be handy for identifying when a room has become empty (though more reliable methods [Hack #26] do exist). But the constant stream of On signals can be problematic if you have multiple detectors and a home with a lot of active people. If several motion detectors are sending signals at the same time, their signals will collide and get missed, so it’s best to limit the number of motion detectors you have in a home or use a direct-to-computer receiver [Hack #83] instead of a transceiver.
Each Eagle Eye motion detector uses up two X10 addresses [Hack #1]. The first address is used to indicate when motion has started and ceased; the unit’s dusk detector uses the second address.
For example, if you set the address to C1, the motion detector sends C1 On when it senses motion. When it no longer sees movement, it sends C1 Off. When a lit room becomes dark, it sends C2 On. When the light returns, it sends C2 Off.
If that seems backward, remember that it is a dusk detector. That is, it’s turned on when the room darkens and turned off when it brightens. Now, in practice, the dusk On and Off signals aren’t all that useful, although they can come in handy for confirming that you haven’t left the light on in the garage or basement when going to bed at night. The most important thing to remember about the dusk sensor is that although you can ignore it, you can’t turn it off. After you program a motion detector with an address, the next sequential address always will be taken up by the dusk signal. Keep this in mind when you’re planning for the addresses you’ll use in your home.
One thing you can change about the dusk sensor is whether the Eagle Eye watches for motion when it is turned off. In other words, you essentially can turn off the motion detector so that it no longer sends signals if the room is lit when it senses movement. If you’re using the motion detector primarily to turn on lights for a dark room, this is a decent option to consider. Once the lights are turned on, you won’t get another signal from the detector until motion ceases and it sends an Off command. But if you’re using the motion detector to generally know when someone might be present, such as when a visitor comes to your front door [Hack #74], you probably want to turn off the dusk-only mode.
You can also set how soon after motion ceases that the detector sends the Off command. You can set the off delay to 1, 2, 4, 8, 16, 32, 64, 128, or 256 minutes. It’s nice to have this flexibility if you’re using the signal to turn off lights in the room [Hack #7].
Tip
The process for setting an Eagle Eye’s address, dusk mode, and off delay is more than a little convoluted. It involves repeatedly pressing two tiny buttons located in the battery compartment while counting little blips of light as the detector acknowledges your actions. I’m not making this up. Luckily, every motion detector has a piece of paper glued to the inside of the battery compartment door that explains the procedure. Get used to consulting it often; you’ll be reprogramming the unit every time you change its batteries.
Now that you’ve configured the motion detector, you’ll need to mount it on the wall. For best results, position it so that movement occurs across its field of view. It’s looking for a moving object, and a person walking toward the motion detector won’t set it off as quickly as someone walking past it will.
The detector’s field of view is cone-shaped and extends out about 30 feet. If you expect people will be passing close to the detector, mount it at about chest or waist height to put more mass in the field of view. You also might want to turn it sideways, as shown in Figure 1-8, so that the widest part of the field is oriented vertically rather than horizontally.
The Eagle Eye motion detector is also sold as the Hawk Eye motion detector. They’re functionally the same, except that the Hawk Eye is black rather than white, and the cover has a rubber gasket that seals the unit for outdoor use.
Another wireless motion detector, the X10 DM10A (http://www.smarthome.com/4086.html; $30), has better transmitting range than the Eagle Eye, but it is so unsightly due to its large size (about the size of a softball) that your spouse is unlikely to let it anywhere inside your home. However, if you can find a suitable place to use it, the DM10A does have another advantage: it is a lot less chatty than the Eagle Eye and sends a signal only every minute or so. Another key difference is that it never sends an Off signal when motion ceases. It simply stops sending the On signal.
When you’re shopping for motion detectors, be careful about buying ones that are for use with the X10 security consoles. Their signals are different, and X10 transceivers cannot receive them. You’ll need to use a direct-to-computer interface to use security motion detectors [Hack #78].
Here’s an easy way to turn on the lights when you enter a room and have them turn off automatically after you leave. You don’t even need a computer!
Although many of the hacks in this book use a computer to automate your home [Hack #16], computers are not always strictly necessary. X10 modules work just fine without a computer, and in the case of motion-activated lights, you can improve response time and keep your system simple by setting them up to work without a computer-based controller. Even if you generally want to have a computerized smart home, setting up a few lights so that they work independently is a good idea to ensure some basic functionality even when the computer is turned off.
I use that approach for the overhead light in my garage. It’s a single light, so it’s a good candidate for having it controlled strictly with X10. Also, there aren’t any windows, so it’s very dark, and I want the light to come on quickly and reliably, even if I happen to be tinkering with my home automation system and it’s offline or terribly confused.
I use a motion detector [Hack #6] to turn on the overhead light whenever someone enters the garage using the door from the house. Here’s how it’s set up:
An Eagle Eye motion detector, mounted near the door, is set to address
C2.A built-in X10 light switch [Hack #14] is set to address
C2.An X10 transceiver, set to house code
C, is plugged into a wall outlet in the garage.
Here’s how it works. When someone enters the garage, the motion detector sends C2 On. The transceiver picks up this signal and relays it to the power line. The X10 light switch sees the C2 On command, which matches its address and turns on the garage light. This whole process takes just less than two seconds, due to the timing necessary for the wireless and X10 command transmissions.
After the motion detector hasn’t sensed any motion for five minutes, it sends C2 Off, which causes the garage light to turn off. The five-minute delay is programmed into the motion detector; you might want to set a longer delay [Hack #6] if you’re using this technique in a larger room or in an area where you might not be moving around too much. This will ensure that the light won’t be turned off when the room is still occupied.
The home automation software running on my computer will see this activity take place because it is listening to the power line and keeping track of all the X10 commands it receives, but it does not send any commands.
Involving the computer in this process would allow for a more sophisticated response [Hack #8], but would introduce an additional delay while it responded to the signals and made decisions about how to react.
Combining a computer-controlled home, motion detectors, and lamp modules can ensure that your lights come on only when you really need them.
The simple approach [Hack #7] of setting a motion detector to the same address as the light you want to control is often useful, but there’s a more flexible approach. Instead of having the motion detector control the lights directly, use your home automation software [Hack #16] to add some intelligence to the equation.
Here’s the situation:
When a person enters the room and triggers the motion detector, it sends B2 On, which the transceiver receives and transmits to the power line. XTension sees the command and turns on the unit that represents the B2 motion detector in the software.
The unit has the following On script, which XTension executes [Hack #17] when it turns on the unit:
     if (status of "daylight") = false then
         turnon "bedroom light"
     endif
In this script, the lamp module named bedroom light will be turned on only if it’s nighttime. Compare this with the technique in “Turn On the Lights When You Enter a Room” [Hack #7], which turns on the light every time the motion detector is activated, day or night. It’s a basic idea, but it illustrates how simple logic and just a little scripting can elevate your automation to smart behavior.
In the preceding example, how is the light turned off? There are at least two good approaches. First, you could modify the On script to automatically add a scheduled event that turns off the light five minutes later:
    if (status of "daylight") = false then
       turnon "bedroom light"for 5 * minutes
    endif
This approach works, but it will result in a new scheduled Off event every time the motion detector sends an On command, so it’s not very efficient. It does work well, however, for hallways, garages, or other areas where people tend not to linger.
A different approach is to use an Off script that executes when the motion detector sends an Off command when it detects that motion has stopped [Hack #6]. The Off script doesn’t have to be complicated; it simply tells the lamp module to turn off:
Turnoff "bedroom light"
Like so often in computing, the simplest approach is often the best. Once you’ve gotten the hang of using your computer to react to motion detectors, you’ll likely want to do even more. The actions you take aren’t limited to controlling lights; you also can make voice announcements [Hack #74] or decide if you should sound an alarm [Hack #71].
The chime module provides an easy way to add audible alerts to your home automation system. Simply plug it in, and then tell it to sound off with a single command.
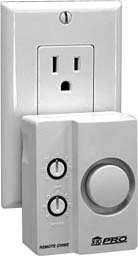
The chime module, shown in Figure 1-9, is quite simplistic. You need only to set its house and unit codes, and then to plug it in. When it receives an On command, it makes a doorbell-like “ding-dong” sound that repeats three times. There’s no way to make it ring in any other pattern, and there’s no volume control, so this module is a take-it-or-leave-it affair.
The chime module most commonly is used as a remote doorbell and is helpful particularly if your home’s bell is too quiet to hear throughout the house. You can set up a Powerflash to trigger the module with your existing doorbell button, or set its house and unit code to the same as a motion detector and have it chime automatically every time the motion detector signals that someone is nearby. This probably would get annoying quite quickly because it will chime every time the motion detector is triggered, so it’s better to control it with a script that limits how often it goes off [Hack #85].
In a less highly trafficked area, such as a back gate, the chime module is useful for alerting you of comings and goings where there usually aren’t any. Another useful application is to associate the chime module with the arming or disarming of your X10-enabled burglar alarm system so that everyone knows when the system is being armed. Many alarm consoles can send an X10 command when they’re armed or disarmed, so simply set the chime module to the address sent by the console and you’ll get a nice audible beep when the alarm changes state. Another way to use a chime module is to have it alert you to when the mail is delivered [Hack #62].
If there’s one thing to be said about the chime module, it’s that it’s loud and it gets your attention. You can quiet it down a bit by placing duct tape over the speaker grille. Or, consider using a universal module instead [Hack #11]. Its “beep, beep, beep” is quieter than the chime module’s “ding-dong, ding-dong, ding-dong.”
Combine the Powerflash module with switches and sensors to monitor conditions in and around your home.
The oddly named Powerflash module (http://www.smarthome.com/4060.HTML; $24), shown in Figure 1-10, often is overlooked by beginning home automation enthusiasts because at first glance it doesn’t seem to do much of anything. It doesn’t have the ability to control lamps or anything else, and, in fact, it doesn’t respond to any power-line commands at all. So, you might be wondering, what’s it good for?
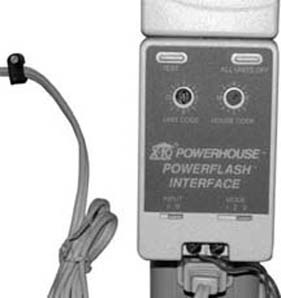
The Powerflash module is an essential tool for knowing what’s happening in your home because you can use it to turn virtually any switch or sensor into an X10-savvy signaling device and have your home react automatically to changes in conditions and states. Thanks to the Powerflash and to the wide variety of sensors that are commonly available, you can integrate nearly any condition you care to monitor into your smart home—water, temperature points, current detectors, pressure mats, breaking-glass sensors, and more— nearly any of which you can bring into the reach of your home automation controller.
Simply connect a switch to the two screw-terminals on the front of the Powerflash. The switch doesn’t need to know anything about home automation; it just sends its usual signal (On or Off), which the Powerflash detects and translates into an X10 signal to which other modules or your home automation controller can react.
If at any time you find yourself thinking, “I wish I could tell when [something] happens,” think Powerflash and go Googling for sensors that complete the puzzle. With a little creative thinking, a solution is probably within reach.
For example, connect a magnetic reed switch to a Powerflash and you can know when the garage door has been opened or closed [Hack #55]. If you have a problem with rainwater seeping into your garage during storms, hook up a water sensor to a Powerflash and you’ll get a signal that alerts you to the encroaching puddle [Hack #44].
You’ll need one Powerflash for every sensor you want to use, and many home automators find they have at least one or two in their setups. In fact, the artful use of a Powerflash or two is often what separates the newbies from the old hands in the ranks of home automation.
There are three steps to hooking up a Powerflash module:
Configure the Powerflash for the type of switch you’re using.
Connect the switch to the Powerflash.
Select a signaling mode and set the house and unit codes, which will determine the X10 commands the Powerflash sends when the sensor is triggered.
A Powerflash is only as useful as the sensor or switch to which you’ve attached it. Thankfully, the Powerflash is quite versatile and works with both dry-contact and low-voltage devices.
A dry-contact switch is a common type of switch; it works by opening or closing a circuit. An everyday light switch is a dry-contact switch; when the switch is closed, the circuit is complete, and electricity can reach the light bulb, turning it on. When the switch is open, no electricity can reach the bulb, so it’s off.
Magnetic reed switches, mercury tilt switches, pushbuttons, and pressure-mat sensors are examples of dry-contact switches used in home automation. In essence, a dry-contact switch is little more than a safe and reliable way of touching the ends of two wires together and pulling them apart again.
To use a dry-contact switch, set the Input selector on the front of the Powerflash to position B.
A low-voltage switch, sometimes known as a digital sensor, works by changing the amount of power on a circuit. It’s up to some other component, in this case the Powerflash, to interpret these fluctuations.
If you’re connecting the Powerflash to a spare relay on your home alarm system, or using a digital I/0 controller connected to a computer, you’re using a low-voltage switch.
To send its signal, a low-voltage switch has to have some sort of power source, typically in the form of a battery or power supply. The Powerflash will work with devices that supply between 6 and 18 volts (AC or DC), so be sure the power output of the switch you’re connecting falls within that range. In addition, some sensors are finicky about polarity, so pay attention to the positive (+) and negative (–) indicators on the Powerflash (near the screw-terminals) when you connect the sensor to the Powerflash.
To use a low-voltage switch or sensor, you need to set the Powerflash Input selector to position A.
Whether a switch is dry-contact or low-voltage is determined by its design, so there’s no decision about that on your part; you simply set the Powerflash to the correct setting for your switch. But before you buy a switch, consider whether you want a momentary or toggle switch.
A momentary switch is like a doorbell button; it automatically reverts to its previous state when pressure is removed. A toggle switch is like a light switch—it stays in one state or another until it is reset manually.
Be sure to choose the appropriate switch for the application you have in mind. If it is important to know the exact state of something, choose a toggle switch. For example, if you want to know whether the garage door is currently open or closed, use a reed or mercury-based toggle switch. You’ll be able to determine the state of the door by watching the state of the switch, as indicated by the On or Off received when the switch moves into each distinct position. If you only want to know that the door has been moved, and you don’t care whether it’s open or closed, use a momentary switch. When connected to a momentary switch, the Powerflash sends an On command followed quickly by an Off command when the switch resets itself.
Regardless of the type of switch or sensor you buy, it’s most important that you get one that’s classified as normally open (N/O). The Powerflash will not work correctly with a normally closed (N/C) switch. The reason lies in its roots as a module for security applications. Alarm system components are manufactured to be normally open so that a burglar cutting a connecting wire will trigger the alarm.
The next step is to connect your switch to the screw-terminals on the front of the Powerflash. Use good quality solid-core wire, as well as some wire mounts or wraps to keep the wires securely fastened for the length of the run.
Don’t worry too much about the length of the wire; either your low-voltage device or the Powerflash itself (in input mode B) will provide sufficient voltage for powering the circuit. But it’s always good practice to test the setup so that you know it will work before spending a lot of time carefully running, hiding, and securing the wires.
You set the house and unit codes by turning the dials on the front of the Powerflash module. But unlike almost all other X10 modules, this selects the codes the module sends, not the code to which it responds. When the attached switch is triggered, the Powerflash will send its commands using the codes you’ve set. The exact sequence of commands it sends is determined by its mode setting.
Aside from the terminals where you connect a sensor, the most important part of the Powerflash is its mode selector switch. Selecting the proper mode setting is truly the key to getting the most out of this module.
The Powerflash reacts in one of three ways when the sensor is triggered. You indicate how you want the Powerflash to react by using the Mode selector on the front of the unit.
In the following examples, assume that the Powerflash’s House Code dial is set to B and the Unit Code dial is set to 9.
- Mode 1
When the attached sensor closes, the Powerflash sends an
All Lights Oncommand toHouse Code Band then sendsB9 On. When the sensor’s contacts open, the Powerflash sendsB9 Off.This mode of operation is probably useful only as part of a security setup to activate multiple lights and set off a siren. After the
All Lights Oncommand, you’ll need to manually push the All Lights Off button on the front of the module.- Mode 2
When the attached sensor closes, the Powerflash repeatedly sends
All Lights OnandAll Lights OfftoHouse Code B, causing all the lights to blink on and off. (Now you know where this module gets its name.)When the sensor opens again, all the lights are left on. That is, the last command sent always will be
All Lights On. This mode also is useful for security applications, unless you need to be alerted to a condition using a silent, but obvious, signal.- Mode 3
Thankfully, this Powerflash mode is quite useful for general home automation. In this mode,
B9 Onis sent when the sensor’s contacts close, andB9 Offis sent when the contacts open.A Powerflash set to Mode 3 is easy to incorporate into your home automation system. If you have a switch attached to a door, for example,
B9 Ontells you the door has been opened. When the commandB9 Offis received, the door has been closed. In the case of a water sensor,B9 Onmeans your garage is getting wet andB9 Offmeans the sensor is once again high and dry.
A downside to the Powerflash is that it sends each command, when in Mode 3, just once. It does not signal repeatedly, like a motion detector might do, so you’ll want to be prepared for the occasional lost signal if knowing the exact state of the sensor is critical to your implementation.
For example, if you’re counting on a low-temperature sensor to alert you to when it’s too cold for your prize-winning koi to survive in their outdoor pond, build in some redundancy by using two sensors or another different method to ensure you get a chance to rescue the little carps from Mother Nature.
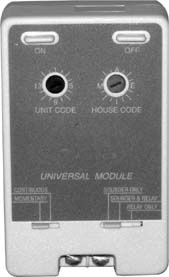
The universal module is an important part of an advanced or intermediate home automation system. With it you can control things that don’t have built-in X10 capability.
Let’s cut right to the bottom line: the universal module is a relay switch that you control with X10 commands. If there’s something you want to automate and it has a switch you can replace or bypass, the universal module, shown in Figure 1-11, is just what you’re looking for. Plug this module into the wall and connect wires from its terminals to the device you want to control, and you’re pretty much all set.
A common use of the universal module is to control a garage door [Hack #56]. In this case, the module becomes a second switch, acting in parallel to the push button you use to manually open and close the door.
You set the module’s address [Hack #1] by turning the House and Unit dials on the front of the unit. The universal module can act as either a momentary-contact switch—like a doorbell button—or a continuous switch. You determine in which mode the universal module operates by moving the slider on the front of the unit to one of these settings.
The universal module also has a built-in chime. It’s louder than the standard chime module [Hack #9] and sounds off in a more pleasing tone.
The universal module’s chime has three different settings:
- Relay Only
The module’s chime is turned off. The relay switch functions silently.
- Sounder & Relay
When the relay switch is turned on or off, the bell will ring four times. This is useful as a warning tone that alerts bystanders that something is about to happen, such as a garage door opening or closing.
- Sounder Only
Puts the module into chime-only mode. The relay-switch portion of the unit is disabled and its switch will never be opened or closed. An
Oncommand causes the bell to ring four times.Offcommands are ignored in this mode. This mode is useful as a remote doorbell or as part of a simple alarm or visitor alert system.
The universal module is easily confused with the Powerflash module. They appear to be similar, and both have terminals you use to wire them into another device. Here’s an easy way to remember how they differ: the universal module enables you to control (turn on and off) the universe. The Powerflash is like a flashbulb on a camera: it provides a snapshot of the state of something (on or off).
The X10 method of sending signals over your home’s power system is quite clever, but it’s subject to interference from other electrical devices and any anomalies you have in your power system. With a little bit of effort and equipment, you can greatly improve the reliability of X10 in your home.
Most homes in North America have two 120-volt power lines from the utility company coming into the home. These two lines meet at the home’s breaker box, where the circuits that feed light switches, plug-in outlets, and appliances are supplied with electricity. Half of the circuits are fed by one of the 120-volt lines, and the second 120-volt line feeds the other half. The intermittent operation of X10 modules usually happens when the transmitter is sending signals on one line and the receiver module is plugged into an outlet on the other line. For the signals to get to the receiver, they actually leave the home, travel to the utility company’s transformer, and then come back into the home on the other power line. Not surprisingly, by the time the X10 signal completes this circuitous journey, it might be too weak for the module to detect, particularly in large homes.
The first order of business, then, is to install an X10 coupler-repeater, also known as an amplifier. A coupler-repeater will detect the incoming X10 signal, regenerate it, and then blast it out over both 120-volt lines. If your home is larger than 3,000 square feet, consider installing a coupler-repeater. In smaller homes, a device known as a signal bridge might be enough to get good results. A signal bridge performs the same function but does not amplify the signal when it passes it on to the other power line. See “Improve X10 Reliability” [Hack #86] for more information about options for choosing between when to use an amplifier and when to use a repeater.
Once the signal has been amplified, it’s time to preserve it. X10 signals are like water under pressure in a pipe: they go everywhere they can, not just to the receiving module. This means they reach every electrical device in your home, and some of them will affect the strength of the X10 signal. Computers, video gear, and high-end electronics are likely culprits of interfering with X10 signals. The more complicated the electrical power supply in a device, the more likely it is to disrupt X10 signals because the engineers who design power supplies build in traps to filter out and kill electrical noise. Unfortunately, the X10 signals look like electrical noise to these devices, and when the signals are filtered, they get weaker and harder for the intended recipients to receive.
These are the most common sources of signal loss:
If you suspect a device is absorbing signals, unplug it and retransmit the X10 signal. It is important that the device is unplugged and not just turned off because some devices can cause problems simply by being plugged in. If the X10-controlled product begins working after the device is unplugged, you’ll need a plug-in X10 filter to prevent the offending device from interfering with your home automation. A typical house requires four or five filters to ensure X10 signals can be sent reliably. For more on using X10 filters, see “Improve X10 Reliability” [Hack #86].
Another factor that can degrade X10 signal quality is the number of X10 transmitters installed in your home. Each X10 transmitter contains a tuned circuit that, when it’s not sending X10 signals, is absorbing them! Generally, the closer your devices are to each other, electrically speaking, the more signals are weakened by absorption, particularly if you have two-way X10 devices that have circuitry to send and receive X10 commands. If you find your system getting less reliable as you add more devices, here’s a good rule of thumb: if you have more than 20 devices, consider that you might have reached the point where you need an amplifier or repeater.
—Smarthome, Inc.
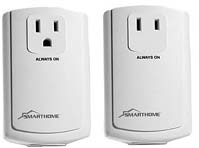
Some X10 modules don’t have mechanical dials to set their addresses or other options. To configure these types of devices, you need to send commands over the power line.
Some of the X10 modules from Smarthome, Inc. have shed the old-style dial method of setting the module’s house and unit code [Hack #1]. For example, the LampLinc and ApplianceLinc modules, as shown in Figure 1-12, have smooth fronts with no code wheels.
Eliminating the code wheels has some advantages because they can be prone to failure and have a certain air of cheesiness about them, but it’s more complicated than that. By teaching the module to listen for configuration commands over the power line, more options can be supported. That’s exactly what Smarthome has done. With the SmartLinc lamp module, for example, you can set how quickly it dims, its initial brightness level when it’s on, and whether using the switch on the lamp will turn on the module.
Whew. That’s a lot of choices to make when setting up a single lamp module, and, correspondingly, some special steps are required to program it.
Because the X10 protocol supports only a handful of commands, setting the options involves sending addresses in a specific sequence, within a short window of time. For example, to set the address of a LampLinc 2000 model, you plug it into the wall, hold down its Set button for five seconds, then send the X10 address you want to set the module to respond to (such as B11) within 30 seconds. Then, send an On command if you want the module to turn on when the lamp’s switch is used, or send Off if you want to disable the local control feature.
To set other features, such as the initial brightness level, you might need to send several addresses in sequence. For example, to set the LampLinc 2000SLS’s default brightness you send O16, N16, M16, P16, and M16. Then send one or more Dim commands to adjust the lamp to the desired level. Then, send P16, N16, M16, O16, and M16 to lock in the setting.
The sequence of commands you use varies depending on the module, so be sure to check the documentation that came with your unit. Because the sequence is so lengthy and any X10 commands sent on the power line from another source such as a motion detector can interrupt the progression, these units can be easier to program if you set up a closed X10 system. Plug an inexpensive power strip into an X10 filter [Hack #86], and then plug the filter into the wall. Plug the module you want to program into one of the power strip’s outlets, and plug an X10 minicontroller into another of the power strip’s outlets. The filter will prevent the minicontroller’s commands from being sent onto your home’s power line, but the module you’re programming still will see them because it’s plugged into the power strip, too.
More importantly, the filter also will prevent commands from sources reaching the module and interfering with your programming steps.
Alternatively, do as Smarthome suggests in its documentation and disable all your transceivers, home automation computer, or any other device that might decide to send an X10 command while you’re in the process of configuring the module. Either way, it’s a bit of a hassle.
Instead of using a minicontroller to program the modules, you probably will have more success, and less setup, by using your home automation software instead. It still will be possible for the programming sequences to be interrupted accidentally by another command, but the speed at which your computer can send commands makes it less likely to happen—or, at least, less of a hassle to start all over again.
For HomeSeer, you use the X10 control panel. Choose Control Panel from the View menu. Enter an X10 address in the Device Address field, and then click the appropriate command button. To send just the address, without an On or Off command, click the Address Only button. To send to multiple addresses at the same time, enter each address separated by commas, as shown in Figure 1-13.
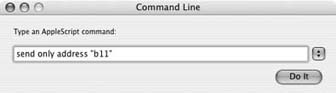
If you’re an XTension user, the Command Line window provides the simplest way to send a command to a single address. Choose Command Line from the Window menu. Type in an AppleScript command to execute, and then press Return. To send just an X10 address, one that does not include an On or Off command, use the send only address command as shown in Figure 1-14.
If you have to send multiple addresses, you can write a script that uses this same approach, or simply enter and send each command in the Command Line window. Click the button with the arrows at the end of the text field to select commands you entered previously if you need to resend any.
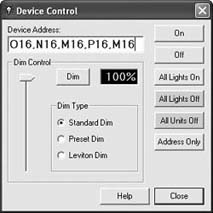
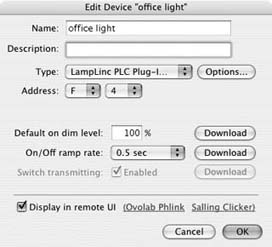
With Indigo, you program the modules by editing its settings in the application. Create a new device, or edit an existing one to change settings made earlier, then use the controls in the device dialog box. When the Type is set to a device which Indigo supports, additional controls appear in the dialog, as shown in Figure 1-15.
Set the address you want to use, and then click OK to send the appropriate commands to the power line. To change the default brightness level or the dimming speed, set the options and click the appropriate download button. Indigo sends the appropriate sequence of commands for you.
If all this seems like an awful lot of work just to set an X10 address, it is. Eliminating the code wheels is necessary to support more sophisticated settings, and it cleans up the appearance of the modules, but progress doesn’t come without a price. Luckily, it’s not something you have to do very often.
Living in a smart home requires, at the very least, tolerance from your family or housemates. If they’re indulging your desire to create a home of the future, here are some tips for returning the favor by smoothing out some of the rough spots.
Not everyone in your household will be as enthusiastic about home automation as you are. That’s to be expected—everyone has different interests— but unlike some hobbies, automating your home has a profound impact on others. If it’s not done in a careful and considerate fashion, it can disrupt and bring frustration to a family’s ultimate retreat: their home. For this reason, and just for common courtesy, it’s a good idea to discuss your plans before you implement them. The results of some automation projects can be surprising, such as a talking house [Hack #28], so it’s best to make sure you aren’t the only one who will enjoy them.
Something else to keep in mind is that installing X10 modules changes the behavior of everyday objects, sometimes in ways that make them virtually unusable by normal methods. For example, using an appliance module to control the Vornado air fan [Hack #3] is a neat idea, but it means you might not be able to turn on the fan by using its switch; some appliance module might prevent that from happening. In addition, if the fan is operating and you turn it off by using its switch, the home automation system won’t be able to turn it back on later. You should make sure that everyone in the house is aware of this to reduce frustration with the new approach, and that the benefits of automation—such as energy savings or being able to have the fan turned on only when it’s needed—outweigh the drawbacks.
Other X10 modules have their own quirks, too. If you’re using lamp modules to control lighting [Hack #2], you’ll need to understand how local sense works. This enables you to turn on the light by turning its built-in switch, but it often takes an extra turn of the switch before the light comes on. Moreover, like the air fan, if the light is turned off at the switch, it’s beyond the control of X10. For motion detectors, it is a good idea to discuss how they work [Hack #6] so that your housemates understand that taking a single step into a dark room and then stopping to wait for the light to come on won’t work very well; it’s better to keep moving.
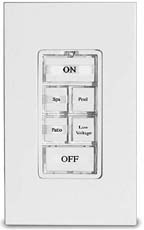
Another common objection to the use of X10 concerns aesthetics. Most of the devices are far from attractive, as you can see in Figure 1-16, and their size means they not only draw attention to themselves, but also they’re often in the way, such as when you want to use them behind a couch that you’d like to abut against the wall. Fortunately, if you’re willing to spend a little more money, you can use built-in X10 modules that are virtually identical to standard equipment.
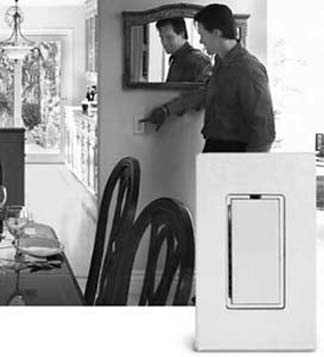
Replacing external X10 modules with built-ins is one of the surest ways to boost your home’s spousal approval factor (SAF) rating. Not only do built-in modules look better, but also they often add features that you can use to make your home automation system even less intrusive. For example, some built-in light switches are two-way. That is, when the light switch is used, it sends a signal back to the home automation system reporting that it has been turned on or off. These types of switches, such as the SwitchLinc (http://www.smarthome.com/2380.html) shown in Figure 1-17, also respond to X10 status requests, which can enable you to confirm that a light has turned on or off as the result of a command, or to see its current level of brightness.
Warning
In addition to the higher cost of these units, you’ll want to make sure your home automation software works with their extra features, which are special-purpose extensions to the X10 protocol and require additional support.
Other types of built-in modules include power outlets in which one of the plugs is X10-controllable and the other is not, and multiple-function controllers that mount in the wall, such as the KeypadLinc (http://www.smarthome.com/12073w.html; $90) shown in Figure 1-18. A device such as this can replace not just a light switch, but also a plugged-in minicontroller [Hack #4] that you might use for triggering scripts.
It certainly costs more to use these better-looking modules, in terms of both the price of the equipment and the work required to install them, but the results can be worth it. To temper the costs, consider using them only where you’ll get the biggest benefit. Put some nice switches in the kitchen, for example, but not in the garage or little-used spare bedroom. Also, as with all things related to home automation, it’s a good idea to expand your system little by little to avoid introducing too much change all at once, which is often the cause of hard-to-solve problems.
In addition to the X10 equipment you choose to install, keep your family in mind when you program your home automation system. Consider how and when they might want to override the behavior of your design. For example, although it can be very nice to have lights come on automatically at sunset, occasionally you might want to turn them on earlier, such as when it’s dark and stormy outside. In such cases, provide a Palm Pad or another controller that triggers your sunset routine [Hack #20] on demand.
If you frequently have houseguests, consider altering your system so that it works well for them, too. Many visitors will get a kick out of your smart home, but expecting them to adapt to lights that come on by themselves might be asking too much. If you’ve set up your system so that it knows who is at home [Hack #70], it’s easy to create a mode that simplifies, or bypasses, the automations that guests are most likely to encounter. In fact, this can be a good idea for use with anyone in your home who might be less enthusiastic about home automation. For example, you could have the computer play spoken announcements only when you are at home, remaining silent if you’re gone.
Like any technology, home automation ultimately is useful only if you use it in a way that enhances or makes your life easier. For some alpha geeks, the fact that you can put your computer in charge of your home automatically means that you should, but usually that’s not a recipe for success. For better results, select a few key things to automate that benefit everyone in the home and that are easy to live with, and grow the system from those starting points. The best measure of cool technology is that you genuinely miss it when it’s not functioning, and your home automation system will fit that definition in spades, if you build it with human interest at its core.
Using your computer to control your home makes your home smart. But don’t overlook the benefits of a slightly less sophisticated approach.
You can create an automated home by using different approaches. These approaches vary in terms of the equipment needed and the degree of control and automation they provide. If you simply want to turn on lights or appliances without leaving your easy chair, all you need are a few X10 modules and a wireless Palm Pad [Hack #5] or a minicontroller [Hack #4]. This approach gives you complete control (you push buttons to make things happen), but it provides very little automation (if you don’t push those buttons, nothing happens).
If you want the lights to come on by themselves at certain times during the day or night, you can use a standalone X10-capable timer, such as the Mini Timer (http://www.smarthome.com/1100x.html; $30) shown in Figure 1-19. This box plugs into your wall and you can program it to turn lights on or off, up to twice a day.
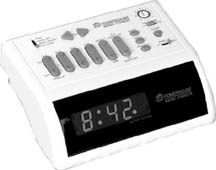
The Mini Timer also has a security mode that varies the on-and-off schedule you’ve entered to provide the appearance that someone might be home. You also can use it for an alarm clock and, optionally, have it turn on your coffee maker [Hack #37] when the alarm goes off. With a timer-based system, you’re doing more than remotely controlling your home; you’re beginning to move toward automation.
Moving up in sophistication are X10 controllers that can use simple logic to make automation decisions, execute a series of X10 commands defined as a macro, and execute macros at scheduled times or at sunrise and sunset. You need a personal computer to program these controllers, but once you have done so, they operate by themselves. See “Choose the Right Controller” [Hack #21] for a discussion of some controllers that fall into this category.
Next up, providing the most sophistication and flexibility are computer-based home automation systems. These systems enable you to use sophisticated logic in your automation, such as reacting appropriately based on which house members are at home and whether it’s a holiday [Hack #24]. You also can use the other capabilities of your computer, such as voice synthesis [Hack #28] and its Internet connection [Hack #64], to make your home seem smart. See “Add a Brain to Your Smart Home” [Hack #16] for more on this approach.
Each approach has its advantages, and, thankfully, it’s not necessary to choose just one. In fact, a mix-and-match approach can result in a very robust and reliable home automation system. Use the technique that’s appropriate for the problem you’re trying to solve.
For example, you might use a Mini Timer to control your landscape lighting; it needs scheduled events only, not sophisticated logic. If you travel frequently, you might decide to use computer-based home automation when you’re at home so that you can benefit from its capabilities. But when you go on a trip, you might put a standalone controller in charge so that you don’t have to leave a computer turned on while you’re away.
Most of the other hacks in this book focus on using a computer-based system. Because it’s simple to program a Mini Timer, let’s focus on using a standalone controller here.
In general, standalone controllers are very reliable. They rarely crash or lock up, and they don’t have mechanical components that might fail, such as a hard drive. For mission-critical home automation tasks, using a standalone controller can make a lot of sense.
Most standalone controllers can function independently, or in a mode where they pass commands only to the computer to which they’re connected. When disconnected from a host computer, they use the logic and scheduled events you’ve stored in their memory. An example is the USB PowerLinc Controller (1132CU) from Smarthome, Inc. (http://www.smarthome.com/1132CU.html; $70). With Indigo [Hack #18], the process of updating the controller for standalone operation is done automatically when you quit the application.
To prepare for standalone use, you need to specify which portions of your home control logic and schedules for which you want the PowerLinc to assume responsibility when Indigo quits. Let’s say you have several X10-controlled exterior and interior lights, and you have motion detectors on the front porch, in the backyard, and over the driveway. You have defined trigger actions to turn on the exterior lights for 30 minutes when motion is detected, and you have defined time/date actions to turn on the interior lights one hour after sunset. Additionally, this time/date action is randomized by 25 minutes to give the house a lived-in look and to discourage would-be burglars. These are the actions you want your PowerLinc to continue to perform when Indigo is not in charge.
To flag these actions for standalone operation, choose Upload from the Interface menu. The Upload Settings for Interface dialog appears, as shown in Figure 1-20.
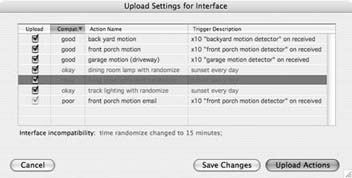
Indigo provides an upload compatibility rating for all your home-control actions. This rating tells you how compatible a particular action is with the PowerLinc’s standalone mode. Some actions translate perfectly to the controller (good compatibility), some partially translate (okay compatibility), and some will not translate to work at all (poor compatibility).
If an action gets a less-than-perfect rating, select it in the list and Indigo displays more information about it at the bottom of the window, as shown in Figure 1-20. In this case, the action living room lamp with randomize has been adjusted automatically to a 15-minute period of randomization. That’s the maximum value PowerLinc supports.
Tip
The action retains the 25-minute randomization setting when used by Indigo. It’s adjusted for the PowerLinc only when it’s uploaded to the controller for standalone use.
A standalone PowerLinc can’t execute some actions. For example, front porch motion email, shown in Figure 1-20, cannot be selected for uploading to the PowerLinc because the action includes steps that send email, which the PowerLinc is incapable of doing.
Even if an action can be used with a standalone PowerLinc, you might not want to upload it to the controller. The controller can store about 1,000 commands (32 KB), but you should consider omitting actions that don’t need to take place when you’re away from home, or at other times when you’re using the standalone controller.
Once you’ve set up Indigo to upload to the PowerLinc, switching between controlled and standalone mode is as simple as quitting the Indigo application. When you’re ready to put the computer in charge again, just launch Indigo and it will resume control.
If you’re a dedicated computer-in-control type of automator, consider adding a standalone PowerLinc to your tool belt. You can simplify your computer-based system by offloading basic automation, such as sunrise and sunset events [Hack #20]. However, keep in mind that if both your computer-based system and the standalone controller are working at the same time, you’ll need to ensure they don’t respond to the same events. This would result in a too-many-cooks-in-the-kitchen situation and would increase the likelihood of X10 signal collisions. It also could make the system confusing to debug.
—Matt Bendiksen
You don’t need a computer to use X10, but you’ll be missing out on many great techniques if you don’t have one. Take your automation to the next level by letting your computer pilot your home.
At the most fundamental level, the only thing you need for an automated home is a few X10 modules and a way to send X10 commands, such as a Palm Pad [Hack #5] or a minicontroller [Hack #4]. For some people, a simple setup that enables you to push a button on your nightstand to turn off the lights in the next room, or have the lights come on automatically when you enter a room [Hack #7], is more than enough. And it’s even fun, at least until you discover that it’s pretty limited.
But that’s so 20th century. You still have to push a button to control the lamp, so all you’ve really done is relocate the lamp switch from the room next door to your nightstand. That’s not automation: that’s remote control. Sure, it’s a bit more sophisticated than using The Clapper (http://www.chia.com), but only because X10 doesn’t make you clap your hands together to trigger it.
To move up from remote control to automation, you need to have something making decisions—something that’s dedicated, tireless, and works for little pay. Something exactly like a personal computer! Computers excel at doing repetitive, boring tasks such as waiting for an X10 command to which they can respond. It will sit happily, waiting for the sun to set, and then turn on your outdoor lights the instant the sun dips below the horizon. Or, if you’re not home, it will make your house look occupied [Hack #74], convincing nearby prowlers that they should look elsewhere for an easy mark.
Of course, it’s not quite as simple as just adding a computer into the mix. You’ll need a few bits of hardware and some software that’s ready to run your house. Let’s take a look at each piece individually.
To get started, you’ll need a computer that you’re willing to leave switched on all the time. You can turn off the monitor, of course, but the CPU needs to be powered on so that it can keep track of what’s going on in your house. You can use the computer for other server-like things, such as playing iTunes music. But you’ll need to keep the home automation software running all the time, so a system that is often occupied playing CPU-hogging games, or switched off at night for some peace and quiet, isn’t the best candidate.
The good news is that you don’t need the latest, fastest computer to run your home. If you’ve got an older system sitting around, or if you’re looking for an excuse to upgrade to a newer main machine, you’ve just found a great way to put “ol’ pokey” to use. If you’re lucky enough to have an old laptop, all the better because they’re low-energy and power-failure-resistant (for a couple of hours, at least), as well as quiet and easy to stash out of the way.
You’ll also need a power-line interface, also called a controller, which is a box that enables your computer to send and receive X10 commands. It plugs into an electrical outlet, just like a lamp module [Hack #2], and has a serial port for connecting to your computer. The power-line interface acts like a babelfish that speaks both X10 and computer code. It listens to the power line for X10 commands, which it translates and sends to your computer over the serial connection. Your computer, in turn, can send commands to the interface; the commands are converted into X10-speak and sent down the power line to all your modules.
You have several different interfaces to choose from, but the most common are X10 Corporation’s CM11A, Marrick Limited’s LynX-10 or LynX-10 PLC, and Smarthome’s PowerLinc USB, shown in Figure 1-21.

- The CM11A (http://www.x10.com/automation/x10_ck11a_1.htm)
The CM11A is the most used, least expensive, and most-often-derided power-line interface available. Its reliability and speed aren’t the best, but its ubiquity means you won’t have a problem finding software that can work with it. The CM11A often is bundled with home automation starter kits that include several modules, which enables you to keep a spare on hand and stay within a reasonable budget. If you just want to try out home automation and aren’t sure it’s something you’ll really dig, buy a CM11A; it will be quite a while before you outgrow its capabilities.
Unique to the CM11A is its ability to function when the computer it’s attached to is turned off. It has a tiny bit of built-in RAM to store a series of X10 commands as a macro. This is a fine approach for very simple automation projects, but most serious automators generally avoid it because the macros don’t enable you to utilize programming logic for making decisions.
- The LynX family (http://www.marrickltd.com/lynx105.htm)
The LynX-10 and LynX-10 PLC interfaces, in contrast to the CM11A, are reliable and much loved. They’re also more expensive, so you might want to save your pennies until you are seriously hooked on this new hobby. The LynX interfaces have several specialized functions that your home automation software will need to support to be useful. But most software packages can use them in their basic modes, and even if you don’t take advantage of the fancy stuff, you’ll appreciate how quickly the LynX sends X10 commands.
- The PowerLinc USB (http://www.smarthome.com/1132u.html)
The PowerLinc USB is one of the newest interfaces on the market, so it hasn’t yet established a reputation for itself. Because it’s a newcomer, it doesn’t yet enjoy the widespread software support of the CM11A or LynX. But if the software you want to use will work with it, it’s well worth considering. For one thing, it’s the only interface that has a built-in USB port. That makes it much easier to connect to any new-ish computer. The PowerLinc USB also has a pass-through electrical plug on the front, so it doesn’t completely block access to the outlet you plug it into, a feature that increases its acceptance around the home [Hack #14].
- Other interfaces
Experienced home automators might be sputtering over the omission of the Adicon Ocelot (http://www.appdig.com) and the JDS Stargate (http://www.jdstechnologies.com). Both are capable products, but more commonly are installed and supported by home automation consultants. Check out the companies’ web sites if you want to learn more. Both offer unique functions, such as infrared control, which you might find useful.
The X10 FireCracker, the TW523 Two-Way, and the X10 CP290 interfaces, however, are best avoided. The CP290 and TW523 interfaces are quite limited in their abilities, and the FireCracker is a send-only device. That is, you can use it to send X10 commands from your computer, but not to react to commands from other devices. It’s fun to play with, but it’s not capable of running a smart home.
For more about the features of each controller, and how they compare, see “Choose the Right Controller” [Hack #21].
This brings us to the boring, yet important, topic of adapters and cables. Both the CM11A and LynX have an old-school, nine-pin serial port for connecting to the computer, so you’re probably going to need a serial-to-USB converter. The Keyspan High Speed USB Serial Adapter (Part #USA-19HS, http://www.keyspan.com/products/usb/USA19HS/) is a good choice, though similar adapters should work just as well.
If you’re using a desktop computer with a spare expansion slot, consider adding a standard serial card and foregoing the USB-serial conversion. If you’re using an older Macintosh that has a round DIN8 serial port, a palmOne Mac Serial Adapter (http://www.amazon.com/exec/obidos/tg/detail/-/B00000JHVS/qid=1090876873) will do the trick.
The last piece of the puzzle is home automation software. As luck would have it, several good software packages are up to the task of running your home. All of these programs can send and receive X10 commands and run scheduled events, and each enables you to script your own sequence of actions so that you can fine-tune your system to your every desire. Indeed, it’s in the scripting where all the fun and personalization become possible, as evidenced by so many hacks in this book.
Read this list to get a brief overview of each application, and then refer to the hacks that walk you through the basics of using and configuring each package. Naturally, you’ll find the applications’ web sites to be really useful.
XTension, by Sand Hill Engineering (http://www.shed.com), is the granddaddy of Macintosh home automation software. It has a multiwindow interface that you can use to control your X10 devices directly, and it has extensive support for AppleScript so that you can tailor the system to your heart’s content. For more information about XTension, see “Get to Know XTension” [Hack #17].
Indigo, by Perceptive Automation (http://www.perceptiveautomation.com), is a Cocoa-based application that works with AppleScript but also has a unique interface that enables you to define home automation tasks without writing any code. It also works with the PowerLinc USB controller, which eliminates the need to buy a USB-to-serial adapter. For more information about Indigo, see “Get to Know Indigo” [Hack #18].
ActiveHome, by X10 Corporation (http://www.x10.com/support/support_soft1.htm), is bundled with home automation starter kits and is free to download and use, so it’s the first introduction to home automation for many people. You can use it to create macros that are stored in the CM11A and to program simple timed events. It’s not sophisticated enough to implement most of the hacks in this book, but it’s OK for getting started.
HomeSeer, by HomeSeer Technologies LLC (http://www.homeseer.com), is a very popular home automation package that supports a wide variety of add-on devices and includes a built-in web server for controlling your home via the Internet. You can script HomeSeer using VBScript, JScript, or Perl. For more information about HomeSeer, see “Get to Know HomeSeer” [Hack #19].
Home Automated Living (HAL), from Home Automated Living, Inc. (http://www.automatedliving.com), is also popular, and it features some very interesting options for using voice recognition to control your home. For example, with the right kind of modem, you can pick any extension phone in your house and tell HAL what you want it to do.
As is typical with Linux, a lot of interesting home applications are available, but to get a full-featured solution, you’ll probably have to use two or three separate applications in conjunction with each other. For example, the powerful Heyu (http://heyu.tanj.com/heyu/) is a command-line application that can send X10 commands. Many automators use it with Xtend (http://www.jabberwocky.com/software/xtend), which can execute commands when the computer receives an X10 signal. By using both, you get two-way control. But when you use them separately, each is only half of the solution.
If you want to access your Linux-based home automation system over the Web, you’ll want a copy of BlueLava (http://www.sgtwilko.f9.co.uk/bluelava/), which is a CGI that works with Xtend and Heyu to provide enough tinkering room to keep you busy for a long time.
Tip
Most of the Linux programs are available for Mac OS X, too, if you want to get down-and-dirty with the command line instead of using Indigo or XTension. Chuck Shotton’s port of Heyu and Xtend to Mac OS X is available at http://www.shotton.com/muscle/.
Another popular choice for Linux is MisterHouse (http://misterhouse.sourceforge.net/). Written entirely in Perl so that it works with Mac OS X as well as Windows, it has an impressive array of features including support for voice, web access, and integration with Outlook scheduling.
A lot of people who have dabbled with home automation and then lost interest because it seemed so limited never discovered the almost limitless possibilities that are added when you use a powerful home automation software package. Sure, it takes some effort to decide what you want to do and to learn how to do it, but it’s something that’s easy to grow into as your skills develop. And don’t be shy about asking for help. Most of the products mentioned here have a thriving community of users who are friendly and helpful to newbies, so be sure to explore these resources as you decide which package will work best for you.
To implement many of the hacks in this book, you’ll need to know some basic techniques for programming the XTension home automation application for Mac OS X.
XTension is the granddaddy of X10-based home automation software for the Macintosh, having originated several years ago for the Classic Mac OS.
Tip
In fact, if you have an older Macintosh, even a lowly Mac Plus, XTension (http://www.shed.com/; $150) is a great way to put your doorstop-Mac back in service.
But don’t let its modest origins fool you. Beneath the old-school user interface lies an automation powerhouse. Its designer and chief programmer, Michael Ferguson, helped NASA automate its space shuttle operations, and he makes sure XTension is every bit as capable for those of us who aren’t rocket scientists.
Tip
For more detail and the latest skinny, be sure to consult the XTension user guide. Choose Download Manual from the XTension menu in the application to get the latest version, or visit http://www.shed.com/download.html.
XTension can handle all the home automation programming you can throw at it, but to send commands to X10 modules, it needs a power-line interface [Hack #16]. XTension currently works with the CM11A, LynX-10, and LynX-10 PLC. These are standard serial devices, so if you’re using a newer Macintosh, you’ll also need a USB-to-serial interface, such as the Twin USB Port Serial Adapter from Keyspan (http://www.keyspan.com). If you’re using a Macintosh that has a round serial port, you’ll need an adapter to convert the connection to a standard nine-pin configuration. A palmOne Mac Serial Adapter (http://www.palmone.com) will do the trick.
After you’ve connected the power-line interface to your Mac, you’ll need to configure XTension. To do this, choose Preferences from the XTension menu, and then click Communications. Check the Enable X-10 checkbox and select the interface you’re using, such as a CM11A, from the pop-up menu. See Figure 1-22 for an example.
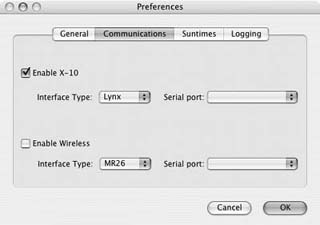
Tip
Why in the world do you have to enable X10 before you can choose an interface? Well, you can use XTension as a wire-less-only controller or simply as a way to execute scripts and automated tasks automatically—such as sending email or anything else you can do with AppleScript. If you leave both wireless and X10 turned off, you still can use XTension to kick off anything you want to happen on a regular basis.
XTension also works with two wireless X10 receivers, the MR26A and the W800 [Hack #83]. These are excellent ways to improve your wireless motion detectors and the like, but wireless X10 is not a replacement for the power-line interfaces discussed earlier. If you’re just getting started, don’t worry about wireless X10 yet. Just know that it will work with XTension when you’re ready to go there.
Now that you’ve got XTension set up, let’s start adding the details it will need to run your home.
XTension needs to know about the X10 devices you have installed in your home so that it can send commands to them in response to events, your actions, or scripts that execute on a scheduled basis. XTension refers to X10 devices—lamp modules, motion detectors, appliance modules, and so on— as units. To add a new one, choose New Unit from the Edit menu. The New Unit dialog appears, as shown in Figure 1-23.
Every unit needs a name, so fill in the Name field with something meaningful. Because you might be referring to this name often in your scripts, choose something that is easy to type and reminds you of the device it represents. Bedroom Lamp, LampMBR, or MBRL1 are common approaches to unit naming.
The next important field is the X10 Address [Hack #1]. Here, type in the address that you assigned to this X10 module. In this example, the lamp in my bedroom is plugged into a lamp module whose address is set to House Code A, Unit Code 10—a.k.a. A10.
The Description field is optional, but you might find it handy. You’ll be able to see it in the Master List of units (see Figure 1-24), but if you’re planning on using a hack that dynamically sets the description [Hack #27], don’t bother filling it in, as whatever you put there now will just be changing later.
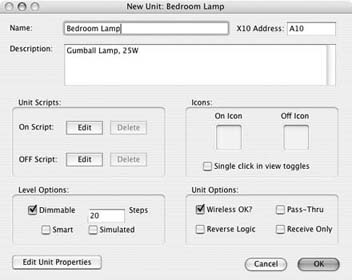
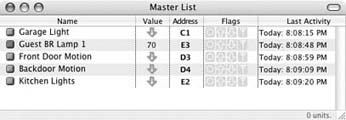
If you’re adding a lamp module and you want to be able to set the brightness level, be sure to check the Dimmable checkbox. When you do this, the Master List will show the current brightness level in the Value column. In Figure 1-24, the unit Guest BR Lamp 1 is dimmed to 70%. If you don’t select this, Dim commands will be ignored, which can be quite perplexing to troubleshoot unless you notice the entry that gets put in the log when this occurs.
If the unit you’re adding sends its signals wirelessly (primarily this will be a motion detector) and you have a Wireless-to-X10 interface [Hack #5], check the “Wireless OK?” checkbox. This tells XTension to accept wireless commands for this unit. If you don’t check this, incoming wireless commands for this address will be noted in the log, but otherwise ignored.
Just as you’re getting used to the idea of units, let’s throw in a measure of possible confusion for the fun of it. It turns out that a particular unit doesn’t necessarily have to correspond to a particular X10 module. You can, in fact, add units that don’t specify an X10 address. These are called pseudo units and you’ll use them for tracking the states of things in your house, such as the temperature, who is at home, or the last time it rained.
To create a pseudo unit, you choose New Unit from the Edit menu, as you do for adding an actual unit, but leave the X10 Address field blank. Figure 1-25 shows a unit for storing the temperature and sky conditions.
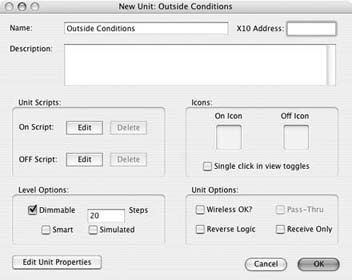
Notice that the Dimmable checkbox has been checked. This is so that we can use the value of the unit to store the outside temperature. Usually, the value indicates the brightness level of a lamp module, but in reality it holds any negative or positive whole number, so even if you live in chilly Chicago, or steamy Key West, XTension can more than adequately track the current conditions [Hack #64].
You also can use the Description field of a unit to store bits of information, as mentioned previously, or a unit’s Properties list if you need to keep track of even more metainformation [Hack #61].
If you want something to happen at a specific time in the future, either once or repeatedly, set up a scheduled event. For example, you might want the air cleaner in the office, which is connected to an appliance module, to come on for three hours every other day. Or perhaps you need to get up early tomorrow, and you want the coffeepot to be turned on at 4:30 a.m.
To create a new scheduled event, choose New Event from the File menu. The New Event dialog is where you specify what you want to happen and when and how often you want it to occur. Figure 1-26 shows the XTension Event dialog.
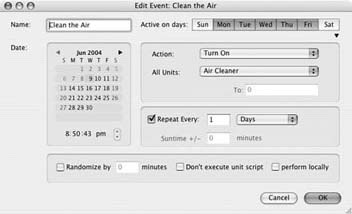
Enter a name for the event so that you can identify it easily in the Scheduled Events window (see Figure 1-26), and then select the days on which you want this event to be active and the time of day when it should happen. If you want it to occur more than once, check the Repeats checkbox and enter a value. Choose an interval, such as Daily, from the pop-up menu.
Select what you want this event to do by selecting an action from the pop-up menu, and then a target from the All Units menu. For example, to turn on a unit or group, choose Turn On. Then choose the unit name. To run a global script you’ve written, choose Execute Script and select the script from the second pop-up menu.
Figure 1-26 shows an event called Clean the Air that turns on the Air Cleaner unit every weekday at 8:50 a.m.
To view all of your system’s scheduled events, choose Scheduled Events from the View window, as shown in Figure 1-27. In the window, click the “Sort by Date” column to show the events in the order in which they’ll occur. The first column shows some rather cryptic but useful symbols. The R next to an event indicates it is set to repeat, and the upward arrow indicates that the unit shown below the event name, such as Kitchen Lights, will be turned on. The notation “as” indicates that the event runs a scripted action.
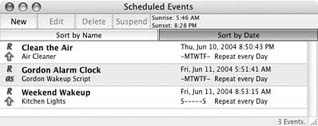
Although scheduled events are handy, having your home automation system respond to stimuli puts the “smart” in your smart home. Like the man behind the curtain in The Wizard of Oz, it’s XTension responding to events—motion detectors triggering, garage doors opening—which makes it all happen.
For example, when you press a button that tells your home you’re departing [Hack #70], XTension runs a script when it receives the On command sent by the button. Or, after you’ve gone downstairs in the morning, the Off command sent by the motion detector in the bedroom triggers a script that turns off all the upstairs lights.
To define what happens when a unit turns on or off, select the unit in the Master List, then choose Edit Unit from the Edit menu. In the Edit Unit dialog box, click the Edit button next to On Script or Off Script. A little window opens where you can edit, or import, an AppleScript. When an On command is received for this unit, XTension executes the script you enter in the On Script window. You’ve probably guessed that it executes the Off script when it receives an Off command, right?
In Figure 1-28, we’re entering the On script for the Air Cleaner unit at address K2. This unit is turned on every weekday with a repeating event, as described earlier, but instead of setting up another repeating event to turn it off a few hours later, the unit’s On script schedules it to turn off automatically. Whenever the air cleaner is turned on, the script creates a one-time scheduled event that automatically turns off the unit three hours later.
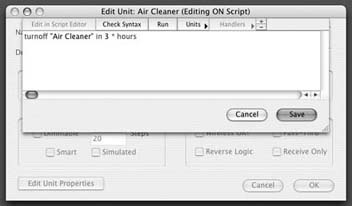
You can test this by using a Palm Pad [Hack #5] to send an On command to the unit’s address (K2). When you do, the air cleaner turns on, and then the On script is executed and a new event appears in the Scheduled Events window, as shown in Figure 1-29. The 1 in the first column indicates that this event will happen only once (that is, it’s not a repeating event) and the down arrow shows that it will turn off the Air Cleaner unit. XTension generates the name of the scheduled event, Air Cleaner #1, automatically by adding a number to the unit name. This ensures that each event has a unique name.
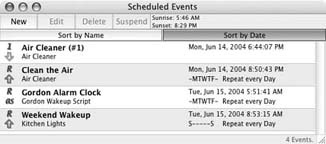
You should remember two key things about unit scripts. First, the On or Off scripts are executed whenever that unit receives the indicated command. It doesn’t matter how that command was initiated—by a scheduled event, by pressing a button on a Palm Pad, by clicking the unit in XTension, or via another script—the On and Off scripts will run. In our example here, this permits us to ensure that the air cleaner is always turned off after three hours, without regard to how it is turned on.
The second thing to remember is that each unit script is available only to the unit for which it is defined. That is, you can’t share scripts between multiple units, nor can you execute a script without also turning the unit on or off. If you have a script that you want multiple units to be able to use, or you want to use it directly without having to trigger a unit, you should use a global script instead.
A global script is an AppleScript that a scheduled event can execute or another script can call. In XTension, global scripts are the glue that ties your whole automation system together.
Earlier in this discussion, we created a scheduled event that turned on an air cleaner every weekday, and then we used a unit script to create a second scheduled event that turned the air cleaner off after three hours. That’s pretty neat, but it’s not very smart; it doesn’t take into account anything else that might be happening in your home. To make it smarter, let’s use a global script to make sure the air cleaner comes on only when the office window is closed because it doesn’t make much sense to try to filter the whole outdoors.
Let’s get started. To create a new global script, choose Manage Global Scripts from the Scripts menu. The Global Script Manager window appears, as shown in Figure 1-30. Click the New Script button and then enter a name for this script, such as Clean Office Air.
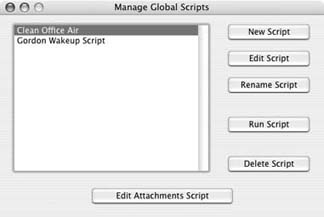
The Script Editor window (Figure 1-31) is where you enter your script. After you’ve typed it in (or imported one you’ve written in Apple’s Script Editor), click the Check Syntax button to make sure it compiles without any errors.
When you’ve got it perfected, click Save. The new script now appears in the Global Scripts Manager window, and XTension adds it to the Scripts menu so that you can execute it easily by selecting it. But in this example, we want to run this script automatically, so let’s modify the scheduled event we created earlier.
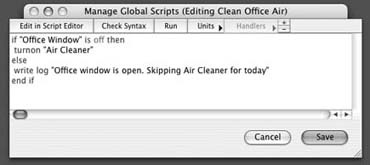
Choose Scheduled Events from the Window menu, and then double-click Clean the Air in the Scheduled Events window (Figure 1-29) to edit the event. In the Action pop-up menu, choose Execute Script. Then, in the All Units pop-up menu, choose the global Clean Office Air script we just created. Click OK to save the changes. The Clean the Air scheduled event now appears as shown in Figure 1-32.
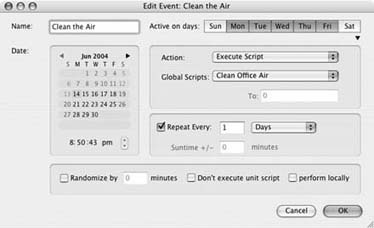
Let’s take a closer look at this script, which you can see in the Global Script Editor window in Figure 1-31. It’s simple, but it illustrates some key points. First, it checks the status of something called Office Window. That’s a unit representing an X10 security module [Hack #78] attached to the window frame in the office. When the window is opened, the module sends an On command, which XTension sees and dutifully changes the status of the unit to match. So, the script, in checking to see if Office Window is off, determines if the window is currently open. If not, it turns on the air cleaner; otherwise, a message is written to the XTension log indicating that the cleaning cycle is being skipped this time.
One of the best ways to control many units is to assign them to a group. Using a group can save you a lot of typing in your script; you simply send a command to the group and XTension automatically repeats the command for each unit individually. To create a group, choose New Group from the File menu. Then drag units from the Master List window to the “Units in this Group” list in the New Group dialog box, as shown in Figure 1-33. The order of the units in the list determines the order in which they’ll be commanded. You can change the lineup at any time by dragging the units into a new order.
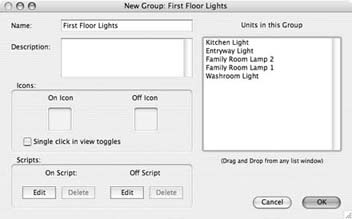
Be sure to give the group a distinctive name, and if you’re an advanced user, you might even want to create On and Off scripts for the group. As with the unit scripts discussed earlier, XTension will execute these when the group receives an On or Off command.
Note that groups don’t have an X10 address, so you can’t send them a command using a Power Pad or minicontroller; they’re accessible only from within the XTension user interface or scripts. To command a group in a script, you address it as if it were an individual unit:
Turnoff "First Floor Lights"
For more information about using groups effectively, see “Control Lights in a Group” [Hack #95].
Speaking of the log file, XTension keeps an extensive record that enables you to see exactly what’s going on with your home automation system. Not only does the log keep track of everything XTension does, but also, because the application is listening to the power line, you’ll see X10 commands that are sent from other sources as well, such as minicontrollers [Hack #4]. Figure 1-34 shows just a few minutes of activity from a typical day. To show the log, choose Log Window from the Window menu.
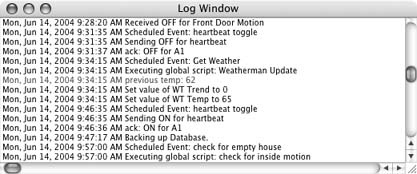
All of this detail makes the XTension log a very valuable debugging tool, but it also means it’s overwhelming to view if everything is running smoothly. To reduce some of the clutter, you can set XTension preferences so that only critical information is displayed in the Log Window, as shown in Figure 1-35.
If you select the “Database items only” option, the Log Window shows X10 commands for the units that you defined in XTension. In other words, if XTension sees a command on the power line and it doesn’t have a unit that corresponds to that address, that command will not be shown in the Log Window. If you select the “Exceptions only” option, the Log Window will show a message only when there’s an error, such as an attempt to execute a global script that doesn’t exist, or a problem communicating with your power-line interface.

Tip
Either of the logging options can really cut down on the visual clutter in the Log window, but they don’t affect the information written to the XTension log file. XTension always writes all activity to the log file, so even if you’ve filtered the log display by changing XTension’s preferences, you always can get the full story by opening the log file with TextEdit or another text editor.
Now you know enough about XTension to begin building your system, but be sure to visit Sand Hill’s extensive web site (http://www.shed.com) and peruse the extensive technical notes and tutorials, too. You’ll also want to check out the product’s active, and friendly, email discussion list. Even if you’re not a Mac user, it offers a daily dose of practical home automation techniques, news, and chit-chat.
Using the Indigo home automation application for Mac OS X requires some basic techniques that you’ll need to know in order to implement many of the hacks in this book.
Indigo, from Perceptive Automation, is the newest home automation software for the Mac, but it already has earned an enthusiastic following for its clean, Cocoa-based implementation and its support of the latest equipment. Its designer and chief programmer, Matt Bendiksen, has a hand in programming some of the best mainstream Macintosh applications, and he’s applied that experience to making sure Indigo is approachable for beginners and experts alike.
Tip
For more detail and the latest skinny, be sure to consult the Indigo user guide—available from Indigo’s Help menu—and the online tech support area (www.perceptiveautomation.com/indigo/support.html).
For Indigo to send commands to X10 modules it needs a power-line interface [Hack #16]. Indigo currently works with the CM11A, the LynX-10 PLC, and the PowerLinc Serial, PowerLinc USB (1132U), and PowerLinc Controller (1132CU). With the exception of the PowerLinc USB, the others are standard serial devices, so if you’re using a newer Macintosh you’ll need a USB-to-serial interface, such as the High-Speed USB Serial Adapter from Keyspan (http://www.keyspan.com/products/usb/USA19HS/), to make the connection to your computer. If you’re using a Macintosh that has a round serial port, you’ll need an adapter to convert the connection to a standard nine-pin configuration. A palmOne Mac Serial Adapter (http://www.palmone.com) will do the trick.
If you don’t already have a power-line interface, you should consider getting the PowerLinc USB (http://www.smarthome.com/1132u.html). It’s inexpensive, and because it has a USB port rather than a standard serial port, you won’t have the added expense of buying an adapter. At the time of this writing, Indigo is the only Macintosh home automation software that works with the PowerLinc USB, and it also supports the capability of storing macros in the PowerLinc Controller (1132CU), so you can have some automation even when your computer is turned off [Hack #15].
After you’ve connected a power-line interface to your Mac, you’ll need to configure Indigo. To do this, choose Preferences from the Indigo menu and then click Interface. Check the “Interface communication online” checkbox, and then check the “Enable X-10 interface” checkbox. Select the type of interface you’re using from the pop-up menu. See Figure 1-36 for an example.
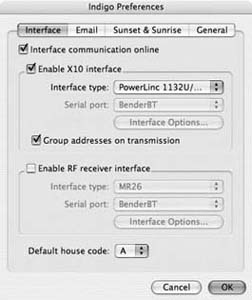
Tip
Why do you have to turn on “Interface communication online” and “Enable X10 interface” before you can choose an interface? Well, Indigo can be used as a wireless-only controller or simply as a way to automatically execute scripts and automated tasks, such as sending email or anything else you can do with AppleScript. If you leave both wireless and X10 turned off, you still can use Indigo to schedule things you want to happen on a regular basis.
Indigo also works with two wireless X10 receivers, the MR26A and the W800RF32 [Hack #83]. These are excellent add-ons for improving your system, but wireless X10 is not a replacement for the power-line interfaces discussed earlier. If you’re just getting started, don’t worry about wireless X10 yet. Just know that it will work with Indigo when you’re ready to go there.
Now that you have Indigo set up, let’s start adding the details it will need to run your home.
Indigo needs to know about the X10 devices you have installed in your home so that it can send commands to them in response to events, your actions, or scripts that execute on a scheduled basis. To add a device to Indigo, choose New Device from the Edit menu. The Edit Device dialog appears, as shown in Figure 1-37.
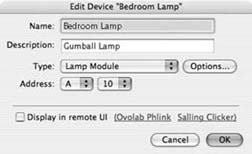
Every device needs a name, so fill in the Name field with something meaningful. Because you might be referring to this name often in your scripts, choose something that is meaningful and easy to type. Bedroom Lamp, LampMBR, or MBRL1 are common approaches to unit naming.
Select the type of module you’re adding, using the Type pop-up menu. It’s important that you choose the correct type of device, as this tells Indigo what commands it can accept. For example, when you choose Lamp Module, Indigo knows this module can accept Dim commands to set the lamp’s brightness level.
The next important field is the X10 Address [Hack #1]. Here, select the address that you assigned to this X10 module. In this example, the gumball lamp in my bedroom is plugged into a lamp module whose address is set to House Code A, Unit Code 10—a.k.a. A10.
The Description field is optional, but you might find it handy. You’ll be able to see it in the list of units Indigo displays when you click the Devices button on the left side of its window, as shown in Figure 1-38.
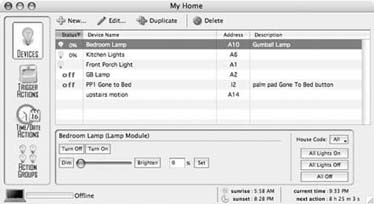
Sometimes you need to keep track of the states of things in your house, such as the temperature, who is at home, or the last time it rained. To do this in Indigo, you use a variable. A variable is a place where you can store some text, a number, or a true/false Boolean value.
Tip
Some hacks in this book, which are described as implemented in XTension [Hack #17], will refer to pseudo units. Indigo users should use variables instead. Keep this in mind if you’re adapting a hack that’s described using XTension for use in Indigo.
To create a variable, choose Variable List from the Window menu, then click the New button in the window’s toolbar, shown in Figure 1-39. In the dialog that appears, enter a name for the variable and an initial value, such as false.
Indigo variables are useful for tracking things such as the current outside temperature [Hack #64] or knowing which house members are currently at home [Hack #70].
If you want something to happen at a specific time in the future, either once or repeatedly, set up a scheduled event. For example, you might want the air cleaner in the office, which is connected to an appliance module, to come on for three hours every weekday. Or, perhaps you need to get up early tomorrow, and you want the coffeepot to be turned on at 4:30 a.m.
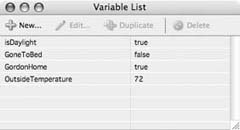
To create a new scheduled event, choose New Time/Date Action from the File menu. The Create New Time/Date Action dialog is where you specify what you want to happen, when, and how often it occurs. Figure 1-40 shows an event called Clean The Air that turns on the Air Cleaner unit every weekday at 8:50 a.m.
Enter a name for the event so that you easily can identify it later. Then, click the Time/Date Trigger and select the days on which you want this event to be active, and the time of day when it should happen. If you want it to occur more than once, make sure the “Delete this action after first trigger time” checkbox is unchecked.
Select what you want this event to do by clicking the Action tab and then make a selection from the Type pop-up menu. For example, to turn on a unit, choose Send Device Action and choose the device name. To run a script you’ve written, choose Execute AppleScript and then either select the script file on your hard disk, or enter the script into the dialog box’s editing field.
To see all of your system’s scheduled events, click the Time/Date Actions button on the left side of the main window, as shown in Figure 1-41. To view details about the scheduled action, select it in the list and Indigo displays a summary near the bottom of the window.
Although scheduled events are handy, having your home automation system respond to stimuli puts the “smart” in your smart home. Like the man behind the curtain in the The Wizard of Oz, it’s Indigo responding to events—motion detectors triggering, garage doors opening—which makes all the magic happen.
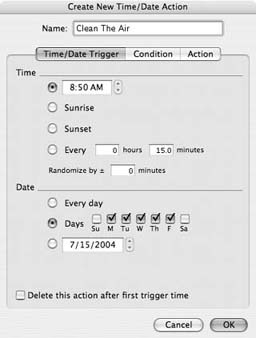
For example, when you push a button that tells your home you’re departing [Hack #70], Indigo runs a script when it receives the On command sent by the button. Or, after you’ve gone downstairs in the morning, the Off command sent by the motion detector in the bedroom triggers actions that turn off all the upstairs lights.
To define what happens when an event occurs, choose New Trigger Action from the File menu. The Create New Trigger Action dialog box appears, as shown in Figure 1-42. Enter a meaningful name for this action, and then select an action from the Type pop-up menu. This defines what action will cause this trigger to execute, such as receiving an X10 command. The rest of the dialog changes depending on the action you select. In this example, we define that this trigger is active when the Air Cleaner device receives an On command.
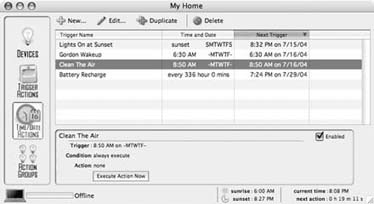
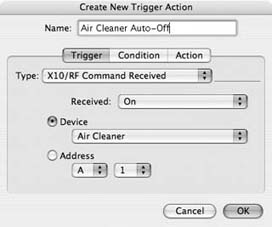
To specify the actions Indigo will perform for this trigger, click the Action tab. In Figure 1-43, we’re specifying that 90 minutes after this trigger is activated, Indigo will send an Off command to the Air Cleaner unit. This ensures that whenever the air cleaner is turned on, it automatically will turn off later. If you wanted to specify that this action should occur only during daylight hours, or based on some other variable you’re keeping track of, you can set this up using the Condition tab.
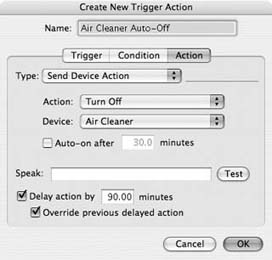
Many of the hacks in this book work by using scripts that are triggered when a device is turned on or off. For example, a button on a Palm Pad might trigger an On script that turns off all the lights in the house and sets a variable that you’ve gone to bed [Hack #48]. In Indigo, you can do this by setting up a trigger whose action is to run an AppleScript, or you can use an Action Group to define a series of steps you want Indigo to perform:
To have the trigger run an AppleScript, click the Action tab and then select Execute AppleScript from the Type pop-up menu. Then you can either select a compiled script file that you’ve saved on disk, or type (or paste) an AppleScript into the Embedded field.
To have the trigger run an Action Group, click the Action tab and select Execute Action Group from the Type pop-up menu. Then select a previously defined action group from the Group pop-up menu.
Action groups are, quite simply, a list of actions that Indigo performs in the sequence you specify. To define an action group, choose New Action Group from the File menu. In the dialog box that appears, enter a name and a description (if you want), and then click the New button to define the first step in the sequence.
Just as with action triggers, you can have Indigo send an X10 command, set the value of a variable, execute an AppleScript, and perform several other actions for each step in the sequence. You even can execute another action group, which enables you to modularize your action groups into discrete, reusable chunks.
After you’ve defined your first action, simply click New to add another. The action group shown in Figure 1-44 speaks using text-to-speech, turns off the lamp in the guest bedroom, executes another action group that turns off the outdoor lighting, and then sets the GoneToBed variable to true.
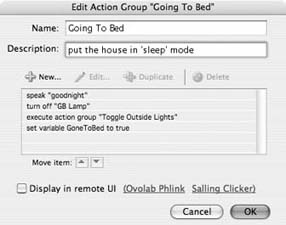
A script is a series of instructions, written using AppleScript, that can be executed by a scheduled event or even called by another script. Often, a script is the glue that ties your whole automation system together and uses the logic necessary to make your home behave more intelligently.
Earlier in this discussion, we created a scheduled event that turned on an air cleaner every weekday, and then we used a trigger action to turn it off after three hours. That’s neat, but it’s not particularly smart; it doesn’t take into account anything else that might be happening in your home. To make it smarter, let’s use a script to make sure the air cleaner comes on only when the office window is closed because it doesn’t make much sense to try to filter the whole outdoors. Our script will also make the air cleaner come on only when someone is at home, so the air filter doesn’t run when there’s nobody around to enjoy its results.
You don’t necessarily need a script to do this—you could just have the trigger action check a variable that indicates if a window is open. But using a script is often more straightforward and flexible for making logical tests, and learning how to use it through this simple example will serve you well as you expand your system.
Let’s get started. Create a new action group by choosing New Action Group from the File menu. Enter a name for the group, and then choose Execute AppleScript from the Type pop-up menu. Click the Embedded button and enter your script in the field provided, as shown in Figure 1-45.
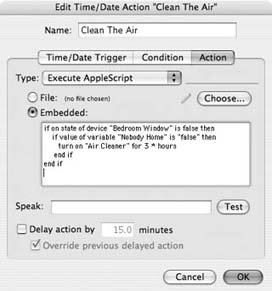
Click OK to save the script, and then click OK again to save the action group. Now you have an action group with a single step that executes your script. To call this script from anywhere else in Indigo, such as from a time/ date action or from another action group, choose it as part of an Execute Action Group command.
For example, set up a repeating event. Choose New Date/Time Action from the File menu, and define an event named Air Filtering that executes the action group you just created every day at 8:00 a.m. When this event is triggered, the script embedded in the action group will turn on the air cleaner if the bedroom window is closed, and the No body Home variable indicates that the house is occupied. If you want to clean the air at other times, simply set up additional date/time actions that refer to the same action group.
Indigo keeps an extensive record that enables you to see exactly what’s going on with your home automation system. Not only does the log keep track of everything the program does, but also, because it’s listening to the power line, you’ll see X10 commands that are sent from other sources as well, such as minicontrollers [Hack #4]. Figure 1-46 shows just a few minutes of activity from a typical day. To show the log, choose Log Window from the Window menu.
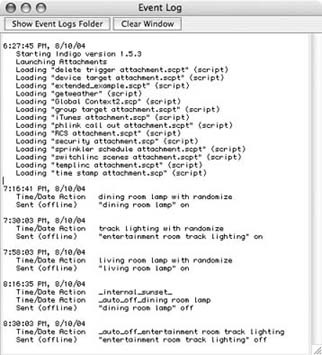
The Indigo Event Log window shows only the last several hundred log entries, or only the entries that occurred since the last time you clicked the Clear Window button. To view the full log file, or the log from a previous day, click Show Events Log Folder to open a Finder window with each daily log Indigo has created. These are plain-text files, so you can open them with TextEdit or something similar to view all their detail.
Now you know enough about Indigo to begin building your system, but be sure to visit Perceptive Automation’s extensive web site (http://www.perceptiveautomation.com) and peruse the technical notes and tutorials. You’ll also want to check out the product’s discussion board (http://www.perceptiveautomation.com/indigo/forum.html) for the latest information and tips from other Indigo users, as well as the library of user-contributed scripts (http://www.perceptiveautomation.com/indigo/scripts.php).
You’ll need to know some basic techniques to using the HomeSeer home automation software for Windows in order to implement many of the hacks in this book.
HomeSeer is a popular program for Windows XP, Windows 2000, Windows 98 Second Edition, and Windows NT. By way of a familiar user interface, HomeSeer enables you to view and command a huge variety of home automation devices and modules, offers voice control so that you can speak your commands to the system, and includes a built-in web interface so that you can access your system from anywhere there’s a network connection. Thanks to its popularity and extensible design, a large number of third-party plug-ins are also available that add additional capabilities.
Tip
For more details and the latest skinny, be sure to consult HomeSeer’s help system. It’s available from the Help menu in the application or online at http://HomeSeer.com/products/homeseer/WebHelp/homeseer.htm.
HomeSeer adeptly can handle all the home automation tasks you can throw at it, but to send commands to X10 modules, it needs a power-line interface [Hack #16]. HomeSeer works with several controllers, including the CM11A, LynX-10, and LynX-10 PLC, which are standard serial devices. If your computer has a USB port, you can use a SmartLinc USB or another controller that works with USB.
After you’ve connected the power-line interface to your computer, you’ll need to configure HomeSeer. Choose Options from the View menu and then click the Interfaces tab. Click the Device list and select the interface you’re using, such as a CM11A, and then select the Port where you’ve connected the power-line interface, as shown in Figure 1-47.
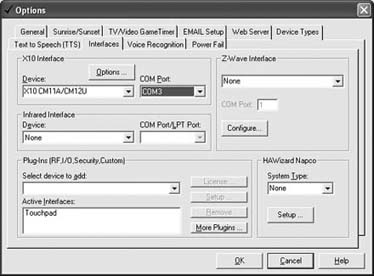
HomeSeer also works with wireless X10 receivers [Hack #5]. These are excellent ways to improve your wireless motion detectors and the like, but wireless X10 is not a replacement for the power-line interfaces discussed earlier. If you’re just getting started, don’t worry about wireless X10 yet. Just know that it will work with HomeSeer when you’re ready to go there.
Tip
HomeSeer’s support for different types of devices is impressive. In addition to several X10-compatible interfaces, it also works with infrared and other types of controllers. Plus, it supports Z-Wave (http://www.zen-sys.com/), which is a wireless technology that someday might supplant X10.
Now that you’ve got HomeSeer set up, let’s start adding the details it will need to run your home.
HomeSeer needs to know about the X10 devices you have installed in your home so that it can send commands to them in response to events or to your actions, or by executing scripts on a scheduled basis. To add a device to HomeSeer, click the Devices button in the Views pane and then click the Add Device button in the toolbar (it’s the one that looks like a light bulb). The Device Properties dialog appears, as shown in Figure 1-48.
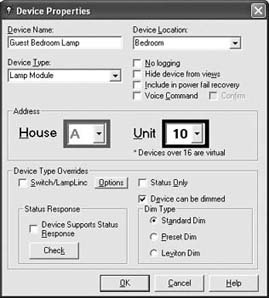
Every device needs a name, so fill in the Device Name field with something meaningful. Because you might be referring to this name often in your scripts, choose something that is easy to type and reminds you of the device it represents. Because HomeSeer enables you to control your home using voice recognition, choose device names that are easy to say, too, such as Bedroom Lamp, Overhead Light, or Side Table Reading Lamp. Also keep in mind that HomeSeer will add the device’s location, which you’ll get to specify in a moment, to the name—for example, Master Bedroom Overhead Light, which can help you to distinguish between what otherwise would be similarly named devices.
The next important field is the Address [Hack #1]. Here, enter the address you assigned to this X10 module. In this example, the lamp in the guest bedroom is plugged into a lamp module whose address is set to House Code A, Unit Code 10 —a.k.a. A10.
To ensure that HomeSeer knows about the capabilities of the new device, select its type from the Device Type list. When you do this, it sets several useful default options—such as the Status Only checkbox for motion detectors, which indicates that the device sends commands but does not receive them—but you can change the default options that HomeSeer elects if you need to.
If you’re adding a lamp module and you want to be able to set the brightness level, make sure “Device can be dimmed” is selected. If you don’t select this, Dim commands will not work as you expect, which can be quite perplexing to troubleshoot. When “Device can be dimmed” is selected, the device list will show the current brightness level in the Value column. In Figure 1-49 the Guest Bedroom Lamp device is dimmed to 70%.
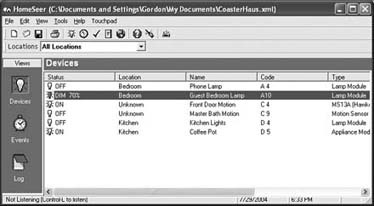
The Device Location field is optional, but you might find it handy because it helps make the names unique, as described earlier. You’ll be able to see it in the master list of devices (see Figure 1-49), which you can sort by location, to more easily locate devices in the list. It’s also a good idea to change the location from its default value, Unknown, to avoid confusion when activity for the device is shown in the HomeSeer log file as Unknown Guest Bedroom Lamp.
Just as you’re getting used to the idea of devices, let’s throw in a measure of possible confusion for the fun of it. It turns out that a particular device doesn’t necessarily have to correspond to a particular X10 module. You can, in fact, add devices with addresses that are invalid—that is, devices that have house codes beyond P or unit codes greater than 16. These are called virtual devices, and you’ll use them for tracking the states of things in your house, such as the temperature, who is at home, or the last time it rained.
Tip
Some hacks in this book, which are described as they’d be implemented in the XTension application [Hack #17], refer to pseudo units. These are the equivalent of HomeSeer’s virtual devices. Keep this in mind if you’re adapting a hack that was described using XTension for use in HomeSeer.
To create a virtual device, click the Devices button in the Views pane and then click the Add Device button in the toolbar, as you do when adding an actual device. But this time specify an out-of-range X10 address, such as A19. Figure 1-50 shows a virtual device used for storing the temperature and sky conditions.
Notice that the “Device can be dimmed” checkbox has been checked. This is so that we can use the value of the device to store the outside temperature. Normally, the value indicates the brightness level of a lamp module, but in reality, it holds any negative or positive whole number. So, even if you live in chilly Chicago, or steamy Key West, HomeSeer can more than adequately track the current conditions [Hack #64].
You can also use the Status field of a device to store bits of information, if you need to keep track of additional metainformation [Hack #61], for example. To do this, you can use HomeSeer’s scripting language to add custom status values:
hs.DeviceValuesAdd "A19","~Partly Cloudy" & chr(2) & "76" & chr(1)
In this script, chr(2) and chr(1) separate the status text and the value of the unit. This command associates the 76 with the string Partly Cloudy. The tilde (~) in front of the status text indicates that this value will not be added to the device’s pop-up status selector in the HomeSeer interface. But from this point forward, whenever A19 is dimmed to 76%, its status will display Partly Cloudy instead of Dim 76%, as HomeSeer usually would display. See the discussion of hs.DeviceValue in the Scripting section of HomeSeer’s onscreen help system for more information.
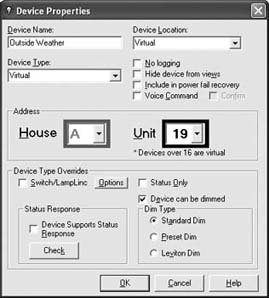
If you want something to happen at a specific time in the future, either once or repeatedly, you set up a scheduled event. For example, you might want the air cleaner in the office, which is connected to an appliance module, to come on for three hours every other day. Or, perhaps you need to get up early tomorrow and you want the coffeepot to be started at 4:30 a.m.
To create a new scheduled event, click Events in the Views pane and then click the New Event toolbar button. The Event Properties dialog, shown in Figure 1-51, is where you specify what you want to happen.
Enter a name for the event so that you can identify it easily in the Events list. Then, select “Absolute time / Date” from the Type list and enter a date and time for the event to occur. If you want it to occur more than once, select Reoccurring from the Type list, type in how many times you want it to repeat, and then choose the interval between repetitions, such as 60 minutes, from the pop-up menu.
Next, to specify what you want this event to do, select the Device Actions tab. To send a command to a device, drag it from the Device Selection list to the Selected Devices list. Then, double-click the device in the Selected Devices list, specify an action in the dialog box that appears, and click OK. Figure 1-52 shows the result. The Coffee Pot device will receive an On command when this event triggers.
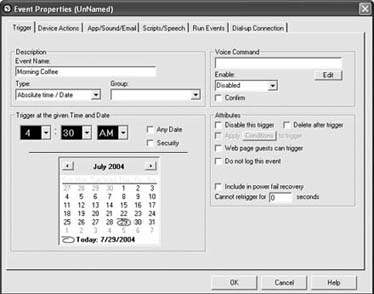
Why does the coffeepot show up in the Selected Devices list twice? It’s a good idea to make sure the coffeepot isn’t left on inadvertently, so the second action of this event sends an Off command at 5:35 a.m. To set this up, drag another copy of the device from the Device Selection list to the Selected Devices list and then double-click to edit the event. Change the Time Delay settings to have this command sent one hour and five minutes after the event is triggered initially, as illustrated in Figure 1-53.
Although scheduled events are handy, having your home automation system respond to stimuli puts the “smart” in your smart home. Like the man behind the curtain in The Wizard of Oz, it’s HomeSeer responding to events— motion detectors triggering, garage doors opening—which makes it all happen.
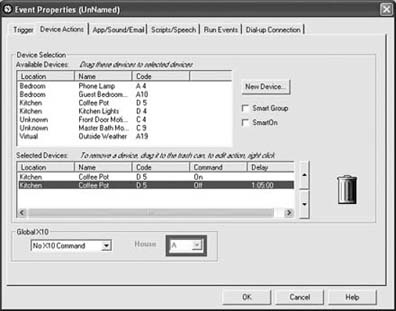
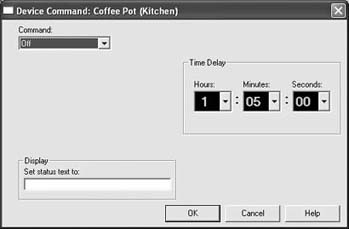
For example, when you push a button that tells your home you’re departing [Hack #70], HomeSeer runs a script when it receives the On command sent by the button. Or, after you’ve gone downstairs in the morning, the Off command sent by the motion detector in the bedroom triggers a sequence of commands that turns off all the upstairs lights.
To define a trigger event (i.e., what happens when a unit turns on or off), click Events in the Views pane, and then click the Add Event toolbar button. In the Event Properties dialog box, select a trigger condition from the Type menu, and then choose a device and its status. In the example shown in Figure 1-54, the action we’re defining will occur when the Outside Front Door Motion motion detector sends an On command, indicating that someone has passed by its field of view.
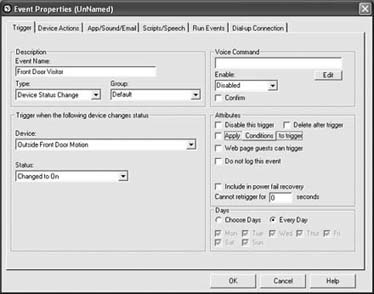
Next, define what happens when this event is triggered. Click the tab Scripts/Speech and enter a phrase in the “Speak the following:” field, as shown in Figure 1-55. When the computer announces the visitor, the sound will be heard throughout the house [Hack #28]. Then, the frontdoorvisitor.txt script will decide what other actions to take based on who is home and what time it is [Hack #74].
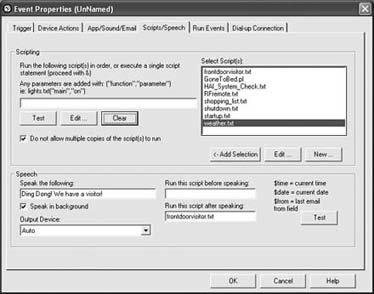
That’s the basic process of setting up an event. As you can see from the other settings in the Event Properties dialog box, you have plenty of choices for fine-tuning exactly how you want HomeSeer to react to any given command or situation. Let’s look at a couple of additional techniques, based on what we’ve already set up, that will come in handy as you adapt the hacks in this book to your own liking.
You can create your HomeSeer-based home automation system so that it’s constructed of building blocks of command sequences. For example, you might create an event that turns off all the lights when you go to bed for the evening [Hack #48]. You also might find it useful to be able to turn off these lights at other times, such as sunrise, when you’re cocooning in the den to watch a good movie, or when you’re leaving the house. Let’s create a single event that controls these lights so that you can call it whenever you need it, much like programmers use subroutines to keep their code efficient.
In HomeSeer, create a new event and set its Type to Manual Only. Then, click the Device Actions tab and drag all the devices you want to command to the Selected Devices list, as illustrated inFigure 1-56. Remember to set an appropriate command for each device (Off in this example).
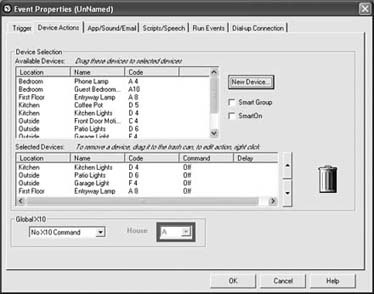
Because this event is defined as Manual Only, it won’t be triggered until you trigger it using the user interface or via another event or script. To trigger this event from another, such as when you push a button on a Palm Pad [Hack #5], set up a new event whose Run Events properties are set to call this one. For example, the event shown in Figure 1-57 will execute the Downstairs Lighting event.
As you can see, you can call any number of other events, in whatever sequence desired, to build new functions from other events you’ve created. This is a powerful and handy feature, but start with simple actions and keep an eye on the HomeSeer log file to help you debug any nested actions that seem to be misbehaving.
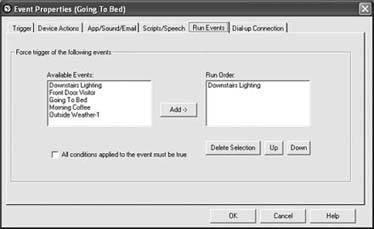
You can do a lot with HomeSeer without using scripts, but you’ll be missing out on some of the best features of the product. In addition, as you’ll notice from the hacks in this book, scripting is often the only way to accomplish some of the smarter things you can do with your home. When it comes to scripting, HomeSeer is unique among home automation applications in that it supports three different scripting languages: VBScript, Perl, and Java-Script.
The best way to learn about scripting HomeSeer is to review its onscreen help, and to peruse the example scripts included with the product as well as the large library of user-contributed scripts available at the HomeSeer discussion board (http://ubb.homeseer.com). Assuming you have a script you want to use, whether borrowed or written from scratch, let’s look at how you set up events to trigger it.
Several of the hacks in this book use scripts that are activated when you turn a device on or off. To set this up, you begin with an event that is triggered by the device changing state, such as turning On. Then, in the Event Properties dialog box, you click the Scripts/Speech tab. To create a script, click the Edit button. You’re asked to enter a name for the script. The file extension you enter for the name determines which script interpreter will be used to execute the script, as shown in Figure 1-58.
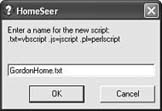
After you name the script, Notepad opens. Type, paste, or import your script, and then save the Notepad document. When you’re done, the new script will be added to the Select Scripts list in HomeSeer and will be available for execution by any event. It’s selected automatically for the current event and will be executed when the trigger conditions you specified are met.
Finally, notice the “Do not allow multiple copies of the script(s) to run” checkbox in Figure 1-55. This can be important if an event might be triggered multiple times in rapid succession—such as with some motion detectors—because new instances of your script might be started before already-running instances have finished. Depending on what your script does, selecting this option can save you some debugging headaches.
Similar to how you can use events as building blocks for more complex procedures, you can also have HomeSeer execute multiple scripts in a sequence. To add another script, select it in the list and click the Add button. The scripts will execute in the order shown in the Scripts field.
HomeSeer keeps an extensive record that enables you to see exactly what’s going on with your home automation system. Not only does the log keep track of everything HomeSeer does, but also, because the application is listening to the power line, you’ll see X10 commands that are sent from other sources, too, such as minicontrollers [Hack #4]. To view the log, click the Log button in the Views pane, as shown in Figure 1-59.
The detail shown in the log makes it a valuable debugging tool, but it also means it can be overwhelming to sort through if you have a lot of devices and events. To reduce some of the clutter, you can set some devices so that their activity isn’t logged. This can be handy for things such as motion detectors, which can generate many log entries in an active home. To set this up, check the “No logging” checkbox in the Device Properties dialog for each device you want to exclude.
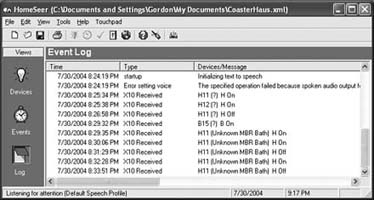
Now you know enough about HomeSeer to begin building your system, but be sure to visit the product’s extensive web site (http://HomeSeer.com) and peruse the technical notes and tutorials. You’ll also want to check out the active, and friendly, community discussion board(http://ubb.HomeSeer.com). Even if you’re not a HomeSeer user, this discussion board offers a daily dose of practical home automation techniques, news, and advice. It’s well worth signing up for a free account so that you can read all the messages and post new ones.
One of the best things about a smart home is that you never have to bother turning on lights when it starts to get dark or turning them off if you’re an early riser and the sun is making them unnecessary.
All the home automation software packages make it easy to control your lights automatically, or to perform virtually any other task, when the sun rises and sets. In fact, it’s the perfect task for a computer-based home automation system; the computer can accurately calculate the sun times for your exact location and time of year, and then do your bidding with clockwork precision.
You need to make sure your computer’s clock and location are set correctly so that the time calculations are reliable, but other than that it’s simply a matter of configuring your home automation software and deciding what you want done. The latter bit is the hardest part: what do you want to do?
The most obvious sunset action is to turn on some lights in the home so that people on the inside can see what they’re doing. You probably don’t want the entire household to light up, so focus on ambient lighting. An efficient way to do this is to spend a couple of minutes every night and note which lights you and your family have turned on manually and which ones tend to stay in use until bedtime. For example, the small lamp in the family room, the light over the sink in the kitchen, and the front porch light might be good candidates for automation.
Next, identify the lights you might want to come on sometime after sunset. In addition to having lights turned on at sunset, it’s simple to schedule events that occur a set number of minutes later. As the house gets darker, do additional lights provide comfort or safety? The lights over the stairway or the landscape lighting in the backyard are likely candidates.
Finally, consider more than just lighting. If you have a webcam on the bird-bath outdoors, you probably want to turn it off after nightfall. Perhaps you want to mute the sound on your home automation system so that you’re not bothered by the audible notification of incoming email and faxes. If you want to use the scheduler in your home automation software to run a script that backs up your hard drive, sunset might be a good time to do that, too.
Typically, there are fewer things to do, automation-wise, at sunrise than at sunset. With a few exceptions, such as lights in darkened areas, you probably just want to turn off all the lights in the home at sunrise. In fact, many home automators use the sunrise trigger to check and reset the status of every device in their home, just to ensure that everything is in a known state as the day begins.
Other candidates for automation at sunrise include setting the sound volume on your home automation system computer so that audible alerts can be heard throughout the day, retrieving the day’s weather report [Hack #64], fetching the morning’s email, or checking to make sure your broadband connection is still up by loading a URL or two. As with sunset scripts, you can use the sunrise event to schedule events that occur later, such as reminders to bring out the garbage [Hack #25].
Now that you have a list of what you want to accomplish at each time, let’s look at how you configure your system to handle your tasks.
With XTension [Hack #17], you define what happens at sunrise and sunset by creating scripts that perform the tasks you want to occur. Simply create global scripts named Sunset and Sunrise, and XTension automatically will execute the appropriate script at the correct time for your location.
XTension knows when sunset and sunrise are in your location, by calculating the times based on your computer’s settings. If you find they’re not quite correct make sure the time and time zone are set correctly in the Date & Time pane of the Mac OS X System Preferences.
If you want to further adjust the sunset and sunrise times—perhaps because you live in a valley where it gets dark a little before sunset—you can offset the times XTension uses. Choose Preferences from the XTension menu, and then click the Suntimes tab. Enter how many minutes you want added to or subtracted from the calculated sun times, as shown in Figure 1-60. You also can set the exact latitude and longitude for your location, instead of using System Preferences’ rough idea of your location based on your time zone, which also might increase the accuracy of the calculations of your sun times.
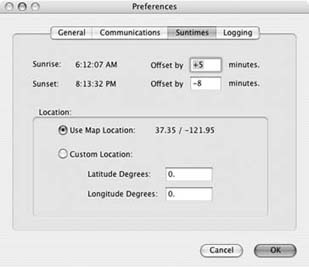
After you’ve saved the adjustments, quit and restart XTension to trigger a recalculation of the sun times for the current day.
In Indigo [Hack #18], you define what happens at sunrise and sunset by creating an action group that performs the tasks you want to occur. Then, create a Time/Date Trigger whose condition is Sunrise or Sunset, as shown in Figure 1-61.

Indigo knows when sunset and sunrise are in your location by calculating the times based on your computer’s settings. If you find they’re not quite correct make sure the time and time zone are set correctly in the Date & Time pane of the Mac OS X System Preferences.
If you want to further adjust the sunset and sunrise times—perhaps because you live in a valley where it gets dark a little before sunset—you can offset the times Indigo uses. When you define the event, enter the number of minutes before or after sunset or sunrise when you want the event to occur. In the previous example, shown in Figure 1-61, the action will occur 10 minutes before sunset because –10 was entered in the Offset field.
You also can set the exact latitude and longitude for your location instead of using System Preferences’ rough idea of your location based on your time zone. Doing this might increase the accuracy of the calculations of your sun times. Choose Preferences from the Indigo menu, and then click the Sunset & Sunrise tab. Click Override System Location and enter the longitude and latitude for your location. If you’re not sure what to enter, there’s a handy link in the Indigo window to a web site where you can look up your approximate values by city or Zip Code.
In HomeSeer [Hack #19], you define what happens at sunrise and sunset by setting up a trigger event that executes each day at sunrise or sunset. If you need to adjust the sunset or sunrise time—perhaps because you live in a valley where it gets dark before sunset—simply provide a positive or negative offset time when you define the trigger event.
For HomeSeer to calculate the sun times correctly, it needs to know your location. It will use the time zone that’s set in Windows, or you can specify a more exact location. Choose Options from the View menu, and then click the Sunrise/Sunset tab. Select a nearby city from the Pick Location list, or enter the longitude and latitude in the fields provided. Click the Calculate button to tell HomeSeer to recalculate the sun times for the current day.
If you’ve implemented a state machine [Hack #24] so that your home automation system knows about the various conditions of your home, such as the weather and who is at home, you can take these factors into account when automating tasks for sunrise and sunset. For example, if the house is unoccupied at sunset [Hack #70], you might want to turn on a different set of lights or start a script that makes it looks like someone is at home to discourage burglars [Hack #72].
To some extent, the home automation controller you use defines your system. It also determines which home automation software you choose because not all programs work with every controller.
Your choice of home automation controller determines the expandability, flexibility, and reliability of your system, and it might be the single most expensive item you have to buy to automate your home. This hack helps you make the right decision for your particular needs.
A smart controller is a software-programmable X10 transmitter and receiver. The word smart in the term distinguishes these controllers from devices such as minicontrollers [Hack #4], which can transmit commands but cannot be controlled by a computer. Let’s take a systematic look at the most common smart controllers that are available and rate each of them based on these criteria.
- Price
This will tell you quickly if you should consider a particular controller, depending on your budget.
- Features
Does the controller offer a comparative richness of features when compared to others in its category?
- Flexibility and expandability
How scalable and modular is the device?
- Reliability
Are there any known bugs or issues that you should be aware of or that are not commonly documented?
- Support and application base
This is a popularity measure, which indicates bang-for-buck. A better supported controller will give you more options to choose from.
This hack rates each controller with a score from 1 to 5 against each criterion, with an overall score that’s an approximate, opinionated, and weighted sum of the controller’s score in each area. The result should be helpful in deciding which controller to use when compared against your needs and requirements.
Now that we’ve laid the ground rules, let’s get started.
Controllers in this category will enable you to get a feel for what home automation is like, but their limited capabilities prevent many basic techniques.
The CM17A, also called the FireCracker (http://www.x10.com/automation/firecracker.htm), was once X10 Incorporated’s $6 postage-only giveaway to new customers, but now it sells for $40 as part of a kit that includes a transceiver, lamp module, and remote control.
- Praise
At $6, the price was hard to beat, but it’s not such a great deal at $40. The low price and small size of the FireCracker prompted people to write software for it. You can find an ActiveX control for commanding it via a web browser, and other utilities that can work with it are but a quick Google search away.
- Gripes
The FireCracker can only send commands. It cannot receive commands and thus cannot trigger your home automation software to react to events in your home.
- Overall
The FireCracker kit will give you no more than a taste of controlling lights from your PC. This is very different from anything that falls under home automation in my dictionary. I think you soon will grow tired of using it and you quickly will look for a better controller. In fact, even as a demonstration system, it gives the false impression that a home automation system is of limited use. If you want a much better taste of home automation, buy a HomeDirector kit for $20 on eBay instead; it includes a CM11A controller, described later in this hack.
Table 1-1 rates the FireCracker based on the criteria outlined earlier.
The CP290 is the oldest controller in the game, but surprisingly enough, it has some distinct features that are not found in higher-priced devices. Though the CP290 is discontinued and no longer manufactured, you still might find one on eBay.
- Praise
For starters, it’s both a controller and a console. The console has On/Off buttons that you can use to manually control up to eight devices in a house code [Hack #1]. Another unique feature is that you can program a macro into the CP290 and execute it on a schedule or at randomized times to simulate a lived-in look. Finally, it has a battery that saves programmed macros in case the power goes out. Of course, if the power is out, no transmitted event will get through the power line, but at least when electrical service is restored, the events still will be stored.
- Gripes
The worst shortcoming of the CP290 is that, like the FireCracker, it’s a one-way (transmit-only) device. Also, because it’s discontinued, most of the newer home automation software doesn’t work with it. However, several DOS-based programs—and I’m sure, if you look hard enough, Windows-based programs—work with it. A pesky problem with the CP290 is that its clock drifts badly (more than a minute per month), although there is a remedy for this that involves replacing the clock chip with a better one.
- Overall
For the price, there is no reason to buy this old timer (no pun intended) today.
Table 1-2 rates the CP290 based on the criteria outlined earlier.
These are the mainstream workhorses of home automation. They work with many home automation applications, and they are well supported and used in the home automation community.
The CM11A (http://www.smarthome.com/1140.HTML) is the controller behind most residential home automation systems today, and for good reason. It offers a sensible balance between features, price, and software support.
- Praise
The CM11A is the first controller we’ve looked at so far that sends and receives X10 commands, which makes it a lot more flexible for use with smart home automation. The CM11A strikes a good balance between price and features, and it enjoys the widest application support. I am not aware of any recent general-purpose home automation software that doesn’t work with it. It also comes in versions that work worldwide: the CM11A is made for the 110V electrical systems; the CM11K is for 220V systems; and versions are available that work with French, German, and British electrical plugs.
Like the CP290, the CM11A can store macros for use without being connected to a host computer, although not all the software programs that otherwise work with the controller support this ability. It also has the ability to report back to the host computer about commands that collide with each other, as can happen when multiple devices try to send X10 commands at the same time. The CM11A also works with extended X10 commands, a feature missing from some of the other controllers.
- Gripes
There are plenty of known problems with the CM11A when it comes to reliability. For example, there are at least four different ways the CM11A can become hung and stop responding to commands. There also have been reports of the device overheating to the point of being too hot to touch.
- Overall
The CM11A is a sensible choice, unless you’re looking for a build-it-yourself kit or want to integrate infrared control into your home automation system. For most people, your search for a controller to use will end with this one.
Table 1-3 rates the CM11A based on the criteria outlined earlier.
The LynX-10 (http://www.marrickltd.com/products.htm) is, in my opinion, a gem. It is not nearly as popular as the CM11A, although the LynX-10’s build-it-yourself price is in the same ballpark, at about $50. You can buy an already-assembled version for about $120, or an ISA card version for about $180. There is no real reason not to buy the kit to save some money, unless you absolutely don’t know how to solder and don’t care to learn. Also consider that if you’re going to pay $120 for the preassembled version, you’re approaching the price range of the Ocelot (discussed later in this hack), which might be a better controller to consider. However, in the $50 range, the LynX-10 kit rules.
- Praise
The LynX-10 kit is an ideal controller for an enthusiast with an electronics background. You can place the assembled board inside the PC, on the bottom, resting on a sheet of plastic to protect from shorting. In addition, you can use the extra space on the printed circuit board for something useful, such as adding a watchdog timer that resets the PC if it stops working. The LynX-10 has extensive error reporting and statistics counting, which can result in a more robust system, and most home automation software packages work with it, too.
- Gripes
To communicate with the power line, the LynX-10 requires an additional module called the TW523 two-way interface. This adds $20 to the overall cost of using the LynX-10. An issue with the TW523 is that it does not support extended codes and does not receive
Dimcommands, which prevents you from using many of the more advanced devices that are available.Unlike the CM11A and CP290, the LynX-10 cannot function unless it is connected to a computer with home automation software. That is, it doesn’t have the capability of storing and sending macro commands. However, for a truly smart home, you’re going to want the capabilities of a computer [Hack #16], so you shouldn’t consider this to be a drawback except for the simplest of systems.
Tip
Marrick Ltd. (http://www.marrickltd.com/), maker of the LynX-10, also makes the LynX-10 PLC, an improved version of the LynX-10 that does not require a TW523 and supports extended X10 commands. It costs about $100, preassembled, and is also well worth considering.
- Overall
If you don’t need infrared capabilities and you’re willing to build it yourself, the LynX-10 kit is, in my opinion, a sure bet.
Table 1-4 rates the LynX-10 based on the criteria outlined earlier.
The Ocelot (http://www.appdig.com/ocelot.html) is on the high end of the mainstream controller category, and it is priced accordingly at about $200. In addition to sending and receiving X10 commands, it works with a wide range of modular add-ons that provide analog (e.g., temperature) and digital (e.g., alarm sensors) data acquisition capabilities. It can also control relay modules, such as sprinkler valves, and infrared equipment, such as stereos, directly.
- Praise
The Ocelot has a relatively tremendous program space for storing macros—16 K (compared to 1 K for the CM11A). It also can work with touchscreen devices, such as the Leopard (http://www.smarthome.com/73103.HTML), and it is considered to be a flexible and expandable controller.
- Gripes
The Ocelot, like the LynX-10, requires a TW523 and shares the same limitations regarding extended X10 commands. Additionally, the cost of the various (albeit attractive) add-ons adds up quickly.
- Overall
The Ocelot makes a superb and expandable X-10 controller, if you don’t mind the price.
Table 1-5 rates the Ocelot based on the criteria outlined earlier.
These are professional home automation controllers, and they are priced accordingly. They also have extra capabilities that lesser controllers can do only via their host computer, or cannot do at all. These controllers cost in the $600 to $1,000 range, so here’s a brief word to the wise before getting to their reviews. The X10 protocol has some inherent limitations, such as its speed and occasional lost commands due to collisions or noise. Many people find it bothersome, but people who are willing to pay nearly $1,000 for a controller might find it irritating. What this boils down to is that when you enter this price range, X10 might be the wrong technology for you. It’s an appealing low-cost solution, but if you’re willing to spend this much just for a controller, it might be worthwhile to consider other alternatives, such as hardwired dedicated control lines or wireless systems.
The TimeCommander-Plus (http://www.jdstechnologies.com/jdstcp.html) costs about $600 and is similar to an Ocelot with the digital and analog I/O modules already built-in. It has 8 analog inputs, 16 digital inputs, and 8 relay outputs. If that’s not enough, you can add more with a $400 expander unit. It has macro support and logging, built-in timers, and some special enhanced commands for high-end wall switches, such as the PCS SceneMaster (http://www.smarthomeusa.com/Shop/PCS-Wall-Switches/).
- Praise
The TimeCommander-Plus is an integrated unit with powerful hardware features. It easily can control your HVAC system, handle alarm sensors, and actuate sprinkler relays, all from its built-in I/O modules.
- Gripes
There is no direct support for infrared; it requires the Infrared Xpander ($300). Surprisingly, given its price, it also needs a TW523 module to support X10 commands, which brings along the TW523’s limitations as discussed previously.
- Overall
This is a good choice for high-end systems, if your plans call for many sensors and controls actuated from a central location.
Table 1-6 rates the TimeCommander-Plus based on the criteria outlined earlier.
The ultimate in hardware control, the Stargate (http://www.jdstechnologies.com) is a TimeCommander-Plus controller, with voice response and telephone control, including voice mailboxes. Voice response (not to be confused with voice recognition) enables you to record up to 100 phrases and tie them to events and commands.
- Praise
A high-end controller that integrates many components that others sell separately.
- Gripes
Like its predecessors, this controller needs the TW523 for X10 support. At $1,000, the added value is, in my opinion, questionable. The expense of providing features in a dedicated piece of hardware rather than in a host PC is not warranted.
- Overall
An excessively expensive controller for X10 applications.
Table 1-7 rates the Stargate based on the criteria outlined earlier.
There are other controllers besides the ones reviewed here. (See Matt Bendiksen’s sidebar, “The PowerLinc Family,” for example.) However, their capabilities and features are similar, and the evaluations given here provide you with a basis with which you can compare.
X10 is, by nature, modular and incremental. However, think your system through before choosing a controller because changing to a different one later is more involved than adding new modules to the system. Make sure the one you select works with the software you intend to use, and that it can support what you want to do with your system over the next few years. Also consider the requirements of each controller. For example, do you want to have a computer running continuously? Can you wire all your inputs to a central location? Answering these questions should steer you toward choosing the right X10 controller.
—Ido Bar-Tana
You’ll save yourself some hassle, and the need to memorize esoterics, by keeping an up-to-date collection of X10 and related modules.
There’s one thing you’ll learn quickly about using X10: it’s a world that’s filled with hard-to-remember details that, if you forget them, result in hard-to-diagnose problems or bothersome procedures. For example, if you use a computer-based controller that’s based on the TW523 two-way interface [Hack #21], you won’t be able to use modules that work with extended X10 commands. That’s fine if you don’t have any when you first set up your system, but if you later add a two-way light switch, you might spend a lot of time troubleshooting the problem before you remember why it doesn’t work correctly.
More commonly, when it comes time to replace the batteries in your X10 motion detector [Hack #6], you’ll have to remember the correct sequence in which to push its buttons to restore its settings. And the options are numerous: you have to reset its address, select whether it ignores motion during daylight, and determine how soon after the last time it senses motion it sends an Off signal.
Similarly, some modules from Smarthome, such as the LampLinc lamp module, require you to send a special sequence of X10 commands [Hack #13] to set their address, as well as other options. If you want to change its settings or address because you moved it to a new location, you’ll need to repeat the programming procedure.
Clearly, keeping your equipment’s manuals, instruction sheets, and package inserts organized is one approach to solving this problem, but even if your organization gene is strong enough to accomplish this, sorting though all that paper when you want to find something isn’t very much fun. A better approach is to keep an all-electronic library that you can search and organize as you see fit. Here’s a list of resources where you can find most of what you need:
- X10 Incorporated (http://www.x10.com/support/support_manuals.htm)
X10’s web site thoughtfully provides a handy listing of manuals for all the company’s products.
- Smarthome, Incorporated (http://www.smarthome.com)
Smarthome’s web site almost always includes a product manual, in PDF format. To locate a particular manual, search for the product by name, and then look for a download link near the bottom of the Purchasing Information section of the product’s page.
- Leviton (http://www.leviton.com)
Leviton provides manuals for individual products in the tech support area of its web site.
Finally, many X10 devices that are similar in function actually have quite different capabilities. For example, the TM751 transceiver does not enable you to control its built-in outlet via X10, but the RR501 does. The best resource for sorting out quirks such as this is Sand Hill Engineering’s overview of X10 modules (http://www.shed.com/x10stuff.html).
It’s possible that you already have an X10 device or two in your home, and you don’t even know it. In addition, sometimes you can find good deals on modules that work with X10 but don’t admit it.
X10 technology has been around since the mid-1970s, so it’s had plenty of time to become commonplace, and in fact has, with relatively little fanfare. The modularity of the system has allowed it to grow over time, with various modules and add-ons being introduced in response to new markets and demand for new capabilities. For example, the selection of X10 light switches ranges from X10 Corporation’s simple pushbutton switches (http://www.smarthome.com/2031.html; $10) to Smarthome’s two-way designer dimmers (http://www.smarthome.com/2380.html; $70), to Leviton’s sophisticated switches with LEDs that indicate their status (http://www.smarthome.com/4289.html; $75).
This bounty of consumer choice isn’t limited just to light switches. In today’s market, there are hundreds of X10-capable devices to choose from, but not all of them are readily identifiable. Some companies prefer to deemphasize (and sometimes outright conceal) their use of the X10 protocol. This might be an attempt to shield customers from X10’s high geek factor, avoid the stigma of early and less-reliable X10 equipment, or perhaps make their technology seem unique.
If you come across a product that offers remote control or automation, but doesn’t mention X10, it’s worth a little digging to see what protocol it uses. First, determine if it receives signals wirelessly or over the power line. Devices that use the power line often use power line carrier (PLC) to describe their capabilities. If you see that, it’s definitely worth investigating further. But remember that although X10 is a PLC protocol, it’s not the only one, so don’t buy a device that you’re unsure about, unless you can return it easily. Also, other PLC protocols might interfere with X10 signals—there’s limited signal space to share on your electrical lines—so keep that in mind as you investigate unfamiliar devices.
Here are three of my favorite ways to root out secret X10-compatible devices. First, take a close look at the device and see if it looks familiar. X10 Incorporated frequently manufactures devices for other companies to sell under other names. But even with a different label, the devices look essentially the same. For example, the X10 ActiveHome minicontroller (http://www.x10.com/automation/x10_mc460.htm; $13) is identical to the RadioShack Plug ‘n Power minicontroller (http://www.radioshack.com/product.asp?catalog%5Fname=CTLG&product%5Fid=61-2677; $15), but the latter doesn’t refer to X10 in its product description.
In fact, X10 devices that are sold under other names are the most common source of secret devices. They’re often a good deal, too, because some companies, such as IBM, have exited the X10-based home automation business and shed their inventory of modules. Here are some of the names under which X10 equipment is sold:
Table 1-8.
|
X10 Powerhouse |
Heath Kit - Zenith |
|
The BSR System X-10 |
Wesclox |
|
Magnavox |
NuTone |
|
Leviton Manufacturing Co. |
RCA |
|
HomePro |
HomeLink |
|
Advanced Control Technologies |
SmartLinc |
|
Stanley |
Universal Electronics |
|
GE Homeminder |
One-For-All |
|
PCS |
Sears |
|
Safety First |
RadioShack Plug ‘n Power |
|
IBM Home Director |
If you come across a device that you don’t recognize as being an X10 module, see if you can spot a way to set an X10 address [Hack #1]. It might not be described as such, but if you see the familiar A–P house codes, and a way to set 1–16 unit codes, you’ve almost certainly found a compatible device. For example, you might find a wireless replacement doorbell kit that includes a secret X10 chime module [Hack #9] at your local hardware store.
Finally, if you’re determined to discover how a mystery device works, turn to the manufacturer’s web site to see if a manual is available for download. Check the technical specifications, and look for instructions on how to set the unit’s address, if it has one. Or, turn to Google and look for posts on the comp.home.automation newsgroup, where newly discovered X10 equipment often is discussed and dissected. Happy hunting!
Set up a simple state machine to keep track of key conditions and events in your home. Then, use this information to make your smart home even smarter.
One of the keys to having a truly automated home—that is, a home that can react intelligently and proactively to current conditions—is setting up a state machine. A state machine is simply a logical approach to keeping track of key conditions and events so you can decide how to react when something changes.
For example, if you keep track of whether the sun is up when somebody rings your home’s doorbell, you can turn on the porch light if it’s dark, or keep it off during daylight. Without keeping track of whether it’s dark outside, the best you could do is always turn on the light in case it might be dark—not a very good example of a smart home.
Another technique that uses a state machine is to have a text message sent to your cell phone when your home phone rings. The message contains the Caller ID information of the call you missed. If you’re at home, the message isn’t sent to your cell; it occurs only when you’re away [Hack #70]. To do this, your house must know whether you’re at home.
Table 1-8 shows some of the states I track in my system and a snapshot of their status.
Table 1-9. Typical states for an automated home
|
State |
Value |
|---|---|
|
|
|
|
|
|
|
|
|
|
|
|
|
|
|
|
|
|
|
|
|
This handful of simple states enables me to program my system so that automation decisions are made in a seamless and seemingly intelligent fashion. Let’s look at how the states can be used.
For my family, three key states need to be tracked: whether my wife and I are home, whether one of us is home, and whether we currently have houseguests staying with us. Who is currently at home determines how important automation-related messages get delivered. When I am away, the system will send reminders to my cell phone via email [Hack #73]. When I am home, the reminders are announced using text-to-speech. Similarly, reminders for my wife are routed to email, or announced, depending on her at home status.
Who is at home also determines which wake-up alarms are triggered in the morning. If my wife is traveling, her early-morning alarm does not sound, allowing me to sleep until my usual time. When I’m gone, my alarm is similarly silenced [Hack #47].
Whether we have houseguests is tracked for two important reasons. First, it tells the system to stop controlling the lights that are in the guest bedroom. In my experience, houseguests can be startled when a lamp seems to have a mind of its own.
Second, the houseguests state is used to indicate that the house still might be occupied, even though both my wife and I are away. This is an important logical test for reacting to outside motion detectors and other security considerations. As much as guests dislike having the bedroom lights turned off unexpectedly, that’s nothing compared to the sirens and whole-house flashing lights they’d trip if the home was in “secure” mode after my wife and I left.
Most home automation software automatically calculates sunrise and sunset times for your location. By executing scripts at these times, you can set a daylight variable for use in many decisions throughout the day. (Most home automation software can maintain a daylight flag for you automatically.) In my system, daylight is used to decide whether to turn on lights when outdoor motion detectors are triggered, such as on the front porch. When combined with knowing that the house is empty (by looking at the Gordon Home, Gale Home, and Houseguests variables), someone coming to the front door can also start a series of events that makes the home look occupied [Hack #74].
Another environmental state is called Speech OK. This one is checked before all text-to-speech announcements are made. It enables me to silence the system while we’re asleep, watching a movie, or having a dinner party.
Similarly, if Gone To Bed is true, when an inside motion detector sees movement, nearby lights are dimmed to only half-strength—just enough to ensure safe passage—and then turned back off automatically a few minutes later.
Finally, the Holiday Today state is used to silence our weekday morning wake-up alarms. The scripts that wake us up in the morning check this state first, and if it’s true, they just exit silently, so we can sleep in on those rare days off. It’s possible to have this state set automatically by teaching your system which days are nonwork holidays. But I find it easier to just toggle it manually because I also want it to apply when I’m home sick, when I’m just taking a regular vacation day, or if want a later alarm for some reason.
Most home automation software enables you to easily create variables that you can use to store the status of the states you’re tracking. For example, in Indigo you can track states by using a variable [Hack #18]. In XTension, use a pseudo unit [Hack #17] for each state. In HomeSeer [Hack #19], they’re called virtual devices. A pseudo unit (or virtual device) does not have an X10 unit address, but it can be commanded as if it were an X10 module. That is, to set a unit called Gordon Home to true, simply turn it On. To set it to false, turn it Off.
Regardless of which software you’re using, you will generally use one of three techniques for working with the states you’re tracking. For some states, you’ll want to set them using scheduled events. For example, you can set the Daylight state appropriately by scripts that run every day at sunrise and sunset.
Another method is to have the states set logically based on other conditions. For example, when I manually turn on the Gone To Bed state, the state Speech OK is also turned off [Hack #48].
Finally, some states are best set manually. Because I don’t have an exact bedtime, the Gone To Bed state is set when I push a button on a Palm Pad remote control [Hack #5]. Similarly, the states that keep track of who is at home are controlled by push buttons near the front door [Hack #70].
Get Smart Home Hacks now with the O’Reilly learning platform.
O’Reilly members experience books, live events, courses curated by job role, and more from O’Reilly and nearly 200 top publishers.

