If you frequently add or edit more than one customer a time, filling in the New Customer dialog box isnât only mind-numbingly tedious, it also wastes time you should spend on more important tasks like selling, managing cash flow, or finding out who has the incriminating pictures from the Christmas party.
Chances are you store customer info in programs other than QuickBooks, such as a customer relationship management (CRM) program that tracks customer interactions or a word-processing program where you create mailing labels. (Choosing the Right Edition of QuickBooks tells you where to learn more about Intuitâs CRM product.) If your other programs can create Excel-compatible files or delimited text files, you can avoid data entry grunt work by transferring data to or from QuickBooks. (Delimited text files are nothing more than files that separate each piece of data with a comma, space, tab, or other character.) In both types of files, the same kind of info appears in the same position in each line or row, so QuickBooks (as well as other programs) can pull the information into the right places.
In many cases, youâll want to add (or edit) more than one record, but less than a gazillion. QuickBooks 2010 introduced the perfect tool for that: the Add/Edit Multiple List Entries command. When youâre creating customers, vendors, or items, you can use the Add/Edit Multiple List Entries dialog box to paste data from Excel into QuickBooks. Or, to edit existing records, you can filter or search the list to show just the customers (or vendors or items) you want to update and then paste Excel data, type in values, or use shortcut commands to copy values between records.
When you want to transfer a ton of customer information between QuickBooks and other programs, importing and exporting is the way to go. By mapping QuickBooks fields to the fields in the other program, you can quickly transfer hundreds, even thousands, of records in no time.
This section covers it all: working with multiple entries, importing, and exporting.
The Add/Edit Multiple List Entries command lets you add or update values in the customer, vendor, and item lists by pasting information from an Excel spreadsheet directly into a table in the Add/Edit Multiple List Entries dialog box. Other commands, for copying or duplicating values between records, make short work of changes like updating the new billing address for a customer who sends you job after job. Typing values into cells works, too, if you notice a typo in one of the records in the list. And you can customize the table in the dialog box to show only the customers you want to edit and the fields you want to modify.
This command goes by different names depending on where you find it in QuickBooks. Choose it in any of these locations to open the Add/Edit Multiple List Entries dialog box to the customer list:
On the Lists menu, choose Add/Edit Multiple List Entries.
In the Customer Center toolbar, click New Customer & Job, and then choose Add Multiple Customer:Jobs.
In the Customer Center toolbar, click Excel, and then choose âPaste from Excelâ.
QuickBooks automatically selects Customers in the Add/Edit Multiple List Entries dialog boxâs List drop-down menu (unless you open the dialog box from the Vendor Center or the Item List window). You can switch lists by choosing Customers, Vendors, or Items from this menu.
Tip
If you set up jobs for customers, the Add/Edit Multiple List Entries dialog boxâs table includes rows for both customers and jobs. The Name column contains the customerâs name for a customer row and the jobâs name for a job row. Usually, you can spot job rows by looking at the Company Name field, since all jobs for that customer will have the same thing listed here.
To make it easier to edit existing list entries, you can display only the entries you want to edit. Here are some ways to control which customers appear in the table:
Filter the entries. The View drop-down list includes several choices for filtering the customer list. Choose Active Customers if you want to make changes to only active customers in your company file. Inactive Customers displays customers that youâve changed to inactive status (Hiding and Deleting Customers).
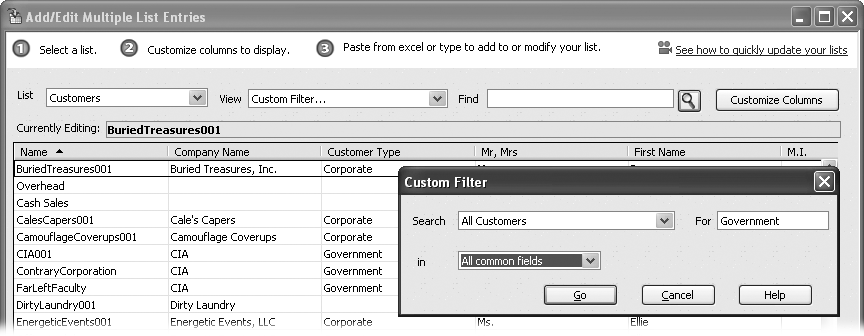
To filter the customer list to your exact specifications, choose Custom Filter and fill in the dialog box shown in Figure 4-5. For example, if you want to divide your government customers into local, state, and federal customers, you can filter the list to show only records with Government in their customer fields. Note that QuickBooks only displays list entries that exactly match what you filter for. For example, if you type (555) to look for the 555 area code, records that donât have parentheses around the area code wonât show up.
Because QuickBooks doesnât save the changes you make in the Add/Edit Multiple List Entries dialog box until you click Save Changes, you can select Unsaved Customers to see all the entries youâve edited but not yet saved. Choosing âCustomers with errorsâ displays entries that contain invalid values, like a customer type or tax code that doesnât exist in your company file. In fact, if you click Save Changes when there are records with errors, the dialog box automatically filters the list to the âCustomer with errorsâ view, so you can see what you need to correct before you can save your changes. See Saving changes to learn how to spot and fix errors.
Figure 4-5. In the Custom Filter dialog box, you can type a word, value, or phrase to look for, and specify the fields you want QuickBooks to search. For example, type Government in the For field, and search common fields (all the fields listed in the âinâ drop-down list) to find customers with the Government customer type.
Find entries. Typing a word, value, or phrase in the Find box is similar to applying a custom filter to the list, except that QuickBooks searches all fields. For example, if you type 555 in the Find box and then click the Search button (which looks like a magnifying glass), QuickBooks will display records that contain 555 anywhere in the record, whether itâs in the company name, telephone number, address, or account number field.
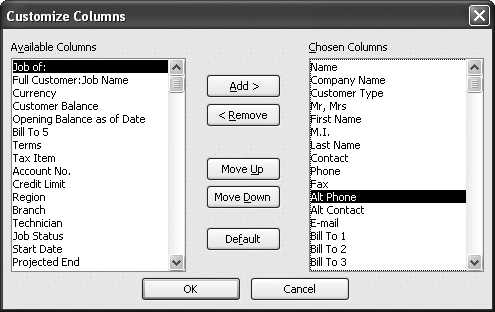
Customize the columns that appear in the table. To paste data from Excel in a jiffy, you can customize the tableâs columns to match your Excel spreadsheet. (If youâre an Excel whiz, you may prefer to rearrange the columns in your spreadsheet before pasting data.) Click Customize Columns to open the Customize Columns dialog box. The tools for customizing columns are straightforward, as Figure 4-6 illustrates. To add a column, select the field you want in the Available Columns list and then click Add. To remove a column, select it in the Chosen Columns list and then click Remove.
Sort the list entries. To sort the entries in the table, click the column heading for the field you want to sort by, and QuickBooks sorts the records in ascending order (from A to Z or from low to high numbers). Click again to sort in descending order.
Whether you want to add new entries or edit existing ones, you can paste data from Excel, type in values, or use commands like Copy Down to copy values between records. (When you want to add a new record, you have to click the first empty row at the bottom of the list before you can enter any data.) Here are the various ways to enter values in records:
Type values in cells. This method is straightforward: Click a cell and make your changes. Click within text to select the text up to where you clicked. Click a second time to position the cursor at that location. Click the right end of a cell to select all the text in it. Drag over text to select part of an entry.
Copy and paste values. If youâre a fan of copying and pasting (and who isnât?), you can copy data from an Excel spreadsheet (a single cell, a range of cells, one or more rows, or one or more columns) and paste it into the table. The only requirement is that the rows and columns in the table and in the spreadsheet have to contain the same information in the same order. You can rearrange the rows and columns either in the dialog box or in the spreadsheet, whichever you prefer. When you paste Excel data into existing records in the Add/Edit Multiple List Entries dialog box, QuickBooks overwrites the existing values in the cells. To paste Excel data into new records, be sure to select the first empty row in the Add/Edit Multiple List Entries dialog box before pasting the data.
Tip
You can copy and paste data from one cell in the table to another. For example, if a customer with several jobs has relocated its main office, you can copy values from Bill To cells and paste them into the cells for the customerâs jobs. When you copy and paste data within the table, you can copy only one cell at a time. If you want to copy several cells, itâs quicker to make the change in your Excel spreadsheet and then paste the data from Excel into the Add/Edit Multiple List Entries table.
Duplicate a row. To create a new record that has many of the same values as an existing record, right-click the row you want to duplicate and then choose Duplicate Row from the shortcut menu. The new record appears in the row below the original and contains all the same values as the original record, except that the value in the first field begins with âDUPâ to differentiate it from the original. Edit the cells in the row that have different values. Then, edit the Name cell to reflect the new customer or jobâs name.
Copy values down a column. You can quickly fill in several cells in a column using the Copy Down command. Because this command copies data into all cells below the cell you select, itâs important to filter the list (Selecting a list to work with) to show only the records you want to change. Then, right-click the cell you want to copy down the column and choose Copy Down from the shortcut menu. QuickBooks copies the value in the selected cell to all the cells below it in the column, overwriting any existing data. For example, if you want to change the contact name for all the jobs for a particular customer, filter the list to show all the records for that customer (in the Find box, type the customerâs name, and then click the magnifying glass icon). Next, type the new contact into the first Contact cell. Then, right-click the cell and choose Copy Down.
Insert line. If you want to insert a blank line in the table (to create a new job for a customer, for example), right-click the record where you want the blank line, and then choose Insert Line from the shortcut menu (or press Ctrl+Ins).
Delete line. If you created a record by mistake, you can get rid of it by right-clicking anywhere in its row and then choosing Delete Line.
Clear column. If you want to clear all the values in a column, right-click in the column and then choose Clear Column from the shortcut menu.
After youâve completed the additions and modifications you want, click Save Changes to save those list entries. QuickBooks saves all the entries that have no errors and tells you how many records it saved. If it finds any errors, like a value that doesnât exist in the Terms list, it displays those entries in the table in the Add/Edit Multiple List Entries dialog box and changes the incorrect values to red text. Click a cell to see a hint about the error. If the problem is a list entry that doesnât exist, the â<list name> Not Foundâ dialog box opens, where â<list name>â is a list like Terms. Click Set Up to add the entry to the list. Fix the errors and then click Save Changes again.
If you have hundreds of customer records to stuff into QuickBooks, even copying and pasting can be tedious. If you can produce a delimited text file or a spreadsheet of customer info in the other program (Importing a Delimited File), then you can match up your source data with QuickBooks fields and import all your customer records in one fell swoop.
Delimited files and spreadsheets compartmentalize data by separating each piece of info with a comma or tab, or by cubbyholing them into columns and rows in a spreadsheet file. An exported delimited file isnât necessarily ready to import into QuickBooks, though. Headings in the delimited file or spreadsheet might identify the field names in the program that originally held the information, but QuickBooks has no way of knowing the correlation between those fields and its own.
But donât worry: You can help QuickBooks understand the data youâre importing. QuickBooks looks for keywords in the file youâre importing to figure out what to do, as shown in Figure 4-7. So, youâll need to rename some headings to transform the file produced by the other program into an import file that QuickBooks can read. QuickBooksâ customer keywords and the fields they represent are listed in Table 4-1. Fortunately, Excel and other spreadsheet programs make it easy to edit headings. When your exported file looks something like the file in Figure 4-7, save it in Excel 2010 by clicking that programâs File tab and then choosing Save (if youâre using Excel 2007, click the Office button and then choose Save). The box on The Easy Way to View Data describes how to use spreadsheets for other data task
Tip
To see how QuickBooks wants a delimited file to look, export your current QuickBooks customer list to an .iif file (Exporting a text file) and then open it in Excel and check out the field names it uses.
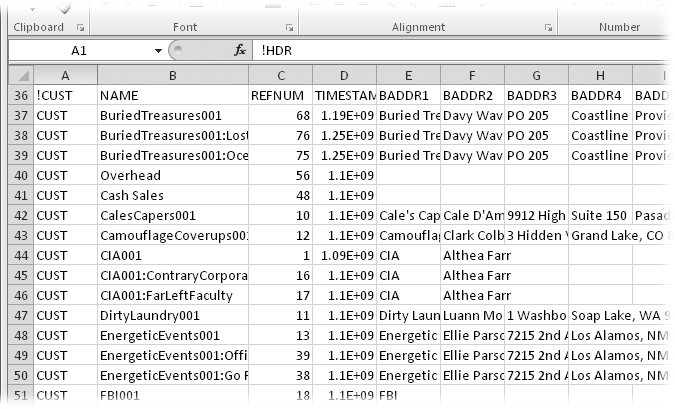
Figure 4-7. A file you import has to use field names that match QuickBooksâ. For example, replace a Last_Name heading with LASTNAME, which is the keyword for the last name field in QuickBooks. The first column has to include the keywords QuickBooks uses to identify customer records. And the first cell in the first row of a customer import file has to contain the text â!CUSTâ.
Table 4-1. Customer keywords and their respective fields
|
Field contents | |
|---|---|
|
NAME |
(Required) The Customer Name field, which specifies the name or code that you use to identify the customer. |
|
BADDR1 â BADDR5 |
Up to five lines of the customerâs billing address. |
|
SADDR1 â SADDR5 |
Up to five lines of the customerâs shipping address. |
|
PHONE1 |
The number stored in the Phone Number field. |
|
PHONE2 |
The customerâs alternate phone number. |
|
FAXNUM |
The customerâs fax number. |
|
|
The customerâs email address. |
|
NOTE |
Despite its confusing keyword, this field is the name or number of the account stored in the Account No. field. (To set up a customer as an online payee, you have to assign it an account number.) The NOTEPAD keyword (later in this table), on the other hand, represents the notes you enter about a customer. |
|
CONT1 |
The name of the primary contact for the customer. |
|
CONT2 |
The name of an alternate contact for the customer. |
|
CTYPE |
The customer type category. If you import a customer type that doesnât exist in your Customer Type List, QuickBooks adds the new customer type to the list. |
|
TERMS |
The payment terms by which the customer abides. |
|
TAXABLE |
Y or N in this field indicates whether you charge the customer sales tax. |
|
SALESTAXCODE |
The code that identifies the type of sales tax to charge. |
|
LIMIT |
The dollar amount of the customerâs credit limit with your company. |
|
RESALENUM |
The customerâs resale number. |
|
REP |
The representative who works with the customer. The format for a rep entry is name:list ID:initials, such as âSaul Lafite:2:SEL.â Name represents the repâs name; list ID equals 1 if the repâs name belongs to the Vendor List, 2 for the Employee List, or 3 for the Other Names List; and initials are the repâs initials. |
|
TAXITEM |
The name of the type of tax you charge this customer. What you enter has to correspond to one of the sales tax items on your Item list (on Sales Tax Items). |
|
NOTEPAD |
This field is where you can wax poetic about your customerâs merits or simply document details you want to remember. To see this imported data in QuickBooks, in the Customer Center, select the customerâs name, and then click the Edit Notes button on the windowâs right side. |
|
SALUTATION |
The title to include before the contactâs name, such as Mr., Ms., or Dr. |
|
COMPANYNAME |
The name of the customerâs company as you want it to appear on invoices or other documents. |
|
FIRSTNAME |
The primary contactâs first name. |
|
MIDINIT |
The primary contactâs middle initial. |
|
LASTNAME |
The primary contactâs last name. |
|
CUSTFLD1-CUSTFLD15 |
Custom field entries for the customer, if youâve defined any. To learn how to create custom fields, see Hiding Entries. |
|
HIDDEN |
This field is set to N if the customer is active in your QuickBooks file, or Y if heâs inactive. |
|
PRICELEVEL |
The customerâs price level (Entering payment information). |
QuickBooks lets you do lots of cool things with customer info, but say you have a mail merge already set up in FileMaker Pro, or you want to transfer all of your customer records to Access to track product support. You have to export your customer data out of QuickBooks into a file that the other program can read and import.
To extract customer info from QuickBooks, you have three choices:
Export your customer information directly to Excel if youâre not sure what info you need and youâd rather delete and rearrange columns in a spreadsheet program. QuickBooks exports every customer field. Then, you can edit the spreadsheet all you want and transfer the data to yet another program when youâre done. (The one downside to this approach is that the spreadsheet includes blank columns between each data-filled column.)
Create a report when you want control over exactly which fields QuickBooks exports. By creating a customized version of the Customer Contact List report, for example, you can export the same set of records repeatedly, creating delimited files, spreadsheets, and so on. (Chapter 21 covers QuickBooksâ reports in detail.)
Export a text file of your customer data if you need a delimited text file to load into another program. The delimited file lists each customer in its own row with each field separated by tabs.
The following sections explain all your options.
In QuickBooks, exporting the Customer List to Excel is a snap. To export all the customer data stored in QuickBooks to an Excel file, in the Customer Center toolbar, click Excel, and then choose Export Customer List to open the Export dialog box (Figure 4-8). The Excel menu also contains commands for exporting transactions and for importing and pasting spreadsheet data into QuickBooks.
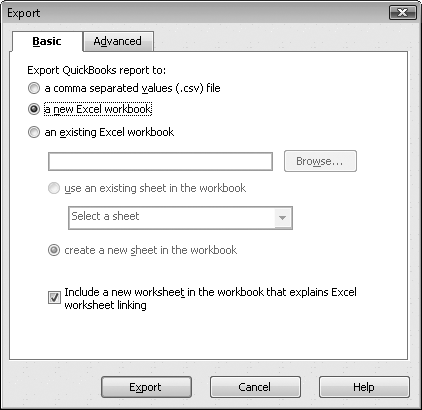
Figure 4-8. The Export dialog box that appears is already set up to create a new spreadsheet. Click the Export button and youâll be looking at the Customer List in Excel in mere seconds. If youâd rather give QuickBooks more guidance on creating the spreadsheet, click the Advanced tab and then adjust options like Autofit (which sets the column width so you can see all your data) before clicking Export.
By modifying the Contact List reportâs settings, you can export exactly the fields you want for specific customers. For example, storing email addresses in QuickBooks is perfect when you email invoices to customers, but you probably also want them in your email program so you can communicate with customers about the work youâre doing for them. Exporting the entire Customer List is overkill when all you want is the contact name and email address; thatâs where exporting a report shines.
Out of the box, QuickBooksâ Customer Contact List report includes the Customer Name, Bill To address, Contact, Phone, FAX, and Balance fields. Hereâs how you transform this report into an export tool:
Choose ReportsâCustomers & ReceivablesâCustomer Contact List.
The Customer Contact List report window opens.
In the report windowâs toolbar, click Modify Report.
The âModify Report: Customer Contact Listâ dialog box that appears lets you customize the report to filter the data that you export. (See Customizing Reports to learn about other ways to customize reports.)
Click the Display tab (if youâre not already on it) and, in the Columns section, choose the fields you want to export.
The Customer, Contact, Phone, and Fax fields might be good ones to export. Then again, they might not. You can add or remove whichever fields you want by clicking a fieldâs in the Columns list to toggle that field on or off. If thereâs a checkmark in front of the fieldâs name, the report will include a column for that field; if thereâs no checkmark, it wonât.
To produce a report for only the customers you want, click the Filters tab. In the Filter list, choose Customer. In the Customer drop-down list that appears, choose âMultiple customers/jobsâ to select the customers you want to export.
QuickBooks displays the Select Customer:Job dialog box, with the Manual option selected; thatâs what you want. In the list of customer names on the right side of the Select Customer:Job dialog box, click each customer you want to export, and then click OK. Then, in the Modify Report dialog box, click OK.
You see the report with the modifications youâve made.
In the Customer Contact List windowâs toolbar, click Export.
The Export Report dialog box opens. To create a new Excel workbook, simply click Export. Your computer launches Excel and displays the report in a workbook.
Tip
Saving the modified report reduces the number of steps you have to take the next time you export. Memorizing Reports explains how to memorize a report.
To create a delimited text file of the entire Customers & Jobs List (or any other QuickBooks list), choose FileâUtilitiesâExportââLists to IIF Filesâ. The first Export dialog box that appears includes checkboxes for each QuickBooks list, described in detail on Exporting Lists and Addresses. Turn on the checkboxes for the lists you want to export, and then click OK.
Get QuickBooks 2011: The Missing Manual now with the O’Reilly learning platform.
O’Reilly members experience books, live events, courses curated by job role, and more from O’Reilly and nearly 200 top publishers.

