Chapter 4. Getting the Right Materials

I'M GOING TO MAKE a confession: I’ve read loads of books on drawing and painting, and guess what section I always gloss over and never read? The “materials” section. I know I’m probably not alone in this, but as a Presto Sketcher, you need to be smart about the materials you use for different occasions. So I hereby present to you: The Materials Section That You Will Actually Read.
The Materials Section That You Will Actually Read
There’s an ever-widening array of sketching materials to choose from these days, not to mention some pretty snazzy digital materials on offer. It pays to think about what you’re like as a sketcher and how you want to incorporate sketching into your work; this will steer you toward a more satisfying set of tools. The good news is that anything you draw with and draw on is fine for Presto Sketching. But isn’t it good to know the advantages and disadvantages of different materials, to bring out your best sketching? With that in mind, let’s take a look at the following:
What Materials Star Sign are you?
Which markers, paper, and sketchbooks to use
Dealing with whiteboards
Digital surfaces
Blending the traditional and digital
What Materials Star Sign Are You?
- The MacGuyver Sketcher
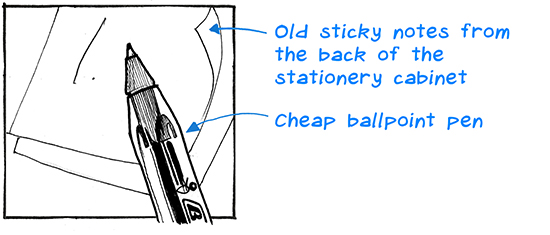
You’ll sketch with anything and on anything that’s nearby, whatever it takes to get the job done.
Go ahead and grab that old blue biro and that unused Filofax from 1992, or some ratty sticky notes where the sticky back bit is all clogged up with dust and last month’s potato chip crumbs. They’ll do just fine. But know this: sooner or later your creative instincts and resourcefulness will land you in front of the top brass, and they’re going to want to see some polish, capisce?
- The Earnest Sketcher

When it comes to sketching, why do 1 line when you could do 20? Hopefully one of them will be right.
Oh, the joy of producing something that’s perfect in every way...in form, function, and feedback from others. Sure, it takes a lot of time, paper, and pencils, and there’s so much of that eraser dust on the paper, desk, and floor that it looks like a herd of dandruff fairies skipped past, but that’s the cost of perfection. Might I tempt you to be a little reckless: hop on the Harley Davidson of stationery for a while, and use ink without—gasp—a pencil and an eraser? It will be faster and more exhilarating. You’ll make mistakes, but your confidence will go through the roof.
- The Executive Sketcher

Your sketches are always going to be glorious, because they’re rendered with a Mont Blanc fountain pen on 600 gsm organic cotton archival paper.
You have an eye (and a wallet) for the most expensive gear. You never fail to impress others with your first-class style, so why should your sketching be any different? Between you and me, I applaud your contribution to the stationery manufacturing industry, but you might want to practice a bit with a humble Sharpie and some letter-size printer paper first. Go ahead, I won’t tell anyone.
- The Presto Sketcher
You’re never without a marker and are always ready to use it to make your idea or someone else’s idea tangible.
Ideas won’t wait for the perfect time, the perfect place, the perfect pen, or the perfect audience, so you have to go with whatever is handy, wherever you are. Still, there’s nothing wrong with having the right marker for the right scale. The value is in the way you visually express the idea: clearly, quickly, confidently, and compellingly. And with a bit of panache.
Whatever your sketching star sign is, the more you do the activities in this book and the more you sketch in the wild with your friends, clients, and colleagues, the more you’ll turn into a Presto Sketcher. Because Presto Sketching is light, simple, and often done impromptu, any materials are good materials. It’s important to move at the speed of your mind and hand, not your materials. So, use what you like, always keep them fresh, and always keep them close by.
Markers
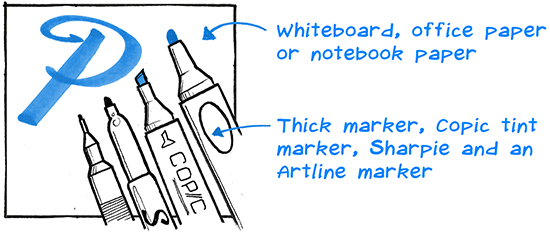
Think about the scale of your sketching. If it’s just for you, a simple fine-line marker is great. If it’s for a group of people, or to be viewed from around a large room, make sure you use a thick marker (take a look at the visual effects of different lines produced by the markers in Figure 4-1). The finer the marker, the more precision you have, but try not to be wooed by precision: going for the perfect line will slow you down and inhibit your thinking.

Figure 4-1. Try a range of markers: Try different marker brands, thicknesses, and point types to see what’s right for you.
If the sketching you’re doing is meant to last beyond the immediate conversation, think about the best way to render it and capture it. Is it going to carry more authority if done with a colored tint marker or two, or perhaps in your organization’s corporate colors? Would going straight to digital and using a tablet help you reuse and repurpose it later on?
I tend to use a humble black Artline or Staedtler medium marker for most of the sketching on paper that I do. Indeed, most of the sketches you’ll find in this book are done with a medium black marker. I use thicker markers like whiteboard markers, Sharpies, and Neulands when I’m sketching with others so that they can see them from across a room.
I’m a huge fan of alcohol-based color markers (or art markers) like Copic, Prismacolor, and Letraset. These color markers are popular with comic artists, architects, graphic designers, industrial designers, and calligraphers. The grooviest thing about them is that you can vary the tint of the color by going back over your strokes again and again. Look for ones that have both brush-tip and chisel-tip ends. The best ones are also refillable, with replaceable nibs, too.
If you want strong, gutsy color, go no further than the Posca and Ironlak paint markers. These are becoming more popular, and with their easy-on opaque intense colors, it’s easy to see why.
Paper and Sketchbooks
The main thing to keep in mind when choosing paper to sketch on is the life it will have after you’re done sketching. If it’s made to share or stick up on a wall or whiteboard, loose-leaf blank office paper is perfectly fine. Loose leaf tends to be easier to scan, too.
If it’s anything that you want to hang on to for a while, invest in a decent sketchbook (Figure 4-2). This is especially important if you’re practicing your technique over and over, or if you’re in the habit of observing and sketching while you’re out and about.1 This is something I learned the hard way: the more sketching I did on loose-leaf paper, the more disorganized I became, and the more I kept losing my sketches. Keeping a sketchbook is one of the best habits a Presto Sketcher can develop.

Figure 4-2. Paper variety is important: Blank office paper (left) is perfectly fine to sketch on, but try different kinds of sketchbooks, too. Hardcover ones with an elastic strap are great (middle), but avoid spiral-bound sketchbooks (right), because the metal can be uncomfortable on your hand...especially if you’re left-handed!
Sketchbooks range from inexpensive, pocket-sized units to thick toothy A3 pads, and everything in between. I prefer A4 (letter) size (about 220 mm x 300 mm) and 100 to 110 gsm, because I can draw something fairly large, but they’re still small enough to be portable. I don’t tend to like tiny sketchbooks, but I know others who swear by A5 size (150 mm x 210 mm), or even pocket size.
Variety is important! Make sure that you try different types and brands, from Rhodia’s dreamy silky-smooth paper, to Whitelines’s light-gray paper with—er—white lines, to Khadi Papers’s 210 gsm thick textured cotton paper. Bleed-proof paper pads are brilliant if you sketch with alcohol-based markers like Sharpies and Copic markers, and these days you even can get waterproof paper.2
Now, a word of caution! Sketchbooks are a gateway drug for many people who—ahem—have a healthy appreciation of fine stationery. There are tribes of people out there who make it their life’s mission to find and collect the most exquisite notebooks and sketchbooks as well as making delicious sketchbooks with detailed leather-bound covers by hand. Whatever your poison, just make sure you actually sketch in them.3 Here are a few other tips for sketchbooks:
Always check first to see if your marker will bleed through the paper.
Steer away from using notebooks with lines on every page (Figure 4-3). Lines constrain your hand, and constrain your mind!

Figure 4-3. Avoid regular lined paper: Avoid regular lined paper (left); lines constrain the mind! Blank paper is perfect (middle), and dotted or gridded paper is fun (right).
Mix it up by trying paper with dot grids and line grids. Rhodia and Moleskine have great sketchbooks and notebooks with grids.
Avoid buying notebooks with templates in them (e.g., storyboard templates, large screen and mobile screen templates). You’re better off drawing these by hand.
Always date your sketches so that you have a record of how you improve your technique and what sorts of themes and phases you go through.
Try annotating your sketches using a set of color-coded shorthand reference icons (Figure 4-4), so it’s easier to keep track of different topics and themes you sketch.

Figure 4-4. Sketchbook annotations: Include little annotations next to your sketches to keep track of different themes and topics. These are ones I use: from left to right, screenshot, random idea, problemsolving, schematic diagram, and team-based sketching.
Whiteboards
I know some people harbor a morbid terror of having to draw on a whiteboard. I mean, it’s such a hard, smooth, unforgiving surface, isn’t it? And it’s up on the wall, for crying out loud, for everyone to watch every single line you draw and mistake you make! What a cruel invention!
But trust me, the whiteboard is your friend. Think of a whiteboard as another voice in the room; you have the opportunity to let it reflect and condense whatever the conversation is.
There’s no harm in practicing what you’re going to draw on a whiteboard well before the meeting gets underway, or at least drawing something on the whiteboard ahead of time, so it’s ready for when everyone else enters the room for the meeting.
Whiteboards are generally fairly large, but you also can get smaller portable ones.4 Betabook is a great example of a portable whiteboard that folds in half like a book, to about A4 (letter) size.5 I began using a Betabook a while back, and I find it super useful in meetings—especially online videoconferences—where I want to quickly draw something simple to show others and there’s no other writable surface around.
Digital Surfaces
Some people are purists when it comes to sketching only with paper and markers, or only with their tablet, but I think variety and flexibility are great, and both digital and traditional media have advantages and disadvantages. What’s most important is that you try different media for yourself to see how they work for you, your abilities, your workflow, and the style you’re after.
Here’s a synopsis of different types of digital surfaces, some advantages, and some things about which you need to be aware.
Graphic Tablets
Graphic tablets (Figure 4-5) let you draw with a stylus onto a plain surface, capturing and sending whatever you draw to software on a computer, like Adobe Photoshop or Autodesk SketchBook.6 Graphic tablets are also pressure-sensitive, which allows you to vary the thickness of your digital sketching stroke in really interesting ways.
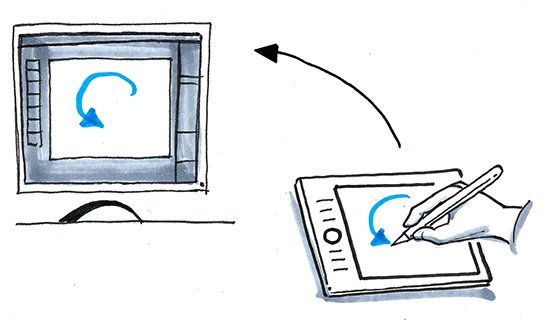
Figure 4-5. Graphic tablets: Some people like using graphic tablets, because they can draw directly into their preferred graphics software (like Adobe Photoshop or Autodesk SketchBook).
The trickiest thing about this way of digital sketching is that the sketch itself appears on the computer screen and not on the surface on which you’re drawing, and often with a little bit of a delay. This can be a bit disorienting, but it’s well worth sticking with it if you want to become fluent in digital sketching.
Another disadvantage for you might be the different feel of a stylus on a smooth synthetic surface. To overcome this, try just sticking a piece of regular paper to the tablet, and sketching with the stylus on that.
Embedded LCD Graphic Tablets
If watching your sketch magically appear on a screen while you’re sketching blind on a surface is a bit weird for you, you might want to try an embedded LCD tablet (Figure 4-6). These tablets essentially let you draw directly on a large touchscreen. They tend to have similar resolution as regular computer screens, plus they’re pressure-sensitive.

Figure 4-6. Embedded LCD graphic tablet: This is Jess, from strategic consultancy Second Road, working up a digital sketch on an LCD graphic tablet, using her paper sketches as a reference.
Tablets and Apps
These days, iPad and Samsung tablets offer a pretty sophisticated digital sketching experience for much less money than what you have to pay for big LCD graphic tablets. So, if you don’t need the larger-sized LCD graphic tablets, an iPad or a Samsung tablet is perfect.
You can have a lot of fun sketching with your finger on a smartphone, and there are many apps around—including apps that come out of the box with the smartphone—that let you turn out a reasonably nice sketch. But I much prefer digital sketching with a stylus on a tablet.
And, oh my word, the sketching apps for tablets are getting better and better! There are new variations coming out all the time, so I’m not going to recommend one app over another.7
You even can have the best of both worlds by using the Astropad app. Astropad lets you sketch on your iPad and mirror it wirelessly to your Mac, into software you might be more familiar with, like Adobe Photoshop.
Whatever tablet and app you use, it’s important to fully embrace the advantages that the digital sketching experience gives you, rather than just trying to do exactly the same thing as you would with a marker and paper.
Here’s an example of what I mean. There are precious few moments in my life that I can recall when technology had a wonderful, massive, mind-blowing effect on me. The first was discovering the Star Wars arcade game in my local corner store. Another was the first time I used JavaScript and CSS to create a dynamic style switcher on a website, where the entire website would change look and feel at the click of a link.8 Add another such moment was the first time I used Procreate on an iPad, and I sketched in layers.
In layers! I could preserve different parts of my sketch in layers! I could sketch “under” my existing sketch! Honestly, I have goosebumps right now, just thinking about it.
This layers function can definitely open up—dare I say it—a new dimension to your sketching (Figure 4-7). For example, here’s a nifty little trick that my friend Justin Cheong does in Procreate for his conference sketchnotes: he imports a photo of a conference speaker, traces over it, and then removes the photo, leaving an impressive sketch of the speaker.9
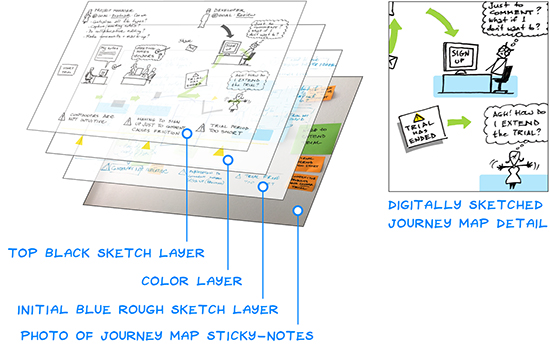
Figure 4-7. Digital sketching in layers: Several tablet apps let you sketch in layers, which opens up more sketching methods, such as tracing over a photo (in this case a photo of some journey map sticky notes), a rough sketch layer, and a color layer.
Take Admiral Akbar’s Advice
I must press upon you one warning about digital sketching, however. It’s all too easy to keep using the Undo function as you sketch, in an attempt to create that one perfect picture. But as Admiral Akbar sagely shouted in Return of the Jedi, “It’s a trap!” That Undo function can actually smother your creative spirit and hamper your way to developing your own natural visual style.
Blending Traditional and Digital Media
There’s no end to the blending of the traditional world of pens and paper together with the digital world, and there are exciting new technologies and blends emerging all the time. Here are a few that are worth trying:
- LiveScribe pens
These “smart pens” use special paper infused with patterns of microscopic dots to digitize your notes and sketches, and map what you’re sketching to any audio that’s recorded at the same time. This is perfect for situations like customer interviews and workshops.
- Evernote Moleskines and Evernote Post-It Notes
Evernote has been busy doing its best to integrate the paper-to-digital workflow, with the Evernote Smart Notebook and Evernote Post-It Notes. They essentially use your smartphone’s camera and OCR to index, classify, and organize the information you sketch and write.
- Wacom Inkling
The Wacom Inkling solves the problem of using only a certain type of “smart” pen or “smart” paper to get your sketches into your computer. It’s a little box that sits at the top of your sketchbook that uses infrared signals, centaur eyelashes, or goodness knows what magic to digitize your sketches straight to your computer.
Sketching Materials at Work
The sketching materials you use at work will depend on how you want to bring sketching into your workflow (Figure 4-8). If you needed sophisticated accounting functionality in your job, you wouldn’t struggle on just using a calculator, would you? You’d ask your workplace to get the right accounting software. The same applies to sketching materials: you needn’t be shy about asking your workplace for the right stationery, or a whiteboard.
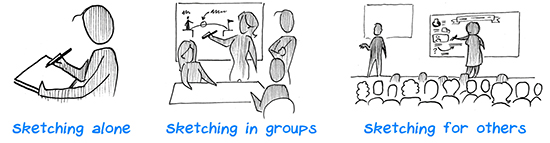
Figure 4-8. Materials differ depending on what mode you’re sketching in: You’ll need different materials when sketching for yourself, sketching with a group, or sketching for others.
Sketching Alone
If the sketching you’re doing is mainly for your own thoughts, learning, and practice, go for a sketchbook. If you’re sketching anything that you’re likely to scan and share, a sketchbook is still your friend, but consider a larger one so that you can get into the habit of sketching at a larger scale.
If you’re sharing sketches as you draw them with a team (like user interface sketches, storyboards, and so on), humble office paper is perfect.
Sketching in Groups
If you’re sketching with a small group of people, a whiteboard is your best friend. Whiteboards are probably the best co-sketching surfaces there are—especially floor-to-ceiling boards, or the 6-foot boards on wheels. If I had my way, I’d make sure every meeting room and office break-out area in every office building had a floor-to-ceiling whiteboard. If sketching is a better way of working, the wall is the new desk.
As I mentioned earlier, however, drawing on a whiteboard can be rather daunting for some people, and it can hold them back from taking part in sketching in a meeting, so keep this in mind if you’re expecting a group to jump in and sketch together.
If you’re preparing materials for a small group to sketch with, consider the large pads of sticky tear-off flipchart paper, too. Careful, though: it’s easy to burn through them, and they’re not cheap.
Lots of really interesting digital options for co-sketching have been emerging over recent years. If you’re lucky enough to have an interactive whiteboard (IWB) at your workplace or school, you’ll know the delight of drawing with your finger on a wall and seeing pixels appear like magic. Many teams are spread across different locations and countries these days, which is where digital co-sketching options are essential. I really enjoy using Mural, and Google Suite has just released JamBoard. These digital options save your work online, so it’s really easy for a team to work together from different locations and pick up where they left off seamlessly.
Sketching for Others
The BASE jumping equivalent of sketching is graphic facilitation,10 or sketching for others in real time, reflecting a meeting, workshop, or conference talk in pictures to enhance everyone’s understanding and engagement. For this, you will need a large, stable surface11 in a prominent area and nice thick pens so that everyone can read what you’re drawing from a distance.
Exercises
 Exercise 4-1: Treat yo’self
Give yourself permission to go out and buy a decent sketchbook and a couple of different markers to use for all the other exercises in this book. Ask the nice people in the shops for advice; you’ll probably make their day.
Exercise 4-2: Break in those new materials
Now, it’s easy to think that everything inside a sketchbook has to look PERFECT, as if it just came from the desk of Monet, or Leonardo da Vinci. No, it doesn’t. It’s not only okay to make lots of futzy mistakes, you should make lots of mistakes. No one else is going to see inside this sketchbook.
So, open your nice new sketchbook, take up one of your nice new pens, and practice some sketching drills like those shown in Figure 4-9. Do them over and over. Fill a page with each type of swirl and pattern, to help forge a stronger bond between your brain and your hand.

Figure 4-9. Sketching drills to try: Try copying these patterns with your new sketching materials.
Exercise 4-3: Doodle some pixels
Now’s a great time to try doodling in pixels! If you have a smartphone or tablet, open an app that allows you to doodle with your finger (like the native note-taking or messaging apps) and try sketching the drills in Figure 4-9.
Download a sketching app (try the apps mentioned in this chapter, or search for “sketching” in the App Store, Google Play, or Windows Store), and try the sketching experience in that app, as well.
Some Questions for You
How do you compare the pair?
Get your hands on at least two different kinds of pencils, like a harder type (H, 2H) and a softer type (B, 2B). Try sketching some shapes, like in Exercise 4-2. Which do you prefer? Why is that?
Pixels and/or paper?
As I mentioned, I like the idea of sketching on both paper and screens rather than picking one mode over another. After doing Exercise 4-3, do you find doodling in pixels easier or more difficult? What do you like (or not like) about the experience?
How are whiteboards used at your work?
Do you have any whiteboards where you work? How do people use them? How do you think you might use them more effectively?
Interview with Justin Cheong
Justin is only just getting started in his graphic facilitation and sketchnoting career, but already he has been an amazing inspiration and example to others.
JC: I’ve been sketchnoting for a while, and I’ve just started my own freelance business in graphic facilitation. I attend events and workshops to visualize the flow of a conversation as it unfolds, using a giant scroll of paper and tons of paint markers. It’s been great fun, and I’m still learning lots along the way.
I really enjoy the live aspect of graphic facilitation. There’s something powerful for the people in the room who see that the large piece of paper starts blank, and it’s their conversation that is going to fill it. Rather than it being prefilled. They feel more connected to it, because the image emerges as they speak (Figure 4-10).
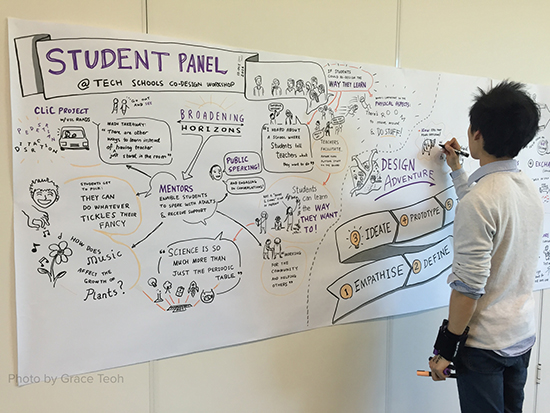
Figure 4-10. Justin in full flight as a graphic facilitator: “There’s something powerful for the people in the room...They feel more connected to it, and to each other, if the image emerges as they speak.”
Preparation is very important for these sessions. I prepare by reading any materials sent to me beforehand, and then I’ll do some thumbnailing to test out different layouts for the graphic. Thumbnailing is scribbling down about 10 ideas (according to what I know about the event), and then selecting one or two of the strongest compositions. Thumbnailing gives me some solid ideas for how I can draw the image during the event.
Buffering is another important part of my scribing method. Often at the start of a talk or conversation, I’m not really sure what topics are going to emerge. So if a speaker says something and I’m unsure whether it’s relevant, I’ll write it down on an index card as a buffer. Once the talk gets to a few minutes in, I usually get a clearer sense of what the key themes are, and I can start to transfer some of the messages from the cards to the canvas. From there, it becomes much easier for me to scribe directly onto the canvas. I just have to keep track of time, and make sure I don’t run out of white space to capture information during the duration of the event.
I’ve developed quite a distinct style now. I mostly use black Posca paint markers because they produce dense, vivid colors. Shaking the pen adds to the theatrics and showman factor. I also use an Arm-adillo, which straps to my wrist and keeps my markers handy.
For smaller-format sketchnotes, I like to use the Procreate app on my iPad Pro. Procreate automatically records the sequence of my sketches, which helps me to look back and review my own process.
When it comes to finishing a graphic, I like to decorate content with frames, shadows and color. They give the content visual hierarchy and help to make important bits pop. I prefer to add frames towards the end of a session, so that during the session, new ideas have room to connect to each other. When people see the graphic and it doesn’t have the frames yet, it doesn’t look as complete, but it does save up the really nice bit—the magic—until the end, when I join it all up.
I still remember my first job out of university, before I knew anything about sketchnoting. On my first day, my manager set aside the whole day to explain to me how our company worked and where I fit in. He drew everything on flipchart paper as a diagram. Thanks to that one diagram, I could see exactly how the company worked. It was brilliant. I also noticed that everywhere my manager went, he carried a sketchbook. He’s not an illustrator—he’s trained in finance—but he brought his sketchbook to all of his meetings. From then on, following his lead, I brought one too.
Now I see that effect continuing. A high school teacher friend happened to see my sketchnotes on Twitter, so he gave it a try himself at a teachers’ conference, and got similar engagement and interest. He decided to then teach sketchnoting to his high school students, and now they’re doing it. He shows their work on Twitter as well. Now he is going to the same conferences to teach other teachers how to teach their students how to sketchnote. That feels really nice. Imagine if they taught visual literacy during your schooling, imagine where you would be now? This is what inspires me to keep going, doing sketchnotes, sharing them with others, and keeping that ripple effect going.
Imagine if they taught visual literacy during your schooling, imagine where you would be now?
1 Two habits, of course, I highly recommend to all my students!
2 Nu Stone makes “tradie notebook” waterproof paper pads, and the pages are practically indestructible. Hard to tear, waterproof, and bleed-proof. It feels a little weird to draw on, but perfect with a pencil.
3 Just to pique your interest, head on over to The Perfect Sketchbook (http://www.theperfectsketchbook.com). If you’re using this sketchbook, you’re using cotton paper from the original Fabriano Papermill, which—I kid you not—was a favorite of Renaissance artists like Michelangelo Buonarroti.
4 A cool little trick is to cover the front of your laptop in whiteboard paper, which then doubles as a mini pop-up screen to show others!
5 The Betabook website (http://www.betabook.co) has lots of ingenious uses that you might not have thought of.
6 Other good drawing software products are PaintTool SAI, Mischief, and Krita.
7 And by the time you read this, I’ll probably be using a different app anyway. But if you’re curious, look no further than Procreate, Penultimate, Paper by 53, or Tayasui Sketches. If you regularly use the Adobe Creative Cloud suite, Adobe Illustrator Draw is really nice, and integrates tightly with your other apps and devices.
8 Does anyone remember CSS Zen Garden?
9 You can find out more about Justin Cheong in his interview, in “Interview with Justin Cheong”.
10 Otherwise known as live scribing or graphic recording. There’s more about this in Chapter 10.
11 I’ve learned from experience on this one. I remember live scribing at a Google breakfast meetup on a super wobbly squeaky whiteboard: needless to say, it was a bit distracting for the audience!
Get Presto Sketching now with the O’Reilly learning platform.
O’Reilly members experience books, live events, courses curated by job role, and more from O’Reilly and nearly 200 top publishers.

