Where is this supposed to go?
Itâs a question you ask every day. Where do these shoes go? Where does this new box of books go? Where do these receipts go? Because thatâs such a common question, it shouldnât surprise you too much that when youâre building web applications, you need to ask the same thing:
Where does my information go?
For the kinds of web applications youâve been building with web pages and PHP, the answer to this question is simple: in a database. But what do you get out of a database that makes it worth the effort of installing another tool and learning another language? And, why does everyone seem to agree that if youâre writing PHP code, you need a database, too? Sit tight, because this chapter is about to reveal all.
A database is just a repository in which you can store information, add some layer of organization to the stored information, and grab that information when itâs needed. In a literal sense, a file cabinet is a database. You can throw things into it, pull those things back out, and even use files and labels to keep your files organized.
Youâve already seen that PHP gives you arrays (The $_REQUEST Variable Is an Array) that serve as a sort of programmerâs file cabinet. An array might function as a database in a simplistic sense, but it wonât serve your needs for long. For one thing, arrays and their contents in PHP are lost every time your program stops and starts again. Thatâs not very helpful.
A good database provides long-term storage for your information. If your program stops running, or your entire web server has to be restarted, a database doesnât lose your information. Imagine if every time your web server had to be shut down for an upgrade, your database lost every userâs first name, last name, and email address. Do you think your users would come back to your site if they repeatedly had to type everything in again? Not a chance.
Therefore, a good database needs to store information more permanently. In programmer jargon, this is called persisting your information. (At times, though, even permanent information can be lost; see the box that follows for advice on backing up your information in such cases.)
If you think about it, youâre constantly working with something like this on your computer: a system that stores your information over a long term. Itâs your hard drive and file system. The files on your computer are basically pieces of information; such as addresses, emails, your finances, or maybe what level youâve made it to in Angry Birds. You can shut down your computer and start it back up, or even upgrade to a new computer, and all those files with all your information will still load up.
In other words, a file system is really a sort of database. In fact, lots of databases actually use files much like your computer does to persist information. So, why doesnât PHP just store information in files? It actually has an entire set of tools for working with files, including creating, writing, and reading files. Isnât that enough?
Note
You learn about how to use PHP to work with files in Chapter 5.
If you think about it, thereâs something pretty clunky about your computerâs file system. Have you ever tried to remember the last time you sent an email to someone? Your email program might not know that personâs email address. And, if you go to that personâs card in your address book program, that address book program might not be connected to your email program.
Even if you actually find the email address, you might need to reference some documents related to the email message. Where are those documents? In another folder somewhere, probably in some highly-organized structure about which youâve long forgotten.
Thatâs why your computer gives you one or more ways to search for information. In Mac OS X, you can use Spotlight (see Figure 4-1) or a program like Quicksilver (http://quicksilver.en.softonic.com/mac). If you have Windows, you can download Googleâs Desktop Search (http://www.google.com/quicksearchbox, see Figure 4-2). These programs find all occurrences of a certain word or topic across your entire system.
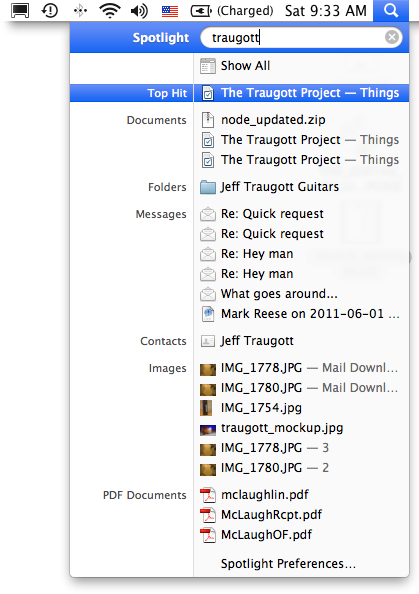
Figure 4-1. Spotlight in Mac OS X tries to relate files in different places by their name, the folder theyâre in, or their content. In other words, Spotlight tries to determine the relationships between different files and folders.
In fact, these search programs attempt to do what databases do by nature: locate and organize information. If youâve ever tried to make these sort of connections on your computerâwhether youâre using Spotlight or Google Search or doing it by handâyou know itâs a hassle and inconsistent, at best. What you need is a better way to connect two, three, or ten pieces of information together.

There is one task for which a file system and your hard drive are lacking, but a database excels: creating relationships between different pieces of information. For example, you might have a person, and that person has several email addresses, phone numbers, and mailing addresses. This isnât anything new; your address book program already handles these sorts of relationships.
But a good database goes further. An email message is related to the email address of the sender, and that email is related back to the personâs name and phone numbers and mailing address. A map with streets connects those streets to the streets used in a personâs mailing address. The creatorâs name in a file description relates to that person, and their email, and their phone, and so on.
In a lot of ways, these relationships are really a giant web of connections. A good database both creates and manages all these relationships. In fact, relationships are so integral to MySQL, FileMaker, Oracle, and other big-time databases that theyâre called relational databases. (For a technical journey into how these databases operate, see the box on Objects and Relations in Databases, Oh My!.)
This means that in addition to instructing a database what information you want it to store for you and your programs, you also define how that information is connected to other pieces of information. Not only do you get to use this web of connections, but you specify to the database exactly how the web should be constructed. Thatâs a lot of power, which is why youâll have to learn an entirely new language to work with these relational databases.
Before you can tackle the new language of databases, youâve got to get a database installed on your computer. In this book, youâll be working with the MySQL database, which is one of the most common databases used in web applications. The reason for this is because itâs easy to get, easy to install, and easy to use.
Note
Like most things in life, ease-of-use comes with some tradeoffs. There are some database programs that cost a lot of money and are really complicated to use, such as Oracle. But these programs typically offer features that programs like MySQL donât: higher-end tools for maintenance, and a whole slew of professional support options that go beyond what you can get with MySQL.
Donât worry, though. Almost every single command, technique, and tool youâll learn for working with MySQL will work with any relational database, so even if you end up at a company or in a situation where Oracle (or an IBM product, or PostgreSQL, or something else entirely) is in use, youâll have no problems getting your PHP working with a database other than MySQL.
If you installed MAMP on your Mac or WampServer on your Windows-based PC (see Chapter 1, PHP on the Windows-Based Computers (WampServer Installation)), then you already have a local installation of MySQL. Pretty sweet, right? (And, if you didnâtâyou masochist, you!âcheck out Appendix B for detailed, step-by-step instructions on installing MySQL without MAMP or WampServer.)
Just as Chapter 1 deals with a local installation of PHP, this chapter starts out by focusing on a local installation of MySQL. Of course, just as your PHP work in Chapter 1 progressed into working with a remote installation of PHP in Chapter 2, the same applies here, so if you donât want to mess with WampServer or MAMP, you can jump on your hosting provider, fire up the mysql program, and get to typing. Of course, this assumes that your hosting provider lets you have shell access and lets you run the mysql console programâneither of which is a sure thing. If those become an issue, you can always resort to the already-installed MAMP/WampServer version on your local computer.
Regardless of how you install MySQL, your first step toward database mastery is to begin using the mysql console program. Although MySQL is a database, mysql is a program that lets you interact with that database from a command line. Every installation of MySQL comes with the mysql tool; you just have to know how to get at it.
But first you have to start the MySQL service. Otherwise, youâll get errors because the mysql program has nothing to which it can connect. For WampServer, on the right side of the taskbar, click the green âWâ icon and choose Put Online or Start All Services and read on. For MAMP, start the program, select Start Servers, and then go to Run the mysql Tool on MAMP.
WampServer installs mysql along with the MySQL database. However, it doesnât set up your PATH to access that program, so youâll have to do a little digging around.
Once youâve started up MySQL, change into the wamp/ directory on the drive on which you installed WampServer. For example, if you put WampServer on the c:\ drive, go to a command prompt (StartâRun and then type command on Windows 7 and earlier; Windows key+R on Windows 8) and then type the following:
C:\Users\bdm0509> cd c:\wamp\bin\mysql\
Now, youâll have to do a little investigation, because things change based upon the version of MySQL your copy of WampServer installed. Do a directory listing:
C:\wamp\bin\mysql>dir
 Volume in drive C has no label.
 Volume Serial Number is 7C78-FE01

 Directory of C:\wamp\bin\mysql

08/01/2012  02:32 PM    <DIR>          .
08/01/2012  02:32 PM    <DIR>          ..
08/01/2012  02:32 PM    <DIR>          mysql5.5.24
               0 File(s)              0 bytes
               3 Dir(s)  52,739,547,136 bytes free
You should see just one directory, specific to the version of MySQL installed by WampServer. Change into that directory. For MySQL 5.5.24, use the following:
C:\wamp\bin\mysql> cd mysql5.5.24
Now, you can go into yet another bin directory and finally run the mysql command:
C:\wamp\bin\mysql\mysql5.5.24> cd bin

C:\wamp\bin\mysql\mysql5.5.24\bin>mysql
ERROR 2003 (HY000): Can't connect to MySQL server on 'localhost' (10061)
You have the right program, but the error message tells you that things arenât working yet. Thatâs because you havenât told mysql what user to use for logging in. You must specify the user with the -u option and then tell it to log in as ârootâ. Hereâs how it looks:
C:\wamp\bin\mysql\mysql5.5.24\bin>mysql -u root
Welcome to the MySQL monitor.  Commands end with ; or \g.
Your MySQL connection id is 2
Server version: 5.5.24-log MySQL Community Server (GPL)

Copyright (c) 2000, 2011, Oracle and/or its affiliates. All rights reserved.

Oracle is a registered trademark of Oracle Corporation and/or its
affiliates. Other names may be trademarks of their respective
owners.

Type 'help;' or '\h' for help. Type '\c' to clear the current input statement.

mysql>
And there you have it! Somewhat surprising, you donât need to provide a password to WampServer. Of course, because this is all running on your own local installation, security isnât the concern it will be when you start connecting to a MySQL database on your web host out on the Internet. For now, youâre ready to start interacting with your database.
If youâre on Mac OS X, MAMP came with a mysql tool, available through the Terminal. Itâs stored in /Applications/MAMP/Library/bin, so you can run it like this:
$ /Applications/MAMP/Library/bin/mysql
You can make this easier with a few quick edits to your profile and setup:
Create a directory called bin in your home directory:
mkdir ~/bin
Go to that directory:
cd ~/bin
Create a symbolic link to the
mysqlprogram in that directory:ln -s /Applications/MAMP/Library/bin/mysql mysql
Add your new ~/bin directory to your path. Edit your ~/.bash_profile:
vi ~/.bash_profile
Find or add a line to update your
PATHvariable. For example:export PATH=$PATH:~/bin
Now save your .bash_profile, and restart Terminal.
Note
If youâre comfortable with the Mac OS X command line and see things here that donât apply to your systemâsuch as bash needing to be replaced by a custom shell youâve installedâthen feel free to make those changes. Youâre probably a few steps ahead already, anyway, so if you know what to do, go on and make the changes for your system.
If you can power through this setup, all you have to do in the future is start a new Terminal and type the following:
$ mysql
If you donât want to go through that rigamarole, just type the full path to mysql every time:
$ /Applications/MAMP/Library/bin/mysql
For MAMP installations, just as with WampServer installations, using the mysql tool log in to MySQL as the root user. You specify that by using the -u option and then the username root, like this:
$ mysql -u root
Running this command as is doesnât quite give you what you were hoping for. In fact, youâll probably see an error similar to this:
$ /Applications/MAMP/Library/bin/mysql -uroot
ERROR 1045 (28000): Access denied for user 'root'@'localhost' (using password:
NO)
Thatâs because users have passwords, and you havenât supplied one. On top of that, for reasons too confusing to mention, the mysql program doesnât ask you for a password, unless you instruct it to. Add the -p option, and youâll be prompted for a password:
$ /Applications/MAMP/Library/bin/mysql -uroot -p
Enter password:
To find your root user password, go to the MAMP start page. Thatâs the web page that fires up every time you start MAMP. If MAMP is already running, you can click âOpen start page.â Youâll see something like Figure 4-3, and there, clear as can be, is your password.
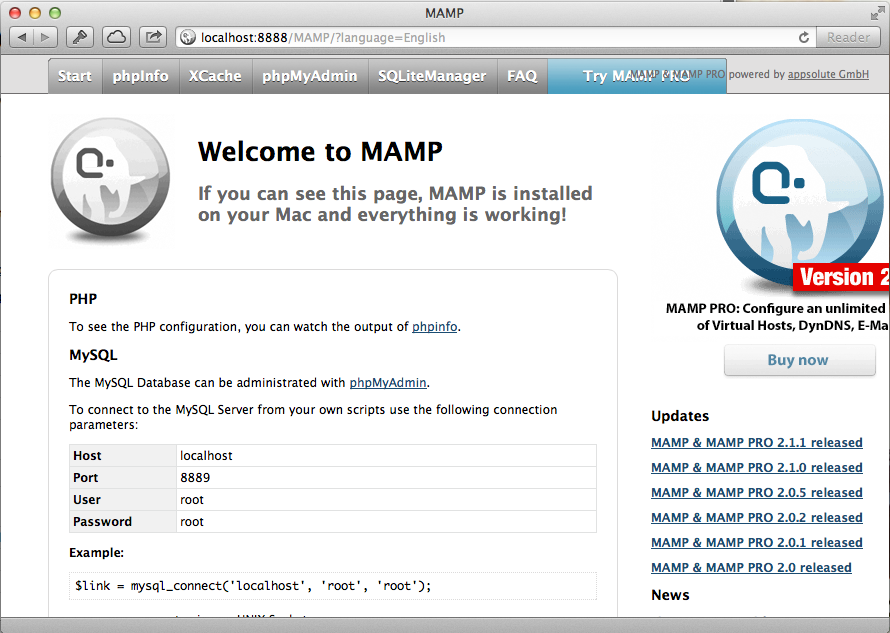
Figure 4-3. The MAMP start page is your first and best source for all things PHP, MySQL, and web server on your local installation of these programs. In this case, it displays the MySQL root password, which youâll needâ¦a lot!
A root user password of ârootâ isnât particularly secure, but again, youâre on your local computer, not the NASA user store. Now, you can give that password to the mysql prompt. You should see something like this in return:
$ /Applications/MAMP/Library/bin/mysql -uroot -p
Enter password:
Welcome to the MySQL monitor.  Commands end with ; or \g.

Your MySQL connection id is 6
Server version: 5.5.9 Source distribution

Copyright (c) 2000, 2010, Oracle and/or its affiliates. All rights reserved.

Oracle is a registered trademark of Oracle Corporation and/or its
affiliates. Other names may be trademarks of their respective
owners.

Type 'help;' or '\h' for help. Type '\c' to clear the current input statement.
Once you're logged in, you can type exit to quit:
mysql> exit
Bye
$
Thatâs all there is to it! Now youâre ready to start talking to MySQL.
MySQL has installed a number of pre-created databases on your system. To see them, all you have to do is ask. Fire up the mysql command line tool again, and type this command:
show databases;
Warning
Be sure you end your line with a semicolon, or youâll get unexpected results. All your MySQL commands must end with a semicolon, just like most of your PHP commands.
You should get a text response from MySQL that looks a bit like this:
mysql> show databases;
+--------------------+
| Database           |
+--------------------+
| information_schema |
| development        |
| eiat_testbed       |
| mysql              |
| nagios             |
| ops_dashboard      |
| performance_schema |
| test               |
+--------------------+
8 rows in set (0.25 sec)
You might not have as many databases that come back, or you might have different databases. Thatâs OK.
The show command does just what you might expect: it shows you everything for a particular keyword; in this case, databases. To sum it up, show databases is just a way you can ask MySQL to show you all the databases installed on your machine.
On top of that, now you know something really important: MySQL really isnât so much a database, but a piece of software that can store and create databases. In this example, there are eight rows returned as a result of running the show databases command, which means there are eight databases on the system, not just one. Before youâre done, youâll have created several databases, all running within MySQL.
For now, tell MySQL you want to work with the mysql database, which you have on your system even if youâve only installed MySQL. You do that with the use command, like so:
use mysql;
Now, youâre in the mysql database. This means that any commands you give to MySQL are run against just the mysql database.
At the beginning of this section, you asked MySQL to show you all the databases it has; now tell it to show you all the tables in the database youâre currently using:
show tables;
You should get a nice long list, as illustrated here:
mysql> show tables;
+---------------------------+
| Tables_in_mysql           |
+---------------------------+
| columns_priv              |
| db                        |
| event                     |
| func                      |
| general_log               |
| help_category             |
| help_keyword              |
| help_relation             |
| help_topic                |
| host                      |
| ndb_binlog_index          |
| plugin                    |
| proc                      |
| procs_priv                |
| proxies_priv              |
| servers                   |
| slow_log                  |
| tables_priv               |
| time_zone                 |
| time_zone_leap_second     |
| time_zone_name            |
| time_zone_transition      |
| time_zone_transition_type |
| user                      |
+---------------------------+
24 rows in set (0.00 sec)
A lot of these table names appear odd, but thatâs mostly because these are internal tables used by MySQL. As you create new tables and users and set up your database, all of that information is stored within another database: the mysql database.
To see some of this information, you must use the select command to access information from a specific tableâfor example, the user table. Type this command at your MySQL command prompt:
mysql> select * from user;
The asterisk (*) means âselect everything.â Then, from specifies to MySQL where to get the information: in this example, user, which is a table in your database.
Donât be surprised when you get a confusing stream of information back. In fact, it might look like something out of the Matrix; check out Figure 4-4 for an example.
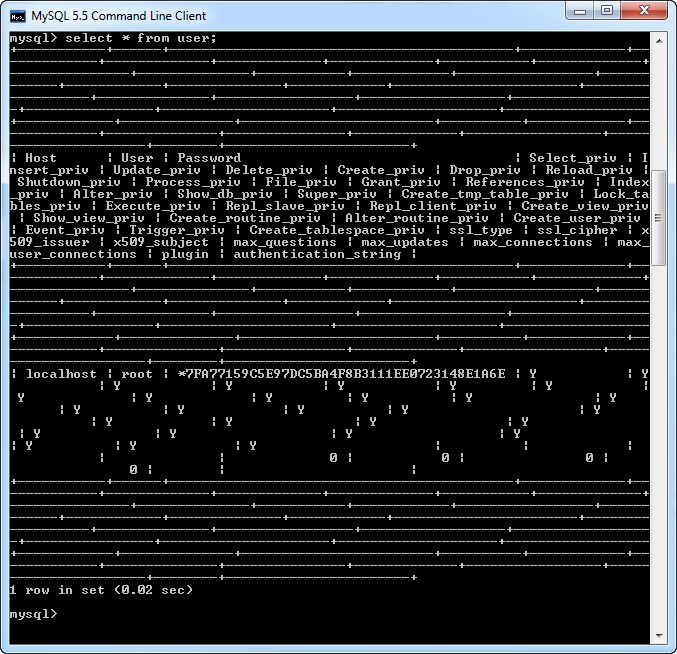
Figure 4-4. As you become more comfortable with MySQL and PHP, youâll learn to select just the information you want and clean up this messy response, which was the result of using the from user command. There are also ways to format the response from MySQL, although you wonât need to worry about formatting much, because youâll mostly be grabbing information from MySQL in a PHP script, where formatting isnât a big deal.
The problem here isnât in anything you typed. Itâs just that you instructed MySQL to select everything from the user table, and in this case, everything is a lot of information. In fact, itâs so much information that it wonât all nicely fit into your command-line client, which is why you got all the strange looking lines in your response.
To tame this beast a bit, you can select just a little information from a table. You do this be replacing the * in the command with the specific column names you want, separated by commas:
mysql> select Host, User, Password from user;
You get back just the three columns for which you asked:
mysql> select Host, User, Password from user;
+--------------------------+-------+-----------------------------------------
--+
| Host                     | User  | Password
|
+--------------------------+-------+-----------------------------------------
--+
| localhost                | root  | *62425DC34224DAABF6995B46CDCC63D92B03D7E9
|
+--------------------------+-------+-----------------------------------------
--+
1 row in set (0.00 sec)
This example shows that for your local computer (localhost), you have a single user named âroot.â The password is encrypted, so it isnât very helpful, but you can see that MySQL definitely has an entry for you. Because you only asked for three columns, this response is a lot more readable and actually makes a little sense.
So, whatâs a column? A column is a single category of information in your table. For example, in a table that stores users, you might have a first_name and a last_name column.
Note
If youâre starting to get a little dizzy or your nose is bleeding from the rush of new terms, donât worry. Youâll be working with tables, columns, and these MySQL statements over and over and over again as you build your PHP programs. Just get what you can now, and youâll have all this new MySQL lingo under control in no time.
Now that youâve dipped your feet into the MySQL pool, itâs time to start to create your own tables and columns, and fill those tables and columns with your own information.
So far youâve been using a program called MySQL, and youâve been talking to that program using SQL, the Structured Query Language. And youâve already written a couple of SQL queries:
mysql> select * from user;
...
mysql> select Host, User, Password from user;
...
Both of those commands are SQL queries, or expressed more accurately, SQL. The Structured in SQL comes from the idea that youâre accessing a relational database, something with a lot of structure, and youâre using a language that itself is very structured. Youâll soon see that SQL is very easy to learn, mostly because itâs very predictable. Thatâs why you can look at a command like the following and probably figure out what it does:
mysql> select User, Password
         from users
        where first_name = 'Dirk'
          and country = 'Germany';
Even though youâve never seen the where keyword, itâs obvious what it does: this returns only the User and Password column from the users table, where the userâs first_name field is âDirkâ and the country field is âGermany.â
Warning
The pronunciation of SQL is more hotly contested than most presidential elections. Some folks say âsequelâ while others insist on âS-Q-L,â saying each letter individually. Although you probably want to stick what with the folks around you are using, both are perfectly fine. (By the way, this book goes with the âsequelâ pronunciation.)
You could buy a SQL book and start memorizing all the keywords, but itâs a much better idea to simply begin building your own tables and learn as you go. To do that, though, you need to get connected to the database with which all your PHP programs will talk to.
Now that youâve got a basic lay of the land for how MySQL behaves, itâs time to get things set up on the database your web server uses. Youâll probably need to use a tool like telnet or ssh to log in to your web server.
Note
If youâve never used telnet or ssh before, you should Google either programâs name; youâll find a ton of resources. You might also want to call whoever hosts your domain and ask how you can best access your server. Many web providers now have a graphical version of SSH that you can use right from their control panel. Most good hosting providers also have detailed online instructions to help you get logged in and started, usually applicable to both Windows and Mac OS X.
Once youâre logged in, you should be able to use the MySQL command-line client, mysql. Almost every hosting provider that supports PHP also supports MySQL, which means that just typing mysql is usually the way to get started.
Unfortunately, youâre likely to get an error like the following, right out of the gate:
bmclaugh@akila:~$ mysql
ERROR 2002 (HY000): Can't connect to local MySQL server through socket '/tmp/
mysql.sock' (2)
This usually means that MySQL isnât installed on your server, or at least that itâs not been configured correctly. But thatâs probably by intention: most hosting providers keep their MySQL installation either on a different machine, or they at least limit accessibility by using a different domain name, like mysql.kattare.com. That adds some protection, isolation, and security to the MySQL databases they host, all of which are good things.
Note
If running mysql doesnât work, you might also try mysql --host=localhost. Some MySQL installations are configured to only answer to localhost rather than whatâs called the local socket. That adds a bit of security to a MySQL installation, but isnât something you need to worry much about at this point. Just ensure that you can get mysql running, one way or another.
No matter where MySQL is installed, your task is simple. Run mysql and instruct it exactly where to connect. The --host= option lets you give mysql the hostname of your MySQL database server, and --user= lets you give it your own user name.
Note
Youâll almost certainly have a user name other than âadminâ or ârootâ for your domain providerâs MySQL installation. You can ask what it is when you ask about telnet or ssh access. Or, if you want to try something out on your own, start with the user name and password you use for logging in to your web server itself. Be cautious, though: good database systems will have different user names and passwords than the web servers that talk to them.
Put all this together on the command line, and youâ get something like this:
bmclaugh@akila:~$ mysql --host=dc2-mysql-02.kattare.com
                        --user=bmclaugh --password
Enter password:
That last option, --password, instructs MySQL to ask you for a password. You could put your password on the command itself, like --password=this_is_not_very_secure, but then that slightly nosy cube-mate would be able to log in to your MySQL server. And, if youâre wondering what happened to the -u and -p options for mysql, you might want to check out the box that follows.
Once you type your password, you should see the standard MySQL welcome screen, as demonstrated in Figure 4-5.
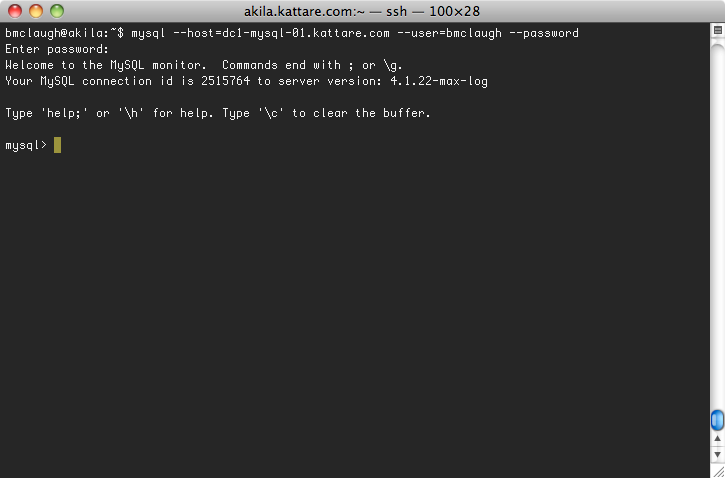
Figure 4-5. Once youâre logged in to MySQL, it really doesnât matter whether youâre in Windows, Mac OS X, or a Linux or Unix machine on a hosting providerâs network. Itâs all the same: you just enter SQL and get back responses.
Now, youâre ready to actually do something with this new SQL youâve been learning.
On most MySQL installations that hosting providers give you, you donât have nearly as much freedom as you do on your own installation. For example, on a remote server, suppose that you type the SQL show command you used on Run Your First SQL Query:
myqsl> show databases;
If you ran this earlier on your own computer, you probably saw a lot of databases listed here. But now, on your hosting provider, youâll probably only see one:
myqsl> show databases;

+----------+
| Database |
+----------+
| bmclaugh |
+----------+
1 row in set (0.09 sec)
Thatâs because your privileges on your hosting providerâs server are limited, and as such, the company certainly isnât going to let you log in to the mysql system databases and see what users are in the systemâs user table. What you probably see is a single entry: a database named something similar to your login name. So, if you log in to your system with the user name âljuberâ, you might see a database named ljuber or perhaps db-ljuber or something similar.
In fact, youâre probably already set up within the database thatâs named after you. Go ahead and inform MySQL thatâs the database in which you want to work:
mysql> use bmclaugh;
Database changed
Warning
On some systems, youâre automatically set up to use your userâs database when you log in to MySQL. Still, the use command wonât give you any problems if you point it to the current database, so itâs always a good idea to begin your MySQL sessions with use [your-database-name].
While youâre acclimating yourself to your new MySQL environment, you also want to get used to seeing and typing SQL commands in all capital letters. So if you get an email from your database buddy and she suggests that you use a WHERE clause or tells you that your SELECT query is goofy, sheâs not actually yelling at you. Sheâs saying (or more accurately, writing) SQL commands in all uppercase letters, which is the way most database jockeys do it.
In fact, the commands youâve seen thus far are more commonly written and typed like this:
mysql> SELECT * FROM user;
...
mysql> SELECT Host, User, Password FROM user;
...
mysql> SELECT User, Password
         FROM users
        WHERE first_name = 'Dirk'
          AND country = 'Germany';
This creates a nice clear distinction between the SQL keywords like SELECT, FROM, WHERE, and AND, and the column and table names. As youâve guessed, though, MySQL accepts keywords in either uppercase or lowercase letters. They all work the same way.
Note
In this book, an all-capitals word like SELECT means the same thing as select written in code font.
Again, though, you donât have to use capital letters in MySQL for keywords like SELECT and WHERE. Although it makes the code easier to decipher, lots of programmers get tired of all-caps and just go straight for the lowercase letters.
When you could get to and USE the mysql database, you had some tables ready for you to SELECT from: the users table, for example. However, now youâre on a database server from which you canât get to those tables. So, before you can get back to working on your SELECT skills, you need to create a table.
As you might have already guessed, you can do that with another handy-dandy SQL keyword: CREATE. The objective is to create a table, put data in it, get data out, and generally have all kinds of database fun.
Type this command into your MySQL command line:
CREATE TABLE users (
This time, donât add the usual semicolon at the end. When you press Enter, youâll see something a little weird:
mysql> CREATE TABLE users (
    ->
As you know, MySQL commands should end in a semicolon, so when you leave it off, youâre telling MySQL, âHey, Iâm writing a command, but Iâm not done yet.â What this demonstrates is that, you donât have to jam a lot of SQL onto one line; you can split it up over several lines by pressing Enter. As long as you donât type that semicolon, MySQL wonât try to do anything with your command. And that little arrow, ->, lets you know that MySQL is waiting for you to continue typing.
So be obliging! Keep typing the following lines, each of which sets up a different column of information in your table:
mysql> CREATE TABLE users (-> user_id int,-> first_name varchar(20),-> last_name varchar(30),-> email varchar(50),-> facebook_url varchar(100),-> twitter_handle varchar(20)-> );
Press Enter after this last semicolon, and you get a very unimpressive response:
mysql> CREATE TABLE users (
    -> user_id int,
    -> first_name varchar(20),
    -> last_name varchar(30),
    -> email varchar(50),
    -> facebook_url varchar(100),
    -> twitter_handle varchar(20)
    -> );
Query OK, 0 rows affected (0.18 sec)This last line is MySQLâs very modest way of saying, âI did what you asked.â If you get an error message instead, see the following box for advice on handling typos.
Without even thinking very hard, you probably know at least a bit about whatâs going on in your CREATE command:
CREATEinforms MySQL you want to create a new structure in the database.TABLEspecifies to MySQL what kind of structure. In this case, you want a table.The opening parenthesis (
() indicates to MySQL that youâre about to describe the table to create, one line at a time.Each line has a column name, such as
user_id, and a type, such asintorvarchar(20).When youâre done describing the table, you use a closing parenthesis (
)) to let MySQL know youâre done describing the table, and then end the whole enchilada with a semicolon.
Youâll learn a ton more about all the different types of columns as you go, but for now, there are just two to worry about. The first is int, which is short for integer. An integer, as you recall from math class, is any whole number; 1, 890, and 239402 are ints, but 1.293 and 3.1456 are not.
The second type to which you need to pay some attention is a little less obvious: varchar. The varchar type stands for variable character, which means that it holds character dataâstringsâof variable lengths. Referring back to our example, a varchar(20) can hold a string as short as the length of 0 all the way up to a length of 20 characters. For advice on deciding on how big to make your columns, see the box below.
The upshot of all these new terms is youâve directed MySQL to create a table comprising several new columns, one thatâs an int (user_id), and several that are varchars of various maximum lengths.
Did this command work? Well, look for yourself by using the SHOW command:
mysql> SHOW tables;
+------------------------------------+
| Tables_in_bmclaugh                 |
+------------------------------------+
| users                              |
+------------------------------------+
1 row in set (0.06 sec)
No doubt about it, you definitely created a table. But, whatâs actually in the table? For that, you need a new command: DESCRIBE. Try it out on your users table:
mysql> DESCRIBE users;
+----------------+--------------+------+-----+---------+-------+
| Field          | Type         | Null | Key | Default | Extra |
+----------------+--------------+------+-----+---------+-------+
| user_id        | int(11)      | YES  |     | NULL    |       |
| first_name     | varchar(20)  | YES  |     | NULL    |       |
| last_name      | varchar(30)  | YES  |     | NULL    |       |
| email          | varchar(50)  | YES  |     | NULL    |       |
| facebook_url   | varchar(100) | YES  |     | NULL    |       |
| twitter_handle | varchar(20)  | YES  |     | NULL    |       |
+----------------+--------------+------+-----+---------+-------+
6 rows in set (0.04 sec)
Note
You can also use DESC (or desc) for DESCRIBE. Thus, DESC users; is a perfectly acceptable SQL command, too.
Now, you can see that MySQL did what you commanded it to: It created a table called users with all the columns you specified, using the types you gave it. Thereâs a lot more information there, too, but you donât need to worry about that just yet.
What goes up must come down, or so the saying goes. For everything MySQL and SQL let you do, thereâs a way to undo those things. Youâve created a table, but now you need to delete that table. However, DELETE isnât the command you want; instead, itâs DROP.
Suppose that you decide you no longer like that users table, or you want to practice that fancy CREATE command again, you can ditch users with a simple line of SQL:
mysql> DROP TABLE users;
Query OK, 0 rows affected (0.10 sec)
Boom! Itâs gone. But, just to be sure, confirm it:.
mysql> SHOW tables;
+------------------------------------+
| Tables_in_bmclaugh                 |
+------------------------------------+
0 rows in set (0.06 sec)
How simple is that? But waitâ¦now you have no tables again, and nothing from which to SELECT. Itâs back to creating tables again. Type that CREATE SQL statement into your MySQL tool one more time and create the users table again.
At this point, youâve created and dropped, and created the users table. But itâs still empty, and thatâs no good. What do you do? Easy: INSERT some data.
Try entering this command into your command-line tool:
mysql> INSERT INTO users
    -> VALUES (1, "Mike", "Greenfield", "mike@greenfieldguitars.com",
    -> "http://www.facebook.com/profile.php?id=699186223",
    -> "@greenfieldguitars");
Query OK, 1 row affected (0.00 sec)
What a mouthful! Still, you can probably just look at this SQL and figure out whatâs going on. Youâre inserting information into the users table and then youâre giving it that information (VALUES), piece by piece.
You can actually trace each value and connect it to a column in your table. You might want to DESCRIBE your table again:
mysql> DESCRIBE users;
+----------------+--------------+------+-----+---------+-------+
| Field          | Type         | Null | Key | Default | Extra |
+----------------+--------------+------+-----+---------+-------+
| user_id        | int(11)      | YES  |     | NULL    |       |
| first_name     | varchar(20)  | YES  |     | NULL    |       |
| last_name      | varchar(30)  | YES  |     | NULL    |       |
| email          | varchar(50)  | YES  |     | NULL    |       |
| facebook_url   | varchar(100) | YES  |     | NULL    |       |
| twitter_handle | varchar(20)  | YES  |     | NULL    |       |
+----------------+--------------+------+-----+---------+-------+
6 rows in set (0.29 sec)
The first value, 1, is assigned to user_id; the second, âMikeâ, to first_name; and so on.
And really, thatâs all there is to it. You can insert as much into your table as you want, anytime you want. There are lots of ways to fancy up INSERT, and youâll learn about most of them as you start to work with INSERT in PHP.
Finally, youâre back to where you can use good-old SELECT. By now, that command should seem like ancient history, given that youâve used DROP and CREATE and INSERT and a few others since that first SELECT * FROM users. But, now youâve got your own users table, so try it out again:
mysql> SELECT * FROM users;
+---------+------------+------------+----------------------------+--
------------------------------------------------+-------------------
-+
| user_Id | first_name | last_name  | email                      |
facebook_url                                     | twitter_handle
  |
+---------+------------+------------+----------------------------+--
------------------------------------------------+-------------------
-+
|       1 | Mike       | Greenfield | mike@greenfieldguitars.com |
http://www.facebook.com/profile.php?id=699186223 | @greenfieldguitars
|
+---------+------------+------------+----------------------------+-
-------------------------------------------------+-----------------
---+
1 row in set (0.00 sec)
No big surprises here; you got back the row you just inserted. However, just like earlier, the screen is a bit of a mess. Too many columns make the results hard to read.
To simplify things, grab just a few columns. For example, letâs assume that you donât really need to see Mikeâs entire Facebook page URL right now. From the code on Run Your First SQL Query, you know how to select specific columns of information:
mysql> SELECT first_name, last_name, twitter_handle FROM users;
+------------+------------+--------------------+
| first_name | last_name  | twitter_handle     |
+------------+------------+--------------------+
| Mike       | Greenfield | @greenfieldguitars |
+------------+------------+--------------------+
1 row in set (0.00 sec)
Thatâs a lot more readable. And once youâre writing PHP to talk to MySQL, this formatting wonât be such a problem. PHP doesnât care about fitting everything into a nice line or two. Itâs happy to take a big messy set of results and handle them.
If youâd like, take some time to insert a few more rows of users and then play with SELECT. If you want to get really fancy, try using a WHERE clause, like this:
mysql> SELECT facebook_url
    ->   FROM users
    ->  WHERE first_name = 'Mike';
+--------------------------------------------------+
| facebook_url                                     |
+--------------------------------------------------+
| http://www.facebook.com/profile.php?id=699186223 |
+--------------------------------------------------+
1 row in set (0.00 sec)
As you can see, WHERE lets you choose a specific person or record of information. Youâll see that again on Avoid Changing User Input Whenever Possible. Try creating tables with more columns, selecting different columns, choosing records with WHERE, and see how far you can get with all the SQL youâve already picked up.
Get PHP & MySQL: The Missing Manual, 2nd Edition now with the O’Reilly learning platform.
O’Reilly members experience books, live events, courses curated by job role, and more from O’Reilly and nearly 200 top publishers.

