PHP is ultimately just text that is taken by your web server and turned into a set of commands and information for your web browser. And because youâre just working in text, thereâs not a lot you have to do to get going as a PHP programmer. You need to become familiar with PHP itself, and the best way to do that is to install PHP on your own computer as well as becoming familiar with how PHP runs on a remote web server.
Then, you need to run an actual script. Donât worry; itâs amazingly easy to write your first program in PHP. Not only that, youâll run your script, upload it to your web server, and access your script with a web browserâ¦and thatâs all in the first two chapters!
Throughout the process, youâll begin taking control. With PHP, you become an active participant in your web pages. PHP lets you listen carefully to your users and say something back. So get going; thereâs no reason to leave your users with passive HTML pages any longer.
One of the most difficult things to get a handle on when it comes to PHP programming doesnât have much to do with programming at all. Itâs figuring out just how PHP runs, how it interacts with your web browser and web server, and why itâs not possible to just double-click a PHP file on your hard drive and see the script in that file run.
First, itâs worth thinking back to when you were a wee programmer, writing your first HTML page. You could save that page in a file, name that file with a .html extension, and boomâyou had a web page. Double-click that file, and on most computers, you see that page open up in a web browser. Thatâs because just as a .doc file is connected to the Microsoft Word program, a .html file is connected to a web browser (specifically, the browser youâve chosen as the default on your computer). Figure 1-1 should give you an idea.
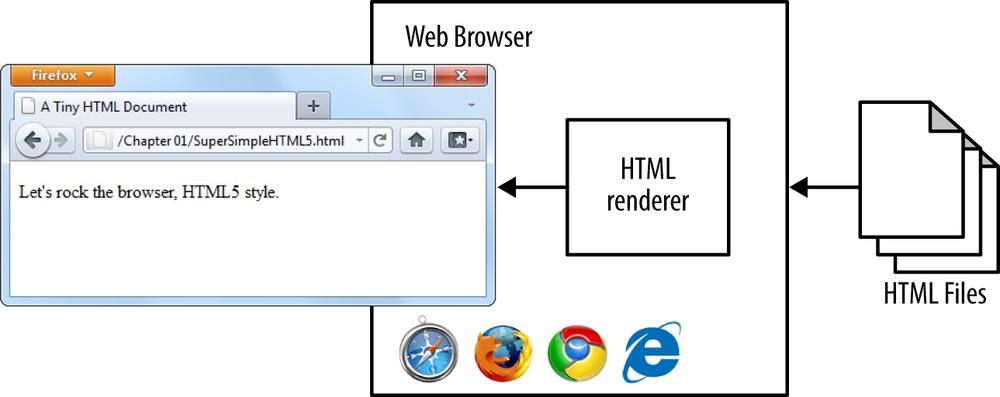
Figure 1-1. Web browsers know all they need to know in order to load and display an HTML page. No extra software or configuration is necessary.
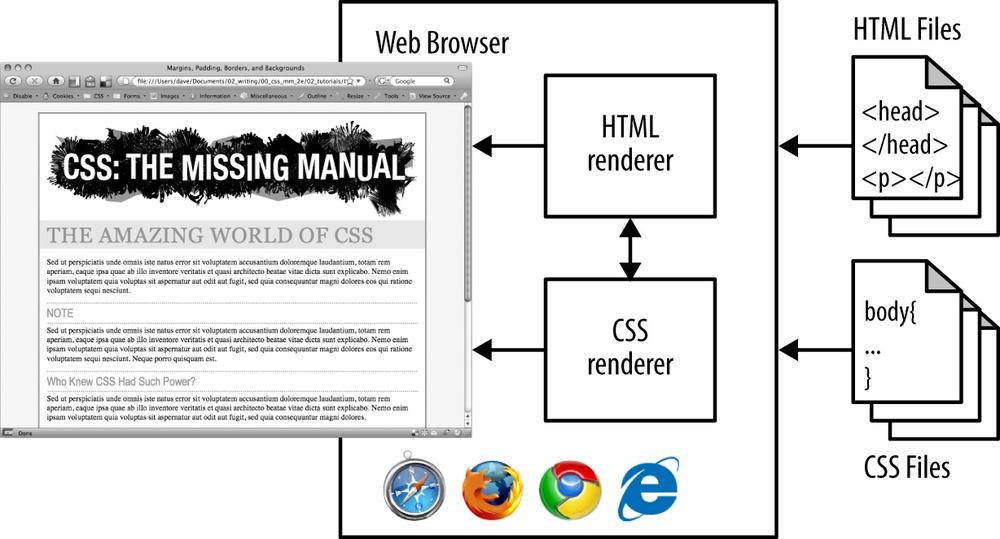
If you keep thinking back, you probably added some styling to your HTML pages. Using the style attribute and <style></style> tags in your HTML document, you could change fonts, add striping to your table rows, and generally spice up otherwise boring text.
Then, at some point, some well-meaning web designer slapped your hand and insisted that you start writing all your CSS in external style sheets, and referencing those files in the head of your HTML, like this:
<link rel="stylesheet" href="styles/mysite.css" type="text/css" />
You might even have a few style sheets for the benefit of people viewing your website on mobile devices or printing out a page:
<link rel="stylesheet" href="styles/mysite.css" type="text/css" media="all" />
<link rel="stylesheet" href="styles/print.css" type="text/css" media="print"
/>
But you can still double-click that HTML file, and your browser knows what to do (see Figure 1-2). Thatâs because, once again, the web browser is completely capable of not just rendering HTML, but applying all those CSS styles to the page, too. Again, no extra software needed.
At this point, even though youâre using only two technologiesâHTML and CSSâyou need only a single program to handle those technologies: the web browser.
Next up in the pantheon of web technologies that every designer and fledgling programmer needs to learn: JavaScript. Suddenly, you werenât limited to elements that never moved and text that never changed. Whether it was simple phone number validation, more advanced jQuery functions that turned boring gray boxes into animated buttons and <div> elements into tabs, or even the new HTML5 canvas object, within which you could build entire JavaScript-based 3D games, your pages suddenly had new life with JavaScript.
But just as with HTML and CSS, JavaScript is at heart a web technology, and even more specifically, a browser-based technology. In other words, support for JavaScript is part and parcel of your web browser. In fact, if a new version of JavaScript were to appearâsomething that rarely happens these daysâyouâd need to download a new version of your browser to get that version of JavaScript. Just as you canât upgrade your HTML installation outside of your browser, you canât upgrade your JavaScript installation outside of your browser.
Figure 1-3 shows you how JavaScript fits in (hint: just as HTML and CSS do).
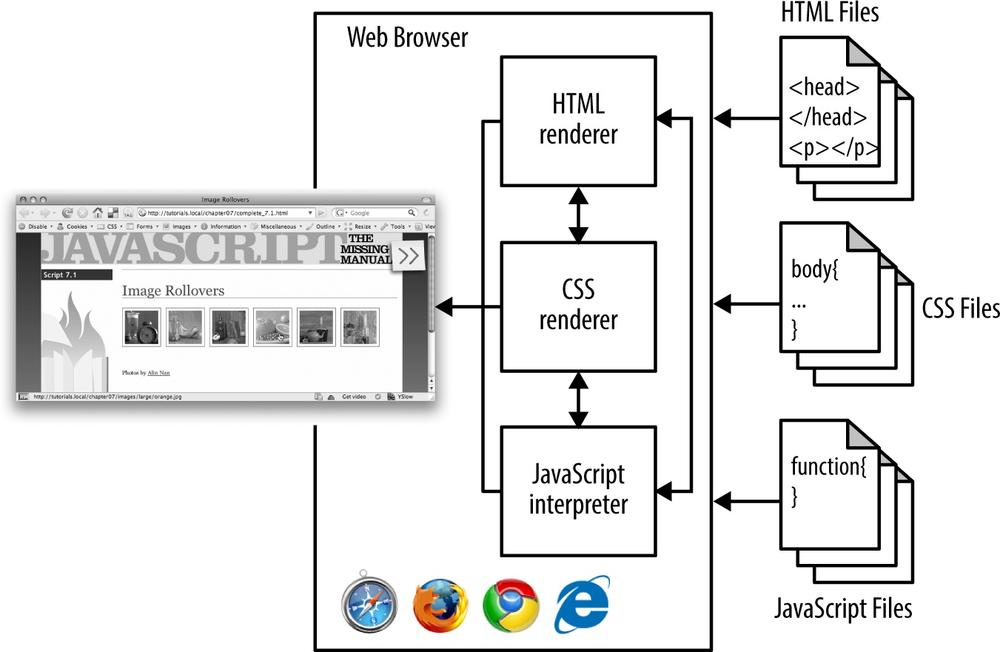
Figure 1-3. The web browser can handle your JavaScript, too. That browser is doing a lot behind the scenes.
Note
The code that handles your HTML and CSS isnât quite as disconnected as it might appear from Figure 1-2 and Figure 1-3. In other words, there are no individual components in your web browser that render HTML or CSS. But you get the idea; your browser can handle all these different tasks and technologies and turn them into a web page.
And hereâs where things change from the easy, browser-centric view of the world. When you download a web browser, you get HTML, CSS, and JavaScript, but you do not get PHP. PHP scriptsâwhich youâll soon be writingâhave to be interpreted by the PHP interpreter program, called php. And, you canât just add a PHP interpreter to your browser. It doesnât know what to do with scripts and isnât built to interpret PHP.
Instead, you need PHP on a web server. Itâs the web serverânot the web browserâthat can interact with a PHP interpreter. Your browser can handle HTML on its own, but it has to make a request to a web server to deal with PHP scripts. That server can take your PHP scripts and run them, and then take the response and send it back to your browser. Your browser can then understand and handle the response.
So, Figure 1-4 adds a couple of new wrinkles: the PHP interpreter, the magical thing that takes the PHP scripts youâll be writing and does something useful with them; and a web server to communicate with that interpreter. These both live outside of your web browser. In this scenario, the browser now makes a request to the server and then takes the response and shows it to you.
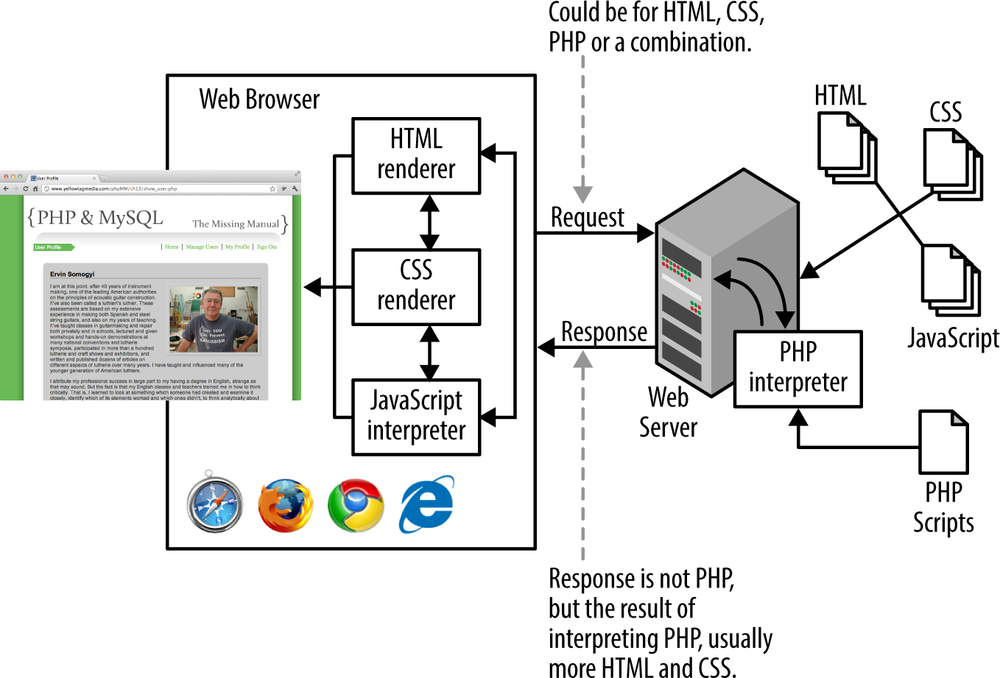
Figure 1-4. Web browsers handle HTML, CSS, and JavaScript using the browserâs own code. But PHP scripts have to be handed off to another program, and that program deals with the scripts, returning something useful (hopefully!) to a web server, which then can pass a response back to the web browser. (As was the case with earlier diagrams, this is a bit of an over-simplification. The PHP interpreter interacts closely with your web server, and so doesnât stand quite so far outside the server as it might appear.)
Hereâs the basic process:
A web browser makes a request for some page. That page might be a URL on a remote web server, or a local file on your computer.
Warning
Right away, thereâs potential for trouble here. If the browser requests a local HTML, CSS, or JavaScript file, thereâs no problem. Thatâs because, as you now know, browsers can handle those file types. But if it requests a PHP file without going through a web server youâre not going to get a response that the browser can handle on its own.
Assuming that the request goes to a web server, the web server returns HTML (and CSS and JavaScript) or, in the case of PHP, passes the PHP request on to the PHP interpreter.
The PHP interpreter does what itâs supposed to: it interprets, or runs, the PHP. The result of that should be something that a browser can understand, like HTML. It passes this result, or response, back to the web server.
The web server gives the browser back something that the browser can understand: the HTML result of interpreting a PHP script, or CSS, or JavaScript, or a combination of all of the above.
Understanding this difference in how PHP works, as opposed to HTML, CSS, and JavaScript, is important because it determines the approach youâll take to writing PHP scripts and getting those scripts to run.
The cool thing about HTML, CSS, and JavaScript is that because theyâre built in to browsers and you can download browsers so easily, those technologies become instantly available. Itâs tough to even find a computer without a browser preinstalled. So, you turn on your computer for the first time, and boom, you can start creating web pages immediately. Double-click the HTML file, your browser fires up, and youâre good to go.
But PHP isnât part of that browser. Itâs not always preinstalled. If you write a PHP script and then double-click it, youâll probably see a code editor launch, but not something that will actually run that script. Even worse, if your browser does open up your PHP script, itâs not a web server. It doesnât have a PHP interpreter. It will just show you your code, rather than run it, and what good is that to anyone?
This long prelude is just a big warning: although itâs easy enough to start writing PHP scripts, you canât just open them in Dreamweaver or Firefox and expect them to run. Youâll end up frustrated and annoyed, and thatâs no good for anyone.
The bottom line is this: You can write PHP on your own local computer, but youâve got two choices for actually running that PHP:
You can go through the lengthy process detailed in the next section and install PHP on your local computer. This process will take some time, and youâll have to monkey around a bit with your computer at a system and network level. Youâll also need a local web server to handle the PHP interpreting part of the gig. This way, youâll not only have a browser that can handle HTML, CSS, and JavaScript, but a complete setup that can take on PHP without a problem, tooâright on your own computer.
You can write your scripts locally and always upload them to an Internet Service Provider (ISP) or web hosting company. Every ISP and web hosting company supports PHP, and you usually donât have to do anything more than name your scripts with a .php extension. This option involves less initial setup, but it means that every time you edit your script, you need to upload it again to your ISP. It also means that double-clicking your PHP script wonât do anything more than, at best, open your editor. You canât test your scripts on your own computer.
Both choices are equally good, and which one you choose depends largely on your circumstances. Even though it might seem perfectly natural to jump right into uploading your scripts, you arenât always going to have a network connection. (The sound you just heard was the cheering of all the programmers who have an hour-long commute into work on their local metro or subway!) For those unwired situations, itâs nice to be able to keep developing on your own computer without the need to access your hosting provider. Note only that, installing PHP on your own computer is great for understanding what the PHP interpreter actually does.
So, before you start writing scripts that you canât even run, itâs time to get PHP working on your own computer (if you want to), and then talk about getting scripts running out there in the wild, as well.
Itâs not difficult to install PHP on your own computer. This is typically called a local installation, which just means that all your programs are running on your own local machine. (For more detail on how the whole thing works, see the box on Local Software Runs on localhost.)
Although PHP isnât preloaded on every computer like web browsers are, itâs still easy to download PHP from the Internet, get it working on your computer, and get up and running fastâ¦all without spending a dime. On top of that, most of the easiest and best tools for writing PHP code are also free. You just have to know where to find them.
Note
The next section explains how to install PHP on computers running Microsoft Windows. If you have a Macintosh, flip to PHP on the Mac (Default Installation).
Open your favorite web browser and head to www.wampserver.com. This is the online home of WAMP, which stands for Windows, Apache, MySQL, PHP. The site is shown in Figure 1-5.
Note
Although the website is called WampServerâand describes the grouping of software âApache, PHP, MySQL on Windowsââthe WAMP acronym lives on.
Select the relevant Download link for your version of Windows. If youâre not sure, you can go to your Control Panel, select System, and then poke around. Youâll see either â32-bit Operating Systemâ or â64-bit Operating System,â and that tells you what you want. Just select the first link on the top-left of the page that matches your system.
When downloading starts, you see a warningâactually, a couple of themâabout needing some C++ extensions. Click the link for your system (see Figure 1-6), download the extensions (see Figure 1-7), and then run the downloaded file. Youâll need to allow the downloaded program to update your system, accept a license agreement, and install the extensions. When thatâs complete, a screen appears like the one in Figure 1-8.
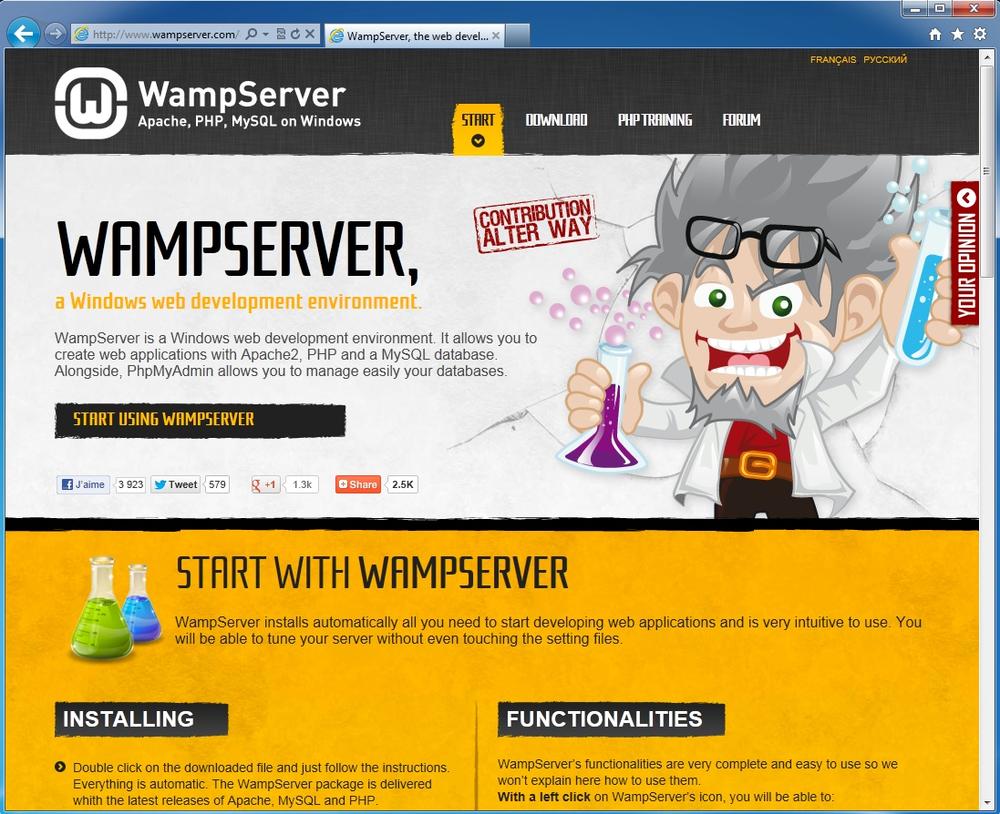
Figure 1-5. Wampserver.com brings together everything you need for getting PHP and MySQL going and behaving on your Windows PC.
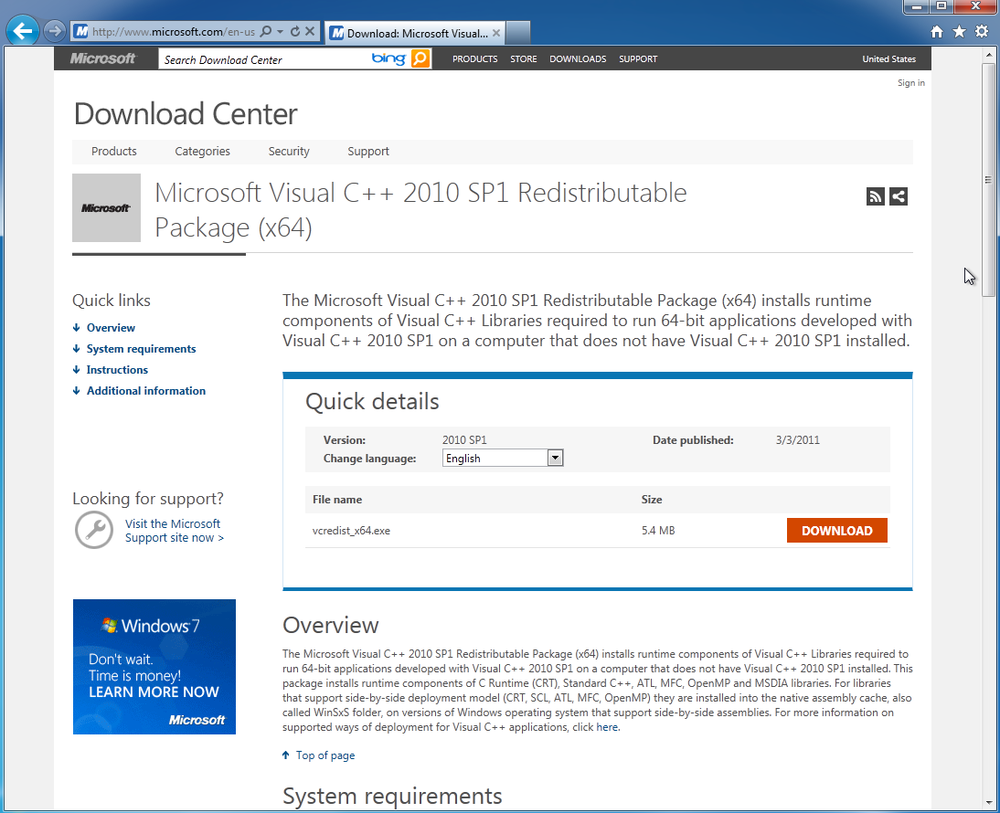
Figure 1-6. WampServer requires some extra work on your part before it can install, most notably, you need to download some C++ extensions to get everything in the PHP interpreter behaving.
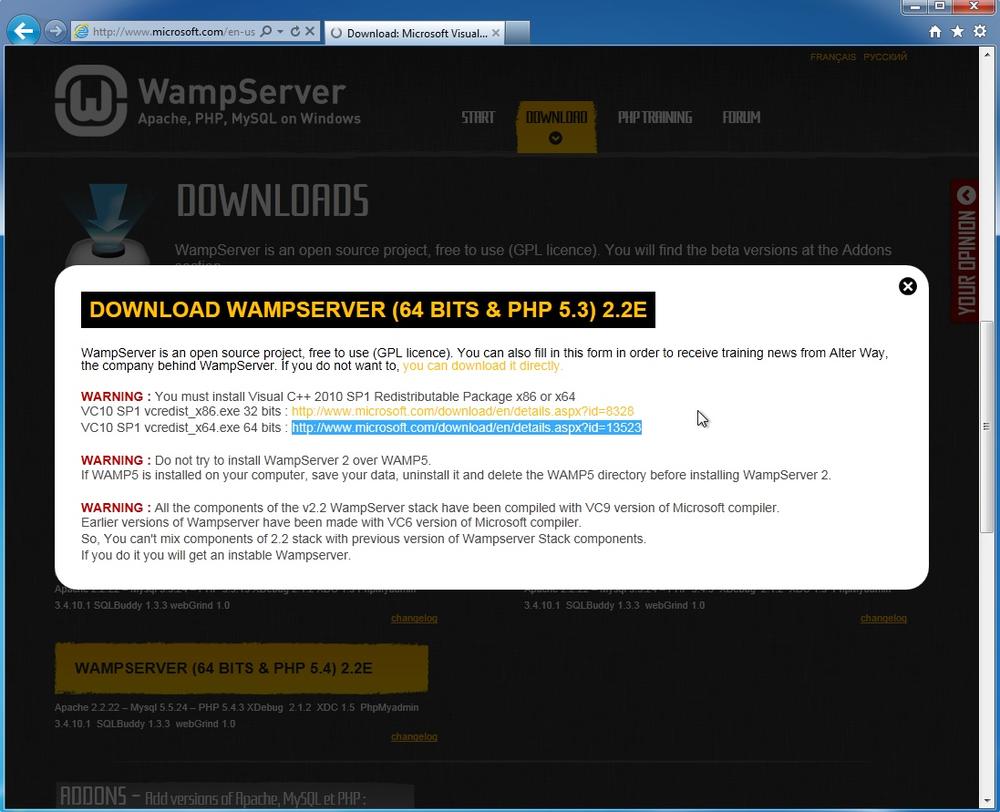

Figure 1-8. Finally! The C++ extensions are installed. Now you can get back to actually installing WampServer.
Once youâve installed the C++ extensions, go back to Wampserver.com, select Downloads again, and then click the download link. This time, you can ignore the warning. Click the words âyou can download it directly.â
The ad-heavy site youâre taken to will trigger a download in a few seconds. Then, save and run that file; youâre finally installing WampServer. Figure 1-9 is what youâre aiming for.
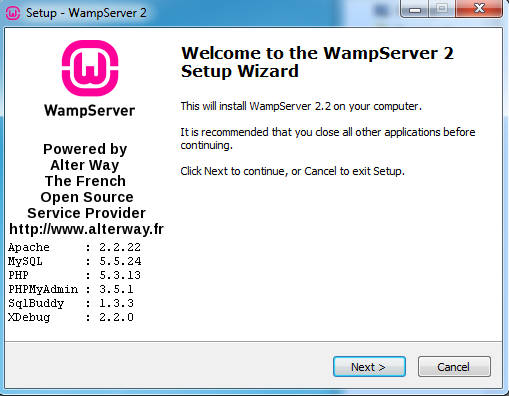
Figure 1-9. All that work for the little pink âWâ logo. Itâs worth it, though. Installing PHP manually (as detailed in the appendixes) makes this look like a walk in the park.
Accept the license and default installation directory (typically C:\wamp). You might want to create a quick link icon, or at least a desktop shortcut, and then let installation take off. Select your default browser. Youâll then be asked about allowing Apache to access public networks (Figure 1-10). The best option here is usually the default supplied by the WampServer installer.
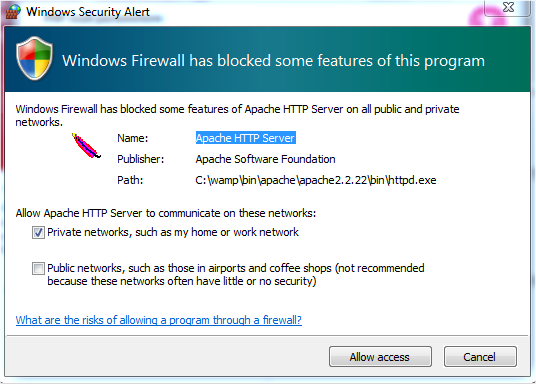
Figure 1-10. Unless your computer is directly connected to the Internet and has its own dedicated, publicly available IP address, the default options are just fine here.
You then have a few other options for PHP mail, and then youâre finished. Launch WampServer, and you should seeâ¦nothing! Well, almost nothing. On the right side of the taskbar, notice there is now a little green âWâ (check out Figure 1-11).
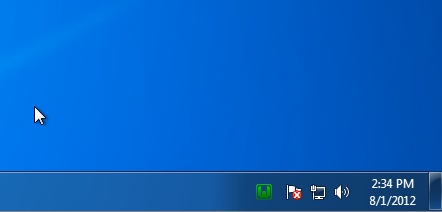
Figure 1-11. Now youâve got WampServer running happily in the background. For your troubles, though, it appears youâve only got this little green âWâ icon.
Click the green W icon to see all of the things youâve been reading about, like PHP, MySQL, and Localhost, as shown in Figure 1-12.
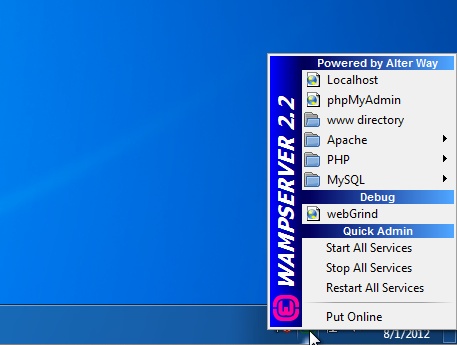
Figure 1-12. You can do a lot from the WampServer icon: start and stop the new programs youâve installed, use the handy-dandy phpMyAdmin tool (which youâll see more of in Chapter 7), and more. Youâll use almost everything here before youâre done.
Youâre almost done. Select the top option, Localhost. (If you donât remember what localhost means, see the box on Local Software Runs on localhost.) A new web browser window or tab opens with an address that references your own locally installed web server. This Server Configuration page presents information about your own web server setup (see Figure 1-13). It isnât particularly impressive to look at, but it âs proof that your Windows computer can now serve up web pages.
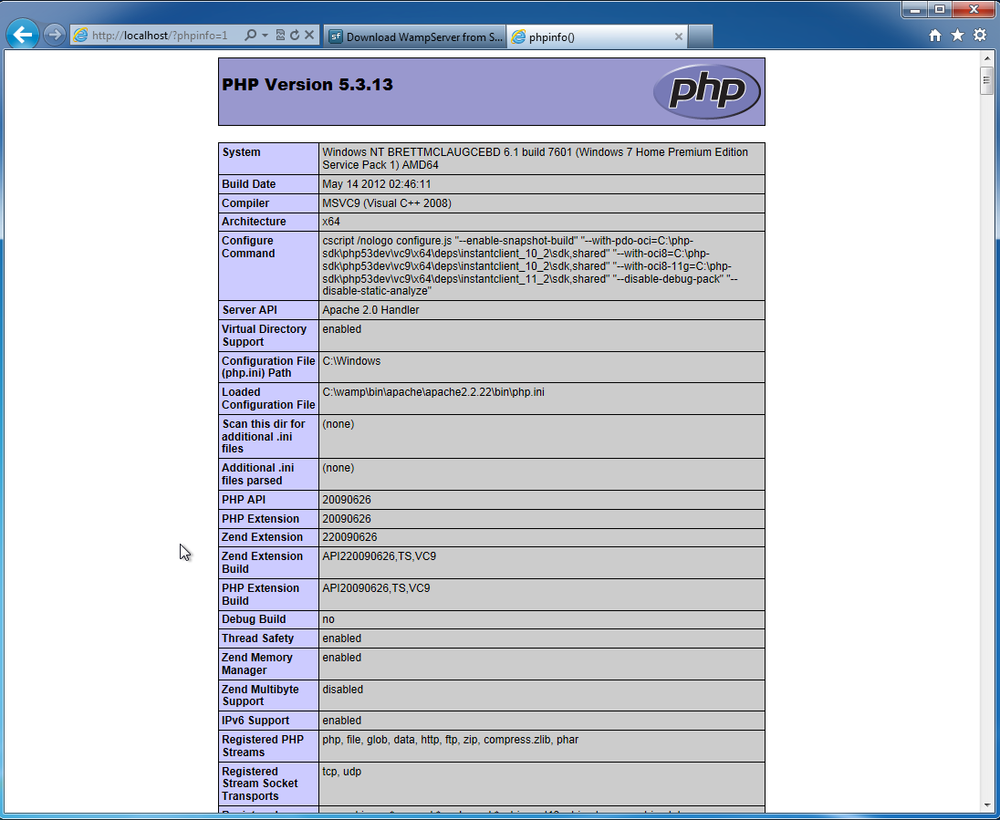
While on the Server Configuration page, in the Tools section (about halfway down the page), click the phpinfo() link. A page opens that looks something like Figure 1-14, which is everything youâll ever need to know about your local PHP installation.
More important, it means that your browser made a request to a web server, and that web server processed some PHP (the phpinfo function) and handed back a response to your browser. Not only can you run PHP on your computer, you just did.
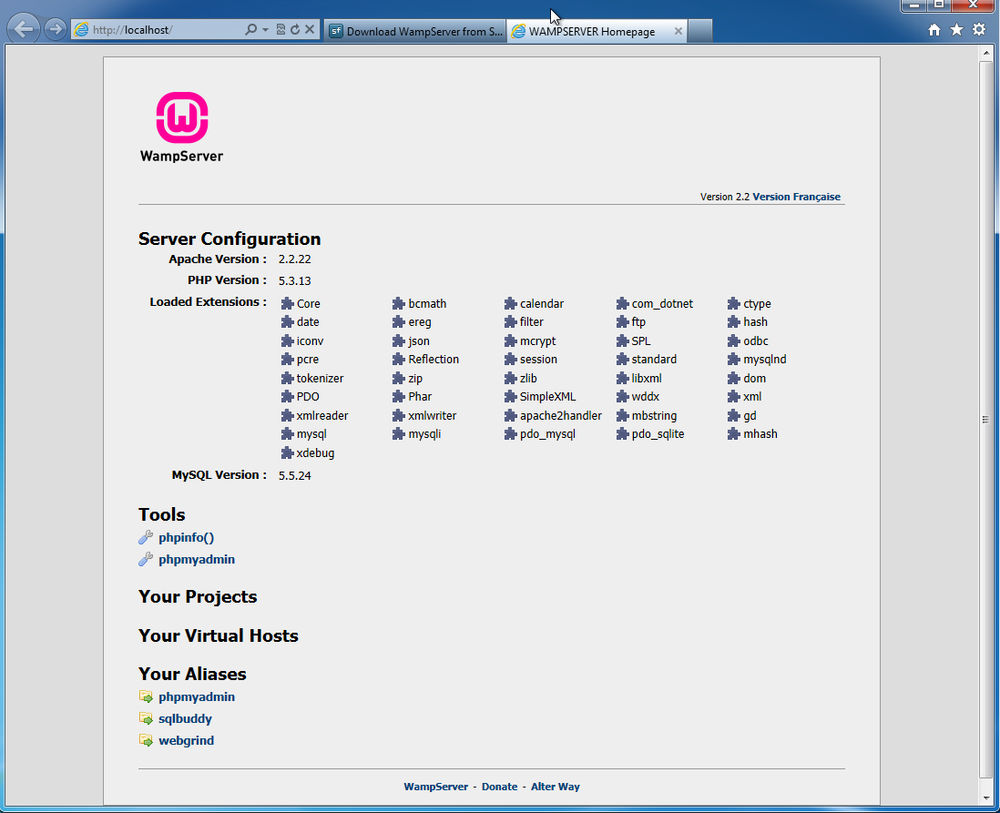
Figure 1-13. Having a web server running on your local computer isnât necessary for developing HTML, CSS, or most JavaScript applications. But because a browser canât interpret PHP, a local web server is essential if you want to write PHP scripts on that computer and run them without uploading them to a server somewhere.
If youâve got a Mac, youâve got more than just a sleek, shiny machine and way too many ways to spend even more money with Apple, youâve already got PHP installed. To prove it, open the Terminal application on your Mac. If youâve never used Terminal, donât worry; youâll get used to it quickly and find itâs one of your best friends for working with PHP. Go to ApplicationsâUtilitiesâTerminal.
Note
You can also get to the Applications folder in a flash by pressing Shift-â-A. However, this keyboard shortcut works only in the Finder. If youâre currently viewing this book in an e-reader or online, for example, click your desktop and then press Shift-â-A. Shift-â-A is a little-known shortcut, but if youâre the programming type, youâre probably all about keyboard shortcuts.
Once youâve found the Applications folder, open it and find the Terminal application. It looks like a computer monitor with a black screen and a little white arrow, as shown in Figure 1-15.
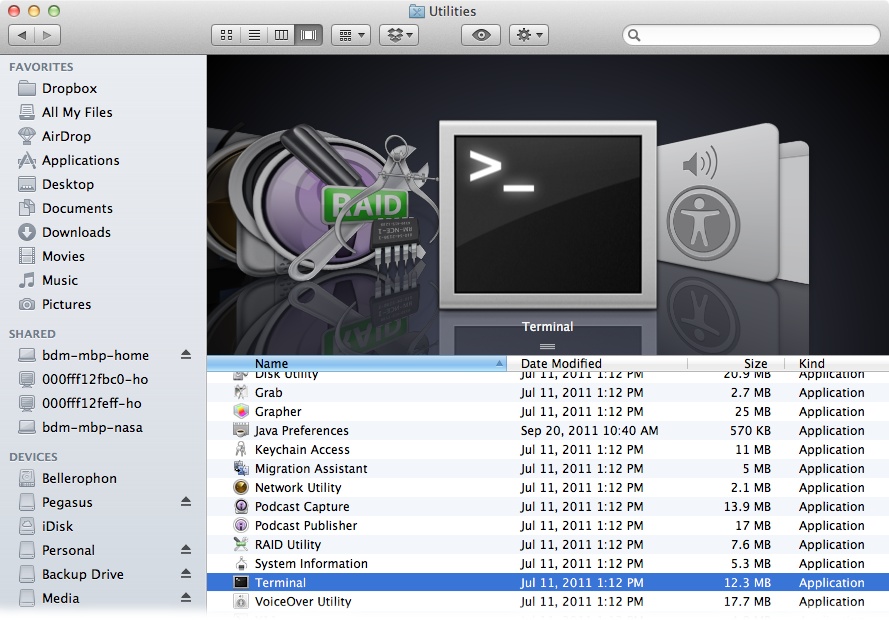
Figure 1-15. The Terminal program lets you use a command line on Macintosh computers. A lot of your PHP coding will be done by using Terminal, so youâll get used to this application quickly. Open it, and you see a barebones screen like the one in Figure 1-16.
Tip
Youâll often use Terminal for testing your PHP programs before you upload them to your server. To make it easier to launch Terminal, drag the icon onto your dock.

Figure 1-16. When you first open Terminal, you wonât be too impressed. Youâll get a line that probably matches your computerâs name and then a weird dollar sign. Donât worryâ¦this will all soon be old hat.
To ensure that PHP is installed on your system, type php (all in lowercase letters) and press Enter. Unfortunately, the way to know things are working is if you donât see anything but that blank cursor, a little further down in Terminal. It wonât even blink at you anymore; itâs just a boring, dark gray square.
Press Control-C to stop that single eye from hanging around and to display the blinking cursor again. This time, type which php. The which command lets you know where on your computer the program you type is located. In this case, youâre asking where the php program is located. Youâll probably get something back that looks like Figure 1-17; for the computer in this example, php is in the /usr/bin directory. Youâll probably get a similar result.
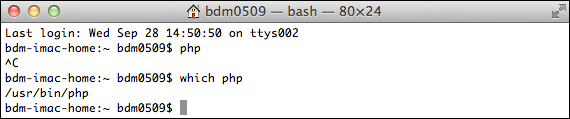
Figure 1-17. Lots of the programs youâll use in Terminal are scattered around your Macâs hard drive. The which command lets you know exactly where a program resides on your machine.
Once youâve seen where php is, youâre ready to go. It was installed all along.
Although itâs nice that Macs come with PHP already installed, there might just be a better optionâone worth doing a bit of downloading and installing for yourself. That better option is MAMP, which stands for Mac, Apache, MySQL, PHP. This is the Mac counterpart to WAMP, the easy Windows PHP installation (PHP on the Windows-Based Computers (WampServer Installation)) that you, as a Mac user, probably skipped.
MAMP doesnât improve on the PHP installation that came on your Macs; it does integrate MySQLâwhich youâll need before you know itâas well as the Apache web server and several helpful tools for working with PHP scripts and MySQL databases. You even get a simple control panel for starting up your local web server and MySQL database. Those additions are a nice perk, and coupled with how easy it is to install MAMP, you might just want to ditch the default PHP installation and get MAMP going.
First, using your favorite web browser, visit www.mamp.info. A site like the one shown in Figure 1-18.
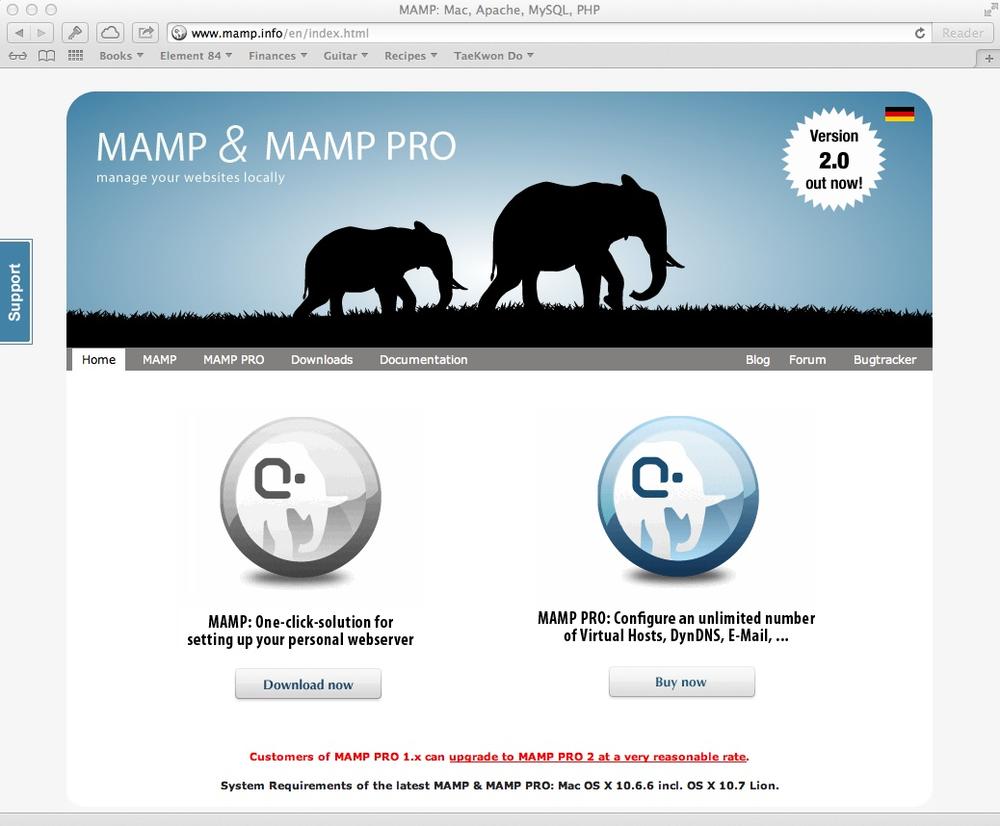
Figure 1-18. The MAMP site is a PHP developerâs best friend. The free MAMP download gives you almost everything you could want for developing great PHP scripts and the databases with which they work.
Simply click the âDownload nowâ button under MAMP and then grab a coffee and wait for the installer to download.
Now, launch the installer. Click Next a few times to select your hard drive and agree to the license. Keep going until the installer informs you that MAMP is ready to install, as shown in Figure 1-19.
Note
Some versions of MAMP donât have a correctly signed security certificate. This results in a nasty message popping up when you try to launch the installer: âMAMP_2.1.1.pkg canât be opened because it is from an unidentified developer.â
Fortunately, you can safely ignore this for MAMP. Just Control-click the installer, and then in the popup menu that appears, you can click âOpen.â This will in turn give you a dialog box, and you can click âOpenâ yet again. Finally, youâll have your program ready to run. Fortunately, you should only have to do this once.
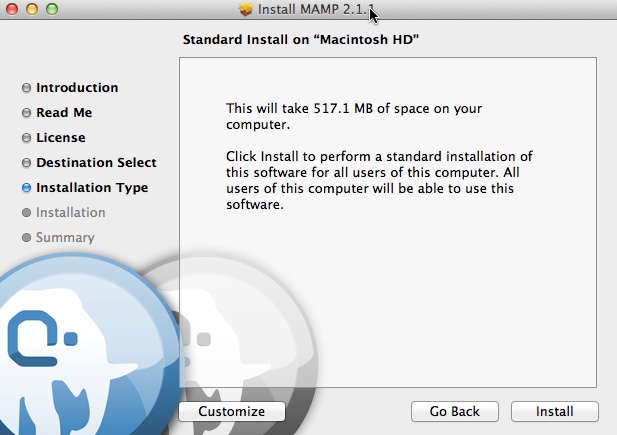
Figure 1-19. MAMP is simple to install but it eats up about half a gigabyte of disk space. Thatâs ok; youâre getting a full-blown web server, PHP interpreter, MySQL database, and a suite of tools.
Once the installation is complete, go to Applications â MAMP. Youâll see a nifty control panel, a la Figure 1-20.
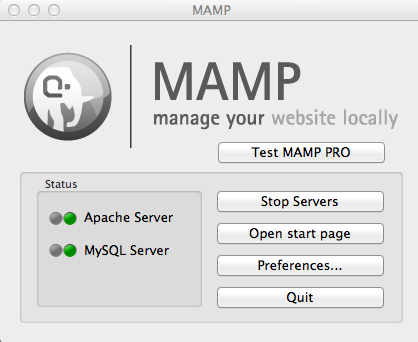
Figure 1-20. This control panel is MAMPâs home base. You can start and stop software components and make all your configuration changes here. While youâre getting your PHP feet wet, you may want to move the MAMP icon into your dock; youâll be using it a ton.
Your installation might try to automatically start both an Apache server and the database. Still, you can configure these easily by clicking the Preferences button. You should probably check the Ports tab and ensure that there arenât any issues with any other software on your computer. You can do this all within MAMP, as shown in Figure 1-21.
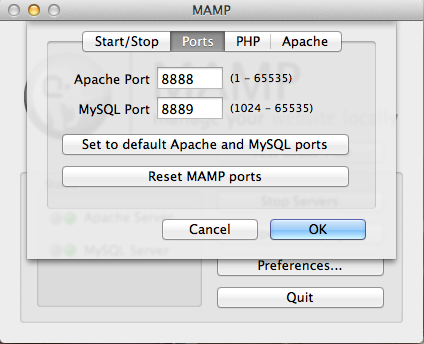
Figure 1-21. MAMP lets you change both the port that Apache (the web server) runs on, as well as the port that MySQL runs on. Be especially careful with the MySQL port. Most programs that use MySQL will need to be updated to the value you use here.
Note
If all this talk of ports is starting to give you a headache, thatâs okay. It probably just means that your machine is set up without any software running on weird ports, and that makes things easy here: just accept the defaults. These are pretty standard ports, and will almost always work perfectly with a system.
You can also click the PHP Preferences option and see a few things that, honestly, probably donât matter much to you (see Figure 1-22). Just leave these alone. In fact, thereâs almost never a reason to mess with these selections. Mostly, itâs good to know that yes, MAMP did indeed install PHP (along with a web server and MySQL) with just a few mouse clicks.
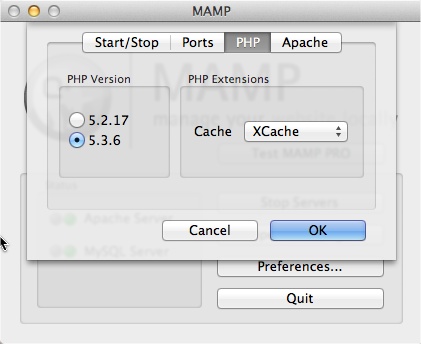
Figure 1-22. There are some reasons you might one day want to jump back from PHP 5.3 to 5.2, but thatâs far down the line. For now, just accept these options as they are and get ready to start scripting.
Thereâs not much else to do now, so you can close Preferences and click the âOpen start pageâ option to get a nice browser page like the one shown in Figure 1-23. Hereâs where youâll spend lots of your troubleshooting time as well as digging into databases once youâve mastered the command line tools for MySQL that youâll learn about in Chapter 4.
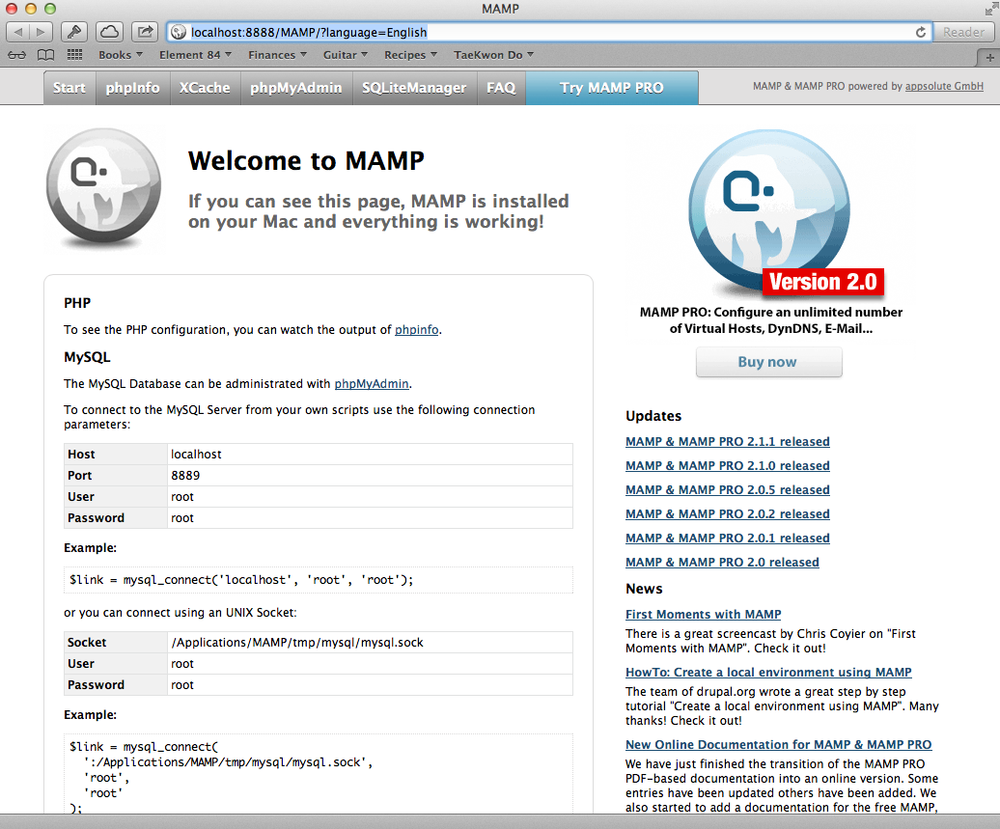
Figure 1-23. Hereâs where youâll do most of the work once you have your MAMP software running. Think of the MAMP control panel as the place youâll control the programs, and this start page as where youâll interact with those programs.
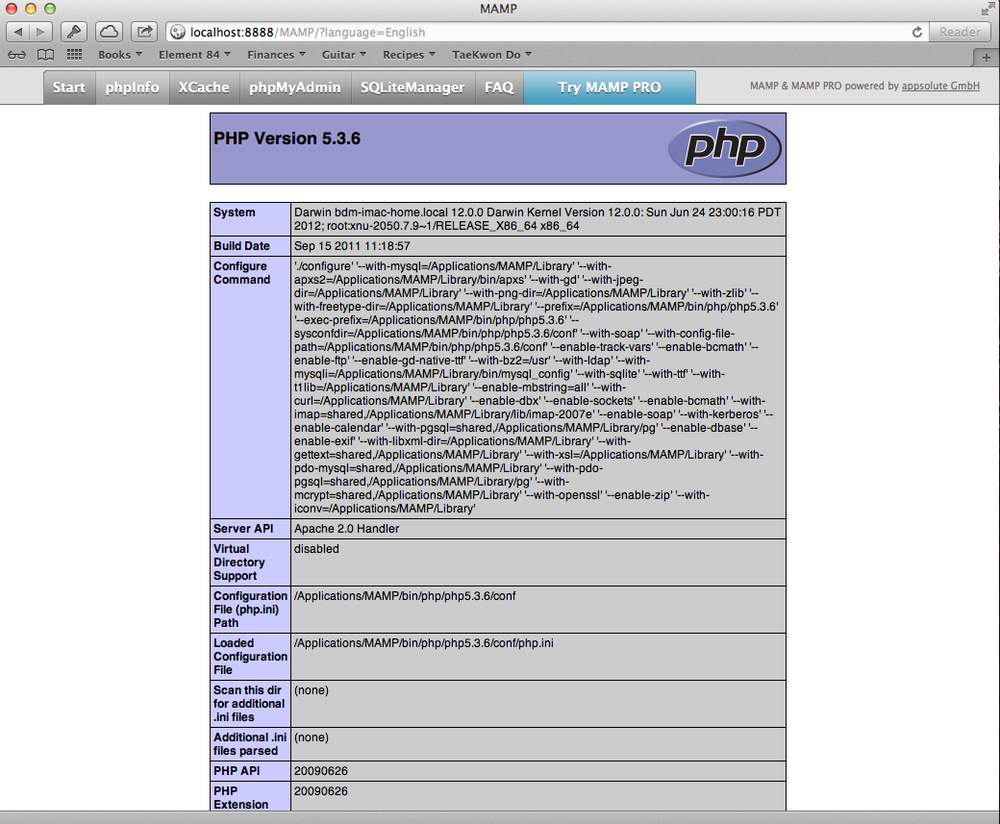
Before moving on, you can verify that this is all doing what it should. At the top of the MAMP start page, click the âphpInfoâ tab. A screen appears, similar to that in Figure 1-24. What âs significant here isnât all the information listed; you neednât concern yourself with that just yet. What is cool, though, is that youâre looking at a PHP script thatâs been interpreted by a PHP interpreter (installed as part of MAMP). The interpreter then fed the output of that script to your new MAMP-installed web server, which in turn handed that response to your web browser. Proof that youâre already running PHP.
All the programs youâre going to write in PHP are plain, old text files. Writing PHP isnât a lot different than writing HTML or CSS or JavaScript. Youâll type different things, of course, but these are all just text files saved with a special extension. You use .html for HTML, .css for CSS, .js for JavaScript, and now youâll use .php for PHP files.
Because PHP is just text, youâll want a good text editor in which to work. If youâre in Windows, you can use Notepad. As simple as that program is, itâs perfect for coding in PHP. If youâre on a Mac, TextEdit is a great choice. The good news is that each of these programs comes preinstalled on your computer, so you donât have to download or buy anything. The bad news is that none of these programs know youâre writing PHP, so you donât get much help if you type something wrong or want to organize your files without resorting to Windows Explorer or the Finder. These programs are simple, but limited.
On the other hand, there are quite a few editors out there that are built specifically to handle PHP. For instance, for Windows, you can download NuSphere PhpED (nusphere.com/products/phped.htm), which is shown in Figure 1-25. Youâll pay a bit for a program like NuSphereâusually between $50 and $100âbut youâll get fancy color coding, help with special language features, and in a lot of cases, some nifty file organization features and the ability to upload your PHP directly to your web server.
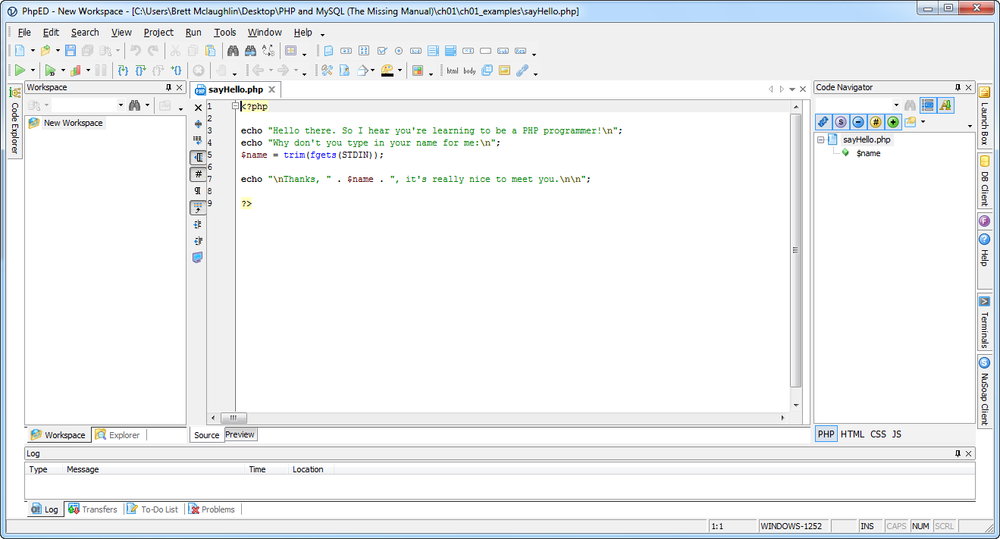
Figure 1-25. NuSphere PhpED gives you a ton of features and supports JavaScript, CSS, and HTML, as well as PHP. It also has great documentation for most of the PHP functions and libraries.
If youâre on a Mac, the two leading candidates for editors that do text plus lots of other cool things are BBEdit (www.barebones.com/products/bbedit/index.html) and TextMate (www.macromates.com). Both are Mac-only programs, and both offer similar features on the Mac as does PhpED for Windows: color-coding, file management, help documentation, and support for HTML, CSS, JavaScript, and a lot more. You can see BBEdit in action in Figure 1-26; youâll need to drop $100 to get your own copy, though.

Figure 1-26. BBEdit is supposed to be bare bones, but youâll find it has more than adequate PHP support. Itâs tuned primarily for HTML, so there are a few oddities, but itâs a great choice for PHP work on the Mac.
You can see what TextMate looks like in Figure 1-27. It âs a little simpler than BBEdit, so if youâve never used a programming editor, this might be easier to begin with. TextMate costs around $60, slightly less than BBEdit.
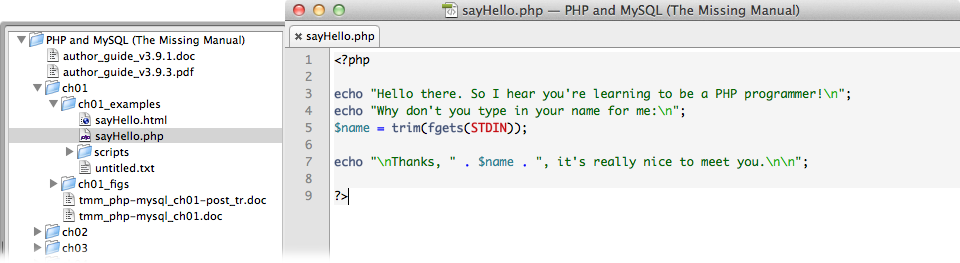
Figure 1-27. TextMate is an editor that seeks to provide color-coded editing and not much else. It does offer file management and FTP support, but itâs best at letting you type code and staying out of the way.
Once youâre comfortable writing PHP code, you can spend some time playing with all these different enhanced editors. You can see what you like, discover whether an editor is perfect for you, or realize youâre a Notepad or TextEdit programmer at heart. Thereâs no one right option for PHP; all of these choices work just fine.
If youâre just starting out, though, try to use a simple text editorâNotepad on Windows or TextEdit on the Mac. Youâll learn a lot more about PHP this way, even if you donât get all the bells and whistles of one of the full-featured editors. Besides, once you understand PHP and have learned to work with it manually, youâll appreciate and be able to use the features of the other editors a lot more effectively.
Note
Once youâve become familiar with PHP, you can also check out Eclipse PHP (www.eclipse.org). The Eclipse IDE has long been a favorite for Java developers, and there are now enough plug-ins for PHP that itâs a legitimate option for PHP programmers, too. However, thereâs a lot going on in Eclipseâtons of tools and gadgetsâso you might want to wait a bit before you dive head first into it. Come back to it later, though; itâs well worth checking out.
Youâve got PHP installed locally and youâve got a text editor. Now all you need is an actual program. Start your text editor and type the following code, exactly as shown here:
<?php

   echo "Hello there. So I hear you're learning to be a PHP programmer!\n";
   echo "Why don't you type in your name for me:\n";
   $name = trim(fgets(STDIN));

   echo "\nThanks, " . $name . ", it's really nice to meet you.\n\n";

?>
Note
You can find a copy of this script on this bookâs Missing CD page at www.missingmanuals.com/cds/phpmysqlmm2e.
A lot of this probably looks weird, and thatâs OK. Youâll soon understand every bit of this code. Right now, just get used to looking at PHP, which is quite different from HTML or JavaScript.
Warning
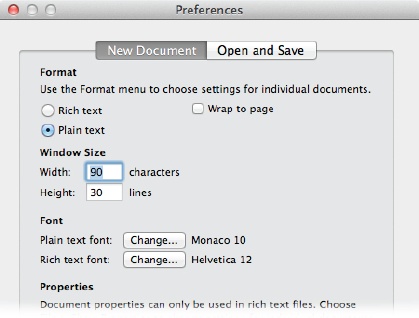
Some of the editors you might use, like TextEdit, will try to save the document as rich text. Rich text lets you use formatting, like bolding and underlining. You donât want that in your PHP code, so look for the option to use plain text, which doesnât provide formatting.
If youâre using TextEdit, choose FormatâMake Plain Text. (You wonât see that option if youâre already working in plain text.) If youâre using Notepad, rich text isnât an option, so youâve got nothing to worry about.
Once youâre done, your editor should look similar to Figure 1-28.
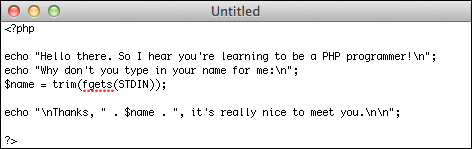
Figure 1-28. PHP is just text, but it uses several weird characters. Start getting used to typing the dollar sign ($), angle brackets (< and >, just like in HTML), and the backslash (\). Youâll be using those characters a lot.
Note
You wonât see the nice color-highlighted syntax until you save your file with a .php extension.
This program does just a few simple things:
Identifies itself as PHP by using
<?php.Prints out a welcome message by using the
echocommand.Asks the user for her name, again by using
echo.Gets the userâs name and stores it in something called
$name.Says hello to the user by printing out a message that includes the information stored in
$name.Finishes up with the
?>characters.
Itâs okay if not much on this list makes sense yet, especially the weird line beginning with $name =. There are also some strange characters like \n and STDIN that youâll learn about soon. But see if you can follow the plain-English words through the basic path: the opening <?php, the printing, the request for the userâs name, another bit of printing, and the closing ?>.
Now, save this program. Name it sayHello.php, and ensure that you add that .php extension! Otherwise, youâll have a lot of problems down the line. Save the file some place handy, like on your desktop, your home directory, or a folder youâre using to keep all your PHP programs in as youâre learning.
What good is it to get all this code typed in if you canât see if it works? This particular program isnât ready to run on the Web yet; first you need to add something to it in your command-line terminal program, so go ahead and fire that up. If youâre on the Mac, you should open up Terminal. In Windows 7 or earlier, go to Windows Start âRun and then run command or cmd from the menu to get a command line. In Windows 8, at the start screen, press Windows key + R and then type cmd (as shown in Figure 1-30).
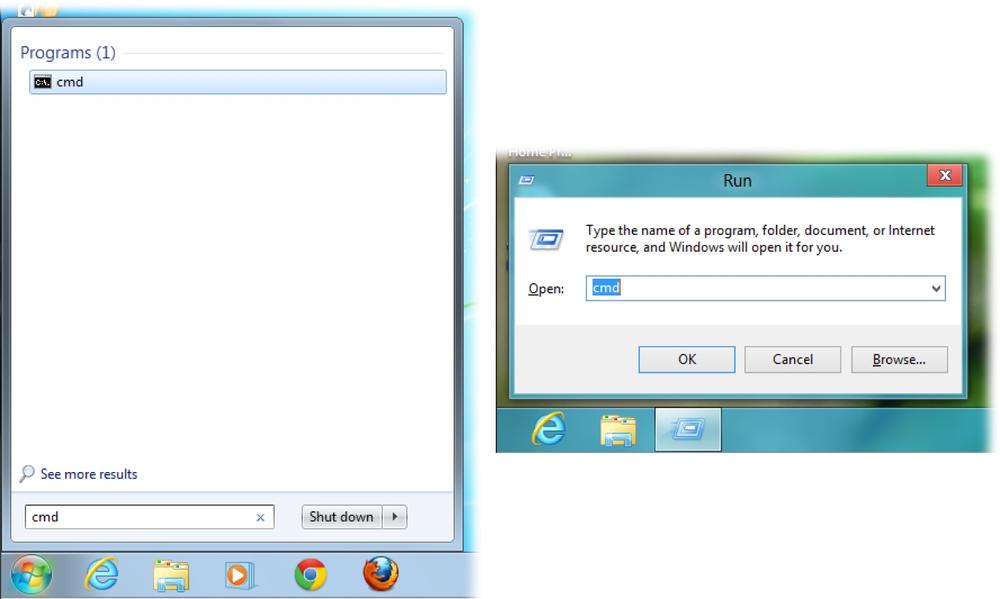
Figure 1-30. In Windows 7 (left) and earlier, you can get to the command line via the Start menu. Since Windows 8 doesnât have a Start menu, just go to the Start screen and press Windows key+R. That opens the Run box where you can type cmd.
Now, go to the directory in which you saved your program, sayHello.php. You can do a directory listing with dir (in Windows) or ls (on the Mac) to ensure that youâre in the right directory. Once youâre in the right directory, type this into your command line:
php sayHello.php
This instructs the php program to run and gives it your program, sayHello.php, as the script to run. In short order, you should see the welcome message you typed, and then the program asks you for your name. Type your name and press Enter. The program should then greet you, just as shown in Figure 1-31.
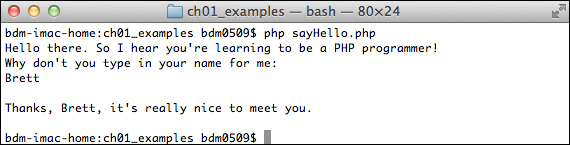
Figure 1-31. Eventually, youâll run most of your PHP scripts through a web browser. For now, though, the command line lets you take control of the php command and give it a particular script to run so that you can see the output on the command line.
Thatâs it! Your first program works, and youâre ready to go deeper into PHP.
Before you take that well-deserved break, thereâs one question left to answer. Remember way back to the discussion about a PHP interpreter interacting with a web server? All that business about PHP running locally or running remotely? Uploading files, web hosting providers; remember all that stuff? If not, Figure 1-32 should be a helpful refresher as to how PHP usually functions.
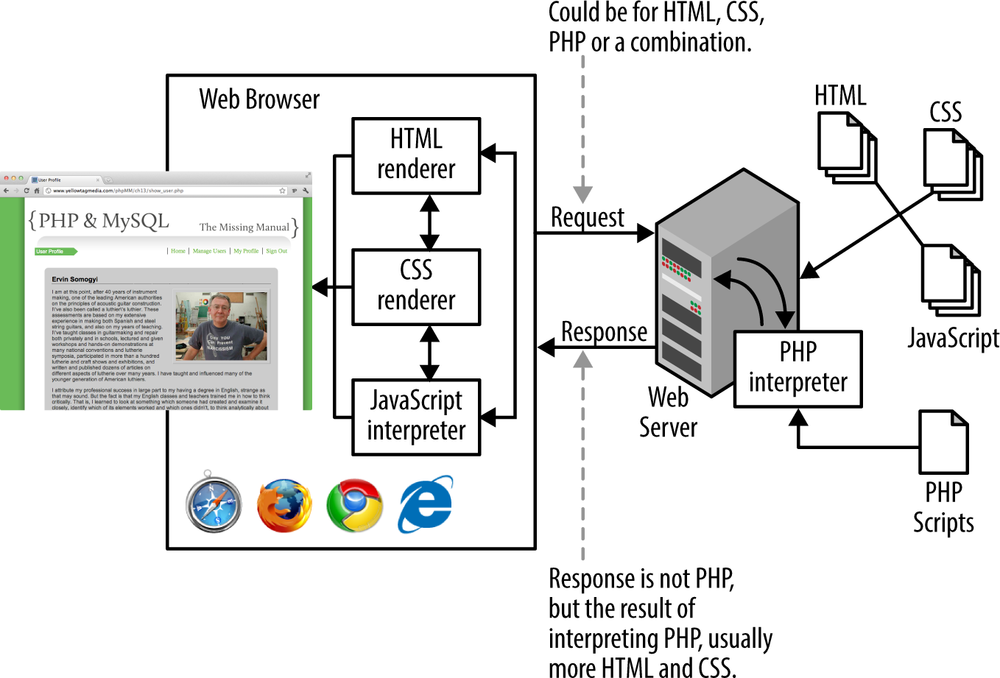
Figure 1-32. Remember this diagram from earlier? Even though it hasnât applied to your first PHP program, it still holds true. As soon as you start writing scripts that interact with web pages, youâre going to need a web server.
So what gives? You installed PHP locally and ran your script without problem, but a web browser wasnât involved
The PHP interpreter thatâs shown in Figure 1-32 is just a program, like dir or ls or which or anything else you can type into a command-line or terminal window. And just like those other programs, you can run it on your scripts manually. In fact, thatâs just what you did. You ran the PHP interpreter (php) on your script, because you installed WampServer or, if youâre on a Mac, because php is already installed.
But, this sort of scriptâwhere all it does is output some textâis not the typical PHP script. Itâs more of a âblow bubbles in the kiddie poolâ script: helpful to get started, but just the tiniest taste of whatâs coming.
So, you donât need a web browser or a web server. You just needed the PHP interpreter. Because of that, thereâs no sense uploading your script and trying to find the PHP interpreter on your hosting provider, which requires shell access, which in turn might require calling up tech support and spending 20 minutes on the phone giving out maiden names and birthdatesâ¦in other words, itâs just not worth it.
Keep those credentials handy, though, because in the next chapter, you will start uploading your scripts. Youâll move beyond simply outputting text and begin to output HTML. Youâll take input from an HTML form and churn back out styled, web-friendly responses. And, youâll move from using just a local PHP installation to using a remote one.
Buckle up, take that break, and head on over to Chapter 2.
Get PHP & MySQL: The Missing Manual, 2nd Edition now with the O’Reilly learning platform.
O’Reilly members experience books, live events, courses curated by job role, and more from O’Reilly and nearly 200 top publishers.

