If you're like most amateur photographers, your most important photos are pictures of people: your family, your friends, or even just fascinating strangers. Elements gives you yet another tool for making fast fixes—one that's designed especially for correcting photos that have people in them. This is the "Adjust Color for Skin Tone" command, available in both the Quick Fix and Full Edit windows.
The name "Adjust Color for Skin Tone" may be a bit confusing. What this command actually does is adjust your entire image based on the skin tone of someone in the photo. The idea behind "Adjust Color for Skin Tone" is that you may well be much more interested in the way the people in your photos look than in how the background looks. This command gives the highest priority to creating good skin color. It's an automatic fix, but there's a dialog box where you can tweak the results once you've previewed Elements' suggested adjustments. To use the "Adjust Color for Skin Tone" command:
Call up the "Adjust Color for Skin Tone" dialog box.
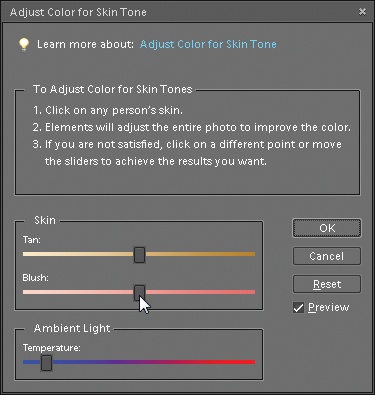
In either Quick Fix or Full Edit, go to Enhance → Adjust Color → "Adjust Color for Skin Tone". The dialog box shown in Figure 4-11 appears. You may need to move it out of the way of your photo so you can see what's happening.
Figure 4-11. When this dialog box appears, your cursor turns into a little eyedropper when you move it over your photo. Just click the best-looking area of skin you can find. After Elements adjusts the photo based on your click, you can use the sliders to fine-tune the results. Clicking different spots gives different results, so you may want to experiment by clicking different places.
Show Elements an area of skin to sample for calculating the color adjustments.
Once the dialog box appears, your cursor turns to an eyedropper. Just find a portion of your photo where your subject's skin has relatively good color, and click it.
Tweak the results.
Elements is often a bit overenthusiastic in its adjustments. Use the sliders in the dialog box to get a more pleasing, realistic color. The Ambient Light slider works just like the Temperature slider in the Quick Fix control panel (Color). Blush increases the rosiness of the skin as you move the slider to the right and decreases it to the left. Tan increases or decreases the browns and oranges in the skin tones. You may get swell results with your first click, or you may have to use all the sliders to get a truly realistic result. It all depends on the photo.
You can preview the changes right in your photo as you work. If you mess up and want to start again, click Reset. If you decide you'd rather be using another tool instead, click Cancel.
When you like what you see, click OK.
Elements applies your changes. If you want to undo them, press Ctrl+Z.
"Adjust Color for Skin Tone" seems to work best on fair skin, and not so well on darker skin tones. And it's most suited for making fairly subtle adjustments, so you may have to reduce the amount of change from what Elements first did.
Also, notice that not only the skin tones are changing. Elements is adjusting all the colors in the photo in sync with the skin tones (Figure 4-12). Sometimes you may find you've acquired quite a color cast by the time you've got the skin just right (see Removing Unwanted Color). If this bothers you, try a different tool. On the other hand, you can create some very nice late afternoon light effects with this command.
While "Adjust Color for Skin Tone" is really meant as a kind of alternative fast fix, you may find it's most useful for making small final adjustments to photos you've already edited using other tools.
Tip
If you understand layers (explained in Chapter 6), you may want to make a duplicate layer and apply this command to your duplicate. Then you can adjust the intensity of the result by adjusting the layer's opacity (see Managing Layers).

Get Photoshop Elements 6: The Missing Manual now with the O’Reilly learning platform.
O’Reilly members experience books, live events, courses curated by job role, and more from O’Reilly and nearly 200 top publishers.

