POSE
POSE emulates the hardware of a number of different Palm OS devices: Pilot 1000, Pilot 5000, Palm III, Palm IIIx, Palm V, Palm Vx, Palm VII, Palm VIIx, Palm IIIc, Palm m500, Palm m505, Symbol 1700, Handspring Visor, Handspring Prism, HandEra TRGPro, and HandEra 330.
Everybody should read and follow the instructions for POSE. First, we will show you how to install it, then how to run it. We’ll be discussing POSE Version 3.2.
Getting and Installing POSE
The first thing to do is to download and install POSE. The instructions are slightly different for Unix, because you need to build it from the sources.
On Windows and Mac OS you can download the latest version of POSE from http://www.palmos.com/dev/tech/tools/emulator/.
On Unix, things are a bit more complicated. You’ll need to build POSE from the source code. Before you can do this you need to get the FLTK toolkit.
Download the FLTK toolkit ( fltk-1.0.11-source.tar.gz) from http://www.fltk.org.
Uncompress it:
tar -zxf fltk-1.0.11-source.tar.gz
Build FLTK:
cd fltk-1.0.11
./configure
make
make install
Download POSE at http://www.palmos.com/dev/tech/tools/emulator/emulator-src-32.tar.gz.
Extract the sources:
tar -zxf emulator-src-32.tar.gz
Configure and build the POSE sources (instructions are in the file, Docs/_Building.txt):
cd Emulator_Src_3.2/BuildUnix
./configure
make
Install POSE into /usr/local/bin/pose:
make install
Emulator Skins
You’ll also want to install Emulator Skins for your platform. Skins are pictures of actual devices used to provide a more faithful representation of the device. Here are the steps:
Download the latest Emulator Skins file and uncompress it. It’ll create a directory named something like Skins 1.7.
Move that Skins 1.7 directory into the proper place to ensure that POSE finds the skins when it needs them:
- Windows and Mac OS
Make a directory within the POSE directory called Skins. Move the Skins 1.7 directory into this newly created Skins directory. POSE looks for its skins recursively within the Skins directory.
- Unix
Create a Skins directory in your home directory, and place the Skins 1.7 directory within that newly created directory.
POSE and ROM Images
You can get ROM images for POSE from the Internet or from an actual device.
Palm-branded product ROMs require registration and signed license agreements. You can register at http://www.palmos.com/dev/.
Handspring ROMs require registration and faxed license agreements. You can get further information from http://www.handspring.com/developers/.
Retrieving ROM from a Handheld
Before you get a copy of your particular handheld’s ROM, make sure that POSE can use that type. If the handheld from which you are obtaining the ROM isn’t in the earlier list, POSE will refuse to use the resulting ROM image.
To retrieve a ROM image you need to do a couple of things. First, you’ll need to install the ROM Transfer application (part of the POSE distribution) onto your handheld using the standard desktop installation procedure. You will then see the form shown in Figure 4-1 when you run the application on your device.
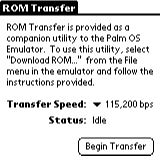
Follow the instructions on the device and tap the Begin Transfer button. Now, you’ll need to initiate the process on the desktop as well. (See the following instructions for the appropriate platform.)
In Windows:
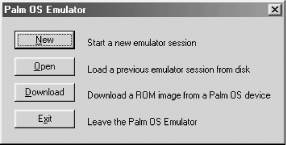
Run Palm OS Emulator. You’ll see the initial dialog box (see Figure 4-2).
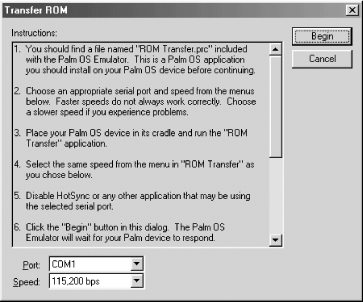
Click on the Download button to display the Transfer ROM dialog box shown in Figure 4-3.
Follow the directions in this dialog box.
In Mac OS, POSE transfers ROMs using a serial connection. Since modern Mac OS computers don’t have serial ports, you’ll need either:
A serial PC card (like those available from http://www.socketcom.com).
A USB-serial adapter (like the Keyspan USB PDA Adapter from http://www.keyspan.com). The PalmConnect® USB-serial adapter works only with the HotSync application, and can’t be used by POSE.
Now do the following:
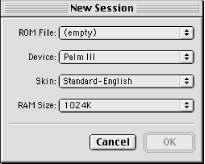
Run Palm OS Emulator on your Macintosh. You’ll see the New Session dialog box (see Figure 4-4). Press Cancel.
Choose Transfer ROM from the File menu. The Transfer ROM dialog box (shown in Figure 4-5) will describe all the steps needed to transfer the ROM.

In Unix:
Run the Emulator and you’ll see the initial POSE window.
Right-click on the window to display a menu. From that menu, choose Transfer ROM. Follow the instructions shown in the resulting Transfer ROM dialog box.
Creating a New POSE Session
Now that you’ve downloaded a ROM image you can use it.
Close Palm OS Emulator, and reopen it.
Create a New Session (Windows and Mac OS: click the New button; Unix:right-click and choose New).
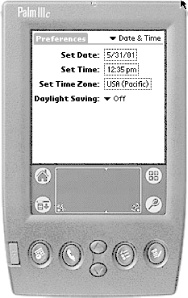
You’ll see the New Session dialog box (see Figure 4-6). From this dialog box, you’ll need to change the ROM file (change to the one you just downloaded). The Device pop up will change automatically to reflect the devices for which this ROM is valid. The Skin is a picture of the actual device (though all that it affects is the visual look of the Emulator).
Choose a RAM Size of 2048K (you don’t want the size larger than actual devices you’ll be targeting).
Tap OK, and the Emulator will display a picture of a Palm device that is booting up. Then it will show the main screen (see Figure 4-7).
You can tap on the screen with your cursor just as you would with a stylus. Tap on the hardware buttons as well. You can enter characters with both the Graffiti system, and with the desktop’s keyboard.

In Windows and Unix the menu for POSE is available by right-clicking on the POSE window. On the Macintosh the menus are in the menu bar.
Now it is time to choose which tutorial you wish to read through. This first one is for CodeWarrior (Windows, Mac OS). If you’ll be using PRC-Tools, skip to Section 4.3.
Get Palm OS Programming, 2nd Edition now with the O’Reilly learning platform.
O’Reilly members experience books, live events, courses curated by job role, and more from O’Reilly and nearly 200 top publishers.

