Outlook installs with several preconfigured toolbars that give one-click access to common commands. Like menus, toolbars are context sensitive (for example, a Message view displays different buttons than a Contacts view) and adaptive (buttons no longer display on a formatting toolbar if you fail to use a particular command for a given length of time). The default toolbars available in Outlook depend on the installation mode chosen (see Chapter 2).
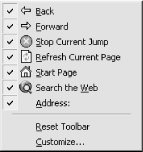
An Internet Mail Only (IMO) installation preconfigures three toolbars: Standard, Advanced, and Web. The context menu shown in Figure 4-12 is used to display and customize these toolbars and can be accessed via the View → Toolbars command or by right-clicking anywhere on a toolbar or empty toolbar area.

When Outlook is installed in Corporate Workgroup (CW) mode a fourth preconfigured toolbar is added: Remote. The commands on this toolbar relate specifically to reading, marking, and retrieving message headers off a mail server that supports this function.
Toolbars are normally " docked” or “anchored” to the top edge of Outlook’s interface. They can, however, be “undocked” and float anywhere on your screen, anchored to any side of Outlook’s interface window, or resized to show more or less of the command buttons displayed.
To resize a floating toolbar, move your cursor over any edge until it turns into a double-headed arrow, and then drag that edge of the toolbar in the desired direction.
To resize a docked toolbar that shares a row with another toolbar, position your cursor over the “move handle” (the vertical raised bar on the left edge of the toolbar) until it turns to a four-headed arrow and drag horizontally in the desired direction (see Figure 4-13).
Note
Toolbars remember both their location and state. If, for example, you float a toolbar on your screen and minimize or close Outlook, it will return to the same location and state when you maximize or restart Outlook.
When a toolbar is docked and hiding command buttons, a double-caret
symbol (>>) appears on the right edge of the
toolbar. Selecting this symbol displays any buttons or drop-down
lists not currently in view as well as an “Add or Remove
Buttons” pad. Holding your cursor on this pad opens a context
menu similar to that shown in Figure 4-14.
This is a very fast and handy way to customize a toolbar. Deselecting a command causes it to be hidden. Toggling the same command item again (restoring the checkmark) redisplays it on the toolbar. The Reset Toolbar toggle returns the toolbar to its original state before any customizations, while the Customize toggle opens the customization dialog discussed later in this chapter in Section 4.5.4.
On floating toolbars there is a down-arrow in the top-left corner of the title bar. This arrow calls up the context menu shown in Figure 4-14.
Although most toolbar buttons simply echo commands that are found on the normal menus and submenus, the Standard and Advanced toolbars also act like context menus by adapting the function of some of the buttons displayed to the current component in use. For example, the Find button sets up a context-specific search scope, and the Organize button opens a “Ways to Organize” pane with preselected options specific to the Outlook component you are working in.
In the next sections we explore in detail the Standard, Advanced, and Web toolbars.
The minimum
Standard toolbar in Figure 4-15 mirrors the essential File and Tool commands.
In this example, the
encryption application
PGP is installed (see Chapter 15), which adds the red key-icon to the far
right.

The icons on the standard toolbar are:
New (with context-dependent icon, plus list down-arrow) indicates the current default “New” (Ctrl+N) command, which will vary depending on which component view you are working in. The down-arrow button accesses the same submenu entries given by File → New in the current context.
Print sends the item(s) currently selected in the view to the default printer for immediate printing—there is no confirmation dialog displayed and no opportunity to change printing options. Use File → Print Preview (or the Advanced toolbar button with the same name) to see what your document will look like. By contrast, the File → Print command (Ctrl+P) calls up the print settings dialog first.
Move to Folder, again acting on the currently selected item(s), first shows a submenu with your most recently accessed Outlook folders as selectable destinations. Once the list reaches ten folders, your most recently accessed folder is added to the top and the bottom entry is dropped. At the bottom of the list is the general Move to Folder command, which opens a dialog to choose from all folder destinations.
Delete moves the selected item(s) to Outlook’s Deleted Items folder. Holding down the Shift key and clicking this icon deletes an item permanently.
Find opens a context-sensitive Find pane above the current view. If you are working in a Contacts view, for example, the Name, Company, Addresses, and Category fields are searched for the text string entered here. (See Chapter 3, for a detailed discussion on using Find.)
Organize is similar to the Find icon, but opens a context-sensitive Organize pane above the current view. From this pane you can move or copy the selected items, create a mail rule based on the current item’s message header, or mark a selected message for inclusion on the Junk Mail list. Organizing your data across all Outlook components is also covered in Chapter 3.
Address Book opens the Windows Address Book (WAB), which is actually an alternate interface for viewing the records contained in your Contacts folder. See Chapter 3 for a full explanation of the ins and outs of Outlook’s Address Book.
Find a Contact (entry field and drop-down list) searches the Contacts folder for matches to the text string provided. A successful result is displayed in an opened Contact details form. If there are multiple matches to the entered name, a Choose Contact dialog allows you to select from those entries found. The drop-down list associated with the entry field lists previous successful matches for quick reference.
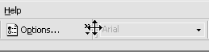
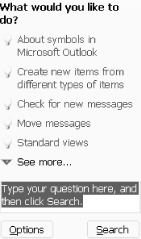
Help opens Outlook’s Help/Search dialog shown in Figure 4-16. Enter a word or phrase and select Search. To open the Office Assistant dialog (Help options), select Options.
Search with Find a Contact
The Find a Contact search field is a powerful and handy tool, once you gain a sense for what to enter as a search phrase. Names, partial names (for example, “to”), URLs, and email addresses all produce results—usually even with only a few key letters. Other fields that might be obvious candidates for a search result return a blank or confusing response. Examples of nonsearchable fields are: any part of an address (city, street name, or state), phone numbers, and company name. For industrial-strength contact searches, see Section 3.6.2 in Chapter 3.
The Advanced toolbar is shown in Figure 4-17 and mirrors the Outlook folder navigation and view commands. The first group complements the menu command View → Go to → Folder.
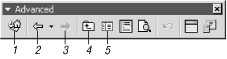
The special toolbar actions here are:
Outlook Today is a one-click shortcut to the summary view Outlook Today, discussed in Chapter 3.
Previous Folder (and History down-arrow) takes you back to the previous folder view when several folders have been selected in the current session. Otherwise it is grayed out. The visited-folder history is shown in a submenu list when the down-arrow is selected, from which any previous folder can be selected.
Next Folder advances to the next folder in the history list. If there is nothing in History to advance to, the button is disabled.
Up One Level (parent folder) moves the view up a level in the folder tree, i.e., to the one where the current folder is shown as a child.
Folder List toggles the left view pane that shows the folder tree, like View → Folder, on and off.
When browsing web folders, the Previous and Next history echoes the corresponding Web toolbar history, which can be useful if the latter is hidden or disabled.
Figure 4-18 shows the Web toolbar, which contains the Outlook Web navigation commands. These are relevant when Outlook is used as a web browser. This toolbar does not change context like the others. All the buttons on this toolbar function the same as they would in Internet Explorer—which makes sense, since Outlook uses Internet Explorer 5 Dynamic Link Libraries (DLLs) for the code to produce its internal browsing features.
The icons on the Web toolbar are:
Page Back returns to the previously visited page
Page Forward (shown as unavailable in this screenshot) allows you to move forward through pages already browsed.
Stop stops the current request for a page.
Refresh “refreshes” the page displayed, requesting a fresh (updated) copy from the server it is resident on. In the case of a local file folder, it will refresh the contents of that folder to reflect any changes made since it was last displayed.
Start Page opens your default Home page as configured in Internet Explorer under the Tools menu, Internet Options → General tab.
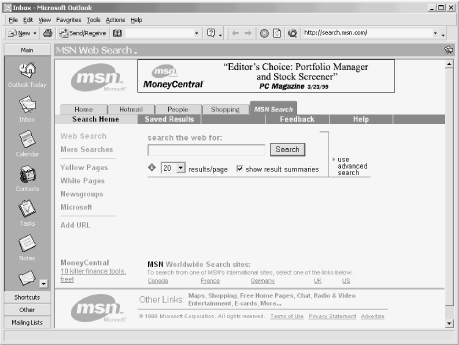
Search the Web starts Internet Explorer and takes you to the Microsoft search site (see Figure 4-19). Note that this site may differ depending on the version of Windows installed on your system.
Address provides a text box to enter a URL address. The most common use of this is, of course, an Internet address in the form of www.somewhere.com (Internet Explorer will, by default, provide the prefix http://). Do not forget that if Outlook’s File Management features are installed (see Chapter 2), you can also use this entry box to type a local filesystem path (of the form
C:\MyDocuments) or a network file path (of the form\\server\share). Using the latter will bring up a file manager-like window with that folder displayed in the Outlook window.The visited-page history is shown in a drop-down list using the down-arrow button. Selecting an item from this list allows you to quickly redisplay any recently visited sites or files without concern for the order of visit.
Like menus, Outlook toolbars are fully customizable with regard to both the command buttons shown, and the location of those buttons on the toolbar. Much of the technique involved in modifying Outlook’s toolbars is functionally identical to customizing a menu, so only details unique to toolbars are discussed here.
To customize a toolbar, right-click on any displayed toolbar or the menu bar and select Customize from the context menu (or from the View menu, Toolbars → Customize).
The Toolbars tab in Figure 4-20 displays a list of Outlook’s default toolbars, plus any custom toolbars created. Toolbars can be turned on or off from this dialog by selecting an entry and using the checkbox provided. Despite its presence on this list with a checkbox, you cannot turn the Menu Bar off.
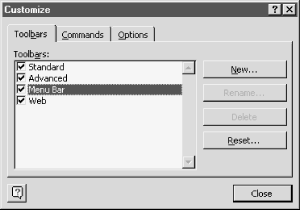
The Reset button will return the selected entry to the original commands and placements used when Outlook was first installed. Any customizations you have added to the toolbar are lost. Note that the Reset command works for the Menu Bar entry as well—as a matter of fact, this is the only way—as noted earlier in the menu section—to reset all Outlook’s menus to their default state in one fell swoop.
Note
The Rename and Delete commands on the Customize Toolbars tab are only available for custom toolbars; not Outlook’s default toolbars, and not a customized default toolbar.
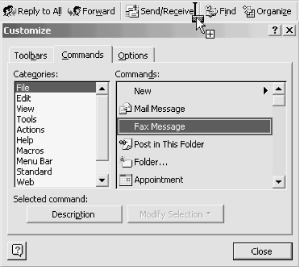
The basic procedure for customizing an existing toolbar is the same one used for menus: go to the Commands tab on the Customize dialog, choose a command category from the list on the left, and drag a command from the right pane onto the toolbar you wish to modify.
Figure 4-21 illustrates this procedure. As you drag
a command the cursor will provide a visual reference to where you can
drop the command (X for not allowed,
+ for allowed), and when in a permissible location
an I-beam will indicate where on the toolbar the command will be
added. Release the mouse button to drop the command button in the
desired location.
Keep in mind that you are not restricted to using the lists displayed in the Customize dialog as your only source for commands. If the Standard toolbar is displayed and there is a command on it you want to copy to the Advanced toolbar, for example, hold down the Ctrl key and drag the command from one toolbar to another.
How to Copy When Dragging
The default behavior when dragging commands between two toolbars (or menus) is to move the command; to copy it, hold down the Ctrl key while dragging. And don’t restrict yourself to thinking about toolbars and menus as discrete objects—they are all fair game when the Customize dialog is open. See a command on a menu that would look nice on your custom toolbar? Go get it!
With the Customize dialog open you can also rearrange the order of a toolbar by selecting a button and dragging it to a new location. To remove a command, select it and drag it off the toolbar pad.
Removing a button from any of Outlook’s default toolbars does not actually delete them; it simply stops them from being displayed. You can reset the display of any of these commands through the Add or Remove Buttons submenu accessible from the small down-arrow displayed next to the toolbar title (this same arrow can be found on the far-right edge of a docked toolbar). In Figure 4-22, the Start Page icon has been removed from the toolbar. To restore it, open the submenu and select the appropriate entry from the list displayed.
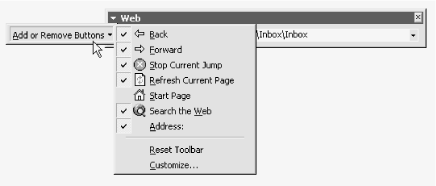
Figure 4-22. Restoring or hiding toolbar buttons; the Add or Remove Buttons submenu is accessed via the small arrow shown to the left of the toolbar title—in the example pictured, “Web”
Be aware that this technique only works for Outlook’s default toolbars. If you remove a command from a custom toolbar, the only way to restore it is to add it back using the Reset Toolbar command.
Like menus, toolbar images and the text displayed can be modified. Again, the Customize dialog must be open to gain access to the context menu displayed in Figure 4-23.
When using this menu in the context of toolbars, be aware of the following:
The
&in the Name field works the same for toolbars as it does for menus—the character following it will become the keyboard shortcut (Alt+key). You can, however, use a different keyboard shortcut for separate instances of the same command. For example, you could customize Outlook such that the Forward command was invoked from the Standard toolbar with Alt+W (the default) and set the keyboard shortcut for the Forward command contained on a custom toolbar to be Alt+F. If you decide to tread in these waters, choose your keyboard shortcuts with care to avoid conflicting with shortcuts already in use.In light of possible conflicts, Reset returns the selected command to Outlook’s preprogrammed default keyboard shortcut combination.
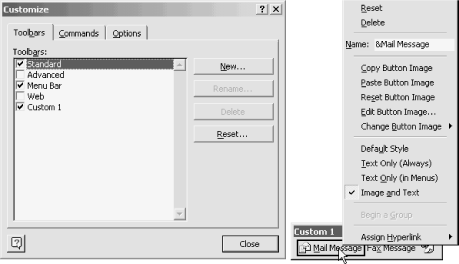
The Name field is also unique and distinct across menus and toolbars. For example, changing the Name field in Figure 4-21 from
MailMessagetoMailMessonly affects the text shown on the toolbar Custom 1, not the File → New menu command and not any Mail Message commands on existing toolbars.
To create a new custom toolbar, use the New button on the Customize dialog. This command invokes a dialog prompting you for a toolbar name. The default provided is Custom 1, which can be accepted if a creative name escapes you at the time; don’t forget, a custom toolbar can be renamed by using the Rename button on the Toolbars tab.
Note
The toolbar “pad” created with the new command is only large enough to hold one icon, which makes it hard to find if it ends up laying on top of the Preview Pane divider—which is often the case. There is no direct solution to this, other than being aware of the fact that a new toolbar pad is small and can be easily overlooked.
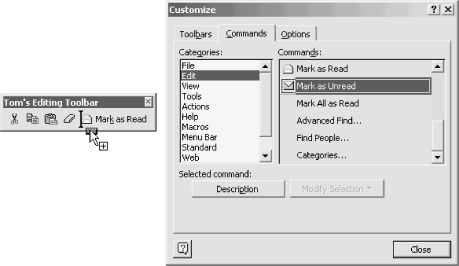
To populate your new toolbar, select the Commands tab on the Customize dialog. The categories box lists the groupings available; these mirror Outlook’s menu structure (File, Edit, etc.). Each category lists a different subset of commands in the right scroll box. Pick the command you want and drag it to your new toolbar pad. This procedure is illustrated in Figure 4-24.
When you’re happy with your new masterpiece, simply close the Customize dialog.
Toolbars, like menus, can be customized in more ways than space in this chapter can provide. Here are just a few ideas to get your creative juices flowing:
Build a custom toolbar to hold your most commonly used edit commands (Cut, Copy, Paste, Move to, etc.). Use “Icons only” to keep it compact, turn on “Show ScreenTips on toolbars” (from the menu-toolbar Customize dialog), and leave the toolbar to float in the currently open Outlook window. Now you have access to a range of common item/message manipulation tools only inches from the focus of your attention. Such a custom toolbar is illustrated in Figure 4-24.
Create a toolbar for quick access to your favorite web sites. Drag a command from the Customize dialog to a new or existing toolbar.
Note
Some commands from the Customize dialog cannot be reconfigured to activate a hyperlink (For example, Category → File/Command → New).
Right-click the command, select Assign Hyperlink from the context menu, and click Open. This will display the dialog shown in Figure 4-9. Choose a link to assign from one of the options available. Right-click the button again and change the displayed Name.
Any custom toolbar you create should have commands for Categories and Flag for Follow-up on them. These are two of the most potentially useful organizational tools in Outlook and we recommend you use them frequently.
If you find yourself switching views on a routine basis, add the Current View command to your all-purpose editing toolbar discussed earlier. This will give you a drop-down list of view choices that switch with context.
If you close either the Outlook Bar (discussed in the next section of this chapter) or the Preview Pane, you have to make a trip to the menus to turn them back on again; put them on a toolbar for quick access.
The Address text box (from the Web toolbar) is a good candidate for inclusion on a custom toolbar. With it you can not only quickly go to an Internet URL, but also open a local filesystem folder.
In general, consider any command you have to dig for on a sub-submenu a worthy candidate for a custom toolbar. A good example of this is the New Mail Message Using → Plain Text menu option. My default email format is HTML, but I have several people I correspond with on a daily basis who prefer Plain Text format. Rather than digging through two menu levels, this command is on a custom toolbar.
Get Outlook 2000 in a Nutshell now with the O’Reilly learning platform.
O’Reilly members experience books, live events, courses curated by job role, and more from O’Reilly and nearly 200 top publishers.

