Outlook’s Menus are fully customizable—you can add and remove commands, rearrange the order they are listed in, change the text that describes a menu item, and even alter the keyboard shortcuts used to activate them.
Note
Any customizations you apply to toolbars and menus are program specific. For example, customizing the Tools menu in Outlook has no consequence to the Tools menu in any other Office application.
The first step in customizing any of Outlook’s menus is to open the Customization dialog shown in Figure 4-1. Activating this dialog is the toggle that alerts all Office products to the fact that you want to modify a menu rather than use it.
With the Customize dialog open, clicking on a menu will highlight the menu title with a bold black rectangle, as shown in Figure 4-2 (left).
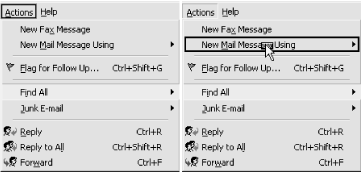
Figure 4-2. Customizing menus—the Actions menu selected (left); a command selected for modification (right)
Selecting a menu command produces a rectangle around that item and a “handle” under the cursor (Figure 4-2, right). There are many different ways to customize menus:
To move a selected command to another location, hold down the mouse button and drag. When you’ve settled on a new home, release the mouse button in the desired location and the command will “anchor” itself there. Note that you can move a command to another position on the currently open menu, to a submenu of that menu, or to an entirely different menu.
To move a complete existing menu structure to another location on the menu bar, select the menu title (e.g., View) and drag it to the desired position. Suppose you prefer your Favorites menu to the right of Help instead of to the left of Tools—just drag it there.
To remove a selected command from a menu, simply drag it off the menu pad. The same action will remove a complete menu by dragging the menu title off the menu bar.
To add a new command to a menu, select the Commands tab on the Customize dialog. Choose an entry from the Categories list box. Selecting a category displays the commands available for that group in the right list box. Choose a command and drag it from the Customize dialog to a menu (see Figure 4-3). Take some time to acquaint yourself with both the categories and related commands found on these two lists. Many of them are either not found on Outlook’s default menus at all, or are buried deep in sub-submenus. By bringing your most frequently used commands to the surface—either by moving them to a higher menu level or by creating a custom toolbar (see Section 4.5.4 later in this chapter)—you will save yourself a great deal of time and effort rifling through menus.
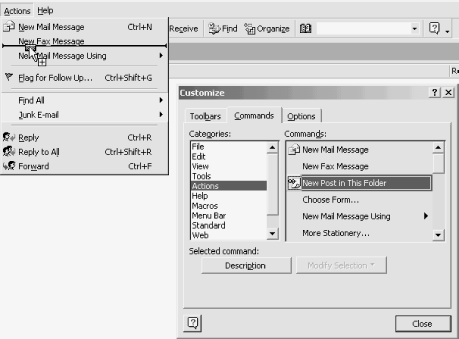
Figure 4-3. Adding a command to a menu—New Post in This Folder is added to the Actions menu under New Fax Message
To create a new menu, select the New Menu category and the New Menu command in the right list box. Drag this item to the desired location. Note that this location can be anywhere—on the existing menu bar, on an existing menu (which, in effect, creates a submenu), or on an existing toolbar. With this new menu anchored, repeat the steps previously listed to create the items for the new menu.
Gotcha—Modifying Outlook’s Favorites Menu
The contents of the Favorites menu cannot be modified from within Outlook. You can move the location of the menu on the menu bar itself, and modify the menu’s properties, but not the URLs it contains. This “Gotcha” is a result of the way Microsoft chose to implement the integration of Internet Explorer and Outlook. The contents of the Favorites menu displayed in Outlook must be modified from IE5 or Windows Explorer.
Before we move on to more advanced modifications, let’s pause for a moment and look at a few common challenges you might encounter and how to correct them.
Note that there is no Cancel button on the Customization dialog. This means there is no way to back out of a menu customization if you find your efforts are not producing the intended results. Never fear, though, there are ways to restore your menus to their original pristine state. For example:
You decide you don’t need Help with Outlook and drag this menu off the menu pad into never-never land. A week later, you change your mind and want it back because the program is not as simple as you first assumed. Open the menu Customize dialog, select Menu Bar from the Categories list, Help from the Commands list, and drag it back to the menu pad.
You make extensive modifications to the Tools menu, add commands, and shuffle menu items to other locations. After using your modified menu for a day, you decide you want the defaults back. Open the menu Customize dialog, and right-click the Tools menu. Select Reset from the context menu shown. Your Tools menu is restored to original the program defaults.
Your menu customizations are extensive, stretch over several menu groups, and you have lost track of what exactly was altered where. It is possible to restore all your menus to their original defaults (that is, in the form they were when Outlook was first installed). Open the Customize dialogs referenced in Figure 4-1, and go to the Toolbars tab. Select Menu Bar from the list shown, and then use the Reset button. Note that using this option removes all customizations from all menus.
Now that we know how to restore menus to their defaults, we can take the modification process to the next level.
Open the menu Customize dialog. As previously noted, if you right-click a menu, a context menu will appear that allows an even deeper modification of either an existing or custom menu. To customize the properties of a menu item (as shown in Figure 4-4), click the menu title, then right-click the menu item you wish to modify.
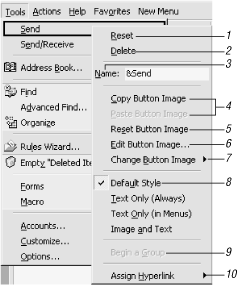
Reset restores the selected menu to its default as discussed previously.
Delete removes the selected menu or menu item. This is identical to dragging a menu item off the menu pad.
Name sets the title of the menu or menu item. If you prefer your Help menu title to read “911,” enter this here. This field is important when you create a custom menu. The default title of a new menu is—you guessed it—New Menu, which does not do much to explain its purpose. The ampersand (&) sets the keyboard shortcut for the menu. For example, on a top-level menu like Tools, placing the ampersand before the T in the Name field allows this menu to be opened with the keyboard shortcut Alt+T. On a second level menu, the ampersand will denote what further key must be pressed to select this menu item. So the full keyboard shortcut to access the Send menu item shown in Figure 4-4 would be: Alt+T-S. The ampersand also places an underscore under the letter to visually denote it as a shortcut.
Copy/Paste Button Image can be thought of as mini-clipboards for transferring button images. If a menu item does not have an image associated with it, or the image it uses is not to your liking, select a command with the image you want and copy/paste that image to your customized entry. Keep in mind that this handy little tool is not restricted to button images found in Outlook; it can be utilized in any Office application. If there is a menu icon you fancy in Word, for example, use the menu customizing tools there to copy the button image and paste it to a menu in Outlook. The copy/paste functions also tie in nicely with the Edit Button Image tool discussed later in this list.
Reset Button Image resets the button image to its original default state. Any button customized by you for the command is removed and any default button associated with it is restored. If you crafted your own button with the Button Editor, it will be forever lost unless you cut and paste the image elsewhere before resetting the button.
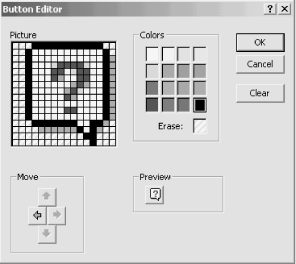
Edit Button Image allows you to make your own button image. Select the menu command you want to customize a button for, right-click, and select Edit Button Image from the context menu. The Button Editor, a component shared across all Office applications, is displayed (Figure 4-5).
If the command you select has no button image associated with it, you will get a blank palette to create from. When you find an image that is close to your needs, use the copy/paste commands to add it to your menu item first, and then edit the button to your preferences by replacing pixels with different colors or by moving them around.
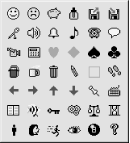
Change Button Image allows you to add a button image to a command that lacks one, or change the default image associated with a command. The selection available is rather limited, but some choice is better than none. The palette displayed from this command is shown in Figure 4-6.
Default Style defines the way a command displays on the menu or toolbar. Default Style refers to how the command normally displays—some commands display only an icon (such as the Print icon on the standard toolbar), some commands show both icon and text, while other commands have no icon associated with them (such as Send). Experimentation with the following options will allow you to pick a display style that suits your needs:
- Image and Text
Forces any associated icon to be displayed to the left of the command text. This applies only to the menu item being added, not to the same command that may already exist on another menu, or to a toolbar version of the command.
Begin a Group is a toggle, which when activated inserts a divider above the selected item. This, in effect, creates a visual “group” of menu commands. When toggled again, the option is turned off. Top-level menu titles can be grouped in the same way—the divider is then inserted to the left of the selected item. When you move an existing menu or toolbar into another, this also creates a group around the moved item.
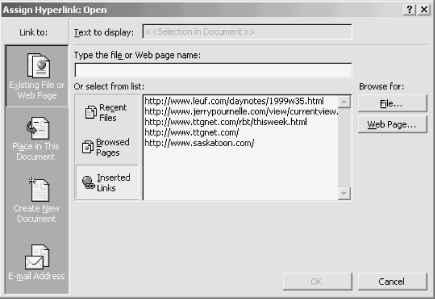
Assign Hyperlink (displayed in Figure 4-7) is common to all Microsoft Office applications, and allows you to assign a hyperlink to a menu, toolbar, or document.
Toggling any of the four choices shown on the “Link to” icon bar on the left lets you select the type of hyperlink to insert or assign, and shifts the context and choices available in the central part of the dialog.
- Existing File or Web Page
This presents you with a field in which to type the name of a file (already existing on your system) or enter an Internet address in the form of a URL. You can also select from one of the lists displayed: Recent Files, a list of recently accessed files stored by the operating system; Browsed Pages, a list of recently accessed pages stored by Internet Explorer; or Inserted Links, a list of recent links you have cut/pasted or otherwise inserted into documents recently.
If you still haven’t found exactly what you are looking for, the "Browse for” buttons on the right edge of the dialog opens a common Windows Browse dialog (File), Internet Explorer (Web Page), or opens a dialog allowing you to locate a bookmarked section of your document (Bookmark). The latter is not functional within Outlook unless you are using Word as your mail editor.
- Create New Document
This provides you with the means to create a new document, specify the path where it will be stored, and choose whether you want to edit the document now or later. Notice that by choosing the “later” option, you would place a hyperlink to a new uncreated document on a menu or toolbar, and create that document by accessing this command.
Note that for all these link options, as you enter the type of link in the applicable field (E-mail address, New Document, etc.) the name you provide for this entry in also transcribed to the “Text to display” field. In most cases, the name of the link you enter will not always be the best choice for the displayed name, so you will want to edit the display field afterward. There is also provision to add a descriptive screen tip to the link, the text of which will display when the mouse cursor is held over the link itself.
The following example illustrates both
creating a new menu, and using the
previously discussed Assign Hyperlink dialog. Although the following
example uses menus and the
mailto: hyperlink, there are many different
hyperlink protocols that can be used, which we cover in Chapter 5.
If you send email to the same people on a routine basis, why not build a custom menu and populate it with a preaddressed message form for each individual? Then, instead of opening a new message form and manually locating the recipient’s address, all you have to do is select a menu item and Outlook will do all the work for you. Here is the drill:
Right-click anywhere on Outlook’s menu, choose Customize, and go to the Commands tab. From the Categories list select New Menu; from the Commands list select the New Menu item. Drag it to the desired location on your menu.
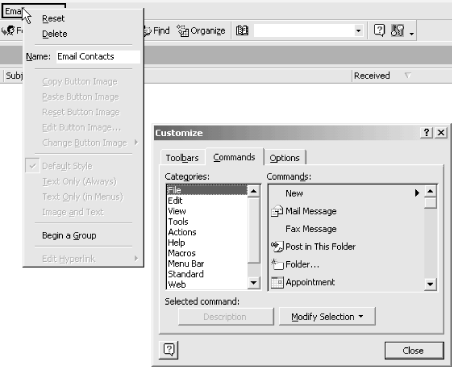
Right-click the title (which, by default, will be named “New Menu”), and go to the Name field on the context menu displayed (see Figure 4-8). Rename your new menu something appropriate—in the example shown, we’ve chosen “Email Contacts.” If you want to associate a hot-key with this menu, use an ampersand before the desired letter.
Click on your new menu (that’s left-click, not right-click) to display an empty menu pad. Go back to the Customize dialog, and choose a command to add. At this point in time, your only consideration should be whether you want an icon displayed with the entry. If you do, choose a command with the icon you desire. Any command will work, as we will be adapting its behavior in a moment. While creating a menu item, you are restricted to choosing an icon from the palette shown earlier in this section (see Figure 4-6). If you want to use an icon associated with an existing Outlook command, you have two choices. You may either copy the whole command (including icon), then edit the associated command behavior, or you can create a new menu item, then use the icon copy/paste feature to modify the icon afterwards. For this example, we’ll use the “Mail Message” command so we pick up the associated mail envelope icon. Drag whatever command you’ve chosen and place it on your new menu.
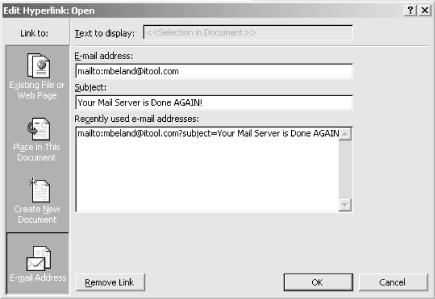
Now right-click this new menu item. From the context menu displayed, type a name in the text box provided. Again, if you want to hot-key to this contact, use an ampersand before the letter. Now from this same context menu, choose Edit Hyperlink → Open. From the Edit Hyperlink dialog select “E-mail Address” from the “Link to” icon bar.
Type an email address in the field provided as shown in Figure 4-9. Outlook automatically inserts mailto: in front of your entry. Note that you have no provision to call up an address list from this dialog. This means you will have to either know the address you want to enter, or have copied it to the clipboard from another source beforehand. The Subject field is optional. If you do elect to use it, what you type here will appear as the initial text in the Subject line of every message you send via this menu item.
Displaying ScreenTips on Custom Buttons
Once you’ve created a custom toolbar with “mailto:” hyperlinks, how do you remember which button sends mail to whom? Hold your cursor over an icon and it displays the recipient’s email address plus the subject, if you used one. Providing, of course, you have the “Show ScreenTips” option enabled (Tools → Customize → Options → “Show ScreenTips on toolbars”).
Get Outlook 2000 in a Nutshell now with the O’Reilly learning platform.
O’Reilly members experience books, live events, courses curated by job role, and more from O’Reilly and nearly 200 top publishers.

