How do you use Word to create a résumé, agenda, program booklet, list, multiple choice test, Web page, or other document where numbers, words, and phrases need to be aligned across the page? In the bad old days, people did it by pressing the Tab key to line up columns. As Figure 4-14 illustrates, this method is a recipe for disaster. (Unfortunately, thousands of people still use this method—or, worse, they still try to line up columns by continuously pressing the Space bar.)
Using Word’s table feature is light-years easier and more flexible. As shown in Figure 4-14, each row of a table expands infinitely to hold whatever you put into it, while everything else on its row remains aligned. Tables also have a few simple spreadsheet features.
There are two ways to insert a table: You can let Word build the table to your specifications, or you can draw it more or less freehand.
Office 2008’s Elements Gallery introduces a new way to add tables, complete with background shading and borders. Click the Elements Gallery’s Quick Tables Tab to display the Quick Tables gallery. Click the buttons at the left end of the gallery to view a selection of Basic tables with a variety of cell-shading styles, or Complex tables laid out as calendars, an invoice, a quarterly report, and so on. Click one of the gallery’s table thumbnails to insert the pre-designed table in your document (see Figure 4-15). Tables always enter your document as page graphics. The variations of Basic Quick Tables appear with three columns and eight rows. The size of the Complex tables varies depending on which design you choose. You can add, delete, or resize rows as described on Deleting table parts.

Figure 4-14. Top: If you use tabs to set up a table, things may look good at first—as long as every line fits within its space and you never plan to insert any additional text. Middle: Here’s what’s wrong with the tab approach: When you insert words into the columns, they push the text too far to the right, causing an ugly ripple effect. Bottom: If you use a table, you never have this kind of problem. Just type as much text as you like into a “cell,” and that row of the table simply expands to fit it.
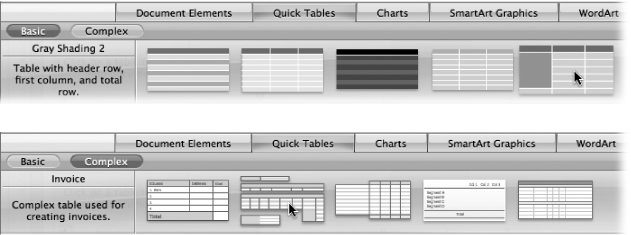
Figure 4-15. Click the Quick Tables tab to display the Elements Gallery’s collection of prefab table designs. The buttons at the left end display an assortment of basic (top) and complex (bottom) designs. As you move your cursor over the thumbnails, a brief description of the table appears at the left end of the gallery. Click one of the thumbnails to add it to your document.
To quickly add a plain table to your document use the Tables pop-up button on the Standard toolbar (see Figure 4-16).
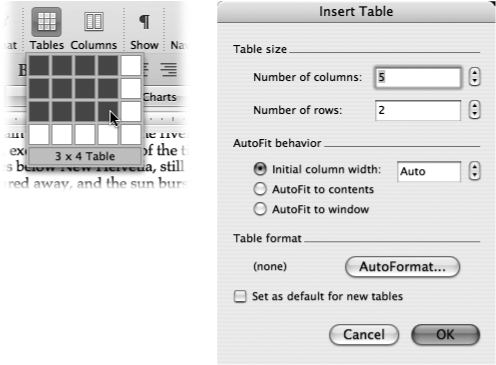
Figure 4-16. Left: A quick way to make a small table is to drag from the Insert Table button on the Standard toolbar. As you drag through the resulting grid, you’re specifying the grid size you want. (You can drag beyond the boundaries shown here, by the way, to specify a 9 x 9 table, for example; the pop-up grid grows as necessary.) Right: If you frequently use the same kind of table, check the “Set as default for new tables” box to make your favorite settings automatic in new documents. They will appear in this dialog box each time you choose Table → Insert → Table.
If the toolbar isn’t visible, choose Table → Insert → Table. The Insert Table dialog box opens, also shown in Figure 4-16. After choosing the number of rows and columns you want (you can always add more later), click an AutoFit radio button to instruct Word how to size the columns across your table. If you know how wide in inches you’d like each column to be, click “Initial column width” and set a measurement in the size box. “AutoFit to contents” creates skinny columns that expand as you type into them, and “AutoFit to window” (the easiest way to go if you’re not sure) spaces the selected number of columns evenly across the page. The table appears in your document at the insertion point when you click OK. Figure 4-17, top, depicts a small 5 x 3 table.
Word’s Draw Table tool gives you free rein to form the table of your dreams—the trick is learning to control it. To summon this toolbar, choose View → Toolbar → “Tables and Borders”, or choose Table → Draw Table. The “Tables and Borders” toolbar opens and the cursor turns into a pencil. (Press Esc whenever you want the normal cursor back.)
When you drag the pencil horizontally or vertically, it draws lines; when you drag diagonally, it draws boxes. Using these techniques, you can design even the most eccentric, asymmetrical table on earth.
The tidiest way to begin drawing a table is to drag diagonally to create the outer boundary (Figure 4-18, top), then drag horizontal and vertical lines to create the rows and columns. Drawing your own table is a good option when you want a variety of widths in your rows and columns, as shown in Figure 4-18, rather than evenly spaced ones.

Figure 4-17. Top: Position your cursor at the very top of the column until the downward-pointing arrow appears—then click to select the whole column. Similarly, click just outside the table on the left to select an entire row. Now you can make a formatting change that applies to all the selected cells. Bottom: The various panes of the Formatting palette can handle most of your table creation and formatting needs. For 2008, the buttons from the “Tables and Borders” toolbar are cloned in the Formatting palette’s Table, and “Borders and Shading” panes. Use whichever you find more convenient.
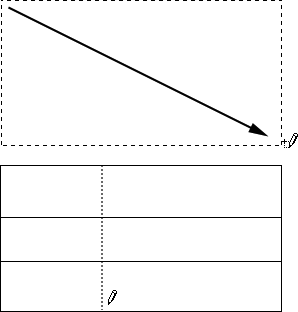
Figure 4-18. Top: Drag diagonally to create the outer border of your table. Bottom: The Draw Table tool lets you create rows and columns of any size and shape just by drawing them, but to be honest you can get similar effects, with much less drama, by using the Insert → Table command, as described on Charts and Spreadsheets.
To remove a cell or line you’ve just drawn, hold down the Shift key (or click the eraser tool on the "Tables and Borders” toolbar) and drag it across a line. The line promptly disappears. Be aware, however, if you erase the line between two cells, they merge.
When you’re finished with your table’s framework, you can dismiss the “Tables and Borders” toolbar. On the other hand, if you leave it open, you’ll have buttons for sorting and formatting your table, or drawing more tables, ready at hand. Of course, you could also make use of the Formatting Palette’s Table; “Borders and Shading”; and “Alignment and Spacing” panes, which have all the same buttons you’ll find in the “Tables and Borders” toolbar. The insertion point is now blinking in your new table, all set to begin typing.
If you really make a mess of things, press ⌘-Z to undo what you’ve done, one step at a time. Alternatively, vaporize the entire table by clicking inside it and choosing Table → Delete → Table.
To type into a table cell, click in that cell. You can use the up or down arrow keys to change rows; press Tab and Shift-Tab to jump forward or backward through the cells. (There’s not much call for tabs within cells—after all, you’ve already aligned the text the way you like it. But if you need a tab character, press Option-Tab.)
Note
Pressing Return or Enter doesn’t take you to the next cell; it puts a line break in the current cell instead. Get in the habit of pressing Tab to move on to the next cell.
You can also navigate like this:
Table 4-1. Keystrokes for Navigating Tables
To move to: | Press these keys: |
|---|---|
First cell in the row | Control-Home |
Last cell in the row | Control-End |
Top cell in the column | Control-Page Up |
Bottom cell in the column | Control-Page Down |
Highlight whole table | Option-Clear |
Next cell | Tab |
Previous cell | Shift-Tab |
As you type, text wraps within the cell, forcing the row to grow-taller as necessary. To widen the cell as you type, choose Table → AutoFit → “AutoFit to Contents”. (Even then, the cell will widen only until the table reaches the edge of the page—then the text will start to wrap down.)
Of course, this automatic wrapping is the principal charm of tables. But if you find yourself wishing Word would not wrap text in this way, select the cells where you want wrapping turned off, and then choose Table → Table Properties → Cell tab. Click Options and uncheck the Wrap Text box. Click OK and then choose the Row tab and change the “Row height is” pop-up menu to Exactly. You can still enter as much text in a cell as you like, but the cell won’t expand downward to show it—it’ll just disappear beyond the cell boundary.
To cut, copy, or drag material from cells in a table, you have to first select it, as with any other Word text. Because it’s a table, however, you have the following options:
To select multiple cells, drag the mouse—down, across, or diagonally over the cells.
To select an entire column, click at the top of a column—the cursor changes into a downward-pointing arrow. Or, Option-click anywhere in a column. Likewise, to select an entire row, click at the left of a row—the cursor changes into a right-slanting arrow.
To highlight a cell, click the thin, invisible selection bar at the left edge of a cell. (Double-click the selection bar to highlight a whole row.)
To extend the selection by additional cells, rows, or columns, click one cell, row, or column, and then Shift-click another.
To select the entire table, triple-click the cursor at the beginning of any row. In Print Layout, Publishing Layout, or Web Layout view, you can also click the table move handle (at the upper left) to select the entire table.
You can make a row taller or shorter, or a column wider or narrower, much the way you adjust Word’s text boxes or margins. Click to place your insertion point inside the table, then point to any line or boundary of a table without clicking, and drag when the cursor turns into a double-sided arrow.
You can also rely on Word’s own automatic table features to help you design the table. They include:
Balanced columns. If a symmetrical, balanced look is what you crave, Word can automatically arrange the rows or columns across your table so that there’s equal space between them. First select the rows and columns that you want to balance, then choose Table → AutoFit → Distribute Rows Evenly or Distribute Columns Evenly. (Corresponding buttons on the “Tables and Borders” toolbar and Formatting Palette can do all this with a single click; you can even Control-click [or right-click] and choose this option from the shortcut menu.)
Automatic sizing. Often, you want the columns to stretch and shrink depending on what you type into them. Or, you just don’t know in advance what size you want or need the columns to be. In such cases, choose Table → AutoFit → “AutoFit to Contents”. As you work, the columns will stretch to just the width necessary to accommodate the contents. For maximum room, Table → AutoFit → “AutoFit to Window” stretches your columns—no matter how many of them there are—to fill the page from margin to margin.
You can resize the table using the mouse at any time; doing so overrides and cancels the previous AutoFit setting. When you have the column widths right where you want them, choose AutoFit → Fixed Column Width. The same menu choices are available on the “Tables and Borders” toolbar (click the little arrow next to the Insert Table button) as well as the bottom of the Formatting Palette. Or simply Control-click (or right-click) and choose this option from the shortcut menu.
Numeric precision. To set row and column sizes using exact measurements, select the rows or columns in question and then choose Table → Table Properties. The resulting dialog box (see Figure 4-19) has size boxes where you can enter exact measurements.
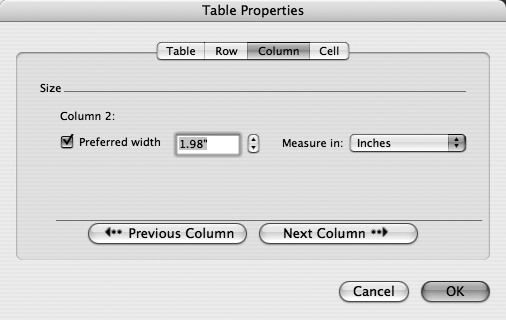
Figure 4-19. When using the Table Properties dialog box, you can select a group of rows and columns and size them all at once, or you can use the Previous and Next buttons to work on each row or column one at a time.
For columns, you can also specify a percentage of the table width instead of a measurement in inches. For rows, you have the option of setting an exact measurement, or an “At least” measurement. When “At least” is chosen, the cells in that row will stretch downward to wrap text as you type—even if you’ve turned off “Wrap Text” on the Cell tab.
If you run out of room and need more rows at the bottom of your table, it’s easy to add more: Click the lower-right cell and press Tab. A new row appears, identical to the one above, ready for your typing.
To add a new row or column anywhere in your table, click in the table and then use the Table → Insert submenu. Choose one of the options from the menu that appears: “Insert Columns to the Left,” for example. (These commands are also available in the Insert Table pop-up button on the “Tables and Borders” toolbar and the Formatting Palette.)
Adding multiple rows or columns at either end of your table, or anywhere within it, is a two-step process. First, highlight the same number of rows or columns as the ones you want to insert; to add two rows, select two existing rows. Next, choose Table → Insert, and one of the submenu options (Insert → Rows Below, for example). Word instantly creates the requested number of new, empty rows or columns.
Inserting individual cells works much the same way. Insert one cell at a time by choosing Table → Insert → Cells, or by using the Insert Table menu on the “Tables and Borders” toolbar. To insert multiple cells, select the equivalent number of existing cells at the desired location in your table before choosing from the menu.
Of course, you may find it more fun simply to click the Draw Table tool on the “Tables and Borders” toolbar and draw the extra columns and rows onto your table.
It’s easy to dismantle a table in various ways:
Deleting cells. Select one or more cells and choose Table → Delete → Cells. Word asks if you want to move the remaining cells up or leftward to fill the void; choose one and click OK (or press Return).
Deleting rows and columns. Select them and choose Table → Delete → Rows (or Columns). You may find it faster to click anywhere in the row or column and choose Table → Delete → Cells, then choose a radio button to delete the entire row or column. Click OK or hit Return to confirm the deletion. You can also right-click and choose this option from the shortcut menu.
Deleting the whole table. Click anywhere in the table and choose Table → Delete → Table.
When you click inside a table, the ever-responsive Formatting Palette sprouts a new set of formatting tools—a section called Table. In conjunction with the existing “Borders and Shading” section, you now have all the formatting controls you need.
To use them, begin by highlighting the cells, rows, or columns that you want to work on. Now you’re all set to format any of these table elements:
Table border or gridlines. The Borders tool lets you choose a line style (solid, dashed, and so on), color, and weight (thickness in points). Click the Type button to trigger a menu where you can choose which sides of the table you want borders to appear on. For instance, you may want only vertical lines inside the table and no outside border. Or you may want a heavier top border on the top row of cells only. (The same border formatting tools appear in the “Tables and Borders” toolbar.)
Tip
You can also eliminate certain table lines entirely. Just click the eraser tool on the top row of the “Tables and Borders” toolbar, and drag along each line you want to disappear from the table. Doing so merges the table cells (Merging and splitting cells).
Background shading in cells. Shading in a table is similar to a fill (see Fill Color: Standard palette), except that you don’t use the Fill palette; you use the “Borders and Shading” pane in the Formatting Palette (or “Tables and Borders” toolbar). You can choose from 70 colors and shades of gray, or choose More Colors to use Word’s color pickers (see Fill Color: Standard palette).
With creative combinations of borders, lines, and shading, you can make a table look right for anything from Citibank annual reports to Sesame Street. When you’re in a hurry, though, choose a Table AutoFormat for instant good looks.
Click anywhere in your table and choose Table → Table AutoFormat. There’s a long list of potential formats in the list box of the Table AutoFormat dialog box. Simply click each for a preview. If you want to use some of the features in the format but not others (font, color, and so on), then just turn on the boxes for the ones you wish to use.
Tip
Turning on AutoFit is a good idea, since it ensures that the new format will exactly fit the existing information in your table, instead of vice versa.
Many of the formats have a different typeface or shading applied to the top (heading) row, first column, last column, and so on. The checkboxes in the “Apply special formats to” section control whether you accept those features with the rest of the format. For example, if you’re not using the last row of your table for totals, don’t turn on the “Last row” box.
For the purposes of Autoformatting, Word considers the first row of a table to be a heading. But what if your table is longer than a page? Wouldn’t it be nice if Word could repeat the column titles at the top of each page? Well, it can, thanks to the Heading Rows Repeat feature.
Select the top row of your table (and any additional rows you want to repeat). Then choose Table → Heading Rows Repeat; that’s all there is to it. When your table flows onto a new page (page breaks you insert yourself don’t count), the heading will appear at the top of each new page of your table.
To enhance the look of your text in a table, adjust the gap between the characters and the borderlines. You can also put a little space around the outside of each cell—an especially attractive effect on Web pages (see Chapter 9).
Just select one or more cells and choose Table → Table Properties → Cell tab. Click Options, and set measurements in the size boxes for the distance between the text and the top, bottom, left, and right edges of the cell. The “Same as the whole table” box changes the margins of the selected cell to match the default cell margins for the table. To set the default margins for all cells in the table at once, choose Table → Table Properties → Table tab; click Options and enter measurements in the “Default cell margins” boxes.
To add more spacing around the outside of cells, click anywhere in the table and choose Table → Table Properties → Table tab. Click the Options button and turn on “Allow spacing between cells”; enter a setting in the size box. When you click OK, that amount of white space will surround each cell, simulating the effect of thicker cell walls. Usually .1” or less looks good. More space than that creates a waffle-like effect, as shown in Figure 4-20, top.
Like text anywhere else in Word, you can change the direction and alignment of selected text in a table using the Format → Text Direction command—a terrific effect for row or column labels (Figure 4-20, right). In the resulting dialog box, choose the text orientation—horizontal, vertical, or bottom-to-top—and click OK.
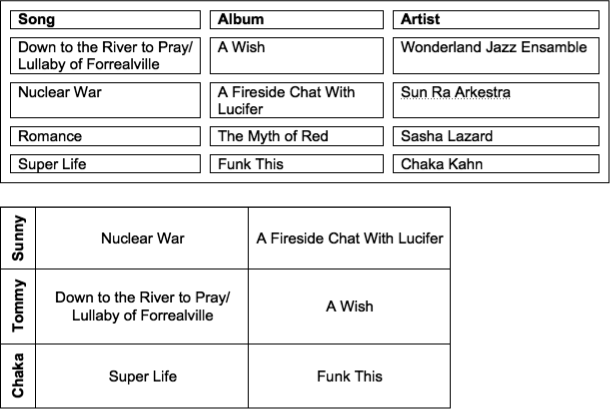
Figure 4-20. Top: You can create some unusual table looks using, for example, .15” spacing between cells. Bottom: Rotated text.
You can also make the text in selected cells hug the left or right side of its cell, center it in the middle, or make it stick to the “floor” or “ceiling” of a cell. After selecting the cells, click the arrow button next to the alignment button on the “Tables and Borders” toolbar and choose the alignment pattern you seek. Align Top Left, for example, aligns text to the top and left margins of the cell, so that the text starts in the upper-left corner.
When you created your table, you probably dragged it where you wanted it, or built it starting from the insertion point. To position it exactly where it looks best on the page and apply advanced features like text wrapping, use the tools in the Table → Table Properties → Table tab, shown in Figure 4-21.
Size. Use this box to set a width for the entire table. (It says “Preferred width” because it may change if you use the AutoFit feature, as described on Adding rows and columns.)
Alignment. Choose left, centered, or right alignment. “Indent from left” tells Word where to start aligning, measured from the edge of the page. (If your table already spans the page, margin to margin, you won’t see any difference.)
Text Wrapping. For large tables, you’ll usually choose None. If you choose Around, the Positioning button becomes activated; clicking it opens a dialog box where you can use advanced layout features like those described on Wrapping.
A nested table is a table-within-a-table, or, more specifically, a table within a cell of another table. This feature is especially valuable when you’re using Word as a Web-design tool. For example, you can create a table with four large cells to divide your Web page into quarters, and put a smaller table in each one.

Figure 4-21. The Table Properties: Clicking the “Borders and Shading” button in the Table Properties dialog box opens a box where you can choose lines and fills for the table, as well as page borders.
To create a nested table, click in the cell where you want the table to start, then click the Insert Table button on the “Tables and Borders” toolbar. Choose the number of rows and columns for your nested table. Now you can click in one of the nested cells and start typing. (Because the nested table has to remain within one cell, either resize the cell to hold the nested table, or choose Table → AutoFit and Distribute → “AutoFit to Contents” to allow the holding cell to expand.)
Merging and splitting are nothing more than ways of subtracting or adding columns en masse. Merging cells (or rows or columns) turns two into one, and joins their contents together as separate paragraphs in the merged cell. Splitting cells (or rows or columns) divides them, forcing their contents into the cell above or to the left of the split.
Start by highlighting the cells, rows, or columns you want to merge. Then choose Table → Merge Cells, or click the Merge Cells button on the “Tables and Borders” toolbar; the selected cells instantly merge. Another way to proceed: Use the eraser tool to remove the line dividing two cells, columns, or rows. This lets you see directly how merging cells works.
The quickest and most satisfying way to split cells is to draw new lines right smack across existing cells, using the Draw Table tool on the “Tables and Borders” toolbar.
If you need computer-aided precision, however, you can split cells, rows, or columns perfectly evenly by selecting them and then choosing Table → Split Cells (or click the Split Cells button on the “Tables and Borders” toolbar). In the Split Cells dialog box, choose the number of rows and columns you want your selection to be divided into. For example, the cells at the right in Figure 4-22 were split into two columns and one row; the one row that was selected stayed one row, and the two columns became a total of four.

Figure 4-22. Top: A simple table. Middle: The same table after merging the two of the top cells. Bottom: The table after splitting the same two cells in two. If the “Merge cells before split” box had been turned on in the Split Cells dialog box, A Fireside Chat with Lucifer would immediately follow Nuclear War in the top row.
Sometimes you want to create a table from information that’s already in Word, such as a table that a novice Word person (perhaps even a younger you) created by trying to line up text with the Tab key. Word is happy to be your obedient servant.
First, of course, select the desired text. Presumably, the text is a list, a number of words separated by tabs, or some other vaguely table-like blob of text. The key to turning highlighted text into a table is the Table → Convert → “Convert Text to Table” command. In the “Convert Text to Table” dialog box, start with the “Separate text at” settings. Choose the most logical place to divide your selected text into cells. If that’s not a paragraph, comma, or tab, then click Other and press the key that represents your choice—Space bar, Return, period, and so on.
Word automatically suggests the number of columns you’ll need to hold all the text, though you can also specify the number of rows and columns you want, too. You also have the chance to use the AutoFit and AutoFormat features now—or you can always save them for later. Click OK to begin the conversion process.
If the table doesn’t look quite as you had hoped, examine it and learn how Word interpreted your choices in the “Convert Text to Table” dialog box. Then press ⌘-Z to undo the conversion and try again with different selections. Or just reformat your table using the tools described in this section.
You can also extract information from a table without maintaining its tableness. For example, suppose you want to import it into a page-layout program that doesn’t understand Word tables. This kind of conversion is easy—simply click the table and then choose Table → Convert → “Convert Table to Text”.
Your only decision is how to divide the contents of one cell from the next—you don’t want them all to run together, of course. You have a choice of paragraph marks (each cell’s contents will become a new Word paragraph), tabs, commas, or any other character you enter in the Other box by pressing its key. If you choose tabs, the result is what you’ve heard described as tab delimited text—that is, one tab separating each word or phrase that formerly occupied a cell on a single row, with a Return character at the end of each line.
Word isn’t Excel, but Microsoft is at least aware that you may want to perform simple math from time to time. Fortunately, a table can carry out many of the most common spreadsheet tasks with the help of functions and operators. You can add up a column of numbers, for example, or have Word average them and display the results.
To add a column of figures, click in the bottom cell of the column (making sure that it’s blank, of course) and click the AutoSum (Σ) button in the “Tables and Borders” toolbar or Formatting Palette (see Figure 4-23, top). Your answer appears immediately against a gray background (which doesn’t print). This gray box indicates that you’re dealing with a field (which you can only edit if you right-click and choose Toggle Field Codes, as explained on Updating fields).
Note
This kind of field doesn’t update automatically. If your table numbers change, you have to select the total field and click the AutoSum button (or click the field and then press F9).
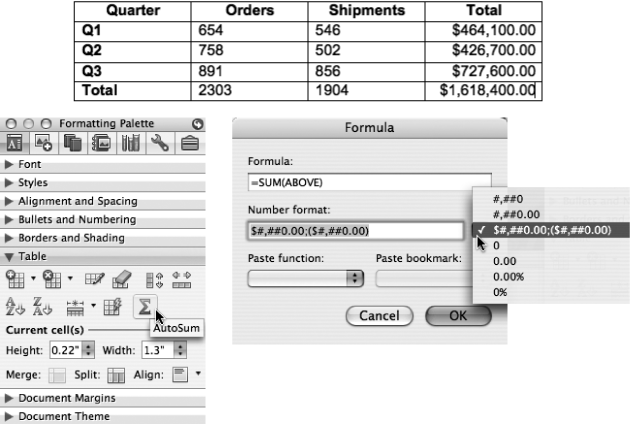
Figure 4-23. Top: Clicking in the bottom cell and then clicking AutoSum adds up the numbers in each column. Lower left: The Table pane of the Formatting palette shows the AutoSum button responsible for this magic. Lower right: The Table → Formula command reveals that the AutoSum function does nothing more than insert the invisible formula =SUM(ABOVE) into the selected cell. You could have typed it in this dialog box yourself, if you had very little else to do.
For more complex formulas, click the cell where you want to place the results of your calculations and choose Table → Formula. Word’s guess at what formula you’re looking for already appears in the Formula window (see Figure 4-23). If that’s not right, press Delete, type an equal sign to begin your formula, and build it with the following:
Cell references. Cells in Word tables are named the same way as in Excel spreadsheets, except that you can’t see the row letters and column numbers. The columns are named A, B, C, and so on, from left to right; the rows are numbered 1, 2, 3, and so on, from top to bottom. The upper-leftmost cell is A1.
To refer to the entire column above the formula cell, use the expression (ABOVE); to refer to the entire row, use (LEFT). For a range of cells (a block of them), use a colon to separate the top-left and lower-right cells of the range, such as A1:B2 to name a four-cell range.
Operators. Operators are symbols like + for addition, – for subtraction, * for multiplication, / for division, and > for greater than. Using operators in combination, you can set up a table cell to add sales tax (* 1.05) to a subtotal column, for example.
Functions. Choose formulas from the “Paste function” list in the Table → Formula dialog box. These are the same as the Excel formulas described in Chapter 13.
Click the arrow next to the Number format box to tell Word what you want the results to look like—AutoFormatted with a dollar sign, with commas, and so on.
Click OK to place the formula in the current cell. See Chapter 13 for much more on using formulas in Office 2008.
If your table includes names, dates, or other listed items, you may want to arrange them in numerical or alphabetical order. Click one of the cells in the column containing the data you want to sort by, and choose either the Sort Ascending or Sort Descending button in the Table Toolbar or the Formatting Palette’s Table pane.
To perform a more complex sort using up to three columns, click the table and choose Table → Sort. In the “Sort by” box, Word helpfully suggests that you start with “Column 1,” the first column on the left. All the columns in the current table are listed in a menu; click the arrows to choose one. For instance, to sort chronologically, choose the column containing your dates. You can sort by Text (alphabetically), Number, or Date; just choose the one that matches your data.
You can choose second and third sort columns as well. For example, after the first column sorts by date, you may want to sort names alphabetically within each date. Use the “Then by” boxes to set up these second and third internal sorts.
Finally, choose one of the buttons at the bottom to designate whether your table has a header row or not—choosing “Header row” excludes that row from the sort.
Click OK to begin the sort. (Note that you can’t sort columns—only rows.)
Get Office 2008 for Macintosh: The Missing Manual now with the O’Reilly learning platform.
O’Reilly members experience books, live events, courses curated by job role, and more from O’Reilly and nearly 200 top publishers.

