Putting text in a box of its own, sitting there independently on the page, represents a quantum leap in text-flow management (see Figure 4-9). You can now format and color a text box independently from everything else on the page, as well as use drawing tools on it. In other words, text boxes let you think outside the box.
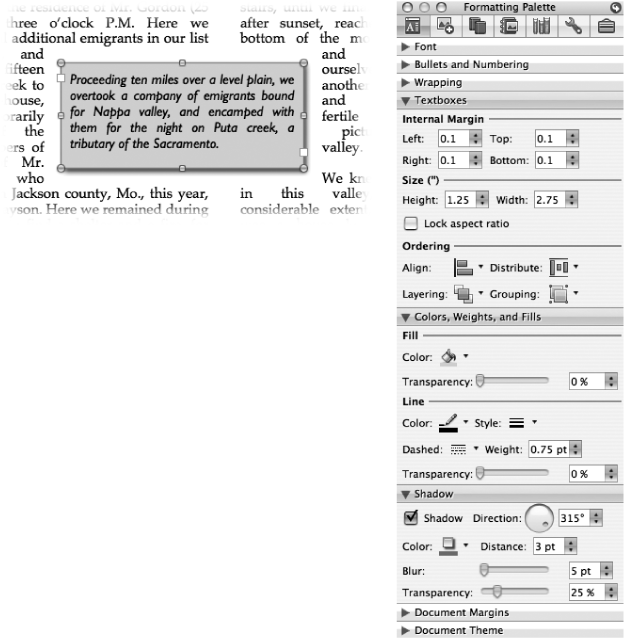
Figure 4-9. Left: A text box is ideal for pull quotes—extracted quotations designed to catch the eye of someone browsing your document—like the one shown here. Right: When a text box is selected, the Formatting Palette changes to reflect the tools you need.
Note
A text box is fundamentally different from a paragraph with a border around it, although text boxes can (and often do) have borders. For one thing, you can’t drag to resize a bordered paragraph, or flow text around it, as you can with a text box. On the other hand, if all you want is a border and none of the other fancy features, then creating a border around a plain old paragraph is the easiest way to do it.
Text boxes also emulate the way desktop publishing programs such as Quark XPress and InDesign handle text. If you’ve never used professional desktop publishing software, consider this your initial training.
Note
Text boxes completely disappear in Draft view. To work with text boxes, make sure you’re using Print Layout view (View → Print Layout) or Publishing Layout view (View → Publishing Layout)—or be prepared for some surprises when you first see the printout.
To create an empty text box in your document, choose Insert → Text Box. (Another avenue: If the Drawing toolbar is open [AutoShapes and WordArt], click the Text Box button.)
Move the cursor—which now sports an attractive blue “T” ball and a crosshair—to where you’d like the box to appear, and drag diagonally; Word shows you the rectangular outline of the box you’re creating. The box is complete when you let go of the mouse, though you can always resize or move it later. To place text inside your new text box, begin typing or paste text you copied beforehand.
Tip
To enclose existing text in a text box, first select the text, then choose Insert → Text Box or click the Text Box button. Your text appears in a small text box, which you can then resize.
Link and unlink text boxes. Linking text boxes sets up an automatic text flow from one to another, exactly as does InDesign, Quark XPress, or any newspaper on earth that makes you “Continue on Status Bar.” As you add text to the first text box, overflow text falls into the second one, even if it’s many pages away. Most people never suspect that Word is even capable of this page-layout feature.
Note
Word 2004’s version of the Print Layout view (called Page Layout view) included a Text Box toolbar and more obvious text-box linking commands. With Word 2008’s advent of the Publishing Layout view, Microsoft has shifted such page-layout features to the new view, and euthanized the Text Box toolbar in the process. Turn to Making Text Boxes or Sidebars for full coverage of text boxes in Publishing Layout view.
To link two text boxes, click the first box, type or paste text into it, and then click the box’s forward link tab near its lower right corner. Your cursor again assumes the text box-drawing shape of the crosshair in the blue “T” ball. Use it to draw your next text box—which Word immediately fills with any of the overflow text from the first one. Repeat the process if you need more linked text boxes. Chapter 8 covers the process in depth, beginning on Linking text boxes.
Change text direction. Choose Format → Text Direction, or open the Formatting Palette’s “Alignment and Spacing” pane, click one of the text orientation buttons, and click OK. Word rotates the text within the box (and all others linked to it) to run vertically up or down the page—or back to horizontal again, as shown in Figure 4-10. (If you use this command when your insertion point is outside of a text box, Word rotates the text of your entire document.)
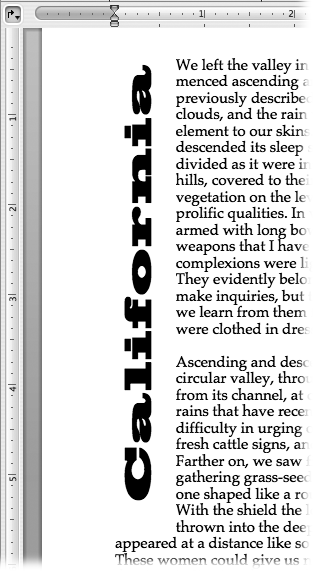
Figure 4-10. Choosing Format → Text Direction or using the Orientation buttons in the Formatting Palette’s “Alignment and Spacing” pane, lets you create eye-catching mastheads like this one. You can make text read top to bottom, bottom to top, or back to normal. (You can’t turn text upside down.) Use this trick for creative layout effects for newsletter mastheads or letterheads, or for creating those tear-off tabs on the bottom of your lost-kitty poster.
To format text within text boxes, just select the text first. The tools on the Standard toolbar and the Formatting Palette pertain to the text within a box, so long as the insertion point is in that box.
Tip
Choosing Edit → Select All or pressing ⌘-A, while the insertion point is in a text box, effectively selects all the text in that box and any boxes that are linked to it.
To adjust the margins within a text box (Figure 4-11), open the Formatting Palette’s Text Box pane, or choose Format → Text Box. (This choice only appears when you’ve selected a text box.) Now click the Text Box tab, as shown in Figure 4-12. Alternatively, double-click the boundary of the text box. The settings you establish in these boxes control the distance between the borders of the text box and the text itself.
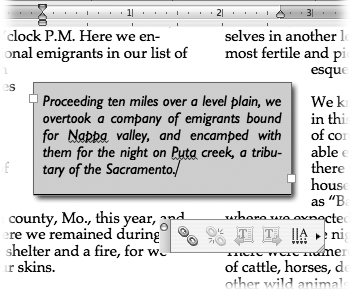
Figure 4-11. Even if text boxes are linked, the internal margin settings (shown here in the ruler at the top of the page) apply only to the text box containing the insertion point.
When you’ve selected a text box, the Formatting Palette changes to show specialized controls for formatting its line thickness, line color, and background (“Fill”) color or pattern. If you prefer, double-click the text box boundary or choose Format → Text box to access similar settings within the Format Text Box dialog box.
If you can’t see all the text in a box, you can either link it to another text box or just make the original box bigger. Here’s how: Select the box by clicking it, and then drag any of the blue resize handles at its borders. Or, for numerical precision, use the boxes on the Formatting Palette’s Size section; the relevant portions of the Formatting Palette are shown in Figure 4-9, right.
Microsoft calls a group of linked text boxes a story. There’s no limit to the number of text boxes you can link together—just keep creating new ones and linking them (Linking text boxes) until there’s room for all your text.
You can copy or cut an entire story (or part of one) to paste into another document. To do so, select the text box (not the text) of the first box in the story and Shift-click any additional text boxes you want to copy. Once they’re selected, you can copy or cut and paste the chain of boxes using any of the copy/paste methods described in Chapter 2. Use this method if, for example, you want to copy a series of text boxes and then change the text inside them. This saves you the work of creating and sizing new text boxes.
Note
Word can’t link text boxes across documents in order to keep the text flowing “live” from one to the next.
To cut or copy the text only from a story, click in any box in the chain and choose Edit → Select All (or press ⌘-A). Now when you use the cut or copy and paste commands, you’ll be pasting just the text, not the boxes.
If you delete one box in a story, the text remains intact, flowing from beginning to end through the remaining text boxes in the chain. Select the box that you want to delete by holding the cursor over the box’s boundary until it changes into a four-arrow icon; click the box edge. Then choose Edit → Cut (or press Delete). If necessary, enlarge the remaining linked text boxes to show all of the story.
You can group text boxes and then operate on them as a unit—the only problem is selecting them. As noted above, the trick is to click their borders; Shift-click to select the additional boxes that you want to group. Once they’re selected, choose Group from the Grouping pop-up in the Ordering section of the Formatting Palette’s Size, Rotation, and Ordering pane, or right-click and choose Grouping → Group from the shortcut menu. (If you change your mind, the Ungroup and Regroup commands are also on this menu.)
When you drag a grouped text box, they all move together. When you drag the sizing handles, they all grow or shrink by the same amount. Likewise, when you use the color and fill commands, they act upon all boxes in the group.
Whether you’re creating a Web site or printed document, one of the most enjoyable parts is putting in a few images—photos, clip art, or drawings. But too often, the text and graphics don’t harmoniously share the space. Many people find topics like text wrapping too intimidating to bother learning.
Don’t be one of them. Word 2008’s layout features are more intuitive than ever, especially for you, the wise and discriminating Mac fan.
The “things” around which you can wrap text include pictures from your iPhoto library, clip art from Word’s own collection (see The Clip Gallery); charts from Excel, drawings you’ve made in Word or any drawing program, AutoShapes from the Drawing toolbar, WordArt, table, or text boxes. (See Chapter 19 for a review of the various graphic objects you can place into a Word document.)
The best way to configure the text around your text box or picture is with the Format dialog box. To get started, select the graphic or text box you want to wrap your text around. Ignore the text for now—just worry about getting the picture where you want it on the page. Then proceed as follows:
Click to select the graphic or text box, then choose Format→ whatever, or just double-click the graphic.
In other words, choose Format → Picture, Format → Object, Format → AutoShape, or Format → Text Box. The wording of the bottommost choice on the Format menu depends on the item you’ve selected. In any event, the appropriate Format dialog box now appears (Figure 4-12, top).
Click the Layout tab. Choose one of the text-wrap styles by clicking its icon.
These wrapping controls correspond to those on the Formatting Palette, also shown in Figure 4-12. For example, choose Tight if you’d like the text to follow the outlines of an irregularly shaped object. Choose Behind Text to create a watermark, or choose Square for a neat, businesslike look.
To keep the object right where you placed it on the page, click Other under “Horizontal Alignment.”
The other buttons move the object to align with the left margin, center line, and right margin, respectively.
Click Advanced.
The Advanced Layout dialog box appears (see Figure 4-13).
Make the changes you want, as shown in Figure 4-13; click OK twice.
Most of the time, you’ll want to wrap text around objects. But sometimes, for effect, you’ll put text right over an object, or vice versa. To pull this off, use the “Behind text” or “In front of text” options shown in Figure 4-12.
If superimposing a graphic has made the text difficult to read, there are a couple of fixes. Either lighten the object beneath the text, or, if the text has a fill, change it to a clear or semitransparent fill.
To lighten an object, select it. If it’s a picture, open the Formatting Palette’s Picture pane and adjust the Transparency slider.
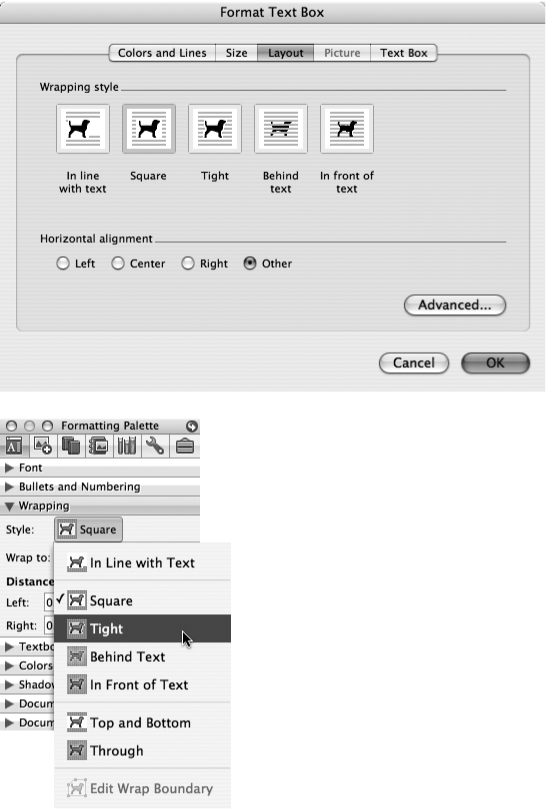
Figure 4-12. The wrapping controls in the Format dialog box (top) and the Wrapping pane of the Formatting Palette (bottom) lets you bend text to your will. Your text can leave a hole for the graphic (Square), hug its irregular sides (Tight), sit superimposed (Behind Text), hide beneath the graphic (In Front of Text), or treat it as just another typed character (In Line With Text).
If the object is a drawing or AutoShape, you can use the Transparency sliders for Fill and Line on the Formatting Palette’s Colors, Weights, and Fills pane to make it easier to see through.
Tip
You can even layer text with text—a great trick when using your company’s name as a watermark on your letterhead, for example. To do so, make a text box containing the logo, apply a light color or light shade of gray to it in the Formatting Palette, and choose “Behind text” from the Style pop-up button in Formatting Palette’s Wrapping section. Drag the logo into place.
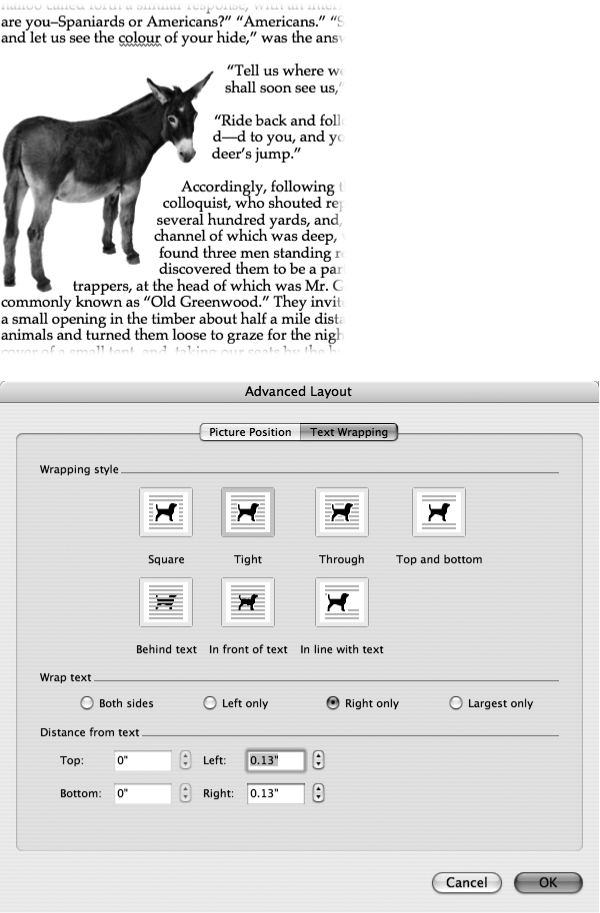
Figure 4-13. Top: A Word clip art inserted into a document; left alignment, tight wrapping, one side only, 0.25” from text. Bottom: The Advanced Layout tab has additional options. For example, you can wrap text on one side only, instead of both sides (if the text wrapping is down one side of a column, perhaps). “Largest only” wraps text only on one side—the side that has the most room, even if that changes in the middle of the object. This is a good choice for irregularly shaped objects. Distance from text lets you choose how close you want the text against the object it wraps—in hundredths of an inch.
Get Office 2008 for Macintosh: The Missing Manual now with the O’Reilly learning platform.
O’Reilly members experience books, live events, courses curated by job role, and more from O’Reilly and nearly 200 top publishers.

