You can’t help reacting, one way or another, to the futuristic, sleek looks of Mac OS X the first time you arrive at its desktop. There’s the Dock, looking photorealistic and shiny on its new mirror-finish shelf. There are those Finder windows, 8smooth and textureless with their gentle gradient-gray title bars. And there’s the shimmering, even continually morphing backdrop of the desktop itself.
This chapter shows you how to use and control these most dramatic elements of Mac OS X.
For years, most operating systems maintained two different lists of programs. One listed unopened programs until you need them, like the Start menu (Windows) or the Launcher (Mac OS 9). The other kept track of which programs were open at the moment for easy switching, like the taskbar (Windows) or the Application menu (Mac OS 9).
In Mac OS X, Apple combined both functions into a single strip of icons called theDock.
Apple’s thinking goes like this: Why must you know whether or not a program is already running? That’s the computer’s problem, not yours. In an ideal world, this distinction should be irrelevant. A program should appear when you click its icon, whether it’s open or not—like on a PalmPilot, for example.
“Which programs are open” already approaches unimportance in Mac OS X, where sophisticated memory-management features make it hard to run out of memory. You can open dozens of programs at once in Mac OS X.
And that’s why the Dock combines the launcher and status functions of a modern operating system. Only a tiny white reflective dot beneath a program’s icon tells you that it’s open.
Whether or not you agree with Apple’s philosophy (and not everyone does), Apple has made it as easy as possible to learn to like the Dock. You can customize the thing to within an inch of its life, or even get rid of it completely. This section explains everything you need to know.
Apple starts the Dock off with a few icons it thinks you’ll enjoy: Dashboard, QuickTime Player, iTunes, iChat, Mail, the Safari Web browser, and so on. But using your Mac without putting your own favorite icons in the Dock is like buying an expensive suit and turning down the free alteration service. At the first opportunity, you should make the Dock your own.
The concept of the Dock is simple: Any icon you drag onto it (Figure 4-1) is installed there as a button. (You can even drag an open window onto the Dock—a Microsoft Word document you’re editing, say—using its proxy icon [Close Button] as a handle.)
A single click, not a double-click, opens the corresponding icon. In other words, the Dock is an ideal parking lot for the icons of disks, folders, documents, programs, and Internet bookmarks that you access frequently.
Tip
You can install batches of icons onto the Dock all at once—just drag them as a group. That’s something you can’t do with the other parking places for favorite icons, like the Sidebar and the Finder toolbar.
Figure 4-1. To add an icon to the Dock, simply drag it there. You haven’t moved the original file; when you release the mouse, it remains where it was. You’ve just installed a pointer—like a Macintosh alias or Windows shortcut.
Here are a few aspects of the Dock that may throw you at first:
It has two sides. See the whitish dotted line running down the Dock? That’s the divider (Figure 4-1). Everything on the left side is an application—a program. Everything else goes on the right side: files, documents, folders, disks, and minimized windows.
It’s important to understand this division. If you try to drag an application to the right of the line, for example, Mac OS X teasingly refuses to accept it. (Even aliases observe that distinction. Aliases of applications can go only on the left side, and vice versa.)
Its icon names are hidden. To see the name of a Dock icon, point to it without clicking. You’ll see the name appear above the icon.
When you’re trying to find a certain icon in the Dock, run your cursor slowly across the icons without clicking; the icon labels appear as you go. You can often identify a document just by looking at its icon.
Folders and disks sprout stacks. If you click a folder or disk icon in the right side of the Dock, a list of its contents sprouts from the icon. It’s like X-ray vision without the awkward moral consequences. Turn the page for details on stacks.
Programs appear there unsolicited. Nobody but you (and Apple) can put icons on the right side of the Dock. But program icons appear on the left side of the Dock automatically whenever you open a program, even one that’s not listed in the Dock. Its icon remains there for as long as it’s running.
Tip
The Dock’s translucent, reflective look is something to behold. Some people actually find it too translucent. But using TinkerTool, you can tone down the Dock’s translucence—a great way to show off at user group meetings. See TinkerTool: Customization 101 for details.
You can move the tiles of the Dock around by dragging them horizontally. As you drag, the other icons scoot aside to make room. When you’re satisfied with its new position, drop the icon you’ve just dragged.
To remove a Dock icon, just drag it away. (You can’t remove the icons of the Finder, the Trash, the Dock icon of an open program, or any minimized document window.) Once your cursor has cleared the Dock, release the mouse button. The icon disappears, its passing marked by a charming little puff of animated cartoon smoke. The other Dock icons slide together to close the gap.
Tip
You can replace the “puff of smoke” animation with one of your own, as described on Replacing the Poof.
Something weird happens if you drag away a Dock program’s icon while that program is running. You don’t see any change immediately, because the program is still open. But when you quit the program, you’ll see that its previously installed icon is no longer in the Dock.
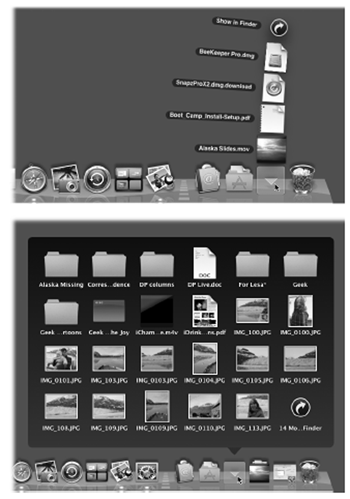
A stack is what you get when you click a disk or folder icon on the Dock—and it’s one of Leopard’s marquee new features. The effect is shown in Figure 4-2.
In essence, Mac OS X is fanning out the folder’s contents so you can see all of them. If it could talk, it would be saying, “Pick a card, any card.”
Tip
You can change how the icons in a particular stack fan are sorted: alphabetically, chronologically, or whatever. Just choose “Sort by” from the Dock folder’s shortcut menu, and choose from the submenu. Your choices are Name, Date Added (to the Dock), Date Modified, Date Created, or Kind.
Sometimes there are too many icons in a folder to fit in a fan. In that case, the stack becomes a grid instead (Figure 4-2, bottom). The grid, of course, holds many more icons than the fan, although it’s not as pretty.
Figure 4-2. Top: When you click the icon of a folder or disk on the Dock (just one single click), you get this effect: a rainbow that shows what’s inside. Click an icon to open it, just as though you’d double-clicked it in a window. You can even Option-click one icon after another, opening them all while the stack remains arrayed before you. Or grab an icon and drag it right out of the stack—into another window, say. Bottom: If there are too many icons to fit in the arc (as determined by your monitor size), you get this grid instead. Alas, here, too, space is limited. If there are more than fits on the grid, click the “35 more in Finder” icon at the lower right. You go to the folder’s regularly scheduled window, where you can see the complete list of icons)
But you can force a certain Dock folder to sprout a fan or a grid all the time, rather than letting Mac OS X decide. From the Dock folder’s shortcut menu (Stacks), choose View As→Fan or View As→Grid.
From now on, you’ll always get the fan, or always get the grid.
Note
When your Dock is positioned on a side of the screen instead of the bottom, you alwaysget the grid, never the fan. The View As command doesn’t even appear in the shortcut menu.
Both the grid and the fan have limited storage space for icons. (The exact number depends on your monitor size. In any case, if there are too many icons to display at once, the last icon says, “24 more in Finder” (or whatever the number is). Click that icon to open the folder’s regular window, where all the contents are available.
Of course, then you’ve defeated the fan’s step-saving purpose.
Tip
The ideal solution, of course, would be what Mac OS X had in 10.0 through 10.4: a simple pop-up list of everything in a Dock folder. That’s exactly what you get with the free program Quay, available for download from this book’s “Missing CD” at www.missingmanuals.com
When you first install Mac OS X 10.5, you get a couple of starter stacks just to get you psyched. One is called Downloads; the other is Documents. (Both of these folders are physically inside your Home folder. But you may well do most of your interacting with them on the Dock.)
The Downloads folder, new in Leopard, collects three kinds of Internet arrivals:
Files you download from the Web using Safari
Files you receive in an iChat file-transfer session
File attachments you get via email using Mail.
Unless you intervene, they’re sorted by the date you downloaded them.
It’s handy to know where to find your downloads, and nice not to have them all cluttering your desktop.
Creating a new stack is easy. Just drag anyfolder or disk icon onto the right end of the Dock. That’s right: All folders and disks become stacks when clicked on the Dock.
Therefore, to get a stack off the Dock, drag its folder icon away from the Dock and let go. You’re not deleting the actual folder—just its Dock shortcut.
Tip
In Leopard, folder icons on the Dock can actually change to reflect their contents. That can be a little disorienting, since you can’t get to know a folder by its icon—it keeps changing!
The solution is simple: Put an alias of the folder on the Dock instead of the folder itself. Its icon will never change. (Folder aliases don’t open into stacks or hierarchical contents menus, however.)
Once a fan or grid is on the screen, you can highlight any icon in it by typing the first few letters of its name. For example, once you’ve popped open your Applications-folder stack, you can highlight Safari (for example) by typing sa. (Press Enter or Return to open the highlighted icon.)
If you just want to see what’s in a folder, without all the graphic overkill of the fan or thegrid, choose Open “Applications” (or whatever the folder’s name is) from the Dock folder’s shortcut menu (Stacks). You go straight to the corresponding window.
Another possibility: ⌘-click the folder’s icon. You jump immediately to the window that contains that folder’s icon. That’s not exactly the same thing as opening the Dock folder, but it’s sometimes even more useful.
The bottom of the screen isn’t necessarily the ideal location for the Dock. All Mac screens are wider than they are tall, so the Dock eats into your limited vertical screen space. You have three ways out: Hide the Dock, shrink it, or rotate it 90 degrees.
To turn on the Dock’s auto-hiding feature, choose ![]() →Dock→Turn Hiding On (or press Option-⌘-D).
→Dock→Turn Hiding On (or press Option-⌘-D).
Tip
You also find this on/off switch when you choose ![]() →Dock→Dock Preferences (Figure 4-3), or when you click the System Preferences icon in the Dock, and then the Dock icon. (System Preferences contains much more about the System Preferences program.)
→Dock→Dock Preferences (Figure 4-3), or when you click the System Preferences icon in the Dock, and then the Dock icon. (System Preferences contains much more about the System Preferences program.)
When the Dock is hidden, it doesn’t slide into view until you move the cursor to the Dock’s edge of the screen. When you move the cursor back to the middle of the screen, the Dock slithers out of view once again. (Individual Dock icons may occasionally shoot upward into Desktop territory when a program needs your attention—cute, very cute—but otherwise, the Dock lies low until you call for it.)
On paper, an auto-hiding Dock is ideal; it’s there only when you summon it. In practice, however, you may find that the extra half-second the Dock takes to appear and disappear makes this feature slightly less appealing.
Many Mac fans prefer to hide and show the Dock at will by pressing the hide/show keystroke, Option-⌘-D. This method makes the Dock pop on and off the screen without requiring you to move the cursor.
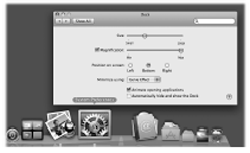
Depending on your screen’s size, you may prefer smaller or larger Dock buttons. The official way to resize them goes like this: Choose ![]() →Dock→Dock Preferences. In the resulting dialog box, drag the Dock Size slider, as shown in Figure 4-3.
→Dock→Dock Preferences. In the resulting dialog box, drag the Dock Size slider, as shown in Figure 4-3.
Figure 4-3. To find a comfortable setting for the Magnification slider, choose ![]() →Dock→Dock Preferences. Leave the Dock Preferences window open on the screen, as shown here. After each adjustment of the Dock Size slider, try out the Dock (which still works when the Dock Preferences window is open) to test your new settings.
→Dock→Dock Preferences. Leave the Dock Preferences window open on the screen, as shown here. After each adjustment of the Dock Size slider, try out the Dock (which still works when the Dock Preferences window is open) to test your new settings.
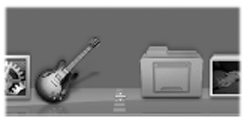
There’s a much faster way to resize the Dock, however: Just position your cursor carefully in the Dock’s divider line, so that it turns into a double-headed arrow (shown in Figure 4-4). Now drag up or down to shrink or enlarge the Dock.
Figure 4-4. Look closely—you can see the secret cursor that resizes the Dock. If you don’t see any change in the Dock size as you drag upward, you’ve reached the size limit. The Dock’s edges are already approaching your screen sides.
Tip
If you press Option as you drag, the Dock snaps to certain canned icon sizes+0151those that the programmer actually drew. (You won’t see the in-between sizes that Mac OS X generally calculates on the fly.)
As noted in Figure 4-4, you may not be able to enlarge the Dock, especially if it contains a lot of icons. But you can make it almost infinitely smaller. This may make you wonder: How can you distinguish between icons if they’re the size of molecules?
The answer lies in the ![]() →Dock→Turn Magnification On command. What you’ve just done is trigger the swelling effect shown in Figure 4-3. Now your Dock icons balloon to a much larger size as your cursor passes over them. It’s a weird, magnetic, rippling, animated effect that takes some getting used to. But it’s another spectacular demonstration of the graphics technology in Mac OS X, and it can actually come in handy when you find your icons shrinking away to nothing.
→Dock→Turn Magnification On command. What you’ve just done is trigger the swelling effect shown in Figure 4-3. Now your Dock icons balloon to a much larger size as your cursor passes over them. It’s a weird, magnetic, rippling, animated effect that takes some getting used to. But it’s another spectacular demonstration of the graphics technology in Mac OS X, and it can actually come in handy when you find your icons shrinking away to nothing.
Tip
New in Leopard: on-the-fly magnifying!
If you press Shift-Control as your cursor approaches the Dock, the icons swell into magnification mode even if magnification is turned off in the ![]() →Dock menu. (The icons swell to whatever maximum size you specified in System Preferences (Figure 4-3).
→Dock menu. (The icons swell to whatever maximum size you specified in System Preferences (Figure 4-3).
Yet another approach to getting the Dock out of your way is to rotate it, so that it sits vertically against a side of your screen. You can rotate it in either of two ways:
You’ll probably find that the right side of your screen works better than the left. Most Mac OS X programs put their document windows against the left edge of the screen, where the Dock and its labels might get in the way.
Note
When you position your Dock vertically, the “right” side of the Dock becomes the bottom of the vertical Dock. In other words, the Trash now appears at the bottom of the vertical Dock. So as you read references to the Dock in this book, mentally substitute the phrase “bottom part of the Dock” when you read references to the “right side of the Dock.”
Most of the time, you’ll use the Dock as either a launcher (you click an icon once to open the corresponding program, file, folder, or disk) or as a status indicator (the tiny, shiny reflective spot, identified in Figure 4-1, indicate which programs are running).
But the Dock has more tricks than that up its sleeve. You can use it, for example, to pull off any of the following stunts.
The Dock isn’t just a launcher; it’s also a switcher. For example, it lets you:
Jump among your open programs by clicking their icons.
Drag a document (such as a text file) on to a Dock application (such as the Microsoft Word icon) to open the former with the latter. (If the program balks at opening the document, yet you’re sure the program should be able to open the document, add the ⌘ and Option keys as you drag.)
Hide all windows of the program you’re in by Option-clicking another Dockicon.
Hide all other programs’ windows by Option-⌘-clicking the Dock icon of the program you do want (even if it’s already in front).
This is just a quick summary of the Dock’s application-management functions; you’ll find the full details in Chapter 5.
If you turn on keyboard navigation, you can operate the Dock entirely from the keyboard; see Reassigning all documents of one type.
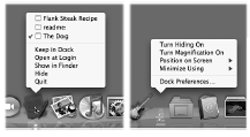
If you read the box on Stacks, you know that each Dock icon has its own very useful shortcut menu (Figure 4-5).
If you’ve clicked a minimized window icon, this shortcut menu says only Open (unless it’s a minimized Finder window, in which case it also says Close).
But if you’ve clicked any other kind of icon, you get some very useful hidden commands. For example:
Figure 4-5. Left Control-click or right-click a Dock icon, or click and hold on it, to open the secret Right: Control-click the divider bar to open a different hidden menu. This one lists a bunch of useful Dock commands, including the ones listed in the ![]() →Dock submenu.
→Dock submenu.
[Window names]. The secret Dock menu of a running program usually lists at least one tiny, neatly labeled window icon, like those shown in Figure 4-5. This useful Mac OS X feature means that you can jump directly not only to a certain program, but to a certain open window in that program.
For example, suppose you’ve been using Word to edit three different chapters. You can use Word’s Dock icon as a Window menu to pull forward one particular chapter, or (if it’s been minimized) to pull it up—even from within a different program. (The check mark indicates the frontmost window, even if the entire program is in the background at the moment.)
Keep In Dock/Remove From Dock. Here’s another item that’s relevant only to program icons in the Dock.
Whenever you open a program, Mac OS X puts its icon in the Dock—marked with a shiny, white reflective spot—even if you don’t normally keep its icon there. As soon as you quit the program, its icon disappears again from the Dock.
If you understand that much, then the Keep In Dock command makes a lot of sense. It means, “Hello, I’m this program’s icon. I know you don’t normally keep me in your Dock, but I could stay here even after you quit my program. Just say the word.” If you find that you’ve been using, for example, Terminal a lot more often than you thought you would, this command may be the ticket.
Tip
Actually, there’s a faster way to tell a running application to remain in the Dock from now on. Just drag its icon off the Dock and then right back onto it—yes, while the program is running. You have to try it to believe it.
On the other hand, what if a program’s icon is always in the Dock (even when it’s not running) and you don’t want it there? In that case, this command says Remove From Dock instead. It gets the program’s icon off the Dock, thereby returning the space it was using to other icons. (You can achieve the same result by dragging the icon away from the Dock, but evidently too many Mac fans weren’t aware of this trick.)
Use this command on programs you rarely use. When you do want to run those programs, you can always use Spotlight to fire them up.
Note
If the program is already running, using Remove From Dock does not immediately remove its icon from the Dock, which could be confusing. That’s because a program always appears in the Dock when it’s open. What you’re doing here is saying, “Disappear from the Dock when you’re not running”—and you’ll see the proof as soon as you quit that program.
Open at Login. This command lets you specify that you want this icon to open itself automatically each time you log into your account (Parental Controls). It’s a great way to make sure that your email Inbox, your calendar, or the Microsoft Word thesis you’ve been working on is fired up and waiting on the screen when you sit down to work.
To make this item stop auto-opening, choose this command from its Dock icon again, so that the check mark no longer appears.
Show In Finder. This command highlights the actual icon (in whatever folder window it happens to sit) of the application, alias, folder, or document you’ve clicked. You might want to do this when, for example, you’re using a program that you can’t quite figure out, and you want to jump to its desktop folder in hopes of finding a Read Me file there.
Hide/Show. This operating system is crawling with ways to hide or reveal a selected batch of windows. Here’s a case in point: You can hide all traces of the program you’re using by choosing Hide from its Dockicon.(You could accomplish the same thing in many other ways, of course; see Moving windows among screens.)
What’s cool here is that (a) you can even hide the Finder and all its windows, and(b) if you press Option, the command changes to say Hide Others. This, in its way,is a much more powerful command. It tells all the programs you’re not using—the ones in the background—to get out of your face. They hide themselves instantly.
Quit. You can quit any program directly from its Dock shortcut menu. (Finder and Dashboard are exceptions.) You don’t have to switch into a program in order to access its Quit command. (Troubleshooting moment: If you get nothing but a beep when you use this Quit command, it’s because you’ve hidden the windows of that program, and one of them has unsaved changes. Click the program’s icon, save your document, and then try to quit again.)
Of course, thanks to Mac OS X’s state-of-the-art memory management features, there’s less need these days to quit programs at all. Still, you might be thankful for this quick-quitting feature when your boss is coming down the hallway and the Dilbert Web site is on your screen where a spreadsheet is supposed to be.
When you click an application icon in the Dock, its icon jumps up and down a few times as the program launches, as though with excitement at having been selected. The longer a program takes to startup, them or ebounces you see. This has given birth to a hilarious phenomenon: counting these bounces as a casual speed benchmark for application-launching times. “In Design took 12 bouncemarks to open in Mac OS X 10.4,” you might read online, “but only three bouncemarks in 10.5.”
Tip
If you find the icon bouncing a bit over the top, try this: Choose ![]() →Dock→Dock Preferences. In the Dock preference pane (shown in Figure 4-3), turn off “Animate opening applications.” From now on, your icons won’t actually bounce—instead, the little shiny spot underneath it will simply pulse as the application opens.
→Dock→Dock Preferences. In the Dock preference pane (shown in Figure 4-3), turn off “Animate opening applications.” From now on, your icons won’t actually bounce—instead, the little shiny spot underneath it will simply pulse as the application opens.
In Leopard, for the first time, Dock icons are spring-loaded. That is, if you drag any icon onto a Dock icon and pause—or, if you’re in a hurry, tap the Space bar—the Dock icon opens to receive the dragged file.
This technique is most useful in these situations:
Drag a document icon onto a Dock folder icon. The folder’s Finder window pops open, so that you can continue the drag into a subfolder.
You drag a document into an application. The classic example is dragging a photo onto the iPhoto icon. When you tap the Space bar, iPhoto opens automatically. Since your mouse button is still down, and you’re technically still in mid-drag, you can now drop the photo directly into the appropriate iPhoto album or Event.
You can drag an MP3 file into iTunes or an attachment into Mail or Entourage the same way.
Once you’ve tried stashing a few important folders on the right side of your Dock, there’s no going back. You can mostly forget all the other navigation tricks you’ve learned in Mac OS X. The folders you care about are always there, ready for opening with a single click.
Better yet, they’re easily accessible for putting away files; you can drag files directly into the Dock’s folder icons as though they were regular folders.
In fact, you can even drag a file into a subfolder in a Dock folder. That’s because in Leopard, the Dock’s folders are spring-loaded. When you drag an icon onto a Dock folder and pause, the folder’s window appears around your cursor, so you can continue the drag into an inner folder (and even an innerinner folder, and so on). Spring-Loaded Folders: Dragging Icons into Closed Folders has the details on spring-loaded folders.
Tip
When you try to drag something into a Dock folder icon, the Dock icons scoot out of the way; the Dock assumes that you’re trying to put that something ontothe Dock. But if you press the ⌘ key as you drag an icon to the Dock, the existing Dock icons freeze in place. Without the ⌘ key, you wind up playing a frustrating game of chase-the-folder.
Now that you know what the Dock’s about, it’s time to set up shop. Install the programs, folders, and disks you’ll be using most often.
They can be whatever you want, of course, but don’t miss these opportunities:
Your Home folder. Many people immediately drag their hard drive icons—or, perhaps more practically, their Home folders (see The Mac OS X Folder Structure)—onto the right side of the Dock. Now they have quick access to every file in every folder they ever use.
The Applications folder. Here’s a no-brainer: Stash the Applications folder here, so you’ll have quick pop-up menu access to any program on your machine.
Your Applications folder. As an even more efficient corollary, create a new folder of your own. Fill it with the aliases of just the programs you use most often and park it in the Dock. Now you’ve got an even more useful Applications folder that opens as a stack.
The Shared folder. If you’re using the Mac’s accounts feature (Chapter 12), this is your wormhole between all accounts—the one place you can put files where everybody can access them (Logging Out).
Tip
Ordinarily, dragging an icon off the Dock takes it off the Dock.
But if you press ⌘ as you drag, you drag the actual item representedby the Dock icon from wherever it happens to be on the hard drive! This trick is great when, for example, you want to email a document whose icon is in the Dock; just ⌘ -drag it into your outgoing message. (Option-⌘-drag, meanwhile, creates an aliasof the Dock item.)
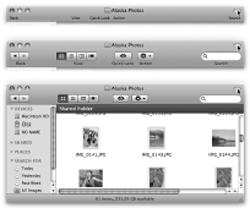
At the top of every Finder window is a small set of function icons, all in a gradientgray row (Figure 4-6). The first time you run Mac OS X 10.5, you’ll find only these icons on the toolbar:
Back, Forward. The Finder works something like a Web browser. Only a single window remains open as you navigate the various folders on your hard drive.
Figure 4-6. If you ⌘-click the upper-right toolbar button repeatedly, you cycle through six combinations of large and small icons and text labels. (Three examples are shown here.) Tip: This same ⌘-clicking business cycles through the same toolbar variations in Mail, Preview, and other programs that have toolbars.
The Back button (
 ) returns you to whichever folder you were just looking at. (Instead of clicking,
  you can also press ⌘-[, or choose Go→Back—particularly handy if the toolbar is hidden,as described below.)
The Forward button (
 ) springs to life only after you’ve used the Back button. Clicking it (or pressing ⌘-]) returns you to the window you just backed out of.
View controls. The four tiny buttons next to the
 button switch the current window into icon, list, column, or Cover Flow view, respectively (Resize Handle). And remember, if the toolbar is hidden, you can get by with the equivalent commands in the View menu at the top of the screen—or by pressing ⌘-1, ⌘-2, ⌘-3,or ⌘-4 (for icon, list, column, and Cover Flow view, respectively).
QuickLook. The eyeball icon opens the Quick Look preview for a highlighted icon (or group of them); see Quick Look.
Action (
 ). You can read all about this context-sensitive pop-up menu on page77
Search bar. This little round-ended text box is yet another entry point for the Spotlight feature described in Chapter 3. It’s a handy way to search your Mac for some file, folder, disk, or program.
Between the toolbar, the Dock, the Sidebar, and the large icons of Mac OS X, it almost seems like there’s an Apple conspiracy to sell big screens.
Fortunately, the toolbar doesn’t have to contribute to that impression. You can hide it with one click—on the white, oval "Old Finder Mode” button (Old Finder Mode: The Toolbar Disclosure Button). You can also hide the toolbar by choosing View→Hide Toolbar or pressing Option-⌘-T.(The same keystroke, or choosing View→Show Toolbar, brings it back.)
But you don’t have to do without the toolbar altogether. If its consumption of screen space is your main concern, you may prefer to collapse it—to delete the pictures but preserve the text buttons.
The trick is to ⌘-click the Old Finder Mode button. With each click, you make the toolbar take up less vertical space, cycling through six variations of shrinking icons, shrinking text labels, and finally labels without any icons at all (Figure 4-6).
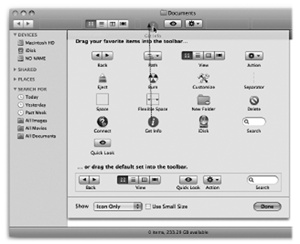
There’s a long way to adjust the icon and label sizes, too: Choose View→Customize Toolbar (or Option-⌘click the Old Finder Mode button). As shown in Figure 4-7, the dialog box that appears offers a Show pop-up menu at the bottom. It lets you choose picture-buttons, Icon Only, or, for the greatest space conservation, Text Only. You can see the results without even closing the dialog box.
Click Done or press Enter to make your changes stick.
Note
In Text Only mode, the four View buttons are replaced by a little pop-up menu called View. Furthermore, the Search bar turns into a one-word button called Search. Clicking it brings up the Spotlight window (The Spotlight Window).
Mac OS X not only offers a collection of beautifully designed icons for alternate (or additional) toolbar buttons, but makes it easy for you to add anythingto the toolbar, turning the toolbar into a supplementary Dock or Sidebar. This is great news for people who miss having their Home and Applications folder icons at the top of the window, as they were in early Mac OS X versions, or for anyone who’s run out of space for stashing favorite icons in the Dock or the Sidebar. (Of course, if that’s your problem, you need a bigger monitor.)
As noted above, the first step in tweaking the toolbar is choosing View→ Customize Toolbar. The window shown in Figure 4-7 appears.
Tip
There’s a great secret shortcut for opening the Customize Toolbar window: Option-⌘-click the Old Finder Mode button that appears in the upper-right corner of every Finder window.
Figure 4-7. While this window is open, you can add icons to the toolbar by dragging them into place from the gallery before you. You can also remove icons from the toolbar by dragging them up or down off the toolbar. Rearrange the icons by dragging them horizontally.
This is your chance to rearrange the existing toolbar icons or delete the ones you don’t use. You can also add any of Apple’s buttons to the toolbar by dragging them from the “gallery” onto the toolbar itself. The existing icons scoot out of your cursor’s way, if necessary.
Most of the options in the gallery duplicate the functions of menu commands. Here are a few that don’t appear on the standard toolbar:
Path. Most of the gallery elements are buttons, but this one creates a pop-up menu on the toolbar. When clicked, it reveals (and lets you navigate) the hierarchy—the path—of folders that you open to reach whichever window is open. (Equivalent: ⌘-clicking a window’s title, as described on Title Bar.)
Eject. This button ejects whichever disk or disk image is currently highlighted. (Equivalent: The File →Eject command, or holding down the ⌘ key on your keyboard.)
Burn. This button burns a blank CD or DVD with the folders and files you’ve dragged onto it. (Equivalent: The File→Burn Disc command.)
Customize. This option opens this customizing window that you’re already examining. (Equivalent: The View→Customize Toolbar command.)
Separator. This gallery icon doesn’t actually do anything when clicked. It’s designed to set apart groups of toolbar icons. (For example, you might want to segregate your folder buttons, such as Documents and Applications, from your function buttons, such as Delete and Connect.) Drag this dotted line between two existing icons on the toolbar.
Space. By dragging this mysterious-looking item into the toolbar, you add a gap between it and whatever icon is to its left. The gap is about as wide as one icon. (The fine, dark, rectangular outline that appears when you drag it doesn’t actually show up once you click Done.)
Flexible Space. This icon, too, creates a gap between the toolbar buttons. But this one expands as you make the window wider. Now you know how Apple got the Search box to appear off to the right of the standard toolbar, a long way from its clustered comrades to the left.
NewFolder. Clicking this button creates a new folder in whichever window you’re viewing. (Equivalent: the File→New Folder command, or the Shift-⌘-N keystroke.)
Delete. This option puts the highlighted file or folder icons into the Trash. (Equivalent: the File→Move to Trash command, or the ⌘-Delete keystroke.)
Connect. If you’re on a home or office network, this opens the Connect to Server dialog box (see Connection Method B: Connect to Server) so that you can tap into another computer. (Equivalent: The Go→Connect to Server command, or ⌘-K.)
Get Info. This button opens the Get Info window (Get Info) for whatever’s highlighted.
iDisk. The iDisk is your own personal 5-gigabyte virtual hard drive on the Internet. It’s your private backup disk, stashed at Apple, safe from whatever fire, flood, or locusts may destroy your office. Of course, you already know this, because you’re paying $100 per year for the privilege (see .Mac Services).
In any case, you can bring your iDisk’s icon onto the screen simply by clicking this toolbar icon.
Search. This item represents the Spotlight search bar described in Chapter 3.
Drag the default set. If you’ve made a mess of your toolbar, you can always reinstate its original Apple arrangement by dragging this rectangular strip directly upward onto your toolbar.
Note
If a window is too narrow to show all the icons on the toolbar, the right end of the toolbar sprouts a >> symbol. Click it for a pop-up menu that names whichever icons don’t fit at the moment. (You’ll find this toolbar behavior in many Mac OS X programs, not just the Finder: iPhoto, Safari, Mail, Address Book, and so on.)
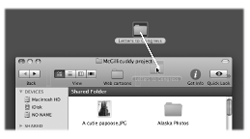
Millions of Mac fans will probably trudge forward through life using the toolbar to hold the suggested Apple function buttons, and the Sidebar to hold the icons of favorite folders, files, and programs. They may never realize that you can drag any icons at all onto the toolbar—files, folders, disks, programs, or whatever—to turn them into one-click buttons.
In short, you can think of the Finder toolbar as yet another Dock or Sidebar (Figure 4-8).
You can drag toolbar icons around, rearranging them horizontally, by pressing ⌘ as you drag. Taking an icon off the toolbar is equally easy. While pressing the ⌘ key, just drag the icon clear away from the toolbar. It vanishes in a puff of cartoon smoke.
If the Customize Toolbar sheet is open, you can perform either step without the ⌘ key.
In some ways, just buying a Macintosh is a renegade act of self-expression. But that’s only the beginning. Now it’s time to fashion the computer screen itself according to your personal sense of design and fashion.
Cosmetically speaking, Mac OS X offers two dramatic full-screen features: desktop backgrounds and screen savers.
The command center for both of these functions is the System Preferences program (which longtime Mac and Windows fans may recognize as the former Control Panels). Open it by clicking the System Preferences icon in the Dock, if it’s there, or by choosing its name from the ![]() menu.
menu.
When the System Preferences program opens, you can choose a desktop picture or screen saver by clicking the Desktop & Screen Saver button. For further details on these System Preferences panes, see System Preferences.
One of the earliest objections to the lively, brightly colored look of Mac OS X came from Apple’s core constituency: artists and graphic designers. Some complained that Mac OS X’s bright blues (of scroll bar handles, progress bars, the ![]() menu, pulsing OK buttons, highlighted menu names and commands), along with the red, green, and yellow window-corner buttons, threw off their color judgment.
menu, pulsing OK buttons, highlighted menu names and commands), along with the red, green, and yellow window-corner buttons, threw off their color judgment.
These features have been greatly toned down since the original version of MacOSX.The pulsing effects are subtler, the three-dimensional effects are less drastic, and the button colors are less intense. It’s all part of Mac OS X’s gradual de-colorization; in Leopard, both the ![]() menu and the Spotlight menu have gone from colorful to black.
menu and the Spotlight menu have gone from colorful to black.
But in case they still bother artists, Apple created what it calls the Graphite look for Mac OS X, which turns all of those interface elements gray instead of blue. To try out this look, choose ![]() →System Preferences;click Appearance;and then choose Graphite from the Appearance pop-up menu.
→System Preferences;click Appearance;and then choose Graphite from the Appearance pop-up menu.
Desktop sounds are the tiny sound effects that accompany certain mouse drags. And we’re talking tiny—they’re so subdued that you might not have noticed them. You hear a little plink/crunch when you drop an icon onto the Trash, a boingy thud when you drag something into a folder, a whoof! when you drag something off the Dock and into oblivion, and so on. The little thud that you hear at the end of a file-copying job is actually useful, because it alerts you that the task is complete.
If all that racket is keeping you awake, however, it’s easy enough to turn it off. Open System Preferences, click the Sound icon, and then turn off “Play user interface sound effects.”
And if you decide to leave them turned on, please—use discretion when working in a library, neurosurgical operating room, or church.
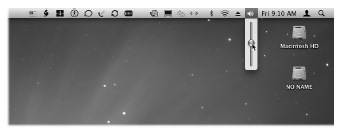
See the menu-bar icons in Figure 4-9? Apple calls them Menu Extras, but Mac fans on the Internet have named them menulets. Each is both an indicator and a menu that provides direct access to certain settings in System Preferences. One lets you adjust your Mac’s speaker volume; another lets you change the screen resolution; yet another shows you the remaining power in your laptop battery; and so on.
Figure 4-9. These little guys are the direct descendants of the controls once found on the Mac OS 9 Control Strip or the Windows system
To summon the various menulets, you generally visit a certain pane of System Preferences (System Preferences) and turn on a checkbox called, for example, “Show volume in menu bar.” Here’s a rundown of the various Apple menulets that you may encounter, complete with instructions on where to find this magic on/off checkbox for each:
Tip
The following descriptions indicate the official, authorized steps for installing a menulet. There is, however, a folder on your hard drive that contains 25 of them in a single window, so that you can install one with a quick double-click. To find them, open your hard drive→System→Library→CoreServices→Menu Extras folder.
AirPort lets you turn your AirPort card on or off, join existing AirPort wireless networks, and create your own private ones. To find the “Show” checkbox: Open System Preferences →Network. From the “Show” pop-up menu, choose AirPort.
Battery shows how much power remains in your laptop’s battery. To find the “Show” checkbox: Open System Preferences→Energy Saver→Options tab.
Bluetooth connects to Bluetooth devices, “pairs” your Mac with a cellphone, and so on. To find the “Show” checkbox: Open System Preferences→Bluetooth. The “Show Bluetooth status in the menu bar” checkbox appears at the bottom of the Settings tab.
Clock is the standard menu-bar clock that’s been sitting at the upper-right corner of your screen from Day 1. Click it to open a menu where you can check today’s date, convert the menu-bar display to a tiny analog clock, and so on. To find the “Show” checkbox: Open System Preferences→Date & Time. On the Clock tab, turn on “Show the date and time.”
Displays adjusts screen resolution. On Macs with a projector or second monitor attached, it lets you turn screen mirroring on or off—a tremendous convenience to anyone who gives PowerPoint or Keynote presentations. To find the “Show” checkbox: Open System Preferences→Displays→Display tab.
 is the oddball: There’s no checkbox in System Preferences to make this menulet appear. The fact that it even exists is something of a secret.
To make it appear, open your System→Library→CoreServices→Menu Extras folder as described above, and double-click the Eject.menu icon. That’s it! The
 menulet appears.
You’ll discover that its wording changes: “Open Combo Drive,” “Close DVD-ROM Drive,” “Eject [Name of Disc],” or whatever, to reflect your particular drive type and what’s in it at the moment.
Fax reveals the current status of a fax you’re sending or receiving, so you’re not kept in suspense. To find the “Show” checkbox: Open System Preferences→Print & Fax, and then click Faxing.
HomeSync is useful only if some friendly neighborhood network administrator has set up Mac OS X Server at your office.
Thanks to a feature called portable Home folders, you can take your laptop on the road and do work—and then, on your return, have the changes synced automatically to your main machine at work over the network. Or not automatically; this menulet’s Sync Home Now command performs this synchronization on demand.
iChat is a quick way to let the world know, via iChat and the Internet (iChat), that you’re away from your keyboard, or available and ready to chat. Via the Buddy List command, it’s also a quick way to open iChat itself. To find the “Show” checkbox: Open iChat; it’s in your Applications folder. Choose iChat→Preferences, click the General button, and turn on “Show status in menu bar.”
Inkturns the Write Anywhere feature on and off as you use your graphics tablet. (That may not mean much to you until you’ve read about the Ink feature, described on The VoiceOver Master Keyboard List.) To find the “Show” checkbox: Open the Ink panel of System Preferences. Even so, the menulet doesn’t appear unless a graphics tablet is attached.
IrDAis useful only to ancient PowerBooks that have infrared transmitters—if indeed any of them can even run Leopard. This menulet is known for flakiness; you’re best off not installing this.
Keychain. This menulet isn’t represented by an icon in the Menu Extras folder, but it’s still useful if you use Leopard’s Keychain feature (Locking and unlocking the Keychain). The menulet lets you do things like opening the Security pane of System Preferences and locking a Keychain. To find the “Show” checkbox: Open your Applications→Utilities folder. Open the Keychain Access program, and then open the Keychain Access→Preferences→General tab.
PCCard ejects a PC card that you’ve inserted into the slot in your laptop, if it has such a slot. To make it appear, open your System→Library→CoreServices→Menu Extras folder, and then double-click the PCCard.menu icon.
PPP lets you connect or disconnect from the Internet. To find the “Show” checkbox: Open System Preferences→Network. From the “Show” pop-up menu, choose Internal Modem. Click the Modem tab button.
PPPoE (PPP over Ethernet) lets you control certain kinds of DSL connections. To find the “Show” checkbox: Open System Preferences→Network. From the “Show” pop-up menu, choose Built-in Ethernet. Click the PPPoE tab button.
Remote Desktop is a program, sold separately, that lets teachersor system administrators tap into your Mac from across the network. In fact, they can actually see what’s on your screen, move the cursoraround, and soon. The menulet lets you do things like turning remote control on and off or sending a message to the administrator. To find the “Show” checkbox: Open System Preferences→Sharing, and then click Apple Remote Desktop.
Script menu lists a variety of useful, ready-to-run AppleScript programs (see The Script Menu). To find the “Show” checkbox: Open your Applications folder, and then open the program called AppleScript Utility.
Syncis useful only if you have a .Mac account (.Mac Services)—but in that case, it’s very handy. It lets you start and stop the synchronization of your Mac’s Web bookmarks, calendar, address book, Keychains, and email with another Mac across the Internet, and it always lets you know the date of your last sync. (Syncing is described in more detail in Chapter 19.) To find the “Show” checkbox: Open System Preferences→. Mac, and then click Sync.
TextInput (officially named the Input Menu) makes it easy for you to switch among different text input modes . You’re probably most familiar with the normal keyboard. But what if your language uses a different alphabet, like Russian, or thousands of characters, like Chinese? This menulet summons and dismisses the alternative keyboards and input methods needed for these other systems. Details on Input Menu Tab. To find the “Show” checkbox: Open System Preferences →International. Click the Input Menu tab.
Note
You also use this menulet when you’re trying to figure out how to type a certain symbol like ¥ or § or
 . You use the menulet to open the Character Palette and Keyboard Viewer—two great character-finding tools that are described in System Preferences.
UniversalAccess, new in Leopard, offers simple on/off status indicators for features that are designed to help with visual, hearing, and muscle impairments. System Preferences has a rundown of what they do. To find the “Show” checkbox: Open System Preferences→Universal Access.
User identifies the account holder (Chapter 12) who’s logged in at the moment. To make this menulet appear (in bold, at the far right end of the menu bar), turn on fast user switching, which is described on Fast User Switching.
Verizon starts and stops your laptop’s connection to the Internet via Broadband Access, Verizon’s glorious high-speed cellularservice (meaning you can get online almost anywhere—no Wi-Fi required). This service requires a BroadbandAccess PC card, ExpressCard, or external USB thingie from Verizon. Just slip said device into your laptop—and pay $60 a month.
Volume, of course, adjusts your Mac’s speaker or headphone volume. To find the “Show” checkbox: Open System Preferences→Sound.
VPNstands for virtual private networking, which allows you to tap into a corporation’s network so you can, for example, check your work email from home. You can use the menulet to connect and disconnect, for example. To find the “Show” checkbox: Open the program called Internet Connect (in your Applications folder). Click the VPN button.
To remove a menulet, ⌘-drag it off of your menu bar, or turn off the corresponding checkbox in System Preferences. You can also rearrange them by ⌘-dragging them horizontally.
These little guys are useful, good-looking, and respectful of your screen space. The world could use more inventions like menulets.
Get Mac OS X Leopard: The Missing Manual now with the O’Reilly learning platform.
O’Reilly members experience books, live events, courses curated by job role, and more from O’Reilly and nearly 200 top publishers.

