Chapter 4. Faces and Places
iPhoto gives you plenty of ways to organize your pictures into neat little collections. But until the ’09 version came along, the only way to organize everything was manually. Manually apply keywords. Manually drag things into albums. Drag, drag, drag.
Now it’s all different. iPhoto comes with two features that organize your photos automatically. You’d call it artificial intelligence if it didn’t seem so much like real intelligence.
One of them uses face recognition to group your photos based on who’s in them. It can be extremely handy when, say, you need to quickly round up a bunch of pictures of Chris for that last-minute, surprise-party slideshow. This isn’t the crude sort of face recognition that you find in lesser photo programs or even in digital cameras, which can tell you only if there’s a face in the picture. iPhoto attempts to go a step further and tell you whose face it is.
You can also round up photos based on where they were taken. You can compare various trips to Paris, for example, or show friends what else you did in Chicago besides go to a White Sox game.
Meet Faces and Places, two iPhoto features that have become favorites of people who really want to get to the who and the where of their photos.
Faces
Here’s the Faces feature in a nutshell: By analyzing the unique properties of each face in each photo—distance between the eyes, nose, mouth, hair color, lack of hair, and so on—iPhoto attempts to distinguish among the people in the photos of your library and group them into piles. (Once the setup process is complete, you’ll see these piles when you click the Faces icon in your Source list.)
iPhoto makes a first pass at this automatically, which is pretty amazing.
It’s not a perfect process, however; after its initial pass, iPhoto requires you to review each photo and confirm its subject’s identity. (It’s easy and fun!)
Thereafter, you can click the Faces icon in the Source list to see that iPhoto has grouped your photos by the people in them.
Step 1: Analysis
When you upgrade from an earlier version, iPhoto ’11 doesn’t waste any time. The first time you run it, the program upgrades your photo library (Upgrading from earlier versions)—and gets to work searching all your images for human faces.
Note
Depending on the number of photos you’re importing, iPhoto may take quite some time to perform its initial face hunt.
This part of the Faces setup doesn’t require any effort from you, and it happens each time you import photos.
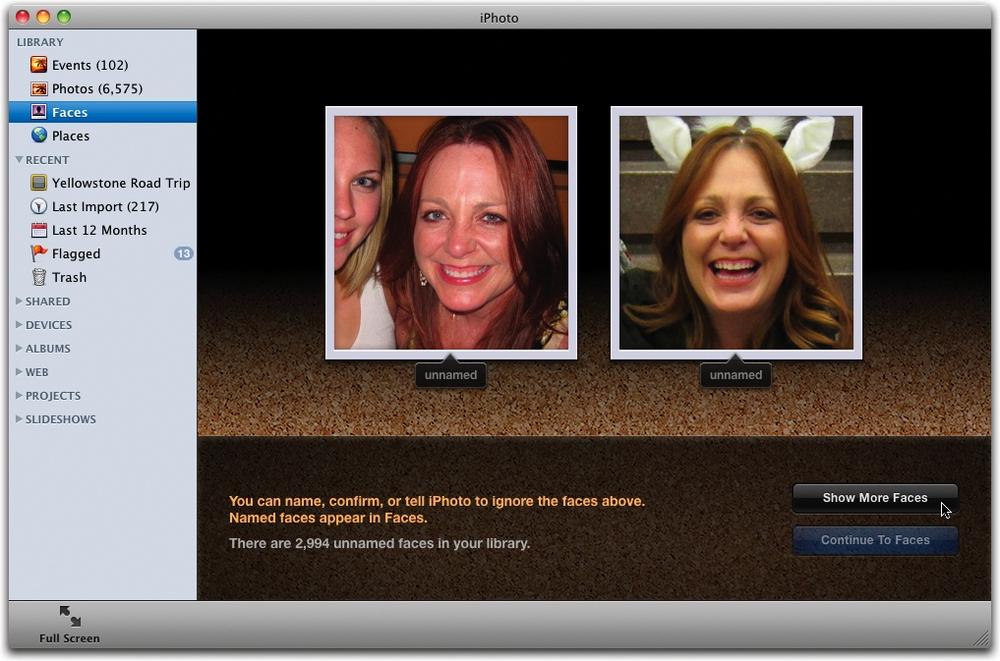
After completing its scan, iPhoto has a good idea of what your social circle looks like. But it still has no idea what those people’s names are, as you can see in Figure 4-1.
Note
If iPhoto doesn’t detect any faces in your photos, you see an empty corkboard with a note about getting started. If you’ve been using Faces in the previous version of iPhoto, you see a corkboard with a slew of Polaroid-style headshots with names underneath (shown in Figure 4-3).
Tagging Faces Automatically
Now that iPhoto has done its face-detection dance, it’s time to introduce it to your friends and family. Once you label a face, the program looks around and tries to match it up with other similar faces in the library. The whole face-tagging process is incredibly simple:
Click Faces in your Source list.
iPhoto displays thumbnails of a few faces it found in your library.
Click the “unnamed” label below a thumbnail and type the person’s name, and then press Return.
While you can type any name you want—like Dad or Uncle Robin—it’s a good idea to stick with the person’s real name, as iPhoto automatically tries to match it with the contents of your Address Book, as shown in Figure 4-2. This is especially important in iPhoto ’11 because it makes emailing from within iPhoto fast and easy (Chapter 8).
Tip
To enter names more quickly, skip the mouse and just use your keyboard. Name one thumbnail and then press the Tab key to move to the next one’s naming area. (To go backwards—say, if you accidentally skipped a thumbnail or you named it incorrectly—press Shift-Tab instead.) Enter another name and then press Tab to highlight the Show More Faces button, and then press Return to move on to the next set of thumbnails.
You can also use the keyboard to confirm names: Press Tab to
highlight the naming area and then press Return to confirm the name
(the ![]() has a little blue circle around it). To tell
iPhoto it made a mistake, press Tab again, and when you see a little
blue circle around the
has a little blue circle around it). To tell
iPhoto it made a mistake, press Tab again, and when you see a little
blue circle around the ![]() , press Return.
, press Return.
Here are a few things to remember as you’re naming faces:
Focus on naming photos that have a clear, frontal view of the person. iPhoto will try to match other pictures in the library with this initial one, and it works best when there’s plenty of face to recognize.
Name faces in profile, too. While it’s important to name full-face photos, naming profile shots helps iPhoto recognize those, too.
Name faces of different ages. If you’ve got several years worth of photos in your library, chances are that you’ll have photos of the same person at a variety of ages.
Don’t waste time naming blurry or poorly lit photos, or those with microscopic faces. Each time you name a photo, iPhoto broadens its range of suggested photos for that person. Naming bad shots makes it harder for iPhoto to recognize people.

Note
iPhoto sometimes gets a little overzealous. It may tag faces
in paintings, framed photos, statues, Star Trek
action figures, or shadows on drapery. In these cases, point the
cursor at the top-left corner of the thumbnail and click the
![]() to delete it, so you can go on tagging the
actual humans in the shot. The thumbnail doesn’t disappear, it just
dims slightly. Theoretically, it won’t show up as a face the next
time you go tagging.
to delete it, so you can go on tagging the
actual humans in the shot. The thumbnail doesn’t disappear, it just
dims slightly. Theoretically, it won’t show up as a face the next
time you go tagging.
When you’ve had your fill of naming faces, click Continue to Faces at the bottom right of the iPhoto window. As shown in Figure 4-3, you now see a corkboard with Polaroid-style shots of each person you’ve tagged so far, labeled with the names you just assigned. It’s like being the casting director in the movie of your life.

Tagging Faces Manually
If iPhoto fails to detect a face during import or rescan (see the box below)—a fairly rare occurrence—you can always tag it yourself. Start by selecting the photo and then opening the Info panel. In the panel, click the word Faces to expand that section and then click “Add a face,” as shown in Figure 4-4.
New in iPhoto ’11 is the ability to rescan photos for faces it
may have missed during the import process. To do so, select the
offending photo(s) using one of the techniques described on Selecting Photos, and then choose Photos→Detect Missing
Faces. Over in your Source list, you see a tiny spinning
![]() icon appear to the right of the word Faces to
let you know that iPhoto is taking another look at your photos. To
find more faces, iPhoto uses looser facial-recognition criteria, so
you may end up with more objects tagged than people.
icon appear to the right of the word Faces to
let you know that iPhoto is taking another look at your photos. To
find more faces, iPhoto uses looser facial-recognition criteria, so
you may end up with more objects tagged than people.
Once iPhoto is finished processing, you can see if it found anything by selecting one photo at a time, and then clicking the Info icon at the bottom of the iPhoto window. (If you only had one photo selected, the Info panel opens automatically.) If the search was successful, you see the additional names listed in the Faces portion of the Info panel, along with other detected-but-unknown faces labeled “unnamed”—just click to add a name.
If iPhoto still didn’t find a face, you can point it out manually as shown in Figure 4-4.
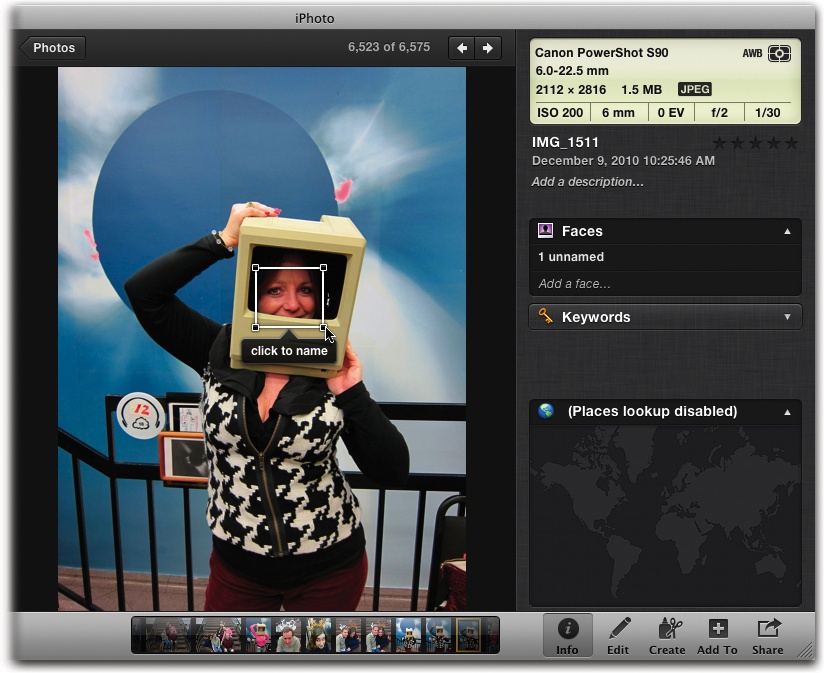
A fresh white square appears, which you can drag over onto that poor, undetected face. Drag the corners of the box to resize it. (Dragging a corner causes both sides of the box to change size, making it a little awkward to get perfectly centered over the face. To better control your box resizing, hold down the Option key as you drag a corner. This stops both sides of the box from moving around and lets you manipulate the size from just the corner you’re dragging.)
When you’ve got the white square right where you want it, click the “click to name” balloon and type the real name of the person. Repeat as necessary with any other people you know in the picture.
Note
While it’s not quite as sophisticated as the software the FBI and Interpol are using these days, the face-detection feature generally gets better the more you work with it. But there are still some cases when you’ll have to plod through manually.
For example, the program may not recognize shaggy dogs as actually having faces, but you can sail through those pictures of Skipper and use the Info panel’s “Add a face” link to add your pet to the Faces wall. Babies, identical twins, and people wearing sunglasses (or posing at odd angles) may also require manual intervention.
Adding More Pictures to a Name
Once you’ve put at least one name to a face, iPhoto’s powers of recognition really kick in. Here’s how to help it match up the rest of the names and faces:
Double-click a person on the Faces corkboard.
iPhoto displays all the photos you’ve already tagged with this person’s name. At the bottom of the window, you see a note telling you how many other pictures iPhoto thinks contain this same person.
Just above the iPhoto toolbar, click Confirm Additional Faces.
The program now displays a screen full of tiles. Each tile contains a closeup of the lucky person’s face, each culled from a different photo. The caption “click to confirm” appears beneath each one (Figure 4-5). This is your chance to tell iPhoto’s face-detection software how it did.
Figure 4-5. You can give iPhoto a hand by confirming its correct guesses and rejecting its wrong ones. Photos above the gray bar (not shown) are confirmed pictures of this Face; photos below it are ones that iPhoto wants you to confirm (iPhoto lists them in order of certainty). Click a picture to confirm it, or Option-click to reject it. The more you work with iPhoto here, the better it gets at identifying people. However, if you come to a point where you’re seeing more misses than hits, click Done and move on to confirming someone else’s face.Click a photo once to confirm that iPhoto has correctly matched this face with the name.
When you click a face, the “click to confirm” bar turns green and displays the name of the person—for example, Chris. Behind the scenes, iPhoto learns from your selection. “Ah, OK—that’s Chris,” it says to itself. You’ve just helped it refine its recognition smarts for next time.
When you encounter a tile that shows somebody else—iPhoto has picked the wrong person—either Option-click it or double-click it.
The “click to confirm” banner turns red, and the text says, “Not Chris” (or whoever).
When you’re finished accepting or rejecting tiles, click Done.
The more guidance you give iPhoto in identifying people in your photos, the more accurate it gets at recognizing them in new images. With enough input from you, the program has a better chance of telling babies and bald men apart, and even differentiating among your various bald friends.

Tip
To see the whole photo instead of a closeup of the face in question, drag the little slider in the upper-right corner of the iPhoto window to Photos; to switch back to viewing closeups, drag the slider to Faces.
Naming faces anytime
Any time you select Faces in your Source list, the Find Faces button appears on the iPhoto toolbar, even after your initial burst of face tagging. Click it to see the faces iPhoto has identified in your library, and then set about the task of naming them.
Even as you stroll around your photo library in Events or Photos view and come upon photos or people you want to add, the “Add a face” link awaits you in the Info panel, as shown on Tagging Faces Manually. iPhoto is always trying to guess who the people in your life are. For example, if you open up a snapshot from that family reunion and click the Info button and then take a peek at the Faces pane, iPhoto will offer a guess if the face looks familiar.
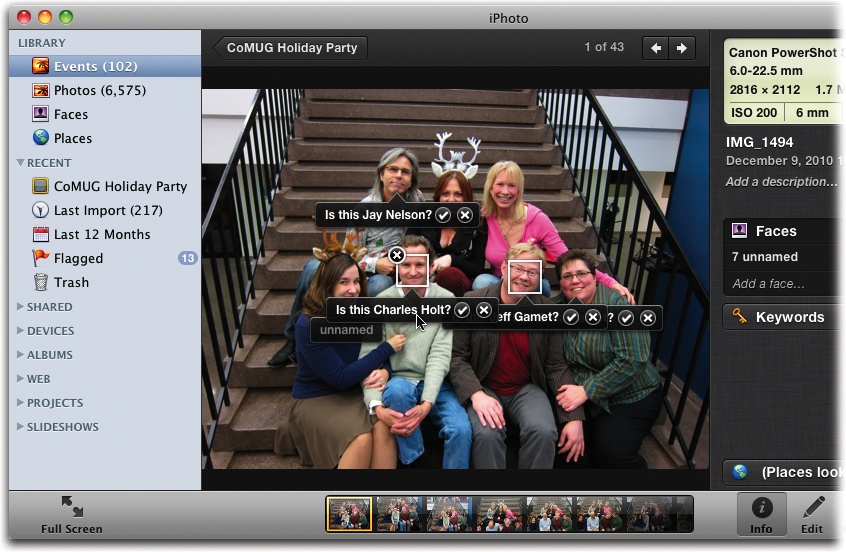
You see the customary white square around the face, but instead of “unnamed” under it, you get a polite question like, “Is this Leroy?” (Figure 4-6).
If it is indeed Cousin Leroy, then click ![]() to confirm and add the picture to Leroy’s
Faces album. If iPhoto has guessed wrong, then click the
to confirm and add the picture to Leroy’s
Faces album. If iPhoto has guessed wrong, then click the
![]() and type in the name that does go with the face.
and type in the name that does go with the face.
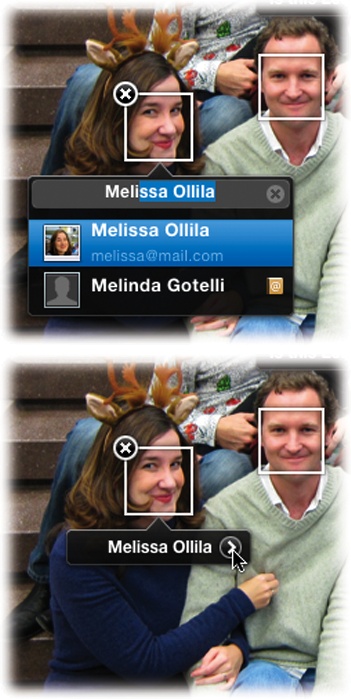
As you add more and more names to your Faces library, iPhoto tracks your typing and offers a drop-down list of potential, previously typed names (as well as names that are in your Mac OS X Address Book) that you can select from to save keystrokes. The top of Figure 4-7 shows an example.
Tip
When naming or confirming names using the Info panel in
Events or Photos view, you can click the ![]() next to the name on any face tag (Figure 4-7, bottom) to
jump into that person’s Faces album.
next to the name on any face tag (Figure 4-7, bottom) to
jump into that person’s Faces album.
The Payoff
Between iPhoto’s own analysis and your patient confirmation of faces, you gradually refine the Faces feature.
Eventually, you wind up with a whole array of mugshots on the Faces corkboard (click Faces in the Source list), as shown back in Figure 4-3 (page 97). The next time you need to gather pictures of Suzy, just double-click her Polaroid on your Faces corkboard; iPhoto displays closeups of all the photos she’s in. (To see the whole photo instead of her face, drag the little slider at the top right of your window to Photos instead of Faces.) This kind of thing is a real time-saver when you need to, say, make that monthly book of grandchild pictures for your parents or a slideshow of your hubby’s ever-evolving facial hair for his 50th birthday blowout.
To return to the corkboard array of faces, click All Faces at the top left of your iPhoto window.
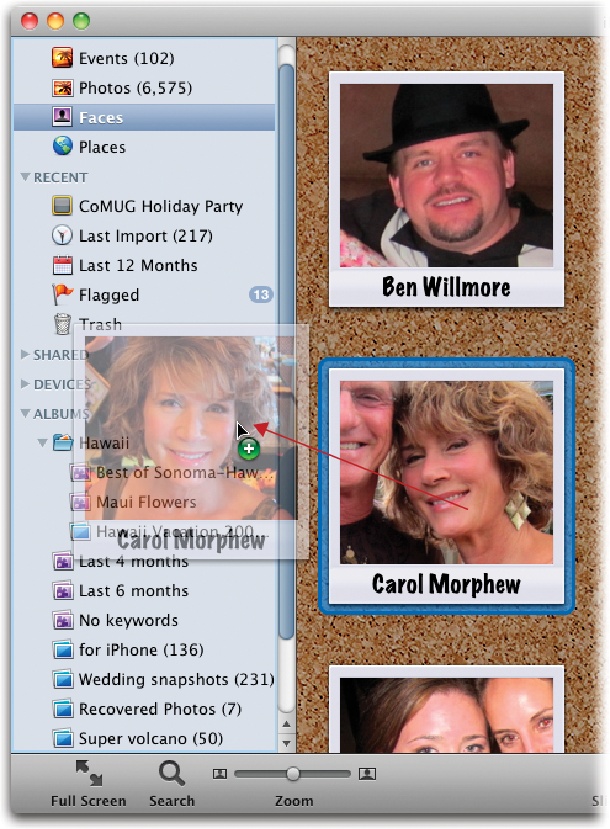
You can also drag a corkboard snapshot directly into your Source list to create a smart album (see Figure 4-8). This album will eternally update itself, auto-adding any confirmed photos of the person that may enter your collection in the future. You can also drag a snapshot onto an existing Face-based smart album to make one that updates with both people—very convenient for corralling all those pics of the kids or the bowling team into one convenient place.
Deleting Faces
OK, you got a little excited by iPhoto’s face-detection technology and tagged your annoying coworker Madge. Look, there she is on the Faces corkboard next to pictures of Mom. Yikes! Don’t panic—if you want to remove a face from the wall, select it and press ⌘-Delete. iPhoto asks if you’re sure you want to remove this person from Faces. If you are, then click Delete Face and wave goodbye.
If you want to zap multiple people off the wall at once, ⌘-click each undesired person, and then press ⌘-Delete. Again, iPhoto asks you to confirm your action. (If you want to delete a whole row of people, Shift-click the first and last faces in the row to select them and everyone in between.)
Adding More Details to a Face
In addition to neatly lining up mugshots of all your family and friends, the iPhoto Faces album helps you keep track of your pictures (and the people in them) in several other ways.
Click any face on the corkboard and then click the Info button on the iPhoto toolbar to open the Info panel. As Figure 4-9 shows, you see the number of photos (and range of photo dates) you have for this person, a spot to type the person’s full name and email address, a map of where those photos were taken (if you’ve added that info), and how many photos might contain this person, should you decide to confirm them.

Now, why would you want to add the person’s email address here? No, it doesn’t automatically add the photo to the appropriate entry in the Mac’s Address Book program, or stick that photo onto incoming messages in Mail (although it would be very nice if Apple made that happen…hint, hint).
No, by giving you a place to add your friend’s email address, you get to use iPhoto ’11’s new graphic email option that lets you send emails from inside iPhoto. The program is also banking that this same name and address are also used for your friend’s account on Facebook, the social-networking site that is a gigantic time vacuum for over 500 million people. Later, when you post iPhoto pictures on your Facebook page, the name tags you’ve so carefully assigned go along for the ride, saving you the trouble of tagging them all over again in Facebook.
For more on merging your iPhoto and Facebook lives, skip to Chapter 8.
Organizing the Faces Album
Seeing your friends and family all lined up in Faces view gives you a glorious sense of organization. (A few years ago, those pictures would have been falling out of physical photo albums—or still in their envelopes from the drugstore and shoved into the back of a desk drawer!) But even on the corkboard, you can organize the faces still further.
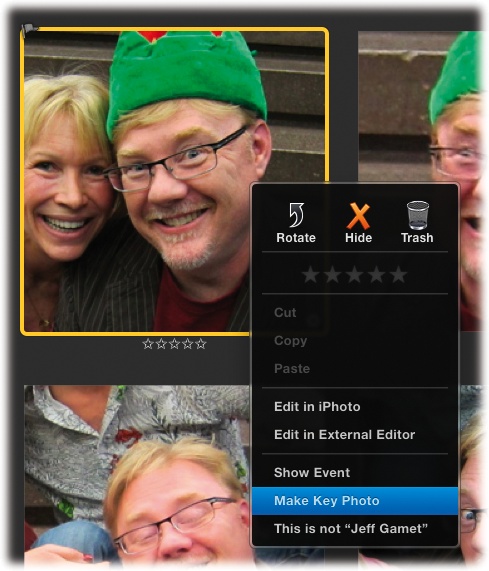
Change the key photo
The key photo is the one that represents a person on your Faces corkboard; it’s typically the first one you tagged (Figure 4-10). If that photo doesn’t do your friend justice, there are at least three easy ways to change it:
Click Faces in your Source list. As you slowly move the mouse pointer (don’t click) over a face on the corkboard, all the tagged pictures of that person flit by in the frame. When you see the one you want to use, tap the space bar to set it as the key photo.
Double-click the face to open up the album. Scroll through and select a photo you like better, and then choose Events→Make Key Photo. Even if it’s a group shot from a distance, iPhoto is savvy enough to zoom in on the person’s face.
If you have a face-tagged photo selected, Control-click (or right-click) it, and then choose Make Key Photo from the shortcut menu shown in Figure 4-10.
iPhoto’s smart albums (Merging Albums) are a terrific way to round up all the photos that meet a certain set of conditions—for example, all the ones you shot with a particular camera, or on a particular date. The names you apply to Faces can be smart albums conditions, too.
Say you’re planning the Embarrassing Slideshow portion of your friend’s birthday dinner. You need to find all the photos in your library that contain either Jeff or Erica, and photos with both Jeff and Erica together.
Choose File→New Smart Album (or press Option-⌘-N on the
keyboard). Give the album a name, and then set up the pop-up menus
to say “Face” and “is” and “Jeff.” Click the ![]() button to add another row, and then repeat
the steps to add “Erica” as the name on the second line. Finally,
choose Any from the Match pop-up menu near the top of the dialog
box (this option becomes available after you set at least two
conditions).
button to add another row, and then repeat
the steps to add “Erica” as the name on the second line. Finally,
choose Any from the Match pop-up menu near the top of the dialog
box (this option becomes available after you set at least two
conditions).
When you click OK, a new smart album appears in your Source list containing all the photos you’ve ever tagged of Jeff and Erica, either together or apart, in one handy place. (Later, when you’ve geotagged your photos—see Edit names—and want to add Place as a condition, too, you can even make an album of all the times you went skiing in Colorado with Jeff and Erica.)
You can also set up a smart album to corral all the pictures you haven’t gotten around to face-tagging yet. Just choose File→New→Smart Album and call it something memorable, like “Untagged photos.” Set up the pop-up menus to say “Face” and “is.” In the last box, pick “Unnamed” and click OK to create a smart album of the great untagged.
Rearrange the order
Would you like to put Mom and Dad together on the board, or get all your soccer team pals in a row? No problem; you can drag the Faces snapshots around on your corkboard, as Figure 4-11 illustrates.
Be careful where you drop that face, though. If you accidentally drop the person on somebody else’s snapshot, you merge their two sets of photos, and iPhoto applies the wrong name to all of the faces in the pile you dropped. (If that happens, press ⌘-Z, the Undo command.)
Tip
Just as you can merge Events (The Events List), you can merge Faces, too. Why would you want to? Well, say you make a typo in someone’s name when tagging photos and inadvertently create two Faces for the same person. You can merge the two by dragging the snapshot of the Typo Name right onto the snapshot of the Correct Name and not have to rename a thing!
If it’s too late for ⌘-Z, double-click the merged pile. Then click the Confirm Name button and reject (and eject) the wrong face out of the photo collection, as described on Adding More Pictures to a Name. (Or Control-click each unwanted photo and choose “This is not [Name]” from the shortcut menu.)

Tip
You can also organize the faces alphabetically, though by first name only. Choose View→Sort Photos→By Name. (That creates an A to Z order. You can also be contrary and go from Z to A; use the same menu and choose Descending.) Switching to name sorting, however, means you can’t drag your pals around manually. At least not until you choose View→Sort Photos→Manually.
Edit names
Want to change the spelling or fix a typo in the name
displayed on the corkboard key photo? Just click the name, and the gray box
reappears, letting you type whatever you want. Clicking the
![]() at the right of the little box automatically
clears the existing text, but since clicking the name selects it
anyway, you can just start typing right over the old name.
at the right of the little box automatically
clears the existing text, but since clicking the name selects it
anyway, you can just start typing right over the old name.
Places
Geotagging is the latest hot feature of digital photography. That’s when your camera buries longitude and latitude coordinates into each picture it takes (invisibly, the same way it stamps the time and date) so you’ll always be able to pinpoint where a picture was taken.
There are only two problems with this scenario.
First, very few cameras actually contain the necessary GPS circuitry to geotag your photos. Second, what happens after you geotag your photos? What are you going to do, say, “Oh, yes, I remember that romantic evening at +41° 30′ 18.48″ N, -81° 41′ 55.08″ W″?
iPhoto solves the second problem, at least. It translates those coordinates to the much more recognizable “Cleveland,” or even more precisely, a street address, like “100 Alfred Lerner Way, Cleveland, Ohio” (which happens to be the address of Cleveland Browns Stadium)—and shows that spot with a red pin on a map right in iPhoto.
This can be really convenient if you’ve made several trips to London and want to see all the pictures taken there over the years, and not just ones from a particular album or Event. It’s also a great way to learn geography—slideshows, books, and calendars take advantage of this info, and include themes that make a quick map of your trip.
Automatically Geotagging Photos
Your photos are probably geotagged when you shoot them if you’re using one of the following gadgets:
A digital camera with a built-in GPS chip, like the Nikon Coolpix P6000.
The Eye-Fi Geo Card. It’s a remarkable SD memory card, the kind you put into most camera models, with built-in wireless networking and a pseudo-GPS feature ($70 for a 4 GB card). See www.eye.fi for details.
A small GPS-enabled box like the $90 ATP PhotoFinder that tracks the time and your coordinates as you snap photos—and marries them up with the time stamps on your pictures when you insert the camera’s memory card. See http://photofinder.atpinc.com for more information.
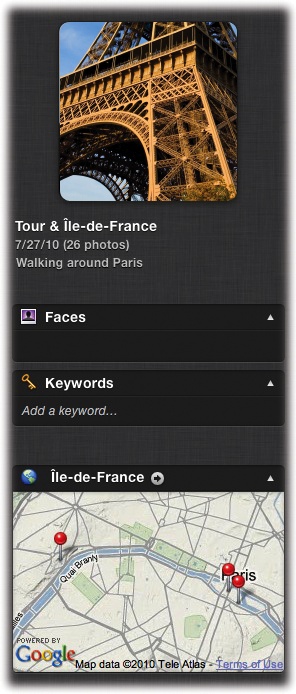
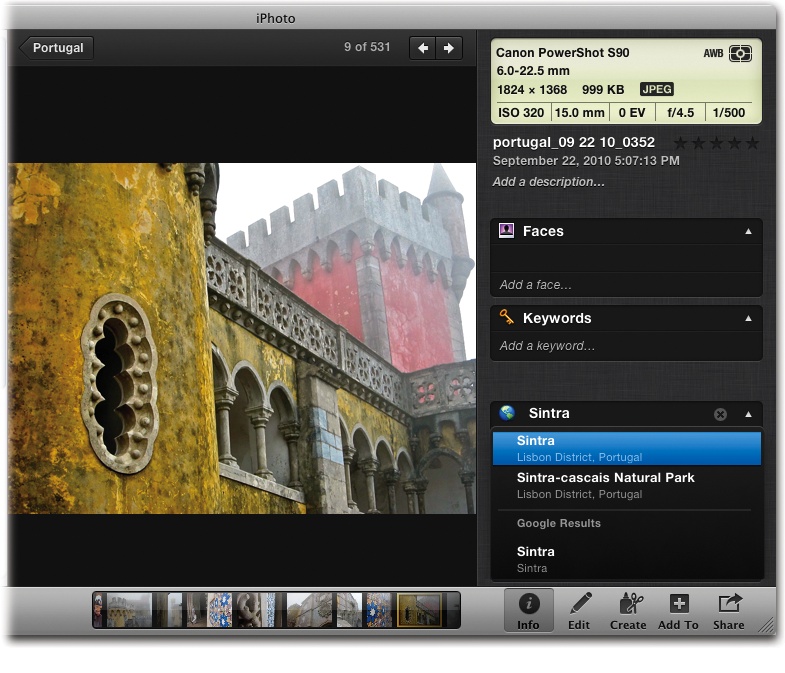
If that’s your situation, then all you have to do is import the pictures into iPhoto (Getting Your Pictures into iPhoto) and smile smugly. When the images appear in the viewing window, you can check the location by clicking the Info button on the iPhoto toolbar to open the Info panel shown in Figure 4-12.
In the Places section of the Info panel, you can see the location’s name and a pin on a miniature Google map; if the map is generally correct, then iPhoto has done its job.
However, GPS coordinates can sometimes be off by yards. Or, if the place is wrong and you know it (because you forgot to turn on the Location Services function of your iPhone, for example), don’t worry; You can manually assign the photo to a place, as described in the next section.
Manually Geotagging Photos
But what about photos that don’t have geographical information embedded—like the 300 billion photos that have been taken with non-GPS cameras?
In that case, you can geotag them manually.
Select a photo (or an Event) and then click the Info button on the iPhoto tool-bar.
The Info panel opens to reveal several bits of information, including the name of the picture.
Click “Assign a Place” and start typing the name of the town, city, or landmark (like Washington Monument) where the picture was taken.
As shown in Figure 4-13, a pop-up menu appears; iPhoto is trying to guess what you’re typing, to save you some effort (and spelling). If you see the location in the list, use the arrow keys on the keyboard to select it and then press Return to confirm your choice, or just click the correct location in the list.
Tip
If, by some bizarre occurrence, you have the latitude and longitude of your location, you can enter those numbers instead of a name. Click “Assign a Place” and then type the coordinates separated by a comma, such as 38, –9 (the latitude always goes first). A pop-up menu appears with iPhoto’s guess as to where on the map those coordinates actually are.
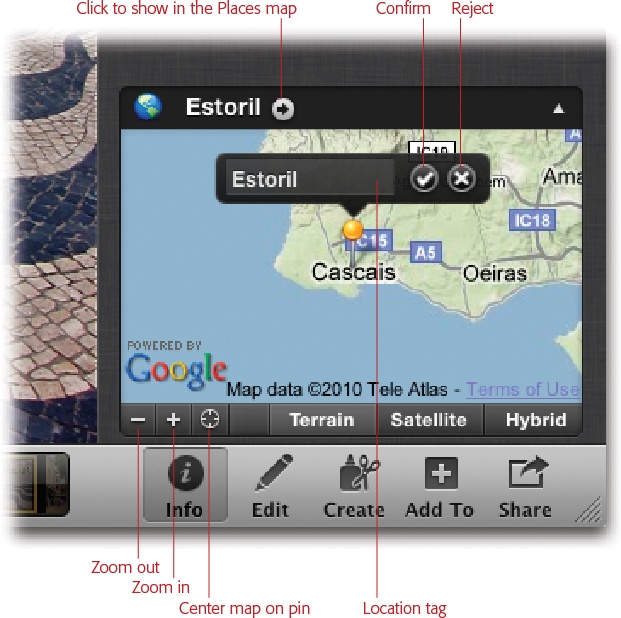
If the place you’re typing doesn’t appear on the list, pick one that’s close and then move the marker pin.
Unlike the previous version of the program, iPhoto ’11 doesn’t have a “Find on Map” option, mainly because you don’t need it. In the off chance that iPhoto and Google can’t find your location, just pick a spot that’s close. Then, click the red pin on the little map and drag it to the correct location, as Figure 4-14 shows.
Note
You can only move marker pins using the tiny map in the Info panel; you can’t move them when you’re looking at the big map in Places view.
I’m all for having machines do things for me automatically, but what if I don’t want iPhoto revealing where my iPhone pictures were snapped?
These days, privacy concerns run deep; sometimes, you may not want iPhoto blabbing about where you’ve been.
If this is the case, you have a couple of options. The first one—if you remember to do it in time—is to turn off the GPS feature on your camera or cameraphone. On the iPhone, for example, go to the Home screen and tap your way through Settings→General→Location Services→Off. (Just remember to turn Location Services back on again the next time you want to use Maps or another location-aware app.)
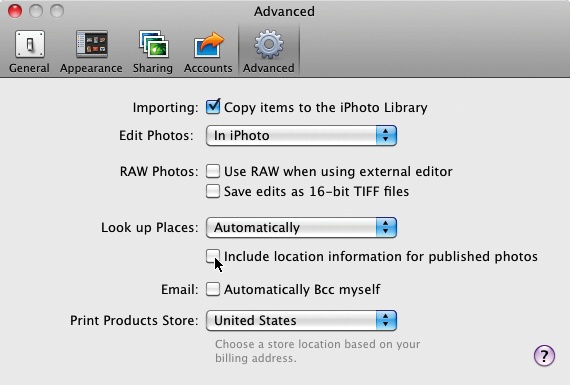
Second, you can tell iPhoto itself not to look up the GPS coordinates embedded in the file. Choose iPhoto→Preferences (or press ⌘-comma) and then click the Advanced icon. In the “Look up Places” pop-up menu, change Automatically to Never, and then click OK.
Also, new in iPhoto ’11 is the option to have iPhoto keep locations secret for published photos only (those you send off to photo-sharing websites like Facebook, Flickr, and so on). If that sounds more agreeable, you can leave the “Look up Places” menu set to Automatically and then turn off “Include location information for published photos” underneath it.
However, if you’re part of the Witness Protection Program, you might want to delete location information that’s already been added to a photo or Event. Just click the Info icon in the iPhoto toolbar to summon the Info panel and then click Places to expand that section. Then click the location tag and click the
 to its right, shown in Figure 4-14. To delete
location info for multiple photos or Events, just select them
using the techniques described on Selecting Photos first.
to its right, shown in Figure 4-14. To delete
location info for multiple photos or Events, just select them
using the techniques described on Selecting Photos first.When the pin is in the right spot, click the
 next to the location tag to confirm
it.
next to the location tag to confirm
it.You can also refine and/or delete locations by choosing Window→Manage My Places. This command summons a list of all the places you’ve tagged in iPhoto—or captured by your GPS-enabled phone or camera—with a handy map that lets you move location pins to and fro, as well as reduce or widen the region of a particular pin using tiny left and right triangles that automatically appear to its right.
Renaming Places
The Geotagging photos approach is usually enough for most people. But if you want to add a personal touch to your locations, you can rename them in the Info panel.
Once iPhoto finds your location (or you find it yourself),
click the marker pin to summon the location tag (the marker pin
turns yellow). Once the tag appears, highlight it and then type a
new name, such as Grandma’s House. Click the
![]() to confirm the new name (or just press
Return). Later, you’ll be able to use iPhoto’s Search box to round
up all the pictures that were taken at Grandma’s House, just by
typing grandm.
to confirm the new name (or just press
Return). Later, you’ll be able to use iPhoto’s Search box to round
up all the pictures that were taken at Grandma’s House, just by
typing grandm.
Tip
Once you’ve pinpointed the right location for a photo, you can copy that info to other photos. Just select the photo with the correct locale and then choose Edit→Copy. Next, select the photo(s) you want to copy the location to and then choose Edit→Paste Location. That’s all there is to it.
Adding Additional Info to a Photo or Event
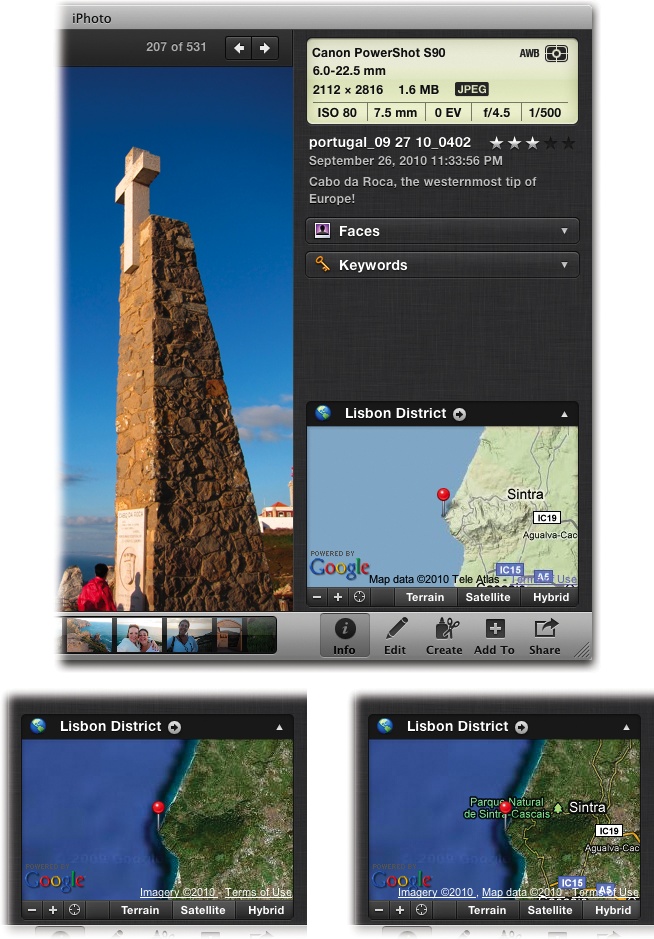
As you may have noticed, the Info panel has room for more facts than just a photo’s spot on the map. Here’s a quick roundup of what the other controls shown in Figure 4-15 can do for you:
Rename the photo. If you’re tired of all your pictures being called IMG_this or DSC_that, then click the Name field near the top of the Info panel (below the white box) and type in a better title, like Baby’s first Jell-O parfait or Bath time!
Rate the photo. See those dark stars next to the photo’s name? Drag your cursor mouse along them to add the number of stars you think the picture deserves. (See Ratings for details on ratings.)
Add a description. Along with a better title, you can also add details about what’s in the photo: “Stevie’s first at-bat in the T-ball game” or “Toboggan accident Day 3.” Just click where it says “Add a description” and start typing.
Zoom the map. Just below the map, click the
 and
and  buttons to zoom in and out of the image,
anywhere from a closeup street view to a world map. (These
controls appear when your cursor is on the map.)
buttons to zoom in and out of the image,
anywhere from a closeup street view to a world map. (These
controls appear when your cursor is on the map.)View on the Places map. Next to the location tag is a tiny arrow
 that you can click to see the location on
iPhoto’s Places map. (This tiny arrow is labeled back in
Figure 4-14.)
that you can click to see the location on
iPhoto’s Places map. (This tiny arrow is labeled back in
Figure 4-14.)Change the look of the map. When you point to the tiny map, a row of labeled buttons appears near the bottom. They let you see the location three different ways: a cartographical Terrain view that shows street names and elevations, a Satellite view with an overhead photo of the area, or Hybrid—a combination of both.
Tip
Once you’ve geotagged your photos, you can use iPhoto’s Search box to find them.
First, click Events or a particular album in the Source list. Then,
at the bottom of the iPhoto window, click the Search icon
(![]() ) and type what you’re looking for, like
San Francisco or Wrigley
Field. Press Return to see your results.
) and type what you’re looking for, like
San Francisco or Wrigley
Field. Press Return to see your results.
Going Places with Places
Now that your photos are geotagged, detailed, and ready, it’s
time to see how they look in iPhoto’s Places view. In the Source list,
click Places. Or, if the Info panel is open, click ![]() in your photo’s location tag (labeled back in
Figure 4-14).
in your photo’s location tag (labeled back in
Figure 4-14).
Tip
Once iPhoto knows where your pictures were taken—because you’ve geotagged them—that information is preserved if you upload the pictures to Flickr (Flickr). That means your admirers will be able to see where you took those photos using Flickr’s geotag maps—if you haven’t turned off the new location privacy option in iPhoto ’11’s preferences, that is (see the box on When You Don’t Feel Like Sharing).
Map view
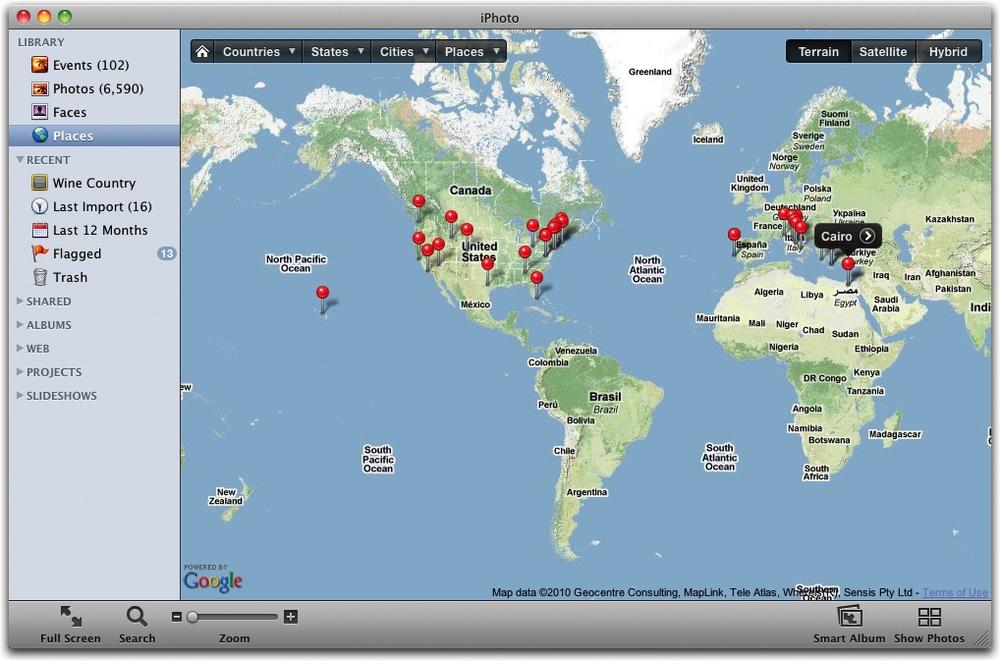
In the Places map view shown in Figure 4-16, a global map
fills your screen, festooned with little red pins representing all
the pictures you’ve geotagged. (If you click iPhoto ’11’s new Full
Screen button, the map takes over your whole monitor!) To see the
photos attached to a pin, point to that pin and click the
![]() next to the place’s name.
next to the place’s name.
Here are some ways to navigate the map:
Zoom in by double-clicking a pin until you get as close as you want.
Zoom out of the map by Control-clicking (or right-clicking) twice.
Zoom in or out by dragging the slider near the bottom-left of the iPhoto toolbar.
If you want to travel more incrementally, drag the map itself with the mouse to get to the part you want to see.
Figure 4-15. Top: A photo’s Info panel can store quite a bit of information about it—like names, dates, and ratings—which you can use for searching or making smart albums. Bottom: You also get a choice of map styles, as shown here. The left image shows Satellite view, and the right Hybrid view (the top image shows Terrain view).See all your pins on the map at once by clicking the Home button at the top left of the iPhoto window (it looks like a little house).
See all the countries, states, cities, and places you’ve visited by clicking the floating lists at the top of the map. These lists are new in iPhoto ’11; they let you view photos by region, as discussed in the next section.
Along the top-right edge of the iPhoto window are buttons for the same three map types you can see in the Info panel’s mini-map: Terrain, Satellite, and Hybrid (see Figure 4-15).
To see all the photos you’ve mapped, click the Show Photos button at the bottom of the iPhoto window.
View photos by region
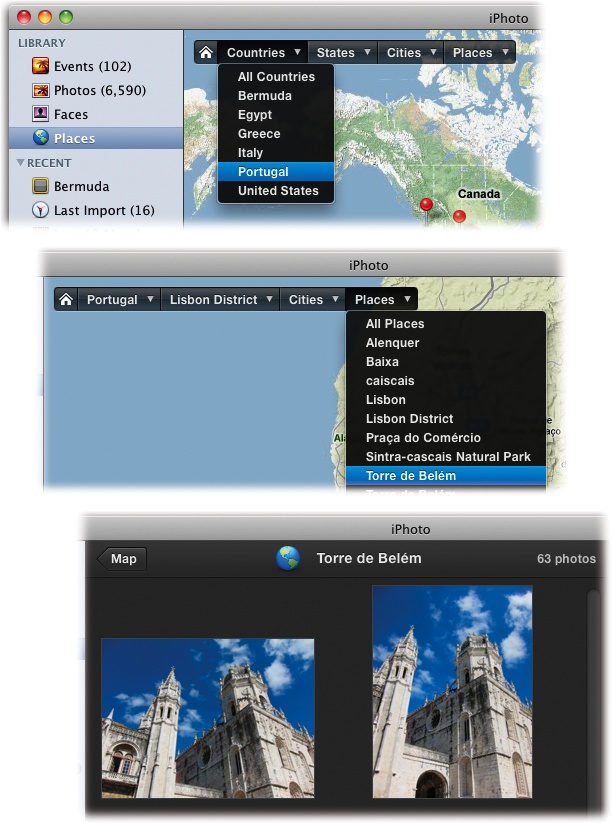
The map view is fun and all, but sometimes you want to see all your Places information grouped together in a good, old-fashioned list. Easy: Use the new floating lists at the top of the Places map, shown in Figure 4-17.
Longtime fans of iTunes should instantly recognize this look: a series of lists in the top part of the window, and the locations (countries, states, cities, or places—not songs) in each list underneath. Four columns appear in the top part of the window, breaking down each location into smaller and smaller subcategories.
As shown in Figure 4-17 (top), the left-hand column has the big overall location: the individual countries where you’ve tagged photos. As you move to the right, countries get divided into states or provinces, which get narrowed down to cities or towns (Figure 4-17, middle). It can get as specific as a street address or a landmark, if you’ve gone that far in your geotagging frenzy.
Places for Your Smart Albums
Want a self-updating album of all the photos in a certain state or city? Smart albums (Merging Albums) play nice with Places, too. Setting up a location-aware smart album is easier than ever in iPhoto ’11, as long as you have an Internet connection to keep the map info flowing from Google.
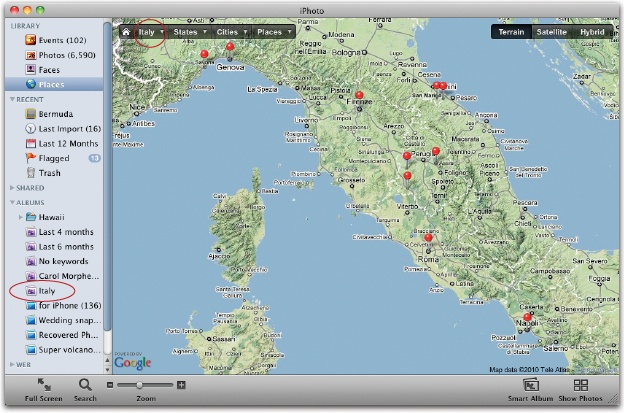
To set up a smart album based on location, follow these steps:
In your Source list, click Places and then click the Home button at the upper left of the map.
Your own personal map of the world appears, complete with a red pin for every location you’ve tagged in a photo.
Find the location you want using the floating region columns, or drill down through the lists until you find a specific location. Then click its red pin.
If you’re making a smart album to contain all the photos you’ve ever taken in Italy, choose it from the Country list (Figure 4-18).
If you’re making a smart album based on Florence, you can drill down through the other region lists until you find a marker pin for Florence, and then click it. In a big blast of colorful contrast, the red pin turns yellow.
Click the Smart Album icon at the bottom of the window.
A fresh, new smart album appears in the Source list based on the pins shown on your map, sporting the name of the location you just chose.
Tip
To make a smart album based on multiple locations, zoom in until the map shows all the pinned places you want to include. Then click the Smart Album button in the iPhoto toolbar to make a self-updating album that includes photos from all those places. It appears in the Source list under an unwieldy name like “United Kingdom, France and more” but you can click to rename it something a little catchier, like “Europe.”
If you don’t happen to be online at the time (the horror!), you can still set up a smart album without looking at the map:
Option-click the Create button in the iPhoto toolbar. From the shortcut menu, choose Smart Album.
The Smart Album sheet slides down from the top of the iPhoto window.
Type a name for the album. Set up the pop-up menus to say “Place” and “contains.” In the remaining box, type the location you want to use, like Texas or Grand Canyon, and then click OK.
Your new smart album rounds up all the photos that match the Place criteria you entered. It also keeps an eye out for photos with matching geotags that may arrive in the future.
Tip
You can commemorate all this geotagging work with a custom map that can be added to a book of your photos. Choose a Page Layout has the details.
Get iPhoto '11: The Missing Manual now with the O’Reilly learning platform.
O’Reilly members experience books, live events, courses curated by job role, and more from O’Reilly and nearly 200 top publishers.

