Chapter 1. Camera Meets Mac
Your digital camera is brimming with photos. You’ve snapped the perfect graduation portrait, captured that jaw-dropping sunset over the Pacific, or compiled an unforgettable photo essay of your 2-year-old attempting to eat a bowl of spaghetti. It’s time to use your Mac to gather, organize, and tweak all these photos so you can share them with the rest of the world.
That’s the core of this book—compiling, organizing, and adjusting your pictures using iPhoto, and then transforming this collection of digital photos into a professional-looking slideshow, set of prints, movie, web page, email, desktop picture, calendar, or bound book.
But before you start organizing and publishing these pictures using iPhoto, they have to find their way from your camera to your Mac. This chapter explains how to get pictures from camera to computer and introduces you to iPhoto.
iPhoto: The Application
iPhoto approaches digital photo management as a four-step process:
Import. Working with iPhoto begins with feeding your digital pictures (and videos) into the program, either from a camera or from somewhere else on your Mac. In general, importing is literally a one-click process. This is the part of iPhoto covered in this chapter.
Organize. This step is about sorting and categorizing your chaotic jumble of pictures so you can easily find them and arrange them into logical groups. You can add searchable keywords like Vacation or Kids to make pictures easier to find. You can change the order of images, and group them into folders called albums. You can group your pictures based on who’s in them, and have iPhoto help match names to faces. You can pin your photos to a virtual map that shows your travels around the globe. Chapter 2 and Chapter 3 cover all of iPhoto’s organization tools, and Chapter 4 explains the Faces and Places features.
Edit. This is where you fine-tune your photos to make them look as good as possible. iPhoto provides everything you need for rotating, retouching, resizing, cropping, color-balancing, straightening, and brightening your pictures. (More significant image adjustments—like editing out an ex-spouse—require a different program, like Photoshop Elements.) Editing your photos is the focus of Chapter 5.
Share. iPhoto’s best features have to do with sharing your photos, either onscreen or on paper. In fact, iPhoto offers nine different ways of publishing your pictures. In addition to printing pictures on your own printer (in a variety of interesting layouts and book styles), you can display images as an onscreen slideshow, turn the slideshow into a QuickTime movie, order professional-quality prints or a professionally bound book, email them, apply one to your desktop as a backdrop, select a batch to become your Mac OS X screensaver, post them online as a web page, and so on. Chapters Chapter 8–Chapter 13 explain how to undertake these self-publishing tasks.
Note
Although much of this book focuses on using digital cameras, remember this: You don’t have to shoot digital photos to use iPhoto. You can just as easily use it to organize and publish pictures you’ve shot with a traditional film camera and then digitized using a scanner (or had your local camera store convert into a photo CD). Importing scanned photos is covered later in this chapter.
iPhoto Requirements
To run iPhoto ’11, Apple recommends a Mac that has an Intel chip, Mac OS X 10.6.3 (that’s Snow Leopard) or later, and 1 gigabyte of memory or more.
The truth is, iPhoto may be among the most memory-dependent programs on your Mac. It loves memory. Memory is even more important to iPhoto than your Mac’s processor speed. It makes the difference between tolerable speed and sluggishness. So the more memory and horsepower your Mac has, the happier you’ll be.
Finally, of course, you’ll need a lot of hard drive space—not just several gigabytes for iPhoto and the other iLife programs, but also lots of gigabytes for all the photos you’ll be transferring to your Mac. (Apple recommends at least 5 gigabytes free.)
Getting iPhoto
A free version of iPhoto has been included on every Mac sold since January 2002. If your Mac falls into that category, then you’ll find iPhoto in your Applications folder. (To open this folder, press Shift-⌘-A or, in the Finder, choose Go→Applications.) You can tell which version you have by single-clicking its icon—the little camera superimposed on the palm tree—and then choosing File→Get Info. In the resulting info window, you’ll see the version number. (Confusingly, iPhoto ’11 is actually version 9 of the program.)
If you bought your Mac after October 2010, you probably have iPhoto ’11 installed. Otherwise, it’s available only as part of Apple’s iLife ’11 software suite—a $49 DVD that includes GarageBand, iMovie, iPhoto, iDVD, and iWeb. You can get the iLife box from www.apple.com/store, mail-order websites, or local computer stores.
Note
You can also purchase iPhoto ’11 (all by itself) for $15 from Apple’s Mac App Store. If you’re using Mac OS 10.6.6 or later, the Mac App icon (it looks like a round, blue button with a white A in the middle) probably appears in your Dock, or for sure in your Applications folder.
When you run the iLife installer, you’re offered a choice of programs to install. Install all five programs, if you like, or just iPhoto. (The other programs in iLife can access your iPhoto library, too.)
When the installation process is over, you’ll find the iPhoto icon in your Applications folder and in your Dock, so you’ll be able to open it more conveniently from now on.
Note
If you installed iPhoto ’11 from the iLife DVD, do not launch iPhoto
’11 yet! There was a serious bug in the initial release, capable, in
some cases, of deleting your photo library (that’s why backups are
so important!). The fix is to run Software Update and download the
iPhoto 9.1.1 update (or a higher-numbered one) first. That is,
choose ![]() →System Preferences, and then click the
Software Update icon (it looks like a tiny globe encircled by two
arrows). Click Check Now; your dutiful Mac connects to Apple.com and
downloads the update. Once it’s finished downloading, click the
Install button. It’s now safe to install iPhoto from the DVD.
→System Preferences, and then click the
Software Update icon (it looks like a tiny globe encircled by two
arrows). Click Check Now; your dutiful Mac connects to Apple.com and
downloads the update. Once it’s finished downloading, click the
Install button. It’s now safe to install iPhoto from the DVD.
Upgrading from earlier versions
If you’ve used an earlier version of iPhoto, then you’d be wise to make a backup of your iPhoto library—your database of photos—before running iPhoto ’11. That’s because iPhoto’s first bit of business is converting that library into a new, more efficient format that’s incompatible with earlier iPhotos (see Figure 1-1, bottom).
Ordinarily, the upgrade process is seamless: iPhoto smoothly converts and displays your existing photos, comments, titles, and albums. But lightning does strike, fuses do blow, and the technology gods have a cruel sense of humor—so making a backup copy before iPhoto converts your old library is very, very smart.
To perform this safety measure, open your Home→Pictures folder, and then copy or duplicate the iPhoto Library icon. (This folder may be huge, since it contains copies of all the photos you’ve imported into iPhoto. This is a solid argument for copying it onto a second hard drive, an iPod classic, or a bunch of burnable DVDs; see iPhoto Backups.) Now, if anything should go wrong with the conversion process, you’ll still have a clean, uncorrupted copy of your iPhoto library files.
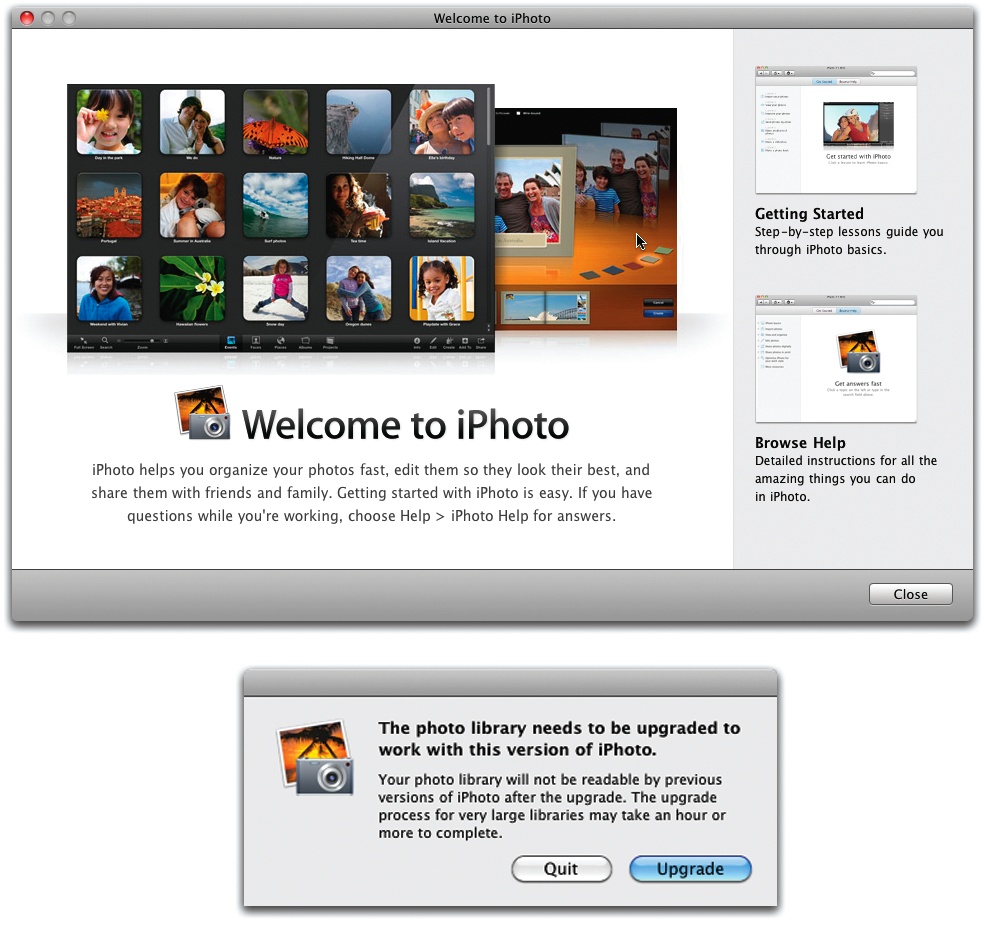
Running iPhoto for the First Time
Click the iPhoto icon in your Dock to open the program. After you dismiss the “Welcome to iPhoto” dialog box (Figure 1-1, top), iPhoto checks to see if you have an older version and, if so, offers to convert its photo library (Figure 1-1, bottom). (If you’ve got a lot of photos, you’ll have time to fetch a snack—or possibly get a graduate degree—while iPhoto does the conversion.)
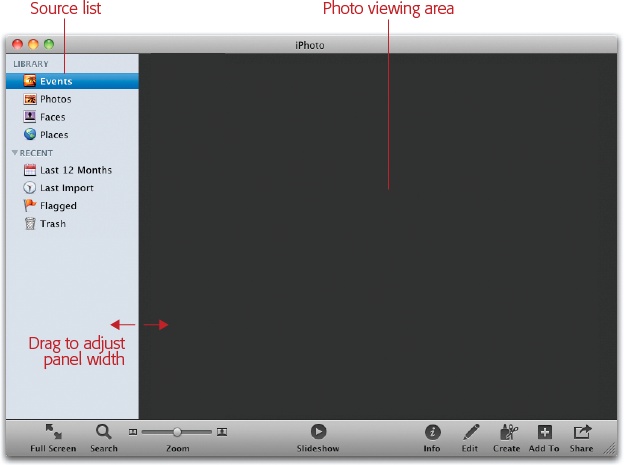
Finally, you arrive at the program’s main window, the basic elements of which are shown in Figure 1-2.
Note
When you first run iPhoto ’11, the program also asks if you’d like it to look up photo locations on Apple’s servers so your photos can be placed on a map. This is part of the Places feature, explained in Chapter 4.
Getting Your Pictures into iPhoto
With iPhoto installed and ready to run, it’s time for you to import your own pictures into the program—a process that’s remarkably easy, especially if your photos are going directly from your camera into iPhoto.
Of course, if you’ve been taking digital photos for some time, you probably have a lot of photo files already crammed into folders on your hard drive, on flash drives, or on CD/DVDs. If you shoot pictures with a traditional film camera and use a scanner to digitize them, you’ve probably got piles of JPEG or TIFF images stashed away on disk already, waiting to be cataloged using iPhoto.
This section explains how to transfer files into iPhoto from each of these sources.
Connecting with a USB Camera
Every digital camera can connect to a Mac’s USB port. If your Mac has more than one USB jack, any of them will do.
Plugging a USB-compatible camera, iPhone, or camera-equipped iPod into your Mac is the easiest way to transfer pictures from your camera into iPhoto.
The whole process practically happens by itself:
Connect the camera to one of your Mac’s USB jacks, and then turn the camera on.
To make this camera-to-Mac USB connection, you need what is usually called an A-to-B USB cable; your camera probably came with one. The “A” end—the part you plug into your camera—has a small, flat-bottomed plug whose shape varies by manufacturer. The Mac end of the cable has a larger, flatter, rectangular, standard USB plug. Make sure both ends of the cable are plugged in firmly.
If iPhoto isn’t already running when you make this connection, the program opens and springs into action as soon as you switch on the camera.
Note
If this is the first time you’ve ever run iPhoto, it asks if you always want it to run when you plug in the camera. If you value your time, say yes. Why is it even asking? Because, believe it or not, your Mac came with another program, called Image Capture, that can import photos from a camera. It’s in your Applications folder, and you can use iPhoto’s Preferences to specify which program you want to open automatically when you connect your camera. (Choose iPhoto→Preferences, click the General tab, and then use the “Connecting camera opens” pop-up menu.)
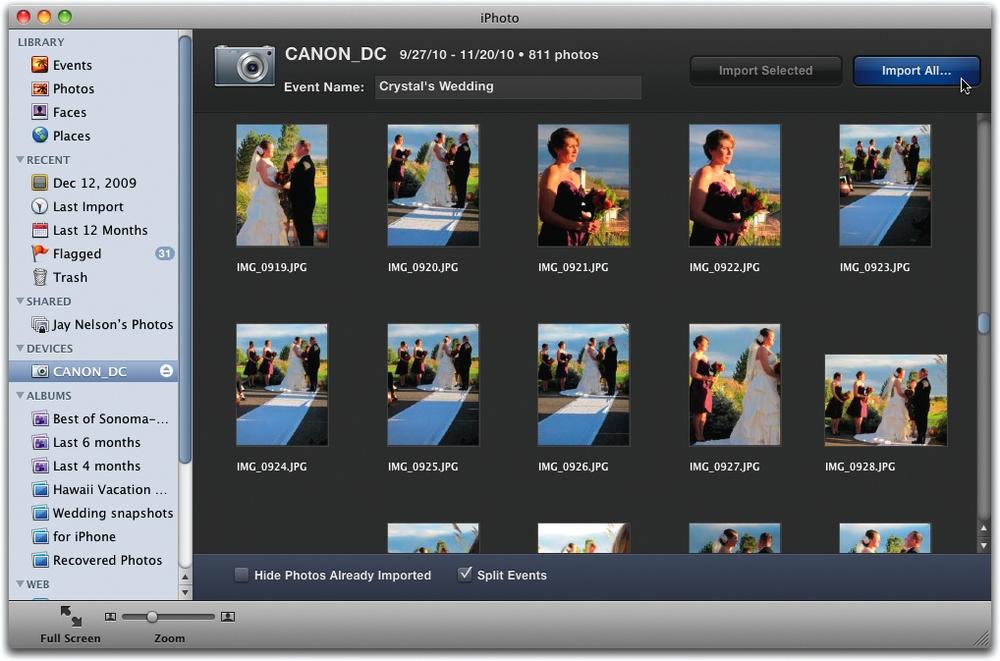
A wonderful thing happens when you connect the camera: After a pause, you get to see thumbnails (miniature images) of all the photos on your camera’s memory card, as shown in Figure 1-3.
Tip
If, for some reason, iPhoto doesn’t “see” your camera after you connect it, try turning the camera off, then on again.
How is this wonderful? Let us count the ways. First, it means that you can see right away what’s on the card. You don’t have to sit through the time-consuming importing process just to discover, when it’s all over, that you grabbed the wrong card or the wrong camera.
Second, you can choose to import only some of the pictures. (To choose the photos you want to import, use any of the photo-selection techniques described on Selecting Photos.)
The option to import only some of the photos opens up a whole new workflow possibility: You can leave all the photos on your memory card, all the time. You can take new photos each day, and import only those onto your Mac each night. If your memory card is big enough, this routine means that you always have a backup of your photos.
Something else happens when you connect the camera, too: Its name and icon appear in the Source list (the list on the left side of the iPhoto window) and at the top of the iPhoto window. That’s handy, because it means that you can switch back and forth between the importing mode (click the camera’s icon) and the regular working-in-iPhoto mode (click any other icon in the Source list), even while the time-consuming importing is under way.
(Here’s an idea for Apple: As long as the camera’s appearing in the Source list, wouldn’t it be cool if you could drag photos onto the camera, too?)
Tip
If you’ve decided to work this way, then you can save yourself some time and worry by turning on the Hide Photos Already Imported checkbox at the bottom of the screen. Now, each time you connect the camera, you’ll be shown only the new photos, the ones you haven’t imported yet. One quick click on the Import All button (step 3) brings in only the latest shots, without your having to pick through the whole collection on the card, trying to remember which pictures you’ve already downloaded to your Mac.
Figure 1-3. iPhoto is ready to import, Captain! If you have to wait a long time for this screen to appear, it’s because you’ve got a lot of pictures on your camera, and it takes iPhoto a while to count them up and prepare for the task at hand. (The number may be somewhat larger than you expect if you didn’t erase your last batch of photos.)Type an Event name and description for the pictures you’re about to import.
An Event, in iPhoto’s little head, is “something you photographed within a certain time period” (for example, on a certain day or during a certain week).
See, in the old days, iPhoto just imported everything on your memory card and displayed all of those pictures in one gigantic clump—even if they included photos from several different events, shot weeks apart.
Now, during the importing, iPhoto automatically analyzes the time stamps on the incoming photos and puts them into individually named groups according to when you took them.
You can read much more about Events on Projects. In the meantime, your job here is to type a name for the event whose photos you’re about to import. It could be Disney Trip, Casey’s Birthday, or Baby Meets Lasagna, for example—anything that will help you organize and find your pictures later.
Tip
See the Split Events checkbox at the bottom of the iPhoto window? If you turn it on, iPhoto will automatically group the imported pictures into Events, as described above; you won’t, however, be offered the chance to name the Events (except for the first one) until after the importing is over.
If this option is turned off, then all the photos will end up in one giant Event. (You can split up this one giant batch into several Events later.)
Click the appropriate button: Import Selected or Import All.
If you selected just some of the photos in step 1, then the Import Selected button springs to life. Clicking it brings only the highlighted photos onto your Mac, and ignores the rest of the camera’s photos.
If you click Import All, well, you’ll get all of the photos on the card, even if only some are selected.
Note
At this point, you might see a special message if you’re about to import photos you’ve already imported (Figure 1-4, top).
In any case, iPhoto swings into action, copying each photo from your camera to your hard drive. You get to see them as they parade by (Figure 1-4, bottom).
When the process is complete and the photos are safe on your hard drive, iPhoto has another question for you: Do you want to delete the transferred pictures from the memory card?
If you click Delete Photos, iPhoto deletes the transferred photos from the memory card (either all the photos or just the selected ones, depending on the button you clicked at the beginning of step 3). The photos are gone forever, but your memory card will have that much more free space for another exciting photo safari.
If you click Keep Photos, then iPhoto leaves the memory card untouched. You might opt for this approach if you’ve adopted the “use the card as a backup” lifestyle described on Connecting with a USB Camera. (You can always use the camera’s own menus to erase its memory card.)
“Eject” the camera by clicking the
 button next to its name in the Source
list.
button next to its name in the Source
list.Or, if the
button doesn’t appear, just drag the
camera’s icon directly onto the Trash icon in the Source list (you
can also Control- or right-click the icon and choose Unmount from
the shortcut menu). You’re not actually throwing the camera away,
of course, or even the photos on it—you’re just saying, “Eject
this.” Even if the camera’s still attached to your Mac, its icon
disappears from the Source list.At last, your freshly imported photos appear in the main iPhoto window, awaiting your organizational talents.
Turn off the camera, and then unplug it from the USB cable.
You’re ready to start having fun with your new pictures.

USB Card Readers
A USB memory card reader offers another convenient way to transfer photos into iPhoto. Most of these card readers, which look like tiny disk drives, are under $20, and some can read more than one kind of memory card.
Note
New iMacs and many Mac laptop models have a memory-card slot built right in. It fits the SD cards used in the huge majority of digital cameras. (A few SLR models use Compact Flash cards, and some older Sony and Olympus cameras accept only Memory Stick and xD cards, respectively; in those cases, the Mac’s built-in card slot won’t help you.)
If you have a reader, then instead of connecting the camera to the Mac, simply remove the camera’s memory card and insert it into the reader (which you can leave permanently connected to the Mac). iPhoto recognizes the reader as though it’s a camera and offers to import the photos—all of them or some of them—just as described on the previous pages.
This method offers several advantages over the camera-connection method. First, it’s faster and eliminates the battery drain involved in pumping the photos straight off the camera. Second, it’s less hassle to pull a memory card out of your camera and slip it into your card reader (which is always plugged in) than it is to constantly plug and unplug camera cables. Finally, this method lets you use almost any digital camera with iPhoto, even those too old to include a USB cable connector.
Tip
iPhoto doesn’t recognize most camcorders, even though most models can take still pictures. Some camcorders also have a “memory card” connection option that makes the camcorder act like, well, a memory card when it’s attached to your Mac. If that doesn’t work, many camcorders store their stills on a memory card just as digital cameras do, so a memory card reader is exactly what you need to get those pictures into iPhoto.
Connecting a USB card reader is almost identical to connecting a camera. Here’s how:
Pop the memory card out of your camera, and then insert it into the reader.
Of course, the card reader should already be plugged into the Mac’s USB jack.
As when you connect a camera, iPhoto displays the thumbnails of all the photos on the card, and offers you a chance to type an Event name and description.
Click Import All (or Import Selected).
iPhoto swings into action, copying the photos off the card. When you’re asked how you want iPhoto to deal with the originals on the memory card, click either Delete Photos or Keep Photos.
Click the Eject button (
) next to the card’s name in the Source
list, and then remove the card from the reader.Put the card back into the camera, so it’s ready for more action. There’s nothing worse than grabbing your camera to capture a prize-winning shot and finding that you forgot to put the memory card back in.
Importing Photos from Really Old Cameras
If your camera doesn’t have a USB connection and you don’t have a memory card reader, you’re still not out of luck.
First, copy the photos from your camera/memory card onto your hard drive (or other disk) using whatever software or hardware came with your camera. Then bring them into iPhoto as you would any other graphics files, as described next.
Importing Existing Graphics Files
iPhoto is also delighted to help you organize digital photos—or any other kinds of graphics files—that are already on your computer, like in a folder somewhere.
For years, Mac fans complained about the way iPhoto handled photos that were already on the hard drive: When you imported them into iPhoto, the program duplicated them. So you wound up with one set inside iPhoto’s proprietary library package (What all those numbers mean) in addition to the original folder full of photos. Disk space got eaten up rather quickly as a result. This system also meant that iPhoto couldn’t simultaneously track photos that resided on more than one hard drive.
But today’s iPhoto can track, organize, edit, and process photos on your hard drive(s) right in the folders that contain them. The program doesn’t have to copy them into the iPhoto library, meaning it doesn’t have to double their disk-space consumption.
This is a blessing if you already have folders filled with photos. You can drag them directly into iPhoto’s Source list (or the main viewing area). iPhoto acts like it’s importing them, but doesn’t really. Yet you can work with them exactly like the ones iPhoto socked away into its own library.
When you connect most cameras to a Mac, the memory card shows up as a disk icon at the upper-right corner of your desktop, as shown here.
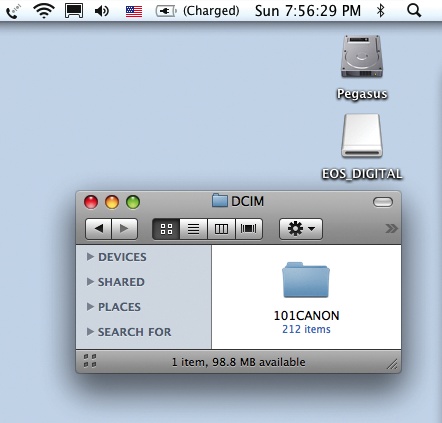
You get the same effect when you insert a memory card into a card reader attached to your Mac.
In the disk window, you’ll usually find several folders, each cryptically named by the camera’s software. One contains your photos; another may contain movies.
In the iPhotos of years gone by, you could perform a sneaky trick with this icon. By opening this “disk” icon, you could selectively delete or copy photos from the card. But since iPhoto now offers that feature right within the program, there’s no need to muck around with the desktop card icon.
Except in one situation.
Finding the folder that contains the memory card’s photos is still the only way to copy photos from your hard drive to your camera (if you like keeping photos on your camera in order to show them off, for example). Just drag photos to the “disk” icon in the Finder, either from another Finder window or even right out of the iPhoto window.
If you choose to go this route, here are a few tips and notes:
Very ugly things will happen in iPhoto if you delete a photo “behind its back,” in the Finder (meaning you also emptied your Mac’s trash). When you try to open or edit one of the deleted photos in iPhoto, an error message will appear, offering you the chance to locate the photo manually. And if you can’t find it, then the photo opens up as a huge, empty, gray rectangle filled with an exclamation point. (You kind of know what the program means.)
On the other hand, iPhoto is pretty smart if you rename a photo in the Finder, or even drag it to a different folder.
Apple doesn’t really want this feature publicized, hopes you won’t try it, and won’t say how iPhoto manages to track pictures that you move around even when the program isn’t running.
But it works. Moved or renamed photos still appear in iPhoto, and you can still open, edit, and export them. However, you may have to do a lot of manual reorganizing.
If you delete a photo within iPhoto, you’re not actually deleting it from your Mac. It’s still sitting there in the Finder, in the folder where it’s always been. You’ve just told iPhoto not to track that photo any more.
Using this feature, you can use iPhoto to catalog and edit photos that reside on multiple hard drives—even other computers on the network. Just make sure those other disks are “mounted” (visible on your screen) before you attempt to work with them in iPhoto.
On the other hand, iPhoto’s offline smarts don’t make it a good choice for managing photos on CDs, DVDs, or other disks that aren’t actually connected to, or inserted in, your Mac.
Internal or External?
Now, it’s nice that iPhoto can track external photos without having to make its own private copies. But the old way had some advantages, too. When iPhoto copies photos into its own library, they’re safer. For example, you can back up your iPhoto library, content in the knowledge that you’ve really backed up all your photos (instead of leaving some behind because they’re not actually in the library).
Tip
Time Machine, Apple’s automated back-up program, backs up your main hard drive, too—yet another reason why it’s safer to store your photos internally than externally.
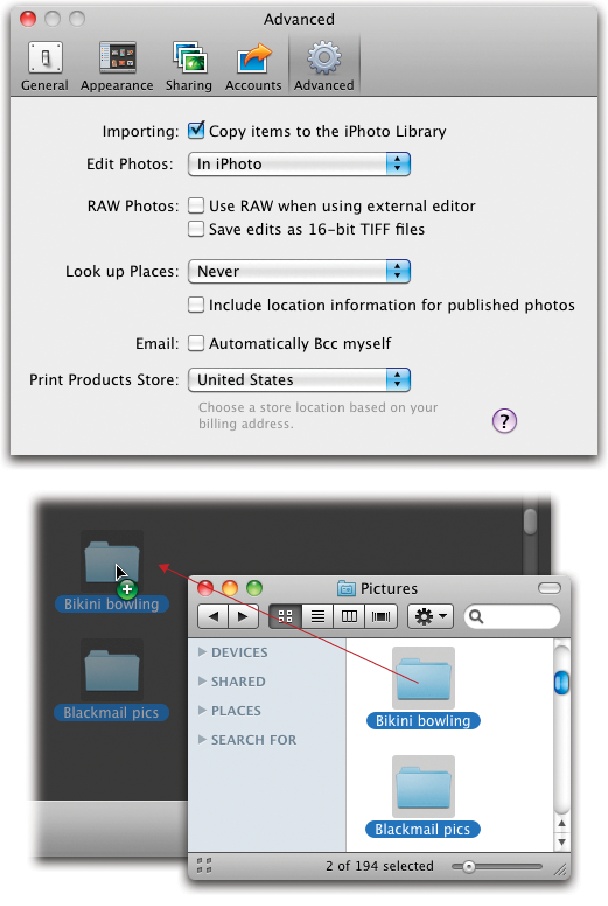
Fortunately, how iPhoto behaves when you import graphics files is entirely up to you. It can either copy them into its own library or it can track photos in whatever Finder folders they’re already in. You make this choice for future imports in iPhoto’s Preferences (Figure 1-5, top); choose iPhoto→Preferences to open it.
Dragging into iPhoto
No matter what choice you make in the Preferences dialog box, the easiest way to import photos from your hard drive is to drag them into the main iPhoto window. You can choose from two methods:
Drag the files directly into the main iPhoto window, which automatically starts the import process. You can also drop an entire folder of images into iPhoto to import the contents of the whole folder, as shown at the bottom of Figure 1-5. You can even drag a bunch of folders at once.
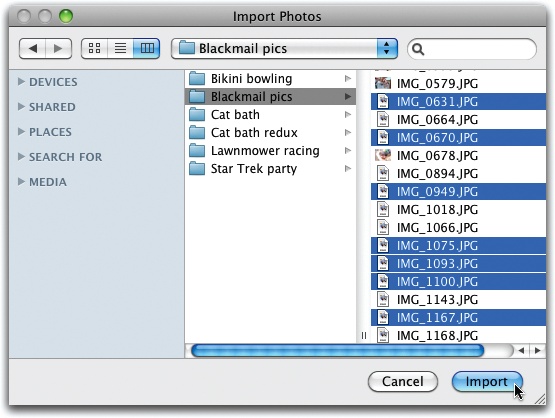
Choose File→Import to Library (or press Shift-⌘-I) in iPhoto and then select a file or folder in the Import Photos dialog box, shown in Figure 1-6.
These techniques also let you select and import files from other hard drives, CDs, DVDs, iPods, flash drives, or other disks on the network.
Tip
Take the time to name your folders intelligently before dragging them into iPhoto, because the program retains their names. If you drag a folder directly into the main photo area, then you get a new Event named for the folder; if you drag the folder into the Source list on the left side of the screen, then you get a new album named for the folder. And if there are folders inside folders, then they too become new Events or albums. Details on all this reside in Chapter 2.
Side Doors into iPhoto
Don’t look now, but Apple has been quietly creating other ways to get photos into iPhoto, directly from other programs on your Mac.
For example, if you use the Mail program of Mac OS X 10.6 (Snow Leopard) and someone sends you a photo, you can pop it directly into iPhoto from within the email message. Just click the little Save button that appears above the body of the message. From the pop-up menu, choose Add to iPhoto.
You can also send pictures to iPhoto right from the Finder. Highlight some icons and then press the space bar to open the Quick Look preview. Once the preview opens, you see a couple of icons at the bottom of the window: Full Screen and Add to iPhoto. In fact, the same button appears anywhere slideshows are found in Mac OS X, including Preview and Mail—once a slideshow is under way, wiggle your mouse to summon the slideshow control bar.
Both of those handy buttons deposit a copy of the photo directly into your iPhoto collection, even if iPhoto isn’t open at the time. (Actually, there’s a folder named Auto Import lurking deep inside iPhoto that automatically imports any photos you drag into it. Skip to Workflow pane for details.)
The File Format Factor
iPhoto can’t import digital pictures unless it understands their file formats, but that rarely poses a problem. Every digital camera on earth can save its photos as JPEG files—and iPhoto handles this format beautifully. (JPEG is the world’s most popular file format for photos because, even though it’s compressed to occupy a lot less disk space, the visual quality is still very high.)
But iPhoto ’11 imports and recognizes some very useful additional formats.
Most people think of iPhoto as a photo-management program. But thanks to a sneaky command that Apple has added to every program, iPhoto can now serve as a document-management program, too.
Thanks to this command, iPhoto has become a convenient, centralized, well-organized database of documents. You can keep drafts or final copies of all your work, ready to be searched, sorted, emailed, printed, cropped, even laid out and custom published as a hardcover book. (Are you listening, authors, lawyers, and real estate agents?)

The key to all this magic is the “Save PDF to iPhoto” command. It’s sitting there even now, in almost every program on your Mac. So why haven’t you seen it? Because it’s hidden.
Start in the program where you’ve done the work: a word processor, database, layout program, sheet-music program, web design program, whatever. Choose File→Print. In the Print dialog box, click the PDF button. From the pop-up menu, choose “Save PDF to iPhoto.”
In a moment, a funny little dialog box appears, asking which iPhoto album you want this PDF document stored in. Choose an existing album or create a new one, and then click OK.
Now you arrive in iPhoto, where your newly hatched PDF document is ready to inspect. Open it for editing just as you would any photo (see Chapter 2). Now you can page through it using the Previous and Next controls; print or send it using the toolbar controls; edit it like a graphic; apply searchable keywords, description text, or ratings to it; and so on. The only limit is your imagination.
Raw Files
Most digital cameras work like this: When you press the shutter button, the camera studies the data picked up by its sensors. The circuitry then makes decisions pertaining to sharpening level, contrast and saturation settings, color “temperature,” and so on—and then saves the resulting processed image as a compressed JPEG file on your memory card.
For millions of people, the resulting picture quality is just fine, even terrific. But all that in-camera processing drives professional photographers nuts. They’d much rather preserve every last iota of original picture information, no matter how huge the resulting file on the memory card—and then process the file by hand once it’s been safely transferred to their Macs.
That’s the idea behind Raw, which is an option in many pricier digital cameras. (Raw stands for nothing in particular, so there’s no good explanation for why it’s so often written in all capitals.)
A Raw image isn’t processed at all; it’s a complete record of all the data passed along by the camera’s sensors. As a result, each Raw photo takes up much more space on your memory card. For example, on a 6-megapixel camera, a JPEG photo is around 2 MB, but the same picture is over 8 MB when saved as a Raw file. Most cameras take longer to store Raw photos on the card, too.
But for image-manipulation nerds, the beauty of Raw files is that once you open them up on your Mac, you can perform astounding acts of editing on them. You can actually change the lighting of the scene—retroactively! And you don’t lose a single speck of image quality along the way.
Until recently, most people used a program like Camera Raw (which comes with Photoshop and Photoshop Elements), Lightroom, or Aperture to do this kind of editing. But amazingly enough, humble, cheap little iPhoto ’11 can edit Raw files, too. For the full scoop, see Chapter 5.
Note
Not every camera offers an option to save your photos as Raw files. And among those that do, not all are iPhoto compatible. Apple maintains a partial list of compatible cameras at http://support.apple.com/kb/HT3825. (Why are only some cameras compatible? Because Raw is a concept, not a file format. Each camera company stores its photo data in a different way, so in fact, there are dozens of different file formats in the Raw world. Programs like iPhoto must be upgraded periodically to accommodate new camera models’ emerging flavors of Raw.)
Movies
In addition to still photos, today’s digital cameras can also capture digital movies. These are no longer jittery, silent affairs the size of a Wheat Thin; modern cameras capture full-blown, 30-frames-per-second, fill-your-screen movies—even high-definition movies.
Movies eat up a memory card fast, but you can’t beat the convenience, and the quality comes breathtakingly close to camcorder quality. (Recent camera models can even zoom and change focus while “filming,” just like a camcorder.)
Fortunately, iPhoto can import and organize them. The program recognizes .mov files, .avi files, and many other movie formats. In fact, it can import any format that QuickTime Player (the program on your Mac that actually plays these movies) recognizes, which is a very long list indeed.
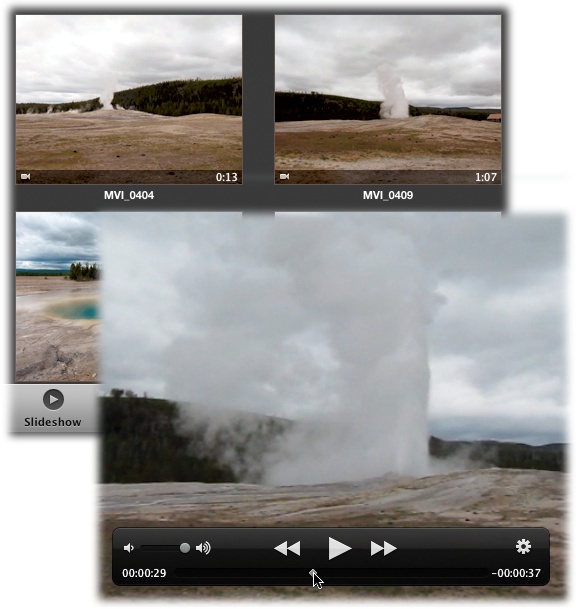
You don’t have to do anything special to import movies; they get slurped in automatically. You can even play them without leaving iPhoto, as Figure 1-7 shows.
Tip
iPhoto ’11 also lets you trim footage from the beginning and end of your movie clips. Movies from Your Camera tells you how.
Other graphics formats
Of course, iPhoto also lets you load pictures that have been saved in a number of other file formats, too—including a few unusual ones. Here’s what it can handle:
TIFF. Most digital cameras capture photos in a graphics file format called JPEG. Some cameras, though, offer you the chance to leave your photos uncompressed on the camera, in what’s called TIFF format. These files are huge—in fact, you’ll be lucky if you can fit one TIFF file on the memory card that came with the camera. Fortunately, they retain 100 percent of the picture’s original quality.
Note, however, that the instant you edit a TIFF-format photo (Chapter 5), iPhoto converts it into JPEG.
That’s fine if you plan to order prints or a photo book (Chapter 9) from iPhoto, since JPEG files are required for those purposes. But if you took that once-in-a-lifetime, priceless shot as a TIFF file, then don’t do any editing in iPhoto—don’t even rotate it—if you hope to maintain its perfect, pristine quality.
GIF is the most common format used for non-photographic images on web pages. The borders, backgrounds, and logos you typically encounter on websites are usually GIF files—as well as 98 percent of those blinking, flashing banner ads that drive you insane.
PNG and FlashPix are also used in web design, though not nearly as often as JPEG and GIF. They often display more complex graphic elements.
PICT was the original graphics file format of the Macintosh before Mac OS X. When you take a screenshot from Mac OS 9, paste a picture from the Clipboard, or copy an image from the Scrapbook, you’re using a PICT file.
Photoshop refers to Adobe Photoshop, the world’s most popular image-editing and photo-retouching program. iPhoto can even recognize and import layered Photoshop files—those in which different image adjustments or graphic elements are stored in sandwiched-together layers. (If you want to learn more, there’s a Missing Manual on Photoshop, too.)
Figure 1-7. Top: The first frame of each video clip shows up as though it’s a photo in your library; only a little camera icon and the total running time let you know that it’s a movie and not a still image. Bottom: Double-click a movie in iPhoto ‘11 to open it up at full size and play it. iPhoto is no iMovie, though; you can view and trim the length of the movie, but that’s it (you can’t rotate movies or edit specific scenes, for example). See Chapter 10 for details on editing them in iMovie, or trimming them with iPhoto and QuickTime Player X. It’s nice to see Old Faithful is still being faithful!MacPaint is the ancient file format of Apple’s very first graphics program from the mid-1980s. No, you probably won’t be working with any MacPaint files in iPhoto, but isn’t it nice to know that if one of these old, black-and-white, 8 x 10 pictures, generated on a vintage Mac SE happens to slip through a wormhole in the fabric of time and land on your desk, you’ll be ready?
SGI and Targa are specialized graphics formats used on high-end Silicon Graphics workstations and Truevision video-editing systems.
PDF files are Portable Document Format files that open up in Preview. They might be user’s manuals, brochures, or Read Me files that you downloaded or received on a disc.
As of version ’09, iPhoto is a better PDF reader than ever. You can open a PDF document at full-screen size, page through it, and even crop or edit it as though it were a photo. In fact, Mac OS X makes it extra easy to create PDFs and stash them in iPhoto all in one step, as described in the box on Saving Everyday Documents into iPhoto.
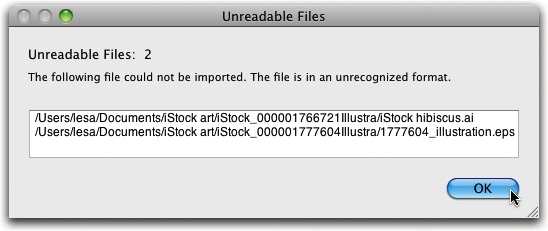
If you try to import a file that iPhoto doesn’t understand, you see the message shown in Figure 1-8.
The Post-Import Inspection
Once you’ve imported a batch of pictures into iPhoto, what’s the first thing you want to do? If you’re like most people, this is the first opportunity you have to see, at full-screen size, the masterpieces you and your camera created. After all, until this moment, the only sight you’ve had of your photos was on the little screen on the back of the camera.
There’s a great way to go about inspecting your pictures after you’ve imported them: the old “double-click to magnify” trick.
Once you’ve imported some pictures, click the Last Import icon in the Source list. In the main iPhoto window, you’re now treated to a soon-to-be-familiar display: a grid of thumbnails. In this case, they represent the pictures you just imported.
Double-click the first one. If all goes well, it swells to fill
the main part of the iPhoto window. If you’re feeling frisky, click the
new ![]() button at the bottom left of the iPhoto window;
your photo commandeers every last pixel on your monitor, as shown in Figure 1-9.
button at the bottom left of the iPhoto window;
your photo commandeers every last pixel on your monitor, as shown in Figure 1-9.
After the shock of seeing the giant-sized version of your photo
has worn off, press the ![]() key on your keyboard to bring the second one into
view. Press it again to continue walking through your imported
photos.
key on your keyboard to bring the second one into
view. Press it again to continue walking through your imported
photos.
This is the perfect opportunity to throw away lousy shots, fix the rotation, and linger on certain photos for more study. You can even apply a rating with a keyboard shortcut; later, you can use these ratings to sort your pictures or create smart albums. See Chapters Chapter 2, Chapter 3, and Chapter 4 for full details on smart albums and ratings.
Here’s the full list of things you can do as you walk through the magnified pictures, whether you opted for Full Screen view or not:
Double-click the photo to demagnify it. You return to the window full of thumbnails. (Double-click another one to magnify it and return to the inspection process.)
Figure 1-9. iPhoto’s new Full Screen view is available anywhere within iPhoto, whether you’re browsing Events or Albums, editing your photos, or creating a project. While you’re in this view, you can walk through your new photos using the arrow keys on your keyboard or by clicking images in the new filmstrip at the bottom of your screen. To bring back the iPhoto menu system, just mouse up to the top of your monitor. To exit Full Screen view, click the Full Screen button again or press the Esc key.Press the
 and
and  keys on your keyboard to browse back and
forth through your photos, or use the new filmstrip at the bottom of
the iPhoto window.
keys on your keyboard to browse back and
forth through your photos, or use the new filmstrip at the bottom of
the iPhoto window.Press the Delete key on your keyboard to send a photo to iPhoto’s Trash can.
Give each photo a star rating, from 1 (terrible) to 5 (terrific). To do that, press ⌘-1 through ⌘-5 (or press ⌘-0 to remove the rating). Chapter 3, which explains how to find and flag photos, also tells you how add star ratings in a variety of ways (Ratings).

Tip
You don’t actually see the stars appear unless you open the Info panel by clicking the little Info button at the bottom right of the iPhoto window.
Control-clicking a photo displays a shortcut menu that gives you access to more goodies:
Click the Rotate button to flip a photo counterclockwise, 90 degrees at a time. (Option-click the button to rotate the photo clockwise instead.)
Click the Hide button to hide a photo, which isn’t the same as deleting it. The photo’s out of your way, but it’s still in your library, and you can always bring it back. You can accomplish the same thing (without Control-clicking first) by pressing ⌘-L. Either way, the now-hidden photo disappears from the filmstrip at the bottom of your iPhoto window, but it stays onscreen (sigh). More on hiding photos appears on Hiding Photos.
Click the Trash button to throw your photo into iPhoto’s very own Trash can (Description as captions).
Edit the image in iPhoto by choosing “Edit in iPhoto,” or open it in another program (say, Photoshop Elements) by choosing “Edit in External Editor” (see Editing in another program).
If you Control-clicked a photo while viewing an Event, you can make this photo the key photo (the icon thumbnail) for the Event by choosing Make Key Photo. You’ll learn all about key photos on The Events List.
The other buttons on the bottom-edge toolbar offer ways to view info about your pictures; edit photos; create projects; add photos to an album, slideshow, or project; and share photos in myriad ways. You’ll learn about all your options in the coming chapters.
Where iPhoto Keeps Your Files
Having entrusted your vast collection of digital photos to iPhoto, you may find yourself wondering, “Where the heck is iPhoto putting all those files, anyway?”
Most people slog through life, eyes to the road, without ever knowing the answer. After all, you can preview, open, edit, rotate, copy, export, and print all your photos right in iPhoto, without actually opening a folder or double-clicking a single JPEG file.
Even so, it’s worthwhile to know where iPhoto keeps your pictures on your hard drive. Armed with this information, you can keep those valuable files backed up and avoid the chance of accidentally throwing them away 6 months from now when you’re doing a little digital spring cleaning.
A Trip to the Library
As you now know, when you import pictures into iPhoto, the program generally makes copies of them, leaving your original files untouched. (Of course, if you tell iPhoto to erase your camera’s memory card after importing, then the originals aren’t untouched—they’re obliterated. But you get the point.)
The question is: Where do they all go?
iPhoto stores its copies of your pictures in a special folder called iPhoto Library, which you can find in your Home→Pictures folder. If the short name you use to log into Mac OS X is mozart, then the full path to your iPhoto Library folder from the main hard drive window would be Macintosh HD→Users→mozart→Pictures→iPhoto Library.
Now, if you’re following along in the comfort of your own living room, you might be objecting to the description of the iPhoto Library. “Hey,” you might be saying, “that’s not a folder! In old versions of iPhoto, it was a folder. But I can’t open this one to see what’s inside. So it’s not a folder.”
OK, you’ re right—it’s not an ordinary folder. It’s a package.
In Mac OS X, packages or bundles are folders that behave like single files. For example, every properly written Mac OS X program looks like a single, double-clickable application icon. Yet to the Mac, it’s actually a folder that contains both the actual application icon and all of its hidden support files. (Even documents can be packages, including iDVD project files, iMovie files, and some TextEdit documents.)
As it turns out, iPhoto ’11’s library is a package, too. It may look like a single icon called iPhoto Library, sitting in your Home→Pictures folder. But it’s actually a folder, and it’s absolutely teeming with the individual JPEG files that represent your photos.
If you’d like to prove this to yourself, try this experiment: Choose Go→Home. Double-click the Pictures folder. See the iPhoto Library icon? Control-click it or right-click it. From the shortcut menu, choose Show Package Contents. (You’re asking Mac OS X to show you what’s inside the iPhoto Library.) Voilà! The iPhoto Library package window opens.
Tip
You should back up your iPhoto Library regularly—using the Share→Burn command to save it onto a CD or DVD, for example. After all, it contains all the photos you import into iPhoto, which, essentially, is your entire photography collection. Chapter 13 offers much more on this important file-management topic.
What all those numbers mean
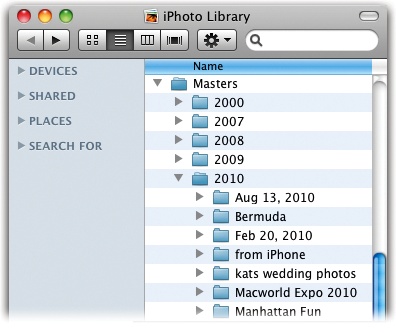
Within the iPhoto Library, you’ll find a set of mysteriously numbered files and folders. At first glance, this setup may look bizarre, but there’s a method to iPhoto’s madness. It turns out that iPhoto meticulously arranges your photos within these numbered folders according to the creation dates of the originals, as explained in Figure 1-10.
Other folders in the iPhoto Library
In addition to the numbered folders, you’ll find several other items nested in the iPhoto Library window, most of which you can ignore:
AlbumData.xml. Here’s where iPhoto stores access permissions for the various photo albums you’ve created within iPhoto. (Albums, which are like folders for organizing photos, are described in Chapter 2.) For example, it’s where iPhoto keeps information on which albums are available for sharing across the network (or among accounts on a single machine). Details on sharing are in Chapter 8.
Library.data, Library.iPhoto, Library6.iPhoto. These are iPhoto’s for-internal-use-only documents. They store information about your iPhoto Library, such as which keywords you’ve used, along with the image dimensions, file size, rating, and modification date for each photo.
Masters. This folder (called Originals in previous versions of iPhoto) is the real deal: It’s the folder that stores your entire photo collection. Inside, you’ll find nested folders organized in the year/month/day structure illustrated in Figure 1-10.
This folder is also the key to one of iPhoto’s most remarkable features: the “Revert to Original” command.
Whenever it applies any potentially destructive operations to your photos—like cropping, red-eye removal, brightening, or black-and-white conversion—iPhoto duplicates the files and stuffs the edited copies in the Previews folder. The pristine, unedited versions remain safe in the Masters folder. If you later decide to scrap your changes to a photo using the “Revert to Original” command (Scrolling Tricks)—even months or years later—then iPhoto ditches the duplicate. What you see in iPhoto is the original version, preserved in its originally imported state.
Previews. In earlier iPhotos, this folder was named Modified. It’s where the program keeps the latest versions of your pictures, as edited. (Remember, behind the scenes, iPhoto actually duplicates a photo when you edit it.)
Thumbnails. This folder contains index card-sized previews of your pictures—jumbo thumbnails, in effect—organized in the year/month/day structure shown in Figure 1-10.
Look, but don’t touch
While it’s enlightening to wander through the iPhoto Library window to see how iPhoto keeps itself organized, don’t rename or move any of the folders or files in it.
You should do all your photo organizing within the iPhoto program, not behind its back in the library. Making changes in the Finder will confuse iPhoto to the point where it will either be unable to display some of your photos or it’ll just crash.
And that, by the way, is precisely why the iPhoto Library is now a package (which takes some effort and knowledge to open) instead of a regular folder. Apple Tech Support evidently got one too many phone calls from clueless Mac users who’d opened the iPhoto Library manually and wound up deleting or damaging their photo collections.
Get iPhoto '11: The Missing Manual now with the O’Reilly learning platform.
O’Reilly members experience books, live events, courses curated by job role, and more from O’Reilly and nearly 200 top publishers.

