Chapter 4. Software Instruments (MIDI)
As you know from the previous chapters, GarageBand’s loops can provide hours of fun and profit even if you don’t have a lick of musical training. If you have some semblance of musical chops, though, GarageBand can quickly take you to the next level of creativity. It can record your live keyboard performances, whether you’re a painstaking, one-note-at-a-time plunker or a veteran of Carnegie Hall.
To generate the notes that GarageBand records, you can play either an external musical keyboard or an onscreen one. Either way, the cool part is that you can combine your own performances with GarageBand’s other tools. For example, some people use GarageBand’s loops to create a rhythm section—a backup band—and then they record a new solo on top. Other people ignore the loops altogether and play all of the parts themselves, one instrument at a time, using GarageBand as a multitrack “tape recorder.”
Anything you record like this shows up in green GarageBand regions. If you made it through Chapter 1, you now know that these regions contain MIDI information (that is, note data that you can edit). If you played a wrong note, no biggie—just drag it onto a different pitch, or delete it altogether. If your rhythm wasn’t perfect, so what? No human being’s rhythm is perfect (at least compared to a computer’s), not even that of rock star millionaires. GarageBand can fix it for you.
How to Feed a Hungry GarageBand
To record a musical performance in this way, you need some way to feed GarageBand a stream of live musical data. You can do so in any of several ways:
Use the onscreen, mouse-clicky keyboard. That is, click the keys of GarageBand’s own, built-in, onscreen piano keyboard. Until Apple invents a 10-button mouse, however, this onscreen keyboard limits you to playing only one note at a time. Unfortunately, it’s very clunky; it’s like playing a piano with a bar of soap.
But it’s free, it’s built-in, and it’s handy for inputting the occasional slow solo line or very brief musical part.
Use your Mac’s alphabet keyboard. A great new feature of GarageBand 2 turns your regular typing keyboard into a musical keyboard. You don’t get much expressive capability, since pressing the letter keys harder or softer doesn’t produce any difference in sound. Still, at least you can play chords this way, and you can use your fingers instead of the mouse.
Connect a MIDI controller. MIDI (pronounced “middy”), you may recall from Chapter 1, stands for musical instrument digital interface. It’s an electronic language that lets musical equipment and computers communicate over a cable.
Because your Mac is perfectly capable of playing any of hundreds of musical-instrument sounds (like the ones built into GarageBand), you don’t really need an electronic keyboard that can produce sounds. All you really need is one that can trigger them.
That’s the point of a MIDI controller; it looks and feels like a synthesizer keyboard, but produces no sounds of its own. It makes music only when it’s plugged into, for example, a Mac running GarageBand.
Apple sells (or, rather, resells) a MIDI controller for $100 called the M-Audio Keystation 49e. If you can live with 49 keys, it’s a very nice keyboard. It draws its power directly from your USB jack, so you don’t need a power adapter, and it’s velocity-sensitive, which means that its keys are touch-sensitive. The harder you play, the louder the piano sound, for example.
Connect a MIDI synthesizer. If you already own a MIDI synth—an electronic keyboard that provides an assortment of sounds and has MIDI connectors on the back—there’s no point in buying a MIDI controller. You can connect the keyboard directly to your Mac and use it the same way, and simply ignore the keyboard’s own sound banks.
Some synthesizers can connect straight to your Mac with a USB cable. Most, however, require a MIDI interface, a box with nickel-sized MIDI In and Out connectors on one side, and a USB cable for your Mac on the other.
The following pages explain these musical input methods one by one.
Your FREE! Onscreen Digital Piano
When you fire up a new GarageBand document (on a Mac with no physical MIDI keyboard connected), the GarageBand keyboard appears automatically in a floating window. This onscreen piano is a gift from Apple to people who would like to record notes of their own (instead of just using loops), but don’t own a physical MIDI keyboard (Figure 4-1).
Clicking the keys of this little keyboard with your mouse plays the instrument sound of whatever Software Instrument (green) track is currently selected. (The corresponding instrument name appears at the top of the keyboard.)
The onscreen keyboard is a pretty bare-bones beast. For example, it lets you play only one note at a time.
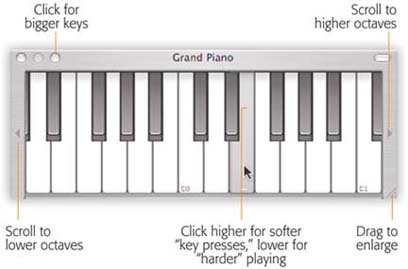
But the onscreen keyboard also harbors two secrets that you might not discover on your own. First, it actually has more keys than the 88 of a real piano—well over 10 octaves’ worth of keys! To reveal the keyboard’s full width, drag its lower-right ribbed resize handle. Or just scroll the keyboard by clicking the tiny gray triangles on either end.
Second, you can actually control how hard you’re "playing” the keys. No, not by mashing down harder on the mouse button. Instead, you control the pressure on the keys by controlling the position of your mouse when it clicks. Click higher up on the key to play softer; click lower down to play harder.
Playing harder usually means playing louder, but not always. Depending on the Software Instrument you’ve picked, hitting a key harder may change the nature of the sound, not the volume. More on this topic in the box on Section 4.2.
For instructions on using the onscreen keyboard to record, skip ahead to Section 4.5.
The Mac Keyboard as Piano
It’s nice that Apple provided a little onscreen keyboard so that even the equipment-deprived can listen to GarageBand’s amazing sound collection. But you’ll never make it to the Grammy Awards using nothing but that single-note, mouse-driven display.
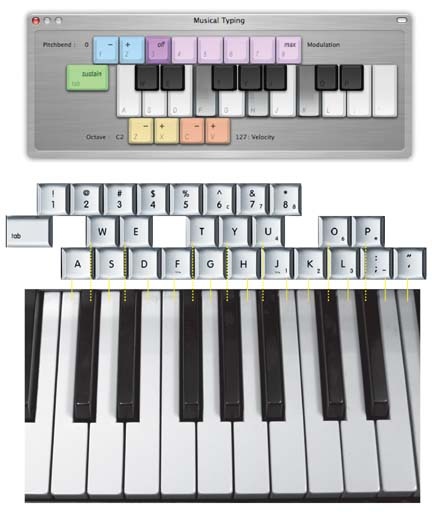
Fortunately, a new feature called Musical Typing lets you trigger notes by playing, rather than clicking. This feature turns your Mac keyboard into a piano keyboard. It even lets you play polyphonically—that is, you can play more than one note at a time. (Six-note chords are the maximum.)
Note
The Mac’s keyboard was never intended to be chorded, however. Indeed, it’s been carefully engineered to process only one keypress at a time, for word processing purposes. Therefore, playing chords using Musical Typing results in a subtle, mandatory rolling effect, as each note sounds a few milliseconds after the preceding one.
If the effect becomes noticeable, you can always clean up the chords after recording, using GarageBand’s quantizing feature (Section 5.5).
The row beginning with the letter A represents the “white keys”; W, E, T, Y, U, O, and P in the top row are the “black keys” (sharps and flats). As shown in Figure 4-2, having one row serve as “black keys” means that some computer keys produce no sound at all, because a real piano doesn’t have a black key next to every white key. No wonder using Musical Typing takes some getting used to.
Tip
In GarageBand 1.0, the only way to perform using your Mac keyboard was to use the shareware program MidiKeys (part of the “Missing CD” of this book’s first edition). In general, the Musical Typing feature is a heck of a lot easier to set up and use, but you still need MidiKeys if you want to play with both hands at once, using two different rows of keys.
Nonetheless, it’s a powerful tool for scratching out GarageBand pieces when you’re on a plane, on a bus, in bed, and anywhere else where lugging along an external keyboard would get you arrested, expelled, or divorced.
Musical Typing
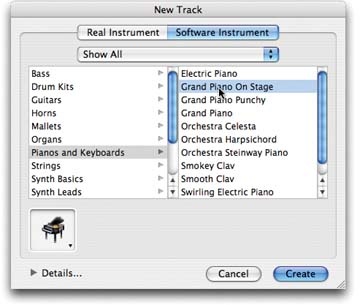
To use Musical Typing, create a Software Instrument (green) track in GarageBand. (One way is to choose Track → New; in the New Track dialog box, click Software Instrument. Choose an instrument from the right-side column, and then click OK.)
Now open the Musical Typing window by choosing Window → Musical Typing, or by pressing Shift-c-K.
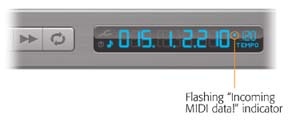
Once its keyboard appears (Figure 4-2), try playing a few “keys” on the A row of your Mac’s keyboard. You’ll see the Musical Typing piano keys change color, you’ll hear the corresponding notes play in GarageBand, and you’ll see a flickering “light” in the time display (Figure 4-4). It tells you that GarageBand is receiving MIDI musical data.
At this point, you can use Musical Typing like it’s a MIDI controller keyboard, including making GarageBand recordings (Section 4.5).
Control of Key Velocity
There’s only one problem with using Musical Typing as you’ve read about it so far: you can’t control the key velocity (Section 4.2) as you play. (Apple never designed the typing keyboard to be touch-sensitive, although the idea is intriguing. What would it do—make the letters bolder the harder you hit the keys?)
The solution is to tap the C and V keys—repeatedly, if necessary—to simulate “softer” and “harder” key presses. This is not exactly a simple task when you’re using both hands in the middle of a Rachmaninoff concerto, but if you record one hand at a time, riding the C and V keys with the other hand, it’s a manageable arrangement.
Of course, you may also want to record your track with no velocity adjustments, and then adjust the key velocities later by editing the track (Section 5.6).
Tips and Tricks
Other than handling key velocity, Musical Typing does the best conceivable job of turning your Mac into a bona fide musical instrument. Here are some of its finer points:
Shift the entire keyboard up or down an octave at a time by tapping the X and Z keys, respectively.
“Press the piano’s sustain pedal” by pressing Tab. Press once to “step on the pedal,” press a second time to “release it.”
“Turn the mod wheel” by pressing 4 through 8; see Section 4.9 for details on the mod wheel. (Higher numbers trigger greater turns of the modulation wheel.) Press 3 to turn off modulation altogether.
“Turn the pitch-bend wheel” by holding down the 1 key, or bend it up by holding down 2. (Alas, you can’t control how much you “turn the wheel.” You always get a pitch bend of 20 units up or down, on a scale of 0 to 127.)
While Musical Typing is quite useful for recording new tracks, it’s also extremely handy when choosing an instrument sound for a track.
Think about it: Ordinarily, when the New Track dialog box appears (Figure 4-3), GarageBand offers no way for you to hear what each listed sound sounds like (unless you have an external MIDI keyboard). Most people wind up laboriously clicking a sound’s name, closing the dialog box, clicking the keys on the GarageBand onscreen keyboard, double-clicking the track name to reopen the Track Info dialog box, and then repeating the whole ritual over and over.
But with Musical Typing’s window open, you can click an instrument’s name and then play a few notes on your Mac’s keyboard to hear what it sounds like—all without leaving the Track Info dialog box.
If you fool around here long enough, you’ll find some surprising selections, including sound effects, exotic percussion instruments, and traditional instruments that have been processed in wild, sometimes musically inspiring ways.
MIDI Synths and Controllers
The best way to record keyboard performances, though, is to bite the bullet, break the bank, and buy an actual, external MIDI musical instrument. As noted earlier in this chapter, it might take any of these forms:
A MIDI controller. Apple, for instance, sells an M-Audio keyboard for $100. The only cable required is its USB cable, which connects to your Mac’s USB port.
That’s not the only controller worth considering, of course. If the idea of 49 keys strikes you as a bit confining, the same company also makes a 61-key model that Apple sells for $200. Online music stores like
www.samash.comsell both of these models and many others, including a full 88-key model (the same number of keys as a real piano) for $300. These more expensive keyboards have semi-weighted keys that feel more like a piano than the spring-loaded plastic keys of the 49-key model.A MIDI keyboard. This category includes synthesizers, electric pianos, Clavinovas, and so on. Some connect directly to your Mac’s USB port, but most require an adapter known as a MIDI interface, which costs about $40 at music stores.
Another MIDI instrument. Keyboards aren’t the only MIDI instruments. There are also such things as MIDI guitars, MIDI drum sets, and even MIDI gloves. They, too, generate streams of note information that GarageBand can record and play back.
Once you’ve hooked up a MIDI instrument, create a Software Instrument track and try playing a few notes. You’ll hear whatever sound you established for that track, and you’ll see the little MIDI activity light blinking in GarageBand’s time display (Figure 4-4). Now you’re ready to record.
Tip
An external instrument is also great when it’s time to choose a sound for a new track, because you can walk through the various instrument names without ever having to close the Track Info dialog box. See Figure 4-3 for more information.
Recording a MIDI Track
Whether your keyboard is on the screen or on your desk, virtual or physical, you use it to record in GarageBand the same way. Here’s the routine:
Click the track you want to fill with music.
Remember, it must be a Software Instrument (green) track.
If you don’t already have a green track ready to record, choose Track → New Track to create one. In the New Track (Track Info) dialog box, click the Software Instrument tab, and then choose the instrument sound you want (Figure 4-3). Click OK.
Turn on the metronome, if you like.
A metronome is a steady beat clicker that’s familiar to generations of musicians. By clicking away “1, 2, 3, 4! 1, 2, 3, 4!” it helps to keep you and GarageBand in sync.
Use the Control → Metronome command, or the
-U keystroke, to turn the metronome clicker on or off. (See the box on Section 4.5.)
This is a very important step. Because you’re using a sequencer (recording software) instead of a tape recorder, it makes no difference how slowly you record the part. You can record at 60 beats per minute, for example, which is basically one note per second—and then play back the recording at a virtuosic “Flight of the Bumblebee” tempo (229 beats per minute, say). Your listeners will never be the wiser.
This isn’t cheating; it’s exploiting the features of your music software. It’s a good bet, for example, that quite a few of the pop songs you hear on the radio were recorded using precisely this trick.
So how do you find a good tempo for recording? First, just noodle around on your keyboard. Find a speed that feels comfortable enough that the music maintains some momentum, but is still slow enough that you can make it through the part without a lot of mistakes.
Then adjust the GarageBand tempo slider to match. Hit the Space bar to play the music you’ve already got in place, if any, and adjust the Tempo control (Section 4.5) during the playback until it matches the foot-tapping in your head.
Position the Playhead to the spot where you want to begin recording.
If that’s the beginning, great; just press the letter Z key or the Home key. If it’s in the middle of the piece, click in the beat ruler or use the keyboard shortcuts (Section 1.6) to position the Playhead there. (Most often, though, you’ll want to put the Playhead a couple of measures before the recording is supposed to begin, as described in the next step.)
It’s very difficult to begin playing with the right feeling, volume, and tempo from a dead stop. That’s why you always hear rock groups (and garage bands) start each other off with, “And a-one! And a-two!” That’s also why most orchestras have a conductor, who gives one silent, preparatory beat of his baton before the players begin.
GarageBand can “count you in” using either of two methods. First, it can play one measure full of beats, clicking “one, two, three, go!” at the proper tempo so you’ll know when to come in. That’s the purpose of the Control → Count In command. When this command has a checkmark, GarageBand will count you in with those clicks.
If you intend to begin playing in the middle of existing music, though, you may prefer to have the music itself guide you to your entrance. This is the second method. For example, you might decide to plant the Playhead a couple of measures before the spot where you want to record. As long as doing so won’t record over something that’s already in your track, this is a convenient way to briefly experience the feel or groove of the music before you begin playing.
Get ready to play—hands on the keyboard—and then click the red, round Record button.
Or just press the letter R key on your Mac keyboard.
Either way, you hear the countoff measure, if you’ve requested one, and then the “tape” begins to roll. Give it your best, and try to stay in sync with the metronome, if you’ve turned it on.
When you come to the end of the section you hoped to record—it might be the entire piece, or maybe just a part of it—tap the Space bar (or click the Play button) to stop recording.
On the screen, you’ll see the new green region you recorded.
Play back your recording to see how you did.
Rewind to the spot where you started recording. If you recorded under tempo (that is, slower than you intend the playback to be), boost the Tempo slider to a better setting. (Because you recorded a stream of MIDI note information and did not record actual digital audio, you can adjust the playback tempo at any time without changing the pitch of the notes. You couldn’t get an “Alvin and the Chipmunks” effect if you tried.)
Tap the Space bar to hear your performance played back just as you recorded it.
Retakes
Even before you play back a new recording, you may know if it was a great performance, a good candidate but not necessarily your best effort, or a real stinker that must be deleted immediately. Maybe you messed up a portion of the playing. Maybe you had trouble keeping up with the metronome, or you felt as though it was holding you back.
The beauty of a MIDI sequencer like GarageBand, though, is that you can keep your take, redo it, or trash it, instantly and guilt-free, having used up no tape or studio time.
Here’s how to proceed after recording a MIDI performance:
Trash the whole thing. If the whole thing stank, press
-Z to trigger the Edit → Undo command. The new green region disappears. Adjust the tempo, if necessary, and try recording again.
Trash part of it. Use the Edit → Split command (Section 3.7) to cut the region into pieces, so that you can preserve the good parts but rerecord the bad ones.
Keep it. If the whole thing was great, or mostly great, save your file (
-S) and move on to the next track.
Mark it “best so far.” Press the letter M key to mute the track you just recorded. Then create a new track and repeat the entire process, hoping to do better this time.
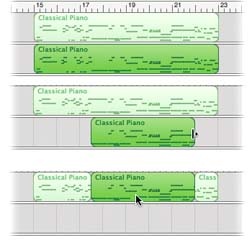
After this second attempt—or your third, fourth, or fifth—you can compare your various takes by muting and un-muting them as they play back. You can also chop up these various regions and use only the best parts of each attempt, yet another extremely common practice in professional recording studios (Figure 4-5).
Spot Recording (Punch In/Punch Out)
If you’re able to record an entire song perfectly the first time, with no mistakes—well, congratulations. Sony Records is standing by.
Most people, though, wind up wishing they could redo at least part of the recording. Usually, you played most of it fine, but botched a few parts here and there.
In the professional recording business, patching over the muffed parts is so commonplace, it’s a standard part of the studio ritual. Clever studio software tools can play back the track right up until the problem section, seamlessly slip into Record mode while the player replays it, and then turn off Record mode when it reaches the end of the problem part, all without missing a beat. Recording engineers call this punching in and out.
Believe it or not, even humble GarageBand lets you punch in and punch out. Once you master this technique, you’ll be very grateful.
Here’s how it goes:
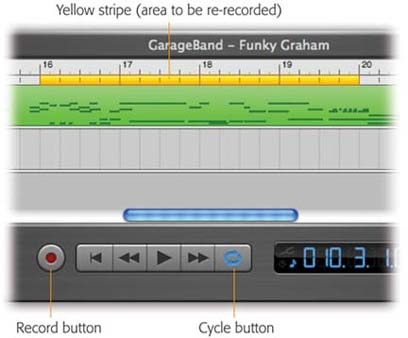
Turn on cycling.
Section 1.5 describes cycling in the context of playing a section of music over and over again. For recording, the steps are much the same (see Figure 4-6). In this case, though, the beginning and end of the yellow Cycle bar designate your punch-in and punch-out points—the part you’re going to rerecord.
Set up your metronome and tempo. Turn on the Count In command (in the Control menu).
See Section 4.5 for details on setting up a recording. In this case, Count In is very important; it makes GarageBand play the one measure of music that precedes your punch-in point. (You don’t have to position the Playhead for this exercise. Whenever Cycling is turned on, the Playhead always snaps to the beginning of the yellow stripe when playing or recording begins.)
Begin recording (by pressing the letter R key, for example).
During the countoff measure, you don’t just hear metronome clicks—you also hear the existing music in that preceding measure. GarageBand begins recording after the countoff, as the Playhead reaches the yellow cycle area.
As you record, you’ll also hear the old material—the part you’re trying to rerecord. Don’t worry, though; it will disappear after you replace it. (If it bothers you, delete it manually before punching in.)
GarageBand doesn’t play past the end of the yellow bar. Instead, it loops back to the beginning of the yellow bar and keeps right on recording. (This loop-record feature is the key to cumulative recording, described next.) If you nailed it on the first take, just stop playing.
Figure 4-6. Click the Cycle button—or press the letter C key—to make the yellow “repeat this much” bar appear at the top of the screen. Drag the ends of the yellow bar to identify the musical section you’ll be loop-recording. (If you don’t see the yellow bar, or if you want it to appear in a totally different section of the piece, drag through the lower section of the beat ruler.)Press the Space bar (or click the Play button) to stop recording.
When you play back the piece, GarageBand flows seamlessly from your original take to the newly recorded “patch” section.
Tip
This punch-in/punch-out routine is the only way to go if your goal is to rerecord precisely measured sections.
When the parts you want to rerecord have nicely sized “bookends” of silence before and after, though, there’s a more casual method available. Just play the piece from the beginning—and “ride” the letter R key on your keyboard. With each tap, you jump into and out of Record mode as the piece plays. This manual punch-in/punch-out method offers another way to record over the bad sections and preserve the good ones.
Cumulative Recording
GarageBand’s tricks for people with less-than-stellar musical ability don’t stop with the slow-tempo-recording trick and the ability to rerecord certain sections. The Cycle button described earlier is also the key to cumulative recording, in which you record one note at a time, or just a few, building up more complexity to the passage as GarageBand loop-records the same section over and over (Figure 4-7).
This trick is especially useful for laying down drum parts. In real life, drummers are surrounded by different kinds of drums; they’re constantly reaching out and twisting to hit the different instruments at different times.
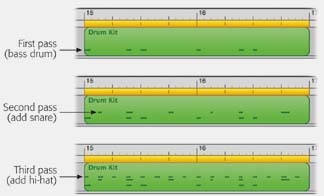
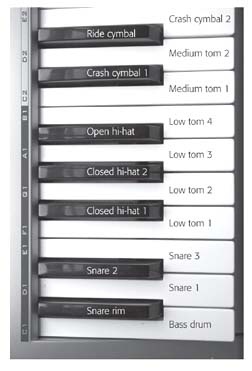
When you want to perform your own drum parts, you’ll probably be using a MIDI keyboard. It turns out that GarageBand’s various drum sounds—bass drum, snare drum, tom-toms, and so on—are “mapped” to the various keys of the keyboard (see Figure 4-8). Unless you have an extraordinarily unusual limb structure, you’ll probably find it very difficult to play all the drums you want in a single pass, since they’re scattered all over the keyboard.
It’s much easier to record drum parts in successive passes, as GarageBand continues to record: the bass drum the first time, the snare on the next pass, and so on.
Here’s how to set up loop recording:
Turn on cycling.
See step 1 of the preceding instructions. Figure 4-6 explains how to adjust the yellow Cycle bar. The point here is to “highlight” the portion of music you want to record.
Adjust the metronome, the Count In option, and the tempo, just as described in the previous pages. If you plan to record in the middle of a piece, place the Playhead to the left of the cycled region to give yourself a running start. (GarageBand will be in playback-only mode until it reaches the yellow Cycle bar.)
Click a track header to indicate which track you want to record. If you intend to lay down a drum track, fool around with your keyboard to identify which key plays which drum sounds. (The basic setup for GarageBand’s drum kit is shown in Figure 4-8.)
Figure 4-8. Cumulative recording is especially useful for drum parts, because it lets you focus on only one drum sound at a time. This diagram illustrates how GarageBand’s drums are mapped to the keys of your keyboard. (The different drum kits are all mapped identically, although what constitutes a snare or a low tom in the Jazz kit may not sound anything like the one in the Techno kit.) The bass drum (kick drum), snare, and ride cymbals are the foundation of most drum parts, so these may be the keys you want to “ride” with three fingers as you record.Click the Record button (or press the letter R key).
Each time GarageBand plays through the yellow-striped section, it will record any notes you play. Remember, GarageBand accumulates all the notes you play, adding them to the piece even if you play them on different repetitions of the looped passage.
Tip
It’s OK to let a pass or two go by without playing anything. You just haven’t added anything to the recording in progress, so no harm done. In fact, you might want to consider routinely sitting out a couple of repetitions between recording bursts.
Each time GarageBand loops back to the beginning of the section, you’ll notice that it’s already playing back what you laid down on previous passes. And when you finally stop (tap the Space bar) and play back the new passage, you’ll discover that every note you played during the various repetitions plays back together.
Tip
Believe it or not, you can stop the playback, listen, do other work on your piece, and return much later to add yet another layer of cumulative-recording notes—as long as you haven’t disturbed the yellow Cycle bar in the beat ruler. Once you move that yellow stripe or turn off cycling, GarageBand ends your chance to record additional material in that region. The next recording you make there will wipe out whatever’s there.
Mod Wheels and Other MIDI Fun
Many of GarageBand’s built-in sounds are samples—brief recordings of actual instruments. That’s why the grand piano sounds so realistic: because it is a grand piano (a $50,000 Yamaha, to be exact).
But behind the scenes, GarageBand’s sounds have been programmed to respond to various impulses beyond just pressing the keys. They can change their sounds depending on what other MIDI information GarageBand receives from your keyboard.
For example:
Sustain pedal. If you have a sustain or damper pedal, you can ride it with your foot just as you would on a piano. (It’s designed to hold a note or a chord even after your hands have released the keys.) Almost any MIDI keyboard—including the $100 M-Audio Keystation—has a jack on the back for a sustain pedal, which costs about $15 from online music stores like
www.samash.com.Key velocity. As noted earlier in this chapter, a number of GarageBand sounds respond to key velocity (that is, how hard you strike the keys). Most of the instrument sounds just play louder as you hit the keys harder, but some actually change in character. Acoustic guitars feature a little fingerboard slide; clavichords get more of a “wah” sound; Wah Horns also “wah” more; and many of the synthesizer keyboard sounds sound “rounder” as you hit the keys harder.
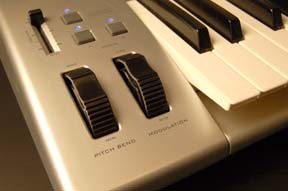
Figure 4-9. On the M-Audio MIDI controller keyboards that Apple sells, two control wheels liven up the MIDI proceedings. The pitch-bend wheel actually bends the note’s pitch. Just turn the wheel either before or after striking the note, depending on the effect you want. The modulation wheel, meanwhile, either produces sound-changing effects or does nothing, depending on the GarageBand sound you’ve selected.Using the correct technical language, you would say that these instruments are velocity-sensitive.
Pitch and mod wheels. Some keyboards, including that $100 M-Audio controller that Apple sells, have one or two control wheels that also affect GarageBand’s sounds (Figure 4-9).
For example, a pitch-bend wheel makes a note’s pitch slide up or down while you’re still pressing the key. It’s an essential tool for anyone who wants to make brass or wind instruments sound more realistic, since those instruments are capable of sliding seamlessly from pitch to pitch—something a keyboard, with its series of fixed-pitch keys, can’t ordinarily do.
You can use the pitch-bend wheel in either of two ways. First, turn the wheel downward, for example, and hold it (it’s spring-loaded). Then, play the key you want—and simultaneously release the key. What you hear is a slide up to the desired note.
Second, you can strike the key first and then turn the wheel, or even wiggle the wheel up and down. The sound winds up wiggling or bending away from the original note, which is a common technique when you’re trying to simulate, for example, the bending notes of a blues harmonica.
Tip
You can hear these effects in the sample file called 04-Control Wheels. It’s on the GarageBand Examples CD described on Section 1.5.
The pitch-bend wheel affects all GarageBand sounds.
Your keyboard may also have a mod wheel, short for modulation wheel. It’s an all-purpose control wheel that produces different effects in different sounds. Here are some of the effects it has on GarageBand’s built-in sounds:
|
Instrument Name |
Mod-Wheel Effect |
|
Bass instruments |
Brightens the sound |
|
Choir sounds |
Vibrato |
|
Drum kits |
No effect |
|
Guitars |
Vibrato |
|
Most horns |
Vibrato |
|
Funk horns |
“Fall-off” (slide down) at end of note |
|
Mallets |
Vibrato |
|
Most organs |
No effect |
|
Vocoder Synth Organ |
Searing distortion |
|
Most pianos |
No effect |
|
Strings |
Vibrato |
|
Most Synth Basics |
Vibrato |
|
Star Sweeper |
“Sweeps” the sound’s phase |
|
Synth Leads |
Vibrato |
|
Most Synth Pads |
No effect or vibrato |
|
Angelic Organ |
“Clicks” through the sound |
|
Aquatic Sunbeam |
“Sweeps” the sound’s phase |
|
Electric Slumber |
“Sweeps” the sound’s phase |
|
Liquid Oxygen |
“Clicks” through the sound |
|
Tranquil Horizon |
“Sweeps” the sound’s phase |
|
Woodwinds |
Vibrato |
Note
Vibrato is the gentle wavering of pitch that’s characteristic of most professional instrumental soloists and singers. (Real-world pianos and drum sets can’t produce vibrato, which is why GarageBand’s corresponding sounds don’t react to the mod wheel.)
If you’ve bought the Symphony Orchestra Jam Pack, you’ll find an even more amazing range of effects lurking in the mod wheel. The violins and other stringed instruments, for example, play normally (legato) when the wheel is at rest. But as you turn the wheel more and more, the articulation (playing style) changes from staccato (short notes), to tremolo (rapid, back-and-forth bow strokes), to rapid half-step trills, then whole-step trills, and finally—at the top of the mod wheel’s rotation—pizzicato (plucked strings).
Woodwinds, brass, and timpani playing styles are similarly affected—for example, turning the mod wheel halfway makes the oboe play with vibrato, the horns swell into a crescendo, and the timpani (kettledrums) play with a thunderous roll.
Learning to use your mod wheel can add a great deal of beauty, realism, and grace to your GarageBand recordings. Remember that you don’t have to turn it all the way up; you can turn the wheel only part way for a more subtle effect. Remember, too, that the mod wheel is usually most effective when you turn it after the note has begun sounding. It’s the contrast of the mod wheel (versus the unaffected note) that produces the best effect.
Get GarageBand 2: The Missing Manual now with the O’Reilly learning platform.
O’Reilly members experience books, live events, courses curated by job role, and more from O’Reilly and nearly 200 top publishers.

