Chapter 1. Setting Up the Garage
GarageBand is a great name. It calls to mind all the great bands that began as amateur acts that rehearsed in some kid’s garage. The name suggests the homemade, independent nature of the music you’ll be making. It even carries overtones of the us-versus-them, little-guy-against-The-Man, counterculture spirit that Apple has always embraced.
The truth is, though, GarageBand is practically incapable of producing anything but professional, polished music—a far cry, that is, from the slightly out-of-tune, drum-heavy work of true first-time garage bands. That’s where the name isn’t such a slam dunk.
On the other hand, it’s catchier than “GarageDigitalRecordingStudio.”
This chapter introduces you to GarageBand. It teaches you how to play back music with GarageBand, and goes on to explain the difference between the two kinds of music the program works with (MIDI data and audio recordings). You’ll learn how to create new music in the following chapters.
Equipment Requirements
Here are the official Apple minimum requirements for GarageBand:
A Mac whose processor is a 600MHz G3 or faster. True, but you can’t use the Software Instruments (see Section 1.7) unless you have a G4 or later chip.
Mac OS X 10.3.4 or later. Tiger (Mac OS X 10.4) is ideal.
256 megabytes of memory. Well, you might be able to record “Chopsticks” with two fingers with this much memory. But if you expect to create compositions much more elaborate than that, 512 MB is the bare minimum. A gigabyte or even more is better.
QuickTime 6.5.2 or later. If GarageBand complains that you don’t have this software, download it from
www.apple.com/quicktime.A screen with at least 1024-x-768–pixel resolution. That would rule out, for example, blueberry and tangerine iBooks. Then again, they can’t run GarageBand anyway.
2 gigabytes of hard drive space. That’s what you need to install GarageBand, although there are some sneaky tricks for moving GarageBand onto a different hard drive if necessary (see Section 9.2).
Musical equipment (optional). You can use GarageBand happily for years using nothing but your Mac and its mouse. But if you have even a little musical talent—even the ability to sing in tune—you can get even more out of the program by adding musical gear like a microphone, synthesizer (electronic MIDI keyboard), or guitar (see Chapters 4 and 6).
The point is that GarageBand is a very hungry program. It craves memory and horsepower like Donald Trump craves publicity.
If you’re getting error messages like “Part of the song was not played,” “The hard disk is not fast enough,” and “Disk is too slow,” flip immediately to Chapter 10 for some explanations and solutions.
Either that, or buy a new Mac.
Installing GarageBand
If GarageBand didn’t come preinstalled on your Mac, you can buy it as part of Apple’s iLife ’05 software suite. You can buy iLife at computer stores or online stores like www.apple.com.
iLife is an $80 DVD that includes GarageBand, iTunes, iMovie, iPhoto, and iDVD. (You can’t buy GarageBand separately, and you can’t download it. Two gigabytes would be a long download.)
When you run the iLife installer, you’ll be offered a choice of programs to install. Install all five programs, if you like (provided if you have the required 4.3 GB of hard drive space), or just GarageBand by itself.
When the installation process is over, you’ll find the GarageBand icon in your Applications folder. (In the Finder, choose Go → Applications, or press Shift-
-A, to open this folder.) If the GarageBand icon—the little electric guitar—isn’t already in the Dock, take a moment to drag it there, so you’ll be able to open it more conveniently from now on.
Note
For the moment, don’t open GarageBand by double-clicking its icon. (If you do so, the program presents the Project dialog box, which offers you three choices: Start a new project, open an existing one, or quit GarageBand. This box goes away if you switch to the Finder and open a GarageBand song manually.)
Opening GarageBand
For this guided tour, you need a GarageBand file that’s already been completed. You can get yourself one by downloading the GarageBand Examples CD, a “virtual disc” available for free at www.missingmanuals.com. (In fact, the rest of this book assumes that you’ve already done so. For details, see the box on Section 1.5.)
Once you’ve downloaded the GarageBand Examples disk, open the Chapter 1 folder and double-click the icon called “01—Garage Door.” After a moment, GarageBand opens and presents you with the simulated studio shown in Figure 1-1.

Playback
You’ll probably spend most of your time in GarageBand playing back music. That, after all, is the only way to fine-tune and perfect your work.
There’s a Play button at your disposal—the big triangle indicated in Figure 1-1—but that’s for suckers. Instead, press the Space bar. That’s a much bigger target, and a very convenient start/stop control. (You may recognize it as the start/stop control for iTunes and iMovie, too.)
Once you’ve got the 01—Garage Door file open, press the Space bar to listen to this fonky, fonky piece. It’s about a minute long.
Tip
If you hear nothing, it’s probably because your Mac’s speakers are turned down. You can adjust your Mac’s overall volume by pressing the volume keys on the top row of your keyboard.
If you have a very old keyboard (or a very non-Apple one), and you therefore lack these keys, you can also adjust the volume by clicking the speaker menulet (the ![]() icon in your menu bar).
icon in your menu bar).
(If the speaker control doesn’t appear on your menu bar, open System Preferences, click the Sound icon, and then turn on “Show volume in menu bar.”)
Whenever music is playing back, you can have all kinds of fun with it. For example:
Stop the music. Press the Space bar again.
Slow it down (or speed it up). Use the Tempo control, as shown in Figure 1-2.
Adjust the volume. You can drag the master volume slider shown in Figure 1-1, or you can press
-up arrow (louder) or
-down arrow (softer). (Hey! Those are the same keystrokes as in iMovie and iTunes!)
Jump around in the song. See the next section for navigation techniques. They work equally well whether the music is playing or not.

Cycling (Looping)
Looping means playing a certain section of the music over and over again continuously. (That’s what musicians call it. Apple calls it cycling, because in GarageBand, the word loop has a very different meaning. You can read about loops in the next chapter.)
Cycling can be very handy in a number of different situations:
Recording. When you’re laying down new music from a MIDI keyboard, GarageBand merges everything you play during all repetitions of the loop. So if your keyboard skills aren’t especially dazzling, you can play one hand’s part, or even one finger’s part, on each “pass” through the loop. GarageBand adds all your passes together.
Editing. In Chapter 5, you’ll see that you can edit the notes in Software Instruments sections—adding or deleting notes, rewriting musical lines, and so on. By cycling the section you’re editing, you can hear the effects of your edits even while you’re making them, in the context of all the other playing instruments.
Playing. Sometimes, it’s useful to loop a section just for the sake of listening and analyzing—when a clashing note, for example, is driving you, well, loopy.
To loop a certain section of your piece, start by clicking the Cycle button (identified in Figure 1-3). Or just press the letter C key on your Mac’s keyboard.
Either way, the Cycle button lights up, and a yellow stripe appears on the beat ruler (the numbered “ruler” strip at the top of the screen). That stripe—the cycle region—tells you which part of the song GarageBand intends to repeat.
A few examples make any learning process easier and more fun—and this book is no exception. Throughout this book, you’ll find references to GarageBand project files, some finished and some intended for you to complete, on something called the GarageBand Examples CD.
You can download these files right now. First, go to www.missingmanuals.com. At the top of the page, click the “Missing CD” button.
You arrive at a page listing the downloadable files for the entire Missing Manual series. Click the “G” tab; under the GarageBand heading, click to download The Examples CD disk image. It contains all of the sample music you’ll work with in this book.
When the download is complete, you’ll find on your desktop a file called GarageBand Examples.dmg. That’s a disk image file, shown here at lower left.
When you double-click it, you’ll find a second icon on your desktop, resembling a hard drive icon, shown here at lower right. (If Safari is your Web browser, just relax and wait as the icon opens automatically.) This is the actual “CD” icon. If you open it up, you’ll find all the files for this book. Copy them to a folder on your hard drive, if you like.
If you’re in a hurry or using a slow connection, you can also download the various tutorial pieces one at a time. You’ll find them listed under the appropriate chapter numbers.

In a new song, the yellow stripe appears across measures 1 through 4. You can adjust its length and position, though, as shown in Figure 1-3.
If you tap the Space bar now, GarageBand plays only the music enclosed by that yellow stripe.
To end the cycling, click the Cycle button again to turn it off, or tap the letter C key again. (You can do that even while the music is playing.)

Navigating the Music
Your current position in the song—that is, the spot from which you’ll start recording or playing—is always indicated by the Playhead (Figure 1-1) and the moving vertical line beneath it.
You can drag the Playhead around manually, of course; you can also click anywhere in the beat ruler to make the Playhead snap to that spot. You can even jump to a spot in your piece by typing in its time or measures-and-beats position into the digital time display (Section 3.14.3).
But you’ll feel much more efficient if you take the time to learn GarageBand’s navigational keyboard shortcuts:
Jump back to the beginning. Pressing either the letter Z key or the Home key rewinds the piece to the beginning without missing a beat.
Jump to the end. Press Option-Z or the End key. That’s a great technique for people who like to build up their songs section by section. After you’ve finished the first part, you can jump to the end of it, ready to begin recording the second.
Note
As far as GarageBand’s playback is concerned, the end of your piece isn’t necessarily where the music stops. It’s the point indicated by the small left-pointing triangle on the ruler.
Sometimes you’ll trim a piece to make it shorter—and wind up stranding the End marker way off to the right, so that GarageBand “plays” a minute of silence after the actual music ends. In that case, you can fix the problem by dragging the End marker inward until it lines up with the end of the colored musical regions. (You can never drag it inward past the end of the music, though. And 999 measures is GarageBand’s max.)
Jump back, or ahead, a measure at a time. As you may recall from your childhood music lessons, a measure is the natural building block of musical time. It’s usually two, three, or four beats long. (You can think of a beat as one foot-tap, if you were tapping along with the music.)
In GarageBand, the measures are indicated on a numbered beat ruler (identified in Figure 1-1) that helps you figure out where you are in the music. You can jump forward or back a measure at a time by pressing the left and right arrow keys. (Clicking the Rewind and Fast-forward buttons serves the same purpose.)
Jump right or left one screenful at a time. Press the Page Up or Page Down key. (It may feel a little odd to press up/down keys to scroll right/left, but you’ll get used to it.)
Zoom in or out. Once you begin editing your own music, you’ll occasionally want a God’s-eye view of your whole piece for a visual overview of its structure. Or you’ll want to zoom in to see the individual sound waves or notes of a certain musical passage.
That’s what the Control-right arrow and Control-left arrow keystrokes are for. They stretch and collapse the ruler, respectively, making the onscreen representation of your music take up more or less space. (You can also drag the Zoom slider beneath the instrument names, but that’s more effort.)
Two Kinds of Music
If you’ve been reading along with half your brain on the book and half on the TV, turn off the TV for a minute. The following discussion may be one of the most important you’ll encounter in your entire GarageBand experience.
Understanding how GarageBand produces music—or, rather, the two ways it can create music—is critically important. It will save you hours of frustration and confusion, and make you sound really smart at user-group meetings.
GarageBand is a sort of hybrid piece of music software. It can record and play back music in two different ways, which, once upon a time, required two different music-recording programs. They are:
Digital Recordings
GarageBand can record, edit, and play back digital audio—sound from a microphone, for example, or sound files you’ve dragged in from your hard drive (such as AIFF files, MP3 files, unprotected AAC files, or WAV files).
If you’ve spent much time on computers before, you’ve already worked with digital recordings. They’re the error beeps on every Mac, the soundtrack in iMovie, and whatever sounds you record using programs like SimpleSound, Amadeus, and ProTools. The files on a standard music CD are also digital audio files, and so are the ones you can buy at iTunes.com.
Digital recordings take up a lot of room on your hard drive: 10 MB per minute, to be exact (stereo, CD quality).
Digital recordings are also more or less permanent. GarageBand offers a few rudimentary editing features: You can copy and paste digital audio, chop pieces out, or slide a recording around in time. In GarageBand 2, you can even transpose these recordings (make them play back at a different pitch) and change their tempo (make them play back faster or slower), within limits. But you can’t delete a muffed note, clean up the rhythms, reassign the performance to a different instrument, and so on.
Now then: To avoid terrifying novices with terminology like “digital recordings, “Apple calls this kind of musical material Real Instruments.
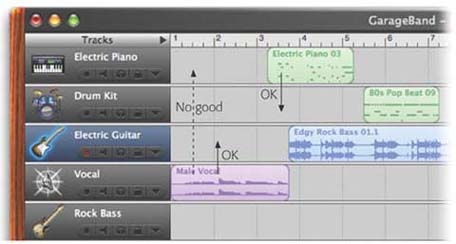
On the GarageBand screen, Real Instrument recordings show up in blue or purple blocks, filled with what look like sound waves (Figure 1-4).
MIDI Recordings
You know what a text file is, right? It’s a universal exchange format for typed text.
In the early ’80s, musicians could only look on longingly as their lyricists happily shot text files back and forth, word processor to word processor, operating system to operating system. Why, they wondered, couldn’t there be a universal exchange format for music, so that Robin in Roanoke, with a Roland digital piano, could play back a song recorded by Susan on her DX-7 synthesizer in Salt Lake City?
Soon enough, there was a way: the MIDI file. MIDI stands for “musical instrument digital interface,” otherwise known as “the musical version of the text file.” To turn your Mac into a little recording studio, a musician had to rack up three charges on the Visa bill:
Although Apple would go bald in horror at using such intimidating language, GarageBand is, in fact, a MIDI sequencer. It can record your keyboard performances; display your performance as bars on a grid, piano-roll style; allow you to edit those notes and correct your mistakes; and then play the whole thing back.
Behind the scenes, GarageBand memorizes each note you play as little more than a bunch of computer data. When it’s playing back MIDI music, you might hear “Three Blind Mice,” but your Mac is thinking like this:

| 01|01|000 E3 00|01|000 60 |
| 01|02|000 D3 00|01|000 72 |
| 01|03|002 C3 00|02|240 102 |
From left to right, these four columns tell the software when the note is played, which note is played, how long it’s held down, and how hard the key was struck. That’s everything a computer needs to perfectly recreate your original performance.
Musical information that’s stored this way has some pretty huge advantages over digital recordings like AIFF files. For example, you can change the notes—drag certain notes higher or lower, make them last longer or shorter, or delete the bad ones entirely—whenever you like. You can also transpose a MIDI performance (change its key, so it plays higher or lower) by an unlimited amount, with no deterioration of sound quality. You can even speed up or slow down the playback as freely as you like. When you make such an adjustment, the Mac just thinks to itself, “Add 3 to each pitch,” or “Play this list of notes slower.”
The downside of MIDI recordings is, of course, that you can’t capture sound with them. You can’t represent singing, or rapping, or sound effects this way. A MIDI file is just a list of notes. It needs a synthesizer to give it a voice—like the synthesizer built into GarageBand.
Apple refers to the sounds of GarageBand’s built-in synthesizer as Software Instruments. They show up in GarageBand as green blocks, filled with horizontal bars representing the MIDI notes that will be triggered. Figure 1-4 makes this distinction clear.
Why It Matters
Why is it important to learn the difference between Real Instruments (sound recordings) and Software Instruments (MIDI data)? Because if you confuse the two, you can paint yourself into some very ugly corners.
For example, suppose you “lay down” (record) the background music for a new song you’ve written. But when you try to sing the vocals, you discover that the key is way too high for you.
If most of your accompaniment is constructed of MIDI (green) musical material, no big deal. You can transpose the entire band down into a more comfortable range.
But if you’d recorded, say, a string quartet as part of the backup group, you may be out of luck. Those are Real Instruments (digital recordings), and you can’t make radical changes to their pitch without some weird-sounding results.
The bottom line: If you began your work by constructing a backup band out of green Software Instruments, you should generally finalize your song’s key and tempo before you record live audio.
Another common example: GarageBand lets you perform a neat trick with Software Instruments. After recording a part using, for example, a MIDI keyboard, you can reassign the whole thing to a different instrument whenever you like, freely fiddling with the orchestration. You can drag a blob of notes from, say, the Electric Piano track into the Country Guitar track. The Mac doesn’t care which sound you use; its job is simply to trigger the notes for “Three Blind Mice” (or whatever).
But although you can drag a blue or purple Real Instrument region into a different Real Instrument track, its instrument sound won’t change (see Figure 1-5). In fact, you can never change the instrument sound of a Real Instrument.
Tracks
When you work in GarageBand, the timeline is your primary canvas. It’s something like the timeline view in iMovie: a scrolling map of the overall project, marked at the top by a beat ruler that helps you figure out where you are in the song.
Tracks are the horizontal, parallel stripes that represent instruments playing simultaneously. Which is lucky, because if this software could play only one instrument at a time, it would have to be renamed GarageSolo.
You’ll learn how to fill these gray stripes in the following chapters. For the moment, though, it’s useful to learn your way around the tracks themselves. After all, like the musicians in a real garage band, they’re paid very little, but respond well if you treat them with a little respect.
As you read the following instructions, you might want to follow along by working with the Garage Door song you opened in the previous section (Section 1.3).
Creating a Track
You can add a track in any of three ways.
Click the + button below the track names. You can see this button in Figure 1-1.
Choose Track → New Track. Or press Option-
-N.
Both of these methods open the New Track dialog box shown in Figure 1-6. Click the appropriate tab—Real Instrument or Software Instrument—and then, on the right side of the dialog box, click the name of the kind of instrument you plan to add.
(If you intend to record sound—that is, if what you need is a Real Instrument track—you can bypass the dialog box by simply choosing Track → New Basic Track. Details in Chapter 6.)
You can read more about this process in the tutorial at the end of Chapter 2.
Tip
A track’s header is the dark area at the left edge of the track, where you see its name and icon. To find out which kind of track you’re dealing with—Real Instrument or Software Instrument—click the track header. If it turns greenish, you’re dealing with a Software Instrument (MIDI) track. If it’s purplish, you’ve clicked a Real Instrument (live recording) track.
You can select one track after another, “walking” through the list of them, by pressing the up or down arrow keys on your keyboard.
Figure 1-6. A certain track can handle either a Real Instrument (sound file) or a Software Instrument (MIDI notes), so you have to tell GarageBand which sort of instrument you intend to add. If you’re going to record a Real Instrument, also specify which effects you want GarageBand to add to the track, like reverb or EQ (equalization). Details in Chapter 7. If you’ve installed additional instruments—some of Apple’s Jam Packs, for example—you can isolate them by choosing them from the pop-up menu that now says Show All.Drag a loop into an empty gray spot in the timeline (the track display area) Chapter 2 covers this method in delicious detail.

In any case, a new track appears below all the existing tracks.
Tip
If you have a standard, preferred “combo”—drums at the bottom, bass line above that, then piano, then guitar, and so on—you can save a lot of time by building an empty GarageBand template with this track structure. Save this empty file to your desktop. Each time you want to work from this template, open it—and then before filling it with music, choose File → Save As and name the song you’re about to create.
The number of simultaneous tracks that GarageBand can play depends on the horsepower of your Mac and which kind of tracks they are; Software Instruments make the Mac work a lot harder than Real Instrument recordings. On slower Macs, four or five tracks is about the limit; 10 or 12 tracks is typical on a Power Mac G4. If you have a fully tricked-out, top-of-the-line Power Mac G5 loaded with RAM, then you can build tracks into the dozens.
Fortunately, there’s a whole chapter’s worth of tips and tricks for helping GarageBand overcome the strain of track-intensive compositions waiting in Chapter 10.
Tip
As you add and work with tracks, keep your eye on the Playhead handle. As described in Figure 1-7, it’s an early-warning system that lets you know when you’re overwhelming your Mac.

Rearranging Tracks
You can rearrange your tracks’ top-to-bottom order just by dragging them vertically. You might, for example, like to keep the track you’re working on up at the top where it’s easy to find. Or maybe you like to keep your tracks in traditional “score order” (that is, as the instruments would appear in standard full-orchestra sheet music).
Deleting a Track
Before you nuke one of your tracks, scroll through the whole thing to make sure you’re not about to vaporize some important musical material. (Consider zooming out—tap Control-left arrow repeatedly—until the entire track fits on your screen.)
Then click the track header to select it. Choose Track → Delete Track, or press
-Delete, to send the track into the great sheet music stack in the sky. (Of course, GarageBand’s amazing Undo command can resurrect it if necessary; see the box on Section 1.8.5.)
Renaming a Track
Click a track’s header to select it, and then click carefully, once, on its name. It’s now a simple matter to edit the track’s name, as shown in Figure 1-8.

Track Characteristics
The importance of the New Track dialog box shown in Figure 1-6 depends on what kind of musical material you intend to record (that is, which of the two tabs you click):
Real Instrument. This tab lists instruments, all right, but they actually refer to effects presets that contain canned settings for reverb, echo, and other processing effects that have been optimized for each instrument type. The actual instrument sound is determined by your microphone or whatever electronic instrument you hook up to your Mac. Chapter 6 has details.
GarageBand offers a multiple-level Undo command. That is, you can take back more than one editing step, backing up in time. GarageBand, in fact, can take back the last 30 steps. If you choose the Edit → Undo command (or press
-Z), you can rewind your file closer and closer to its condition when you last saved it. (Or if you haven’t saved the file, Undo takes you closer and closer to the moment when you opened it.)
That fine print may startle people who are used to, say, Microsoft Word, which lets you keep undoing even past the point of saving a document. It’s a good argument for saving a GarageBand file less frequently—because once you save the document, you lose the ability to undo changes up to that point.
Of course, if you really do want to rewind your work all the way back to the instant when you last saved the piece, you can bypass all of those Edit → Undos and instead choose File → Revert to Saved. GarageBand tosses out all the work you’ve done since the last save.
And one last thing: If you rewind too far, and you Undo your way past a good edit you made, you also have a multiple Edit → Redo command at your disposal. In effect, it undoes the Undos.
Software Instrument. This tab also lists instruments, but here, you’re choosing an instrument sound that will play when you press the keys of your MIDI keyboard. Details in Chapter 4.
Tip
Either way you can also choose an icon for the track, using the pop-up menu at the lower-left corner. Apple gives you 68 little graphics to choose from—every instrument in GarageBand, plus silhouettes of singers. (These are purely graphic ornaments; they don’t affect the sound in any way.)
To open this palette of icons, by the way, you don’t have to click the tiny, down-pointing triangle, as you might expect. Instead, click squarely on the icon itself. The broader target means quicker access.
The appearance of the New Track dialog box is not, fortunately, the only chance you get to adjust these parameters.
You can summon the same box at any time, even after recording into the track, by double-clicking the track header, or, if a track is already selected, by choosing Track → Track Info (
-I). The resulting dialog box is now called Track Info, but it looks overwhelmingly familiar.
Muting and Soloing Tracks
Most of the time, GarageBand plays all of your tracks simultaneously—and most of the time, that’s what you want.
Sometimes, though, it’s useful to ask one track to drop out for a minute. You might want to mute a track when:
You’ve recorded two different versions of a part, and you want to see which one sounds better.
You’re trying to isolate a wrong note, and you want to use the process of elimination to figure out which track it’s in.
The Playhead is bright red, indicating that the Mac is gasping under its load of tracks. So you’d like to lighten its burden by shutting off a couple of tracks without deleting them forever.
Silencing a track is easy: Just click the little speaker icon below the track’s name (see Figure 1-9). Or, if the track header is selected, just tap the letter M key on your keyboard.
The speaker, officially called the Mute button, “lights up” in blue, which means: “I’m shutting up until you change your mind.” The regions of notes in that track grow pale to drive home the point. (You can turn the Mute button on or off while the music is playing—a great way to compare your mix with and without a certain instrument.)
There’s nothing to stop you from muting more than one track, either. If you need the entire percussion section to sit out for a minute, so be it.
Of course, if you find yourself muting more than half of your tracks, you should be using the Solo button instead. That’s the tiny pair of headphones right next to the Mute button.
Here again, the point is to control which tracks play, but the logic is now reversed. When you click the headphones (or, if the track header is selected, press the letter S key on your Mac’s keyboard), that’s the only track you hear. The note regions in all other tracks grow pale.
Veteran Mac fans know that some programs, like Word and TextEdit, create documents—that is, individual file icons on the hard drive.
Other programs, like iMovie, create project folders filled with supporting elements like sound and movie clips.
GarageBand falls into a third category unto itself.
When you save a new GarageBand song, it appears to be a standard, self-contained document file. You’ll soon discover, though, that it doesn’t act like a document file. For example, you can’t attach it to an outgoing email message in Entourage unless you first compress it as a .zip or .sit file.
Turns out GarageBand creates a sort of hybrid, a cross between a folder and a file, known as a package. A Mac OS X package looks like an icon, but acts like a folder, in that it contains other files and folders.
In times of troubleshooting—for example, when you’re trying to figure out why a certain GarageBand “document” is so big—you can actually open up one of these packages to see what’s inside.
To do so, Control-click the GarageBand song icon and, from the shortcut menu, choose Show Package Contents, as shown here. Lo and behold, a new window opens, exactly as though you’d opened a folder.
Inside you’ll find two important elements. First, there’s the project-Data file, which is the actual “edit list” that tells GarageBand what to play when. (If you’re familiar with iMovie, the projectData file is the equivalent of the iMovie project document.)
Second, there’s the Media folder (again, exactly as in an iMovie project folder). Here, GarageBand stashes several kinds of song component: any digital audio files you’ve recorded (singing tracks, for example); copies of sound files you added to a composition by dragging them into the program from the Finder; and in some cases (Section 9.7), copies of any loops you’ve used in your masterpiece.

Oxymoronic though it may sound, you can actually Solo as many tracks as you like. All other tracks are silent.
To turn a track’s Mute or Solo button off again, click it again (or press the M or S key a second time).

Get GarageBand 2: The Missing Manual now with the O’Reilly learning platform.
O’Reilly members experience books, live events, courses curated by job role, and more from O’Reilly and nearly 200 top publishers.

