Chapter 4. The Web and Email
The Web makes our world simultaneously bigger and smaller. It’s hard to imagine computing without a connection to the Internet, but it’s also hard to forget all the annoyances that come along for the ride, such as pop-ups, spam, and droves of incomprehensible error messages.
Having access to the Internet opens your PC to a host of technological dangers; sometimes it’s the dangers themselves that cause problems, while other times it’s the programs designed to protect your PC (such as firewall software) that end up doing more harm than good. The fixes in this chapter will help you streamline your Internet experience without needlessly compromising your security.
For networking and wireless annoyances related to connecting to the Internet, see Chapter 5. For help with web-based audio and video, see Chapter 3.
THE WEB
Lock Down Internet Explorer
THE ANNOYANCE: I’ve heard that Internet Explorer is riddled with security holes. Has Microsoft fixed these problems? If not, why not?
THE FIX: Over the years, Microsoft has fixed dozens of security holes in Internet Explorer, and if you’ve been using XP’s Windows Update feature regularly, you already have these patches installed. But the larger issue is IE’s underlying design—and its cozy connection with the underlying operating system—which permits any web site to install software on your PC. At first, web site designers used this capability sparingly, mostly to install widgets and small helper programs to add trivial features to their pages. But it didn’t take long for unscrupulous hackers and greedy corporate executives to learn how to exploit Internet Explorer’s open nature, which is why we now have spyware, adware, browser hijackers, pop-ups, and other nasty surprises. Despite these problems, Microsoft has too much corporate strategy tied up in this design to change it now, which leaves you with two choices: hobble Internet Explorer by turning off the most dangerous features, or use a safer alternative such as Mozilla Firefox (more on that later).
If you want to stick with Internet Explorer for now, you can take steps to make it safer. Open the Windows Control Panel and open Internet Options (or, in IE, go to Tools → Internet Options). Choose the Security tab, select the Internet icon at the top, and then click the Custom Level button to display the Security Settings dialog box, shown in Figure 4-1.
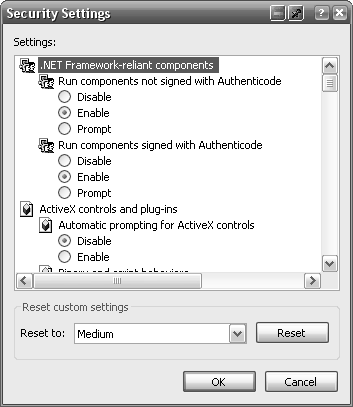
Next, go down the list and set each of the options as shown in Table 4-1. Depending on which edition of Windows XP you have and whether or not the latest service pack is installed, some of these options may be different or missing.
|
Option |
Set to |
|
Run components not signed with Authenticode |
Disable |
|
Run components signed with Authenticode |
Disable |
|
Automatic prompting for ActiveX controls |
Disable |
|
Binary and script behaviors |
Disable |
|
Download signed ActiveX controls |
Disable |
|
Download unsigned ActiveX controls |
Disable |
|
Initialize and script ActiveX controls not marked as safe |
Disable |
|
Run ActiveX controls and plug-ins |
Disable |
|
Script ActiveX controls marked safe for scripting |
Disable |
|
Automatic prompting for file downloads |
Disable |
|
File download |
Enable |
|
Font download |
Prompt |
|
Java permissions |
High safety |
|
Access data sources across domains |
Disable |
|
Allow META REFRESH |
Enable |
|
Disable | |
|
Allow script-initiated windows without size or position constraints |
Disable |
|
Allow web pages to use restricted protocols for active content |
Disable |
|
Display mixed content |
Prompt |
|
Don’t prompt for client certificate selection when no certificates or only one certificate exists |
Disable |
|
Drag and drop or copy and paste files to/from Explorer |
Disable |
|
Installation of desktop items |
Disable |
|
Launching programs and files in an IFRAME |
Disable |
|
Navigate sub-frames across different domains |
Prompt |
|
Open files based on content, not file extension |
Enable |
|
Software channel permissions |
High safety |
|
Submit nonencrypted form data |
Enable |
|
Enable | |
|
Userdata persistence |
Enable |
|
Web sites in less privileged web content zone can navigate into this zone |
Enable |
|
Active Scripting |
Disable |
|
Allow paste operations via script |
Disable |
|
Scripting of Java applets |
Enable |
|
Logon |
Prompt for username and password |
Click OK when you’re done changing the security settings. Next, click the "Trusted sites” icon, click the Sites button, and remove the checkmark next to the “Require server verification (https:) for all sites in this zone” option. Then type the following URLs into the “Add this Web site to the zone” field, clicking the Add button after each one:
	http://*.update.microsoft.com
	https://*.update.microsoft.com
	http://*.windowsupdate.com
	http://*.windowsupdate.microsoft.com
These four URLs permit the Windows Update feature to continue working unencumbered by your new security settings. The asterisks are wildcards, allowing these rules to apply to variants (such as http://download.windowsupdate.com). Feel free to add the domains for other web sites you trust, and then click OK when you’re done.
Now that you see what’s required to make Internet Explorer safer (albeit not bulletproof), you might be tempted to dump IE entirely in favor of a better design. If so, you’re in for a treat! Mozilla Firefox, available for free from http://www.mozilla.org, is an open source, standards-compliant web browser that is faster, much safer, and more feature-rich than Internet Explorer. It does a better job of blocking pop-ups, has a more customizable interface, and can be enhanced with powerful extensions (see “Improve Any Web Site” for an example). We’ll look at Firefox and another Mozilla offering, Mozilla Suite, in several of the annoyances in this chapter.
Turn Off Internet Explorer
THE ANNOYANCE: I’ve stopped using Internet Explorer completely, but the fact that it’s still on my PC makes me nervous. Is there any way to uninstall it?
THE FIX: Yes and no. Since Microsoft has so much at stake with Internet Explorer, the designers of Windows have gone to great lengths to make IE appear indistinguishable and inseparable from the rest of the operating system. However, several court cases (which Microsoft lost) have forced the company to include a way to hide Internet Explorer, effectively making it appear as though it has been uninstalled without hobbling IE-dependant features such as the help system and Windows Update.
If you’re using Windows XP with Service Pack 1 or later, open the Add or Remove Programs control panel, and click the “Set Program Access and Defaults” button on the left. In the “Set Program Access and Defaults” window (see Figure 4-2), you can choose a default web browser, email program, media player, and other Internet-related applications, as well as preventing unwanted programs from being used.
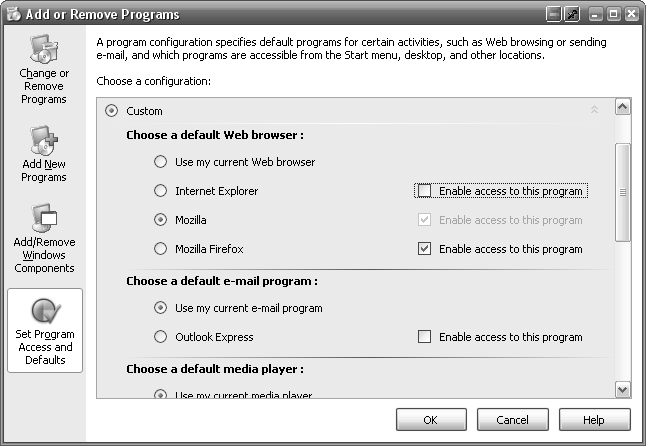
Choose the Custom option, and then click the double arrow to the right. In the “Choose a default Web browser” section, make sure your favorite web browser is selected, and then clear the “Enable access to this program” checkbox next to Internet Explorer. Click OK when you’re done.
Choose a Default Browser
THE ANNOYANCE: I’ve dropped Internet Explorer and switched to Firefox, but IE windows still appear when I click links in email messages. How do I make those links open in Firefox automatically?
THE FIX: Make Firefox (or whatever browser is your favorite) the default browser, associating it with the .htm and .html file types and the HTTP and HTTPS protocols (among others).
When you install any web browser, including Firefox and even new versions of Internet Explorer, you should be given the opportunity to make the newly installed program the default. But if, for example, you didn’t make Firefox the default at that time, or another program made itself the default without asking, you must change the appropriate settings.
The easiest and least-destructive method is to use the browser’s own self-default settings. For example:
- Mozilla Firefox
In Mozilla Firefox, go to Tools → Options, and choose the General category. Place a checkmark next to the “Firefox should check to see if it is the default browser when starting” option, and click the Check Now button.
- Mozilla Suite
In Mozilla Suite, go to Tools → Options, open the Advanced category, and then choose System. Place checkmarks next to the file types and protocols you’d like to associate with the browser, and click OK when you’re done.
- Internet Explorer
To make Internet Explorer the default browser, go to Tools → Internet Options (or Control Panel → Internet Options), and choose the Programs tab. Place a checkmark next to the “Internet Explorer should check to see whether it is the default browser” option, and click OK. Exit Internet Explorer, and then reopen it and answer Yes when asked if you want Internet Explorer to be the default.
If these steps don’t work, reinstall the browser or use the “Set Program Access and Defaults” option in the Add or Remove Programs control panel, as described in “Turn Off Internet Explorer.”
Fix Internet Shortcuts
THE ANNOYANCE: My newly installed browser works great, but after I installed it, the Internet Shortcuts on my desktop stopped working.
THE FIX: An Internet Shortcut is a small text file (.url) containing the address of a web site and some other information. (You can create an Internet Shortcut by, for example, dragging the little icon to the left of the URL in the browser’s address field to the Windows desktop.) Internet Shortcut files aren’t associated with any particular browser, but rather with Windows’s internal protocol handler (see the “How Internet Shortcuts Work” sidebar for details).
To fix the problem, open the Control Panel, go to Folder Options, and choose the File Types tab. Select URL/Internet Shortcut from the list (ignore “(NONE)/Internet Shortcut” if you see it), and click the Advanced button. (If it’s not there, click New, type url, and then click OK.)
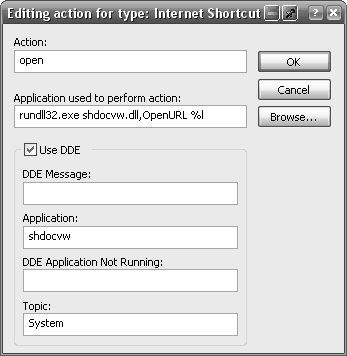
Double-click the Open item in the Actions list (or, if Open is not there, click New and then type Open in the Action field), and type the following command into the “Application used to perform action” field:
rundll32.exe shdocvw.dll,OpenURL %l
Next, check the Use DDE box. Leave the DDE Message field blank, type shdocvw in the Application field, leave the DDE Application Not Running field blank, and type System in the Topic field, as shown in Figure 4-3. Click OK in all three dialog boxes to confirm your choices.
If Internet Shortcuts still don’t work after this change, or if they open in the wrong browser, see “Choose a Default Browser.”
Change Internet Shortcut Icons
THE ANNOYANCE: I chose Firefox as my default browser, but Internet Shortcut icons on my desktop still have the Internet Explorer logo. I’m so mad at IE for facilitating a spyware infestation on my system that I don’t ever want to see that big blue “e” again!
THE FIX: Not surprisingly, Microsoft likes its IE logo, and they don’t want you to change it. Good thing we don’t care what Microsoft likes.
You’ve undoubtedly discovered that changing the icon through the File Types window doesn’t work—you’ll have to get your hands a little dirty to customize this icon. Open the Registry Editor (go to Start → Run and type regedit), and navigate to HKEY_CLASSES_ROOT\InternetShortcut\shellex\IconHandler. Rename the IconHandler key (highlight it and press F2) to IconHandlerBackup, and then close the Registry Editor. Open the Control Panel, and go to Folder Options. Choose the File Types tab, select the “URL/Internet Shortcut” entry from the list (ignore “(NONE)/Internet Shortcut” if you see it), and click the Advanced button. Click the Change Icon button, and then click Browse to locate an .ico, .dll, or .exe file with the icon you want to use.
Remember Web Site Passwords
THE ANNOYANCE: I hate having to type my username and password into my favorite web sites every time I visit them. Internet Explorer sometimes prompts me to save my password, but I still have to type my username. This is idiotic; why can’t IE just log me in automatically?
THE FIX: IE’s password-saving feature is not very well thought-out. By default, IE won’t enter anything into login forms automatically, but will only fill in your password for you once you type in your username. Although you can turn this feature on or off by going to Tools → Internet Options, choosing the Content tab, and clicking the AutoComplete button, there’s nothing else you can do to customize or improve it from within IE.
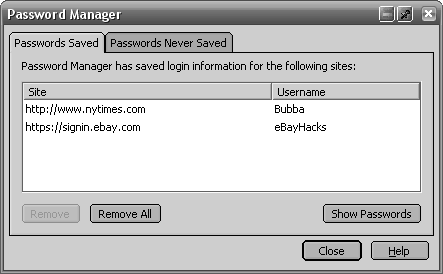
The Mozilla Firefox and Mozilla Suite browsers, both freely available from http://www.mozilla.org, do a much better job of remembering passwords than IE. Whenever you type a password into a web form, the Mozilla browsers ask you whether or not you’d like to save the password. (You can also choose “Never for this site” to turn off the prompt for a certain site without disabling the feature altogether.) Thereafter, the Mozilla browsers will automatically fill in your username and password each time you visit a saved site’s login page (Figure 4-4)—no typing necessary! You can even view and edit your saved passwords: in Firefox, go to Tools → Options → Privacy → View Saved Passwords; in Mozilla Suite, go to Tools → Password Manager. You can also set a master password to protect your stored passwords from being viewed by uninvited guests (after all, remembering one password is easier than remembering fifty).
Although Firefox and Mozilla Suite will do the typing for you, they won’t press Enter or click the login button for you. For that, you’ll need RoboForm (free, http://www.roboform.com). It works with IE out of the box, or with Mozilla Firefox and Mozilla Suite via a variety of special extensions. Among its many talents, RoboForm can not only remember and enter usernames and passwords automatically, but can click Login buttons for you as well. Like the Mozilla browsers, RoboForm can also automatically fill in long web forms, but it goes a step further by supporting complex JavaScript-based forms.
If RoboForm seems like overkill, try the free Google Toolbar, available for both Firefox and Internet Explorer from http://toolbar.google.com. It fills out forms for you—albeit without some of RoboForm’s bells and whistles—but it also adds a language translator, a text field spell-checker, and, of course, quick links to Google’s web search engine.
Living with Firefox in an IE World
THE ANNOYANCE: Some web sites (including Windows Update!) won’t let me in because I’m using Firefox instead of Internet Explorer. But I loathe IE; I’d rather not open up my PC to spyware just to download my phone bill. What are my options?
THE FIX: Every browser has a user agent string—a text “signature” it sends to every web site you visit that identifies the browser name and version, and even the operating system version you’re using. For example, Internet Explorer 6.0’s user agent string looks like this:
Mozilla/4.0 (compatible; MSIE 6.0; Windows NT 5.1)
Firefox 1.5’s looks like this:
	Mozilla/5.0 (Windows; U; Windows NT 5.1; en-US; rv:1.7.10)
	   Gecko/20050716 (No IDN) Firefox/1.5
If you use Firefox—or any non-IE browser, for that matter—you’ll occasionally encounter a web site that won’t let you in. The problem is usually caused either by lazy developers who haven’t made their web sites standards-compliant, or by corporate licensing restrictions that forbid developers from supporting any non-Microsoft products. The good news is that you can fool ‘em all!
The User Agent Switcher Extension for Mozilla Suite and Firefox (available for free from http://chrispederick.com/work/useragentswitcher/) allows both browsers to masquerade as any other browser, including Internet Explorer, Netscape 4, and even Opera. When you stumble upon an IE-only web site, just go to Tools → User Agent Switcher, and pick a browser, as shown in Figure 4-5. (Or click Options to edit the browser list or even type in a custom user agent string.)

Note
When you find a site that doesn’t work in Firefox or Mozilla Suite, send the webmaster a note and request that the site be made standards-compliant. A single email probably won’t change the site owners’ mind, but enough complaints may convince the webmaster to rethink the decision to support only Internet Explorer.
Of course, dressing up your browser as Internet Explorer doesn’t necessarily mean the site will work like it’s supposed to. Often, these sites require Internet Explorer because they employ proprietary IE features, such as ActiveX add-ons that can open the door to spyware (see “Lock Down Internet Explorer”). In these cases, you must either view the page in IE or abandon the site. If you take the former course, you’ll appreciate the IE View extension for Firefox and Mozilla Suite (freely available from http://ieview.mozdev.org). When you encounter a site that won’t work properly in Firefox, just right-click an empty area of the page and select “View This Page in IE,” or right-click any link on the page and select “Open Link Target in IE.”
Funny Symbols in Web Pages
THE ANNOYANCE: I see funny symbols in the text on some web pages, particularly where I’d expect to see hyphens or apostrophes. What’s wrong?
THE FIX: You’re viewing the site with the wrong code page. The code page is the assortment of characters your browser uses to render text, and it must match the code page that was used to create the site. Usually your browser picks the correct one automatically, but if you’ve previously changed the code page (or if another web site switched code pages on you), or if the web site doesn’t specify the correct code page, the site won’t display properly, as shown in Figure 4-6.
In Internet Explorer, go to View → Encoding → Auto-Select. If there’s already a checkmark next to Auto-Select, or if that doesn’t help, go to View → Encoding → More, and choose the nationality that best matches the document you’re viewing. The default code page for sites in English is Western European (Windows).
In Firefox and Mozilla Suite, go to View → Character Encoding, and select Western (ISO-8859-1) for sites in English, or another nationalization that more closely matches the site you’re viewing. If you find yourself returning to this menu often, go to View → Character Encoding → Customize to choose which code pages are displayed in the top-level menu. With either browser, some trial and error may be necessary before the site displays correctly.
Pictures Don’t Show Up in Some Web Pages
THE ANNOYANCE: Recently, some icons, pictures, and photos appear to be missing from all sorts of web pages. Sure, these sites are loading faster, but porn sites aren’t as much fun as they used to be.
THE FIX: There are a bunch of things that can cause this problem. First, clear your browser cache to remove any corrupt data that your browser might be using to display pages. In Internet Explorer, go to Tools → Internet Options, and in the “Temporary Internet files” section, click the Delete Files button. Check the “Delete all offline content” box, and click OK.
If you’re using Firefox, go to Tools → Options, choose the Privacy category, and click the Clear button next to Cache. In Mozilla Suite, go to Edit → Preferences, choose the Advanced → Cache category, and click the Clear Cache button.
Some improperly configured firewall software—particularly Norton Internet Security and Norton Personal Firewall—can interfere with images in some web sites. Temporarily disable your firewall; if that helps, consult the firewall’s documentation (specifically relating to the anti-hotlinking features) to fix the problem. (Note that neither the Windows Firewall nor most firewall-enabled routers typically exhibit this problem.)
Ad-blockers may also be suppressing content you want to see. By design, ad-blockers block images, animations, inline frames, and other content served up by certain sites, but your ad-blocker might be blocking more than just ads. Many sites also pull non-ad content from these same servers, sometimes for economic or technical reasons, but primarily in an attempt to thwart ad-blockers. Either way, turn off your ad-blocking software to see if that solves the problem.
Finally, bad proxy settings can break all sorts of things in web sites. If you’re surfing from work, your employer may require you to go through a proxy server; turn it off and see if the problem stops. Likewise, if you’re surfing from home and you’re using a proxy server, you may have to turn it off to view sites reliably. In Internet Explorer, go to Tools → Internet Options, choose the Connections tab, and click the LAN Settings button to configure your proxy server. In Firefox, go to Tools → Options, choose the General category, and click the Connection Settings button. In Mozilla Suite, go to Edit → Preferences and choose the Advanced → Proxies category. See “Surf Anonymously for Free” for more information on proxies.
Improve Any Web Site
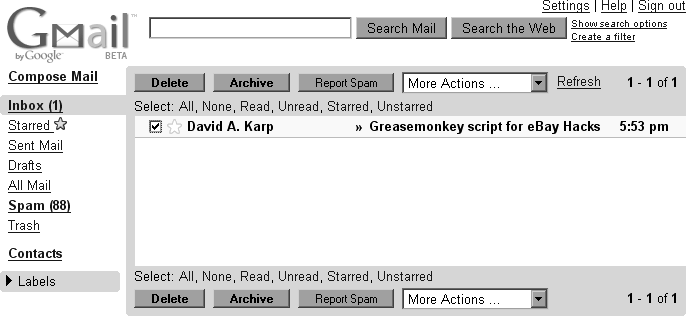
THE ANNOYANCE: I love Google’s Gmail service, but because there’s no Delete button it takes three clicks to delete unwanted messages. While I’m at it, there are some things I’d like to change about other web sites, too.
THE FIX: Use Greasemonkey to customize your favorite web sites. Greasemonkey is a free extension (available at http://greasemonkey.mozdev.org) for the Firefox and Mozilla Suite browsers that lets you add custom JavaScript code to any web page. The code then runs automatically as though it’s part of the page itself and alters the page’s appearance or changes its behavior.
By itself, Greasemonkey doesn’t do much. To bring Greasemonkey to life, you must install user scripts that you download or write yourself. Most user scripts are designed to add features to individual web sites, but some were written to fix bugs. Visit http://www.userscripts.org, and you’ll find plenty of gems. For instance, there’s a user script that adds your requested Delete button to Gmail (see Figure 4-7); another script changes Google’s image search results so thumbnails are linked to their full-size versions.
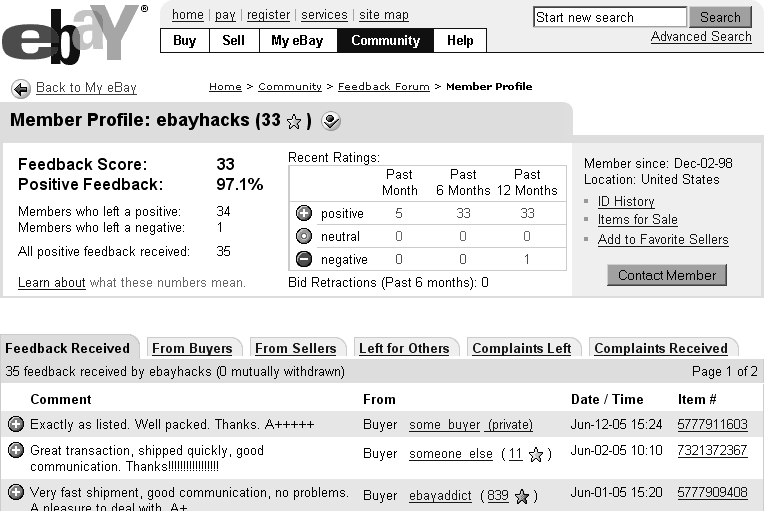
There are scripts for all sorts of web sites. In the eBay section, for instance, you’ll find the “Show Only Negative Feedback” user script, which allows you to show only the complaints an eBay member has received (Figure 4-8)—something eBay won’t let you do.
When you’ve found a user script you want, right-click the link to the script and select Install User Script. You can also click the link to display and examine the script in your browser, and then, if you like what you see, go to Tools → Install User Script. The script will be active immediately, but you’ll have to reload any applicable pages to see the results.
Not all scripts are site-specific. The Linkifier script turns anything that looks like a URL—on any page—into an active link you can click. Similar scripts do the same thing for email addresses and even UPS and FedEx tracking numbers. The best part, though, is that with some knowledge of JavaScript, you can write your own user scripts and customize the Web to your heart’s content! To get started authoring user scripts, visit http://greasemonkey.mozdev.org/authoring.html and pick up a copy of O’Reilly’s Greasemonkey Hacks by Mark Pilgrim.
Note
Greasemonkey works only with Mozilla browsers (e.g., Firefox, Mozilla Suite, Netscape). If you’re using Internet Explorer, try Trixie (http://www.bhelpuri.net/Trixie/), which runs Greasemonkey user scripts on IE. Given that nearly all Greasemonkey user scripts are written for—and tested with—Greasemonkey, there’s no guarantee that they’ll work as well (or at all) with Trixie and IE. But if you’re stuck with IE, Trixie is your best bet.
Put an End to Pop-Ups
THE ANNOYANCE: There should be a law against pop-up advertisements. I hate having to close all those windows when I’m trying to get my work done.
THE FIX: Alas, I suspect anti-pop-up laws would be about as effective as anti-spam laws. But that doesn’t mean you can’t take matters into your own hands and stop the madness (more or less). In the old days, all you had to do was install a third party pop-up blocker, and you were set. Today, all major browsers come with built-in pop-up blockers (though some are better than others). The problem is that pop-ups are no longer limited to web sites, which means your anti-pop-up arsenal must grow to keep up.
To block web-based pop-ups in Internet Explorer, go to Tools → Pop-up Blocker → Turn On Pop-up Blocker. Of course, some sites use pop-up windows for purposes other than advertising, so you may decide to exclude sites from the blocker from time to time to allow their pop-ups to work. To do this, go to Tools → Pop-up Blocker → Pop-up Blocker Settings, type (or paste) the URL of the site into the “Address of Web site to allow” box, click the Add button, and click OK. Unfortunately, IE doesn’t block all types of pop-ups, so a few windows may still poke through.
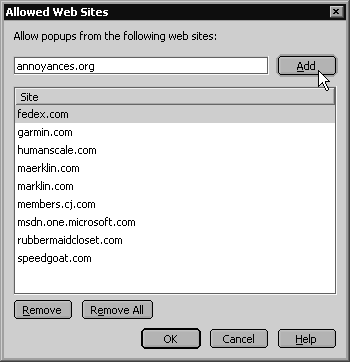
Both Firefox and Mozilla Suite block more types of pop-ups than Internet Explorer, but only Mozilla Suite makes it easier to add exclusions. In Mozilla Suite, go to Tools → Popup Manager → About Popup Blocking to turn on the feature. (You’re also prompted to turn on the blocker the first time a web site tries to show a pop-up window.) When you want to allow a pop-up from a particular site, go to Tools → Popup Manager → Allow Popups From This Site, and click the Add button to exclude the site (see Figure 4-9).
Firefox is the only major browser to block pop-ups by default. To permit pop-ups from certain sites, go to Tools → Options, choose the Web Features category, and click the Allowed Sites button next to Block Popup Windows.
What if you have your browser configured to block pop-ups, but they’re still occasionally showing up? If you see pop-ups when you’re not surfing the Web, your PC may be infected with spyware, software designed to display advertisements and sometimes even monitor your surfing habits. Spyware, adware, and other types of malware (malicious software) come from some web sites, as discussed in “Lock Down Internet Explorer,” and also piggyback on some downloadable applications (commonly P2P file-sharing programs and, strangely, many weather forecasting desktop applications).
Note
Firefox and Mozilla Suite also give you more control over JavaScript, the programming language used to facilitate most pop-ups and add some other annoying traits to web sites. To tweak the JavaScript settings in Firefox, go to Tools → Options, choose the Web Features category, and click the Advanced button next to Enable JavaScript. In Mozilla Suite, go to Edit → Preferences → Advanced → Scripts & Plugins. In either browser, you can prevent sites from moving or resizing windows, changing the text in the status bar, and more by simply turning off the respective options. See “Improve Any Web Site” for other ways to make sites less annoying.
Malware can be difficult to remove manually; the Add or Remove Programs control panel window is typically useless here. To get rid of these kinds of pop-ups, you’ll need to install antispyware software. Among the best free antispyware tools are Spybot - Search & Destroy (http://www.safer-networking.org) and Ad-Aware (http://www.lavasoft.com). Also recommended is SpySweeper (http://www.webroot.com), which offers a free 30-day trial, and Microsoft’s own AntiSpyware tool (http://www.microsoft.com/downloads/), which is free and worth a look.
Note
Keep in mind that no antispyware program offers complete protection, so you may want to routinely scan your system with several of the antispyware tools listed here, as well as antivirus software, to keep your PC malware-free. Whatever package(s) you use, frequently run the tool’s updater to make sure it’s current on the latest threats.
Stop That Browser Hijacker!
THE ANNOYANCE: I clicked a link on a web page, and I was suddenly transported to a search page I didn’t recognize. The same thing happens on a bunch of different sites. Are these web sites broken, or is something else wrong?
THE FIX: Your PC is infected with a browser hijacker, a form of malware that redirects the links in web sites to special advertising sites that generate revenue for the person who wrote the hijacking program.
To get rid of the hijacker, use one or more of the up-to-date antispyware tools recommended in “Put an End to Pop-ups.” If you don’t have an antispyware program on your system, getting one after an infection can be difficult. Hijackers have a nasty sense of self-preservation and tend to block access to web sites offering antispyware tools.
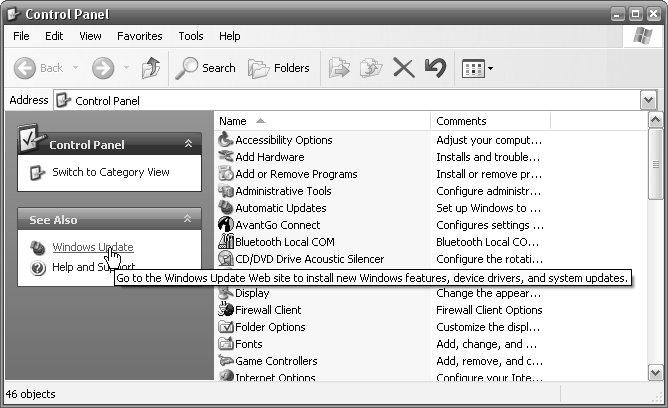
One way to get around a browser hijacker is to open the Windows Control Panel. If you don’t see the task pane on the left (see Figure 4-10), go to Tools → Folder Options, click “Show common tasks in folders,” and click OK. (You can turn it off later by returning here and selecting “Use Windows classic folders.”) In the See Also box that appears on the left, click the Windows Update link. The window that appears is a regular Internet Explorer window, but with a twist: this window is designed to download updates to Windows when IE has been disabled. It’s typically unaffected by hijackers and other malware. From here, you can surf to any of the antispyware sites, download some utilities, and remove the hijacker.
Note
If you know the exact URL of the .exe file to download, such as http://aspect1.tucows.com/files/spybotsd.14.exe, you can often get past a hijacker by typing the URL in your browser’s address bar. With no links for the hijacker to redirect, the download should start right away.
Solve the Blank Form Mystery
THE ANNOYANCE: I filled out a form on a web page and clicked Submit, only to be told that there was something wrong with what I’d entered. When I clicked Back to return to the previous page, everything I typed was gone! What’s wrong with the site?
THE FIX: This is caused by a bug in your web browser, and not the web site. All versions of Internet Explorer, and older releases of Netscape (Versions 4.x and earlier), are affected by this bug.
To date, no browser handles form data in previously visited pages perfectly, but there are a few workarounds.
For one, most web site designers are aware of the bug and have built their web sites accordingly. So, if you submit a form and then need to go back and change what you’ve typed, don’t press your browser’s Back button; rather, look for a Back button or Edit button right on the page, and click it to safely modify your text.
Next, make a habit of performing an impromptu backup before you submit any form. For instance, if you’ve written a long message, click in the text box, press Ctrl-A to highlight all the text, press Ctrl-C to copy it, open a text editor such as Notepad, and press Ctrl-V to paste it. (Repeat these steps for any long field in the form.) If you’re later forced to return to the page by pressing your browser’s Back button and the form is emptied as a result, you can simply paste your text back into the form.
Finally, Mozilla Suite can pre-fill most types of web forms. Just before submitting a form, select Edit → Save Form Info. Then, if the form is blank when you return (or if you encounter a new form requiring similar data), select Edit → Fill in Form to restore your data.
Stop Annoying Animations
THE ANNOYANCE: The dancing hamster was cute at first, but now it’s getting on my nerves. Everywhere I go on the Web, something is pulsating, flying across the screen, or playing music. How can I make this online circus stop?
THE FIX: Pressing the Esc key stops most animations, but this is a temporary fix and works only with animated .gif image files. If you want to permanently disable .gif animations altogether in Internet Explorer, go to Tools → Internet Options, click the Advanced tab, and remove the checkmark next to the “Play animations in web pages” option (see Figure 4-11). You can also turn off sounds and videos with similar settings in the same section. Click OK when you’re done.

In Firefox and Mozilla Suite, type about:config into the address bar to show the staggering list of all available fine-tuning options for these browsers. Find image.animation_mode in the list (type something like anim in the Filter field to locate it quickly), double-click the option, and type none in the Enter String Value box. If you don’t want to completely disable animations, you can type once here instead (normal is the default) to let sites play all animations only once, but never repeat (loop) them. Click OK when you’re done.
Other types of animations require different strategies. If the animation, video, or sound is coming from a Java applet, the only way to stop it is to turn off Java support altogether. In Internet Explorer, go to Tools → Internet Options, click the Security tab, and click the Custom Level button. In the JavaVM section, select Disable Java, and then click OK in both boxes. In Firefox, go to Tools → Options, choose the Web Features category, remove the checkmark next to Enable Java, and click OK. In Mozilla Suite, go to Edit → Preferences, highlight the Advanced category, remove the checkmark next to Enable Java, and click OK.
JavaScript, not to be confused with Java, is often used to create flyovers (where a button or icon changes when you move the mouse over it) as well as cursor trails (the flying bits that follow your mouse pointer). To disable JavaScript in Internet Explorer, go to Tools → Internet Options, click the Security tab, and click the Custom Level button. In the Scripting → Active scripting section, select Disable, and then click OK in both dialog boxes. In Firefox, go to Tools → Options, choose the Web Features category, remove the checkmark next to Enable JavaScript, and click OK. In Mozilla Suite, go to Edit → Preferences → Advanced → Scripts & Plug-ins, uncheck the Navigator box, and click OK.

Of course, none of this will disable plug-ins, such as Flash. To turn off Flash animations in Internet Explorer, you must uninstall the Flash player using Macromedia’s elusive uninstaller tool, available at http://www.macromedia.com/support/flashplayer/ (search the knowledge base for “uninstall”). But in Mozilla Firefox and Mozilla Suite, you can use the powerful Adblock extension, available for free at http://adblock.mozdev.org, to selectively hide animations. Once it’s installed, restart your browser, and then go to Tools → Adblock → Preferences. Open the Adblock Options menu, and if the Obj-Tabs entry doesn’t have a checkmark next to it, click Obj-Tabs and then click Done. Thereafter, a little tab labeled Adblock will protrude from any Flash animation on a page (see Figure 4-12); just click the tab to show the address of the ad, and then click OK to begin blocking that particular Flash animation.
Adblock supports wildcards, so, for instance, you can block all Flash animations from a particular server, rather than having to do it manually for each one. The next time you click an Adblock tab, you’ll see the address of the .swf file, like this:
http://advertising.server/ads/chipmunk.swf
Just replace the filename with an asterisk (*), like this:
http://advertising.server/ads/*
to block all the files from the /ads/ folder on that server. Adblock will continue to hide these animations until you manually remove the corresponding rule from the Adblock Preferences window.
Open PDFs Outside the Web Browser
THE ANNOYANCE: If I double-click a PDF file on my desktop, it opens in Adobe Acrobat. But if I click a link to a PDF file on a web page, the PDF opens in my browser window instead of Acrobat. How do I get PDFs to open in Acrobat all the time?
THE FIX: When you view a PDF in a browser window, you’re using an Acrobat plug-in that’s installed automatically when you install Acrobat Reader (or the full version of Adobe Acrobat, for that matter). There’s an option in Acrobat’s Preferences dialog (go to Edit → Preferences and choose the General category in Acrobat 5.x and 6.x or the Internet category in Acrobat 7.x) called “Display PDF in Browser”; unchecking this box should disable the plug-in, but unfortunately this option often doesn’t always work. In this case, you’ll have to take matters into your own hands.
To bypass the plug-in, right-click links to PDF files and select Save Target As (Save Link As in Firefox or Save Link Target As in Mozilla Suite) to save them to your hard disk instead of opening them in the browser. (In Mozilla Suite, you can also hold Shift while clicking links to save their targets.)
To disable the Acrobat plug-in altogether, exit your browser, open a Search window (Start → Search → All files and folders), and, in the “All or part of the file name” field, type nppdf32. In the “Look in” list, choose Local Hard Drives, and then click the Search button. In a few minutes, you should see at least two (and possibly more) copies of the nppdf32.dll file. Delete all copies of nppdf32.dll, and close the Search window when you’re done. (If you want to reinstate the plug-in, just reinstall Acrobat Reader.) The next time you click a link to a PDF file in any web page, your browser will prompt you to either save the file or open it with the default program (presumably Acrobat).
Control Tabbed Browsing
THE ANNOYANCE: I upgraded to Firefox some time ago, and while I like it, I can’t say I’ve ever warmed up to the idea of "tabbed browsing.” Every so often I open a link in a tab instead of a new window by accident, and I can’t seem to close it fast enough. It’s infuriating that I can’t turn them off completely.
THE FIX: Some people like tabs because they reduce screen clutter, but if you like to view pages side by side, for example, tabs are just a nuisance. In Firefox, Ctrl-clicking a link opens it in a new tab, but Shift-clicking opens it in a separate window. (In Mozilla Suite, however, Ctrl-click opens new windows and Shift-click saves links.)
To disable all tabs in Firefox permanently, install the free Tab Killer extension (available at http://extensionroom.mozdev.org/more-info/tabkiller), and restart Firefox. Firefox will now ignore any attempts to open new tabs, instead opening links in the current window. To have Firefox open such links in new windows, go to Tools → Extensions, highlight Tab Killer, click the Options button, check the “Open new windows instead of new tabs” box, and click OK.
Conversely, Firefox users who despise the pileup of windows and will happily put up with tabs to keep the browser window tidy can install the free Single Window extension (https://addons.mozilla.org/extensions/moreinfo.php?id=50) or the free This Window extension (http://extensionroom.mozdev.org/more-info/thiswindow).
While you’re at it, peruse both of these sites for dozens of other extensions that expand or tame this controversial feature. For instance, if you don’t want to pick sides at all, you can install the free “Open link in…” extension (https://addons.mozilla.org/extensions/moreinfo.php?id=379). With this extension in place, right-clicking any link will display five different options: “Open Link in New Window,” “Open Link in New Tab,” “Open Link in New Background Tab,” “Open Link in New Background Window,” and “Open Link Here.”
Faster Downloads Without the Hassle
THE ANNOYANCE: Downloading files from the Web takes forever, and sometimes the progress bar just stops! How can I kick-start downloads?
THE FIX: You need a download manager (sometimes called a download accelerator), a program designed to eliminate many of the inefficiencies in the download process. Unfortunately, most download managers are so cumber-some and poorly designed that you’ll eat up a lot of time just setting them up before you begin each download.
One of the only decent download managers is Download Express, available for free from http://www.metaproducts.com (see Figure 4-13).
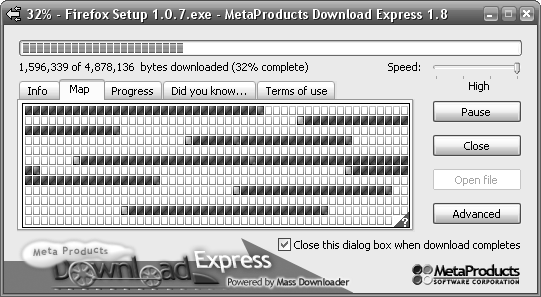
Note
To integrate Download Express with Firefox and Mozilla Suite, install the MetaProducts Integration plug-in, which allows you to download any item with a right-click. Better yet, use the DownloadWith extension described in “Set Download Defaults in Mozilla Suite” to make Download Express your default down-loader for any or all file types.
After installing Download Express, go to Start → All Programs → MetaProducts Download Express → Download Express Options, and click the Integration tab. Check the “Use alternative integration method” box and click OK. (You’ll need to exit and relaunch Internet Explorer for the change to take effect.)
Set Download Defaults in Mozilla Suite
THE ANNOYANCE: When I download files with Mozilla Suite, I’m often asked if I want to open the file or save it to my hard disk. Even when I check the “Always perform this action” box, Mozilla Suite keeps asking me. How can I stop this endless badgering?
THE FIX: This bug has been around for a long time in Mozilla browsers, although it was mostly fixed in Firefox. The solution is to install the free DownloadWith extension, available at http://downloadwith.mozdev.org, along with the Download Express download manager discussed in “Faster Downloads Without the Hassle.”
Install both programs, restart Mozilla Suite, go to Edit → Preferences, and choose the DownloadWith category. Click the “Create new application” button, select MetaProducts Download Express from the list, and click OK. Then, choose the “Automatic download” tab, select the “All files” option, and choose MetaProducts Download Express from the Application drop-down list.
Note
If you only want to automatically download certain file types, select “Specific files” instead of “All files.” Then type a filename extension in the “File type” field, minus the dot (for example, enter
zip
for .zip files). Choose MetaProducts Download Express, from the Application drop-down list, and then click the Add/Update button to add your new entry to the list.
Click OK when you’re done. From now on, to download a file from a web site, just click the link. Choose a folder to save the file in, and Download Express will handle the rest automatically.
Surf Anonymously for Free
THE ANNOYANCE: I visited some web site that showed my IP address and even the state where I live. This is freaking me out. How can I mask my identity when I’m on the Internet?
THE FIX: Use a proxy server to mask your IP address (and yes, your state) from the web sites you visit. As the name implies, a proxy server stands between your browser and the sites you surf, in effect “hiding” you from prying sites. Once you set up a proxy server, all information you send and receive with your browser goes through that server (email and other programs must be configured separately to use the proxy). Most large companies use their own proxy servers to help protect the data on company PCs from prying eyes, but you don’t have to work at a big company to get the same protection.
Start by visiting http://www.annoyances.org/ip/ to view your IP address as web sites see it. Then, go to http://www.proxy4free.com, click "Section 1.1" in the list on the left, and find any server marked “anonymous.” Highlight its IP address and press Ctrl-C to copy it to the clipboard; also note the port number shown in the adjacent column. Next, configure your browser to use that proxy server.
If you’re using Internet Explorer, go to Tools → Internet Options, choose the Connections tab, and click the LAN Settings button. Check the “Use a proxy server for your LAN” box, and then press Ctrl-V to paste the IP address into the Address field. Type the appropriate port number (usually 80 or 8080) into the Port field, and click OK when you’re done.
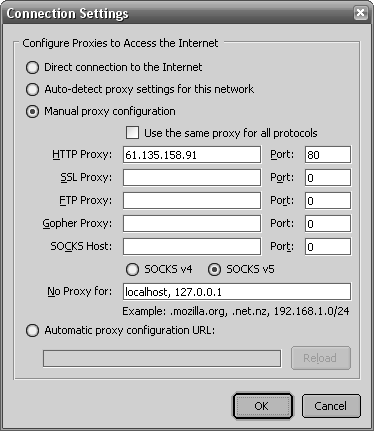
The procedure is pretty much the same for other browsers. If you’re using Firefox, go to Tools → Options, choose the General category, click the Connection Settings tab, and select “Manual proxy configuration” (see Figure 4-14). If you’re using Mozilla Suite, go to Edit → Preferences → Advanced → Proxies, and select “Manual proxy configuration.”
Now, go back to http://www.annoyances.org/ip/, and notice that your IP address has changed! (If you can’t load the page, the proxy server is down; just choose another proxy server from Proxy 4 Free and try again.) From here on, until you disable the proxy, every site you visit will see your proxy server’s IP address instead of yours.
Every byte of data you send and receive with your web browser will be sent through the proxy server. Unless you know—and trust—whoever is hosting that server, you should always disable the proxy before sending sensitive information (e.g., your home address, credit card details, etc.).
If setting up a proxy server sounds like overkill but you’d like to have protection on the odd occasions when you visit a site that you suspect may be harvesting information about you, an alternative is to use a free, single-serving proxy server, such as Proxify (http://www.proxify.com), The Cloak (http://www.the-cloak.com/login.html), or Anonymizer (http://www.anonymizer.com). Just type or paste the URL of the site you want to visit into the text box on any of these pages (at the Anonymizer site it’s the Private Surfing box in the upper-right corner), and press Enter. The proxy site will load up the page, allowing you to surf anonymously for this session. Click links in the page to continue surfing anonymously, or use your browser’s address bar, bookmarks, or Internet Shortcuts to return to normal, non-proxy surfing.
Note
Anonymizer also has a free Privacy Toolbar (for Internet Explorer only, unfortunately), which does much the same thing as the web-based Anonymizer, albeit with a slicker interface.
If you want more flexibility than web-based proxies can offer, try Anonymizer’s $29.95-per-year Anonymous Surfing tool or the $9.95 Anonymous Browsing Toolbar 3.3 (http://www.amplusnet.com). These programs, which run on your PC, perform pretty much the same function as the web-based proxies discussed above, but with more features and speed. All things considered, these software-based proxies are probably marginally safer than anonymous proxies and less of a hassle than web-based proxies.
Now, you might be thinking, why not just use a router? Well, routers—discussed in Chapter 5—offer terrific firewall production and indeed act as a layer between your PC and the rest of the Web. But when you surf from behind a router, web sites see your router’s IP address, and thus can still collect all the same information about you and your geographical location. (See the “What Can They Find Out About You?” sidebar on the previous page for details.)
Pick the Default Email Program
THE ANNOYANCE: I use Eudora to read my email, but Outlook appears at the top of my Start menu. Can I put Eudora here instead, or does Microsoft want me to switch to Outlook?
THE FIX: Well, yes, Microsoft does want you to switch to Outlook. And they want you to use Word and Internet Explorer, rather than WordPerfect and Firefox. If they had their way, you’d be brushing your teeth with Microsoft Toothpaste. The good news is that you can have it your way; Sinatra would be proud.
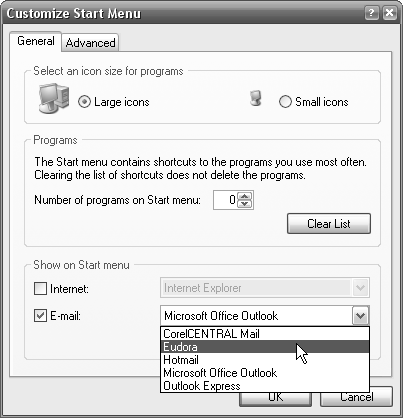
To change the program that appears in your Start menu, right-click the Start button, select Properties, and choose the Start Menu tab. Make sure the “Start menu” option is selected, click the Customize button, and choose the General tab. Pick the desired program from the drop-down Email list in the “Show on Start Menu” section (see Figure 4-15), and click OK. (You can also remove the entry entirely by clearing the checkbox next to “E-mail.”)
But the Start menu entry is only a small piece of the puzzle. What’s particularly important is the default email program—the program that opens automatically when you click a mailto: link in a web page or email a file from within another application. To make your favorite email program the default, open the Internet Options control panel, click the Programs tab, and choose your program from the drop-down Email list. If you don’t see your favorite email program here, see the “Add or Remove Email Clients” sidebar.
Stop Spam
THE ANNOYANCE: I downloaded my email this morning. Of the 873 messages in my inbox, only 4 were actually for me (my thinning hair and waning sex drive notwithstanding). Where are the other 869 messages coming from, and how do I stop them?
THE FIX: There is no perfect solution to the spam problem. Either you live with some junk mail in your inbox, or you employ a spam filter that occasionally deletes valid messages. Fortunately, a handful of steps can reduce your exposure to spam.
First, don’t post your email address on web sites, in public forums, or in the backs of computer books. If you’ve already done this, you’re already on every spam list on the planet.
If you’re already getting tons of spam, now’s the time to change your email address. Get your own domain name and create a bunch of different addresses for different purposes, such as shopping@mydomain.com for online shopping, auctions@mydomain.com for buying and selling on eBay, subscriptions@mydomain.com for newsletters, and personal@mydomain.com for personal correspondence, and have them all go to the same inbox. That way, if one of your addresses makes its way onto a spam list, you can take down the address without disrupting the email to your other accounts. Better yet, create a new email address for every site you visit, such as amazon@mydomain.com, ebay@mydomain.com, nytimes@mydomain.com, and annoyances@mydomain.com. That way, if an address starts getting spam, you’ll know who sold you out.
Once you’ve got a “clean” email address, turn off image fetching for HTML messages in your email software. Some email messages have embedded pictures (as opposed to attachments); when you view one of these messages, your email program fetches the picture from the server, and that server records the event. (And voilà, your email address has been captured.) If you turn off image fetching, those servers are never notified, and you’ll stay off more spam lists. Here’s how to turn it off:
- Microsoft Outlook
Go to Tools → Options, choose the Security tab, and, under Download Pictures, click Change Automatic Download Settings. Place a check-mark next to the “Don’t download pictures or other content automatically in HTML e-mail” option, and then click OK in both boxes.
- Microsoft Outlook Express
Go to Tools → Options, choose the Security tab, and, under Download Images, check the “Block images and other external content in HTML e-mail” box. Then click OK.
- Eudora
Go to Tools → Options, and choose the Display category. Remove the checkmark next to the “Automatically download HTML graphics” option, and click OK.
- Mozilla Thunderbird
Go to Tools → Options, and choose the Advanced → Privacy category. Select the “Block loading of remote images in mail messages” option, and click OK.
Next, install an independent, passive spam filter—one that marks potential spam as **Spam** instead of deleting it—such as SpamPal (free,
http://www.spampal.org). Then configure your email program’s filter to send all email containing the text **Spam** in the subject line to the Junk or Trash mailbox. That way, you can get the spam out of your face, but later peruse your Junk mailbox for valid messages before purging it.
Most email programs (e.g., Outlook, Thunderbird, and Eudora) have built-in spam filters that can likewise route spam into the trash, but third-party programs such as SpamPal are more configurable and update their spam lists and definitions frequently. Note: SpamPal works with any POP3- or IMAP4-based email program, which means it doesn’t work with AOL or with web-based mail systems such as Gmail.
If your spam situation is particularly bad, and passive spam filters aren’t cutting it, there are more drastic options. First, contact your ISP and request that they employ a server-based spam filter such as Postini (http://www.postini.com). The downside: some valid mail may never make it to your inbox.
Note
All spam filters rely on up-to-date lists and definitions to block spam effectively, so make sure your spam filters are kept current. If you’re using Outlook, you can get spam filter updates from http://office.microsoft.com/en-us/officeupdate/. Some other email programs, such as Eudora, include updates only with subsequent versions of the software; check your documentation for details.
Note
If you’re running an online business, think twice before you deploy one of these aggressive spam filters. The last thing you want is a spam filter deleting your customers’ emails! And eBay users take note: spam filters are the number-one cause of negative feedback for both buyers and sellers.
You can also employ a more aggressive interactive spam filter, such as Cloudmark Desktop (http://www.cloudmark.com), which won’t allow any email to reach your inbox unless the sender is on an approved-senders list. (Many ISPs, such as Earthlink, offer this type of service as well.) If a non-approved sender tries to send you a message, the program sends back an email requesting that the sender fill out a web form. This not only trips up spam (which is sent by machines), but lets you reject humans with whom you’d rather not correspond. Of course, you can also easily add any sender to your approved list. This approach can turn a flood of spam into a trickle, but it won’t ever let through valid automated messages, such as newsletters, registration codes you’ve paid for, or order confirmation emails from online merchants. Also, these types of filters won’t stop spoofed messages, wherein the sender is made to look like someone likely to be on your approved list (such as another user in your domain).
Don’t Phall for Phishing
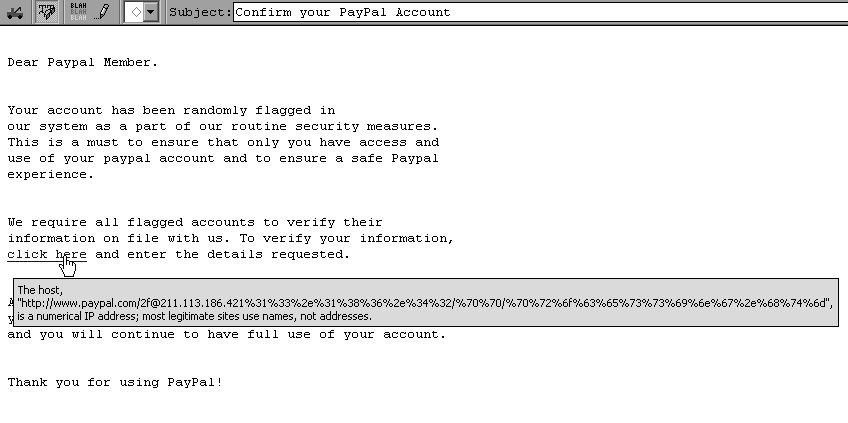
THE ANNOYANCE: I got a message from eBay telling me that my account would be suspended if I didn’t update my information. When I got a nearly identical message from Wells Fargo, I got suspicious, seeing as I don’t have a Wells Fargo account. What’s the story?
THE FIX: Those messages aren’t from eBay or Wells Fargo; they’re spam. But unlike come-ons for weight loss and real estate schemes, this spam tries to trick you into revealing personal information.
The practice is called "phishing” (not to be confused with the musical group, Phish), and it works like this: you get an email that looks authentic (known as a spoof), and you’re encouraged to click a link in the message. The link takes you to a web site that looks like eBay (or Wells Fargo, or whatever), where you’re asked to log in. Type your username and password, and you’ll unwittingly send your login information to the online thieves who created the fake site. Of course, your password isn’t enough; often, you’re asked to supply your credit card number, Social Security Number, mother’s maiden name, and anything else they’ve thought of.
To avoid this trap, recognize the red flags. First, no reputable company will ever ask you to “verify” your information, and while many sites ask you to log in to access your account, you should never do so after following a link in an email. Instead, use a trusted bookmark or just type the URL into your browser’s address bar by hand. Always examine your browser’s address bar to make sure you’re at a legitimate site, especially if you’re about to type sensitive information into a web form. If you’re not comfortable simply discarding the message, contact the company and ask if the email is legitimate.
Second, inspect any URLs in the message. Pass your mouse pointer over the link, and the address should pop up (assuming your email program supports this). Odds are you won’t see something like http://www.ebay.com, but rather a long arcane URL with lots of symbols, or a numeric web address like http://168.143.113.54. This is a sure sign that you’ve gotten a phishing email destined for the circular file!
Note
To further scrutinize a suspicious email, right-click the message body and select View Source to view the HTML source code of the message. Search for “http,” and you’ll find the real URLs tied to the links in the message.
If you’ve configured your browser to save your login information (see “Remember Web Site Passwords”), you’ll know you’re not looking at the real site if your browser doesn’t fill out the form for you; browsers save passwords for specific URLs, and your PC can tell the real thing even if you can’t.
Finally, you can switch to an email program such as Eudora that warns you of potential spoof emails. When you get a message asking you to verify your account, for instance, Eudora will examine the URL inside the message and display a warning message (see Figure 4-16) if it suspects phishing.
Note
If you just need to send a few snapshots, emailing them is fine… as long you shrink them down first. Your 8-megapixel digital camera creates 4-MB files, but your friends don’t need full-resolution photos unless they’re going to print them. You can use Microsoft’s free Image Resizer utility (see “Quickly Shrink Many Photos” in Chapter 3) to make your image files smaller before you email them. The total size of all the files you send should never be more than 400–500 KB.
Send Large Files
THE ANNOYANCE: After several painful experiences, I’ve finally learned my lesson about sending large email attachments. But I really need to send photos of my newborn daughter to my family, and I don’t know any other way.
THE FIX: Clogging your relatives’ inboxes with 20 megabytes’ worth of attachments is definitely a faux pas. Do it twice, and they may configure their spam filters to automatically dump all your emails in the trash.
If you want to share lots of photos, the best approach is to put the files on a web server somewhere, and then send out an email with the server’s URL. Your message will go out in a flash, your recipients won’t have any trouble opening it, and they’ll be able to download the files they want at their leisure. If you have your own web space (often provided free by your ISP), you can FTP your files to the server, and then send your friends an address like this:
http://www.my-isp.net/~myusername/DSCN0165.JPGwhere my-isp.net is your ISP’s web site, myusername is your username, and DSCN0165.JPG is the name of a file you want to share. Contact your ISP for details.
Unfortunately, your ISP probably isn’t interested in helping you host (and have your friends download) gigabytes’ worth of data. If you don’t have web space, or if your ISP restricts the types or size of files you can upload to it, visit YouSendIt ( http://www.yousendit.com). You can upload any type of file to YouSendIt’s servers, and they’ll automatically email your recipients a link to your files. Your files are deleted after 7 days or 25 downloads, whichever occurs first. YouSendIt is free, requires no registration, and permits sharing of files up to 1 GB in size!
If you’re only sharing photos, you have quite a few more options. For example, you can send your photos to a free photo printing/sharing service such as Shutterfly (http://www.shutterfly.com), DotPhoto (http://www.dotphoto.com), Flickr (http://flickr.com), or Kodak Gallery (http://kodakgallery.com). Anyone with whom you choose to share your albums can view your photos one at a time, or as pages of thumbnails; they can even order prints for scarcely more money than it costs to print them at home.
If you want your pals to be able to download the full-resolution pictures (something most printing services won’t allow), send your photos to Putfile (http://www.putfile.com). After uploading your photos, Putfile supplies a URL to the files that you can send in an email. PutFile even generates HTML code you can reference on a web page, all for free.
Receive All Types of Attachments
THE ANNOYANCE: My clients email me attachments, and I can usually open them without a problem. But the other day, I received this message where the attachment should have been: “Outlook blocked access to the following potentially unsafe attachments: product list.mdb.”
THE FIX: By default, Microsoft Outlook won’t allow you to send or receive certain types of attachments, such as .mdb and .exe files; instead, you’ll just get that error message. The rationale is that these files can contain viruses or other harmful code, but the fact that Outlook doesn’t let you easily disable or at least customize this feature is just plain stupid. What’s even more ridiculous is that Word (.doc) files, which are one of the most common transports of viruses, aren’t blocked by default.
The simple fix is to have the sender resend the file, but with a different filename extension. (Better yet, have him zip up files to get them past the blocker, and make them smaller to boot.) I know what you’re thinking: how secure is my system if Outlook can be so easily fooled by renaming product list.mdb to product list.mda? The answer: it isn’t doing a good job, which is why spyware and viruses remain such a monumental problem in the PC world.
But what if the sender can’t be reached, and you need the file right away? Or what if you need to be able to receive .mdb attachments every week?
To change the way Outlook works, you’ll need to fiddle with the Windows Registry. Close Outlook and open the Registry Editor (go to Start → Run and type regedit). If you’re using Office XP/2002, expand the branches to HKEY_CURRENT_USER\Software\Microsoft\Office\10.0\Outlook\Security. If you’re using Office 2003, expand the branches to HKEY_ CURRENT_USER\Software\Microsoft\Office\11.0\Outlook\Security.
Next, create a new string value by selecting Edit → New → String Value. In the right pane, type Level1Remove for the name of the new value. Double-click the new Level1Remove value to edit it, and type the filename extensions you’d like Outlook to allow in the “Value data” box. Extensions should be typed in lowercase, without the leading dots (.), and separated by semicolons (;). For example, type:
exe;mdb;vbs
to allow .exe, .mdb, and .vbs attachments, respectively. Click OK and then close the Registry Editor when you’re done.
Now, restart Outlook and open that email with the error message. You should now be able to open those previously blocked attachments. (If an attachment is still blocked, you likely got the filename extension wrong.)
Note
Of course, receiving all attachments means you’ll now be able to get potentially harmful files via email. Even though the majority of viruses are actually contained in files Outlook doesn’t block by default, such as .zip files, exercise caution when opening any files you subsequently receive. Certainly make sure to scan all incoming attachments manually with your antivirus program, or, if you don’t trust yourself to remember, have your antivirus program automatically scan all incoming files. When in doubt, contact the sender to make sure they actually sent you the attachment in question before you open it.
Hide Old Email Recipients
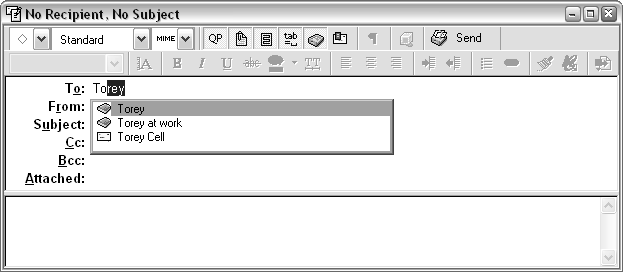
THE ANNOYANCE: When I start to type the name of a recipient in an outgoing email message, my email program shows me a long list of matching names and addresses. Where did all these names come from, and how can I clean out the list?
THE FIX: Email programs build these lists by culling names you’ve typed previously, names of people in your In and Out mailboxes, and names in your address book. Unfortunately, this can include misspelled and obsolete names as well as valid ones.
To remove a single name or address from the history list in Outlook or Eudora, type the first few letters and, when the history list appears, highlight the errant entry (see Figure 4-17) and press the Delete key.
You can also disable the history list completely. In Outlook, go to Tools → Options, choose the Preferences tab, click the E-mail Options button, and then click the Advanced E-mail Options button. Uncheck the “Suggest names while completing To, cc, and bcc fields” box, and click OK in each dialog box.
In Eudora, go to Tools → Options, choose the Auto-completion category, and uncheck the boxes next to all the options under the “Auto-complete items in recipient fields with data from” heading. If you don’t want to disable the feature but you want to make it harder to accidentally select the wrong name, check the “Don’t auto-complete, just list matches” box and click OK when you’re done.
Back Up Stored Email
THE ANNOYANCE: Ever since my hard disk crashed last year, I’ve been paranoid about backing up my important data. Most of my files are easy enough to find in the My Documents folder, but I’ll be darned if I can figure out where my email is located.
THE FIX: Backing up your email is as simple as making copies of the mailbox files. Their locations depend on the email software you’re using.
Note
Eudora’s .mbx files share the same format as Unix mailbox files, so if you want to import a few years’ worth of mail you’ve been reading with Pine, it’s as simple as FTPing the file into your Eudora folder (in ASCII mode) and renaming the file with the .mbx extension. Restart Eudora, and the imported mailbox will show up in the Mailbox menu!
Eudora typically stores its email in either the application folder (usually \Program Files\Qualcomm\Eudora) or your user data folder (\Documents and Settings\{username}\Application Data\Qualcomm\Eudora). Each mailbox is stored in two files: messages are stored in a plain-text .mbx file, and a corresponding “table of contents” is stored in a binary .toc file. So, to back up your Out mailbox, you’d need to copy both out.mbx and out.toc. Mailboxes in folders are stored in actual folders (e.g., Business.fol contains the .mbx and .toc files for your Business folder). Your best bet is to back up the entire Eudora folder and all of its subfolders, which will catch all your email, your address book, your personalities, and all your account settings.
Outlook, on the other hand, stores all your email, contacts, and even your calendar in a single binary .pst file located in your \Documents and Settings\{username}\Local Settings\Application Data\Microsoft\Outlook folder. (The exception is Outlook in a networking environment using Exchange Server, where your .pst file is stored on a file server somewhere; in this case, contact your administrator for help.)
Note
Since all of Outlook’s data is bundled up in such a tidy package, there’s no simple way to merge it with the Outlook data on another computer (say, if you quit your job and wanted to take your email home). Of course, you can overwrite one .pst file with another, but then you’ll lose all your email on the target system. One solution is the Message Vault ($49, http://www.comaxis.com/mv.htm), which, among other things, can extract the mailboxes from a .pst file and export them to Eudora .mbx files. Also available is Microsoft’s own Personal Folders Backup add-in for Outlook 2003, freely available from http://www.microsoft.com/downloads/ .
If you’re using Outlook Express, your email is stored in separate .dbx files—one for each mailbox—in the \Documents and Settings\{username}\Local Settings\Application Data\Identities\{some long string of characters}\Microsoft\Outlook Express folder. Just back up the entire folder, and you’re set.
Note
Find yourself making TinyURLs often? For a shortcut, just go to http://tinyurl.com/#toolbar, and drag the TinyURL! link onto your browser’s Links toolbar. Thereafter, just click the button to create a TinyURL from the current page.
If you use Firefox, try the free TinyURL Creator (https://update.mozilla.org/extensions/moreinfo.php?id=126, or better yet, http://tinyurl.com/574q9). To use the tool, right-click an empty area of the current page and select “Create Tiny URL for this Page.” A shortened URL is created on the spot and copied to the clipboard for your immediate use.
Email Long URLs
THE ANNOYANCE: Whenever I send an email containing a long web address, my recipient complains that it doesn’t work. I finally realized that the long address was being broken apart somewhere along the way, but it’s a hassle telling people that they need to reassemble broken URLs.
THE FIX: You’ve discovered the evils of word wrap. Your typical computer displays lines 80 characters wide. If you send someone a mondo URL, her email program will break it up into separate lines.
Since email vendors have yet to fix this glitch, one neat fix is to shrink the URL before you send it. For example, TinyURL (http://tinyurl.com) can take any horrendously long URL, such as:
	http://maps.google.com/maps?ll=37.826870,122.422682&spn=0.007197,0.009
	112&t=k&hl=en
and turn it into a tidy, easy-to-email URL like:
http://tinyurl.com/cfpmc
TinyURL is fast and free, and the URLs it makes never expire. Also available is SnipURL (http://www.snipurl.com), which does pretty much the same thing but adds tracking features.
So, what do you do when someone sends you a long URL? Well, you can highlight it, copy it to the clipboard (Ctrl-C), and then paste it into Notepad (Ctrl-V), where you can then proceed to manually reassemble the URL onto one line. (Take care to remove extraneous characters, such as spaces and punctuation, while leaving in the stuff that belongs.) Then, copy it again and paste it back into your web browser’s address bar. Or, if you’re using Firefox or Mozilla Suite, you can streamline this process with the free Open Long URL extension (https://addons.mozilla.org/extensions/moreinfo.php?application=firefox&id=132). Install the extension, restart your browser, and then select File → Open Long URL. Paste the long, broken URL into the box and click OK, and the extension will reassemble the URL for you and open the page. See? Much easier than fixing our email software.
Get Fixing Windows XP Annoyances now with the O’Reilly learning platform.
O’Reilly members experience books, live events, courses curated by job role, and more from O’Reilly and nearly 200 top publishers.

