Chapter 1. Windows Interface
You can rearrange the furniture in your office, put your favorite tchotchkes on the shelves, and prune your plants any way you like. So why can’t you customize Windows to your heart’s content?
In fact, Windows XP is surprisingly pliable. This is fortunate, because one of the best ways to deal with many Windows annoyances is to tweak, customize, or otherwise hack the operating system to eradicate them.
GENERAL INTERFACE
Snappy Scrolling
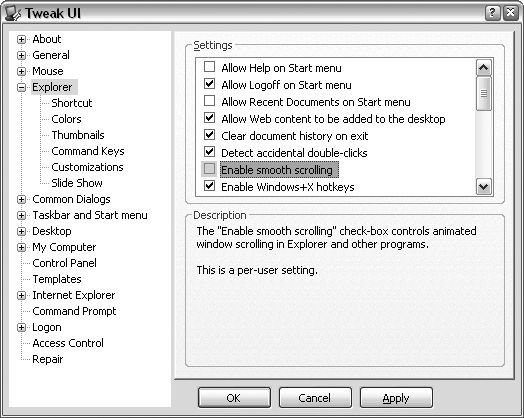
THE ANNOYANCE: When I scroll a folder in Windows Explorer or a web page in Internet Explorer, it acts “sticky,” as though it needs oiling. I presume oiling my monitor is out of the question, but there’s got to be a way to make scrolling snappier.
THE FIX: Microsoft calls this behavior “smooth scrolling,” and fortunately, you can turn it off. For this, you’ll need a Microsoft program called TweakUI (free, http://www.microsoft.com/windowsxp/downloads/powertoys/xppowertoys.mspx). Click the Explorer category on the left side of the window (Figure 1-1), and on the right side, uncheck the “Enable smooth scrolling” box. Click Apply when you’re done.
To turn off smooth scrolling in web pages, in Internet Explorer select Tools → Internet Options, and click the Advanced tab. Scroll down to the bottom of the Browsing section, uncheck the “Use smooth scrolling” box, and click OK.
Sharpen Blurry Text
THE ANNOYANCE: The text on my screen is blurry. Do I need glasses?
THE FIX: If the manufacturer’s logo on your monitor is also blurry, glasses might be a good idea. Otherwise, there are two things that can cause blurry text in Windows XP.
If everything on your screen is blurry, as opposed to just the text, your display may be set to the wrong resolution. If you have a flat-panel LCD monitor, it has a native resolution, which matches the number of the monitor’s physical pixels. If your monitor’s native resolution is 1024x768, for instance, and Windows is set to 800x600, your screen will have to interpolate that lower resolution, and the display will appear blurry. To fix the problem, right-click an empty area of your desktop, click Properties, and then click the Settings tab. Slide the “Screen resolution” slider until the numbers match your screen’s native resolution, and then click OK. (See the next annoyance if this setting makes icons and text too small.)
Note
If you don’t know your screen’s native resolution, it’s usually—but not always—the rightmost (highest) setting. Since an LCD’s native resolution is also the highest it can display, you know you’ve gone too far if you lose the edges of your desktop and Windows scrolls the display as you move the mouse. When in doubt, see the documentation.
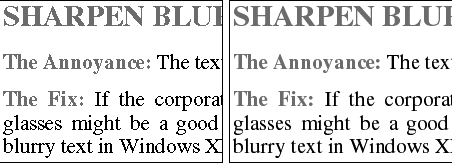
If text is the only thing on the screen that’s blurry, you’re suffering from the “benefits” of anti-aliasing, illustrated in Figure 1-2. Windows “smoothes” screen fonts to reduce their jagged edges, but this doesn’t always look so hot.
Note
If you like font smoothing but aren’t happy with the way Windows does it, try Microsoft’s free ClearType Tuner PowerToy, available at: http://www.microsoft.com/windowsxp/downloads/powertoys/xppowertoys.mspx.
Among other things, it walks you through the settings, allowing you to adjust the feature to suit your taste. It even lets you change the contrast to help minimize the drawbacks inherent in anti-aliasing.
To turn off font smoothing, right-click an empty area of the desktop, click Properties, click the Appearance tab, and then click the Effects button. There are two kinds of font smoothing (Standard or ClearType), but odds are you won’t be able to tell the difference. Just uncheck the “Use the following method to smooth edges of screen fonts” box and click OK to disable the feature altogether.
Make Things Big on High-Res Screens
THE ANNOYANCE: I spent a lot of cash for the best, highest-resolution flat-panel LCD display on the market, but everything on the screen is too small. Did I waste my money?
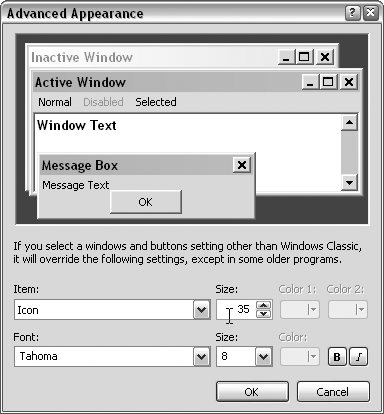
THE FIX: Depends on how much you spent! But the good news is that you can make most things on your screen bigger to compensate for the tiny pixels. To make text bigger, right-click an empty area of your desktop, click Properties, and then click the Appearance tab. From the “Font size” drop-down, you can choose either Large or Extra Large, but for better results, click the Advanced button to enlarge specific elements (title bar, menus, tooltips, etc.) to your taste.
Start by clicking Active Window in the little preview window at the top of the dialog box shown in Figure 1-3 (or selecting Active Title Bar from the Item list), and then choosing a larger number in the Size list in the second row (next to the Font list). Do the same for Inactive Title Bar, Menu, Message Box, Palette Title, and Tooltip.
While you’re here, you’ll probably want to make your desktop icons bigger. By default, they’re 32x32 pixels, but if you choose Icon from the Item menu, you can specify any size you like. For best results, restrict your choice to multiples of 16, such as 48 or 64. Finally, adjust the Icon Spacing (Horizontal and Vertical) to accommodate the new, larger icons.
Drag Windows Intact
THE ANNOYANCE: My coworker can see her application windows while she’s dragging them around her screen, but on my computer, all I see is outlines. How can I get this much more obvious instant feedback?
THE FIX: Right-click an empty area of your desktop, click Properties, click the Appearance tab, and then click the Effects button. Check the "Show window contents while dragging” box, and then click OK.
Make Windows Translucent While Dragging
THE ANNOYANCE: When I have a lot of windows open, it’s hard to find just the one I want. How can I quickly cut through the clutter?
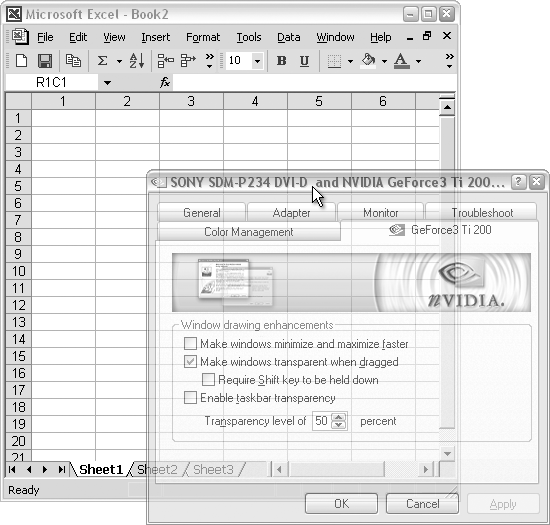
THE FIX: One of the new features Microsoft is promoting in the successor to Windows XP (Windows Vista) is a so-called 3-D interface that allows you to more easily see what’s behind a window while you’re dragging it. Windows XP doesn’t have anything like this, although most video card makers supply drivers that offer something similar. For example, recent versions of the nVidia drivers (available at http://www.nvidia.com; use these only if you have a display adapter with an nVidia graphics processor) can create a transparent window effect, as illustrated in Figure 1-4.
Note
Contact the manufacturer of your display adapter (video card) for appropriate drivers for your hardware; see Chapter 6 for more details on installing new drivers and reverting to earlier versions if the new drivers don’t work properly.
If your display adapter driver doesn’t offer this feature, you can use a program such as Actual Transparent Window ($19.95, http://www.actualtools.com/transparentwindow/).
Un-Animate Windows Controls
THE ANNOYANCE: Windows takes forever to open menus and drop-down list-boxes and to scroll lists. How can I give it a kick in the proverbial pants?
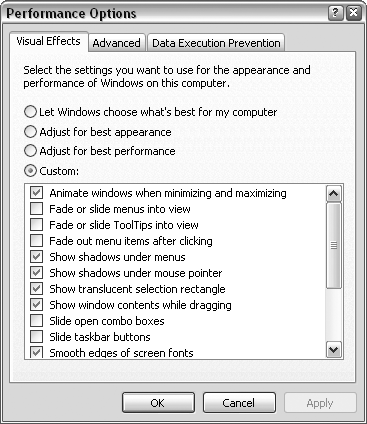
THE FIX: To make Windows XP appear fancier and more advanced than the competition (I know, what competition?), Microsoft added animation to several parts of the interface. But waiting (and waiting) while Windows slowly cranks open a menu can be a real drag. To speed things up, open the System control panel, click the Advanced tab, and click the Settings button in the Performance section. Uncheck the boxes for “Fade or slide menus into view,” “Slide open combo boxes,” and any other animations that annoy you (see Figure 1-5). Click Apply to try out your new settings.
Customize the Windows Look and Feel
THE ANNOYANCE: I’m tired of the “Windows XP” and “Windows Classic” styles, the only two choices in Display Properties. Can’t I add my own styles?
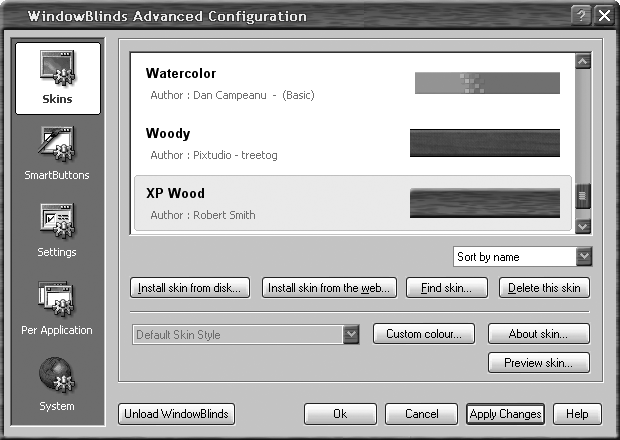
THE FIX: Yes, but you’ll need a third-party program such as WindowBlinds (free and $19.95 versions are available at http://www.stardock.com/products/windowblinds/). With WindowBlinds, not only can you choose from a bunch of interesting, preconfigured “skins” like the one shown in Figure 1-6, but, if you’re particularly adventurous, you can design your own.
Once you have WindowBlinds, you can download new skins from any of several online libraries, including http://skinbase.org, http://www.deviantart.com, and http://www.deskmod.modblog.com.
Simplify the Control Panel
THE ANNOYANCE: I use the Windows Control Panel frequently, but I find the categories confusing and cumbersome. How can I get to Control Panel icons more directly?
THE FIX: You’re right; the categories add an extra (and mostly unnecessary) step every time you need to change a setting. To turn off categories in the Control Panel, simply click the “Switch to Classic View” link in the top-left corner. If you don’t see this link, click the “Appearance and Themes” category and open Folder Options. On the General tab, select “Show common tasks in folders,” and click OK.
For even quicker access, open the Taskbar and Start Menu control panel, click the Start Menu tab, and click the Customize button. If you’re using the XP-style Start menu, click the Advanced tab, find Control Panel in the list, select “Display as a menu,” and click OK. If you’re using the Classic Start menu, check the Expand Control Panel box, and click OK. Now, to open a Control Panel icon, just select Start → Control Panel or Start → Settings → Control Panel, respectively, and select the desired icon from the list.
DESKTOP
Show the Desktop Without Closing Windows
THE ANNOYANCE: I usually have a lot of application windows open, and it’s a pain to have to shove windows out of the way to get to a file on the desktop.
THE FIX: There are a bunch of ways to get to your desktop in a flash. First, hold the Windows logo key (which we’ll call Winkey, just to be cute) and press D to quickly minimize all open windows. Press Winkey-D again to restore them. Do this many times to give yourself a headache.
But what if your keyboard havey no Winkey? No problemo; just click the Show Desktop button on the Quick Launch toolbar (the little row of tiny buttons on the far left of your Taskbar). Give the button another click to restore the windows.
Want to free up some Taskbar real estate? Eliminate the Quick Launch toolbar buttons you don’t use by right-clicking each one and selecting Delete. To really save space, you can banish all the buttons except Show Desktop, and place the shrunken Quick Launch toolbar next to the Windows System Tray on the far right, as shown in Figure 1-7.
Note
If you can’t move or resize the Quick Launch toolbar, right-click an empty area in the Taskbar and deselect the “Lock the Taskbar” option. When you have things the way you like them, turn “Lock the Taskbar” back on.
Note
If you don’t see the Quick Launch toolbar, right-click an empty area on your Taskbar, and go to Toolbars → Quick Launch. And if the Quick Launch toolbar is missing its Show Desktop button? See the “Make a Show Desktop Button” sidebar for instructions on how to add one.
If these tricks don’t do it for you, right-click an empty area of the Taskbar, and select “Show the Desktop.” It’ll look like all your windows have been minimized, but they’re just hidden; to bring them back, repeat the procedure but select Show Open Windows instead.
Alternatively, to access any files or icons on your desktop (without disturbing your open applications), you can simply open Windows Explorer and highlight the Desktop folder at the top of the folder tree.
From Keyboard to Desktop
THE ANNOYANCE: I’m using a computer without a mouse, and I need to open a file on the desktop. How do I get to it via the keyboard?
THE FIX: If you’re already at the desktop, press the Windows logo key (or press Ctrl-Esc if you don’t have one), and then press Esc to close the Start menu. Then, press Tab and watch the dotted rectangle move from the Quick Launch toolbar to, eventually, the System Tray. Press Tab one more time, and an icon on the desktop (such as My Computer) will be selected. (You may not see the selection but it’s there; use the arrow keys to get to your file.) When it’s highlighted, press Enter and it’ll open.
If you’re not at the desktop, first press Ctrl-Esc, then press Esc and tab to the Quick Launch toolbar. Use the arrow keys to highlight the Show Desktop button, and press the spacebar. When the desktop appears, follow the steps above.
If you don’t want to go to all this trouble, just open Windows Explorer, press Tab to move to the folder tree, and then press the Home key to jump to the top of the folder tree, which happens to be the desktop. Tab over to the right window, and use the arrow keys to scoot down to the file you want. When it’s highlighted, press Enter to open the file.
Save Your Desktop Layout
THE ANNOYANCE: All I have to do is sneeze, and Windows rearranges my desktop icons. How do I lock them in place?
THE FIX: This reshuffling can happen for a variety of reasons, such as changing screen resolution (typically for a game) or updating Windows settings (e.g., display settings, screensaver, mouse cursors). To save your desktop layout, you’ll need a program like the free WinTidy (http://www.pcmag.com/article2/0,4149,17748,00.asp) or Desktop Icon Save and Restore (http://www.midiox.com/html/desktop.htm; XP users, download the Windows 2000 version).
If Windows isn’t spontaneously rearranging your desktop icons but refuses to let you put them where you want them, there’s a fix for that, too. This problem is caused by one of two mechanisms designed to help keep your desktop icons tidy, and you’ll have to turn off at least one of them if you want to more freely place your desktop icons. Right-click an empty area of the desktop, select Arrange Icons By, and turn off the Auto Arrange option. If you leave the “Align to Grid” option on, your icons will always appear lined up in rows and columns; turn it off to have complete flexibility when dragging your desktop icons.
Make Icon Labels See-Through
THE ANNOYANCE: The captions under my desktop icons have ugly blocks of solid color behind them, obscuring my pretty, pretty wallpaper.
THE FIX: I know what you mean; you’ve just got to see as much as possible of that kitten playing with the ball of yarn. The color Windows uses for the blocks behind icon captions is the default desktop color—what you’d see if you had no wallpaper. You can change this color by right-clicking an empty area of the desktop and selecting Properties. Choose the Appearance tab, then click the Advanced button. Choose Desktop from the Item menu, and open the color picker under “Color 1” to change it. Pick a color that closely matches the background in your desktop wallpaper, and click OK and Apply to see the results.
An even better option is to open the System control panel, click the Advanced tab, and in the Performance section, click the Settings button. Scroll down and check the “Use drop shadows for icon labels on the desktop” box, and click OK. The caption backgrounds will vanish, and the text will have shadows so you can distinguish the captions from your desktop wallpaper, as shown in Figure 1-8.

Control the Space Between Desktop Icons
THE ANNOYANCE: There’s an awful lot of wasted space between the rows of icons on my desktop; there’s got to be a more efficient way to line them up.
THE FIX: As any greengrocer will tell you, the most efficient way to stack oranges is the face-centered cubic arrangement, wherein each piece of fruit is placed in the cavity formed by three adjacent oranges in the lower plane. (For more information, Google "Kepler Conjecture.”)
Sadly, Windows XP doesn’t have this option, but you can fine-tune the row and column spacing on the desktop. Right-click an empty area of the desktop, choose Properties, click the Appearance tab, and then click the Advanced button. From the Item drop-down menu, choose Icon Spacing (Horizontal), and adjust the spacing—the number of pixels between the edges of adjacent icons—by changing the Size value. A good value is approximately 1.3 to 1.5 times the width of an icon (typically 32 pixels); specify 40 to pack them pretty closely, or 50 to spread them apart. You can likewise change the Icon Spacing (Vertical) value; use the same number for both the horizontal and vertical measurements, and the result will look balanced.
START MENU
Pick a New Username
THE ANNOYANCE: How do I change the name and icon at the top of the Start menu? I don’t like being called “AJAX70761.”
Warning
The name you choose is your username, which is particularly important if you share files with others on your network (Chapter 5) or if you type your username to log into your computer. See the “Welcome Screen” section later in this chapter for more login tips.
THE FIX: Don’t take it personally; Windows doesn’t really care what you’re called. You can choose a new name pretty easily by opening the User Accounts control panel. Choose your account from the list in the lower part of this window, and then click “Change my name.”
While you’re here, click “Change my picture” to choose a new icon to appear at the top of your Start menu (unless you’re using the “Classic” Start menu) and on the Welcome screen. Note that your choices aren’t limited to the generic icons Windows shows you; click “Browse for more pictures” to choose any .bmp, .jpg, or .png file on your system.
Clean Up the Start Menu
THE ANNOYANCE: There’s too much junk in the Start menu. How can I strip out the clutter so I can more easily find the programs I need?
THE FIX: There are three “zones” in the Windows XP–style Start menu (Figure 1-9), and following typical Microsoft logic, each one works in a completely different way.
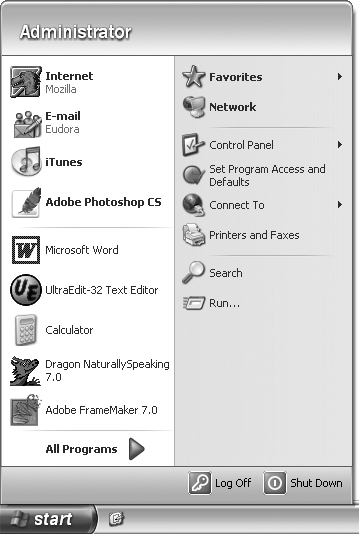
The two items at the top of the left column (above the line) are fixed entries devoted to opening your web browser and email program. To change or hide these entries, right-click the Start button, select Properties, click the Start Menu tab, and click Customize. On the General tab, change the settings in the Show on Start Menu section.
The “zone” immediately below is the somewhat-dynamic list of recently used applications. Back on the General tab, in the Programs section, you can choose how many icons can appear here at once; choose zero to hide the list completely. (You can delete any particular item directly in the Start menu by right-clicking it and selecting “Remove from This List.”)
Next, click the Advanced tab to customize some of the entries in the top-right column of the Start menu, such as Control Panel, Favorites, My Computer, My Music, My Network Places, Network Connections, Printers and Faxes, Run, and Search. (To find out how to hide the My Recent Documents menu, see “Hide the My Recent Documents Menu.”) Click OK when you’re done.
Note
If you’re running Windows XP Professional, you can use the Group Policy Editor to remove any unwanted items from your Start menu. Go to Start → Run, type gpedit.msc, and click OK. Then expand the branches on the left to User Configuration\Administrative Templates\Start Menu and Taskbar. Doubleclick any item on the right and click the Disabled radio button in the Setting tab; then click Apply, then OK. Here, you can remove the All Programs menu, Network Connections, Favorites, Search, Help, Run, and all of the “My” folders (Pictures, Music, etc.). When you’re done, you may have to log out and then log back in for the changes to take effect.
Finally, you can add programs to the top-left zone. One way to do this is to drag any program or shortcut over the Start button and hold it for at least a second. The Start menu will open, and you can then drop the item in the top-left zone. The easier way is to right-click a shortcut or program executable (.exe file) and select “Pin to Start menu.” To delete any “pinned” item from this list, right-click the entry and select “Unpin from Start menu.”
Block Recent Programs from Appearing in Your Start Menu
THE ANNOYANCE: I don’t want every program I’ve run lately to be listed in my Start menu. Is there a way to keep this list tidy?
THE FIX: Yes, but you’ll have to manually exclude each program you don’t want to automatically appear in the Start menu’s recently used programs list. In some cases, this may require messing with the Registry.
First, open TweakUI (free, http://www.microsoft.com/windowsxp/downloads/powertoys/xppowertoys.mspx). Expand the Taskbar & Start Menu branch on the left, and select the Start Menu category. In the list on the right, uncheck the box next to any program you don’t want to ever appear in your Start menu, and click OK when you’re done.
If the program you want to exclude isn’t in the list, you must edit an entry in the Registry. Open the Registry Editor (go to Start → Run and type regedit), and expand the branches to HKEY_CLASSES_ROOT\Applications. Under the Applications branch, you’ll see a bunch of subkeys, each representing a program installed on your PC, named for the applications’ executables (such as WINWORD.EXE for Microsoft Word). To add a new subkey, right-click the Applications key, select New → Key, type the executable filename of the program you want to exclude, and click OK.
Right-click the newly created key, and select New → String Value. On the right, type NoStartPage for the name of the new value. Repeat this for each program you want to add (and thus exclude), and then close the Registry Editor when you’re done.
Note
If you don’t know the executable filename, find the application’s shortcut in your Start menu, right-click it, click Properties, and choose the Shortcut tab. The filename should be in the Target field at the end of a path statement, such as c:\Program Files\Adobe\Adobe Photoshop CS\Photoshop.exe.
Hide the My Recent Documents Menu
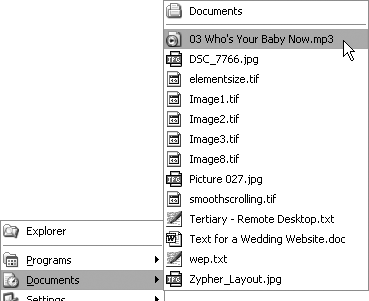
THE ANNOYANCE: The Documents list on my Start menu shows some of my recently opened documents. Since other people sometimes use this computer, I’d rather not have the names of my private documents appear in such a public place. I looked for a setting in the Taskbar and Start Menu Properties window to turn it off, but I can’t find one. How do I hide this list?
THE FIX: There are several ways to hide this list (and/or its contents). If you’re using the XP-style Start menu, right-click the Start button, select Properties, click the Customize button, and go to the Advanced tab. In the scrolling list, under My Documents, select “Don’t display this item,” and click OK to confirm your choice. While you’re at it, on the Advanced tab, click the “Clear list” button and uncheck the “List my most recently opened documents” box.
If you’re using the “Classic"-style menu, you’ll need to use TweakUI (free, http://www.microsoft.com/windowsxp/downloads/powertoys/xppowertoys.mspx) to hide this list, as shown in Figure 1-10. Open TweakUI, expand the Explorer category on the left, and uncheck the “Show My Documents on classic Start Menu” box. Click Apply, then OK. (You can also hide the list for the XP-style Start menu with TweakUI—just uncheck the “Allow Recent Documents on Start Menu” box.)
Sort Your Start Menu Alphabetically
THE ANNOYANCE: At first, I didn’t notice that everything in my All Programs menu was out of order; I thought I was going crazy because I couldn’t find anything. Is there any way to make Start menu programs appear in alphabetical order?
THE FIX: You can organize the items in your All Programs menu (or Programs if you’re using the Classic Start menu) and its submenus by dragging and dropping. To sort entries alphabetically, right-click any menu item and select “Sort by Name.”
Solve the Mystery of Disappearing Start Menu Items
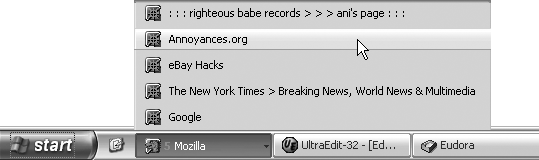
THE ANNOYANCE: To simplify the Start menu I decided to use the “Classic” version, but when I opened it I found that most of the icons in the Programs list were missing. After a few fits of frustration, I eventually stumbled upon the tiny arrow at the bottom of the menu (Figure 1-11) that, when clicked, shows the rest of my programs. Why won’t the Classic Start menu show all my programs at once?
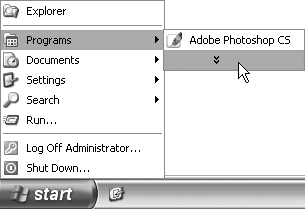
THE FIX: Believe it or not, this is a feature, not a bug. The theory is that you’re supposed to be interested only in programs you’ve used recently. Applications you haven’t opened in a while are thus hidden from view until you click that little arrow or wait awhile for the complete list to unfurl. Fortunately, this feature is easy to turn off: right-click the Start button, select Properties, click the Start Menu tab and then the Customize button, and uncheck the Use Personalized Menus checkbox.
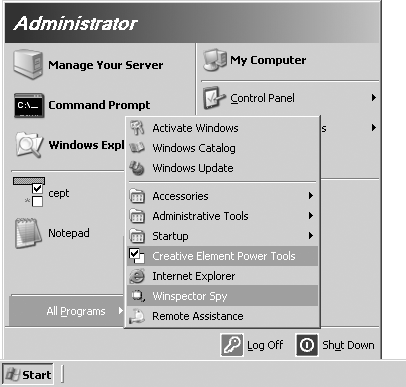
Stop Windows from Highlighting New Programs
THE ANNOYANCE: Why are some items in my All Programs list grayed out? It looks like they’re disabled, but they open when I click them.
THE FIX: By default, Windows XP highlights newly installed programs to make them easier to find, presumably because you are not yet accustomed to seeing them. The problem is that they don’t look so much “highlighted” as grayed out (Figure 1-12). To turn off this feature, right-click the Start button, go to Properties, click the Start Menu tab, and then click the Customize button. On the Advanced tab, uncheck the “Highlight newly installed programs” box.
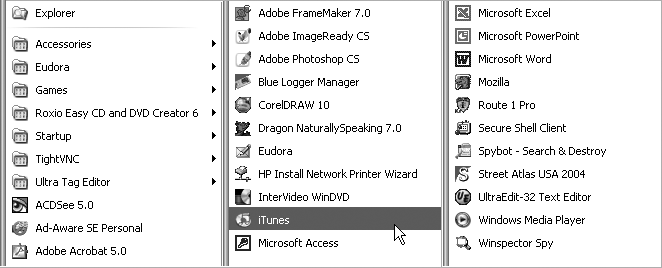
Show Start Menu Programs in Multiple Columns
THE ANNOYANCE: I have so many icons in my All Programs menu that they run off the screen. I have to wait while Windows slowly scrolls the list to the one I want.
THE FIX: You have a few options here: you can either reduce the size of the menu by deleting unwanted items or organizing them into subfolders, or you can display the icons in multiple columns, as shown in Figure 1-13. For this trick, right-click the Start button, go to Properties, click the Start Menu tab, and then click the Customize button. On the Advanced tab, scroll down the “Start menu items” area and uncheck the Scroll Programs checkbox.
TASKBAR
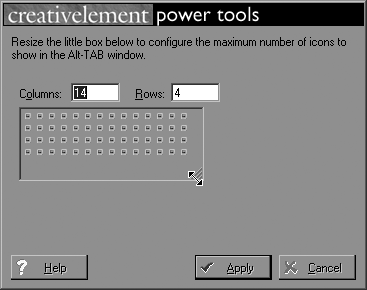
Customize the Alt-Tab Window
THE ANNOYANCE: When I switch between programs using Alt-Tab, it’s hard to tell which window is which. The icons alone don’t provide enough information, and the Alt-Tab window is too small to show the entire title of each window.
THE FIX: There are two ways to customize the Alt-Tab window. The first requires Creative Element Power Tools, available at http://www.creativelement.com/powertools/. Open the Creative Element Power Tools Control Panel, click the button next to “Change the size of the Alt-TAB window,” and stretch the box to customize the size (Figure 1-14).
If you want more than a larger Alt-Tab window, try Microsoft’s free Alt-Tab Replacement PowerToy, available at http://www.microsoft.com/windowsxp/downloads/powertoys/xppowertoys.mspx. Once installed, it shows a preview of each window (Figure 1-15), rather than just the icon.
Note
You can switch between multiple documents in the same application in a similar fashion, by pressing Ctrl-Tab or Ctrl-F6. Some applications (such as Word) show documents in separate windows, so they appear individually in the Alt-Tab sequence. Of course, this can be changed, too; in Word, for instance, select Tools → Options, and, on the View tab, uncheck the “Windows in Taskbar” box.
Ungroup Taskbar Buttons
THE ANNOYANCE: At some point during the day, Windows starts adding little arrows to my Taskbar buttons and “grouping” my programs. Instead of being able to activate a window by clicking once, I now have to click two or three times to get the window I want (Figure 1-16). Make it stop!
THE FIX: By default, Windows XP “groups” similar Taskbar buttons when the Taskbar gets full (when it’s not full, the Taskbar behaves normally). To have the Taskbar work the same way all the time, right-click an empty area of the Taskbar and choose Properties. In the Taskbar tab, uncheck the “Group similar taskbar buttons” box.
Clean Out the Tray
THE ANNOYANCE: There’s a bunch of junk in that little box to the right of my Taskbar, near the clock. I don’t know what half the icons are for, and I think they’re causing Windows to start more slowly.
THE FIX: That little box is called the Tray (or sometimes the System Tray, Systray, or notification area). It’s filled with icons representing currently running programs, most of which are probably unnecessary. And you’re right: these programs slow down the Windows startup process, as each takes time to load and consumes precious memory.
Note
To find out what a particular Tray icon is for, hover the mouse pointer over the icon for a few seconds until a little yellow "tooltip” appears. (Not all icons have these.)
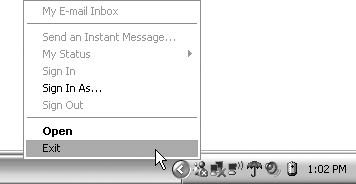
The problem is that removing a Tray icon varies from program to program. Most of the time, you can right-click an icon to exit the program (Figure 1-17), or even to change the setting that controls the icon so it won’t load again. However, in some cases the program will reappear the next time you start Windows. To get rid of it permanently, you may have to hunt for the setting that controls whether or not the program starts with Windows. Look in the Startup folder in your Start menu, and if you find the Tray icon there, remove it. If you don’t see it in the Startup folder, open the Registry Editor, navigate to HKEY_LOCAL_MACHINE\SOFTWARE\Microsoft\Windows\CurrentVersion\Run, and carefully remove the entry corresponding to the unwanted program. (For more tips on tidying your Tray, check out the sidebar “Hide Stubborn Systray Icons.”)
Customize the Start Button
THE ANNOYANCE: That big ugly green Start button is annoying. How can I make it look like an ordinary button, like in earlier versions of Windows?
THE FIX: There’s not much you can do about the Start button without changing the way the rest of Windows looks. If you prefer the no-frills Start button found in Windows 2000, Me, 98, and 95, open the Display control panel, click the Appearance tab, and choose “Windows Classic style” from the “Windows and buttons” drop-down. Of course, this will revert the rest of Windows to the older, simpler, non-XP style as well; unfortunately, you can’t have the fancy new window style without the big ugly green button to go with it.
Move the Taskbar
THE ANNOYANCE: My Taskbar suddenly jumped to the side of my screen. How do I get it back on the bottom?
THE FIX: To move it, just click an empty area of the Taskbar and drag the bar to a new location. The bar won’t move with the mouse like windows do, but if you’re patient and move the mouse far enough, the Taskbar will follow. (If it doesn’t, right-click the Taskbar and turn off the “Lock the Taskbar” option.) To prevent it from moving again, once it’s in place, right-click an empty area of the Taskbar and select “Lock the Taskbar.”
Fix Taskbar Bugs
THE ANNOYANCE: Certain elements of my Taskbar—things described elsewhere in this chapter, for instance—are either missing or grayed out. How come?
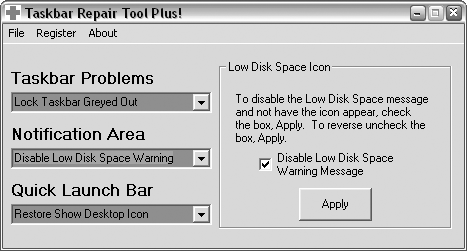
THE FIX: This and related Taskbar glitches are caused by errant Registry entries and nasty bugs. Luckily, you can use the Taskbar Repair Tool Plus! (free, http://www.kellys-korner-xp.com/taskbarplus!.htm), shown in Figure 1-18, to fix these nagging problems.
Among other things, the Taskbar Repair Tool Plus! can fix a grayed-out “Lock the Taskbar” command, recover missing minimized programs and a missing Start button, and squash more than a dozen other bugs relating to the System Tray and the Quick Launch toolbar.
APPLICATION WINDOW
Find Missing Program Windows
THE ANNOYANCE: Certain programs never seem to open successfully. If I double-click a JPG file, for instance, my image viewer never launches—I see its icon in the Taskbar, but that’s it. Clicking the icon doesn’t do anything; the only thing that has any effect is right-clicking it and selecting Close to make it go away.
THE FIX: Although it may seem that the program has crashed, it’s probably opening off-screen. Most programs can remember their last position and size, but few are smart enough to realize that they can’t be seen. To find out if an application has opened off-screen, click its Taskbar icon so that it appears pushed in, and then press Alt-Space. If a little menu appears, use the cursor keys to select Move, and then press Enter. At this point, a gray rectangle should appear somewhere on your screen; use your cursor keys to move the rectangle so that it’s roughly centered on the desktop, and then press Enter. With any luck, the missing window should magically appear.
If you don’t see the menu, minimize all open windows and see if there’s a dialog box for the program hiding behind them (in which case, you can click OK or whatever to make it go away). If there’s no dialog box, uninstall and then reinstall the program. Still no luck? Contact the manufacturer of the misbehaving application for help.
Seeing Double Windows
THE ANNOYANCE: Whenever I double-click a document in Windows Explorer or on the desktop, it opens in two identical windows. Is Windows really that stupid?
THE FIX: Yes, my son, Windows really is that stupid. Luckily, the fix is simple enough, but you must first determine the type of file that causes the problem.
In Windows Explorer, select Tools → Folder Options or open the Folder Options control panel, and choose the File Types tab. Find the appropriate filename extension in the list, and click the Advanced button. (If you see a Restore button here, click it to reveal the elusive Advanced button, and then click Advanced.)
Note
You’ll need to know the extension (e.g., .doc or .wpd) of the offending file, which Microsoft, in its infinite wisdom, has hidden by default. To make filename extensions visible in Windows Explorer, go to Tools → Folder Options, click the View tab, and select “Show hidden files and folders.”
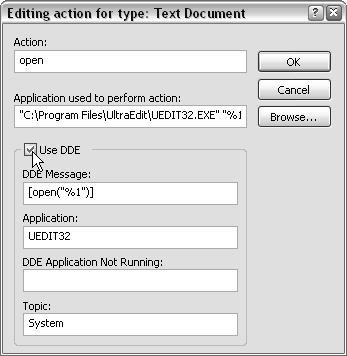
In the subsequent dialog box (shown in Figure 1-19), highlight the bold item in the list—in this case, Open—and click the Edit button. In the “Editing action for type” window, uncheck the Use DDE box (see the “Evils of DDE” sidebar), and then click OK in each successive dialog box to confirm your choice. The duplicate windows should never return (at least until you reinstall the application, and in so doing, reinstall the DDE setting).
Make Old Windows New Again
THE ANNOYANCE: I’m using an older program that’s really showing its age. How can I make it look like the rest of my applications?
THE FIX: The style you choose in Display Properties affects not only the title bars of your applications, but also the push buttons, menus, toolbars, drop-down lists, and other screen elements in most, if not all, programs that run in Windows. Some older applications, though, may not know to take advantage of these new features.
To force a single application to update all of its push buttons, menus, and so on, type the following into a plain-text editor such as Notepad:
	<?xml version="1.0" encoding="UTF-8" standalone="yes"?>
	<assembly xmlns="urn:schemas-microsoft-com:asm.v1" manifestVersion="
	1.0"><assemblyIdentity version="1.0.0.0" processorArchitecture="X86"
	name="COMPANYNAME.PRODUCTNAME.PROGRAMNAME" type="win32"/><description>MY
	DESCRIPTION</description>
	<dependency><dependentAssembly><assemblyIdentity type="win32"
	name="Microsoft.Windows.Common-Controls" version="6.0.0.0"
	processorArchitecture="X86" publicKeyToken="6595b64144ccf1df"
	language="*" /></dependentAssembly></dependency></assembly>
Note
The capitalized text after “name=” can be customized, but the rest of the text must appear exactly as shown. If you don’t feel like typing all this yourself, you can download the text from http://www.annoyances.org/downloads/manifest.txt.
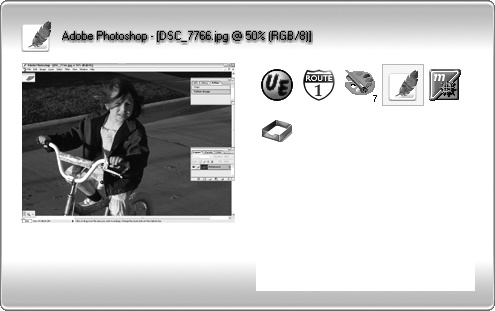
Save this text into the same folder as the application you’re customizing, and give it the same name as the main executable (.exe) file, followed by .manifest. For example, if you were trying to update an old version of Adobe Photoshop (photoshp.exe) installed in the c:\Program Files\Adobe\Photoshop folder, you’d save this text file in the same folder, as Photoshp.exe.manifest.
The next time you start the application, it should look more up to date. Not all programs can be forced to use styles this way, though, and those that support it may not do so properly.
WELCOME SCREEN
Get Rid of the Welcome Screen
THE ANNOYANCE: I’m sick of the Welcome screen. Why can’t I go straight to Windows when I turn on my computer?
THE FIX: You can—if you’re the only one using your computer. First, select a password, if you haven’t done so already. Open the User Accounts control panel, choose your account from the list, click “Create a password,” and then type the password you’d like to use. (Don’t worry; you won’t have to type it every time.)
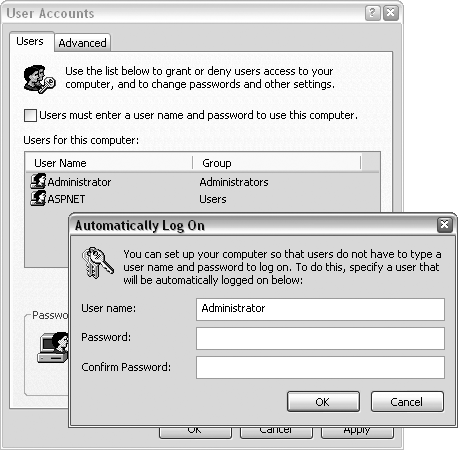
Next, go to Start → Run, type control userpasswords2, and click OK. In this different User Accounts window, shown in Figure 1-20, uncheck the “Users must enter a user name and password to use this computer” box. When prompted, type your username and password (twice), and click OK. Thereafter, you won’t have to log in manually again, and the Welcome screen will be banished.
Fix the Unread Messages Display
THE ANNOYANCE: The Welcome screen is telling me I have unread mail. How does it know? And, besides, it’s wrong—nobody ever emails me. How do I get rid of this?
THE FIX: Sorry to hear that. Try joining some discussion groups or something, or if you like, I can add your address to some spam lists!
Regardless, the “unread messages” display only works if you’re using Microsoft Outlook or Outlook Express to read your email. If you’re not using either of these programs, you’ll need to edit the Registry to fix the problem. Go to Start → Run, type regedit, and click OK. In the Registry Editor window, expand the branches on the left side to HKEY_CURRENT_USER\Software\Microsoft\Windows\CurrentVersion\UnreadMail.
Then, on the right side, double-click the MessageExpiryDays value; if it’s not there, go to Edit → New → DWORD Value, and type MessageExpiryDays for the name of the new value. In the Edit DWORD Value box, type 0, and click OK.
Old-Fashioned Logon
THE ANNOYANCE: My computer is used by a lot of people, and I don’t think Windows’s practice of listing them all is very smart. It’s a lot harder for an intruder to guess both a username and a password than only a password. Is there a way to replace the Welcome screen with a good ol’ logon box?
THE FIX: In the old days, people used to type in their usernames and passwords to log onto their computers (after, of course, climbing down from the mastodons that delivered them to the office).
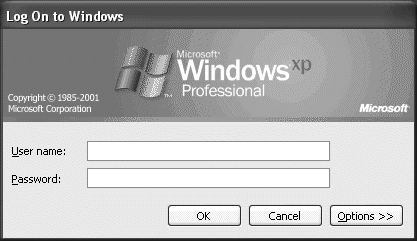
You can replace the friendly-but-not-terribly-secure Welcome screen with the old familiar logon box (Figure 1-21) via the User Accounts control panel. Click the “Change the way users log on or off” link, and then uncheck the “Use the Welcome screen” box. Click the Apply Options button when you’re done.
Hide the Name of the Last User
THE ANNOYANCE: I’ve switched to the classic logon screen, but now the username of the last person who used the computer is shown. From a security standpoint, this is not an improvement!
THE FIX: To hide this username, you must dive into the Windows Registry. Go to Start → Run, type regedit, and click OK. In the Registry Editor window, expand the branches on the left side to HKEY_CURRENT_USER\Software\Microsoft\Windows NT\CurrentVersion\Winlogon. (Notice that this is in the Windows NT branch, not the Windows branch used elsewhere in this book.) Create a new value in this key: right-click Winlogon and select New → String Value, type DontDisplayLastUserName for its name, and press Enter. Double-click the new value, type 1 in the “Value data” field, and click OK.
Un-Secure Your Screensaver
THE ANNOYANCE: Every time my screensaver comes on, I have to type my password to make it go away. Is this necessary?
THE FIX: Other than being a sure-fire way to force you to remember your own password, it’s not really useful unless you work in a public environment. The idea is that if you walk away from your desk, an intruder can’t poke around your system without knowing your password. If you feel that the likelihood of this happening is small, change this setting by right-clicking an empty area of your desktop, selecting Properties, and choosing the Screen Saver tab. Uncheck the “On resume, password protect” box, and click OK.
There’s a second option that does pretty much the same thing when your computer hibernates or goes to sleep. If you don’t want Windows to send you back to the Welcome screen each time you “wake up” your PC, open the Power Options control panel (or click the Power button in Display Properties), choose the Advanced tab, and uncheck the “Prompt for password when computer resumes from standby” checkbox. Click OK, and you’re done.
Get Fixing Windows XP Annoyances now with the O’Reilly learning platform.
O’Reilly members experience books, live events, courses curated by job role, and more from O’Reilly and nearly 200 top publishers.

