11. Advanced and Creative CGI Applications
In this final chapter of practical advice and code, we will look at three applications: a simple animated clock, the game of Concentration, and a Calendar Manager. All three of these examples utilize a combination of the various techniques presented up to this point.
11.1 Animated Clock
This example creates the effect of an animated digital clock by repeatedly generating dynamic GIF images and sending them to the browser using server push (see the discussion in Chapter 6, Hypermedia Documents). You can use the techniques presented in this example to create CGI programs that continuously display such information as system load averages, stock prices, or sports scores. However, programs like these can heavily tax the host machine, although they may be fun and entertaining. So you should use them only if there is an absolute need to do so.
To summarize the method used in this example: First we check that the browser is Netscape Navigator, version 1.1 or higher. That's because Netscape is the only browser that currently supports server push. We then generate a new image every few seconds and send it to the client. To create the image, we'll use the same gd extension to Perl that we showed in Chapter 6, Hypermedia Documents. We have to send the data as a special MIME type called multipart/x-mixed-replace so that the client replaces each old image with the new one. Following the MIME standard, we send an “--End--” string at the end of each image. Here is the code:
#!/usr/local/bin/perl5
use GD;
$| = 1;
$font_length = 8;
$font_height = 16;
$boundary_string = "\n" . "--End" . "\n";
$end_of_data = "\n" . "--End--" . "\n";
The program turns output buffering off by setting Perl's $| variable. The boundary strings for server push are defined.
$delay_time = 5;
$max_updates = 10;
The $delay_time variable reflects the time between image updates. The maximum number of updates performed by this program is set to 10. The reason for setting these variables is so that the user does not tax the system by watching the updates for an infinite amount of time.
print "HTTP/1.0 200 OK", "\n";
This CGI script outputs the complete HTTP header (see Chapter 3, Output from the Common Gateway Interface). Server push animation appears smooth only if buffering is turned off and a complete header is output.
$browser = $ENV{'HTTP_USER_AGENT'};
if ($browser =~ m#^Mozilla/(1\.[^0]|[2-9])#) {
    print "Content-type: multipart/x-mixed-replace;boundary=End", "\n";
    print $boundary_string;
This if block runs if the browser is Netscape Navigator, version 1.1 or higher.
for ($loop=0; $loop < $max_updates; $loop++) {
        &display_time ();
        print $boundary_string;
        sleep ($delay_time);
    }
The display_time subroutine determines the current time, creates an image, outputs the image/gif MIME type, and displays the image. The boundary string is sent to the browser indicating the end of image data. The sleep command then waits for the specified amount of time.
&display_time ("end");
    print $end_of_data;
Once the loop is terminated, the display_time subroutine is called one final time, with an argument. The “end” argument instructs the subroutine to draw the clock in a different way--as we will soon see. Finally, the last boundary string is sent to the browser.
} else {
    &display_time ("end");
}
exit(0);
If the browser does not support server push, the display_time subroutine is called just once to display a static image of the current time.
The display_time subroutine does most of the work for the program:
sub display_time
{
    local ($status) = @_;
    local ($seconds, $minutes, $hour, $ampm, $time, $time_length,
           $x, $y, $image, $black, $color);
    print "Content-type: image/gif", "\n\n";
    ($seconds, $minutes, $hour) = localtime (time);
    if ($hour > 12) {
            $hour -= 12;
            $ampm = "pm";
    } else {
            $ampm = "am";
    }
if ($hour == 0) {
            $hour = 12;
    }
    $time = sprintf ("%02d:%02d:%02d %s", $hour, $minutes, $seconds, $ampm);
The current time is formatted and stored in the variable $time. The output of this variable will look like this: 09:27:03 pm.
$time_length = length($time);
    $x = $font_length * $time_length;
    $y = $font_height;
The size of the image is calculated, based on the length of the $time string multiplied by the font dimensions.
$image = new GD::Image ($x, $y);
    $black = $image->colorAllocate (0, 0, 0);
A new image is created with black as the background color.
if ($status eq "end") {
        $color = $image->colorAllocate (0, 0, 255);
        $image->transparent ($black);
    } else {
        $color = $image->colorAllocate (255, 0, 0);
    }
If the argument passed to this script is “end”, the color of the text is set to blue. In addition, black is set as the transparent color. In other words, black will not appear in the image, and as a result the blue text will appear without any image border. If an argument was not passed, the text color is set to red.
$image->string (gdLargeFont, 0, 0, $time, $color);
    print $image->gif;
}
Finally, the image is displayed to standard output.
11.2 Game of Concentration
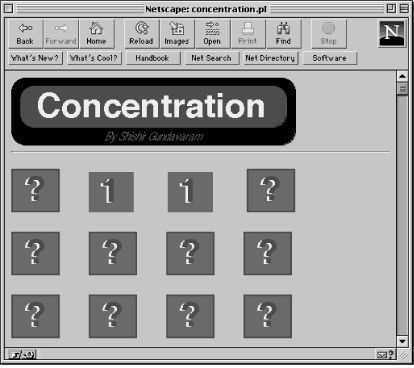
Up to this point, we have discussed reasonably useful applications. So it is time now to look at some pure entertainment: the game of Concentration (also called Memory). The game consists of an arbitrary number of tiles, where each tile exactly matches one other tile. The value (or picture) “under” each tile is hidden from the user. Figure 11.1 shows what the initial screen looks like.
Figure 11.1: First game screen

When the user selects a tile, the value is displayed. The user can select two tiles at a time. If they match, the values behind the tiles remain displayed. The object of the game is to find all matching tiles in as few looks as possible. Figure 11.2 shows a successful match.
Figure 11.2: Game screen with successful match
The new technique introduced by this example is how to store the entire state of the board in the HTML code sent to the browser. Each click by the user sends the state of the tiles back to the server so that a correct new board can be generated. This is how you access the program for the first time:
http://some.machine/cgi-bin/concentration.pl
This program displays a board, where each tile links back to this program with a query string like this:
http://some.machine/cgi-bin/concentration.pl?
%258%c8%7d0%834%578%4b0%a8c%dac%ce4%bb8%1450%2bc%ea6%960%6a4%708%1%0
The query string actually contains all of the board information (encrypted so that you can't cheat!) as well as the user selections. This is yet another way to store information when multiple sessions are involved, if you don't want to use temporary files and magic cookies. It is not a general solution for all applications, because the length of the query string can be truncated by the browser or the server--see Chapter 4, Forms and CGI. But in this case, the size of the data is small, so it is perfect.
When a certain tile is selected, the program receives a query like the one above. It processes the query, checks to see if the two user selections match, and then creates a new series of query strings for each tile. The process is repeated until the game is finished.
Now for the code:
#!/usr/local/bin/perl
@BOARD = ();
The BOARD array is used to store the board information--the values “under” each tile. A typical array might look like this:
1 4 5 8 7 2 1 6 7 4 6 3 2 8 3 5
In this game, the board contains 16 tiles, each containing a number from 1 to 8. For example, the user has to choose location numbers 2 and 10 to find a match for the value 4.
$display = "";
This variable will hold the needed HTML to produce a board layout. The program creates the layout simply by appending information to this string. If the user's browser does not support graphics, this string is output as is. However, if a graphic browser is being used, the program performs some string substitution and inserts <IMG> tags.
We will look at the graphic aspects in more detail after we run through the logic of the game.
$spaces = " " x 5;
$images_dir = "/icons";
The $spaces variable is used to add extra spaces to the output between each tile. And $images_dir points to the directory where the images (representing the values behind the tiles) are stored.
$query_string = $ENV{'QUERY_STRING'};
if ($query_string) {
If a query string is passed to this program (which happens every time the user clicks on a tile), this block of code is executed.
($new_URL_query, $user_selections) = &undecode_query_string (*BOARD);
The undecode_query_string subroutine decodes the query string (and also decrypts it), fills the BOARD array with the board information--based on the information stored in query string--and returns all the information needed by the program to interpret the state of the board. The two strings returned are $new_URL_query, containing the values of the 16 markers, and $user_selections, containing the positions of the tiles that the user selected. This is what $new_URL_query looks like:
%1%4%5%8%7%2%1%6%7%4%6%3%2%8%3%5
in other words, 16 values separated by percent signs. The position of each value represents the position of the tile on the board. The value shown is the actual value under the tile. For example, the second tile contains the value 4.
The format of $user_selections is:
1%0
It contains two values because the user turns up two tiles in succession, trying to find two that match. The 1%0 in this case indicates that the user has clicked on tile number 1 for his or her first selection. The 0 (which doesn't correspond to any position on the board) indicates that only one tile has been turned up. Next time, if the user selects another tile--say tile number 7--the user selection string will look like this:
1%7
From the board data in $new_URL_query above, you can see that tiles number 1 and 7 both contain the value 1, which signifies a match. In this case, the program changes the query string for each tile to reflect a match by adding a “+” sign:
%1+%4%5%8%7%2%1+%6%7%4%6%3%2%8%3%5
These tiles will no longer have links (the user cannot “open” the tile as the value is known), but rather, the values will be displayed.
&draw_current_board (*BOARD, $new_URL_query, $user_selections);
The draw_current_board routine uses the information stored in the BOARD array, as well as the query information and user selections, to draw an updated board.
} else {
    &create_game (*BOARD);
    $new_URL_query = &build_decoded_query (*BOARD);
    &draw_clear_board ($new_URL_query);
}
If no query string is passed to this program, the create_game subroutine is called to fill the BOARD array with new board information. The values for each tile are randomly selected, so a person can play over and over again as long as boredom does not set in. The build_decoded_query subroutine uses the information in BOARD to create a encrypted query string. Finally, draw_clear_board uses the information to draw the board. Actually, the board is not yet drawn, but rather the HTML needed to draw the board is stored in the $display variable.
&display_board ();
exit(0);
The display_board subroutine checks the user's browser type (either text or graphic), performs the appropriate substitutions, and sends the information to the browser for display.
The create_game subroutine fills up the specified array with a random board layout.
sub create_game
{
    local (*game_board) = @_;
    local ($loop, @number, $random);
    srand (time | $$);
A good seed for the random number generator is set by using the combination of the current time and the process PID.
for ($loop=1; $loop <= 16; $loop++) {
        $game_board[$loop] = 0;
    }
    for ($loop=1; $loop <= 8; $loop++) {
        $number[$loop] = 0;
    }
The game_board and number arrays are initialized. Remember, $game_board is just a reference to the array that is passed to this subroutine. Throughout the different subroutines in this program, we will use $game_board to store the values behind the 16 tiles. Note that the loop begins at 1, because tiles are numbered from 1 to 16. We never load anything into $game_board[0]. In fact, we use the number 0 in other parts of the program to indicate when the user has not yet selected a tile.
The $number array keeps track of the values that are already placed in the game_board array. This is so that a value appears “behind” only two tiles.
for ($loop=1; $loop <= 16; $loop++) {
do {
            $random = int (rand(8)) + 1;
        } until ($number[$random] < 2);
        $game_board[$loop] = $random;
        $number[$random]++;
    }
}
First, a random value from 1 to 8 is selected. If the value is already stored in the $number array twice, another random value is chosen. On the other hand, if the value is valid, it is stored in the $game_board array. This whole process is repeated 16 times, until the board is completely filled.
The build_decoded_query subroutine uses the array we just created to construct a decoded query string.
sub build_decoded_query
{
    local (*game_board) = @_;
    local ($URL_query, $loop, @temp_board);
    for ($loop=1; $loop <= 16; $loop++) {
        ($temp_board[$loop] = $game_board[$loop]) =~
            s/(\w+)/sprintf ("%lx", $1 * (($loop * 50) + 100))/e;
    }
The loop builds up a string of 16 values, one at a time. These values come from the BOARD array, which the calling program passes to this subroutine.
The $temp_board array takes on the value of a successive element of the board array each time through the loop. A series of arithmetic operations are performed on the value, and then it is converted to a hexadecimal number. This is an arbitrary encryption scheme. Just about any encryption technique can be used, as long as you can reverse the process when you get the string back, and so that the user will not be able to see the board information by looking at a query string.
Of course, if you use the exact algorithm I'm showing here, someone who's read this book can play your game and figure out what the values are. Maybe no one would go to such trouble to cheat on a game that three-year-olds play, but you should be sure to make up a different encryption algorithm if you're using this subroutine in a serious CGI application.
Note the e at the end of the regular expression, which instructs Perl to execute the second part of the substitute operator (the sprintf statement). In fact, we have been using this type of construct throughout the book; see all the parse_form_data subroutines.
$URL_query = join ("%", @temp_board);
    return ($URL_query);
}
The temp_board array is joined to create a string containing the query string. Notice how the loop starts with the index of 1, which means that the query will start with a leading “%”. There is no specific reason for doing this; you could omit it if you want.
We'll use this short subroutine later in this section:
sub build
{
    local (@string) = @_;
    $display = join ("", $display, @string);
}
This subroutine concatenates the string(s) passed to it with the $display variable. Note that $display is a global variable.
The draw_clear_board subroutine draws the board when the program is invoked for the first time.
sub draw_clear_board
{
    local ($URL_query) = @_;
    local ($URL, $inner, $outer, $index, $anchor);
    $URL = join ("", $ENV{'SCRIPT_NAME'}, "?", $URL_query);
The input to this subroutine is the BOARD array, the elements of which get joined into a string and placed after a question mark. So the $URL variable contains a string that looks like this:
/cgi-bin/concentration.pl?
%258%c8%7d0%834%578%4b0%a8c%dac%ce4%bb8%1450%2bc%ea6%960%6a4%708
To continue with the subroutine:
for ($outer=1; $outer <= 4; $outer++) {
        for ($inner=1; $inner <= 4; $inner++) {
            $index = (4 * ($outer - 1)) + $inner;
            $anchor = join("%", "", $index, "0");
The loop iterates 16 times to add information about the tile number for each tile. For example, it will add the string “%1%0” to the query string for tile number 1, “%2%0” for tile 2, and so on. Later, when the board is displayed and the user clicks a tile, the program can look at the string to figure out which tile was clicked.
You might be wondering why we did not just use a for loop to iterate 16 times. The reason is that we want to display four tiles on one line (see the graphic output above or the text output below).
&build(qq|<A HREF="$URL$anchor">**</A>|, $spaces);
        }
        &build ("\n\n");
    }
}
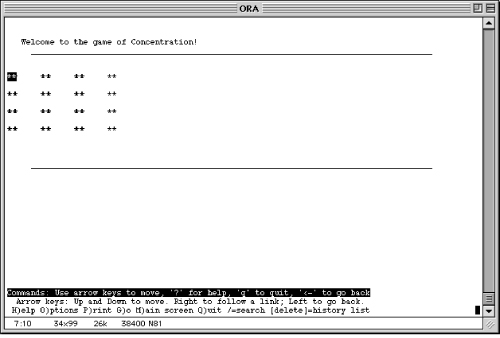
For text browsers, the string “**” represents each tile. Figure 11.3 shows how the output will appear on a text browser.
Figure 11.3: Text browser output
You've probably been wondering how we're going to untangle the marvelous encrypted garbage that we've stored in the HTML code for each tile. The next subroutine we will look at decodes the query information when a tile is selected.
sub undecode_query_string
{
    local (*game_board) = @_;
    local ($user_choices, $loop, $original_query, $URL_query);
    $ENV{'QUERY_STRING'} =~ /^((%\w+\+{0,1}){16})%(.*)$/;
    ($original_query, $user_choices) = ($1, $3);
The regular expression takes the first 16 strings in the format of %xx (possibly followed by “+” to indicate a match), stores them in $original_query, and places the rest of the query (the user selections) in the variable $user_choices.
The regular expression is shown below. Basically, (%\w+\+{0,1}) matches strings like %258 or %258+ (where the plus sign indicates that the tile has been successfully matched). So the larger expression ((%\w+\+{0,1}){16}) matches the whole 16 tiles. This larger expression becomes $1 because it is enclosed in the first set of parentheses.
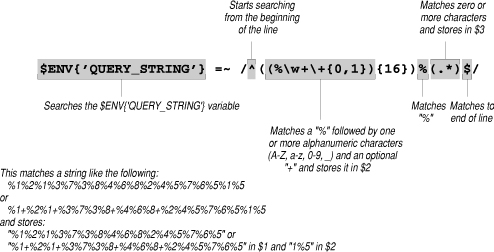
Notice the second set of parentheses? They're the parentheses in (%\w+\+{0,1}). This becomes $2, but we don't care about that. We used the parentheses simply to group an expression so we could repeat it 16 times.
After the 16 tiles comes a percent sign, which we specify explicitly, and then the (.*) that matches everything else. (We didn't really need the $ to match the end of the line, because .* always matches everything that's left.) The (.*) becomes $3, and we save it as the user selections.
So now, $original_query will contain the encrypted values in the tiles, looking something like this:
%258%c8%7d0%834%578%4b0%a8c%dac%ce4%bb8%1450%2bc%ea6%960%6a4%708
while $user_choices contains the user selections, like this:
1%7
We can now operate on the string of tile values.
@game_board = split (/%/, $original_query);
The $original_query variable is split on the “%” delimiter to create a 16-element array consisting of the board positions.
for ($loop=1; $loop <= 16; $loop++) {
        $game_board[$loop] =~ s|(\w+)|hex ($1) / (($loop * 50) + 100)|e;
    }
A regular expression similar to the one used to encode the query string is used to decode it. The hex command translates a number from hexadecimal to a format that can be used in arithmetic calculations.
$URL_query = join ("%", @game_board);
    return ($URL_query, $user_choices);
}
Finally, the decoded query string and the string consisting of the user choices are returned.
Here is the most complicated part of the program--the draw_current_board subroutine that checks for tiles that match, and then updates the board to reflect this. For each tile, the subroutine has to decide whether to turn it up (display the hidden value) or down (in which case it has a link so the user can click on it and continue the game). When a link is added, it must contain the state of the entire 16 tiles, plus information on which tile if any is currently selected.
sub draw_current_board
{
    local (*game_board, $URL_query, $user_choices) = @_;
    local ($one, $two, $count, $script, $URL, $outer, $inner, $index, $anchor);
    ($one, $two) = split (/%/, $user_choices);
The user choice string (i.e.,“1%2”) is split on the “%” delimiter and each choice is stored in a separate variable.
$count = 0;
The $count variable is initialized to zero. It is used to keep track of the total number of matched tiles on the board. If that is equal to 16, the user has won the game.
if ( int ($game_board[$one]) == int ($game_board[$two]) ) {
        $game_board[$one] = join ("", $game_board[$one], "+");
        $game_board[$two] = join ("", $game_board[$two], "+");
    }
If the two user choices match the values stored in the board array, a “+” is added to each position in the array. Remember, before the user selects a tile, the query string will look like this (for tile number 1):
http://some.machine/cgi-bin/concentration.pl?
%258%c8%7d0%834%578%4b0%a8c%dac%ce4%bb8%1450%2bc%ea6%960%6a4%708%1%0
And for tile number 2, it will have the following format:
http://some.machine/cgi-bin/concentration.pl?
%258%c8%7d0%834%578%4b0%a8c%dac%ce4%bb8%1450%2bc%ea6%960%6a4%708%2%0
Notice how the next-to-last number indicates the tile number. After the user selects a second tile (say tile number 4), the query string for tile number 1 will look like this:
http://some.machine/cgi-bin/concentration.pl?
%258%c8%7d0%834%578%4b0%a8c%dac%ce4%bb8%1450%2bc%ea6%960%6a4%708%1%4
If the values stored under tiles 1 and 4 match, the program will append a “+” to indicate a match, so that there is no hypertext link created for these tiles.
$URL_query = &build_decoded_query (*game_board);
A query based on the current board configuration is created by calling the build_decoded_query subroutine, just as we did when the game started.
$script = $ENV{'SCRIPT_NAME'};
    $URL = join ("", $script, "?", $URL_query);
    for ($outer=1; $outer <= 4; $outer++) {
        for ($inner=1; $inner <= 4; $inner++) {
            $index = (4 * ($outer - 1)) + $inner;
The two loops iterate through the board array four elements at a time.
if ($game_board[$index] =~ /\+/) {
                $game_board[$index] =~ s/\+//;
                &build (sprintf ("%02d", $game_board[$index]),                                        $spaces);
                $count++;
If the value in the board contains a “+”, the count is incremented, and the actual value behind the tile is displayed. No hypertext link is attached to the tile, because the user is not supposed to select the tile again.
} elsif ( ($index == $one) || ($index == $two) ) {
                &build (sprintf ("%02d", $game_board[$index]),                                       $spaces);
The value of a tile is displayed if the loop index equals the tile that is selected by the user. Remember, if the two tiles that are selected by the user do not match, they are “closed.”
} else {
                if ($one && $two) {
                    $anchor = join("%", "", $index, "0");
                } else {
                    $anchor = join("%", "", $one, $index);
                }
You have to take a minute to think about when this else clause executes. The current tile has not been turned up because of a successful match (that happened during the if block) nor is it currently selected (that happened during the elsif block). So we know that the tile is turned down, and that we want to attach a hypertext link so that the user can select it.
The only question is what to put in the user selections. If both $one and $two are set, we know that the user selected two tiles and that we are starting over. Therefore, we want to display “1%0” for tile number 1, “2%0” for tile number 2, and so on. That happens in the if block. If one tile has been chosen, we want to record that tile and the current tile. For instance, if the user selects tile 1, we want tile 7 to contain “1%7” as the user selections. This happens in the else block.
&build(qq|<A HREF="$URL$anchor">**</A>|, $spaces);
            }
        }
        &build ("\n\n");
    }
A hypertext link is generated for all of the other tiles that are turned down.
if ($count == 16) {
        &build ("<HR>You Win!\nIf you want to play again, “);
        &build (qq|click <A HREF="$script">here</A><BR>|);
    }
}
Finally, if the count is 16, which means that the user has matched all 8 pairs, a victory message is displayed.
The last subroutine we will discuss manipulates the $display variable to show images if a graphic browser is being used.
sub display_board
{
    local ($client_browser, $nongraphic_browsers);
    $client_browser = $ENV{'HTTP_USER_AGENT'};
    $nongraphic_browsers = 'Lynx|CERN-LineMode';
    print "Content-type: text/html", "\n\n";
    if ($client_browser =~ /$nongraphic_browsers/) {
            print "Welcome to the game of Concentration!", "\n";
        } else {
        print qq|<IMG SRC="$images_dir/concentration.gif">|;
        $display =~ s|\*\*</A>|<IMG SRC="$images_dir/question.gif"></A> |g;
        $display =~ s|(\d+)\s|<IMG SRC="$images_dir/$1.gif">   |g;
The string “**” is replaced with the “question.gif” image, and each number found (indicating either a match or a selection) is substituted with an appropriate “gif” image (“01.gif” for the value 01, and so on).
$display =~ s|\n\n|\n\n\n|g;
        $display =~ s|You Win!|<IMG SRC="$images_dir/win.gif">|g;
    }
    print "<HR>", "<PRE>", "\n";
    print $display, "\n";
    print "</PRE>", "<HR>", "\n";
}
The variable $display is sent to the browser for output. The <PRE> tags allow the formatting to remain intact. In other words, spaces and newline are preserved.
11.3 Introduction to Imagemaps
You've almost certainly seen imagemaps on your trips across the Web. They are pictures with different parts that you can click, and each part takes you to a different URL. Imagemaps let web sites offer pictorial melanges where you can select where you want to go, as an alternative to presenting a boring list of text items.
In this book, the imagemap is generated and interpreted within the program. But you should probably see how most people use conventional imagemaps. They start with a crisp graphic image (preferably GIF, as it is more portable than JPEG). Once they select an image, they must define various hotspots (or areas where users can click), and identify them in an imagemap file in the following format:
shape URL coordinate1, coordinate2, ... coordinaten
where shape can be “circle,” “poly,” or “rect”; URL is the file you want to display in response to the user's click; and the coordinates are measured in pixels. Programs exist to help you determine the coordinates of the regions you want to mark within an image. Here is an example of an imagemap file (the following applies to the NCSA server only):
default http://my.company.com
rect http://some.machine.com 0, 0, 50, 50
poly http://www.machine.com/graphic.gif 100, 120, 230, 250, 320, 75
circle http://their.machine.com/circle.gif 100, 100, 150, 150, 100
The next step is to edit the imagemap.conf configuration file and add an entry like the following:[1]
The first part of this statement is the name of the imagemap, while the second part is the relative path to the imagemap data file. Now, the imagemap is all but set up. The only step that needs to be performed is to add the appropriate HTML in a document to access the imagemap:
<A HREF="/cgi-bin/imagemap/dragon"><IMG SRC="/graphics/dragon.gif" ISMAP></A>
When the user clicks on a point in the image, the client sends the coordinates as query information, and the imagemap name as an extra path to the imagemap CGI program (which comes with most servers). Here is what a typical HTTP client request might look like:
GET /cgi-bin/imagemap/dragon?53,87
First, the CGI program reads the imagemap configuration file, in order to determine the imagemap data file for the clicked image. It then opens the data file and determines the appropriate URL to access. This is a very inefficient process, as two separate files have to be opened. As a result, many webmasters do not allow users to set up imagemaps.
While this should be enough information to get you started with imagemaps, we will do something much more efficient and fun in our last example--we'll generate the imagemap without using auxiliary files.
11.4 Calendar Manager
As the final example for this book, we will look at a very complicated program that uses a combination of CGI techniques: database manipulation, recursive program invocation, and virtual imagemaps.
What are virtual imagemaps? As we explained in the previous section, most people who provide images for users to click on have to store information about the imagemap in a file. The program I'm about to show you, however, determines the region in which the user clicked, and performs the appropriate action on the fly--without using any auxiliary files or scripts. Let's discuss the implementation of these techniques more thoroughly.
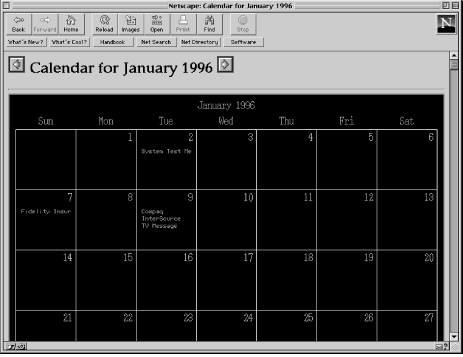
If a graphic browser is used to access this Calendar program, an imagemap of the current calendar is displayed listing all appointments. When an area on the image is clicked, the program calculates the date that corresponds to that region, and displays all the appointments for that date. Another important thing to note about the program is the way in which the imagemap is created--the script is actually executed twice (more on this later). Figure 11.4 shows a typical image of the calendar.
Figure 11.4: Calendar on graphics browser
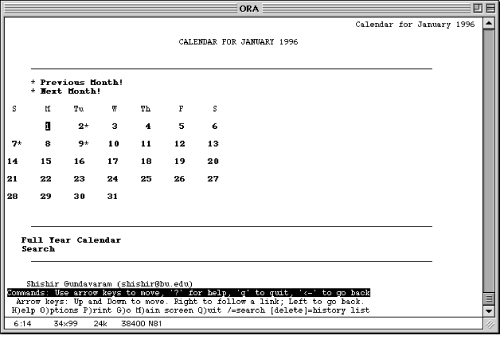
If the user accesses this program with a text browser, a text version of the calendar is displayed. You have seen this kind of dual use in a lot of programs in this book; you should design programs so that users with both types of browsers can access and use a CGI program. The text output is shown in Figure 11.5.
Figure 11.5: Calendar on text browser
Since the same program handles many types of queries and offers a lot of forms and displays, it can be invoked in several different ways. Most users will start by clicking on a simple link without a query string, which causes an imagemap (or text equivalent, for non-graphics browsers) of the current month to be displayed:
http://some.machine/cgi-bin/calendar.pl
If the user then selects the “Full Year Calendar” option, the following query is passed:
http://some.machine/cgi-bin/calendar.pl?action=full
When the user clicks an area on the image (or selects a link on the text calendar), the following query is sent:
http://some.machine/cgi-bin/calendar.pl?action=view&date=5&month=11/1995
The program will then display all the appointments for that date. The month field stores the selected month and year. Calendar Manager allows the user to set up appointments for any month, so it is always necessary to store the month and year information.
To be useful, of course, this program has to do more than offer a view of the calendar. It must allow changes and searches as well. Four actions are offered:
- Add an appointment
- Delete an appointment
- Change an appointment
- Search the appointments by keyword
Each method uses a different query to invoke the program. For instance, a search passes a URL and query information like this:
http://some.machine/cgi-bin/calendar.pl?action=search&type=form&month=11/1995
This will display a form where the user can enter a search string. The type field indicates the type of action to perform. The reason we use both action and type fields is that each action involves two steps, and the type field reflects these steps.
For instance, suppose the user asks to add an appointment. The program is invoked with type=form, causing it to display a form in which the user can enter all the information about the appointment. When the user submits the form, the program is invoked with the field type=execute. This causes the program to issue an SQL command that inserts the appointment into the database. Both steps invoke the program with the action=add field, but they can be distinguished by the type field.
When the user fills out and submits this form, the query information passed to this program is:
http://some.machine/cgi-bin/calendar.pl?action=search&type=execute&month=11/1995
The string “?action=search&type=execute&month=11/1995” is stored in QUERY_STRING, while the information in the form is sent as a POST stream. We will look at the method of passing information in more detail later on. In this case, the type is equal to execute, which instructs the program to execute the search request.
Let's discuss for a minute the way in which the database is interfaced with this program. All appointments are stored in a text-delimited file, so that an administrator/user can add and modify appointment information by using a text editor. The CGI program uses Sprite to manipulate the information in this file. So this program uses two modules that were introduced in earlier chapters: gd, which was covered in Chapter 6, Hypermedia Documents, and Sprite, which appeared in Chapter 9, Gateways, Databases, and Search/Index Utilities.
Main Program
Enough discussion--let's look at the program:
#!/usr/local/bin/perl5
use GD;
use Sprite;
$webmaster = "Shishir Gundavaram (shishir\@bu\.edu)";
$cal = "/usr/bin/cal";
The UNIX cal utility displays a text version of the calendar. See the draw_text_calendar subroutine to see what the output of this command looks like.
$database = "/home/shishir/calendar.db";
$delimiter = "::";
The database uses the “::” string as a delimiter and contains six fields for each calendar event: ID, Month, Day, Year, Keywords, and Description. The ID field uniquely identifies an appointment based on the time of creation. The Month (numerical), Day, and Year are self-explanatory. One thing to note here is that the Year is stored as a four-digit number (i.e., 1995, not 95).
The Keywords field is a short description of the appointment. This is what is displayed on the graphic calendar. And finally, the Description field should contain a more lengthy explanation regarding the appointment. Here is the format for a typical appointment file:
ID::Month::Day::Year::Keywords::Description
796421318::11::02::1995::See Professor::It is important that I see the professor
806421529::11::03::1995::ABC Enterprises::Meet Drs. Bird and McHale about job!!
805762393::11::03::1995::Luncheon Meeting::Travel associates
Now to create and manipulate the data:
($current_month, $current_year) = (localtime(time))[4,5];
$current_month += 1;
$current_year += 1900;
These three statements determine the current month and year. Remember, the month number, as returned by localtime, is zero-based (0-11, instead of 1-12). And the year is returned as a two-digit number (95, instead of 1995).
$action_types = '^(add|delete|modify|search)$';
$delete_password = "CGI Super Source";
The $action_types variable consists of four options that the user can select from the Calendar Manager. The user is asked for a password when the delete option is chosen. Replace this with a password of your choice.
&check_database ();
&parse_query_and_form_data (*CALENDAR);
The check_database subroutine checks for the existence of the calendar database. The database is created if it does not already exist. The parse_query_and_form_data subroutine is called to parse all information from the Calendar Manager, handling both POST and GET queries. As in so many other examples, an associative array proves useful, so that's what CALENDAR is.
$action = $CALENDAR{'action'};
$month = $CALENDAR{'month'};
($temp_month, $temp_year) = split ("/", $month, 2);
The action and month fields are stored in variables. The month and year are split from the month field. As you saw near the beginning of this section, the month field has a format like 11/1995.
if ( ($temp_month =~ /^\d{1,2}$/) && ($temp_year =~ /^\d{4}$/) ) {
    if ( ($temp_month >= 1) && ($temp_month <= 12) ) {
        $current_month = $temp_month;
        $current_year = $temp_year;
    }
}
If the month and year values as specified in the query string are valid numbers, they are stored in $current_month and $current_year. Otherwise, these variables will reflect the current month and year (as defined above). One feature of this program is that it remembers the month that the user most recently clicked or entered in a search form. The month chosen by the user is stored in $current_month so that it becomes the default for future searches.
@month_names = ('January', 'February', 'March', 'April', 'May', 'June',  'July', 'August', 'September', 'October', 'November',  'December');
$weekday_names = "Sun,Mon,Tue,Wed,Thu,Fri,Sat";
$current_month_name = $month_names[$current_month - 1];
$current_month_year = join ("/", $current_month, $current_year);
The $current_month_name variable contains the full name of the specified month. $current_month_year is a string containing the month and year (e.g.,“11/1995”).
This completes the initialization. Remember that the program is called afresh each time the user submits a form or clicks on a date, so it runs through this initialization again and potentially changes the current month. But now it is time to handle the action that the user passed in the query.
if ($action eq "full") {
    &display_year_calendar ();
If the user passed the full field, display_year_calendar is called to display the full year calendar.
} elsif ($action eq "view") {
    $date = $CALENDAR{'date'};
    &display_all_appointments ($date);
If the user selects to view the appointments for a certain date, the display_all_appointments routine displays all of the appointments for that date.
} elsif ($action =~ /$action_types/) {
    $type = $CALENDAR{'type'};
    if ($type eq "form") {
        $dynamic_sub = "display_${action}_form";
        &$dynamic_sub ();
    } elsif ($type eq "execute") {
        $dynamic_sub = "${action}_appointment";
        &$dynamic_sub ();
    } else {
        &return_error (500, "Calendar Manager", "An invalid query was passed!");
    }
If the action field contains one of the four actions defined near the beginning of the program, the appropriate subroutine is executed. This is an example of a dynamic subroutine call. For example, if the action is “add” and the type is “form,” the $dynamic_sub variable will call the display_add_form subroutine. This is much more compact than to conditionally compare all possible values.
} else {
    &display_month_calendar ();
}
exit (0);
If no query is passed (or the query does not match the ones above), the display_month_calendar subroutine is called to output the current calendar in the appropriate format, either as a graphic imagemap or as plain text.
The Database
In the rest of this chapter I'm going to explain the various subroutines that set and retrieve data, create a display, and parse input. We'll start with some database functions. You'll also find incidental routines here, which I've written as conveniences because their functions appear so often.
The following subroutine checks to see if the calendar database exists. If not, we create one. This job is simple, since we're using a flat file with Sprite as an interface: we just open a file with the desired name and write a one-line header.
sub check_database
{
        local ($exclusive_lock, $unlock, $header);
        $exclusive_lock = 2;
        $unlock = 8;
        if (! (-e $database) ) {
                if ( open (DATABASE, ">" . $database) ) {
                        flock (DATABASE, $exclusive_lock);
                        $header = join ($delimiter, "ID", "Month", "Day",
                                        "Year", "Keywords", "Description");
                        print DATABASE $header, "\n";
                        flock (DATABASE, $unlock);
                        close (DATABASE);
                } else {
                        &return_error (500, "Calendar Manager",
"Cannot create new calendar database.");
                }
        }
}
If the database does not exist, a header line is output:
ID::Month::Day::Year::Keywords::Description
The following subroutine just returns an error; it is defined for convenience and used in open_database.
sub Sprite_error
{
    &return_error (500, "Calendar Manager",
          "Sprite Database Error. Check the server log file.");
}
The open_database subroutine passes an SQL statement to the Sprite database.
sub open_database
{
    local (*INFO, $command, $rdb_query) = @_;
    local ($rdb, $status, $no_matches);
This subroutine accepts three arguments: a reference to an array, the SQL command name, and the actual query to execute. A typical call to the subroutine looks like:
&open_database (undef, "insert", <<End_of_Insert);
insert into $database
   (ID, Day, Month, Year, Keywords, Description)
values
   ($time, $date, $current_month, $current_year, '$keywords', '$description')
End_of_Insert
The third argument looks strange because it's telling the subroutine to read the query on the following lines. In other words, the SQL query lies between the call to open_database and the text on the closing line, End_of_Insert. The effect is to insert a new appointment containing information passed by the user. Remember, we would also have to escape single and double quotes in the field values.
$rdb = new Sprite ();
    $rdb->set_delimiter ("Read",  $delimiter);
    $rdb->set_delimiter ("Write", $delimiter);
This creates a new Sprite database object, and sets the read and write delimiters to the value stored in $delimiter (in this case, “::”).
if ($command eq "select") {
        @INFO = $rdb->sql ($rdb_query);
        $status = shift (@INFO);
        $no_matches = scalar (@INFO);
        $rdb->close ();
If the user passed a select command, the query is executed with the sql method (in object-oriented programming, “method” is a glorified term for a subroutine). We treat the select commands separately from other commands because it doesn't change the database, but just returns data. All other commands modify the database.
The INFO array contains the status of the request (success or failure) in its first element, followed by other elements containing the records that matched the specified criteria. The status and the number of matches are stored.
if (!$status) {
            &Sprite_error ();
        } else {
            return ($no_matches);
        }
If the status is zero, the Sprite_error subroutine is called to output an error. Otherwise, the number of matches is returned.
} else {
        $rdb->sql ($rdb_query) || &Sprite_error ();
        $rdb->close ($database);
    }
}
If the user passes a command other than select (in other words, a command that modifies the database), the program executes it and saves the resulting database.
Now, we will look at three very simple subroutines that output the header, the footer, and the “Location:” HTTP header, respectively.
sub print_header
{
    local ($title, $header) = @_;
    print "Content-type: text/html", "\n\n";
        print "<HTML>", "\n";
    print "<HEAD><TITLE>", $title, "</TITLE></HEAD>", "\n";
        print "<BODY>", "\n";
    $header = $title unless ($header);
    print "<H1>", $header, "</H1>", "\n";
    print "<HR>", "\n";
}
The print_header subroutine accepts two arguments: the title and the header. If no header is specified, the title of the document is used as the header.
The next subroutine outputs a plain footer. It is used at the end of forms and displays.
sub print_footer
{
    print "<HR>", "\n";
    print "<ADDRESS>", $webmaster, "</ADDRESS>", "\n";
        print "</BODY></HTML>", "\n";
}
Finally, the Location: header, which we described in Chapter 3, is output by the print_location subroutine after an add, delete, or modify request. By passing a URL in the Location: header, we make the server re-execute the program so that the user sees an initial Calendar page again.
sub print_location
{
    local ($location_URL);
    $location_URL = join ("", $ENV{'SCRIPT_NAME'},                  "?",
                              "browser=", $ENV{'HTTP_USER_AGENT'},  "&",
                              "month=", $current_month_year);
    print "Location: ", $location_URL, "\n\n";
}
This is a very important subroutine, though it may look very simple. The subroutine outputs the Location: HTTP header with a query string that contains the browser name and the specified month and year. The reason we need to supply the browser name is that the HTTP_USER_AGENT environment variable does not get set when there is a URL redirection. When the server gets this script and executes it, it does not set the HTTP_USER_AGENT variable. So this program will not know the user's browser type unless we include the information.
Forms and Displays
In this section you'll find subroutines that figure out what the user has asked for and display the proper output. All searches, additions, and so forth take place here. Usually, a database operation takes place in two steps: one subroutine displays a form, while another accepts input from the form and accesses the database.
Let's start out with display_year_calendar, which displays the full year calendar.
sub display_year_calendar
{
    local (@full_year);
    @full_year = `$cal $current_year`;
If the cal command is specified without a month number, a full year is displayed. The `backtics` execute the command and store the output in the specified variable. Since the variable $current_year can be based on the month field in the query string, it is important to check to see that it does not contain any shell metacharacters. What if some user passed the following query to this program?
http://some.machine/cgi-bin/calendar.pl?action=full&month=11/1995;rm%20-fr%20/
It can be quite dangerous! You might be wondering where we are checking for shell metacharacters. Look back at the beginning of this program, where we made sure that the month and year are decimal numbers.
The output from cal is stored in the @full_year array, one line per element. Now we trim the output.
@full_year = @full_year[5..$#full_year-3];
The first four and last three lines from the output are discarded, as they contain extra newline characters. The array will contain information in the following format:
1995
         Jan                    Feb                    Mar
 S  M Tu  W Th  F  S    S  M Tu  W Th  F  S    S  M Tu  W Th  F  S
 1  2  3  4  5  6  7             1  2  3  4             1  2  3  4
 8  9 10 11 12 13 14    5  6  7  8  9 10 11    5  6  7  8  9 10 11
15 16 17 18 19 20 21   12 13 14 15 16 17 18   12 13 14 15 16 17 18
22 23 24 25 26 27 28   19 20 21 22 23 24 25   19 20 21 22 23 24 25
29 30 31               26 27 28               26 27 28 29 30 31
.
.
.
Let's move on.
grep (s|(\w{3})|<B>$1</B>|g, @full_year);
This might look like some deep magic. But it is actually quite a simple construct. The grep iterates through each line of the array, and adds the <B>..</B> tags to strings that are three characters long. In this case, the strings correspond to the month names. This one line statement is equivalent to the following:
foreach (@full_year) {
    s|(\w{3})|<B>$1</B>|g;
}
Now, here is the rest of this subroutine, which simply outputs the calendar.
&print_header ("Calendar for $current_year");
    print "<PRE>", @full_year, "</PRE>", "\n";
    &print_footer ();
}
The following subroutine displays the search form. It is pretty straightforward. The only dynamic information in this form is the query string.
sub display_search_form
{
    local ($search_URL);
    $search_URL = join ("", $ENV{'SCRIPT_NAME'},  "?",
                            "action=search",      "&",
                            "type=execute",       "&",
                            "month=", $current_month_year);
The query string sets the type field to execute, which means that this program will call the search_appointment subroutine to search the database when this form is submitted. The month and year are also set; this information is passed back and forth between all the forms, so that the user can safely view and modify the calendars for months other than the current month.
&print_header ("Calendar Search");
    print <<End_of_Search_Form;
This form allows you to search the calendar database for certain information. The Keywords and Description fields are searched for the string you enter.
<P>
<FORM ACTION="$search_URL" METHOD="POST"> Enter the string you would like to search for: <P>
<INPUT TYPE="text" NAME="search_string" SIZE=40 MAXLENGTH=40> <P>
Please enter the <B>numerical</B> month and the year in which to search. Leaving these fields empty will default to the current month and year: <P>
<PRE>
Month: <INPUT TYPE="text" NAME="search_month" SIZE=4 MAXLENGTH=4><BR> Year: <INPUT TYPE="text" NAME="search_year" SIZE=4 MAXLENGTH=4> </PRE>
<P>
<INPUT TYPE="submit" VALUE="Search the Calendar!"> <INPUT TYPE="reset" VALUE="Clear the form"> </FORM>
End_of_Search_Form
    &print_footer ();
}
Here is the subroutine that actually performs the search:
sub search_appointment
{
    local ($search_string, $search_month, $search_year, @RESULTS,
           $matches, $loop, $day, $month, $year, $keywords,
           $description, $search_URL, $month_name);
    $search_string = $CALENDAR{'search_string'};
    $search_month = $CALENDAR{'search_month'};
    $search_year = $CALENDAR{'search_year'};
Three variables are declared to hold the form information. We could have used the information from the CALENDAR associative array directly, without declaring these variables. This is done purely for a visual effect; the code looks much neater.
if ( ($search_month < 1) || ($search_month > 12) ) {
        $CALENDAR{'search_month'} = $search_month = $current_month;
    }
If no month number was specified, or if the month is not in the valid range, it is set to the value stored in $current_month. This value may or may not be the actual month in which the user is running the program. The user changes $current_month by specifying a search for a different month.
if ($search_year !~ /^\d{2,4}$/) {
        $CALENDAR{'search_year'} = $search_year = $current_year;
    } elsif (length ($search_year) < 4) {
        $CALENDAR{'search_year'} = $search_year += 1900;
    }
If the year is not specified, or if it does not contain at least two digits, it is set to $current_year. And if the length of the year field is less than 4, 1900 is added.
$search_string =~ s/(\W)/\\$1/g;
    $matches = &open_database (*RESULTS, "select", <<End_of_Select);
select Day, Month, Year, Keywords, Description from $database
where ( (Keywords =~ /$search_string/i) or
        (Description =~  /$search_string/i) )   and
        (Month       =   $search_month)         and
        (Year        =   $search_year)
End_of_Select
The open_database subroutine is called to search the database for any records that match the specified criteria. The RESULTS array will contain the Day, Month, Year, Keywords, and Description fields for the matched records.
unless ($matches) {
        &return_error (500, "Calendar Manager",
              "No appointments containing $search_string are found.");
    }
If there are no records that match the search information specified by the user, an error message is output.
&print_header ("Search Results for: $search_string");
for ($loop=0; $loop < $matches; $loop++) {
$RESULTS[$loop] =~ s/([^\w\s\0])/sprintf ("&#%d;", ord ($1))/ge;
($day, $month, $year, $keywords, $description) =
split (/\0/, $RESULTS[$loop], 5);
$search_URL = join ("", $ENV{'SCRIPT_NAME'}, "?",
"action=view", "&",
"date=", $day, "&",
"month=", $month, "/", $year);
$keywords = "No Keywords Specified!" unless ($keywords);
$description = "-- No Description --" unless ($description);
$description =~ s/<BR>/<BR>/g;
$month_name = $month_name[$month - 1];
print <<End_of_Appointment;
<A HREF="$search_URL">$current_month_name $day, $year</A><BR> <B>$keywords</B><BR>
$description
End_of_Appointment
The for loop iterates through the RESULTS array, and creates a hypertext link with a query string for each appointment. This will allow the user to just click the appointment to get a list of all the appointments for that date. (You may remember that, at the very beginning of this section, we showed how to retrieve appointments for a particular day by passing an action field along with date and month fields).
print "<HR>" if ($loop < $matches - 1);
    }
    &print_footer ();
}
A horizontal rule is output after each record, except after the last one. This is because the print_footer subroutine outputs a horizontal rule as well.
Now, let's look at the form that is displayed when the “Add New Appointment!” link is selected.
sub display_add_form
{
    local ($add_URL, $date, $message);
    $date = $CALENDAR{'date'};
    $message = join ("", "Adding Appointment for ",
                         $current_month_name, " ", $date, ", ", $current_year);
    $add_URL = join ("", $ENV{'SCRIPT_NAME'},           "?",
                         "action=add",                  "&",
                         "type=execute",                "&",
                         "month=", $current_month_year, "&",
                         "date=", $date);
When the add option is selected by the user, the following query is passed to this program (see the display_all_appointments subroutine):
http://some.machine/cgi-bin/calendar.pl?action=add&type=form&month=11/1995&date=10
Before this subroutine is called, the main program sets the variables $current_month_name and so on.
This information is used to build another query string that will be passed to this program when the form is submitted.
&print_header ("Add Appointment", $message);
    print <<End_of_Add_Form;
This form allows you to enter an appointment to be stored in the calendar database.
To make it easier for you to search for specific appointments later on, please use descriptive words to describe an appointment. <P>
<FORM ACTION="$add_URL" METHOD="POST"> Enter a brief message (keywords) describing the appointment: <P>
<INPUT TYPE="text" NAME="add_keywords" SIZE=40 MAXLENGTH=40> <P>
Enter some comments about the appointment: <TEXTAREA ROWS=4 COLS=60 NAME="add_description"></TEXTAREA><P> <P>
<INPUT TYPE="submit" VALUE="Add Appointment!"> <INPUT TYPE="reset" VALUE="Clear Form"> </FORM>
End_of_Add_Form
    &print_footer();
}
The add_appointment subroutine adds a record to the calendar database:
sub add_appointment
{
    local ($time, $date, $keywords, $description);
    $time = time;
The $time variable contains the current time, as the number of seconds since 1970. This is used as a unique identification for the record.
$date = $CALENDAR{'date'};
    ($keywords = $CALENDAR{'add_keywords'}) =~ s/(['"])/\\$1/g;
    ($description = $CALENDAR{'add_description'}) =~ s/\n/<BR>/g;
    $description =~ s/(['"])/\\$1/g;
All newline characters in the description field are converted to <BR>. This is because of the way the Sprite database stores records. Remember, the database is text-delimited, where each field is delimited by a certain string, and each record is terminated by a newline character.
&open_database (undef, "insert", <<End_of_Insert);
insert into $database
   (ID, Day, Month, Year, Keywords, Description)
values
   ($time, $date, $current_month, $current_year, '$keywords', '$description')
End_of_Insert
The open_database subroutine is called to insert the record into the database. Notice the quotes around the variables $keywords and $description. These are absolutely necessary since the two variables contain string information.
&print_location ();
}
The display_delete_form subroutine displays a form that asks for a password before an appointment can be deleted. The delete and modify options are available for each appointment. As a result, when you select one of these options, the identification of that appointment is passed to this script, so that the appropriate information can be retrieved quickly and efficiently.
sub display_delete_form
{
    local ($delete_URL, $id);
    $id = $CALENDAR{'id'};
    $delete_URL = join ("", $ENV{'SCRIPT_NAME'}, "?",
                            "action=delete",     "&",
                            "type=execute",      "&",
                            "id=", $id,          "&",
                            "month=", $current_month_year);
When the user selects the delete option in the calendar, the following query is passed to this script:
http://some.machine/cgi-bin/calendar.pl?action=delete&type=form&month=11/ 1995&id=806421529
This query information is used to construct another query that will be passed to this program when the form is submitted.
&print_header ("Deleting appointment");
    print <<End_of_Delete_Form;
In order to delete calendar entries, you need to enter a valid identification code (or password):
<HR>
<FORM ACTION="$delete_URL" METHOD="POST">
<INPUT TYPE="password" NAME="code" SIZE=40> <P>
<INPUT TYPE="submit" VALUE="Delete Entry!">
<INPUT TYPE="reset" VALUE="Clear the form"> </FORM>
End_of_Delete_Form
    &print_footer ();
}
The following subroutine checks the password that is entered by the user. If the password is valid, the appointment is deleted, and a server redirect is performed, so that the calendar is displayed.
sub delete_appointment
{
    local ($password, $id);
    $password = $CALENDAR{'code'};
    $id = $CALENDAR{'id'};
    if ($password ne $delete_password) {
        &return_error (500, "Calendar Manager",
                            "The password you entered is not valid!");
    } else {
        &open_database (undef, "delete", <<End_of_Delete);
delete from $database
where (ID = $id)
End_of_Delete
    }
    &print_location ();
}
If the password is valid, the record identified by the unique time is deleted from the database. Otherwise, an error message is output.
The display_modify_form subroutine outputs a form that contains the information about the record to be modified. This information is retrieved from the database with the help of the query information that is passed to this script:
http://some.machine/cgi-bin/calendar.pl?action=modify&type=form&month=11/ 1995&id=806421529
Here is the subroutine:
sub display_modify_form
{
    local ($id, $matches, @RESULTS, $keywords, $description, $modify_URL);
    $id = $CALENDAR{'id'};
    $matches = &open_database (*RESULTS, "select", <<End_of_Select);
select Keywords, Description from $database
where (ID = $id)
End_of_Select
    unless ($matches) {
        &return_error (500, "Calendar Manager",
          "Oops! The appointment that you selected no longer exists!");
    }
The identification number is used to retrieve the Keywords and Description fields from the database. If there are no matches, an error message is output. This will happen only if the Calendar Manager is being used by multiple users, and one of them deletes the record pointed to by the identification number.
($keywords, $description) = split (/\0/, shift (@RESULTS), 2);
    $keywords = &escape_html ($keywords);
    $description =~ s/<BR>/\n/g;
The appointment keywords and description are obtained from the results. We call the escape_html subroutine to escape certain characters that have a special significance to the browser, and we also convert the <BR> tags in the description back to newlines, so that the user can modify the description.
$modify_URL = join ("", $ENV{'SCRIPT_NAME'}, "?",
                            "action=modify",     "&",
                            "type=execute",      "&",
                            "id=", $id,          "&",
                            "month=", $current_month_year);
    &print_header ("Modify Form");
    print <<End_of_Modify_Form;
This form allows you to modify the <B>description</B> field for an existing appointment in the calendar database. <P>
<FORM ACTION="$modify_URL" METHOD="POST"> Enter a brief message (keywords) describing the appointment: <P>
<INPUT TYPE="text" NAME="modify_keywords" SIZE=40        VALUE="$keywords" MAXLENGTH=40>
<P>
Enter some comments about the appointment: <TEXTAREA ROWS=4 COLS=60 NAME="modify_description"> $description
</TEXTAREA><P>
<P>
<INPUT TYPE="submit" VALUE="Modify Appointment!"> <INPUT TYPE="reset" VALUE="Clear Form"> </FORM>
End_of_Modify_Form
    &print_footer ();
}
The form containing the values of the selected appointment is displayed. Only the keywords and description fields can be modified by the user. The escape_html subroutine escapes characters in a specified string to prevent the browser from interpreting them.
sub escape_html
{
local ($string) = @_;
local (%html_chars, $html_string);
%html_chars = ('&', '&',
'>', '>',
'<', '<',
'"', '"');
$html_string = join ("", keys %html_chars);
$string =~ s/([$html_string])/$html_chars{$1}/go;
return ($string);
}
The modify_appointment subroutine modifies the information in the database.
sub modify_appointment
{
    local ($modify_description, $id);
    ($modify_description = $CALENDAR{'modify_description'}) =~ s/(['"])/\\$1/g;
    $id = $CALENDAR{'id'};
    &open_database (undef, "update", <<End_of_Update);
update $database
set Description = ('$modify_description') where (ID = $id)
End_of_Update
    &print_location ();
}
The update SQL command modifies the description for the record in the calendar database. Then a server redirect is performed.
The imagemap display
Now let's change gears and discuss some of the more complicated subroutines, the first one being display_month_calendar. This subroutine either draws a calendar, or interprets the coordinates clicked by the user. Because we're trying to do a lot with this subroutine (and run it in several different situations), don't be surprised to find it rather complicated. There are three things the subroutine can do:
- In the simplest case, this subroutine is called when no coordinate information has been passed to the program. It then creates a calendar covering a one-month display. The output_HTML routine is called to do this (assuming that the user has a graphics browser).
- If coordinate information is passed, the subroutine figures out which date the user clicked and displays the appointments for that date, using the display_all_appointments subroutine.
- Finally, if the user has a non-graphics browser, draw_text_calendar is called to create the one-month display. This display contains hypertext links to simulate the functions that an imagemap performs in the graphics version.
But more subtleties lie in the interaction between the subroutines. In order to generate a calendar for a particular month requested by the user, I have the program invoke itself in a somewhat complex way.
Let me start with our task here: to create an image dynamically. Most CGI programmers create a GIF image, store it in a file, and then create an imagemap based on that temporary file. This is inefficient and involves storing information in temporary files. What I do instead is shown in Figure 11.6.
Figure 11.6: Dynamic imagemap creation
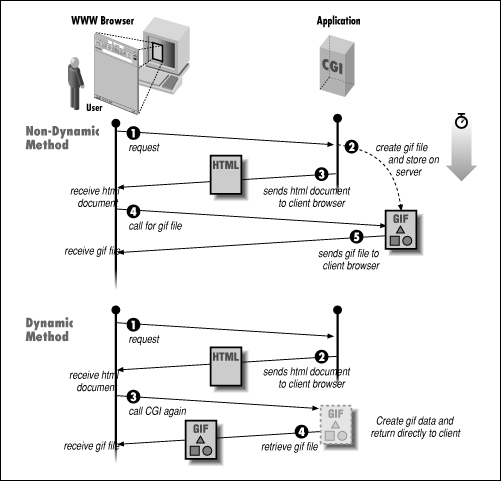
The program is invoked for the first time, and calls output_HTML. This routine sends the browser some HTML that looks like this:
<A HREF="/cgi-bin/calendar.pl/11/1995">
<IMG SRC="/cgi-bin/calendar.pl?month=11/1995&draw_imagemap" ISMAP></A>
Embedding an <IMG> tag in an <A> tag is a very common practice--an image with a hypertext link. But in most <IMG> tags, the SRC attribute points to a .gif file. Here, instead, it points back to our program.
So what happens when the browser displays the HTML? It sends a request back to the server for the image, and the server runs this program all over again. (As I said before, the program invokes itself.) This time, an image of a calendar is returned, and the browser happily completes the display.
You may feel that I'm playing games with HTML here, but it's all very legitimate and compatible with the way a web client and server work. And there's no need for temporary files with the resulting delays and cleanup.
Let me explain one more detail before we launch into the code. The decision about whether to display a calendar is determined by a field in the <IMG> tag you saw, the draw_imagemap field. When this field is passed, the program creates an image of a calendar. When the field is not passed, output_HTML is called. So we have to run the program once without draw_imagemap, let it call output_HTML, and have that subroutine run the program again with draw_imagemap set.
Once you understand the basic logic of the program, the display_month_calendar subroutine should be fairly easy to follow.
sub display_month_calendar
{
    local ($nongraphic_browsers, $client_browser, $clicked_point,
           $draw_imagemap, $image_date);
    $nongraphic_browsers = 'Lynx|CERN-LineMode';
    $client_browser = $ENV{'HTTP_USER_AGENT'} || $CALENDAR{'browser'};
We need to know whether the client is using a browser that displays graphics. Normally the name of the browser is passed in the HTTP_USER_AGENT environment variable, but it is not set if a program is executed as a result of server redirection. In that case, we can find out the browser through the query information, where we thoughtfully set a browser field earlier in the program. The line setting $client_browser is equivalent to:
if ($ENV{'HTTP_USER_AGENT'}) {
    $client_browser = $ENV{'HTTP_USER_AGENT'};
} else {
    $client_browser = $CALENDAR{'browser'};
}
The following code checks to see if a graphic browser is being used, and displays output in the appropriate format.
if ($client_browser =~ /$nongraphic_browsers/) {
        &draw_text_calendar ();
For text browsers, the draw_text_calendar subroutine formats the information from the cal command and displays it.
} else {
        $clicked_point = $CALENDAR{'clicked_point'};
$draw_imagemap = $CALENDAR{'draw_imagemap'};
When the program is executed initially, the clicked_point and the draw_imagemap fields are null. As we'll see in a moment, this causes us to execute the output_HTML subroutine.
if ($clicked_point) {
            $image_date = &get_imagemap_date ();
            &display_all_appointments ($image_date);
If the user clicks on the image, this program stores the coordinates in the variable $CALENDAR{`clicked_point'}. The get_imagemap_date subroutine returns the date corresponding to the clicked region. Finally, the display_all_appointments subroutine displays all the appointments for the selected date.
} elsif ($draw_imagemap) {
            &draw_graphic_calendar ();
When draw_imagemap is set (because of the complicated sequence of events I explained earlier), the draw_graphic_calendar subroutine is executed and outputs the image of the calendar.
} else {
            &output_HTML ();
        }
        }
}
In this else block, we know that we are running a graphics browser but that neither $clicked_point nor $draw_imagemap were set. That means we are processing the initial request, and have to call output_HTML to create the first image.
When displaying the current calendar, this program provides two hypertext links (back to this program) that allow the user to view the calendar for a month ahead or for the past month. The next subroutine returns these links.
sub get_next_and_previous
{
    local ($next_month, $next_year, $previous_month, $previous_year,
           $arrow_URL, $next_month_year, $previous_month_year);
    $next_month = $current_month + 1;
    $previous_month = $current_month - 1;
    if ($next_month > 12) {
        $next_month = 1;
        $next_year = $current_year + 1;
    } else {
        $next_year = $current_year;
    }
    if ($previous_month < 1) {
        $previous_month = 12;
        $previous_year = $current_year - 1;
    } else {
        $previous_year = $current_year;
    }
If the month number is either at the low or the high limit, the year is incremented or decremented accordingly.
$arrow_URL = join ("", $ENV{'SCRIPT_NAME'},  "?",
                           "action=change",      "&",
                           "month=");
    $next_month_year = join ("", $arrow_URL, $next_month, "/", $next_year);
    $previous_month_year = join ("", $arrow_URL,
                                     $previous_month, "/", $previous_year);
    return ($next_month_year, $previous_month_year);
}
The two URLs returned by this subroutine are in the following format (assuming 12/1995 is the selected month):
http://some.machine/cgi-bin/calendar.pl?action=change&month=1/1996
and
http://some.machine/cgi-bin/calendar.pl?action=change&month=11/1995
Now, let's look at the subroutine that is executed initially, which displays the title and header for the document as well as an <IMG> tag that refers back to this script to create a graphic calendar.
sub output_HTML
{
    local ($script, $arrow_URL, $next, $previous, $left, $right);
    $script = $ENV{'SCRIPT_NAME'};
    ($next, $previous) = &get_next_and_previous ();
    $left  = qq|<A HREF="$previous"><IMG SRC="/icons/left.gif"></A>|;
    $right = qq|<A HREF="$next"><IMG SRC="/icons/right.gif"></A>|;
    &print_header
        ("Calendar for $current_month_name $current_year",
         "$left Calendar for $current_month_name $current_year $right");
The two links for the next and previous calendars are embedded in the document's header.
print <<End_of_HTML;
<A HREF="$script/$current_month_year">
<IMG SRC="$script?month=$current_month_year&draw_imagemap" ISMAP></A>
I described this construct earlier; it creates an imagemap with a hypertext link that runs this script. There are interesting subtleties in both the HREF attribute and the SRC attribute.
The HREF attribute includes the selected month and year (e.g., “11/1995”) as path information. That's because we need some way to get this information back to the program when the user clicks on the calendar. The imagemap uses the GET method (so we cannot use the input stream) and passes only the x and y coordinates of the mouse as query information. So the only other option left open to us is to include the month and year as path information.
The SRC attribute, as we said before, causes the whole program to run again. Thanks to the draw_imagemap field, a calendar is drawn.
<HR>
<A HREF="$script?action=full&year=$current_year">Full Year Calendar</A> <BR>
<A HREF="$script?action=search&type=form&month=$current_month_year">Search</A>
End_of_HTML
    &print_footer ();
}
The main calendar screen contains two links: one to display the full year calendar, and another one to search the database.
Let's look at the subroutine that draws a text calendar. I have no chance to indulge in fancy image manipulation here. Instead, I format the days of the month in rows and provide a hypertext link for each day.
sub draw_text_calendar
{
    local (@calendar, $big_line, $matches, @RESULTS, $header, $first_line,
           $no_spaces, $spaces, $loop, $date, @status, $script, $date_URL,
           $next, $previous);
    @calendar = `$cal $current_month $current_year`;
    shift (@calendar);
    $big_line = join ("", @calendar);
The calendar for the selected month is stored in an array. Here is what the output of the cal command looks like:
November 1995
 S  M Tu  W Th  F  S
          1  2  3  4
 5  6  7  8  9 10 11
12 13 14 15 16 17 18
19 20 21 22 23 24 25
26 27 28 29 30
The first line of the output is removed, as we do not need it. Then the whole array is joined together to create one large string. This makes it easier to manipulate the information, rather than trying to modify different elements of the array.
$matches = &open_database (*RESULTS, “select", <<End_of_Select);
select Day from $database
where (Month = $current_month) and
(Year  = $current_year)
End_of_Select
The RESULTS array consists of the Day field for all the appointments in the selected month. This array is used to highlight the appropriate dates on the calendar.
&print_header ("Calendar for $current_month_name $current_year");
    $big_line =~ s/\b(\w{1,2})\b/$1    /g;
    $big_line =~ s/\n/\n\n/g;
These two statements expand the space between strings that are either one or two characters, and add an extra newline character. The regular expression is illustrated below.
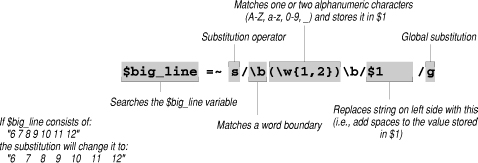
Here is the what the output looks like after these two statements:
S      M     Tu      W     Th      F      S
          1      2      3      4
 5      6      7      8      9     10     11
12     13     14     15     16     17     18
19     20     21     22     23     24     25
26     27     28     29     30
Because of the leading spaces before the “1,” the alignment is off. This can be corrected by taking the difference in length between the line that contains the day names and the first line (without the leading spaces), and adding that number of spaces to align it properly. We do this in the somewhat inelegant code below.
($header) = $big_line =~ /( S.*)/;
    $big_line =~ s/ *(1.*)/$1/;
    ($first_line) = $big_line =~ //;
    $no_spaces = length ($header) - length ($first_line);
    $spaces = " " x $no_spaces;
    $big_line =~ s/\b1\b/${spaces}1/;
While the technique I've used here is not a critical part of the program, I'll explain it because it provides an interesting instance of text manipulation. Remember that $big_line contains several lines. Through regular expressions we are extracting two lines: one with names of days of the week in $header, and another with the first line of dates in $first_line. We then compare the lengths of these two lines to make them flush right.
The regular expression /( S.*)/ picks out the cal output's header, which is a line containing a space followed by an S for Sun. This whole line is stored in $header.
In the next two lines of code, we strip all the spaces from the beginning of the first week of the calendar and store the rest of the week in $first_line. The regular expression contains a space followed by an asterisk in order to remove all spaces. The (1.*) and $1 select the date 1 and all the other dates up to the end of the same line. In the next code statement, the // construct means “whatever was matched last in a regular expression.” Since the last match was $1, $first_line contains a line of dates starting with 1.
Then, using length commands, we determine how many spaces we need to make the first week flush right with the header. The x command creates the number of spaces we need. Finally we put that number of spaces before the 1 on the first line.
for ($loop=0; $loop < $matches; $loop++) {
$date = $RESULTS[$loop];
            unless ($status[$date]) {
                $big_line =~ s|\b$date\b {0,1}|$date\*|;
            $status[$date] = 1;
        }
    }
This loop iterates through the RESULTS array, which we loaded through an SQL select command earlier in this subroutine. Each element of RESULTS is a date on which an appointment has been scheduled. For each of these dates, we search the cal output and add an asterisk (“*”).
The substitute command deserves a little examination:
s|\b$date\b {0,1}|$date\*|
Essentially, we want to replace the space that follows the date with an asterisk (\*). But the date may not be followed by a space. If it's at the end of the line (that is, if it falls on a Saturday) there will be no following space, and we want to just append the asterisk.

The {0,1} construct handles both cases. It means that $date must be followed by zero or one spaces. If there is a space, it's treated as part of the string and stripped off. If there is no space, that's fine too, because $date is still found and the asterisk is appended.
Here is what the output will look like (assuming there are appointments on the 5th, 8th, and 10th):
S      M     Tu      W     Th      F      S
                      1      2      3      4
 5*     6      7      8*     9     10*    11
12     13     14     15     16     17     18
19     20     21     22     23     24     25
26     27     28     29     30
And that is what the calendar will look like in a text browser. But we still want to provide the same access that a graphic calendar does. The user must be able to select a date and view, add, or modify appointments. So now we turn each date in the calendar into a hypertext link.
$script = $ENV{'SCRIPT_NAME'};
$date_URL = join ("", $script, "?",
"action=view", "&",
"month=", $current_month_year);
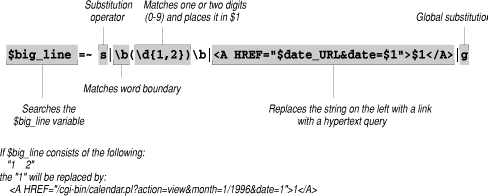
$big_line =~ s|\b(\d{1,2})\b|<A HREF="$date_URL&date=$1">$1</A>|g;
Below is the regular expression that we're searching for in the last line of the preceding code. It defines a date as one or two digits surrounded by word boundaries. (Spaces are recognized as word boundaries, and so are the beginnings and ends of lines.) We add <A> and </A> tags around the date. The URL in each A tag includes the name of this script, an action=view tag, the current month, and the particular date chosen.
Let's continue with the subroutine:
($next, $previous) = &get_next_and_previous ();
    print <<End_of_Output;
<UL>
<LI><A HREF="$previous">Previous Month!</A></LI> <LI><A HREF="$next">Next Month!</A></LI> </UL>
<PRE>
$big_line
</PRE>
<HR>
<A HREF="$script?action=full&year=$current_year">Full Year Calendar</A> <BR>
<A HREF="$script?action=search&type=form&month=$current_month_year">Search</A>
End_of_Output
    &print_footer ();
}
Four final links are displayed: two to allow the user to view the last or next month calendar, one to display the full year calendar, and one to search the database for information contained within appointments.
The display_all_appointments subroutine displays all of the appointments for a given date. It is invoked by clicking a region of the graphic calendar or by following a link on the text calendar.
sub display_all_appointments
{
    local ($date) = @_;
    local ($script, $matches, @RESULTS, $loop, $id, $keywords,
           $description, $display_URL);
    $matches = &open_database (*RESULTS, "select", <<End_of_Select);
select ID, Keywords, Description from $database where (Month = $current_month) and
      (Year  = $current_year)  and
      (Day   = $date)
End_of_Select
The SQL statement retrieves the ID, Keywords, and Description for each appointment that falls on the specified date.
&print_header ("Appointments",
          "Appointments for $current_month_name $date, $current_year");
    $display_URL = join ("", $ENV{'SCRIPT_NAME'},  "?",
                             "type=form",          "&",
                             "month=", $current_month_year);
    if ($matches) {
        for ($loop=0; $loop < $matches; $loop++) {
    $RESULTS[$loop] =~ s/([^\w\s\0])/sprintf ("&#%d;", ord ($1))/ge;
($id, $keywords, $description) = split (/\0/, $RESULTS[$loop], 3);
$description =~ s/<BR>/<BR>/g;
print <<End_of_Each_Appointment;
Keywords: <B>$keywords</B>
<BR>
Description:
$description
<P>
<A HREF="$display_URL&action=modify&id=$id">Modify!</A> <A HREF="$display_URL&action=delete&id=$id">Delete!</A>
End_of_Each_Appointment
print "<HR>", "\n" if ($loop < $matches - 1);
}
If there are appointments scheduled for the given date, they are displayed. Each one has two links: one to modify the appointment description, and the other to delete it from the database.
} else {
        print "There are no appointments scheduled!", "\n";
    }
    print <<End_of_Footer;
<HR>
<A HREF="$display_URL&action=add&date=$date">Add New Appointment!</A>
End_of_Footer
    &print_footer ();
}
If no appointments are scheduled for the date, a simple error message is displayed. Finally, a link allows the user to add appointments for the specified day.
Graphics
Up to this point, we have not discussed how the graphic calendar is created, or how the coordinates are interpreted on the fly. The next three subroutines are responsible for performing those tasks. The first one we will look at is a valuable subroutine that calculates various aspects of the graphic calendar.
sub graphics_calculations
{
    local (*GIF) = @_;
This subroutine expects a symbolic reference to an associative array as an argument. The purpose of the subroutine is to populate this array with numerous values that aid in implementing a graphic calendar.
$GIF{'first_day'} = &get_first_day ($current_month, $current_year);
The get_first_day subroutine returns the day number for the first day of the specified month, where Sunday is 0 and Saturday is 6. For example, the routine will return the value 3 for November 1995, which indicates a Wednesday.
$GIF{'last_day'} = &get_last_day ($current_month, $current_year);
The get_last_day subroutine returns the number of days in a specified month. It takes leap years into effect.
$GIF{'no_rows'} = ($GIF{'first_day'} + $GIF{'last_day'}) / 7;
    if ($GIF{'no_rows'} != int ($GIF{'no_rows'})) {
        $GIF{'no_rows'} = int ($GIF{'no_rows'} + 1);
    }
This calculates the number of rows that the calendar will occupy. We simply divide the number of days in this month by the number of days in a week, and round up if part of a week is left.
Now we are going to define some coordinates.
$GIF{'box_length'} = $GIF{'box_height'} = 100;
    $GIF{'x_offset'}   = $GIF{'y_offset'} = 10;
The box length and height define the rectangular portion for each day in the calendar. You can modify this to a size that suits you. Nearly all calculations are based on this, so a modification in these values will result in a proportionate calendar. The x and y offsets define the offset of the calendar from the left and top edges of the image, respectively.
$GIF{'large_font_length'} = 8;
    $GIF{'large_font_height'} = 16;
    $GIF{'small_font_length'} = 6;
    $GIF{'small_font_height'} = 12;
These sizes are based on the gdLarge and gdSmall fonts in the gd library.
$GIF{'x'} = ($GIF{'box_length'} * 7)   +
                ($GIF{'x_offset'} * 2)     +
                $GIF{'large_font_length'};
The length of the image is based primarily on the size of each box length multiplied by the number of days in a week. The offset and the length of the large font size are added to this so the calendar fits nicely within the image.
$GIF{'y'} = ($GIF{'large_font_height'} * 2)         +
                ($GIF{'no_rows'} * $GIF{'box_height'})  +
                ($GIF{'no_rows'} + 1)                   +
                ($GIF{'y_offset'} * 2)                  +
                $GIF{'large_font_height'};
The height of the image is based on the number of rows multiplied by the box height. Other offsets are added to this because there must be room at the top of the image for the month name and the weekday names.
$GIF{'start_calendar'} = $GIF{'y_offset'}                +
                             (3 * $GIF{'large_font_height'});
This variable refers to the actual y coordinate where the calendar starts. If you were to subtract this value from the height of the image, the difference would equal the area at the top of the image where the titles (i.e., month name and weekday names) are placed.
$GIF{'date_x_offset'} = int ($GIF{'box_length'} * 0.80);
    $GIF{'date_y_offset'} = int ($GIF{'box_height'} * 0.05);
These offsets specify the number of pixels from the upper right corner of a box to the day number.
$GIF{'appt_x_offset'} = $GIF{'appt_y_offset'} = 10;
The appointment x offset refers to the number of pixels from the left edge of the box to the point where the appointment keywords are displayed. And the y offset is the number of pixels from the day number to a point where the appointment keywords are started.
$GIF{'no_chars'} = int (($GIF{'box_length'}     -
                             $GIF{'appt_x_offset'}) /
                             $GIF{'small_font_length'}) - 1;
This contains the number of 6x12 font characters that will fit horizontally in each box, and is used to truncate appointment keywords.
$GIF{'no_appts'} = int (($GIF{'box_height'}           -
                             $GIF{'large_font_height'}    -
                             $GIF{'date_y_offset'}        -
                             $GIF{'appt_y_offset'})       /
                             $GIF{'small_font_height'});
}
Finally, this variable specifies the number of appointment keywords that will fit vertically. Then next subroutine, get_imagemap_date, uses some of these constants to determine the exact region (and date) where the user click originated.
sub get_imagemap_date
{
    local (%DATA, $x_click, $y_click, $error_offset, $error,
           $start_y, $end_y, $start_x, $end_x, $horizontal, $vertical,
           $box_number, $clicked_date);
    &graphics_calculations (*DATA);
    ($x_click, $y_click) = split(/,/, $CALENDAR{'clicked_point'}, 2);
We start by calling the subroutine just discussed, graphics_calculations, to initialize coordinates and other important information about the calendar. The variable $CALENDAR{“clicked_point”} is a string containing the x and y coordinates of the click, as transmitted by the browser. The parse_query_and_form_data subroutine at the end of this chapter sets the value for this variable.
$error_offset = 2;
    $error = $error_offset / 2;
    $start_y = $DATA{'start_calendar'} + $error_offset;
    $end_y = $DATA{'y'} - $DATA{'y_offset'} + $error_offset;
    $start_x = $DATA{'x_offset'} + $error_offset;
    $end_x = $DATA{'x'} - $DATA{'x_offset'} + $error_offset;
The error offset is defined as two pixels. This is introduced to make the clickable area the region just inside the actual calendar.
The $DATA{“start_calendar”} and $DATA{“x_offset”} elements of the array define the x and y coordinates where the actual calendar starts, as I discussed when listing the previous subroutine. We draw lines to create boxes starting at that point. Therefore, the y coordinate does not include the titles and headers at the top of the image.
if ( ($x_click >= $start_x) && ($x_click <= $end_x) &&
         ($y_click >= $start_y) && ($y_click <= $end_y) ) {
This conditional ensures that a click is inside the calendar. If it is not, we send a status of 204 No Response to the browser.
If the browser can handle this status code, it will produce no response. Otherwise, an error message is displayed.
$horizontal = int (($x_click - $start_x) /
                           ($DATA{'box_length'} + $error));
       $vertical = int (($y_click - $start_y) /
                        ($DATA{'box_height'} + $error));
The horizontal box number (starting from the left edge) of the user click is determined by the following algorithm:
![]()
The vertical box number (starting from the top) that corresponds to the user click can be calculated by the following algorithm:
![]()
To continue with the subroutine:
$box_number = ($vertical * 7) + $horizontal;
The vertical box number is multiplied by seven--since there are seven boxes (i.e., seven days) per row--and added to the horizontal box number to get the raw box number. For instance, the first box in the second row would be considered raw box number 8. However, this will equal the date only if the first day of the month starts on a Sunday. Since we know this will not be true all the time, we have to take into effect what is really the first day of the month.
$clicked_date = ($box_number - $DATA{'first_day'}) + 1;
The difference between the raw box number and the first day of the month is incremented by one (since the first day of the month returned by the get_first_date subroutine is zero based) to determine the date. We are still not out of trouble, because the calculated date can still be either less than zero, or greater than the last day of the month. How, you may ask? Say that a month has 31 days and the first day falls on Friday. There will be 7 rows, and a total of 42 boxes. If the user clicks in box number 42 (the last box of the last row), the $clicked_date variable above will equal 37, which is invalid. That is the reason for the conditional below:
if (($clicked_date <= 0) ||
            ($clicked_date > $DATA{'last_day'})) {
            &return_error (204, "No Response", "Browser doesn't support 204");
        } else {
            return ($clicked_date);
        }
    } else {
        &return_error (204, "No Response", "Browser doesn't support 204");
    }
}
If the user clicked in a valid region, the date corresponding to that region is returned.
Now we can look at perhaps the most significant subroutine in this program. It invokes the gd graphics extension to draw the graphic calendar with the appointment keywords in the boxes.
sub draw_graphic_calendar
{
    local (%DATA, $image, $black, $cadet_blue, $red, $yellow,
           $month_title, $month_point, $day_point, $loop, $temp_day,
           $temp_x, $temp_y, $inner, $counter, $matches, %APPTS,
           @appt_list);
    &graphics_calculations (*DATA);
    $image = new GD::Image ($DATA{'x'}, $DATA{'y'});
A new image object is created, based on the dimensions returned by the graphics_calculations subroutine.
$black      = $image->colorAllocate (0, 0, 0);
    $cadet_blue = $image->colorAllocate (95, 158, 160);
    $red        = $image->colorAllocate (255, 0, 0);
    $yellow     = $image->colorAllocate (255, 255, 0);
Various colors are defined. The background color is black, and the lines between boxes are yellow. All text is drawn in red, except for the dates, which are cadet blue.
$month_title = join (" ", $current_month_name, $current_year);
    $month_point = ($DATA{'x'} -
                   (length ($month_title) *
                   $DATA{'large_font_length'})) / 2;
    $image->string (gdLargeFont, $month_point, $DATA{'y_offset'},
                    $month_title, $red);
The month title (e.g., “November 1995”) is centered in red, with the $month_point variable giving the right amount of space on the left.
$day_point = (($DATA{'box_length'} + 2) -
                  ($DATA{'large_font_length'} * 3)) / 2;
The $day_point variable centers the weekday string (e.g., “Sun”) with respect to a single box.
for ($loop=0; $loop < 7; $loop++) {
        $temp_day = (split(/,/, $weekday_names))[$loop];
        $temp_x = ($loop * $DATA{'box_length'}) +
                   $DATA{'x_offset'} +
                   $day_point + $loop;
        $image->string ( gdLargeFont,
                         $temp_x,
                         $DATA{'y_offset'} +
                         $DATA{'large_font_height'} + 10,
                         $temp_day,
                         $red );
    }
The for loop draws the seven weekday names (as stored in the $weekday_names global variable) above the first row of boxes.
for ($loop=0; $loop <= $DATA{'no_rows'}; $loop++) {
        $temp_y = $DATA{'start_calendar'} +
                  ($loop * $DATA{'box_height'}) + $loop;
        $image->line ( $DATA{'x_offset'},
                       $temp_y,
                       $DATA{'x'} - $DATA{'x_offset'} - 1,
                       $temp_y,
                       $yellow );
    }
This loop draws the horizontal yellow lines, in effect separating each box.
for ($loop=0; $loop <= 7; $loop++) {
        $temp_x = $DATA{'x_offset'} + ($loop * $DATA{'box_length'}) + $loop;
        $image->line ( $temp_x,
                       $DATA{'start_calendar'},
                       $temp_x,
                       $DATA{'y'} - $DATA{'y_offset'} - 1,
                       $yellow );
    }
The for loop draws yellow vertical lines, creating boundaries between the weekdays. We have finished the outline for the calendar; now we have to fill in the blanks with the particular dates and appointments.
$inner = $DATA{'first_day'};
    $counter = 1;
$matches = &appointments_for_graphic (*APPTS);
The appointments_for_graphic subroutine returns an associative array of appointment keywords for the selected month (keyed by the date). For example, here is what an array might look like:
$APPTS{'02'} = "See Professor";
$APPTS{'03'} = "ABC Enterprises\0Luncheon Meeting";
This example shows one appointment on the 2nd of this month, and two appointments (separated by a \0 character) on the 3rd.
In several nested loops--one for the rows, one for the days in each row, and one for the appointments on each day--we draw the date for each box and list the appointment keywords in the appropriate boxes.
for ($outer=0; $outer <= $DATA{'no_rows'}; $outer++) {
        $temp_y = $DATA{'start_calendar'} + $outer +
                  ($outer * $DATA{'box_height'}) +
                  $DATA{'date_y_offset'};
This outermost loop iterates through the rows, based on $DATA{“no_rows”}. The $temp_y variable contains the y coordinate where the date should be drawn for a particular row.
while (($inner < 7) && ($counter <= $DATA{'last_day'})) {
            $temp_x = $DATA{'x_offset'} +
                      ($inner * $DATA{'box_length'}) +
                      $inner + $DATA{'date_x_offset'};
            $image->string (gdLargeFont, $temp_x, $temp_y,
                            sprintf ("%2d", $counter),
                            $cadet_blue);
This inner loop draws the dates across a row. A while loop was used instead of a for loop because the number of dates across a row may not be seven (in cases when the month does not start on Sunday or does not end on Saturday). The variable $counter keeps track of the actual date that is being output.
if ($APPTS{$counter}) {
                @appt_list = split (/\0/, $APPTS{$counter});
                for ($loop=0; $loop < $matches; $loop++) {
                    last if ($loop >= $DATA{'no_appts'});
If appointments exist for the date, a for loop is used to iterate through the list. The number of appointments that can fit in a box is governed by $DATA{‘no_appts’}; others are ignored. But the user can click on the individual date to see all of them.
$image->string (gdSmallFont,
                                    $DATA{'x_offset'} +
                                    ($inner * $DATA{'box_length'} +
                                    $inner +
                                    $DATA{'appt_x_offset'}),
                                    $temp_y +
                                    $DATA{'large_font_height'}+
                                    ($loop * $DATA{'small_font_height'}) +
                                    $DATA{'appt_y_offset'},
                                    pack ("A$DATA{'no_chars'}",
                                    $appt_list[$loop]),
                                    $red);
                }
            }
The keywords for an appointment are displayed in the box. The pack operator truncates the string to fit in the box.
$inner++;
            $counter++;
        }
            $inner = 0;
    }
    $| = 1;
    print "Content-type: image/gif", "\n";
    print "Pragma: no-cache", "\n\n";
    print $image->gif;
}
Finally, the program turns output buffering off and sends the image to the client for display.
The following subroutine returns an associative array containing the keywords for all the appointments for the selected month.
sub appointments_for_graphic
{
    local (*DATES) = @_;
    local ($matches, @RESULTS, $loop, $day, $keywords);
    $matches = &open_database (*RESULTS, "select", <<End_of_Select);
select Day, Keywords from $database where
       (Month = $current_month) and
       (Year  = $current_year)
End_of_Select
RESULTS now contains the number of elements indicated by $matches. Each element contains the date for an appointment followed by the keyword list for that appointment, as requested by our select statement. We need to put all the appointments for a given day into one element of our associative array DATES, which we will return to the caller.
for ($loop=0; $loop < $matches; $loop++) {
        ($day, $keywords) = split (/\0/, $RESULTS[$loop], 2);
        if ($DATES{$day}) {
            $DATES{$day} = join ("\0", $DATES{$day}, $keywords);
        } else {
            $DATES{$day} = $keywords;
        }
    }
When a day in DATES already lists an appointment, we concatenate the next appointment to it with the null string (\0) as separator. When we find an empty day, we do not need to add the null string.
return ($matches);
}
Finally, a count of the total number of appointments for the month are returned.
The last major subroutine we will discuss parses the form data. It is very similar to the parse_form_data subroutines used up to this point.
sub parse_query_and_form_data
{
    local (*FORM_DATA) = @_;
    local ($request_method, $query_string, $path_info,
           @key_value_pairs, $key_value, $key, $value);
    $request_method = $ENV{'REQUEST_METHOD'};
    $path_info = $ENV{'PATH_INFO'};
    if ($request_method eq "GET") {
        $query_string = $ENV{'QUERY_STRING'};
    } elsif ($request_method eq "POST") {
        read (STDIN, $query_string, $ENV{'CONTENT_LENGTH'});
        if ($ENV{'QUERY_STRING'}) {
            $query_string = join ("&", $query_string, $ENV{'QUERY_STRING'});
        }
If the request method is POST, the information from the input stream and the data in QUERY_STRING are appended to $query_string. We have to do this because our program accepts information in an unusually complex way; some user queries pass both query strings and input streams.
} else {
        &return_error ("500", "Server Error",
                      "Server uses unsupported method");
    }
    if ($query_string =~ /^\d+,\d+$/) {
        $FORM_DATA{'clicked_point'} = $query_string;
        if ($path_info =~ m|^/(\d+/\d+)$|) {
            $FORM_DATA{'month'} = $1;
        }
If the user clicks on the imagemap, the client sends a query string in the form of two integers (“x,y”) to the CGI program. Here, we store the string right into $FORM_DATA{‘clicked_point’}, where the get_imagemap_date routine can retrieve it. Previously, we set up our hypertext link so that the month name gets passed as extra path information (see the output_HTML subroutine), and here we store it in $FORM_DATA{‘month’}. This value is checked for validity at the top of the program, just to make sure that there are no shell metacharacters.
} else {
        if ($query_string =~ /draw_imagemap/) {
            $FORM_DATA{'draw_imagemap'} = 1;
        }
The $FORM_DATA{‘draw_imagemap’} variable is set if the query contains the string “draw_imagemap”. The rest of the code below is common, and we have seen it many times.
@key_value_pairs = split (/&/, $query_string);
        foreach $key_value (@key_value_pairs) {
            ($key, $value) = split (/=/, $key_value);
            $value =~ tr/+/ /;
            $value =~ s/%([\dA-Fa-f][\dA-Fa-f])/pack ("C", hex ($1))/eg;
            if (defined($FORM_DATA{$key})) {
                $FORM_DATA{$key} = join ("\0", $FORM_DATA{$key}, $value);
            } else {
                $FORM_DATA{$key} = $value;
            }
        }
    }
}
The following subroutine returns the number of days in the specified month. It takes leap years into effect.
sub get_last_day
{
    local ($month, $year) = @_;
    local ($last, @no_of_days);
    @no_of_days = (31, 28, 31, 30, 31, 30, 31, 31, 30, 31, 30, 31);
    if ($month == 2) {
        if ( !($year % 4) && ( ($year % 100) || !($year % 400) ) ) {
            $last = 29;
        } else {
            $last = 28;
        }
    } else {
        $last = $no_of_days[$month - 1];
    }
    return ($last);
}
The get_first_day subroutine (algorithm by Malcolm Beattie <mbeattie@black.ox.ac.uk>) returns the day number for the first day of the specified month. For example, if Friday is the first day of the month, this subroutine will return 5. (The value is zero-based, starting with Sunday).
sub get_first_day
{
    local ($month, $year) = @_;
    local ($day, $first, @day_constants);
    $day = 1;
@day_constants = (0, 3, 2, 5, 0, 3, 5, 1, 4, 6, 2, 4);
    if ($month < 3) {
        $year--;
    }
    $first = ($year + int ($year / 4) - int ($year / 100) +
         int ($year/400) + $day_constants [$month - 1] + $day) % 7;
    return ($first);
}
[1] Modern versions of the NCSA HTTPd server no longer use the imagemap.conf file. You can pass the map file as extra path information to the imagemap program directly, like so:
<A HREF="/cgi-bin/imagemap/graphics/dragon.map">
<IMG SRC="/graphics/dragon.gif" ISMAP>
where the map file (dragon.map) is stored in the /graphics directory. Note that this is a virtual path.
dragon: /graphics/dragon.map
Get CGI Programming on the World Wide Web now with the O’Reilly learning platform.
O’Reilly members experience books, live events, courses curated by job role, and more from O’Reilly and nearly 200 top publishers.

