Chapter 4. Manipulating Text
Since the ancient days of DOS, text has always played an important role in computing. Even today, 20 years after the first Mac came out, every computer Apple ships comes with a keyboard. What’s more, Mac OS X’s Unix core is strictly based on text: preference files are in plain text, and the commands you issue in Terminal (Section 13.1) are all, well, text.
The importance of text isn’t lost on AppleScript, though. From its dialog box capabilities to the Text Suite—a standard set of AppleScript keywords that deals with the details of words, characters, and paragraphs (Section 4.6.1)—AppleScript handles text the way Mac OS X does: simply and powerfully. For example, you can harness AppleScript’s text mojo to do things like:
Add a word count feature to TextEdit (Section 4.6)
Shrink all the fonts in a document simultaneously (Section 4.7.2)
Type and run AppleScript commands in just about any program—not just Script Editor—using an application’s Services menu
AppleScript’s text features are quite powerful, but they’re not always easy to learn—especially if you’re reading Apple’s geeky help files. Thankfully, you don’t have to; just continue reading this chapter instead.
Note
The example scripts from this chapter can be found on the AppleScript Examples CD (see Sidebar 2.1 for instructions).
String Notation
In AppleScript, pieces of text are stored in a format called strings. A string can contain as many letters, numbers, spaces, and punctuation marks as you’d like. In AppleScript, strings are typically placed between double quotes, like so:
"Yam farmer"
"5504.45"
"What the *#@&?!"
However, you won’t get much use out of strings unless you can store them for later use—rather than having to constantly recreate them. To store a string, you use the set command, like this:
set welcomeMessage to "Take your shoes off before entering the building."
In the previous example, welcomeMessage is a variable: a name given to a stored value (Sidebar 4.1). Variables come in handy when you have a long string you want to recall later. Rather than having to type in all that text each and every time you want to use it, you just substitute the variable name anywhere you want the string to appear, like this:
set welcomeMessage to "Take your shoes off before entering the building."
display dialog welcomeMessage
In the previous example, AppleScript notices the welcomeMessage variable that follows the display dialog command, and substitutes in the value that you set on the previous line. That’s why running the previous script would display a dialog box that says “Take your shoes off before entering the building.”
Note
When using variables, it’s important to remember that you must set a variable before you can access it later on in your script. If you switched the two lines in the previous script, for example, AppleScript would display an error, because you would be referring to a variable (with display dialog) before you told AppleScript what the variable should contain (with set).
AppleScript’s set-before-you-access requirement leads many programmers to set all the variables that a script will use at the very beginning of the script. Under this arrangement, if you refer to a variable later in your script, you can be sure that it’s already been defined at the script’s start, thereby avoiding “variable not defined” errors.
Getting Text Back from Dialog Boxes
So far, all you’ve done with dialog boxes is display information. That won’t help you much if you want to get feedback to use in your scripts, though. Luckily, the display dialog command supports an extra option—default answer—which lets you type text into your dialog boxes as well. Try running this script:
display dialog "Enter your name:" default answer "Sylvester"
A dialog box appears on screen, with a text-entry field inside (Figure 4-1).
Still, even though you can enter text in your dialog boxes with the default answer option, you can’t capture the text you entered and reuse it elsewhere in the script.
Or so you might think.
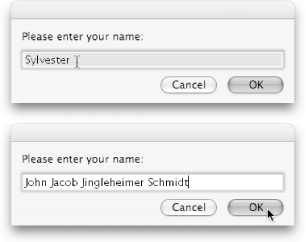
Luckily, using the power of variables, you can store the response to your dialog boxes for later use. Try running this script:
set userResponse to the text returned of (display dialog "Enter your name:" ¬
    default answer "Sylvester")
display dialog userResponse
Note
The ¬ symbol, shown in the previous example, simply means “this command continues on the next line.” This line-continuation symbol has no bearing on how AppleScript interprets your script, so you could theoretically retype the previous script as follows, and it would work exactly the same way:
set ¬
userResponse ¬
to the text returned ¬
of (display dialog ¬
"Enter your name:" ¬
default answer "Sylvester")
display dialog userResponse
Note
In this book, scripts employ the line-continuation symbol because certain commands are simply too long to fit within the pages’ margins. When entering these commands yourself, you can either type the ¬ symbol as written (by pressing Option-Return) or omit the ¬ symbol altogether and instead just type broken-up commands on a single line.
In this script, AppleScript sets the userResponse variable to the text you enter in the dialog box. Then on the next line, that text is echoed back to you in a new dialog box.
Linking Strings Together
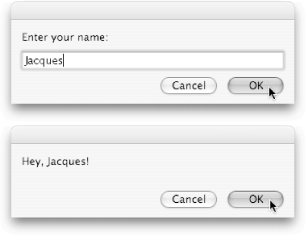
In the previous script, the second command simply spits back whatever text is in the dialog box’s text field when you press OK. It would be much cooler, however, if the script could give you a personalized greeting—something like Figure 4-2.
To achieve this feat of textual impressiveness, you have to use
a feature known as concatenation— linking multiple strings together into one. In
AppleScript, the way you concatenate strings is with an ampersand
(& ), which tells AppleScript to “put together the strings
on my left and right.” Here’s what the improved script would look
like:
set userResponse to the text returned of (display dialog "Enter your name:" ¬
    default answer "Sylvester")
set theGreeting to "Hey, " & userResponse & "!"
display dialog theGreetingSo far, you’ve used variables to store values for later lines in your scripts. Variables have restrictions and quirks all their own, however, and it’s important to understand them so you can effectively write your own scripts.
For one, variable names can’t be the same as preexisting AppleScript keywords. That means you can’t write:
set text to "WiFi"
because text is an AppleScript keyword.
On the other hand, you’re free to write:
set theText to "WiFi"
because the word theText has no significance in AppleScript. In fact, no two-words-squashed-together-as-one have any meaning in AppleScript, and that’s why you’ll often see variable names like myNumber, lastItem, and theAnswer.
You can include letters, numbers, and underscores (_ ) in your variable names, as long as the first character of the name isn’t a number. Keep in mind, though, that variable names can’t be more than 251 characters long—anything longer, and you’ll see the dialog box shown here.
Once you’ve set a variable, you just insert its name in your script to access the corresponding value. That’s why you can write display dialog userResponse, for example, if you’ve set the userResponse variable earlier in your script.
Finally, you can set the same variable more than once in a script. If you wanted to, you could write something like this:
set myNumber to 4
set myNumber to (myNumber + 8)
set myNumber to (myNumber / 2)
In that example, the value of myNumber after the first line would be 4, after the second line it would be 12 (4+8), and after the third line it would be 6 ([4+8]/2).
Note
Whenever you concatenate more than two strings (as in this example), you have to use ampersands between each item.
When the script runs, it combines the three strings—“Hey, " whatever is entered as userResponse, and the exclamation mark—together. The result is that all three items appear together as one big string (theGreeting) in your final dialog box, as shown at the bottom of Figure 4-2.
There are other uses for concatenation, too:
Pulling the results of multiple commands into a single string. For example, if you wrote a script to administer computerized history tests, you could make your script concatenate all your responses together to create a summary of your answers.
Inserting punctuation into strings. You could use concatenation to surround a famous quote with quotation marks, for example.
Mixing numbers into strings. Just as you can concatenate two strings together, you can concatenate a string to a number. You might find that useful if you’re writing a script to manage kitchen utensils, since you can combine the word “fork” with the number of clean forks left, for example.
As you become more and more familiar with AppleScript, you’re sure to find many other ways to put concatenation to work for you. Just remember: if you’re concatenating more than two items together, you must use a separate ampersand between every two items.
Multiline Strings
If you’ve spent any time working in a word processing program like TextEdit or Microsoft Word, you already know that text often spans multiple lines. Unlike typewriters from days of old, you don’t have to hit the Return key when you reach the end of a line. Instead, the text just wraps around to the next line, and you continue typing until you reach the end of a paragraph.
There are, however, certain times when you might like to break text up onto multiple lines—such as typing your mailing address at the top of a letter—and for that, the trusty Return key is right there by your side. But what if you want to use such multiline strings in AppleScript, so you can display a dialog box containing a friend’s address, for example?
Thankfully, AppleScript supports multiple-line strings as well, but you’ll need to enlist some help from escape sequences. Escape sequences are little chunks of slashes and letters that tell AppleScript, “Please insert a special symbol here.”
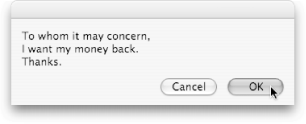
To insert a newline symbol in a string—thus knocking text onto the next line—you use the \n escape sequence. For example, if you ran the following script, you’d see the dialog box shown in Figure 4-3:
set multiLiner to "To whom it may concern,\nI want my money back.\nThanks."
display dialog multiLiner
Note
If you find the \n sequence too geeky, you can instead just type Return in the middle of a string. For example, you could rewrite the above script as follows:
set multiLiner to "To whom it may concern,
I want my money back.
Thanks"
display dialog multiLiner
and it would work exactly the same way. Still, you’ll often see older scripts use the \n sequence, so remember that it works the same way.
There are other escape sequences you can use in your strings, too (Table 4-1 has a list of the most common). Such escape sequences allow you to make AppleScript strings that match what you could create in a TextEdit or Microsoft Word document. That way, you can display dialog boxes with all sorts of punctuation inside—not just letters and numbers.
Note
You should type each string example from Table 4-1 on a single line.
Scripting TextEdit
TextEdit is a free word processor installed on your Mac, and it is—in many ways—the ideal Mac OS X program. TextEdit supports drag-and-dropped text and files, allows complex typographical control, and can check your spelling automatically as you type. Best of all, you can control TextEdit with AppleScript, opening up a whole new world of possibilities beyond just typing:
Create a new TextEdit document with a single click, rather than having to mouse up to File → New (Section 4.5.1).
Insert the current date into a new TextEdit document automatically (Section 4.5.2).
Add a word count feature to TextEdit, so you can brag to your friends about the length of your business memos (Section 4.6).
To understand TextEdit’s scripting abilities, you first have to open its dictionary to see the list of commands it can accept (Section 3.2.2). In Script Editor, choose File → Open Dictionary (Shift-
-O), scroll down to TextEdit, and click Open. As you can see from the left pane of Figure 4-4, TextEdit has a rather lengthy—and quite detailed—dictionary. Take the time to peruse all the scripting suites now, so you can get a feel for what AppleScript and TextEdit can do together.
As you already know, dialog boxes play a critical role in how you interact with your scripts. Thus far, however, you’ve only used one extra option in your dialog boxes: default answer (Section 4.2). Although that’s useful for getting user responses, there are far more options you can tack onto the end of your display dialog commands to make them truly powerful user feedback tools:
The buttons option lets you specify which (and how many) buttons you want to appear at the bottom of the dialog box. You can specify a list of between one and three buttons of your choice. (If you don’t specify any buttons, you’ll end up with the usual Cancel and OK buttons.) The following example displays a dialog box with Nope and Yep for buttons:
display dialog "Got Milk?" buttons ¬
    {"Nope", "Yep"}
The default button option sets the button that pulses blue in your dialog box. The default button is also the button that you can press Return or Enter to select. (If you don’t specify a default button, OK is used.) For example, if you wanted to designate the Yep button as the default, you could write this:
display dialog "Got Milk?" buttons ¬
{"Nope", "Yep"} default button 2display dialog "Got Milk?" buttons ¬
{"Nope", "Yep"} ¬
default button 2 with icon note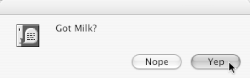
display dialog "Got Milk?" buttons {"Nope", "Yep"} ¬
    default button 2 with icon note ¬
    giving up after 3
(Keep in mind that you can add as many or as few of these options as you’d like. You could specify an icon, for example, but decide not to use any custom buttons.)
There’s more to dialog boxes than just displaying information, though. If you insert the phrase text returned of or button returned of before the display dialog command, you can have your script figure out what text you typed—or what button you clicked—when the dialog box was onscreen. To store the clicked button in a variable called dialogResponse, you could type this:
set dialogResponse to the button ¬
returned of (display dialog "Got Milk?" ¬
buttons {"Nope", "Yep"})
Note that you have to surround the entire display dialog command in parentheses, or else AppleScript will throw a fit.
Finally, if you want a dialog box to appear on top of every running program, you should direct your command at the SystemUIServer program, like this:
tell application "SystemUIServer"
    activate
    display dialog ¬
        "Your computer will crash ¬
        in 4 seconds."
end tell
Regardless of what program is running or how many programs you have open, this dialog box will appear in front of all of them. (Of course, your computer won’t crash if you run that AppleScript—it’s just a silly text message.)
Create a New TextEdit Document
Since you need a document to do anything useful in TextEdit, you might as well learn how to create a new document to hold that text. The trouble is, there’s no create command in TextEdit’s dictionary for making a new document.
This sort of dilemma, unfortunately, is fairly common in AppleScript. To find a command that does what you want, you have to look for synonyms of “create” instead: generate, produce, and—aha!—make. Once you find a synonym that’s listed in the dictionary, just click it to read its definition in the right pane (Figure 4-4).
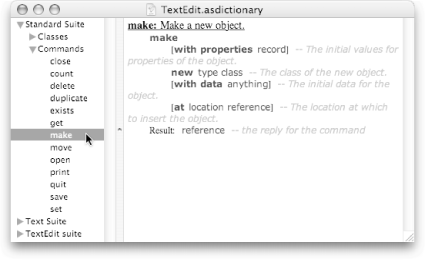
When you read the entry for make, you’ll find that it has only one required addition: new. In other words, any command you write has to say make new <something>. Now the problem is, what should you put in place of something?
As it turns out, TextEdit’s dictionary can help you find this bit of information, too. If you scroll through the Classes lists on the left, you’ll come across a few nouns (Sidebar 3.4): character, paragraph, and word, for example. Finally, at the very bottom of the TextEdit Suite, you’ll come across the term you want—document—which lets you create a new file. Now you have all the information you need to write your script:
tell application "TextEdit"
    activate
    make new document at the front
end tell
Note
The at the front portion of this script tells TextEdit where to place the new document window (in this case, TextEdit brings the new document window in front of any other TextEdit windows you have open). If you didn’t have that little snippet, TextEdit would get confused by the plain make new document command and would show you an error dialog box, because it wouldn’t know where to place the new window.
Adding Text to a New Document
Of course, there’s nothing the previous script does that you can’t do yourself by choosing File → New. What can set your script apart, however, is automatically adding text to your new document—which is particularly helpful when you’re typing a letter and want to insert the date at the beginning, for example.
The key to modifying your script like this, again, is the document entry in TextEdit’s dictionary. If you look under the Properties heading in the right-side pane, you’ll find the keyword text, which is described—quite creatively—as “the text of the document.” This is precisely the property you should use to insert a string into your new TextEdit document:
Note
If you look carefully in TextEdit’s dictionary, there are actually two entries for document. The first entry, in the Standard Suite, simply represents a generic Mac OS X document. The second entry, in the TextEdit suite, represents TextEdit’s personal kind of document. You can safely use properties from either entry when sending AppleScript commands to TextEdit documents.
tell application "TextEdit"
activate
make new document at the front
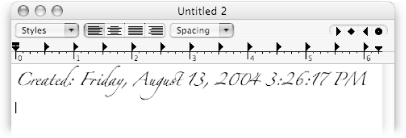
set dateString to "Created: " & current date
set the text of the front document to dateString
end tellHere you added two new lines of code to the AppleScript (both are marked in bold):
In the first new command, you create the dateString variable. This variable concatenates “Created: " and the current date command, resulting in a string something like “Created Wednesday, January 12, 2004 2:29:15 PM.”
The second line tells TextEdit to insert the text from the dateString variable into the front document. This is where the text property comes into play. By telling your newly created document to set its text property to a particular string (in this case, the current date), you effectively insert that string into the document.
When you run this script, therefore, TextEdit obediently opens, creates a new document, and then adds a line for the current date.
Adding Formatting
Now you’re getting somewhere. There are only two minor issues left with your script:
It doesn’t insert a new line after the date.
It doesn’t format the date in a different font and size than the rest of the document.
Once you clear these issues up, the script will be quite useful for making new documents—like business letters—with the date already inserted.
Inserting a new line after the date
To place a new line after the date, you have to modify the dateString variable in your script. Therefore, change the following line:
set dateString to "Created: " & (current date)
to:
set dateString to "Created: " & (current date) & returnNote
If you’d like, you can access specific properties of the current date command from your script. For example, if you want to insert only the current time—not the entire date—you could rewrite the previous command like this:
set
dateString to "Created: " & time string
of (current date) & return
Simply typing & return is enough to append a new line to your text, and thereby to insert a new line in TextEdit.
Note
Using return accomplishes the same thing as the more foreign-looking \r escape sequence (Table 4-1)—that is, it inserts a new line.
Changing the font and size
Finally, to change the font and size of your text, you have to make AppleScript set the appropriately named font and size properties of your TextEdit document. The following, therefore, is what your final script should look like:
tell application "TextEdit"
    activate
    make new document at the front
    set dateString to "Created: " & (current date) & return
    set the text of the front document to dateString
    set the font of the first paragraph of the front document to "Zapfino"
    set the size of the first paragraph of the front document to 14
                     —You can change the font and size to anything you want
                     end tell
When you run the script, you’ll end up with a document that looks like Figure 4-5.
At this point, you have a fully functional script. What now?
If you’re content to run your script from Script Editor for the rest of your life, go take a hot bath—there’s nothing left for you to do. On the other hand, if you want to run your script from elsewhere on your Mac, try one of the following tricks:
Save your script for use in the Script Menu. In Script Editor, choose File → Save, type whatever name you want for the script (like “DateDoc”), and then navigate to the Library → Scripts folder. Save your script in one of the subfolders here, and you’ll be able to run the script anytime from the menu bar, using the system-wide Script Menu described on Section 1.1.
Note
Before you click Save, make sure the File Format is set to Script (Section 2.2.1).
Save your script as a double-clickable program. In Script Editor, choose File → Save As. For the File Format, choose Application, and save the script somewhere on your hard drive. When you double-click this new application in the Finder, Mac OS X runs your code (Section 2.2.2).
Put your script in the Dock. This option requires you to complete the previous trick first. Once you’ve done so, navigate to your new application in the Finder, and simply drag it into the right side of the Dock. Whenever you want to run your code from now on, just click the Dock icon.
Of course, you can perform these three tricks with any script you have—not just this TextEdit script.
Adding Word Count
If there’s one feature that TextEdit lacks over its competitors, it’s the ability to count the number of words in a document. With all the powerful searching, typographical, and speech tools TextEdit has, it almost makes you wonder whether an Apple programmer was just sick the day he was supposed to program that feature.
Thankfully, AppleScript comes to your aid—again. You can write a short script that not only counts the number of words in your document but also counts the paragraphs and even the number of characters in your document—great for tricking people into thinking you’ve written a lot for your term paper.
The key to all this text-based power is the Text Suite, a section of many programs’ dictionaries that deals exclusively with the nitty-gritty of text (like counting individual characters). You’ll find the Text Suite in the dictionaries of professional programs like Microsoft Word (Section 4.7)—but more immediately, you’ll also find the Text Suite in TextEdit’s dictionary. By employing the Text Suite as described in the following pages, you can write a script to count the number of words in any TextEdit document
Employing the Text Suite
If you open TextEdit’s dictionary and browse the lefthand pane, you’ll find that the Text Suite already includes entries for word, character, and paragraph. These are the fundamental nouns (or classes) of AppleScript’s text handling. By using those keywords as follows, you can create a script to add a basic word count feature to TextEdit:
tell application "TextEdit"
    activate
    --Count the characters:
    set allCharacters to every character of the front document
    set numberOfCharacters to (count allCharacters)
    set characterText to "Characters: " & numberOfCharacters
    --Count the words:
    set allWords to every word of the front document
    set numberOfWords to (count allWords)
    set wordText to "Words: " & numberOfWords
    --Count the paragraphs:
    set allParagraphs to every paragraph of the front document
    set numberOfParagraphs to (count allParagraphs)
    set paragraphText to "Paragraphs: " & numberOfParagraphs
    --Assemble the text for the dialog box:
    set dialogText to characterText & return & wordText & return ¬
        & paragraphText
    display dialog dialogText
end tell
Here’s how the script breaks down:
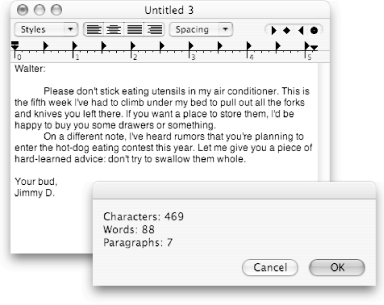
The commands following Count the characters get a list of all the characters in the frontmost TextEdit document, count the number of items in that list (see Sidebar 4-3, and then put together a string something like “Characters: 932” based on how many characters there are in the document.
The commands after Count the words do the same thing, just for words instead of characters.
The commands after Count the paragraphs do the same thing too, but for paragraphs instead of words.
Note
In AppleScript terms, a paragraph is any block of text that has a return or newline character after it (Table 4-1). That means that even an empty line is considered a paragraph in AppleScript.
The commands after Assemble the text for the dialog box concatenate all the previous strings you created, putting each string on its own line.
Finally, the script displays the dialog box that lets you know the script has completed its word-counting mission (Figure 4-6, bottom).
Commanding Microsoft Word
If TextEdit were a sardine, Microsoft Word would be a blue whale. Mentioning the two together invites all sorts of comparisons: TextEdit takes up 5 MB, while Word takes up 20; TextEdit has six menus, Word has a dozen. The two programs, in fact, are illustrative of their respective companies’ approaches: TextEdit is straightforward and simple, while Word is complex and feature-packed.
Still, Word’s AppleScript support puts TextEdit to shame. Word includes the standard Text Suite (Section 4.6.1) but adds more than 50 commands of its own.
Note
Many of Word’s cool AppleScript commands are available only in the most recent release: Word 2004. Therefore, to ensure that the scripts in this chapter—and the rest of this book—work properly for you, you’d be best off upgrading to Word 2004 for the sake of compatibility.
Adapting a TextEdit Script
In Section 4.6.1, you created a script that counted the number of characters, words, and paragraphs in an open TextEdit document. Of course, Word already has a word count feature (Tools → Word Count). Still, it’s a good exercise to adapt your existing TextEdit script for use with Word, to get a feel for the differences in what it’s like to script the two programs.
The first step in adapting a TextEdit script is to replace the tell statement with one that directs Word instead of TextEdit.
                  tell application "Microsoft Word"
    activate
    . . .
end tellIn the previous script, you used the count command for the first time, to figure out how many words are in a TextEdit document. You’ll encounter count again in all sorts of scripts, though, so it’s important to understand how it works.
In essence, count takes a list and returns how many items are inside it. You can take advantage of this command for all sorts of tasks, from counting seashells in a beach-simulation script to counting employees in an employee-management script.
Like the exists command, count can come either before or after the object you want to count. That means that both of the following are acceptable commands in AppleScript:
count allCharacters --Works
allCharacters count --Also works
You’ll often see the count command used in conjunction with the every keyword (Section 6.3), too. This powerful duo lets you get all the objects of a certain type (like all the words in a TextEdit document) and then count them. You can even use this command pair to get the number of items in a folder, like this:
tell application "Finder"
    set itemNumber to (count every item ¬
    in the folder "Applications")
    display dialog "You have " & ¬
    itemNumber & " items inside your ¬
    Applications folder."
end tell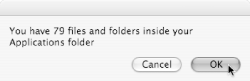
Finally, in a quite specialized use, you can use the count command on its own to figure out how many characters are in a string. This would be helpful if you ever needed to confirm that an essay hadn’t exceeded your professor’s 10,000 character limit, for example. Or, you could find out how many characters are in your first name with this script:
set yourName to the text returned of ¬
(display dialog ¬
    "Enter your first name:" default ¬
    answer "Xavier")
set numChars to (count yourName)
display dialog "Your name has " &  ¬
    numChars & " characters."
If you run the script at this point, you’ll get a strange result: both the character and word counts will be 0. This is caused by an odd quirk in Microsoft Word, which requires that you use the count and every keywords on the same line. To get your script to work properly, therefore, you must merge some of your existing lines to create this new script:
tell application "Microsoft Word"
    activate
    --Count the characters:
    set numberOfCharacters to (count every character of the front document)
    set characterText to "Characters: " & numberOfCharacters
    --Count the words:
    set numberOfWords to (count every word of the front document)
    set wordText to "Words: " & numberOfWords
    --Count the paragraphs:
    set numberOfParagraphs to (count every paragraph of the front document)
    set paragraphText to "Paragraphs: " & numberOfParagraphs
    --Assemble the text for the dialog box:
    set dialogText to characterText & return & wordText & return ¬
        & paragraphText
    display dialog dialogText
end tellYou’ll notice that the two-liners that counted various items—for example, set allWords to every word of the front document and set numberOfWords to (count allWords)—have been put together into single-line commands. This is enough to satisfy Word’s requirement for using count and every together; when you run the script now, it works properly.
When writing your own scripts for different programs, make sure to try using count and every together (as used here) and on different lines. Chances are, the script will work at least one of the ways, but the only way to find out is to try both.
Shrinking Documents by a Page
If you write letters or emails—or computer books, for that matter—you’ve probably experienced the dreaded one-page-too-long problem. It goes like this: you’re typing your document, inserting all sorts of different fonts and sizes, but when you come to the end, you realize your document is just one page longer than you want it.
If you’re like most people, you’d sigh deeply, and then get to work modifying each individual font in your document, shrinking them in size so the document is one page shorter. The trouble with this approach, of course, is that it can take a long time to select blocks of text and change their font sizes, especially if you need to modify multiple fonts on dozens of pages.
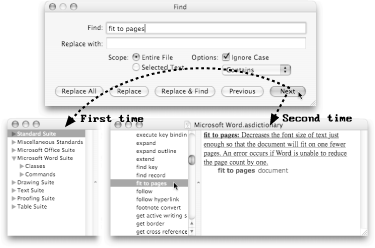
Word, conveniently enough, provides an AppleScript command to take care of this whole text-squeezing business for you: fit to pages . The trouble is, though, that Word has hundreds of different commands in its dictionary. Does Microsoft really expect you to spend several minutes scanning all the entries in the left pane to find the fit to pages command? Yep.
Still, you purchased this book to save you some time, and you can prove Microsoft wrong. Once you’ve opened Word’s dictionary (Section 3.2.2), simply follow the procedure in Figure 4-7 to find the correct dictionary entry.
The definition of the command (also shown in Figure 4-7) tells you that it’s meant to squeeze your fonts “just enough so that the document will fit on one fewer pages.” The light blue document text, furthermore, indicates that you have to tell fit to pages which document you want it to work with.
Armed with this information, you can write your script:
tell application "Microsoft Word"
    activate
    display dialog "Shrink document by a page?"
    fit to pages (front document)
end tell
Note
When you run this script, make sure you have an open Word file that’s more than one page long, so the fit to page command has something to perform its magic on.
This script brings Microsoft Word forward and then displays a confirmation dialog box, asking you if you want to shrink the document by a page. Since you haven’t defined special buttons for the dialog box (Sidebar 4.2), you’re left with only two options:
If you click OK, the script proceeds with the next statement (fit to pages) and squeezes the front document down by one page.
If you click Cancel, the script ends immediately.
After clicking OK, Word checks what it’ll take to knock one page off your document and adjusts the font sizes throughout the document until the mission is complete.
Repeating the Shrinking
The script you have so far is convenient, but what if you wanted to shrink your document by more than just one page? For example, you might be badgered for writing too much in a business proposal but find it easier to shrink the size of your writing than to actually cut text out.
In this situation, of course, you could run your script more than once, returning to Script Editor each time to click Run again. But that would defeat the purpose of using AppleScript in the first place: to automate tasks that you would normally have to do by hand.
Instead, you might as well have AppleScript repeat the fit to pages command all by itself, so you can go ride your bike while AppleScript chugs along on its font-shrinking mission.
The key to repeating a command in AppleScript is to use a repeat statement. Such statements generally follow this format:
repeat <some number> times
    --Commands you want to repeat go here
end repeat
When AppleScript encounters a repeat statement, it goes through the commands inside—one at a time—and then repeats the entire process however many times you specify. For running the fit to page command multiple times, you simply have to add a repeat statement to your existing script, as shown here:
tell application "Microsoft Word"
    activate
    display dialog "Shrink document by 5 pages?"
    repeat 5 times
        fit to pages (front document)
    end repeat
end tell
Now when you run the script, Word tries to shrink the front document by five pages instead of just one. (It accomplishes this, of course, by repeating the fit to page command five times.)
Shrinking a Variable Number of Times
Again, the script you have is convenient. However, it still lacks one crucial feature: you can’t specify how many times you want it to repeat (at least, not without changing the numbers in Script Editor by hand). It would be great if, using a dialog box, you could have the script ask how many times to repeat the fit to pages command.
To do so, you simply have to change a few more lines of your script:
tell application "Microsoft Word"
    activate
    set theNumber to the text returned of (display dialog ¬
        "Shrink by how many pages?" default answer 3)
                  repeat theNumber times
        fit to pages (front document)
    end repeat
end tell
Now the repeat statement runs however many times you specify in the dialog box. In other words, you get to tell Word how many pages you want to shrink the front document by, instead of hard-coding that number into the script. That’s the power of AppleScript for you!
There are other instances when you might want to use repeat statements, including:
Renaming multiple files automatically (Section 6.4.1)
Repeating a computerized beep at regular intervals to create a virtual metronome (Sidebar 8.1)
Rating every song in your iTunes library (Section 8.1.2)
Running Scripts from Text
So far in this chapter, you’ve created a series of scripts that make new text. In this section, the roles are reversed: you’ll create new text and have it run scripts for you.
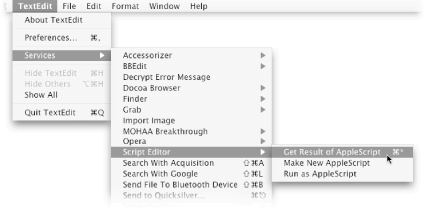
The key to this is the Services menu, which you can find inside any application menu (the bolded menu, directly to the right of the Apple menu in the menu bar). For example, if you’re in TextEdit, you access the AppleScript-related commands by choosing TextEdit → Services → Script Editor (Figure 4-8).
Note
Services are a way of accessing one program’s features while inside another program. For example, if someone sends you an email containing a short URL (one that doesn’t have the http:// in front of it, like www.oreilly.com), you can select the URL with the mouse and then go to Mail → Services → Open URL.
After selecting Open URL from the Services menu, your Web browser jumps into action and opens that Web page for you. Pretty slick, huh?
Running one of these Services commands is a simple process:
Type some AppleScript commands in the current program, then select them.
If you’re working in TextEdit, for example, you could type display dialog “Hello!" and then select it.
Choose the AppleScript service you want to run from the menu bar.
Note
The Services menu doesn’t work properly in certain programs that haven’t been completely updated for Mac OS X. Microsoft Word, for example, won’t let you use the Services menu. On the other hand, TextEdit—and most other programs written in the last few years—work just fine with Services.
Script Editor has three different Services to offer, as described in the following sections.
Get Result of AppleScript
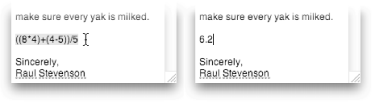
If you select an AppleScript command (or series of commands) and choose “Get Result of AppleScript” from the Services → Script Editor menu, your commands are run in the background and their result is pasted in place of your commands. Try it out by typing:
tell application "Finder"
    count every file in the desktop
end tell
Then select your text and choose Services → Script Editor → Get Result of AppleScript. Script Editor launches in the background, runs your commands, and pastes the result—in this case, the number of files on your desktop—right over your selected text.
Note
If you don’t feel like mousing up to the Services menu, you can also use the convenient keyboard for this Service shortcut instead: Shift-
-8. (If your keyboard has a number keypad, you can also press
-*, using the asterisk from the number keypad.)
This command is more useful than it might seem. Since AppleScript can perform mathematical operations, you can use this feature as a quick text-based calculator, straight from TextEdit or Mail, for example. Figure 4-9 shows you how.
Make New AppleScript
This command takes any text you’ve selected in the current program and copies it into a new document in Script Editor. This feature is particularly handy if you find some AppleScript code posted on the Web; just select the code and choose Services → Make New Script, and you won’t have to copy and paste the code yourself.
This command has another use, although it’s much less obvious. You can use the service while inside Script Editor to select a portion of an existing script, and then have that code quickly copied into a new script window. That way, if you have a big script, you can copy sections of it to make smaller scripts with more specialized purposes.
Run as AppleScript
This command works almost exactly the same way as “Get Result of AppleScript,” with one key difference: it won’t replace your commands with their result. That makes this command perfect for quickly running, say, a line or two of code that you entered in an already-open TextEdit document.
Of course, since you can access the Services menu from Script Editor, you can run this command from Script Editor, too. In fact, this command adds a handy feature to Script Editor: you can use it to test only a few lines of a script rather than running the entire script at once. Simply select the lines you want to run, choose “Run as AppleScript” from the Services → Script Editor menu, and sit back as AppleScript runs only your selected lines.
Note
Remember that the Run as AppleScript command—unlike, say, the Get Result of AppleScript command—doesn’t return the result of your AppleScript commands. To work around this issue, place display dialog commands in your script to show you the status of events in your AppleScript code as they happen.
For even more fun, try running these three services from within Stickies (in your Applications folder). If you prepare a few sticky notes with your favorite AppleScript code written on them, you can then run the scripts by selecting the Run as AppleScript command. In this way, you can use Stickies as an encyclopedia of your favorite AppleScript code.
Get AppleScript: The Missing Manual now with the O’Reilly learning platform.
O’Reilly members experience books, live events, courses curated by job role, and more from O’Reilly and nearly 200 top publishers.

