Chapter 1. Setting Up AppleScript
Although AppleScript is fast and free, perhaps the best part about it is that it gets installed right along with Mac OS X. You don’t need to download any files, install any CDs, or configure any nasty system files to get AppleScript to work. In fact, you’ve got an AppleScript folder tucked inside your Applications folder, right this very moment.
Note
If you don’t have this folder, chances are you’re not running Mac OS X Panther. See Section P.4.3.1 for instructions on how to upgrade to the latest version, Mac OS X Panther (version 10.3).
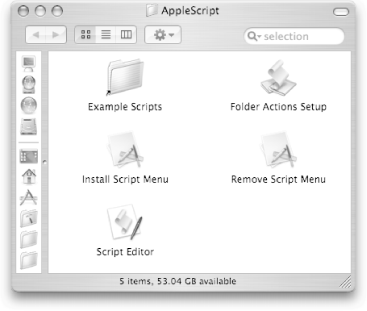
Whenever you install Mac OS X—or buy a new Mac—you’ll find these five icons in your AppleScript folder:
Example Scripts is simply an alias (shortcut) to your Library → Scripts folder. This folder contains more than 100 example scripts for you to run, examine, and edit (Section 1.1.1).
Folder Actions Setup turns on the powerful folder actions feature of OS X. Once it’s on, you can make the Finder run your very own scripts whenever you open a folder, add an icon to a folder, remove an icon from a folder, and so on. (A full explanation of Folder Actions appears on Chapter 11.)
Install Script Menu adds a new icon to the right side of your menu bar. With this menu in place, you can easily run your favorite AppleScripts from any program you want (read on for details).
Remove Script Menu hides the menu that appears when you double-click Install Script Menu.
Script Editor is AppleScript Central. From there you can open, edit, and run your scripts, and save them in any number of special formats. Script Editor coverage starts on Chapter 2.
Now that you know what you’ve got, it’s best to spend some time getting acquainted with all the AppleScript stuff that’s already on your Mac. Pop open a new Finder window—by choosing File → New Finder Window, for example—and then click the Applications folder icon in the Sidebar. Once in the Applications folder, open the AppleScript folder, and you’re ready to explore.
The Script Menu
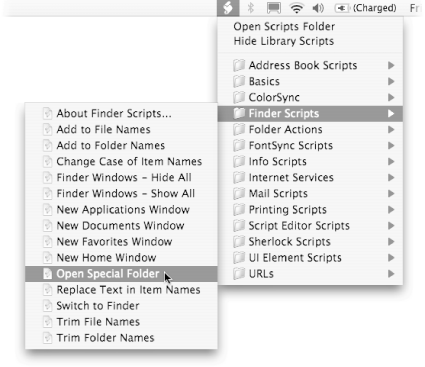
To get your first taste of AppleScript, double-click Install Script Menu. When you do so, a curled-parchment icon appears right in your menu bar. (This icon is a recurring theme in Mac OS X that means, roughly, “What you’re looking at has something to do with AppleScript.”) Simply click the menu bar icon once to display the Script Menu (Figure 1-1).
Note
All the scripts that appear in the Script Menu come from the Library→ Scripts folder. And, as described on Section 1.1.16.1, that means you can add your own scripts to the Script Menu in addition to tweaking the existing ones.
You can run any script just by selecting its name from the appropriate submenu. The following sections provide a breakdown of what the scripts do.
Address Book Scripts
Here, you’ll find a single Import Addresses script, designed to move your contacts into Mac OS X’s Address Book from other applications, such as Entourage, Outlook Express, Palm Desktop, Eudora, Claris Emailer, and Netscape. If you’ve got a lot of friends, this script saves you from having to re-enter all their names, phone numbers, and email addresses by hand.
Note
The scripts in the Helper Scripts submenu (just above Import Addresses) are off-limits to mere mortals. If you try to run any of the Helper Scripts, Mac OS X simply tells you to use the Import Addresses script instead.
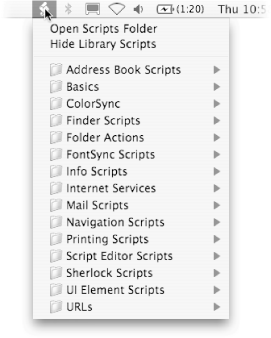
Basics
In this submenu, you’ll find three small, handy scripts:
Note
To see a more orderly list of such files in Help Viewer—organized by Apple for quick reference—choose Library→ AppleScript Help and then click Browse AppleScript Help.
AppleScript Website opens the AppleScript home page (http://www.apple.com/applescript/) in your default Web browser.
Open Script Editor launches the Script Editor program from your Applications → AppleScript folder. See Chapter 2 for more on this powerful program.
ColorSync
This submenu contains almost 20 different scripts for working with ColorSync (a technology for matching colors between pictures, computer screens, printers, and so on). When you select a script from this submenu, it presents a short dialog box explaining what it does. Here are some of the highlights:
Note
Even if you don’t use ColorSync, this script can be quite handy; it’s a great way to quickly generate a Web page from the pictures in a folder.
Mimic PC monitor adjusts your screen so the color settings are similar to those of a Windows PC. (This script is especially useful if you’re a Web designer, since it shows you how your Web pages will likely look to Windows users all over the world.)
Remove profile from image takes any special color settings out of a picture, so you’re left with the raw, unfiltered colors that were there to begin with. If you’re trying to gauge the accuracy of your digital camera’s color settings, this script is a helpful tool.
Note
To learn more about ColorSync, visit http://www.apple.com/colorsync/.
Finder Scripts
This submenu contains a bunch of timesaving scripts for working with files in the Finder:
AboutFinder Scripts simply presents a dialog box explaining how the scripts work.
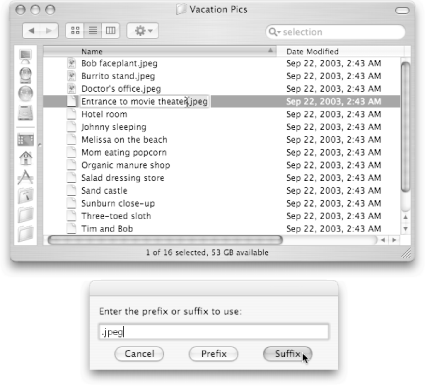
Add to File/Folder Names lets you tack the same prefix or suffix onto every item in the active Finder window (Figure 1-2).
Note
If there aren’t any Finder windows open, this script (and all the other Finder scripts) works with the files or folders on your desktop instead. That means, for example, that the Add to File Names script appends your chosen extension to every file on the desktop if there aren’t any Finder windows open.
Change Case of Item Names lets you make every file and folder in the current Finder window either all uppercase or all lowercase. If you pine for the days of DOS—where every file name was in capital letters—this script is for you.
Finder Windows - Hide All minimizes all your Finder windows, one at a time, to the Dock.
Note
A faster way to minimize all your Finder windows is to simply Option-click the yellow minimize button in any single Finder window. That way, the windows all minimize simultaneously, rather than one at a time.
Finder Windows - Show All brings back all your Finder windows from the Dock.
Replace Text in Item Names does a find-and-replace on every file name, folder name, or both in your active Finder window (Figure 1-3).
Switch to Finder brings the Finder to the front and hides every other program.

Folder Actions
These scripts turn on and off folder actions— scripts that run automatically in the Finder—either for the entire system or just for a specific folder. (Folder action coverage begins on Chapter 11.)
FontSync Scripts
If you spend your life doing visual layout or printing, you may have come across FontSync profiles (little summaries of all the fonts on someone’s computer). You can easily generate such profiles (using Create FontSync Profile) or compare your own profile to someone else’s (using Match FontSync Profile) to see if you have the same fonts. Beyond that, though, there’s not much you can do with the AppleScripts found in this submenu.
Info Scripts
The two scripts in this submenu are pretty much duplicates of existing Mac OS X features:
Current Date & Time displays a dialog box with—you guessed it—the current date and time. The only real benefit to this command is that it has a Clipboard button; when you click that, the date and time information is copied to the Clipboard, so you can paste (
-V) that information into a document window, such as one from TextEdit, Mail, or Microsoft Word.
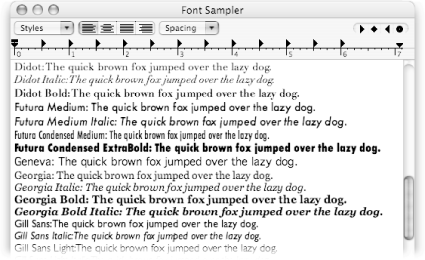
Font Sampler displays every font you have on your computer in its own typeface (Figure 1-4). Of course, you can always preview your fonts with Font Book (found in your Applications folder), but that’s not nearly as fun as being able to see how all your fonts look at once.
Internet Scripts
With the exception of the first script in this folder, these scripts go out and troll the Internet to fetch information for you:
About Internet Services Scripts presents a dialog box with a link to additional Web services. (See Sidebar 9.6 for more about using AppleScript with Web services.)
Current Temperature by Zipcode gives you the temperature outside your house in both Fahrenheit and Celsius, assuming you live in the United States.
Stock Quote fetches a 20-minute delayed stock quote for the ticker symbol of your choice.
Note
If you don’t know a company’s ticker symbol, visit http://finance.yahoo.com/ to look it up. But if you want to quickly see how Apple’s stock is performing, just click the OK button when the dialog box appears. (The script automatically inserts AAPL, Apple’s ticker symbol, into the dialog box.)
Mail Scripts
This submenu contains a collection of scripts that work with Mac OS X’s built-in Mail program (Section 9.4).
Count Messages in All Mailboxes is a convenient way to tell how much spam you’ve been getting. Of course, that’s not what this script is meant for—it’s just supposed to tell you how much email you have in each mailbox. If you’re like most people, though, your spam count will far outweigh anything else you have in your mailboxes, rendering this count almost useless.
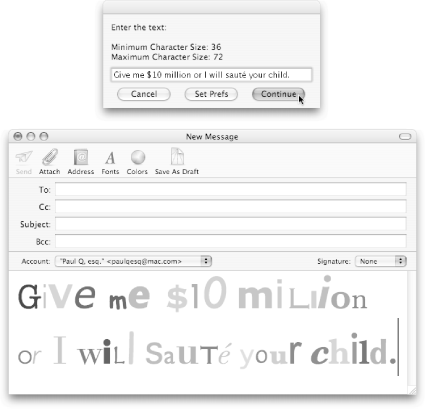
Crazy Message Text is a great way to send electronic greeting cards, birthday wishes, or ransom notes (Figure 1-5).
Create LDAP Server is worthless unless you’re on a corporate network. If you are, though, you may have access to an LDAP server (basically, a virtual employee directory). Your network administrator can help you fill out the dialog boxes.
Once you’ve set up an LDAP server in Mail, you’ll be able to type the first few letters of an employee’s email address and have the rest of the address filled in for you automatically. (Of course, it might not be worth all that trouble to configure an LDAP server if you’ve already got all your contacts in Address Book.)
Create New Mail Account prompts you for everything you need to set up a new email account. There’s not much benefit to this multi-dialog box script, however, when you can set up a new account all at once in Mail → Preferences → Accounts.
Create New Message takes you, dialog box by dialog box, through everything you need to make a new email message. The only benefit of using this script (instead of creating a new message in Mail itself) is that you don’t have to bring Mail to the front first.
Display All Accounts and Preferences puts together a new email message containing every imaginable statistic about your email settings. This script even attaches a copy of Mail’s preference files for your perusing pleasure.
Get Size of IMAP Mailbox is perfect for figuring out how full your .Mac mailbox is—if you’ve signed up for Apple’s .Mac service, that is. Simply select an email account, let Mail synchronize its database with your mail server, and wait a few minutes. When Mail is done calculating, you’ll see a new email message telling you how much space your email is taking up on the server.
Import Addresses is identical to the Address Book version described on Section 1.1.1. In other words, this script lets you import your contacts from a third-party program—like Microsoft Entourage—into Mac OS X’s Address Book. (Once you do so, all your old contacts will be available in Mail as well.)
Note
The Helper scripts aren’t much help here either. Just like in the Address Book scripts, you can’t run these Helper scripts yourself.
Manage SMTP Servers lists all the outgoing email servers that Mail is set up to use but that you’re not using to send mail. If you deleted an email account but forgot to delete all the server settings that went with it, for example, this script can help you track down the orphaned settings.
Rule Actions lets you run AppleScripts whenever email that matches certain criteria arrives. Check out Help with Rule Actions for more information on using this powerful feature, or see Sidebar 9.4 for an example of rule actions in action.
All the AppleScripts found in the Scripts Menu submenu only work from within Mail: just select an email message and choose the script you want to run. For more detailed explanations, check out Sidebar 1-3.
Navigation Scripts
This subfolder contains scripts that let you jump to a particular folder in the Finder, right from the menu bar of any program.
Printing Scripts
Each of these scripts helps you send something to your printer:
About “Convert"/"Print Window” Scripts provides some tips for using these scripts with multiple files at once.
Convert to PDF/PostScript takes any graphics or plain text files you’ve selected in the Finder and converts them to either PDF or PostScript format. This is a great tool if your Mac is connected to a shared printer on your network, for example, but you don’t want to shell out hundreds of dollars for a dedicated PostScript converter (a necessity for using many network printers). Instead, just use this PostScript-converting script and send the resulting file directly to your printer using Printer Setup Utility (in your Applications → Utilities folder).
I see the regular Script Menu in the upper-right corner of my screen, but I also see one in the regular menu bar of some of my programs. What’s the deal?
You’ve just come across one of AppleScript’s quirks. The global Script Menu—the one you see in the menu bar from all your programs, and the one that this chapter talks about—is a fairly new development in the world of AppleScript. As far as old programs like AppleWorks and BBEdit are concerned, the global Script Menu might as well not exist. These programs have their own script menus and don’t add their private scripts to the global Script Menu.
Luckily, some programs are kind enough to put their scripts in program-specific script menus and also in the global Script Menu (Mac OS X-native programs like Mail and Address Book, for example, fall into this category). These programs give you the benefits of both approaches: you get a script menu that you can use when you’re working within the program—often with keyboard shortcuts for useful scripts—but you also get the global Script Menu with the same exact scripts, so you can run them from another program.
Of course, there’s a third category—the one that just about every other program fits into. These programs (TextEdit, Microsoft Word, Photoshop, and iChat, just to name a few) lack script menus of their own. In these cases, any program-specific scripts you create must be placed into the global Script Menu, because the program has nowhere to store them in its own menu bar.
Script Editor Scripts
This submenu is filled with dozens of helpful scripts for getting the most out of Script Editor. For a quick summary of what the scripts do, choose “About these scripts.” Or, for a more detailed explanation of using these scripts while writing your own code, turn to Sidebar 2.3.
Sherlock Scripts
OK, “scripts” is a bit of a misnomer—there’s only one script here. Nonetheless, it’s a useful one: Search Internet lets you enter any text and have Sherlock check the results from five search engines simultaneously. The results come back in an easy-to-browse list, ranked by how relevant each site is to your search terms.
UI Element Scripts
The scripts in this menu are all demonstrations of AppleScript’s GUI Scripting capability, for controlling programs’ interfaces. These scripts probably won’t make much sense to you, however, until you’ve read Chapter 12, which explains how GUI Scripting works.
Note
You can’t run any of these scripts right from the Script Menu; you have to run them from Script Editor (Section 2.1.1.3) instead.
URLs
This final set of scripts provides quick links to some Web sites. All of these scripts use your default Web browser—which for most Mac OS X users is Safari, unless you specify a different browser (such as Camino, Firefox, or even Internet Explorer) in Safari → Preferences → General.
Note
If you want a stock quote for any other company, choose Internet Scripts→ Stock Quote. Unfortunately, using that other script doesn’t provide any of the detailed news, graphs, and statistics that Apple’s own stock quote script does.
Apple Store brings you straight to Apple’s online retail shop, http://store.apple.com/.
AppleScript Related Sites contains scripts for jumping to three of the most popular AppleScript sites on the Web. (See Section C.1 for more AppleScript-related Web sites.)
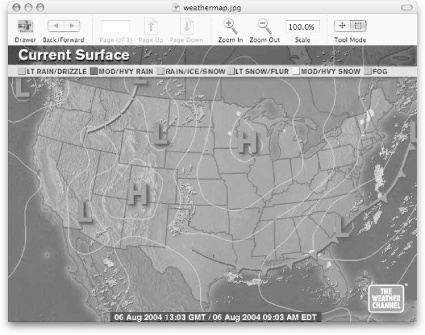
Download Weather Map fetches an up-to-the-minute weather map of the continental United States and saves it as weathermap.jpg on your desktop. The script then goes one step further and opens the file in your favorite image viewer (by default, the Preview program). Figure 1-6 has the details.
Customizing the Script Menu
At this point, you probably think the Script Menu is a pretty handy tool for running the scripts on your Mac. However, the Script Menu is much more than just a tool for launching the scripts that come with Mac OS X. Hidden behind its humble icon in the menu bar is enough power to keep any Mac person engrossed for hours.
For example, you can:
Add new scripts to the Script Menu. Or, if you’re a clutter nut, you can remove some of the useless scripts that come with the menu.
Rearrange the submenus. Since the Script Menu just mirrors a folder that lives on your system (found in Macintosh HD → Library → Scripts), you can move scripts around and customize the Script Menu to suit your needs.
Tweak the scripts themselves. Fix Apple’s spelling oversights (Figure 1-4), for instance, or insert AppleScript commands of your own into the built-in scripts.
Adding new scripts
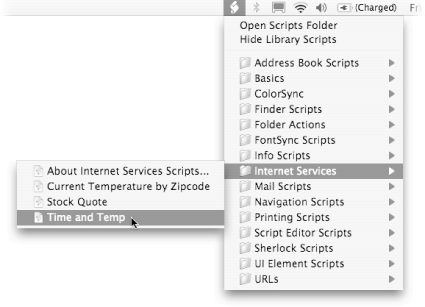
After you use the Script Menu for a while, you’ll probably get bored with the selection of scripts that Apple ships along with Mac OS X. Luckily, you can take any script you want—for example, an AppleScript you write yourself, or one you download from a Web site listed on Section C.1—and add it to your Script Menu.
Say you want a script that’ll speak the time and temperature out loud. You can search online for an AppleScript that does just that, and once you download the script, you can add it to your Script Menu as follows:
Download the script you want from the Internet.
In this case, the script you want is available from http://files.macscripter.net/scriptbuilders/Utilities/SayYourTimeAndTemperature.sit.
Open the Macintosh HD → Library → Scripts folder.
This is the Library folder that’s located at the root of your Mac’s hard drive (not to be confused with your personal Library folder, described on Sidebar 1.2).
Drag the script you just downloaded and drop it into any of the folders in the Finder window.
Because this new script uses the Internet to access its information, an appropriate folder would be Internet Services.
Note
You can put the script in whichever folder you want, and you can even name it whatever you want. For this script (originally named SayYourTimeAndTemperature), a more concise name might be Time and Temp, for example. (To rename a file, select it, press Return, type the new name, and press Return again.)
Open the Script Menu and run your new script (Figure 1-7).
The script opens Address Book in the background to find your home address and then “speaks” out loud the temperature and time for your area (using the default system voice you’ve chosen for your Mac via System Preferences → Speech → Default Voice).
Rearranging submenus
It’s nice that Apple took the time to organize the scripts in the Script Menu into different submenus, but sometimes it seems like their choices were just plain random. Why, for example, aren’t the Finder scripts and Navigation scripts combined in the same folder when both sets of scripts work with the Finder?
Luckily, you can override the Script Menu and put scripts into whatever folders you’d like. To move some scripts from one Script Menu category to another, simply open the Library → Scripts folder, and drag the scripts into a different subfolder (Figure 1-8).
Note
Your scripts don’t have to be inside a subfolder at all; if you’d like, you can just leave them floating in the Library → Scripts folder. That way, they’ll appear directly in the Script Menu—you won’t have to navigate through submenus to get to them .
Working with the Scripts You Have
As you’ll quickly realize from using the Script Menu, your Mac is teeming with dozens of free, built-in scripts. You can run, rename, and organize these scripts, as described on the preceding pages.
But if you’re just starting to learn AppleScript, these scripts can be lifesavers. Not only can you examine how the scripts work, but you can also make changes and see how they affect the scripts’ behavior. Best of all, if you get stuck when writing a new AppleScript, you can copy some of the code from the Script Menu’s scripts and paste that code right into your own script.
Opening a Script
The first step in working with a script, of course, is opening it up. Fortunately, this is an easy process: just double-click the script in the Finder. The script opens in Script Editor, the all-purpose AppleScript program described in Chapter 2.
When you’re just learning AppleScript, you might as well start by looking at a simple script. Double-click Library → Scripts → Navigation Scripts → New Application Window.scpt, and Script Editor opens the script file in a new window (Figure 1-9).
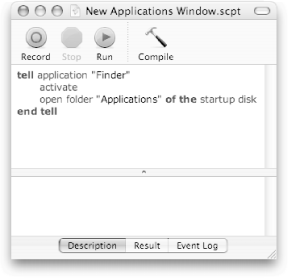
At this point, you can click the Run button to see what the script actually does (in this case, the script opens a new Finder window and takes you to the Applications folder).
Analyzing How It Works
The next step in working with a script, of course, is understanding how the script actually works. Some commands are self-evident, while others require you to examine a program’s dictionary—its master command list (Section 3.2.2)—to understand exactly what’s going on. Luckily, the commands in the New Applications Window script are all pretty simple:
tell application “Finder" instructs Mac OS X that the commands that follow should be run by the Finder.
activate brings the Finder to the front, much as you would by clicking its Dock icon. Unlike clicking the Dock icon, however, the activate command doesn’t automatically open a new Finder window; for that stunt, you’ll need the next command.
open folder “Applications” of the startup disk tells the Finder to open a new window, displaying the Applications folder of your main hard drive. (If you already have the Applications folder open, this command simply brings that window forward.)
end tell directs the Finder to go about its regular business, ignoring further AppleScript commands.
The Script Menu, simple as it may seem, has a number of completely hidden tricks up its sleeve. All these shortcuts can save you time, annoyance, and confusion:
Click any submenu to jump right to that folder in the Finder. For instance, if you wanted to open up the Mail Scripts folder, you could just click on the Mail Scripts submenu of the Script Menu.
Shift-click any script to jump right to it in the Finder. This is a great trick when you want to quickly rename a script: Shift-click its name to switch to the file, start editing its name by pressing Return, and then press Return again when you’re done editing. Presto—the new name now shows up in the Script Menu.
Option-click any script to open it in Script Editor. Once there, you can examine the script to see how it works, or edit it to change how it works. Either way, Chapter 2 has more details on Script Editor.
Add files besides scripts to your Scripts menu. Yes, you read that right. Your Scripts menu is perfectly content to display programs, files, folders, and aliases, and they’ll all show up in your Script Menu (shown here). To make your items appear on the bottom of the Script Menu, put them in your Home → Library → Scripts folder (rather than just Library → Scripts).
Using this trick, you can turn your Script Menu into a fast, free application and file launcher. There’s just one caveat: don’t try to add big folders to the Script Menu. If you do, the menu may spend minutes burrowing into your folders, trying to figure out how to display all their items. Instead, add the individual files and programs you’ll need and leave the rest of the folder somewhere else.
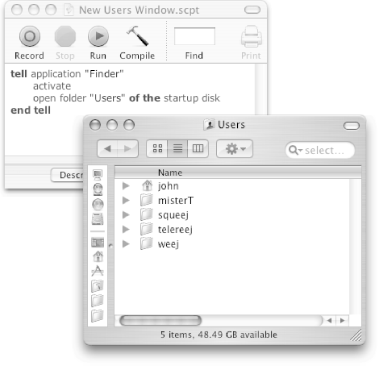
Changing What It Does
Now that you understand how the script works, you can change it to better suit your needs. To make the script open the Users folder, for example, you’d follow this procedure:
Replace Applications with Users.
File names have to be surrounded in double quotes, so make sure you don’t delete the quotation marks.
Click the Run button to test your script.
You should see the Finder come forward and display the Users folder.
Choose File → Save As (Shift-
 -S).
-S).Name the file New Users Window.scpt, make sure the File Format is set to Script, and save it in the Library → Scripts → Navigation Scripts folder.
Open your Script Menu, and run your new script from the Navigation Scripts submenu.
If you did everything correctly, your new menu item opens the Users folder in the Finder (Figure 1-10).
Get AppleScript: The Missing Manual now with the O’Reilly learning platform.
O’Reilly members experience books, live events, courses curated by job role, and more from O’Reilly and nearly 200 top publishers.

