The art of animation is all about images changing over the course of time in a natural, pleasing, and entertaining manner. Itâs the same whether youâre creating a cartoon with a long-eared rabbit or youâre developing a presentation for the next quarterly sales meeting. Elements move, change shape, and change color. In Edge, that means that the properties that define an element change over the course of time. Those properties and their changes are tracked on the Timeline through the use of keyframesâthose little diamond-shaped markers.
The previous chapters involved some Timeline manipulation. This chapter provides more complete details on Timeline basics and controls. Youâll learn how to create Timeline labels, how to use filters, and how to set, move, and remove keyframes. And of course youâll explore transitions, learning how to tweak them to do your bidding. When youâre through, youâll know how to operate every button and widget the Timeline has to offer.
Master the Timeline, and youâll be an Edge Jedi. Youâll have a jump on the learning process if youâve used a timeline in a video editor, Adobe After Effects, or Flash. If you tackled any of the exercises in the earlier chapters, youâre not a complete stranger to the Timeline. When you work in Edge, you use three panels to create your animation: Elements, Properties, and the Timeline. Usually you jump back and forth among them, using their features as necessary. Itâs no surprise that the Timeline is the panel thatâs devoted to working with timeâselecting specific moments in your animation and making something happen.
When you first look at the Timeline, it seems to be quite complicated with all its buttons and widgets. Create a couple of transitions, and things donât get any simpler down there in Edge south. Donât be intimidated. Think of the Timeline simply as a ruler that measures time in your animation. See Figure 4-1. The playhead lets you select a certain moment in time. For example, drag it to 0:02 on the Timeline, and the stage displays the elements as they appear 2 seconds into your animation. As explained in the earlier chapters, elementsâ position on the stage and their appearance is controlled by properties: Location properties, Color properties, Size properties, and so on.
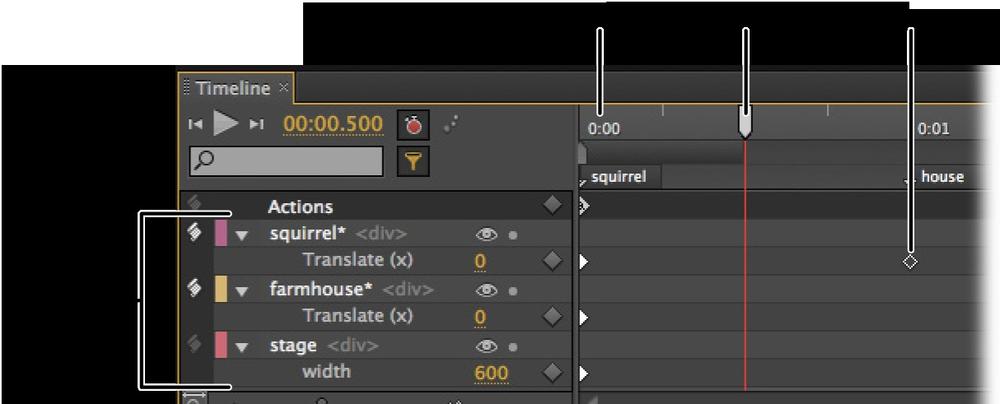
Figure 4-1. The Timeline lists elements in your animation and their properties. The playhead lets you select a certain moment during the animation. Keyframes mark a point in time when the value of a particular property changes.
Initially, the Timeline displays numbers like 0:01 and 0:02, with minutes on the left side of the colon and seconds on the right. As youâre working, youâll want to zero in on a particular portion of the Timeline and the property keyframes it holds. You can zoom in and out of the Timeline; however, doing so changes the tick marks and numbers displayed. The controls for zooming in and out of the Timeline are in the lower-left corner, as shown in Figure 4-2. When you zoom in on the Timeline, youâll begin to see fractions of seconds displayed, like 0:00.500 and 0:00.250, as shown in Figure 4-3.
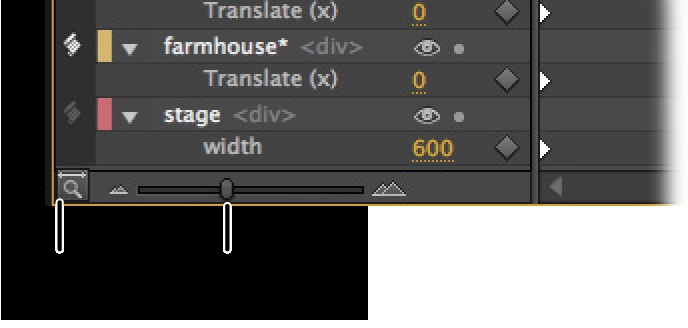
Figure 4-2. Want a better view of a particular segment of the Timeline? Drag the slider to zoom in and out of the Timeline. Click the Show All button to see the entire active portion of the Timeline.
There are two ways to select a particular moment in time. Drag the playhead up and down the Timeline, and the playhead and its red marker line select a point in the animationâs run time. As you move the playhead, the time counter on the left changes to display the selected time in numbers. The time counter (Figure 4-3) gives you a second way to choose a moment in time. It works like all the other counters in Edge: Click it and you can type in a number, or click and drag to scrub in a number. Making changes in the counter moves the playhead. The three playback buttons next to the time counter work just like the ones on your iPod or Blu-ray player. The left button jumps to the beginning of your animation, and the right button jumps to the end, wherever that may be on the Timeline. The big triangle in the middle plays your animation in real time. If the animation is playing, the same button works as a pause button.
Tip
If you can see the point in time you want to select, but the playhead is missing in action, click the Timeline. The playhead will jump to that spot.
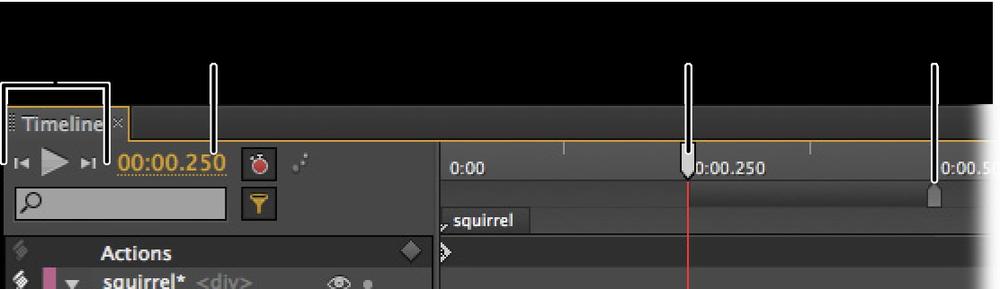
Figure 4-3. On the far left of the Timeline, you have playback controls, just like those on your iPod. The time counter numerically displays the position of the top playhead. The bottom part of the playhead is used when youâre creating transitions, as youâll see on page 78.
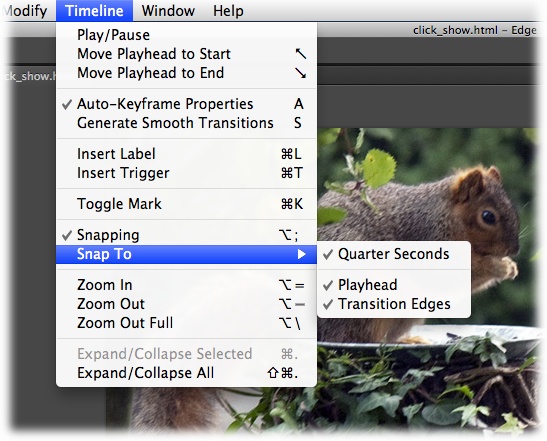
As you drag the playhead around, you may notice some snapping action as the playhead jumps to a particular tick mark on the Timelineâs ruler or jumps to a keyframe. That snapping action is deliberate, but youâre in complete control over how it works. Go to TimelineâSnapping to turn the feature on or off, as shown in Figure 4-4. (Yes. Thatâs right. The Timeline is important enough to have an entire menu of its own.) To fine-tune snapping behavior, you can choose the things that the playhead snaps to. Go to TimelineâSnap To and then turn on or off a snapping feature. These are your choices:
Quarter Seconds. The playhead snaps to tick marks in the Timeline in quarter-second increments, like 0:00.250, 0:00.500, 0:00.750, and 0:01.
Playhead. The playhead comes in two parts, top and bottom. With this feature turned on, the two parts snap to each other when theyâre moved. For more details on using the bottom portion of the playhead while making transitions, see Setting the Mark for a Smooth Transition.
Transition Edges. Transitions are displayed in the Timeline as horizontal, colored bars. With this option on, the playhead snaps to the keyframes at the beginning and end of transitions. Often youâll want to change multiple properties at a single point of time. If you turn on Snap ToâTransition Edges, itâs easier to target those points in time.
The Snap To options work when youâre moving the playhead, but thatâs not the limit of their assistance. Later on, as you edit and fine-tune animations, youâll find snapping handy for lining up keyframes and the edges of transitions.
Computers like numbers more than most human beings do. People appreciate the precision of numbers, but often the descriptive value a word like BOUNCE or ChangeSlide trumps something like 0:03.720. You can add labels to the Timeline to mark important points in your animation. They appear right beneath the number scale, giving you the benefit of both a word and a number.
Drag the playhead to that special point on the Timeline that you want to label. Then go to TimelineâInsert Label (or press Ctrl+L or â-L). A label appears on the Timeline with a less-than-helpful name like Label 1 or Label 2. See Figure 4-5. Itâs up to you to give the label a useful name. Just start typing after you create a label. When youâre done, that label serves as a meaningful bookmark for you in the future. Whatâs more, as youâll see on Using Labels in Your Timeline Code, labels are extremely useful when it comes to creating triggers and actions that control your animation.
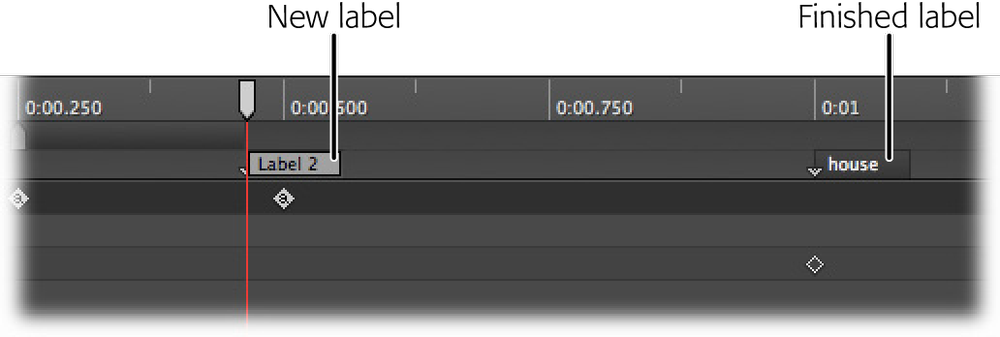
Labels arenât chiseled in stone once you create them. Change the name of a label by double-clicking on the label and typing in a new name. Unlike elements, labels can include the space character, so they can be more than one word. However, on the Timeline, labels display only about six or seven characters, so itâs best to keep them short and sweet.
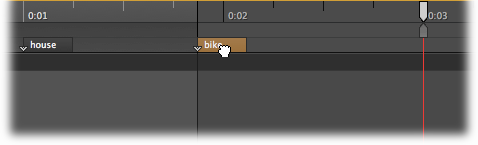
You can move labels to a different point on the Timeline by clicking and dragging them to a new spot, as shown in Figure 4-6. To delete a label, click to select it. Once itâs highlighted, press Delete or Backspace (just Delete on a Mac).
The busiest part of the Timeline is over on the left side, where the elements are listed. Elements are the objects displayed on the stage. Actually, even the stage itself is considered an element, as you can see in Figure 4-7. As explained back on Creating Art in Edge, each element has a number of properties that you use to control it. For example, text has a Color and a Size property. Rectangles have Width and Height properties. All visible objects, except the stage, have Location properties: X and Y. These properties are listed under the elementâs name in outline fashion, with properties subordinate to their element. Click the triangle button to show or hide the properties under an element. You can also use the TimelineâExpand/Collapse Selected option as long as you have an element selected in the Timeline, or its related shortcut key Ctrl+period (â-period for the Mac). Thereâs also a handy command that expands and collapses all the elements at once. Use TimelineâExpand/Collapse All. The shortcut for that command is Ctrl+comma (Shift-â-comma on the Mac).
Tip
To the left of each element name, thereâs a small color bar. Edge automatically labels each element with a specific color that you see in the Timeline and the Elements panel. The same color appears on the transition bars in the Timeline. This color coding of elements makes it a little easier to quickly identify them. The colors donât serve any other function.
Even though youâre building an animation, that doesnât mean every single element in your animation is going to change over time. Perhaps you have several background elements that remain static through the whole show. In that case, thereâs no need to clutter up the Timeline with elements that arenât animated. Click the Only Show Animated Elements button (Figure 4-7) to filter out the lazier elements in your animation. When necessary, you can always toggle them back on.
Next to each element in the Timeline, youâll see, grayed out, the HTML tag that defines it. In many cases, that tag will be <div>, the generic tag that can be used in HTML to define any object, no matter how big or small. You may also see image tags <img>, paragraph tags <p>, or any number of other common HTML tags. The same tags appear next to the elementâs name in the Elements panel. In the Properties panel, you see a drop-down menu next to the elementâs name. You can use that menu to change the tag applied to an element.
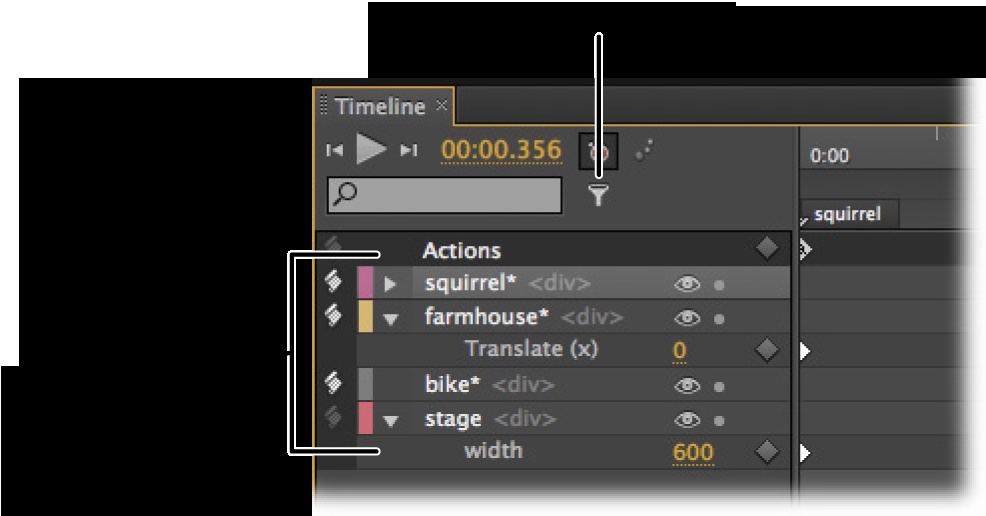
Figure 4-7. Each element in your project, including the stage, gets a row in the Timeline. Click the Expand/Collapse button next to the elementâs name to show or hide the properties that are used in your animation. Here the squirrel properties are hidden, while the farmhouse properties are shown. Bike doesnât show an Expand/Collapse button because no properties have changed.
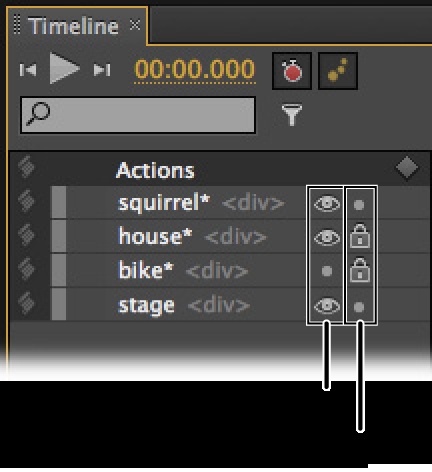
When youâre working with a lot of elements and a complex animation, you tend to have some of those âcanât see the forest for the treesâ moments. You need to hide some elements on the stage so you can focus on others. Thatâs the job of the show/hide toggle buttons next to each of the elementâs names in the Timeline. See Figure 4-8. When the button looks like an eyeball, the element is visible. When it looks like a period, the element is hidden. Keep in mind that this affects elementsâ visibility only while youâre working in Edge. It doesnât affect your finished animation when itâs viewed in a web browser. To control the visibility in the finished animation, you need to use the Alpha property or JavaScript show/hide methods, as explained on âthisâ is a Special Word.
Accidentally moving an element while youâre working is another design-time problem. Perhaps you want to select some text but accidentally grab a background photo, and now youâve dragged it out of position. To avoid these problems, you can lock elements in place. When theyâre locked, you canât move themâyou canât even select them in the Elements panel or on the stage. The Lock button looks like a lock when itâs enforcing the no-move, no-select rules. When an element is unlocked, the button looks like a period (Figure 4-8).
Like most applications, Edge gives you several ways to do the same thing. When it comes to managing the Timeline, you may be able to perform the necessary acts using the menus, buttons, or keyboard shortcuts. The good thing about keyboard shortcuts is that they give you a quick way to trigger a command, such as âcreate a labelâ or âturn on Auto-Keyframe Properties.â The bad thing about keyboard shortcuts is that you have to remember the key combinations. That means youâll probably learn just a few shortcuts for the things you do the most.
Hereâs a quick cheat list for common Timeline tasks, along with their menu commands and keyboard shortcuts:
ACTION | MENU COMMAND | WINDOWS KEYBOARD SHORTCUT | MAC KEYBOARD SHORTCUT |
|---|---|---|---|
Play or Pause the animation | TimelineâPlay/Pause | Space bar | Space bar |
Go to the beginning | TimelineâMove Playhead to Start | Home | Home |
Go to the end | TimelineâMove Playhead to End | End | End |
Zoom in on Timeline | ViewâZoom In | Alt+= | Option-= |
Zoom out on Timeline | ViewâZoom Out | Alt+- | Option-- |
Show all active time | ViewâActual Size | Alt+1 | Option-1 |
Toggle snapping on or off | TimelineâSnapping | Alt+; | Option-; |
Add a label to the Timeline | TimelineâInsert Label | Ctrl+L | â-L |
Toggle Auto-Keyframe Properties | TimelineâAuto-Keyframe Properties | A | A |
S | S | ||
Expand or collapse a selected elementâs properties | TimelineâExpand/Collapse Selected | Ctrl+. (period) | â-. (period) |
Expand or collapse all elementsâ properties | TimelineâExpand/Collapse All | Ctrl+Shift+. (period) | Shift-â-. (period) |
Activate Mark (lower-half) of the playhead | TimelineâToggle Mark | Ctrl+K |
Transitions have been part of this book since the first exercise in Chapter 1, so chances are youâve created a transition or two by now. This section examines transitions and highlights some of the ways you can tweak and modify them. If you want to experiment along with the discussion, go ahead and create and save a new Edge document. Turn off Auto-Keyframe Properties, but make sure the Generate Smooth Transitions button is turned on. Draw a rounded rectangle thatâs about 100 to 140 pxâno need to be too precise. Drag the playhead away from the starting point 0:00. Now, move the element. As expected with Auto-Keyframe Properties turned off, no keyframe or transition is created. This is simply the new location for the element along the whole Timeline. Scrub the playhead a bit, and you can confirm this.
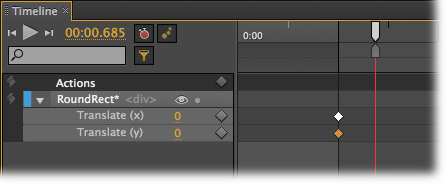
Now, with the playhead still beyond the 0:00 mark and your element selected, click the Add Keyframe button next to Location. Two diamond-shaped keyframes appear in the Timeline, as you can see in Figure 4-9. The properties are listed as Translate (x) and Translate (y). Again, if you scrub the playhead, youâll notice that your element stays in the same place, because it takes at least two location keyframes for each property to move an object from one position to another. If you change the color of your rectangle or the size (W/H), the results are similar. No property keyframes are created, but your object changes. Think of changes at this point as defining the base properties of the elementâthat is, the initial definition of the element. For a change to be visible on the stage, that initial definition needs to be recorded with a keyframe and then changed at some other point on the Timeline and recorded with another keyframe.
If you want to remove a property keyframe, the process is similar to deleting a word in a document. Click to select the doomed keyframe. It shows a gold highlight. At that point, just press Delete (Mac or PC) or Backspace (PC). If you delete the two and only keyframes for your rounded rectangle, it still remains visible on the stage. Youâve deleted the keyframes that recorded its position, but you didnât delete the element.
When you want to animate a car driving down the road or an apple falling from a tree, you need to create a smooth transition. Often youâll want to make these kinds of smooth transitions as the value of a particular property changes. Smooth transitions arenât limited to a location on the stage. You can smoothly change from one color to anotherâthe element will pass through several shades of the two colors. You can smoothly change the size of an element, making it appear to grow gradually.
Hereâs a quick experiment you can do with a rounded rectangle or any other element:
Create a new Edge project and turn on Auto-Keyframe Properties and Generate Smooth Transitions.
When Auto-Keyframe Properties is turned on, Edge automatically creates keyframes when you change an elementâs properties. You use the Generate Smooth Transition options to create those car-driving, apple-falling effects mentioned earlier.
Draw a rectangle, rounded rectangle, or some other element on the stage.
Any old element will work for this quick experiment.
Drag the top portion of the playhead to 0:01, and drag the bottom portion of the playhead to 0:00.500.
The bottom portion of the playhead is known as the mark. Sometimes the mark moves along with the playhead, and sometimes it doesnât. You can toggle this behavior with TimelineâToggle Mark (Ctrl+K or â-K on a Mac).
Move the element up and to the right of its current location.
Edge creates two keyframes, one at a 0:00.500 marking the original location of the element, and one at 0:01, marking the new location, as shown in Figure 4-10. Colored bars signal a smooth transition, and if you scrub the playhead over the transition, youâll be able to appreciate the smooth motion.
Note
Itâs worth taking a moment to consider how the two-part playhead works. Both the top and the bottom portion create keyframes. The changes you make on the stage are recorded in the keyframes at the top playhead position. The mark (bottom part) creates keyframes that match the property values before the change. Why are these keyframes that duplicate property values important? In the previous example, if you donât set the mark, the elementâs motion would begin immediately at 0:00. Setting the bottom playhead ensures that the rounded rectangle remains motionless between 0:00 and 0:00.500. The elementâs motion begins at the point of the mark, and it ends at playhead position 0:01.
In the Timeline, there are numbers to the right of the Translate (x) and Translate (y) properties. The dotted line under these numbers signal that theyâre editable by typing or scrubbing. Notice that at the beginning of the transition, the value for each property is 0âthat is, the elementâs original location. At the end of the transition, the numbers show how far the element moved from that original position. Negative numbers indicate leftward or upward movement.
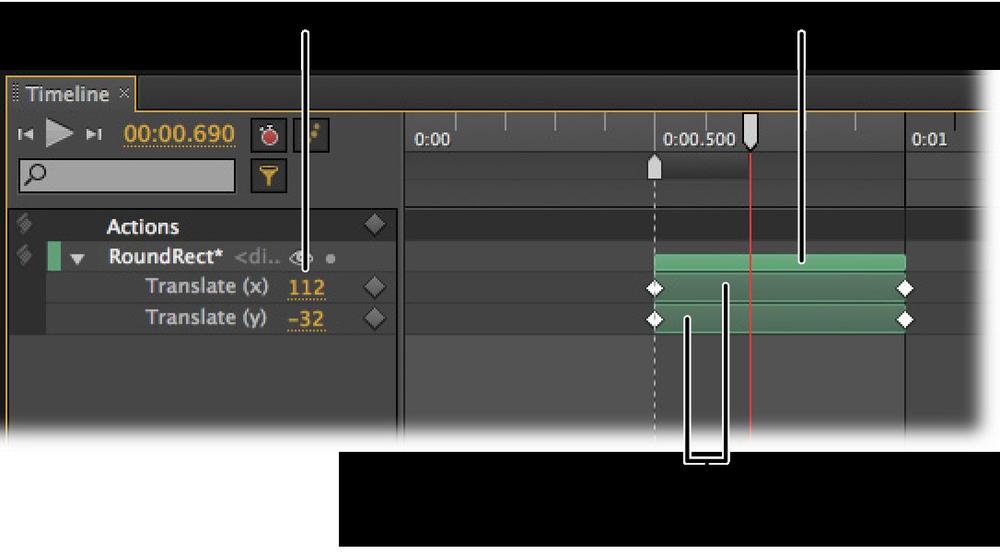
Figure 4-10. Color bars mark smooth transitions in the Timeline. The colors match the identifying color of the element. You can select a single property transition by clicking on the bar. You can select all the transitions by clicking the elementâs bar.
Your transition has three colored bars: the two bars for the properties and one bar at the top for the element. For example, it might be RoundRect, as shown in Figure 4-10. If you collapse RoundRect to hide the properties, you still see the top bar as a signal that thereâs a transition.
In most animation, timing is critical. If youâre animating a bouncing basketball, your audience will immediately notice if the ball hangs too long in midair. If youâre syncing a slideshow to a music track, your audience will notice if you miss the beat. So donât be surprised if you donât get it right the first time you create a transition. Often, itâll need a little tweaking to get the timing just right. Fortunately, itâs not hard to tweak transitions in Edge, and there are a few different ways to do it.
You can change the timing of transitions by dragging individual keyframes or the entire transition up and down the Timeline. For example, if you drag the keyframe on the end of a transition to the right, making the transition bar longer (as shown in Figure 4-11), you extend the time it takes for the transition to take place. If youâre animating a car and you extend the transition, the car drives slower, taking more time to reach its destination. Want the car to go faster? Make that transition shorter.
When it comes to changing the duration of a transition, you donât have to edit each property separately. If you want to change all the properties at once, select the element bar. This selects all the properties below. Then you can drag the ends to change the duration.
In some cases, youâll want to move a transition without changing its duration. Thatâs easy to do, too. Just select the transition you want to move and then move the cursor over the middle, until it changes to a hand. Then click and drag the transition to its new home.
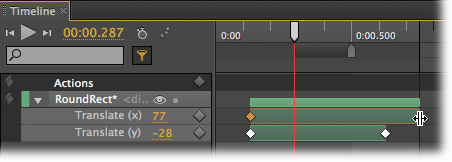
Figure 4-11. You can change the duration of a transition by dragging the keyframe at the beginning or the end. Here, the keyframe at the end of the Translate (x) property is being dragged down the Timeline, extending the transition. RoundRect will continue to move horizontally after the vertical motion stops.
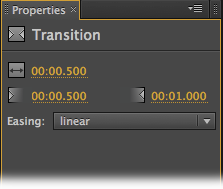
The Timeline displays your elementâs properties and the transitions visually. Often thatâs just the ticket for fine-tuning a particular effect. If you need numerical precision, you can edit the transitionâs properties. As you might guess, transition properties, shown in Figure 4-12, are all about timing. The Duration property tells you how long a transition takes to complete. The Delay property tells you the point in the Timeline when the transition begins. The End property tells you when itâs complete. Naturally, all these properties appear in a time format like 00:01.032. Minutes are to the left of the colon. Seconds and fractions of seconds are to the right. Whenever you make a change in the Timeline, these properties are updated. You can also make changes by typing in new values or scrubbing the numbers. As explained on Add Some Bounce, the Easing property affects the speed of change within the transition. For example, a car might start off slowly and then speed up. Using the Easing drop-down menu, you can choose from a number of different Easing presets.
Note
For details about the different easing options, see Add Some Bounce.
Want to practice fine-tuning a transition? Hereâs a project that will give you a little exercise. You can find 04-1_Basketball_Bounce.zip with the Missing CD files at http://missingmanuals.com/cds. The goal is to make the basketball bounce with a realistic motion. As the ball bounces on the big letter B, it squashes the letter against the ground. When the ball comes back up, the letter re-inflates to its natural stature. See Figure 4-13. Along the way, youâll apply some easing to the basketball bounce, and copy and paste a transition. Most likely, youâll want to adjust the timing a bit by shortening or lengthening the transition bars.
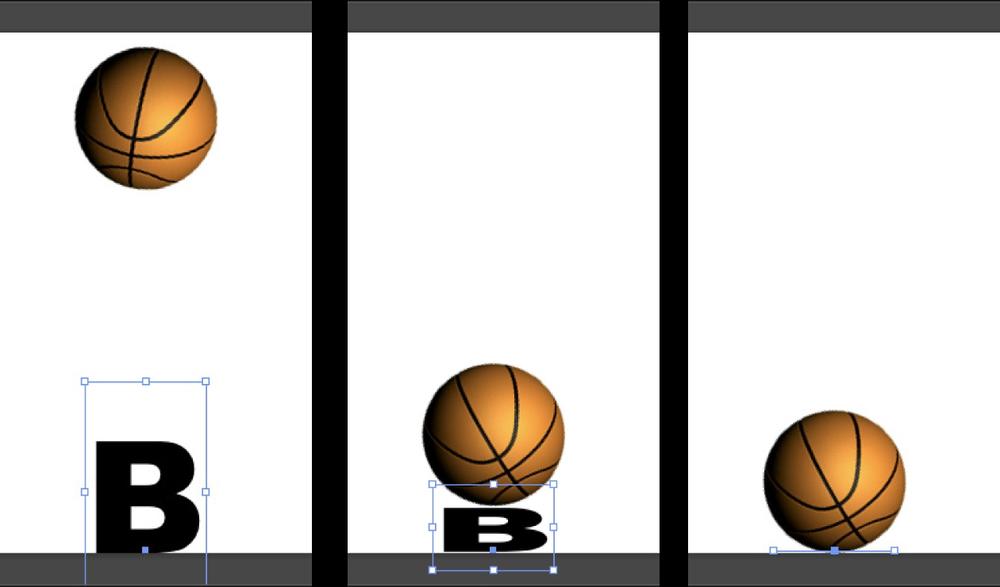
Figure 4-13. In this animation, the basketball drops from above (left). When it meets the letter B, it squashes the letter (middle). By the time it hits the ground, the letter is flat (bottom). As the ball bounces up, the letter springs back into shape.
Here goes! Follow the bouncing ball.
Unzip 04-1_Basketball_Bounce.zip to an empty project folder. Then open 04-1_Basketball_Bounce.html in Edge.
There are two elements on the stage: a basketball image and a text box with a big bold letter B sitting at the bottom of the stage.
Press A to turn on Auto-Keyframe Properties, and press S to turn on Generate Smooth Transitions.
The shortcut keys give you a quick and easy way to toggle these features on and off. As an alternative, you can click the buttons on the Timeline or use Timeline menu commands.
Drag the playhead to 0:01 and leave the mark at 0:00.
With the playhead and mark in this position, you can create a transition that lasts 1 secondâa good first try for the basketballâs downward motion.
Drag the basketball down so that its bottom edge is at the bottom of the stage.
The basketball should hide the letter B, for the most part. The bottom of the basketball graphic should snap to the bottom of the stage. If you drag the ball straight down, only one property is added to the Timeline, the basketballâs Translate (y) property.
Click to select the basketballâs Translate (y) and press Ctrl+C (â-C).
This copies the transition. You can now paste it back into the Timeline. You can paste it into a different Timeline location, or you can paste the transition in the Timeline for a different element.
With the playhead still at the end of the transition, go to EditâPaste SpecialâPaste Inverted.
This handy command not only pastes the transition into the Timeline, but it also reverses the action. So the basketball will go from the bottom of the stage back to its original position. You now have both motions for the bounce.
Press Home and the space bar to test the animation.
The ball goes up and down, but you wouldnât call it realistic animation. It feels a bit wooden. Time for some easing.
Select the first section of the Translate (y) transition. Then in Properties choose the Easing property easeInCubic.
When you select the transition, the Properties panel shows Easing set to linear. That makes the ball travel at the same speed the whole length of the motion. With the easeInCubic easing applied, the ball moves more slowly at the beginning of the journey, picks up speed, and is moving faster by the time it hits the ground. If youâre curious, go ahead and test some of the other easing options.
Select the second section of the Translate (y) transition and apply the easeOutCubic easing.
This easing option is the reverse of the first one. That means the ball will slow as it reaches its highest point on the stage.
Press Home and the space bar to test the animation.
The motion feels better. The ball seems to react to hitting the ground, and with the slowing down at the top, it feels like gravity is in play.
Move the playhead to the 0:01 point where the ball hits the ground. Then select the ball and set its Rotate property to 40 degrees.
The ball rotates rather lazily as it drops. Realistic enough. You can give it more or less spin by changing the Rotate value.
Move the playhead to 0:02 and set Rotate to 80 degrees.
This makes the ball continue to spin in the same direction. If you prefer, use a negative number to make the ball spin back when it hits the ground. At this point, the ball is doing pretty well. Time to focus on that letter B.
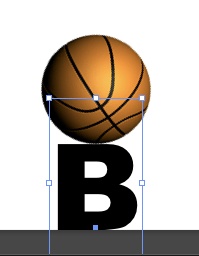
Drag the playhead to the point where the ball touches the top of the letter B, then select the letter B.
The Properties panel shows Bâs properties, including Transform Origin and Scale. The transform origin is the point around which transformations such as rotate and scale take place. For more details, see Transforming Your Rectangle. When B is selected, the transform origin is shown as a blue square. It starts out centered in the text box.
Adjust the Transform Origin Y property so that the transform origin is at the bottom of the letter B.
With the transform origin at the bottom of the character, that point will stay in place when you apply transformations like Scale.
In Properties, with B selected, click the Add Keyframe button next to Scale.
This creates a keyframe where B is scaled at 100 percent.
Drag the playhead to the point where the basketball hits the bottom of the stage. Then set Bâs vertical scale to 0 percent.
This makes it look like the basketball is squashing the letter.
Select the letter Bâs Scale (y) transition bar and press Ctrl+C (â-C).
The transition is copied, and now you can paste it back into the Timeline at a different point.
With the playhead at the end of the transition, and B still selected, go to EditâPaste SpecialâPaste Inverted.
As with the basketball motion (step 6), this reverses the scale transition. So, as the basketball bounces up, the letter bounces back to its regular size.
At this point, the basketball bounce is pretty good. If you want to compare your work with another example, check out 04-2_Basketball_Bounce_done.zip. Naturally thereâs a lot more you can do. For example, if you donât find the motion realistic enough, you can speed it up or slow it down by adjusting the length of the transitions. To adjust everything at once, Shift-click to select both the basketball element and the B element. Then drag the end of the basketball transition. Donât like the results? A simple Undo (Ctrl+Z or â-Z) puts everything back the way it was. If youâre ambitious, you can have the basketball bounce out an entire word. LeBron, anyone? Or you can apply the bounce-squish to some of your own artwork. Experimentation is an artistâs best tool.
Get Adobe Edge Preview 3: The Missing Manual now with the O’Reilly learning platform.
O’Reilly members experience books, live events, courses curated by job role, and more from O’Reilly and nearly 200 top publishers.

