Travelers on the World Wide Web expect strong graphics. They appreciate animation that contributes to the subject as long as it doesnât waste their time. Done well, animation draws attention to important details, shows how things work, and helps site navigation. But, graphics certainly werenât first and foremost when the Web was created. The language used to display web pages is called HTMLâshort for HyperText Markup Language. It has evolved and continues to adapt to current needs and new ideas. The latest step in that evolution is HTML5, which combined with other technologies like CSS3, JavaScript, and jQuery, presents the beautiful interactive pages you visit today.
Instead of creating graphics and visual effects manually by writing code, artists can use Adobe Edgeâa tool thatâs a much better fit for designers. This chapter starts off by explaining how Edge works to write HTML code that a web browser can read. Then it offers a quick introduction to the main parts of the Edge workspace. Finally, youâll take Edge for a test drive, where youâll make an image move and create text that fades in and out. Your first hands-on experience will be quick and easy. Consider this first adventure an overviewâthe following chapters will reveal the details.
Edgeâs role in life is to help you make web pages that move. You design the graphics using familiar visual tools, while Edge writes the underlying code. Itâs as if you hired an HTML/CSS/JavaScript/jQuery coder for your design team. One good way to understand what goes on behind the scenes is to create and save an empty Edge project. Fire up Edge as you would any other application on your computer. That means the process is slightly different for Windows and Mac computers. If you plan on using Edge a lot (and why wouldnât you?) you can use any of the familiar tricks to create handy shortcuts. In Windows, you can pin an Edge shortcut to your Start menu or the taskbar. On a Mac, you can add Edge to the Dock.
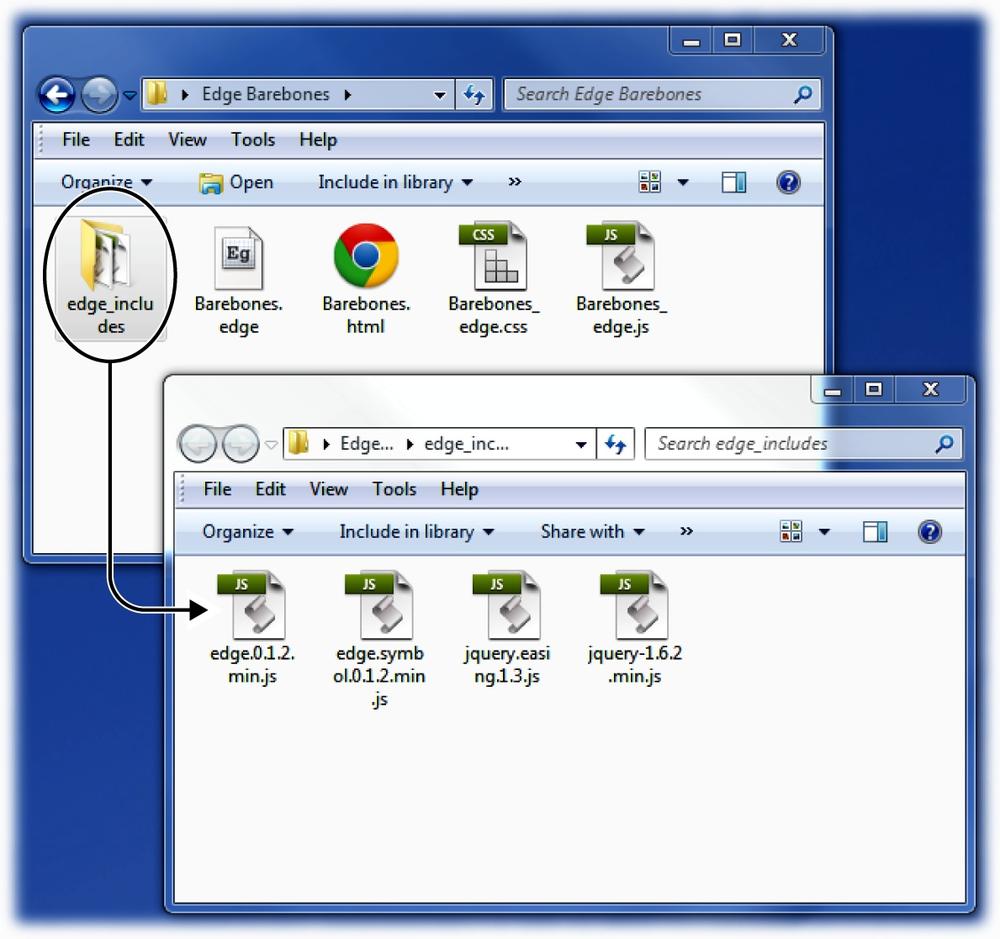
Once Edge is running, youâre greeted with a workspace with a number of panels and some Adobe âGet Startedâ advice. Donât worry about those details now; youâll explore them later in this chapter. Create a new folder on your desktop and call it Edge Barebones. Next, do the project creation two-step. Go to FileâNew and then FileâSave As. When you Save As, you see that Edge uses a standard file/folder navigation window for your computer. Find the Barebones folder on your desktop and save your project with any name you want. Now, examine the contents of the folder. Youâll find four files and a folder like the ones in Figure 1-1. If youâve spent time developing web pages, youâll see some of the usual suspects and maybe a newcomer or two:
The .edge file is used by Edge to keep track of your project.
The .html file describes a web page using HTML code, like any of the gazillion web pages on the Internet.
The .js files hold JavaScript code thatâs specific to your project. Right now your project is bare-bones, but the code defines the empty animation stage and performs other tasks that are necessary for all Edge projects.
Open the folder thatâs named edge_includes, and youâll find more JavaScript files. These are libraries of JavaScript code. Two are specific to Edge, and two are jQuery libraries. These libraries are referenced by the code in the HTML page that Edge created. They serve as the engine behind your Edge project. In short, they make things move.
Unlike a word processor or a spreadsheet, which create single files, Edge creates several files, and it needs those files to build the project and to display your masterfully designed page in a browser. If you delete or move one of these files, chances are youâll confuse Edge and anyone who views the web page. So one thing to learn from this bare-bones exercise is proper folder and file management:
Fire up Edge for the first time and you see a workspace with several panels and a small toolbar, as shown in Figure 1-2. The name for each panel appears on a tab at the top. The Elements, Properties, and Timeline panels and the Tools toolbar all hold tools and widgets you use to create your animation masterpieces. The larger Get Started window initially offers some help and links to Adobe resources, but as soon as you open a project it turns into the stage, and the tab displays the name of your project.
The stage is where you display and animate the graphics and text for your web page audience. When you save your project, Edge records the text and graphics and saves the description as a web page in HTML code. Open the page in a browser, and it plays back just as it appeared on the Edge stage. The stage has defined boundaries, and itâs possible to hide or position elements so that they are offstage.
Elements are objects that you add to the stage, and as a result they appear on your finished web page. Elements may be artwork, photographs, or text.
Elements have properties that affect their position and appearance on the stage.
The Timeline keeps track of elements and their properties over the course of time. When an elementâs properties change, that may change its position on the stage and its appearance.
Tools appear at the top of the main workspace. You use the arrow, rectangle, and text tool to create, select, and modify elements on the stage. Itâs a small toolbox, but you may be surprised at how much it can do.
Tip
You may think of these workspace boxes as panels or palettes, but Adobe lists them all under the Window menu, where you can show or hide each with a mouse click.
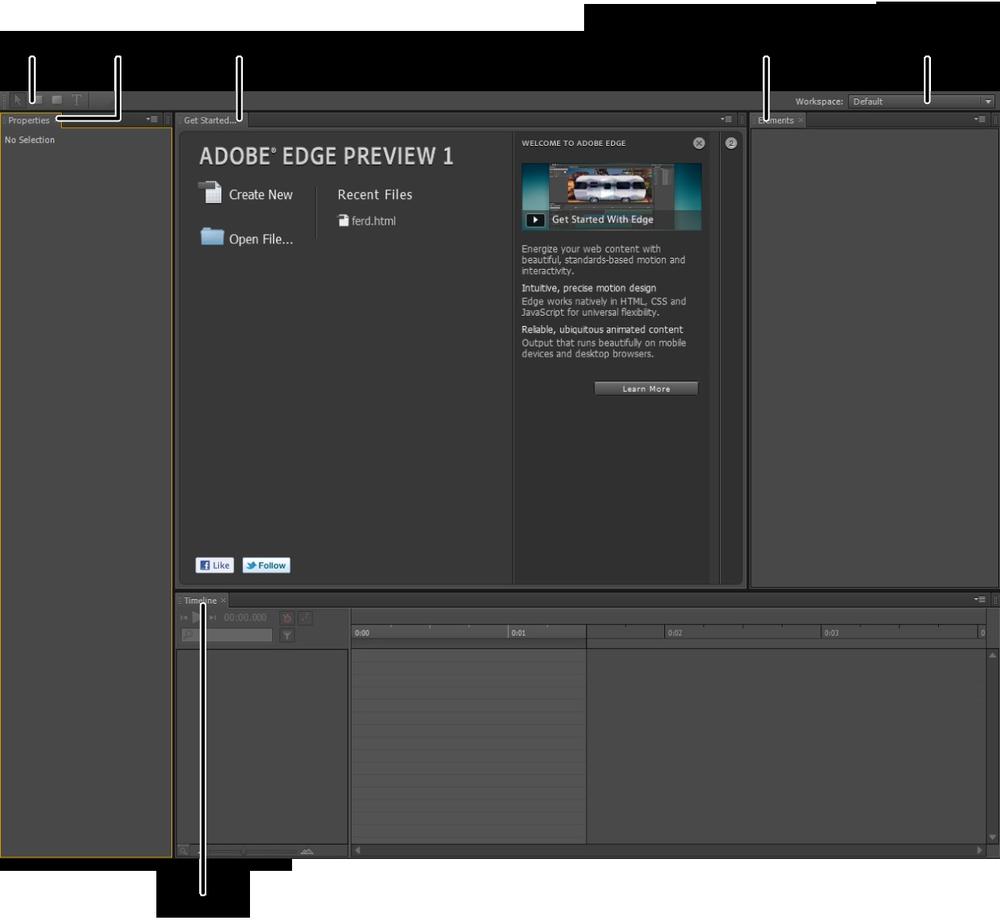
Figure 1-2. The Edge workspace consists of a few movable and resizable panels. Initially, the stage displays getting started info. After you create a new document, you use the stage as your canvas to display the graphic elements in your animation.
The Edge workspace takes its cues from other Adobe products. If youâve used recent versions of Dreamweaver, Photoshop, or Flash, youâll feel right at home. If this is your first foray into Adobe territory, the techniques you learn here can be applied when you explore other applications.
Initially, all the panels are pieced together like a puzzle, but you arenât stuck with that arrangement. You can resize the panels within the workspace, or you can drag panels out so that they float independently. Want to make the Timeline bigger? To resize it while itâs grouped snugly with the others, drag one of its edges. As it changes size, the surrounding panels change to accommodate the new arrangement. Want to move the Properties panel to a second monitor? Just drag its tab anywhere you want; the panel follows. If you have trouble freeing a window, click the small menu button in its upper-right corner (Figure 1-3) and choose Undock Panel. It will pop out from the main Edge workspace.
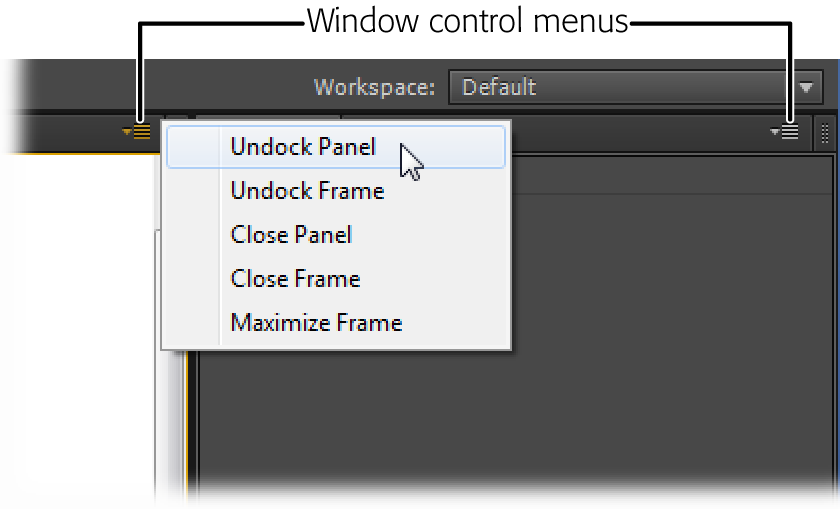
Figure 1-3. Use the menu in the upper-left corner of the individual panels to open, close, dock, and undock the panels.
Two scenarios may arise when you start dragging Edgeâs panels all over the place: Either you love the new layout or you hate it. Suppose you find the perfect layout for your work style and equipment. Perhaps you have a dual-monitor system and you like to have the stage fill one screen while the Timeline, Properties, and Elements panels camp out on the other. You can save the workspace layout using the Workspace menu in the upper-right corner. Initially, the menu is set to Default, as shown in Figure 1-4. Choose New Workspace, and a dialog box appears, where you can provide a custom name, such as âDual Screen,â for your custom workspace. Click OK, and now your newly named workspace joins the workspace menu. Just choose it whenever you want to use your handy Dual Screen workspace.
On the other hand, perhaps through dragging, tugging, and hiding panels youâve arrived at a completely unworkable situation. You just want everything back the way it was when you started. Choose Default or any of the other workspace options, and all those panels jump back in place. Use the Reset option to return the currently selected workspace to its last saved arrangement.

Itâs a long-standing coderâs tradition to program a âhello worldâ test when first tackling a new language. In this case, Edge is going to write the code that displays your web page and animation, but why break with tradition? To dip your toe in the animation waters, youâll develop a hello-world page Edge-style. The blue marble of the earth will rise onto the stage, and the words âHello Worldâ will fade in and then fade out. You can use your own earth picture, or you can download 01-1_Hello_World.zip from http://missingmanuals.com/cds/edgemm. The zip file contains one image, planet_earth.png, which is used for this exercise.
If you want to see the final working example before you build it yourself, grab 01-2_Hello_World_done.zip from the Missing CD. Download and unzip it to create a folder that holds several files. You can view the completed project by opening 01-2_Hello_World_done.html in any browser thatâs HTML5 capable. If youâre not sure whether your browser can handle HTML5, see the box on HTML5 Browsers on the Leading Edge.
Note
You can find all the examples for this book at http://missingmanuals.com/cds/edgemm. Many of the examples are archived in zipped files because Edge projects produce several different files and folders, such as HTML, JavaScript, and graphics. Individual examples are numbered. In the case of 01-1_Hello_World.zip, the 01 at the beginning stands for Chapter 1 and -1 indicates that itâs the first exercise in the chapter. Completed examples for comparison are often included and have the word done in the filename, as in 01-2_Hello_World_done.html.
Start Edge and go to FileâNew to create a new document.
When you create a new document, the Get Started window becomes the stage. You see âstageâ as the only element listed in the Elements and Properties windows. As you see in the Properties panel, the stage has dimension, color, and overflow properties. Youâll learn more about each of those properties later.
Create a folder for your project and then choose FileâSave As to save your file with a name like Hello_World or First_Try.
You can create a folder outside of Edge using Windows Explorer or Finder, or you can create a new folder as part of a FileâSave As command. Itâs a good practice to save your Edge project immediately with a helpful name. That way you wonât end up with a bunch of âuntitledâ projects that you donât remember. Also, it makes it easy to save your work early and often with a quick Ctrl+S or â-S. As explained on Creating and Saving Edge Projects, itâs best to save each Edge project in its own folder because Edge creates several files and an edge_includes folder when you first save a project.
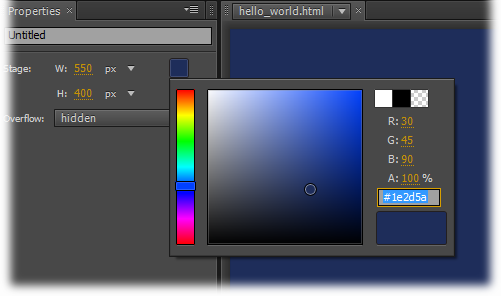
In the Properties window, click the white Background Color swatch.
A panel appears where you can choose a color (Figure 1-5). If you prefer a strictly visual approach, click the ârainbowâ bar at the left for a basic hue and then click inside the square to fine-tune your selection. In some cases, you may have a specific color specification in RGB (red-green-blue) format or as a hexadecimal number. For more details on color management, see Setting the Stage.
When the color picker appears, choose a dark blue color to represent deep space.
If in doubt, try R=30 G=45 B=90 A=100 for this project. Edge uses Adobeâs standard method for choosing numbers. When you see dots underlining a number, that means you can either click and then type in a number, or you can click and drag to âscrubâ in a number. Drag right to increase the number, left to decrease.
Choose FileâImport. Using the Import window that appears, find and select planet_earth.png. Click Open to import the image into your project.
The planet_earth.png image was in the 01-1_Hello_World.zip from the Missing CD (http://missingmanuals.com/cds/edgemm). After you import a file to your Edge project, it is listed in the Elements window and is displayed on the stage. Itâs automatically selected, so you see the properties for the newly imported element in the Properties window. The âplanet_earthâ has Location, Size, and Opacity properties. Below those, you see the Transformation properties that let you rotate, skew, and scale elements. At the very bottom of the Properties window, the source file is listedâa handy point to keep in mind when youâre trying to remember, âWhat the heck was the name of that file anyway?â
In the Properties panel, click the ID box at the very top and change planet_earth to World.
As Edge imports graphics, it names them using the file name. In some cases, that may be fine, but often youâll want to rename the element inside of Edge.
IDs serve an important function in HTML code, as youâll learn later in this book. Notice that in the Elements panel your World appears with its new name. However, World is not yet listed in the Timeline. Thatâs about to change.
In the Timeline, make sure the playhead is at 0:00.
If you havenât made any Timeline changes since you created this project, the playhead is at 0:00, marking the first moment or frame of the animation. If you need to move it, drag the top half of the playhead; the bottom half will automatically follow. There are more details on working with the two-part playhead in the note on Note.
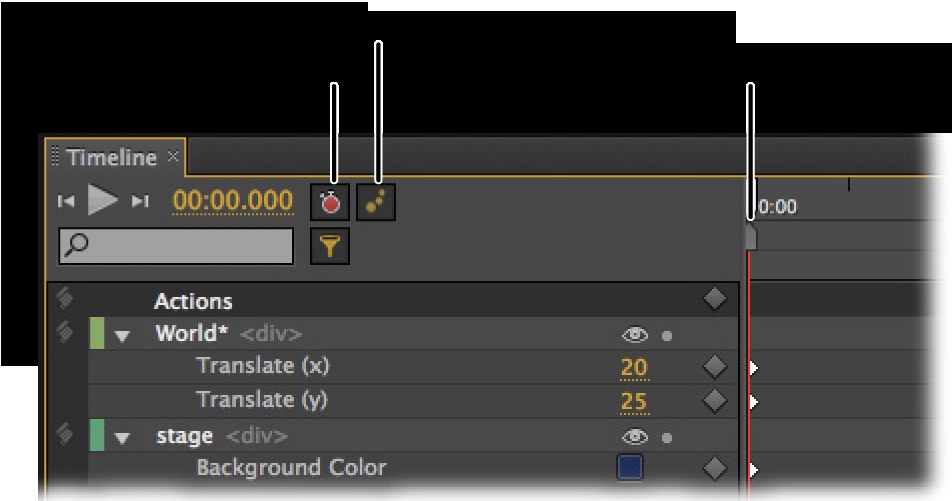
In the Timeline, make sure that the Auto-Keyframe Properties and the Generate Smooth Transitions buttons are pressed.
When the Auto-Keyframe Properties button (Figure 1-6) is pressed, keyframes are automatically created in the Timeline as you make changes to element properties. Keyframe markers look like diamonds. The Generate Smooth Transitions button does just what youâd expect. It gradually changes properties over time rather than making abrupt changes. Youâll learn all about keyframes and other Timeline features in Chapter 4.
Drag the World to the bottom of the stage so itâs completely hidden.
As you drag the World offstage, it disappears from view, but you still see the square selection marquee. As soon as you click elsewhere, the marquee disappears. Donât worry, the World is not lost. You can always select it again by clicking on World in the Elements window.
Notice that now, World is listed in the Timeline, along with Stage.
As soon as Edge records an elementâs property values, it adds that element to the Timeline, creates property layers, and adds diamond-shaped keyframes. In this case, when you reposition the World graphic, Edge takes note.
Edge automatically assigns a reference color to each element in your project. The color appears in the Timeline next to the name, and itâs also used to display transitionsâchanges in property values. You see the same color next to the names in the Elements window. This isnât a big deal when your project contains only a few elements, but when youâre dealing with dozens or hundreds of elements, the color coding comes in handy.
Figure 1-6. The Timeline keeps a running list of elements that appear on the stage. Not only that, it keeps track of their properties as they change. Here the Timeline lists the color of the stage and the position of the World graphic. Click the triangle next to the element names to expand and collapse the Properties lists.
Drag the top half of the playhead to 0:01 on the Timeline.
In the Timeline, 0:01 marks 1 second into the animation. A red line extends downward from the playhead, providing a marker for all the element and property layers.
In the Properties panel, click the diamond next to Location.
Two diamond-shaped keyframes appear in the Timeline marking the translate (X) and translate (Y) properties. The X and Y properties set the position of elements on the stage. Location properties are covered in detail on Rectangles: Building a Basic Box. By clicking the diamond next to Location in the Properties panel, you manually recorded the Worldâs location on the stage. As a result, the World will stay in the same X/Y position for the first second of the animation.
Drag the top half of the playhead to 0:03 on the Timeline.
In Edge, animation is a two-step process. Set the playhead to a position marking the time. Then arrange an elementâs location and adjust other properties the way you want them at that point in time.
Drag the World graphic so that earth is visible on the stage.
You can center the image on the stage, or you can choose some other eye-pleasing layout.
Press the Home key and then press the space bar.
When you press Home, the playhead returns to 0:00. Pressing the space bar plays your animation so you can preview the action on the stage.
Move the playhead back to 0:00, and then in the toolbar, click the letter T.
The text tool is selected, and the cursor changes to a cross.
Click on the stage and type Hello World.
The words âHello Worldâ appear on the stage, but theyâre probably not positioned or formatted as you want.
In the Properties window, set the name for the text to HelloWorld.
Naming your text makes it easier to identify in the Timeline and the Elements panel. Edge doesnât permit space in names, so you need to use HelloWorld or Hello_World.
Using the Properties window, format the text.
Change the text color to white or a very light blue. Choose Arial Black or another bold font. Adjust the size so it nearly fills the screen (72 px works well with Arial Black). Edge notes each change to the text in the Timeline, adding property layers and creating keyframes.
Position the text.
If youâre not sure about the placement, try it centered horizontally and about a third of the way down the stage.
With the playhead still at 0:00, set the opacity to 0.
This means the text will not be visible at the beginning of the animation.
Drag the top half of the playhead to 0:02. With the text selected, click the diamond next to Opacity in the Properties panel.
As you drag the playhead, you see the world.png move on the stage. Filmmakers and animators refer to dragging the playhead as scrubbing, a quick and easy way to review a segment of your animation. Clicking the Opacity diamond creates a keyframe at the 2-second mark where the text is still invisible.
Drag the playhead to the 0:03 mark, and then create another keyframe with the opacity set to 100.
Edge creates a transition, so that the text gradually changes from 0 to 100 percent opacity between 0:02 and 0:03 in your animation. In this case, you donât have to click the Opacity keyframe diamond to create a keyframe. When the Auto-Keyframe Properties button is set (Figure 1-6), Edge automatically creates keyframes when you change a property value. In steps 12 and 22, you manually added keyframes to make sure the properties didnât change over a period of time.
Drag the playhead to 0:04, and then set the opacity back to 0.
The text disappears again.
Press Ctrl+S (â-S) to save your work.
As explained earlier, Edge saves your animation as a collection of HTML, CSS, and JavaScript files. The main HTML file uses the name you provided in step 2, when you first saved your project. So, for example, you may see Hello_World.html in the project folder. When you imported the planet_earth.png image, Edge created an images folder and placed a copy of the graphic in the folder.
Your simple animation is complete. You can preview it in Edge by pressing Home and then the space bar. The earth rises into view, and your message fades in and then fades out (Figure 1-7). The entire animation takes 4 seconds.

Figure 1-7. You can watch your entire animation inside of Edge by pressing Home and then the space bar. You can preview the animation in your web browser by choosing FileâPreview In Browser.
Your audience wonât be viewing your animation in Edge; theyâll be watching it in the familiar comfort of their favorite web browser. That means you need to review your work in a browserâpreferably more than one browser. For a quick look, choose FileâPreview In Browser. Edge starts your browser, if it isnât already running, and opens the HTML file that was created when you saved your project. That single HTML file describes the web page for your audience. All they have to do is load the page in a browser. The HTML code is actually the hub for all the other files the animation needs. It references the planet_earth.png image, which is stored as a separate file in the images folder. It also references the CSS (Cascading Style Sheet) that formats and positions elements and the multiple JavaScript files needed to make everything run.
In animation, timing is everything. You may not be entirely pleased with the pace or other aspects of your Hello World experiment. In the coming chapters, youâll learn all about fine-tuning elements on the page so they look just right.
Hereâs a quick list of some important points to remember from this chapter:
Edge creates multiple files and folders, so itâs best to keep each project in a folder all its own.
You can create and save a custom workspace that suits your work habits and your equipment.
When you import a photo or graphic file, Edge creates a copy and stores that in the Images folder.
Select an element on the stage or in the Elements panel and you see its properties listed in the Properties panel.
To change the location or appearance of an element, select it and then change its properties. For example, change the location properties to move an element. Change the color or opacity properties to change its appearance.
In the Timeline, keyframes record an elementâs properties at a given point in time.
Animation occurs when properties change over time. These changes are marked by keyframes in the timeline.
Transitions can be smooth (gradually changing over time) or abrupt.
Handy keyboard shortcuts to remember: Home moves the playhead to the beginning of the timeline. Space plays the animation in Edge. Ctrl+Enter (â-Return) plays the animation in your web browser.
Get Adobe Edge Preview 3: The Missing Manual now with the O’Reilly learning platform.
O’Reilly members experience books, live events, courses curated by job role, and more from O’Reilly and nearly 200 top publishers.

