The tools in the Quick Fix window are pretty simple to use. You can try one or all of them—it's up to you. And whenever you're happy with how your photo looks, you can leave Quick Fix and go back to the Full Edit window or the Organizer.
If you want to rotate your photo, you can do so here by clicking the appropriate Rotate button, below the image preview area. (See Straightening Individual Photos for more about rotating photos.) These Rotate buttons only appear when you actually have a photo open in Quick Fix.
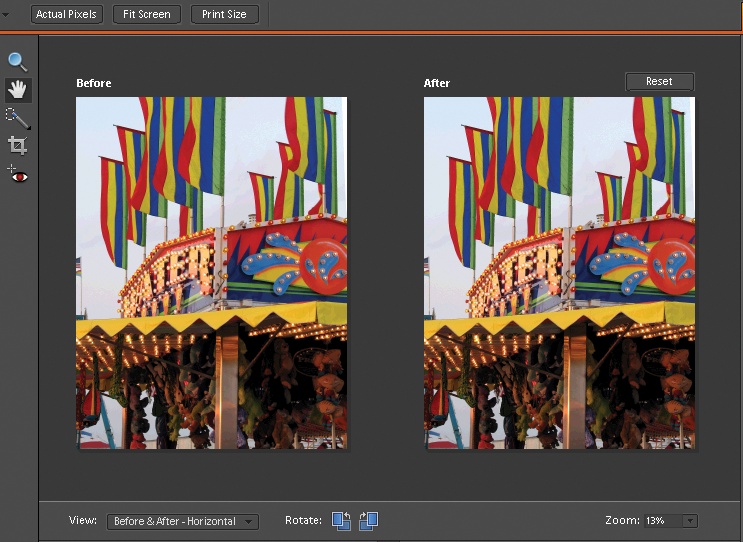
Figure 4-3. The Before and After view in the Quick Fix window makes it easy to see how you're changing your photo. Here you see Before and After—Horizontal, which displays the views side by side. To see them one above the other, choose Before and After—Vertical. If you want a more detailed view, use the Zoom tool (the magnifying glass icon) to focus on just a portion of your picture.
Note
If you click the Quick Fix Reset button, just above your image, you'll return your photo to the way it looked before you started working in Quick Fix. This button undoes all Quick Fix edits, so don't use it if you want to undo a single action only. For that, just use the regular undo command: Edit → Undo or Ctrl+Z.
Everyone who's ever taken a flash photo has run into the dreaded problem of red eye—those glowing, demonic pupils that make your little cherub look like someone out of an Anne Rice novel. Red eye is even more of a problem with digital cameras than with film, but luckily, Elements has a simple and terrific Red Eye tool for fixing it. All you need to do is click the red spots with the Red Eye tool, and your problems are solved.
To use the Quick Fix Red Eye tool:
Open a photo.
The Red Eye tool works the same whether you get to it from the Quick Fix Toolbox or the main Toolbox in Full Edit.
Zoom in so you can see where you're clicking.
Use the Zoom tool to magnify the eyes. You can also switch to the Hand tool if you need to drag the photo so that the eyes are front and center.
Activate the Red Eye tool.
Click the Red Eye icon in the Toolbox or press Y.
Click in the red part of the pupil with the Red Eye tool (see Figure 4-4).
That's it. Just one click should fix it. If a single click doesn't fix the problem, you can also try dragging the Red Eye tool over the pupil. Sometimes one method works better than the other. You can also adjust two settings on the Red Eye tool: Darken Amount and Pupil Size, as explained later.
Click in the other eye.
Repeat the process on the other eye, and you're done.
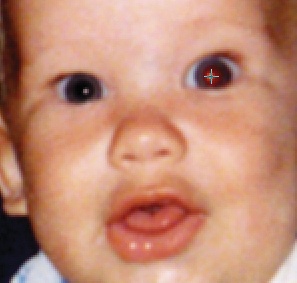
Figure 4-4. Zoom in when using the Red Eye tool so you get a good look at the pupils. The eye on the left side of the picture has already been fixed. Don't worry if your photo looks so magnified that it loses definition—just make the red area large enough for a bull's-eye. Notice what a good job the Red Eye tool does of keeping the highlights (called catchlights) in the eye that's been treated.
Note
You can also apply the Organizer's Auto Red Eye Fix in either the Quick Fix or Full Edit window. In the Quick Fix window, look for the Auto button in the Red Eye area of the Control Panel. In either Quick Fix or Full Edit, you can also activate the Red Eye tool and click the Auto button in the Options bar. The only tradeoff to using the Auto Red Eye Fix in the Full Edit window is you don't automatically get a version set (as you do when using the tool from within the Organizer). But you can create a version set when you save your changes, as explained on Searching by Metadata.
If you need to adjust how the Red Eye tool works, the Options bar gives you two controls, although 99 percent of the time you can ignore them:
Darken Amount. If the result is too light, increase the percentage in this box.
Pupil Size. Increase or decrease the number here to tell Elements how much area to consider part of a pupil.
Note
In Elements 6, you can also fix red eye right in the RAW converter (Saving your settings), if you wish.
The secret weapon in the Quick Fix window is the Smart Fix command, which automatically adjusts a picture's lighting, color, and contrast, all with one click. You don't have to figure anything out. Elements does it all for you.
You'll find the Smart Fix in the General Fixes palette, and it's about as easy to use as hitting the speed dial button on your phone: Click the Auto Smart Fix button, and if the stars are aligned, your picture will immediately look better. (Figure 4-5 gives you a glimpse of its capabilities. If you want to see for yourself how this fix works, download this photo—finch.jpg—from the "Missing CD" page at www.missingmanuals.com.)
Note
You'll find Auto buttons scattered throughout Elements. The program uses them to make a best-guess attempt to implement whatever change the Auto button is next to (Smart Fix, Levels, Contrast, and so on). It never hurts to at least try clicking these Auto buttons; if you don't like what you see, you can always perform the magical undo: Edit → Undo or Ctrl+Z.
If you're happy with the Auto Smart Fix button's changes, you can move onto a new photo, or try sharpening your photo a little (see Sharpening) if the focus appears a little fuzzy. You don't need to do anything to accept the Smart Fix changes. But if you're not ecstatic with your results, take a good look at your picture. If you like what Auto Smart Fix has done, but the effect is too strong or too weak, press Ctrl+Z to undo it, and try playing with the Smart Fix Amount slider instead.
The Amount slider does the same thing Auto Smart Fix does, only you control the degree of change. Watch the image as you move the slider to the right. If your computer is slow, there's a certain amount of lag time, so go slowly to give it a chance to catch up. If you happen to overdo it, sometimes it's easier to press the Reset button above your image and start again. Use the checkmark and the cancel button (which appears next to the General Fixes label, as shown in Figure 4-6) to accept or reject your changes.
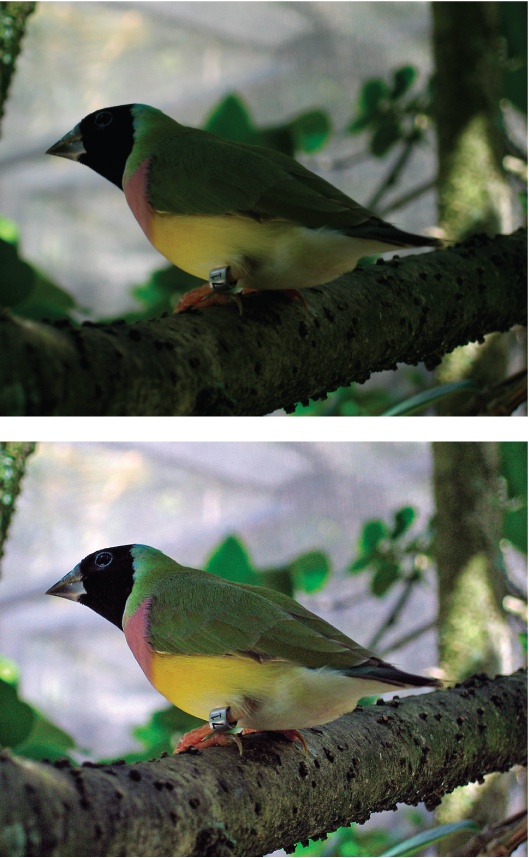
Figure 4-5. Top: This photo is so dark you may think it's beyond help. Bottom: The Auto Smart Fix button improved it significantly with just one click. (A click of the Auto Sharpening button, explained later in "Sharpening" (Sharpening), was added to make it look really spiffy.)
Tip
Usually you get better results with a lot of little nudges to the Smart Fix slider than with one big sweeping movement.
Incidentally, these are the same Smart Fix commands you see in two places in the Editor's Enhance Menu: Enhance → Auto Smart Fix (Alt+Ctrl+M), and Enhance →Adjust Smart Fix (Ctrl+Shift+M).
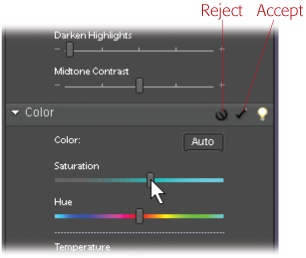
Figure 4-6. When you move a slider in any of the Quick Fix palettes, the Cancel and Accept buttons appear in the palette you're using. Clicking the cancel symbol undoes the last change you made, while clicking the accept symbol applies the change to your image. If you make multiple slider adjustments, the cancel symbol undoes everything you've done since you clicked Accept. (The little light bulb takes you to the Elements Help Center.)
Sometimes Smart Fix just isn't smart enough to do everything you want, and sometimes it does things you don't want. Smart Fix is better with photos that are underexposed than overexposed, for one thing. Fortunately, you still have several other editing choices, covered in the following sections. If you don't like the effect Smart Fix has had, undo it before going on to make other changes.
Note
Auto Smart Fix is one of the commands you can apply from within the Organizer, so there's no need to launch the Editor at all if you want just this tool. Simply click your photo and press Ctrl+Alt+M, or right-click your picture and choose Auto Smart Fix from the pop-up menu. You can also get to the Auto Smart Fix command via the Organizer's Fix pane or the Edit menu.
The Lighting palette lets you make very sophisticated adjustments to the brightness and contrast of your photo. Sometimes problems that you thought stemmed from exposure or even focus may be fixed by these commands.
If you want to understand how Levels really works, you're in for a long technical ride. On the other hand, if you just want to know what it can do for your photos, the short answer is that it adjusts the brightness of your photo by redistributing the color information; Levels changes (and hopefully fixes!) both brightness and color at the same time.
If you've never used any photo-editing software before, this may sound rather mysterious, but photo-editing pros will tell you that Levels is one of the most powerful commands for fixing and polishing your pictures. To find out if its magic works for you, click the Auto Levels button. Figure 4-7 shows what a big difference it can make. Download this photo (squirrel.jpg) from the "Missing CD" page at www.missingmanuals.com, if you'd like to try this out yourself.
What Levels does is very complex. Chapter 7 contains loads more details about what's going on behind the scenes and how you can apply this command much more precisely.
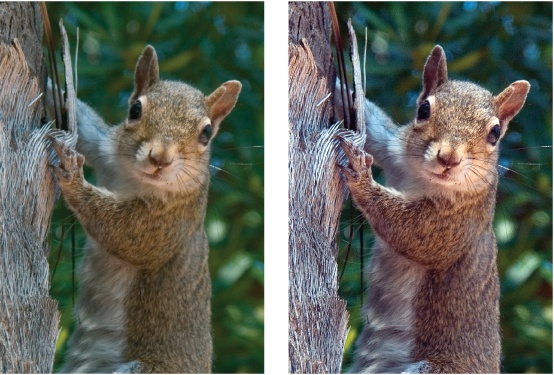
Figure 4-7. A quick click of the Auto Levels button can make a very dramatic difference. Left: The original photo of the squirrel isn't bad, and you may not realize how much better the colors could be. Right: This image shows how much more effective your photo is once Auto Levels has balanced the colors.
The main alternative to Auto Levels in Quick Fix is Auto Contrast. Most people find that their images tend to benefit from one or the other of these options. Contrast adjusts the relative darkness and lightness of your image without changing the color, so if Levels made your colors go all goofy, try adjusting the contrast instead. You activate Contrast the same way you do the Levels tool: just click the Auto button next to its name.
Note
After you use Auto Contrast, look closely at the edges of the objects in your photo. If your camera's contrast was already high, you may see a halo or a sharp line around the photo's subject. If you see that line or halo, the contrast is too high and you need to undo Auto Contrast (Ctrl+Z) and try another fix instead.
The Shadows and Highlights tools do an amazing job of bringing out the details that are lost in the shadows or bright areas of your photo. Figure 4-8 shows what a difference these tools can make.

Figure 4-8. Top: This photo shows a classic vacation picture problem: The day is bright, the scenery's beautiful, but everyone's faces are hidden in the dark shadows cast by their hats. Bottom: The Shadows and Highlights tools brought back everyone's faces, but now they look a tad orange. Use the color sliders to make them look healthy again.
The Shadows and Highlights tools are a collection of three sliders, each of which controls a different aspect of your image:
Lighten Shadows. Nudge the slider to the right and you'll see details emerge from murky black shadows.
Darken Highlights. Use this slider to dim the brightness of overexposed areas.
Midtone Contrast. After you've adjusted your photo's shadows and highlights, your photo may look very flat and not have enough contrast between the dark and light areas. This slider helps you bring a more realistic look back to your photo.
Tip
You may think you need only lighten shadows in a photo, but sometimes just a smidgen of Darken Highlights may help, too. Don't be afraid to experiment by using this slider even if you've got a relatively dark photo.
Go easy. Getting overenthusiastic with these sliders can give your photos a very washed-out, flat look.
The Color palette lets you—surprise, surprise—play around with the colors in your image. In many cases, if you've been successful with Auto Levels or Auto Contrast, you won't need to do anything here.
Once again, there's another one-click fix available: Auto Color. Actually, in some ways Auto Color should be up in the Lighting section. Like Levels, it simultaneously adjusts color and brightness, but it looks at different information in your photos to decide what to do with them.
When you're first learning to use Quick Fix, you may want to try all three—Levels, Contrast, and Auto Color—to see which generally works best for your photos. Undo between each change and compare your results. Most people find they like one of the three most of the time.
Auto Color may be just the ticket for your photos, but you may also find that it shifts your colors in strange ways. Give it a click and see what you think. Does your photo look better or worse? If it's worse, just click Reset or Ctrl+Z to undo it, and go back to Auto Levels or Auto Contrast. If they all make your colors look a little wrong, or if you want to tweak the colors in your photo, move on to the Color sliders, explained in the next section.
If you want to adjust the colors in your photo without changing the brightness, check out the Color sliders. For example, your digital camera may produce colors that don't quite match what you saw when you took the picture; or you may have scanned an old print that's faded or discolored; or you may just want to change the colors in a photo for the heck of it. If so, the sliders below the Auto Color button are for you.
You get four ways to adjust your colors here:
Saturation controls the intensity of your photo's color. For example, you can turn a color photo to black and white by moving the slider all the way to the left. Move it too far to the right and everything glows with so much color that it looks radioactive.
Hue changes the color from, say, red to blue or green. If you aren't looking for realism, you can have some fun with your photos by really pushing this slider to create funky color changes.
Temperature lets you adjust color from cool (bluish) on the left to warm (orangeish) on the right. Use Temperature for things like toning down the warm glow you see in photos taken in tungsten lighting, or just for fine-tuning your color balance.
Tint adjusts the green/magenta balance of your photo, as shown in Figure 4-9.
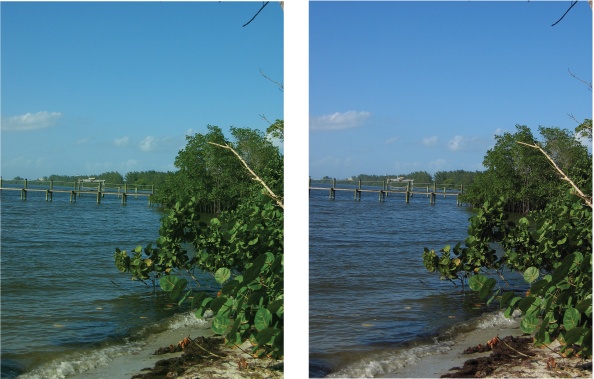
Figure 4-9. Left: The greenish tint in this photo is a drastic example of a very common problem caused by many digital cameras. Right: A little adjustment of the Tint slider clears it up in a jiffy. It's not always as obvious as it is here that you need a tint adjustment. If you aren't sure, the sky is often a dead giveaway. Is it robin's egg blue? If the photo's sky is that color and the real sky was just plain blue, tint is what you need.
You probably won't use all these sliders on a single photo, but you can use as many of them as you like. Remember to click the Accept checkmark that appears in the Color palette if you want to accept your changes. Chapter 7 has much more information about how to use the full-blown Editor to really fine-tune your image's color.
Now that you've finished your other corrections, it's time to sharpen your photo. Sharpening gives the effect of better focus by improving the edge contrast in your photo. Most digital camera photos need some sharpening because the sharpening your camera applies is usually deliberately conservative. Once again, a Quick Fix Auto button is at your service. Give the Auto Sharpen button (located in the Sharpen palette) a try to get things started. Figure 4-10 shows what you can expect.
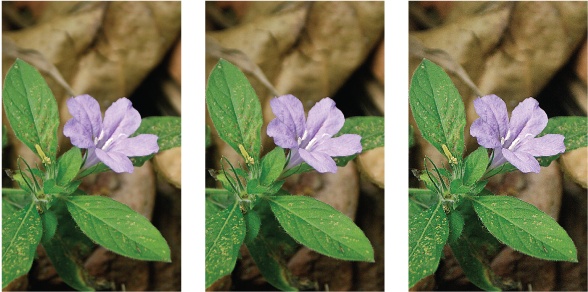
Figure 4-10. Left: The original image. Like most digital photos, it could stand a little sharpening. Middle: What you get by clicking the Auto Sharpen button. Right: The results of using the Sharpen slider to achieve stronger sharpening than Auto was initially willing to perform.
The sad truth is that there really isn't any way to actually improve the focus of a photo once it's taken. Software sharpening just increases the contrast where the program perceives edges, so using it first can have strange effects on other editing tools and their ability to understand your photo.
If you don't like what Auto Sharpening does (you very well may not), you can undo it (press Ctrl+Z) and try the slider. If you thought the Auto button overdid things, go very gently with the slider. Changes vary from photo to photo, but usually Auto's results fall at around the 30 to 40 percent mark on the slider.
Note
If you see funny halos around the outlines of objects in your photos, or strange flaky spots (making your photo look like it has eczema), those are artifacts from too much sharpening.
Always try to view Actual Pixels (View → Actual Pixels) whenever you sharpen because that gives you the clearest idea of what you're actually doing to your picture. If you don't like what the button does, undo it, and then try the slider. Zero sharpening is all the way to the left. Moving to the right increases the amount of sharpening applied to your photo.
As a general rule, you want to sharpen more for photos you plan to print than for images for Web use. You can read lots more about sharpening on Saving colors in the Swatches palette.
Note
If you've used photo-editing programs before, you may be interested to know that the Auto Sharpen button applies SmartSharpening (Adjust Sharpness) to your photo. The difference is that you don't have any control over the settings, as you would if you applied the mask from the Filters menu. But the good news is that if you want it, you can get this control—even from within Quick Fix. Just go to the Enhance Menu and choose Unsharp Mask, or, for even more control, check out the Adjust Sharpness command just below it (Saving colors in the Swatches palette).
At this point, all that's left is cropping your photo, if you'd like to reduce its size. Cropping Pictures tells you everything you need to know about cropping.
There are no hard-and-fast rules for what order you need to work in when using the Quick Fix tools. As mentioned earlier, Elements lays out the tools in the Control Panel, from top to bottom, in the order that usually makes sense. But you can pick and choose which tools you want, depending on what you think your photo needs. But if you're the type of person who likes a set plan for fixing photos, here's one order in which to apply the commands:
Rotate your photo (if needed).
Use the buttons below the image preview.
Fix red eye (if needed).
See Fixing Red Eye.
Crop.
If you know you want to crop your photo, now's the time. That way, you get rid of any problem areas before they affect other adjustments. For example, say your photo has a lot of overexposed sky that you want to crop out. If you leave it in, that area may skew the effects of the Lighting and Color tools on your image. So if you already know where you want to crop, do it before making other adjustments for more accurate results.
Try Auto Smart Fix and/or the Smart Fix slider. Undo if necessary.
Pretty soon you'll get a good idea of how likely it is that this fix will do a good job on your photos. Some people love it; others think it makes their pictures too grainy.
If Smart Fix wasn't smart enough, work your way down through the other Lighting and Color commands until you like the way your photo looks.
Read the sections earlier in this chapter to understand what each command does to your photo.
Sharpen.
Try to perform sharpening as your last adjustment because other commands can give you funky results on photos that have already been sharpened.
Get Photoshop Elements 6: The Missing Manual now with the O’Reilly learning platform.
O’Reilly members experience books, live events, courses curated by job role, and more from O’Reilly and nearly 200 top publishers.

