Layers come in many flavors, all of which have their own special purpose:
Image layers. These layers are pixel-based (see The Open Dialog Box)—in fact, Photoshop also calls ’em pixel layers—and you’ll work with them all the time. If you open a photo or add a new, empty layer and paint on it (Chapter 13), you’ve got yourself an Image layer.
Fill layers. When it comes to changing or adding color to an image, these layers are your best friends. They let you fill a layer with a solid color, gradient, or pattern, which comes in handy when you want to create new backgrounds or fill a selection with color. Just like Shape layers (which are explained in a sec), you can double-click a Fill layer’s thumbnail to change its color anytime. The next time you’re tempted to add an empty layer and fill it with color (Copying and Pasting Layers), try using one of these layers instead.
Adjustment layers. These ever-so-useful layers let you apply changes to one or all the layers underneath them, though the changes actually happen on the Adjustment layer. For example, if you want to change a color image to black and white, you can use a Black & White Adjustment layer (Black & White Adjustment Layers) and the color removal happens on its own layer, leaving the original unharmed. These layers don’t contain any pixels, just instructions that tell Photoshop what changes you want to make (which is why you can’t use any of the program’s painting tools on them). Adjustment layers are also handy for creating reusable effects; to apply the same effect to another image, just drag the Adjustment layer from one document to the other.
You can access these handy helpers in the Adjustments panel on the right side of the Photoshop window (if you don’t see it, choose Window→Adjustments), via the Adjustment layer menu at the bottom of the Layers panel (its icon is a half-black/half-white circle), or in the Layer menu (choose Layer→New Adjustment layer). There are 16 kinds of Adjustment layers, and you’ll learn how to use ’em in Part Two of this book.
Smart Objects. Adobe refers to this kind of layer as a container, though “safe layer” is a better description. You can put anything you want into a Smart Object—pixel-based images, raw images (Working with Raw Files), vector files (The Open Dialog Box), other layers, or even whole Photoshop documents—and Photoshop keeps that content safe by making changes to the container instead of the content. This lets you resize the contents of a Smart Object without trashing its quality (as long as you don’t exceed the file’s original pixel dimensions, unless it’s a vector), swap content with another image, run filters non-destructively, and much more. Flip to Using Smart Objects for more info.
Shape layers. These layers are vector-based, meaning they’re made from points and paths, not pixels (see The Open Dialog Box). Not only can you create useful shapes quickly with these babies, but you can also resize ’em without losing quality and change their fill color by double-clicking their layer thumbnails or using the Fill and Stroke settings in the Options bar. Photoshop creates a Shape layer automatically anytime you use a shape tool, unless you change the tool’s mode as explained on Drawing Multiple Shapes on One Layer.
Type layers. In Photoshop, text isn’t made from pixels, so it gets its own special kind of layer. Any time you grab the Type tool and start pecking away, Photoshop automatically creates a Type layer. See Chapter 15 for the full story on creating text in Photoshop.
Video layers. Want to edit video in Photoshop? No problem. These layers give you the ability to import, trim, and split video clips, as well as add transitions, motion, and even audio tracks to a document. (Prior to CS6, these options were available only in the now-deceased Extended version of the program.) You can use Photoshop to color-correct, apply filters, and layer styles to video as easily as other layers. You’ll learn all about editing videos in Chapter 21, where you’ll also pick up some practical project ideas.
3D layers. Previously found only in the Extended version of Photoshop, these layers let you create three-dimensional objects from scratch, make text that looks 3D, and import existing 3D files so you can add custom paint and other details to ’em. To get started using Photoshop’s 3D tools, head on over to Chapter 22.
No matter how many or what kind of layers your document contains, the one that’s most important to you at any given time is the active layer. You can tell which layer is active by peeking at the Layers panel, where Photoshop highlights it in blue, as shown in Figure 4-2. (To open the Layers panel, click its tab in the panel dock on the right side of your screen, or choose Window→Layers.) The next edit you make will affect only that layer.
About the easiest thing you’ll ever do in Photoshop is activate a layer—just mouse over to the Layers panel and click the layer you want to work on. However, just because this process is easy doesn’t mean it’s unimportant. As you learned in the last section, most of Photoshop’s tools and commands affect only the currently active layer (save for things like cropping or changing your document’s color mode).
![In the Layers panel, Photoshop highlights the currently active layer in blue, as shown here (the exact color of blue depends on the color theme you’re using [page 6]).Each layer has its own little preview of what the layer contains, called a layer thumbnail (circled). To make layer thumbnails bigger so they’re easier to see, open the panel menu labeled here and then choose Panel Options. The resulting dialog box includes a list of thumbnail sizes to choose from. Alternatively, you can Control-click (right-click) the layer thumbnail and choose a size from the resulting shortcut menu.If you’re trying to use a tool and Photoshop doesn’t seem to be responding, take a peek at the Layers panel and make sure you’ve got the right layer activated. Nine times out of ten, you’ll find that you don’t!](/api/v2/epubs/9781449342401/files/httpatomoreillycomsourceoreillyimages2073251.png.jpg)
Figure 4-2. In the Layers panel, Photoshop highlights the currently active layer in blue, as shown here (the exact color of blue depends on the color theme you’re using [page 6]). Each layer has its own little preview of what the layer contains, called a layer thumbnail (circled). To make layer thumbnails bigger so they’re easier to see, open the panel menu labeled here and then choose Panel Options. The resulting dialog box includes a list of thumbnail sizes to choose from. Alternatively, you can Control-click (right-click) the layer thumbnail and choose a size from the resulting shortcut menu. If you’re trying to use a tool and Photoshop doesn’t seem to be responding, take a peek at the Layers panel and make sure you’ve got the right layer activated. Nine times out of ten, you’ll find that you don’t!
As your document gets more complex and your Layers panel starts to grow (and it will), it can be hard to figure out which layer each part of the image lives on. If you want, you can make Photoshop guess which layer an object is on: Press V to activate the Move tool, head up to the Options bar at the top of your screen, turn on the Auto-Select checkbox, and then choose Layer from the drop-down menu to its right. After that, when you click an object in the document, Photoshop activates the layer it thinks that object is on (it’ll do this next time you use the Move tool, too, unless you turn off the Auto-Select checkbox). The program may or may not guess right, and it really works only if your layers don’t completely cover each other up. If you’ve got a document full of isolated objects—ones without backgrounds—on different layers, give this feature a shot. But if you’re working on a multilayered collage, forget it. For that reason, you’ll probably want to leave Auto-Select turned off.
Tip
You can have Photoshop narrow down your layer-hunting options by prodding it to give you a list of layers it thinks an object is on. Press V to grab the Move tool, Control-click (right-click) an object in your document, and then choose one of the layers from the resulting shortcut menu. This trick only works if the layer’s visibility eye is turned on and you click an area that’s more than 10 percent opaque (the requirement was 50 percent in older versions of the program).
You’d be surprised how often you need to do the same thing to more than one layer. If you want to rearrange a few of them in your layer stack (Restacking Layers), move ’em around in your document together (Moving and Aligning Layers), or resize them simultaneously (Resizing and Rotating Layers), you need to activate ’em first. Photoshop lets you activate as few or as many as you want, though how you go about it depends on where they live in the Layers panel:
All layers. To activate the whole kit and caboodle, choose Select→All Layers. Choose Deselect→All Layers to (you guessed it) deactivate everything. Keyboard shortcut: Option-⌘-A (Alt+Ctrl+A). (Note that, on PCs, this command activates all layers except a locked Background layer.)
Consecutive layers. To activate layers that are next to each other in the Layers panel, click the first one and then Shift-click the last one; Photoshop automatically activates everything in between (see Figure 4-3, left).
Nonconsecutive layers. To activate layers that aren’t next to each other, click near the first one’s name and then ⌘-click (Ctrl-click on a PC) the rest of them (see Figure 4-3, right).
Linked layers. If you’ve linked any layers together (Linking Layers), you can activate them all by choosing Layer→Select Linked Layers. This command also lives in the Layers panel’s menu—the one in its upper right—as well as the shortcut menu you get by Control-clicking (right-clicking) to the right of the layer thumbnail.
Note
Activating a layer is completely different from loading a layer’s contents as a selection. When you load a layer as a selection, you see marching ants running around whatever is on that layer. Activating a layer simply makes that layer active so you can perform other edits. See Chapter 5 for more on creating selections.
If your list of layers is really long, you’ll have to scroll through the Layers panel to find the ones you want to activate. However, you can make Photoshop hide layers based on conditions you specify using the row of filtering controls at the top of the Layers panel (labeled in Figure 4-4, top). You tell Photoshop which layers you want to view, and it temporarily hides the rest in the Layers panel (though the content of those layers is still visible in your document).
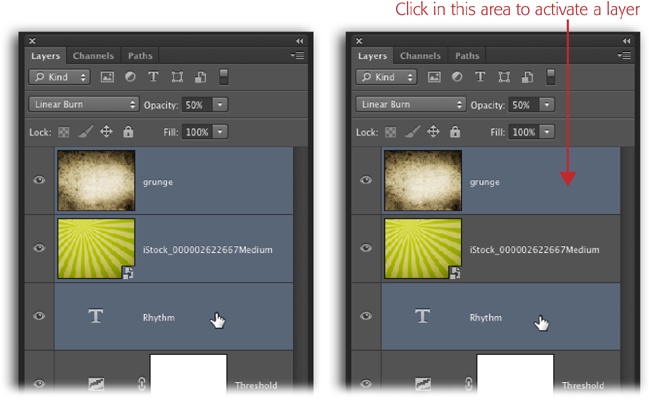
Figure 4-3. You can activate consecutive layers (left) or nonconsecutive layers (right). To avoid loading a layer as a selection (page 136) when you’re activating nonconsecutive layers, make sure you ⌘-click (Ctrl-click) the area to the right of the layer thumbnail (near the layer’s name), as shown here.
To filter layers, pick an option from the drop-down menu in the upper left of the Layers panel, and then use the controls to the menu’s right to refine your search. Here are your options:
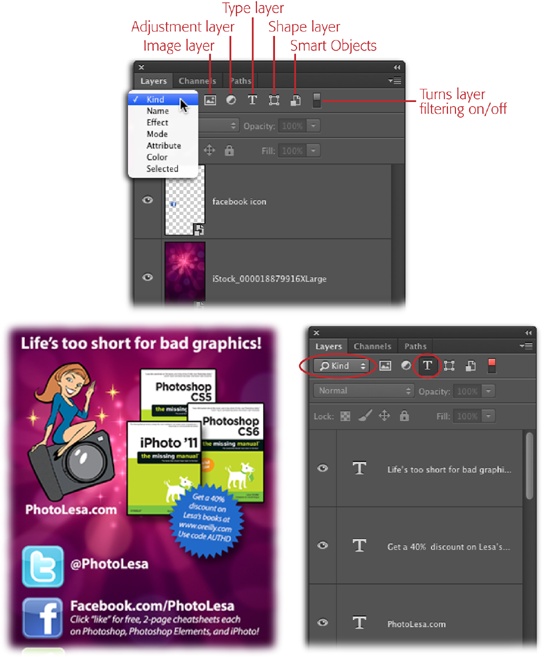
Kind. This is what the drop-down menu is set to unless you change it. This option lets you tell Photoshop what type of layers you want to see. Use the buttons to this menu’s right to have Photoshop display only the Image, Adjustment, Type, or Shape layers, or Smart Objects. For example, to see only the Type layers—so you can activate ’em all and change their fonts, say—make sure the drop-down menu is set to Kind (it should be unless you’ve changed it) and then click the T button to its right, and Photoshop hides all the layers in the Layers panel except the Type layers (see Figure 4-4, bottom). You can also click more than one button to see more than one kind of layer—like the Type and Shape layers, say.
Name. If you’ve given your layers meaningful names, choose this option from the drop-down menu and a search field appears to the menu’s right. Enter some text (it’s not case-sensitive) and Photoshop displays only the layers whose names include what you entered. You don’t need to press Return/Enter—Photoshop begins filtering layers as soon as you start typing.
Tip
When you choose Select→Find Layers or press Shift-Option-⌘-F (Shift+Alt+Ctrl+F), Photoshop automatically sets the filtering drop-down menu to Name and plops a cursor into the text field to its right so you can start typing.
Figure 4-4. Top: If your image has more than one layer, you can use Photoshop’s layer-filtering feature to view layers that match specific conditions that you set. The switch on the right turns layer filtering off and on (it’s gray when turned off or when it’s on and you haven’t set any criteria). Bottom: Layer filtering is extremely helpful when you’ve got a gazillion of layers (like the document shown at left) and you need to find, say, all the Type layers. Once you’ve filtered them in the Layers panel, activating them is a snap: Just choose Select→All Layers and Photoshop highlights ’em all, as shown here. (The little switch on the right turns red when you have layer filtering turned on and you’ve set a filtering criteria.)
Effect. This option lets you filter layers based on layer styles (Layer Styles). For example, to see all the layers that have a drop shadow, choose this option and then choose Drop Shadow from the drop-down menu that appears to this menu’s right.
Mode. To filter layers based on their blend modes (Layer Blend Modes), pick this option and then choose the blend mode you’re after from the drop-down menu that appears on the right.
Attribute. When you pick this option, a drop-down menu appears that lets you filter layers based on whether or not they’re visible, empty, locked or linked to other layers (Linking Layers), clipped to other layers (Using Smart Objects), include a pixel- or vector-based layer mask (Adding Layer Masks), include effects (think layer styles [Layer Styles]), or use advanced blending options (Layer Blending).
Color. If you’ve color-coded your layers (Managing Layers), you can use this option to view layers labeled with a certain color. For example, if you applied a red label to all the layers you used to fix skin imperfections in a portrait, choose this option and then pick Red from the drop-down menu that appears to its right and Photoshop displays only those layers.
Selected. New in Photoshop CC, this option lets you see only the layers that are currently active (see The Layers Panel for more on activating layers); Adobe calls this maneuver isolating layers. This is handy when your Layers panel is long and you’re experimenting with size, placement, or effects of certain layers that don’t necessarily match any of the criteria listed above, or when you’re editing certain Shape layers in a document that contains several.
Once you’ve isolated the active layers, you can deactivate ’em selectively—thus removing that particular layer from your current Layers panel list—by Control-clicking (right-clicking) the layer and choosing “Release from Isolation” from the resulting shortcut menu. If you add a new layer while Selected layer filtering is turned on, Photoshop adds it to the Layers panel’s list (because new layers are active when you make ’em). To see all your layers again, choose Select→Isolate Layers or click the switch labeled in Figure 4-4 (top).
Tip
If you’ve used one of Photoshop’s shape tools to create a Shape layer, you can isolate that layer by double-clicking its gray outline with the Path Selection or Direct Selection tool. When you do, you see only that layer in the Layers panel. However, if you double-click a path that doesn’t live on a layer—you drew the path using the Pen tool or a shape tool in Path drawing mode (Drawing Paths with the Pen Tool), say—layer filtering is indeed turned on, but nothing is isolated in your Layers panel.
After you’ve filtered the layers so that only the ones you’re interested in are visible, you can quickly activate all the visible ones—save for a locked Background layer—by choosing Select→All Layers. You can work with filtered layers just like any other layers: Delete ’em, change their stacking order, and so on. Your filter remains in effect until you turn it off or close the document (Photoshop doesn’t save your layer filter settings when you save the document).
When you’re ready to see all the layers again, Option-click (Alt-click on a PC) the little red switch near the top right of the Layers panel; it turns gray to let you know that filtering is turned off. Photoshop reveals all your layers and then sets the filtering controls to their factory settings so you can use ’em again. If you just click the switch, Photoshop still shows all your layers but it takes several more clicks to use layer filtering again: You have to click the switch again to turn filtering back on and then tweak the filtering options to reveal the layers you want. Yuck.
Note
None of Photoshop’s layer-filtering options currently work with actions (Chapter 19).
Most of the time, Photoshop creates new layers for you, like when you copy and paste an image (Copying and Pasting Layers), create text (Previewing Fonts), draw a shape (Drawing with the Shape Tools), and so on. But if you want to do something like paint with the Brush tool—to colorize a grayscale image (Adding Color), say—you need to create a new layer manually; otherwise, you’ll paint right on your original image. Photoshop gives you five ways to create a new layer:
Click the “Create a new layer” button at the bottom of the Layers panel (it looks like a piece of paper with a folded corner).
Choose Layer→New→Layer.
Choose New Layer from the Layers panel’s menu.
Press Shift-⌘-N (Shift+Ctrl+N).
Drag a file from your desktop, Bridge, or Mini Bridge (Chapter 23) into an open Photoshop document; the item you dragged appears on its own layer in the document—as a Smart Object to boot!
When you click the “Create a new layer” button, Photoshop creates an empty layer called Layer 1, though you can double-click this name in the Layers panel to change it. (If you already have a layer called Layer 1, Photoshop names the new one Layer 2, and so on.) If you use the menu options or keyboard shortcut instead, the program displays the New Layer dialog box (Figure 4-5), where you can name the layer, color-code it (Managing Layers), choose its blend mode (Layer Blend Modes), set its opacity, and use it in a clipping mask (see the box on Clipping Masks). Whichever method you use, Photoshop adds the new layer above the one that was active when you added it.
Tip
If your fingers are flexible enough, you can create a new layer and bypass the New Layer dialog box by pressing Shift-Option-⌘-N (Shift+Alt+Ctrl+N). This shortcut is handy if you want new layers and don’t care what they’re called.
To create a new layer below the one that’s currently active, ⌘-click (Ctrl-click) the “Create a new layer” button at the bottom of the Layers panel. (If the only layer in your document is the locked Background layer, you’ve got to double-click it or choose Layer→New→“Layer from Background” to unlock it before you can add a new layer below it.) This shortcut saves you the extra step of dragging the new layer to a lower position later; over the course of a year, this tip has been known to produce an entire vacation day!
The little visibility eye to the left of each layer thumbnail in the Layers panel lets you turn that layer off and on (Figure 4-5, bottom). Photoshop calls this incredibly useful feature hiding. Here are some examples of what hiding layers lets you do:
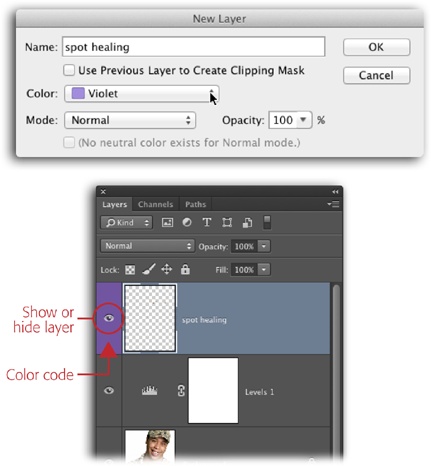
Figure 4-5. In the New Layer dialog box (top), you can give your new layer a name and a colored label. Color-coding layers makes them easier to spot in a long Layers panel (bottom), so it’s especially helpful to use on layers that you may need to return to for additional editing. In the Layers panel, you can double-click a layer’s name to rename it, and turn its visibility on or off by clicking the little eye icon to the left of its thumbnail. The new layer’s thumbnail shown here is a checkerboard pattern because the layer is empty and transparent. (See the box on page 37 for more on transparency.)
See an instant before-and-after preview. If you’ve spent some time color-correcting (Chapter 10) or retouching people (Chapter 11) on duplicate layers, hiding the layers you used to do that is an easy way to see the effect of your handiwork.
Experiment with different looks. If you’re trying out different backgrounds or background colors, you can add them all to your document, hide them, and then turn them on one at a time to see which one looks best.
See what you’re doing. When you’re working on a document that has a bunch of layers, some of them may hide an area you need to see or work on. The solution is to hide in-the-way layers while you’re working on those parts of the image and then turn ’em back on when you’re done. That said, in Photoshop CC, it’s faster to use layer filtering instead (Activating Multiple Layers).
Print certain layers. Only layers that are visible in your document will print, so if you want to print only parts of an image, hide the other layers first.
To hide a layer, simply click the little eye to the left of its layer thumbnail; to show it again, click the empty square where the eye was. To hide all layers except one, Option-click (Alt-click on a PC) the visibility eye of the layer you want to see; to display the other layers again, Option-click (Alt-click) that same layer’s visibility eye again. Alternatively, you can Control-click (right-click) a layer’s visibility eye (or, if the layer is hidden, the spot where the eye was) and then choose “Show/Hide this layer” or “Show/Hide all other layers” from the shortcut menu. You can also find the Show/Hide Layers command in the Layer menu.
Once you start adding layers, you can change their stacking order—the order they’re listed in the Layers panel—to control what’s visible and what’s not. When you think about stacking order, pretend you’re peering down at the Layers panel from above: The layer at the very top can hide any layers below it. For example, if you fill a layer with color (Copying and Pasting Layers) and then place it above another layer containing a photo, the color will completely cover the photo (just like a piece of bread hides all the sandwich ingredients beneath it). But if you’ve merely painted a swish or two with the Brush tool, your brushstrokes will cover only the part of the photo where the two overlap.
You can rearrange layers manually, or make Photoshop do it for you:
By dragging. Click a layer’s thumbnail and drag it up or down to change its position as shown in Figure 4-6. (Technically, you can click the layer anywhere to grab it, but targeting the thumbnail is a good habit to get into, lest Photoshop think you want to rename the layer instead.) When you get the layer in the right place, let go of the mouse button.
Figure 4-6. To rearrange layers, simply drag a layer’s thumbnail up or down. When you drag, your cursor turns into a tiny closed fist as shown here (left). As you drag, you see a ghost image of the layer you’re dragging, which is helpful visual feedback. When the dividing line between two layers changes so it looks more like a gap (left), let go of the mouse button to make the layer you dragged hop in between them (right).
Using the Arrange command. If you’ve got one or more layers activated, you can choose Layer→Arrange to move them somewhere else in the layer stack. Depending on the location of the layer(s) in the Layers panel, you can choose from these commands:
—Bring to Front moves the layer(s) all the way to the top of the layer stack. Keyboard shortcut: ⌘-Shift-] (Ctrl+Shift+] on a PC).
—Bring Forward moves the layer(s) up one level. Keyboard shortcut: ⌘-] (Ctrl+]).
—Send Backward sends the layer(s) down one level. Keyboard shortcut: ⌘-[ (Ctrl+[).
—Send to Back sends the layer(s) all the way to the bottom of the layer stack (or just above the Background layer, if you’ve got one). Keyboard shortcut: ⌘-Shift-[ (Ctrl+Shift+[).
—Reverse. If you’ve got two or more layers activated, this command inverts the stacking order of the active layers. You probably won’t use this command very often, but give it a try just for fun; it can produce some mildly interesting results. (There’s no keyboard shortcut for this command, but you can make one yourself if you use it a lot, as the box on Customizing Keyboard Shortcuts and Menus explains).

Note
If you’ve got a long Layers panel, these keyboard shortcuts can save you lots of time. And, as mentioned previously, these shortcuts are mission critical when creating actions (see Chapter 19).
The only layer you can’t move around is a locked Background layer. The Background layer isn’t really a layer, although it looks like one. It behaves a little differently from other layers, as the box below explains, so if you want to move it around it in the Layers panel, you first have to double-click its thumbnail and then rename it—or simply click OK—in the resulting New Layer dialog box. Once you do that, it becomes a normal, everyday layer that you can position wherever you want.
To really understand how layer stacking works, it helps to put theory into practice. Let’s say you want to make a photo look like one side of it fades to white and then add some text on top of the white part. To do that, you need to place the photo at the bottom of the layer stack, the white paint layer in the middle, and the text layer on top (see Figure 4-7).
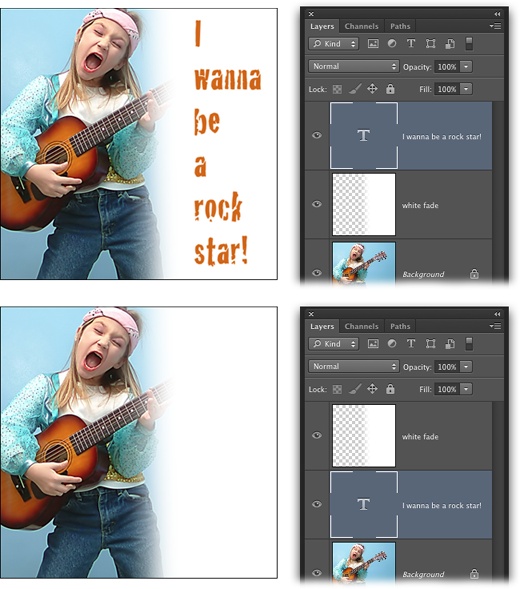
Figure 4-7. The stacking order of layers determines what you can and can’t see. Top: With the Type layer at the top of the stack, you can see the text because it’s sitting above everything else. And because the Gradient Fill layer is partially transparent (you can tell by the checkerboard pattern in its thumbnail), you can see through it to the photo at the bottom of the stack. By the way, this technique is great for ensuring that text remains readable atop a photo when creating postcards, invitations, and the like. Bottom: If you drag the Type layer below the Gradient Fill layer, you can’t see the text anymore because it’s hidden by the white paint.
Here’s a quick lesson in how to softly fade a photo to white and then add some text to it:
Open a soon-to-be-faded photo and set your foreground color chip to white.
Peek at the color chips at the bottom of the Tools panel (Foreground and Background Color Chips). If they’re black and white, just press X to flip-flop them until white hops on top. If the chips are other colors, press D first to reset them to black and white.
Create a Gradient Fill layer and pick the “Foreground to Transparent” gradient preset.
Click the half-black/half-white circle at the bottom of the Layers panel to open the Adjustment layer menu, and then choose Gradient. In the resulting Gradient Fill dialog box, click the down-pointing triangle next to the gradient preview to open the Preset picker. In the drop-down menu of gradient previews, click the second preset in the top row for a “Foreground to Transparent” gradient. Don’t close the dialog box just yet!
Set the gradient style to Linear, change the angle to 180 degrees, enter 10% for scale, and then click OK.
In the Gradient Fill dialog box, make sure the Style menu is set to Linear (it probably is unless you’ve changed it). Enter 180 in the Angle field so the color appears on the right side of your document. Next, enter 10 in the Scale field, and then click OK. The Scale field controls the size of the gradient, or rather the size of the faded area between the two colors you picked (white and transparency, in this example). The lower the number, the narrower the fade; the higher the number, the wider the fade. For more on gradients, see pages The Crop Tool and Building a Better Sunrise (or Sunset).
Press T to grab the Type tool and add some text.
You haven’t learned about the Type tool yet, but be brave and press T to activate it, and then hop up to the Options bar and pick a font and text size from the drop-down menus (see Chapter 15 for a proper introduction to the Type tool). Click once in your document where you want the text to begin and then start typing. When you’re finished, click the little checkmark in the Options bar to let Photoshop know you’re done (pressing Enter on your keyboard’s numeric keypad—not Return—or grabbing another tool works, too).
You’re finished! If you want to move the text around, you can temporarily activate the Move tool by holding down the V key. When your cursor turns into a little arrow, click and move your mouse to move the text.
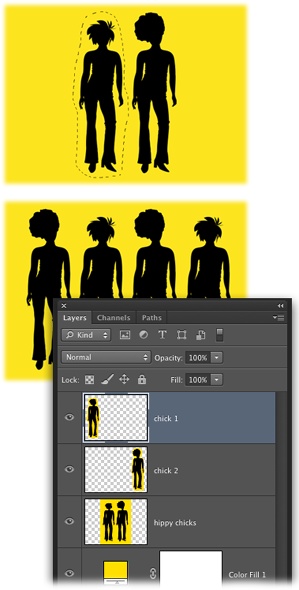
Duplicating a layer comes in handy when you want to do something destructive like remove an object using the Edit→Fill command (Using Content-Aware Fill) or soften Great Grandma’s skin (Skin Softeners). By duplicating the Image layer first, you can work on a copy of the image instead of the original. But duplicating isn’t limited to whole layers; you can duplicate just part of a layer. That technique comes in handy when you want to do some quality head swapping (Saving a Selection) or make multiple copies of an object and move it around (like the hippie chicks in Figure 4-8).
You can duplicate a layer in a gazillion ways:
Press ⌘-J (Ctrl+J) or choose Layer→New→“Layer via Copy” to copy the active layer onto another layer just like it.
Figure 4-8. By selecting each of the silhouettes (top) and then pressing ⌘-J (Ctrl+J), you can put copies of them onto their own layers (bottom). To move them around in your document, activate one of the new layers, press V to grab the Move tool, and then drag to reposition the selected figure. (Chapter 4 has more on how to make selections.) Photoshop automatically adds the word “copy” to duplicated layers’ names. To keep it from doing that, open the Layers panel’s menu, choose Panel Options, and then turn off the “Add ‘copy’ to Copied Layers and Groups” checkbox at the bottom of the resulting dialog box. You can follow along by visiting this book’s Missing CD page at www.missingmanuals.com/cds and downloading the file Chicks.jpg.
Tip
You can duplicate multiple layers at the same time. Just activate the layers by Shift- or ⌘-clicking (Ctrl-clicking) them, and then press ⌘-J (Ctrl+J). Think of this as “jumping” the content onto other layers—it makes the keyboard shortcut easier to remember. (So many shortcuts, so little time to memorize ’em!).
Drag the original layer atop the “Create a new layer” button at the bottom of the Layers panel. When Photoshop highlights the button (which looks like a piece of paper with a folded corner), let go of your mouse button.
Option-drag (Alt-drag on a PC) the layer somewhere else in the Layers panel. Your cursor turns into double black-and-white arrowheads as soon as you start to drag. When you let go of your mouse button, Photoshop duplicates the layer.
Choose Layer→Duplicate Layer or, from the Layers panel’s menu, choose Duplicate Layer. This method gives you a chance to name the new layer, as well as to send it to a new document. If you decide to send it to a new document, in the Duplicate Layer dialog box, pick an open document from the Document drop-down menu or choose New to create a brand-new document (enter a name for the new document in the Name field).
Control-click (right-click) the layer in the Layers panel. From the resulting shortcut menu, choose Duplicate Layer.
To duplicate part of layer, create a selection using any of the tools discussed in Chapter 5 and then press ⌘-J (Ctrl+J) to move your selection onto its own layer. If you want to delete the selected area from the original layer and duplicate it onto another layer at the same time, press Shift-⌘-J (Shift+Ctrl+J). You can think of this trick as cutting to another layer since you’ll have a hole in the original layer where the selection used to be.
Adding layers can really increase your document’s file size, so it’s always a good idea to delete layers you don’t need (especially if you have a slow computer or very little memory). To delete a layer (even a locked Background layer, provided your document has more than one layer), activate it in the Layers panel and then do one of the following:
Press Delete (Backspace on a PC). This is the fastest deletion method in the West.
Drag it onto the trash can icon at the bottom of the Layers panel.
Click the trash can icon. When Photoshop asks if you’re sure you want to delete the layer, click Yes and then turn on the “Don’t show again” checkbox if you don’t want to see this confirmation box in the future.
Control-click (right-click) near the layer’s name in the Layers panel and choose Delete Layer from the shortcut menu. (Be sure to click near the layer’s name—if you click its thumbnail, you won’t see Delete Layer in the shortcut menu.) When Photoshop asks if you really want to delete the layer, click Yes to send it packin’.
Choose Layer→Delete or open the Layers panel’s menu and then choose Delete Layer. You’ll get a confirmation dialog box this way, too, so just smile sweetly, click Yes, and be on your way.
Tip
If you’ve hidden multiple layers (Adding New Layers), you can delete ’em all at once by opening the Layers panel’s menu and choosing Delete→Hidden Layers (hey, if you’re not using them, you might as well toss ’em!). Getting rid of extra layers shortens the Layers panel and reduces the document’s file size.
You can use the regular ol’ copy and paste commands to move whole or partial layers between Photoshop documents, too:
To copy and paste a whole layer into another document, choose Select→All (or press ⌘-A [Ctrl+A]) to select everything on the layer and then press ⌘-C (Ctrl+C). Next, click the other document’s window and press ⌘-V (Ctrl+V) to add the layer.
To copy part of a layer into another document, create your selection first and then press ⌘-C (Ctrl+C) to copy it. Then open the other document and press ⌘-V (Ctrl+V); Photoshop pastes those pixels onto a new layer.
Photoshop’s Edit menu also includes a Paste Special option, which is incredibly handy when you’re combining images. It’s discussed at length starting on Pasting into a Selection.
Tip
When you copy an image from another program and paste it into a Photoshop document, it lands on its very own layer. If the pasted image is bigger than your document, you may need to resize the new layer using Free Transform (The Transformers). Alternatively you can choose Image→Reveal All, and Photoshop resizes the canvas so you can see everything it contains. However, a better option is to use File→Place instead, because that way the image automatically appears on a separate layer surrounded by resizing handles. See Opening Files as Smart Objects for more on using this handy command.
One of the most common things you’ll do with a new layer is fill it with color. If, for example, you’ve hidden your image’s original background with a layer mask (Layer Blending) or added an interesting edge effect (see Loading More Built-in Brushes), you can spice things up by adding a solid-colored background. Photoshop gives you a couple of different ways to tackle this task:
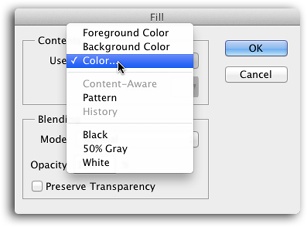
Fill an existing layer with color. After you’ve created a new layer using one of the methods listed on Adding New Layers, choose Edit→Fill. In the resulting Fill dialog box (Figure 4-9), pick a color from the Use menu and then click OK. You can also fill the active layer with your foreground color by pressing Option-Delete (Alt+Backspace on a PC), or your background color by pressing ⌘-Delete (Ctrl+Delete on a PC).
Figure 4-9. The Use menu lets you tell Photoshop to fill a layer with your foreground or background color, or summon the Color Picker by choosing Color. The downside to this method is that if you increase your canvas size (page 249) after filling a layer with color, you’ll need to refill the layer or it’ll be smaller than your document. To avoid this extra step, use a Fill layer instead, as discussed in this section.
Create a Fill layer. If you’re not sure which color you want to use, choose Layer→New Fill Layer→Solid Color, or click the half-black/half-white circle at the bottom of the Layers panel and choose Solid Color. In the New Layer dialog box that appears, name the layer and then click OK. Photoshop then displays the Color Picker so you can choose a fill color. If you decide to change this color later, simply double-click the Fill layer’s thumbnail and Photoshop opens the Color Picker so you can choose a new color or steal one from your image as shown in Figure 4-10. Fill layers come with their own layer masks, making it super simple to hide part of the layer if you need to.
Tip
If you create a selection before adding a fill layer, when you add the Fill layer, Photoshop automatically fills the selection with color and fills in the mask for you in the shape of your selection. Sweet!
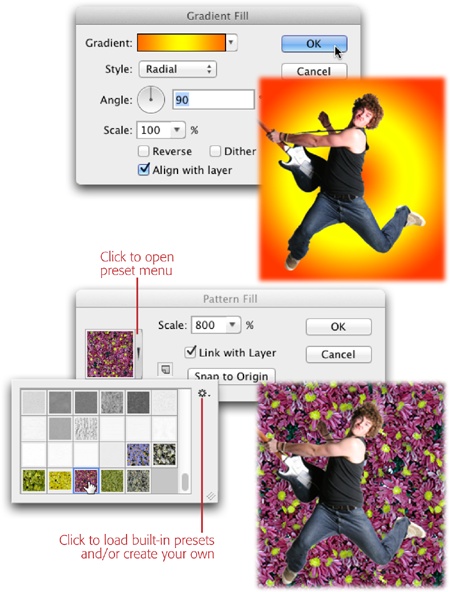
One of the many advantages of using a Fill layer is that, unlike an Image layer, the whole layer gets filled with color even if you enlarge the canvas. In addition to using Fill layers to create solid backgrounds, you can use ’em to fill a layer with a gradient or a repeating pattern, as shown in Figure 4-11. Simply choose Layer→New Fill Layer, and then pick either Gradient or Pattern.
Note
Photoshop includes a bunch of pattern preset categories that you can access in the Pattern Fill dialog box by clicking the down-pointing triangle labeled in Figure 4-11 (bottom), and then clicking the tiny gear icon in the upper right of the resulting menu. For example, the Artists Brushes Canvas and Erodible Textures categories are useful when creating paintings from scratch, as described on Painting from Scratch.

Figure 4-10. Top: Dragging a Fill layer to the bottom of the layer stack creates a solid-colored (in this case, white) background for your image. To change the color, double-click the Fill layer’s thumbnail (circled) to pop open the Color Picker. Bottom: If you want to get super creative, you can snatch color from your image by mousing over to it while the Color Picker is open (your cursor turns into an eyedropper, circled). Click once to grab the color you want, and then click OK to close the Color Picker. If you want to hide part of the Fill layer (to, say, have it show only in certain areas), just paint with black inside the included layer mask (see page 108).
Photoshop includes oodles of pattern presets, though you can also create your own. It’s surprisingly simple, as the following steps explain:
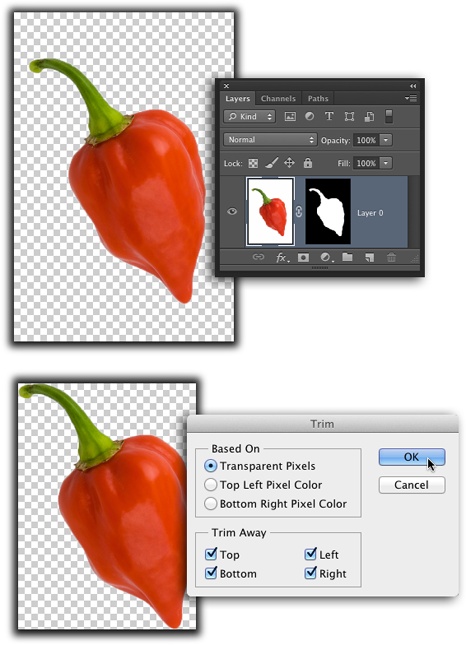
Open the image that you want to create a pattern from, like the chili pepper photo in Figure 4-12.
If you want the image’s background to be transparent as it overlaps and repeats in the pattern, create a selection of the background using the tool of your choice and then hide it with a layer mask. (If Photoshop masks the opposite of what you want, simply double-click the mask’s thumbnail in the Layers panel.
Figure 4-11. Fill layers aren’t just for adding solid color; you can use ’em to create a gradient- or pattern-filled background as shown here (top and bottom, respectively). To change the gradient or pattern after you’ve added the Fill layer, just double-click its thumbnail in the Layers panel to make Photoshop display the appropriate dialog box—Gradient Fill or Pattern Fill. By adjusting the Scale setting in these dialog boxes, you can make the gradient or pattern bigger or smaller. (Page 85 explains how to make your own custom patterns.) You can also add a Fill layer via the Adjustment layer menu at the bottom of the Layers panel (it looks like a half-black/half-white circle). You’ll find Solid Color, Gradient, and Pattern listed at the very top of the resulting menu.
When the Properties panel opens, click the Invert button at the bottom of the panel to flip-flop the mask.) Next, choose Image→Trim and, in the Trim dialog box (Figure 4-12, bottom), pick Transparent Pixels to crop the document to the object’s edges, and then click OK. Choose File→Save As and, in the resulting dialog box, give the document a name—say, “chili pattern”—and pick Photoshop from the Format drop-down menu. Doing so gives you the ability to tweak the pattern later on.
In the Layers panel, click the Image layer’s thumbnail to activate it, and then choose Edit→Define Pattern (this step won’t work if the layer mask is active instead).
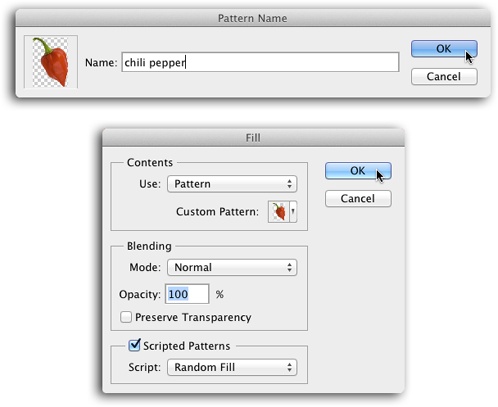
In the resulting dialog box (Figure 4-13, top), give your new pattern a meaningful name and then click OK. Photoshop adds it to your list of pattern presets (Figure 4-13, bottom).
Figure 4-12. If you want to create a pattern with a transparent background, you have to select the background first and then hide it with a layer mask, as described in step 1. When you run the Image→Trim command, Photoshop trims your document to the smallest possible size, ensuring you don’t include a lot of extra space around the object once you define it as a pattern.
Open the document you want to apply the pattern to and create a new layer by pressing Command-Shift-N (Ctrl-Shift-N).
In the resulting New Layer dialog box, name the layer “chili background” and then click OK. Alternatively, you can skip creating a new Image layer and use a Pattern Fill layer instead (though the scripted-pattern feature described below doesn’t work on Fill layers).
Choose Edit→Fill and then, from the Use drop-down menu, choose Pattern (Figure 4-13, bottom).
Click the down-pointing triangle next to the Custom Pattern preview and then click the pattern you created in step 3. Photoshop will repeat it in a grid-like pattern.
If you’d like your pattern to be random in shape, color, and position, you can use scripted patterns instead (a feature introduced in CS6). To do that, turn on the Scripted Patterns checkbox at the bottom of the dialog box and, from the Script drop-down menu, choose one of the five built-in scripts (Brick Fill, Cross Weave, Random Fill, Spiral, or Symmetry Fill) and then click OK. For example, choosing Brick Fill makes Photoshop offset the pattern every second row by half the pattern’s width and introduce a variety of colors based on the original pattern’s color. (Spiral is the only one that doesn’t introduce random color.) When you click OK, Photoshop fills the empty layer with your new pattern. Figure 4-14 shows the result of creating a pattern from a chili pepper (top) and a leaf (bottom).
Note
Give these patterns a spin by downloading the practice files chili.jpg and oakleaf.jpg from this book’s Missing CD page.
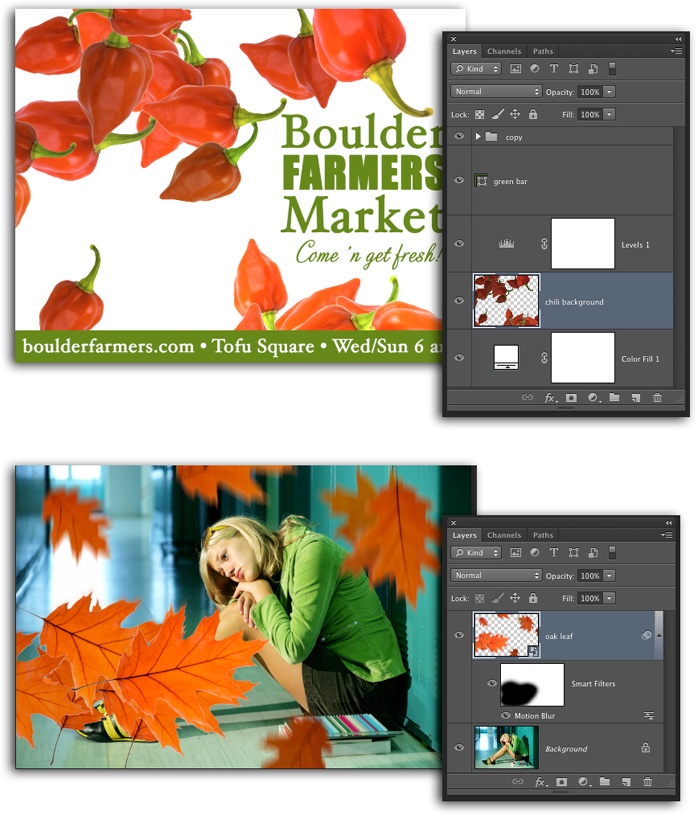
Figure 4-14. Photoshop can use a JavaScript file to make your patterns vary in ways it never could before CS6. Here, the Random Fill script was used to create the background for this fictitious farmer’s market ad (top) as well as the falling leaves atop this schoolgirl’s photo (bottom); the latter pattern was created from a single oak leaf. As you can see, there’s no end to the interesting backgrounds and textures you can create with scripted patterns! You can access Scripted Patterns when you’re filling a path, too, though they aren’t available for use with Pattern Fill layers (dang it!).
You can even customize the existing scripts or (gasp!) create your own. The scripts are written in the JavaScript programming language, and they live in the Applications/Adobe Photoshop CC/Presets/Deco folder on a Mac. On a PC running Photoshop in 32-bit mode, they’re in the \Program Files (x86)\Adobe\Adobe Photoshop CC\Presets\Deco folder; in 64-bit mode, peek in the \Program Files\Adobe\Adobe Photoshop CC (64 Bit)\Presets\Deco folder instead. Once you modify a script or add a new one, you have to relaunch Photoshop before that script will show up in the Fill dialog box’s Script menu.
All layers begin life at 100 percent opacity, meaning you can’t see through them (except where they’re empty, as shown in Figure 4-7). To make a layer semitransparent, you can lower its Opacity setting, which is a good way to lessen the strength of a color or lighting adjustment (Chapter 10), or a strip of color you’ve added as a design element, as shown in Figure 4-15. (Lowering layer opacity is also a good way to make a photo look more realistic after you remove dark circles under tired eyes, as explained on The Healing Brush.) The Opacity setting affects everything on a given layer equally.
The Opacity and Fill settings live near the top of the Layers panel. Unlike Opacity, the Fill setting doesn’t always affect the whole layer. For example, if you create a Shape layer or a Type layer and then add a layer style to it (say, a stroke), then lowering its Fill setting will lower only the opacity of the color inside the shape or letters, not the opacity of the layer styles you’ve added.
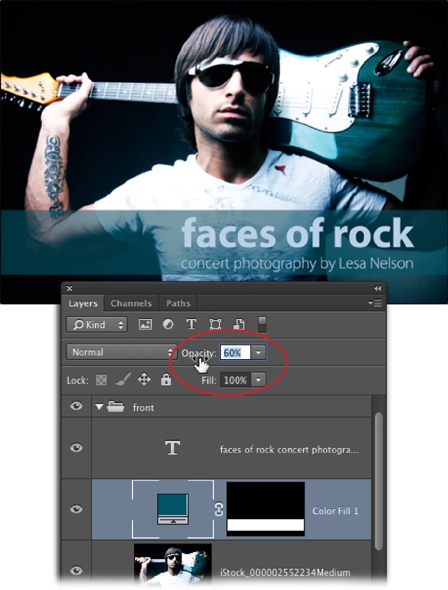
Figure 4-15. If you lower the opacity of this Fill layer to 60 percent, the blue paint becomes partially transparent, letting you see through to the photo layer below, as shown here. To look like a real Photoshop pro, point your cursor at the word Opacity. When the cursor turns into a little pointing hand like the one shown here—known as a scrubby cursor—you can drag to the left or right to lower or raise the layer’s opacity, respectively (you can even drag the cursor off the Layers panel if you want to). This trick works for any Photoshop setting with similar controls, including the Fill setting, most everything in the Options bar (no matter which tool is active), the options in the Character and Paragraph panels, and more!
Tip
If you’ve hidden a layer by turning off its visibility eye, you can still see its Opacity, Fill, and blend mode settings near the top of the Layers panel (even though they’re grayed out). Nice!
To change Opacity or Fill, mouse over to the Layers panel, activate the layer you want to tweak, and then do one of the following:
Enter a new value in the Opacity or Fill field. Double-click the current value in either field, enter a new value, and then press Return (Enter on a PC).
Use the field’s slider. Click the down arrow to the right of the Opacity or Fill field, and then drag the resulting slider to the left or right to decrease or increase that setting, respectively.
Use your keyboard. Press V to activate the Move tool (think “moVe”), and then change the active layer’s Opacity setting by typing 1 for 10 percent, 2 for 20 percent, 3+5 for 35 percent, and so on (type 0 for 100 percent or 0+0 for 0 percent). If you’ve got any other tool that works with transparency active besides the Move tool (such as the Brush or Healing tools), you’ll change the tool’s opacity setting instead. You can use the same keyboard trick to adjust the Fill setting, too; just hold down the Shift key while you type the numbers.
To resize the contents of a layer—or many layers—without changing the size of your document, you can use the Free Transform tool shown in Figure 4-16. (You’ll learn a lot more about this tool in Chapter 7, so consider this a sneak peek.) To resize or rotate a layer, follow these steps:
In the Layers panel, activate the layer(s) you want to adjust (see The Layers Panel for the scoop on activating multiple layers).
Press ⌘-T (Ctrl+T) to summon the Free Transform tool.
Photoshop puts a box lined with small square handles (called a bounding box) around the contents of the active layer(s). If you’re resizing a normal layer, the handles are white; if you’re resizing a Smart Object (Using Smart Objects), they’re black instead, as shown in Figure 4-16. The difference is purely cosmetic—they work exactly the same way.
Drag one of the corner handles toward the center of the layer to make the layer’s content smaller.
Grab any of the white corner handles and drag diagonally inward to decrease the layer content’s size. To resize the content proportionately so it doesn’t get squished or stretched, hold down the Shift key as you drag.
To rotate the layer(s), position your cursor outside the bounding box and then—when the cursor turns into a curved, double-headed arrow—drag up or down in the direction you want to turn the layer(s).
Press Return (Enter on a PC) or double-click inside the bounding box to let Photoshop know you’re done; to bail without changing your image, press Esc instead.
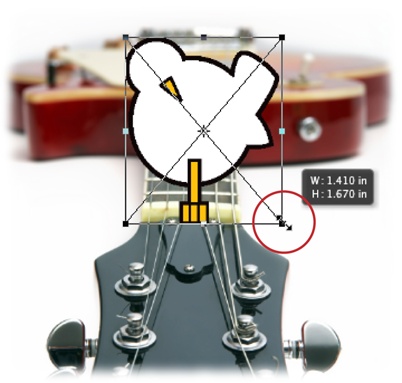
Figure 4-16. You can drag any of the bounding box’s square handles to resize your object. To adjust all four sides of the box simultaneously, hold down Option (Alt) as you drag a corner handle. The Free Transform tool shows you a handy heads-up display (HUD) of the object’s size (the W and H numbers shown here) when you drag a corner handle. If you click within the bounding box and drag to reposition it, the display changes to show either your X and Y coordinates on the document relative to where you started dragging or an angle value if you’re rotating it (the Move tool does the same thing). Don’t forget to press Return (Enter) when you’re finished because Photoshop won’t let you do anything else while you’ve got an active bounding box.
Tip
To see the Free Transform command’s resizing handles whenever the Move tool is active—without actually using the Free Transform command—press V to grab the Move tool and then turn on the Show Transform Controls checkbox in the Options bar. Seeing the handles is helpful if you’re jumping between layers to resize or rotate objects and don’t want to stop and summon Free Transform each time.
Do you risk reducing your image’s quality by resizing layers this way? Sure. Anytime you alter pixel size, you change the image’s quality a little bit, too, whether it’s a single layer or the whole document. But as long as you decrease the Image layer’s size, you won’t lose much quality (though you don’t want to decrease its size repeatedly—try to do it once or twice and be done with it). You definitely risk losing quality if you increase the size of a pixel-based Image layer, because when pixels get bigger, they also get blockier. However, if you increase the size of an object just a little, nobody will be the wiser; plus, Photoshop CC is far better at enlarging images than previous versions (The Mighty Image Size Dialog Box).
That said, if you’re working with a Smart Object (Using Smart Objects), Shape layer (The Layers Panel), or Type layer (Chapter 15), you’ve got no worries. You can resize those babies all day long—larger or smaller, as many times as you want—and you won’t affect their quality, which is why you should use those kinds of layers whenever possible. (However, you don’t want to enlarge a raster-based Smart Object too much beyond its original dimensions because it could become pixelated and blocky.)
Tip
The rest of the transform tools—including Skew, Distort, and so on—work on layers, too. See Simple Rotations for the details.
One of the many advantages of using layers is that you can scoot ’em around independently of everything else in your document. To move a layer, first activate it in the Layers panel, and then press V to grab the Move tool and drag the layer wherever you want. For example, to move the text in Figure 4-15 a bit to the left, press V and drag it to the new spot. To move the layer in a perfectly vertical or horizontal line, hold down the Shift key while you drag. As soon as you start dragging, you’ll see a slightly transparent, dark gray border around the item you’re dragging—and it moves as you drag. This is extremely helpful when you’re moving items that are really small, and thus easy to lose sight of.
Note
You can also nudge the layer one pixel at a time by pressing the arrows on your keyboard (holding down the Shift key while you press the arrow keys scoots the layer by 10 pixels per keystroke).
If you want to move only part of a layer, select that portion first using one of the methods explained in Chapter 5. Then you can grab the Move tool and move just the selected bits.
When you need to position layers, Photoshop has several tools that can help you get ’em lined up just right. The program tries to help you align layers by snapping the one you’re moving to the boundaries (content edges) of other layers. As you drag a layer with the Move tool, Photoshop tries to pop the layer into place when you get near another layer’s edge. (To make the program stop popping them into place, choose View→Snap.) If you’d like to see the boundaries of your layer, press V to activate the Move tool, and then hop up to the Options bar and turn on the Show Transform Controls checkbox (Figure 4-17).
Tip
If you’re trying to visually align one layer perfectly with the layer below it, it’s a good idea to temporarily lower the top layer’s opacity (Tweaking a Layer’s Opacity and Fill) so you can actually see the layer underneath. Alternatively, set one layer’s blend mode to Difference (Comparative Blend Modes).
In addition to snapping layers and showing their boundaries, Photoshop offers you the following alignment helpers:
Alignment settings. These settings come in handy if you need to align the edges of more than one layer. You’ll see them in the Options bar when the Move tool is active, but you’ll only be able to use ’em if you have more than one layer activated (see Figure 4-17). You can also find them in the Layer→Align submenu (you still need to have more than one layer activated, but you don’t have to activate the Move tool). Figure 4-18 shows you what each button does.
Figure 4-17. The alignment settings are only usable when you’ve got two or more layers and the Move tool activated (the distribute settings require three or more active layers); otherwise, they’re grayed out. If you forget what a button is for, put your cursor over it and, within a second or two, Photoshop displays a yellow tooltip telling you what that button does. Figure 3-18 shows these settings in action.
Distribute settings. Nestled snugly to the right of the alignment settings are the distribute settings (Figure 4-17). Their mission is to evenly space the contents of the active layers based on each layer’s horizontal or vertical center, and you need to have at least three layers activated to use them. For example, these options are handy when you’re designing buttons for website navigation because you can use them to space the buttons equally.
Auto-alignment. If you choose Edit→Auto-Align Layers or click the Auto-Align Layers button labeled in Figure 4-17, Photoshop does the aligning for you by looking at the corners and edges of the objects on the active layers. This command is really handy when you’re combining multiple images of the same shot (see Creating High Dynamic Range Images), but it doesn’t work on Adjustment layers, Smart Objects, or Shape layers.
Smart Guides. Unlike the regular guides you learned about in Chapter 3, Smart Guides show up automatically any time you drag a layer near another layer’s edge or center (see Figure 4-19). They’re extremely helpful when you’re manually aligning layers with the Move tool since they make it easier to position layers precisely in relation to each other. To turn ’em on, choose View→Show→Smart Guides.
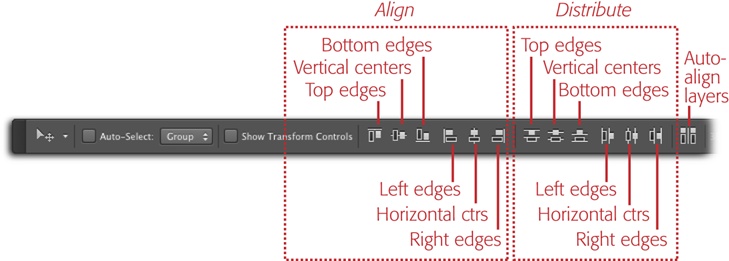
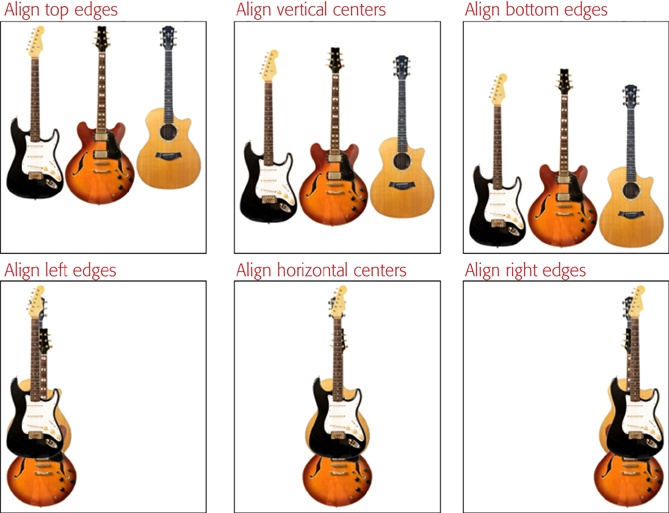
Figure 4-19. With Smart Guides turned on, Photoshop alerts you with a thin red line any time you approach the edge or center of another layer so you know that you’re about to move past it.
Note
Photoshop can also do strange things when you’re using the alignment commands on layers that have layer masks (Layer Blending). Instead of aligning the layers according to what you’ve hidden with the mask (which is probably what you’re trying to do), Photoshop ignores the mask and tries to align the layers using the actual pixel information. In that situation, you may need to turn on Rulers (Guides, Grids, and Rulers), create a few guides (also on Guides, Grids, and Rulers), and manually align the layers with the Move tool (Moving and Aligning Layers).
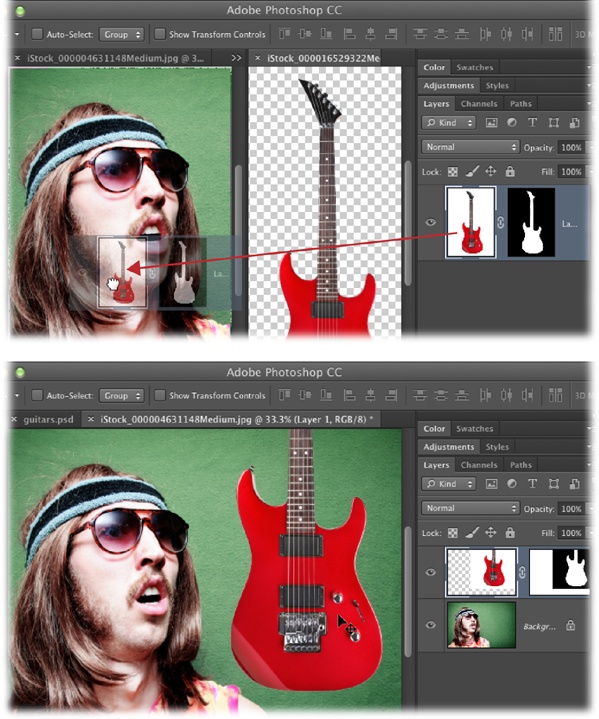
In addition to copying and pasting layers from one document to another (as described back on Copying and Pasting Layers), you can also drag and drop them straight from the Layers panel to another document, as shown in Figure 4-20. When you do that, Photoshop leaves the layer in the original document and places a copy in the target document, so you don’t have to worry about losing anything from either file. This technique is really helpful if you want to create a collage (Chapter 8), swap backgrounds, or share color corrections made with Adjustment layers across documents (Chapter 10). Here are the details:
Open the two documents you want to combine.
Choose Window→Arrange and choose one of the 2-up options.
To drag a layer from one document to another document that contains multiple layers, you have to be able to see both documents, as explained in Figure 4-20. Choosing one of the 2-up display options makes Photoshop rearrange your document windows so you can see ’em both at the same time. (Arranging Open Images has more on your window-arrangement options.)
Figure 4-20. Top: To combine two images into one document, first arrange your workspace so that you can see both windows. (The 2-up Vertical arrangement was used here.) Then drag one layer’s thumbnail from the Layers panel into the other document. Bottom: When you release your mouse button, the new layer appears in the other document’s Layers panel, as shown here. You can also drag an image file from your computer’s desktop into an open Photoshop document and the object lands on its own layer as a Smart Object.
Click the document that contains the layer you want to move, and then drag the layer’s thumbnail from the Layers panel onto the other document.
As you drag, your cursor turns into a tiny closed fist, as you can see in Figure 4-20. When Photoshop highlights the inside border of the destination window in light gray, let go of your mouse button to make Photoshop add the layer to that document.
If you’ve got a bunch of layers that you want to separate into individual files (with each layer in its own file), choose File→Scripts→“Export Layers to Files.” In the resulting dialog box (Figure 4-21), use the Destination field to tell Photoshop where you want it to save the files. In the File Name Prefix box, create a naming scheme (Photoshop uses whatever you enter in this field as the first part of your files’ names) and, from the File Type drop-down menu, choose a format. When you’re finished, click Run and sit back while Photoshop does all the work.
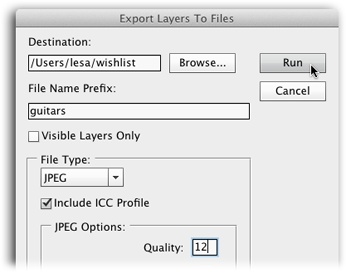
Figure 4-21. The Export Layers To Files dialog box lets you choose where to put the new files and what to name them. To exclude any hidden layers, turn on the Visible Layers Only checkbox. In the File Type drop-down menu, you can choose from BMP, JPEG, PDF, PSD, TARGA, TIFF, PNG-8, and PNG-24. Each format gives you different options; for example, choosing JPEG lets you pick a quality setting. Photoshop includes your document’s ICC profile in each file unless you turn off the aptly named Include ICC Profile checkbox shown here.
Tip
If you’ve got a Smart Object in your document, you can export its contents to a new document by Control-clicking (right-clicking) near the layer’s name in the Layers panel, and then choosing Export Contents. In the resulting dialog box, tell Photoshop where you’d like to save the document, and then click Save. (Smart Objects are covered later in this chapter, beginning on Using Smart Objects.)
Get Photoshop CC: The Missing Manual now with the O’Reilly learning platform.
O’Reilly members experience books, live events, courses curated by job role, and more from O’Reilly and nearly 200 top publishers.

