Chapter 4. Adding Actions
In Chapter 3, you began creating an application to collect email addresses from visitors who would like you to contact them about whatever it is that you do. The only problem is that clicking your “Sign Up” button doesn’t do anything. In this chapter, we will add actions to that button to store the visitor’s email address, thank them if they entered an email address, and ask them to try again if they didn’t.
Handling a Handler
To make a button work it needs a handler. However, buttons are not the only widgets that can have a handler, and clicking on something is not the only handler type. For example, a text box may have a handler that responds to pressing the Enter key, or a list box sometimes needs to fill a second list for situations like choosing a city after the state has been selected. In that case, we might use an onChange handler. In more advanced UIs, mouse handlers, like “over” and “off,” can create rich user interaction by displaying information before a selection is made. It’s also important to note that a widget can have more than one handler. When you have a process that may take some time, like receiving data from a web service or uploading files from the hard drive, it’s a good idea to show a progress indicator to the user after the click something.
In this chapter, we will keep things simple and only work with the onClick handler to provide action for our simple form.
Some of the handlers in the UiApp:
BlurHandler
ChangeHandler
ClickHandler
CloseHandler
Command
InitializeHandler
FocusHandler
KeyHandler
LoadHandler
MouseHandler
SelectionHandler
ScrollHandler
SubmitHandler
ValueChangeHandler
Anatomy of a Handler
You can create a handler like any other element in the UI by calling
on the UiApp class to create what you need. While you can attach a handler
directly to a widget using the .add statement, we will
create the handler here by loading it into a variable. This is a common
practice because it makes the code more readable, but like most things in
programming it’s not always the best solution. Later in the book you will
learn techniques where attaching the handler directly is preferred.
This is how a handler is created:
var handler = app.createServerHandler('contactMe');What we have done is created an object, the handler, using the call
createServerHandler. In the past,
Google Script had many types of button handlers, but now these have been
condensed into a single do all server handler. This server handler acts
like a click handler used for submit buttons and requires a full button
cycle (Down and Up) to execute. That way if the user has pressed down, but
then decides she was not ready, she can drag off the button, let go, and
the button will not execute.
Handlers have the ability to take a function argument on creation,
as we have here in specifying 'contactMe', which is the
name of the function we will be creating later in the chapter to perform
the work. You can also add the function later by using:
handler.setCallbackFunction('contactMe');You might be wondering about that method having the word “callback” in it, which leads us to a very important point in the UiApp.
The Concept of the Callback
When your app needs to do something—like update information on the screen, add data to a spreadsheet, or send an email—it performs what is known as a Remote Procedure Call, or RPC for short. An RPC includes sending code to the server for processing and having the server send back the results. I am sure that Java developers are pulling their hair out at this simplistic definition of RPC, but for what you need to know in Google Script, this about covers it.
The function we specified 'contactMe'—we will
create that soon—is what the server is going to do with the information we
send. In our case, we are going to need to update the UI with some
feedback for the visitor and that means those elements must get passed to
the server in the handler. Certainly you could pass just one widget, but
in most cases you will need to access many parts of the UI. For example,
we will want to get the input from the text box and update the info label.
If you look back on the code we created in Chapter 3, there was a panel to hold the widgets
that we gave an ID. It turns out that when you pass an object like a panel
or other widget in the handler, that also passes all of the widgets and
panels that have been added to it. If you need an HTML reference to
visualize the process, you can think of those as child elements.
Here is how objects are passed in a handler:
handler.addCallbackElement(mainPanel);
But wait, there is a difference here if you are using the GUI
Builder. Because the GUI Builder stores its information in the builder,
you need to use the getElementById call. Therefore,
instead of using only the variable name 'mainPanel',
you would call it like this:
app.getElementById('mainPanel');There will be more on this later in the chapter, but for now just note that there is a difference.
Now your ‘contactMe’ function will have access to both the text box
and label widgets. To make this more concrete (and sorry for beating you
over the head with this but it is really important to get this now), you
are essentially passing the whole mainPanel to the
server, the server is making some changes and then replacing it with those
changes made.
That’s all there is to creating a handler; now all that is left is to attach the handler to the widget of our choosing. In this example, we will attach it to our Sign Up button:
button.addClickHandler(handler);
Or if you are using the GUI Builder:
app.getElementById('button').addClickHandler(handler);For reference, here is the whole block of code if you handcoded:
var handler = app.createServerClickHandler('contactMe');
  handler.addCallbackElement(mainPanel);
  button.addClickHandler(handler);
And if you used the GUI Builder:
var handler = app.createServerClickHandler('contactMe');
  handler.addCallbackElement(app.getElementById('mainPanel'));
  app.getElementById('button').addClickHandler(handler);
Functions Are Where the Action Happens
Applications built for the UiApp have four basic types of functions:
doGet, which you are familiar with;
doPost, which you will learn about later; functions
that return values directly; and functions that are intended to be used
via a handler. They aren’t really that different, however,
when you use them can be important. For example, you
always need doGet to display the UI in a gadget, and if
you are using a form panel, you will likely need a
doPost function.
When you operate a function using a handler and your intent is to update the UI, you must call on the active UI and return it at the end of the processing. Here is what that looks like:
function contactMe(e){
  var app = UiApp.getActiveApplication();
  //code here
  return app;
}
Notice the (e) in the function arguments. That
will be the variable that contains the information we passed in the
handler. To get at that information, we will use the property parameter
where the information is stored and the name we gave the object. For us
that is “textBox” so:
var email = e.parameter.textBox
I have shown the value loaded in a variable email to help you make the connection as to what we are accessing. Later in this chapter we will send that email address to a Google spreadsheet for storage, but for now let’s look at returning some information to the user. Because we loaded the active UiApp into the variable app we can call on elements by their ID.
Let me pause for a second here and cover something that really
confuses people. You can set values, add widgets, and change the
attributes of elements from a function using an ID, but you can’t get
their values by ID. To get a value, you must pass it through the handler
and use
e.parameter..
That also means you need to set the name of the element. This goes back to
when we discussed RPC and how that works.<name>
To give the user, and you as well, some indication that the button works, we will set the value of the text box to nothing and add a label that says “Thank you.”
Replace “//code here” with the following lines:
 app.getElementById('textBox').setValue('').setStyleAttribute("color", "black");
 app.getElementById('info').setText('Thank you!').setStyleAttribute("color", "black");
The getElementById part will call on the ID of
those elements passed in the callback and allow you to act on them. For
the text box, we set the value to an empty string and then we call on the
info label to set a new text value. After clicking the button, the
contactMe function will run and update the UI.
Save your file, and refresh your UI browser window to load in the new code. Now type anything into the text box and click the button. You should see the text box clear and your “thank you” appear. Congratulations, you are now using AJAX.
A few small problems: the value did not go anywhere and you can type in anything you want. Let’s solve the email verification part first.
Here is the contactMe function
all together:
function contactMe(e){
 var app = UiApp.getActiveApplication();

 app.getElementById('textBox').setValue('').setStyleAttribute("color", "black");
 app.getElementById('info').setText('Thank you!').setStyleAttribute("color", "black");

 var ss = SpreadsheetApp.openById('0Aq1-C9Nl4dO-dHRWNHd4d21IUHZjbnVlMktWZVY2Z3c').getSheets()[0];
 var range = ss.getRange(ss.getLastRow()+1, 1, 1, 2);

 var values = [[new Date(),e.parameter.textBox]];
 range.setValues(values);

 return app;
}
Verifying the Input
There are many ways to verify that you are getting an email address, but for our purpose, we will use the validators built into Google Script for filtering the input. This will ensure that what we get looks like an email address. There are ways to actually verify that the email address is an actual valid email, but that exceeds the scope of this chapter.
Along with the validation, you are also going to use client side handlers. There will be much more on this subject later in the book, but for now know that client side handlers run in the user’s browser and are much faster than making an RPC to the server.
Validators prevent the handler from executing the function. This is
a very simple modification where .validateEmail(
is added in the widget)handler:
  var handler = app.createServerHandler('contactMe')
      .validateEmail(email)
      .addCallbackElement(mainPanel);
  button.addClickHandler(handler);
Or for the GUI Builder:
  var handler = app.createServerClickHandler('contactMe')
          .addCallbackElement(app.getElementById('mainPanel'))
          .validateEmail(app.getElementById('textBox'));
  app.getElementById('button').addClickHandler(handler);
Now entering anything that is not an email address will not be allowed to pass. However, from the user’s perspective it will look like nothing is happening or that the button is not working. In addition to stopping the execution of the function if the input is incorrect, you also need to place some notifications on the screen to let the user know what is wrong.
Just above the handler you created in the doGet
function, add a new client handler. This will run on the client’s side and
is very responsive.
Start out by building the handler:
var validateEmail = app.createClientHandler()
Now use the negated form of validate Email—validateNotEmail—which will run more methods if
the validation finds a wrong value. What we want to do to notify the user
is to set the email text to red and put a message in the info label about
what is wrong.
Use forTargets(widget) to get
each element and then make the needed changes. Here you see the completed
validation handler:
    var validateEmail = app.createClientHandler()
      .validateNotEmail(email)
      .forTargets(email).setStyleAttribute("color", "red")
      .forTargets(info).setVisible(true)
        .setText('That's not an email')
        .setStyleAttribute("color", "red");
    button.addClickHandler(validateEmail)
Or for the GUI Builder:
    var validateEmail = app.createClientHandler()
      .validateNotEmail(app.getElementById('textBox'))
      .forTargets(app.getElementById('textBox')).setStyleAttribute("color", "red")
      .forTargets(app.getElementById('info')).setVisible(true)
        .setText('That's not an email')
        .setStyleAttribute("color", "red");
    app.getElementById('button').addClickHandler(validateEmail)
Give it a run and see what you get. Notice that after you enter a non-email address, you get the message “That’s not an email,” and if you try again with a real email address, the message is replaced with the “Thank you” message.
Now that the user interaction is done, we need to find a place to store the information. In Storing the Values, we will finish this project, make the boss happy, and start gathering data.
Storing the Values
I have saved the best for last, or maybe the easiest part, depending on how you might look at it. The app you have been building has all the features needed to interact with the user, but we are lacking the most important thing: a place to store the data and a way to get it there. Not to worry, Google has provided us with several options that should work for most applications.
Store in a Spreadsheet
If you have been following along, your script is living on a Google Site and you have been accessing it through the published URL. What we need to do now is write the visitor email address to a spreadsheet. First, we will need a spreadsheet, so please open Google Docs and make one. You can name it anything you like.
Setting Up the Spreadsheet
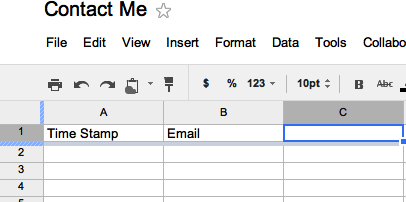
The top row of our spreadsheet will be the column names so we know
what the data is. (Yes, it is obvious for such a small app, but you know
how things can grow.) In column A1 (uppermost-left), name the column
Time Stamp. Next, name B1
Email. See Figure 4-1.
Heading back to your script, you will need to add the code to open your new spreadsheet in the script so we can write the email value to it.
Above the line return app;, insert:
var ss = SpreadsheetApp.openById(“<YourSpreadsheetIdGoesHere>”).getSheets()[0];
Here we are creating a variable (ss) that will represent the first
sheet in our spreadsheet. SpreadsheetsApp is a Google Script service,
like UiApp. Having built-in services that we can call on in the same
script makes using Google Script so easy. Next we will use the
openById method to get the sheet we need to write
data.
What is a Spreadsheet ID, you may be asking yourself? In Google Documents, everything including pictures, PDFs, presentations, and spreadsheets have a unique ID to keep track of them. Fortunately, it is also very easy to find. Select your spreadsheet and look in the address bar where the URL is.
You are looking for something like this:
key=0Aq1-C9Nl4dO-dHR4ZDFkV3FR4UDFFMXlrQXc&hl=en_US\
The key you need is between key= and
&.
What you need to do is copy the ID and replace
<YourSpreadsheetIdGoesHere>:
SpreadsheetApp.openById("0Aq1-C9Nl4dO-dHR4ZDFkV3FR4UDFFMXlrQXc")
The last part—.getSheets()[0]—simply gets the
sheet furthest to the left, or the first one. Note that this is a
zero-based call because .getSheets
returns an array of the sheets in the spreadsheet. This is an
application built to do just one thing and will only have one sheet, but
if you are concerned that your sheet may move to be in a different
place, it would be a good idea to use
.getSheetByName(.
This way it doesn’t matter where the sheet is just as long as the name
stays the same.name)
It can be useful to know when a visitor submitted a request, so we will need to create a timestamp to go along with the email. When using Google Script, it’s always good to look for ways to make your code more efficient. One of the best ways to do this is to minimize the number of calls you make to any of the other services, inside or outside of Google. While you can certainly write the data to a spreadsheet one cell at a time, you will likely run into timeout issues and it’ll take forever.
The next thing we need to do is get the range of cells where we
want to write our values. When accessing a spreadsheet you get the cells
with the getRange method. There are several
constructors for the method such as using ‘A1’ notation where the column
letter and row number are used similarly to spreadsheet formulas, for
example, (‘A1’) or (‘A1:C6’). Letters can get confusing so there is also
a constructor that accepts numbers in place of the column letters. We
will use .getRange(:<row>,
<column>,
<numRows>,
<numColumns>)
var range = ss.getRange(ss.getLastRow()+1, 1, 1, 2);
ss.getLastRow() returns the number of the last
row of data. We want to write our new submission to the row after that,
so we simply add one (+1). Next, we want to start a
column, so <column>1. There is only one row of data
to write, but with the date, it is going to be two columns wide, hence
the 1 and 2 at the end of the
set.
Warning
When converting columns from letters to numbers, the first column is number one, A=1. However, after you get the values, they will be in a JavaScript array that is zero-based, meaning column A is now zero, not one.
Setting Up the Data
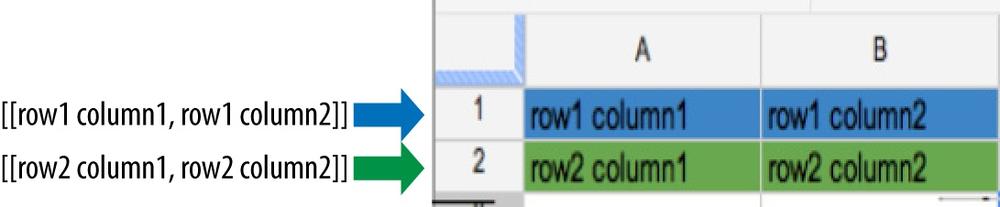
The data will need to be placed in what is known as a 2D array so that we only need to write to the spreadsheet once. Here is how that looks: [[row1 column1, row1 column2] , [row2 column1, row2 column2]], and so on as shown in Figure 4-2. Any amount of consecutive rows and columns can be written simultaneously in this way:
Because we only have one row, the data looks like this:
var values = [[new Date(), e.parameter.textBox]];
Now that we have the range of cells and the data in a matching configuration, all that is left is to write it:
range.setValues(values);
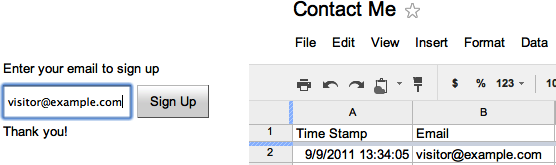
Save your work and load up the web UI. Remember that you need to use an email address in the form or the validation trigger. After pressing the Sign Up button, you should receive a “Thank you” message and the email address in the form will be reset to a blank text box. In the spreadsheet, you will see the results of all your hard work over the last two chapters. See Figure 4-3. Please refer to Chapter 1 for a refresher on placing the UI as a gadget in your site.
Final code for the UiApp style:
function doGet() {
  var app = UiApp.createApplication();

  app.add(app.loadComponent("MyGui"));

  //Validation
    var validateEmail = app.createClientHandler()
      .validateNotEmail(app.getElementById('textBox'))
      .forTargets(app.getElementById('textBox')).setStyleAttribute("color", "red")
      .forTargets(app.getElementById('info')).setVisible(true)
        .setText('Please enter a valid email address')
        .setStyleAttribute("color", "red");
    app.getElementById('button').addClickHandler(validateEmail)

  //handler
  var handler = app.createServerClickHandler('contactMe')
          .addCallbackElement(app.getElementById('mainPanel'))
          .validateEmail(app.getElementById('textBox'));
  app.getElementById('button').addClickHandler(handler);

  return app;
}

function contactMe(e){
 var app = UiApp.getActiveApplication();

 app.getElementById('textBox').setValue('').setStyleAttribute("color", "black");
 app.getElementById('info').setText('Thank you!').setStyleAttribute("color", "black");

 var ss = SpreadsheetApp.openById('0Aq1-C9Nl4dO-dHRWNHd4d21IUHZjbnVlMktWZVY2Z3c').getSheets()[0];
 var range = ss.getRange(ss.getLastRow()+1, 1, 1, 2);

 var values = [[new Date(),e.parameter.textBox]];
 range.setValues(values);

 return app;
}
Final code for the handcoded style:
function doGet() {
  var app = UiApp.createApplication();

  var mainPanel = app.createVerticalPanel().setId('mainPanel');
  app.add(mainPanel);

  mainPanel.add(app.createLabel('Enter your email to sign up'));

  var form = app.createHorizontalPanel();
  mainPanel.add(form);

  var email = app.createTextBox().setName('textBox').setId('textBox');
  form.add(email);

  var button = app.createButton('Sign up');
  form.add(button);

  var info = app.createLabel().setVisible(false).setId('info');
  mainPanel.add(info);

  //Validation
    var validateEmail = app.createClientHandler()
      .validateNotEmail(email)
      .forTargets(email).setStyleAttribute("color", "red")
      .forTargets(info).setVisible(true)
        .setText('Please enter a valid email address')
        .setStyleAttribute("color", "red");
    button.addClickHandler(validateEmail)

  //handler
  var handler = app.createServerHandler('contactMe')
      .validateEmail(email)
      .addCallbackElement(mainPanel);
  button.addClickHandler(handler);

  return app;
}

function contactMe(e){
 var app = UiApp.getActiveApplication();

 app.getElementById('textBox').setValue('').setStyleAttribute("color", "black");
 app.getElementById('info').setText('Thank you!').setStyleAttribute("color", "black");

 var ss = SpreadsheetApp.openById('0Aq1-C9Nl4dO-dHRWNHd4d21IUHZjbnVlMktWZVY2Z3c').getSheets()[0];
 var range = ss.getRange(ss.getLastRow()+1, 1, 1, 2);

 var values = [[new Date(),e.parameter.textBox]];
 range.setValues(values);

 return app;
}
Get Google Script: Enterprise Application Essentials now with the O’Reilly learning platform.
O’Reilly members experience books, live events, courses curated by job role, and more from O’Reilly and nearly 200 top publishers.

