Chapter 1. First Steps in Google Script
What is Google Script and why should you use it to build a web application? Simply put, Google Script is an easy way to figuratively glue Google and other web services together to form one powerful interactive web application. Just ahead, a more in-depth explanation of Google Script and how to use it to enhance existing Google Apps. You will also learn the basics of building an application. This first chapter should get your feet firmly planted on the ground floor of the Google Script development platform and demystify its usage.
Google Script Is...
Google Script is a coding and application development platform built into Google Apps, enabling you to add functionality to spreadsheets, Gmail, Sites, and other services from Google. For example, if your spreadsheet needs a menu item in the tool bar for creating a pivot table, you would write a Google Script that adds it to the menu and performs the task. Because Google Script serves as a backend to other Google services, you will need a spreadsheet or Site to hold the scripts you create. This does not mean that your script will be limited to the spreadsheet or site containing the script. On the contrary, a Google Script can run as a web service without the user ever knowing there is a spreadsheet involved in the interaction. This book will focus extensively on the concept of using Google Script to build applications that present themselves as web services running independently of other interfaces. You will learn how to use Google Script to build apps that run from a spreadsheet, in a browser window or within a Google Site, and from the user’s perspective, they will appear to be complete applications such as you might expect when using a web service like Picasa or Amazon.
There are some real advantages to having your scripts (i.e. applications) stored in one of the Google Apps services. Primarily, security is already built-in, meaning you do not need to worry about implementing that component into your application as you would if it were running on a legacy web server needing patches and constant monitoring for malicious attacks. As part of Google Apps, Google Script also allows you the same collaborative development abilities that are part of the Apps suite. What is truly exciting about Google Script is that it is a 100 percent web development environment that requires no transferring of files from computer to computer, backups, revision control, uploads to a production server, updating the development software, or many of the other tedious aspects of development that get in the way of actually writing applications. These parts are all built-in, allowing you to focus on creating products for your business, school, club, or anything that needs to run on the Web.
The UiApp service, which stands for User Interface App, was released in early 2010 as a way to allow developers to collect user input that could be sent back to a script for processing. UiApp uses the Google Web Toolkit (GWT) Widget set as the framework for building an interface. Widgets allow you to create such things as a text box and a Submit button but also more complex items like flex tables and list boxes. Everything you see in a Google Script UI are widgets cleverly arranged within a frame in the page. The only other elements—panels—are the containers that hold all your widgets, and that is truly all there is to the visual part of a Google Script UI. Part III lists every Google Script Widget, including example code. If you are familiar with GWT, you will be right at home creating UIs in Google Script. Never heard of GWT? Don’t worry, this book will have you crafting widgets and transversing AJAX with little pain and only a mildly slopping learning curve.
What You Will Get From This Book
By the time you get to the back cover you will have learned all the necessary elements that go into building enterprise applications using Google Script. With this knowledge under your belt, you will be able to create your own applications and take full advantage of your Google hosted services. Your apps will have the ability to recognize and authenticate users and carry out tasks such as displaying custom data from a spreadsheet, data entry, sending emails, and so much more. Have a look at Part II to see the kinds of applications we will be building and let your imagination flow.
Getting Started
Enough preamble, let’s dig in!
For the most part, we will be building our scripts in the Google
Documents service. To get started with the examples in this chapter, load
up Google Docs, http:docs.google.com or
http:docs.google.com/a/<your
domain> if you are using a Google Apps account. Create a
new Spreadsheet.
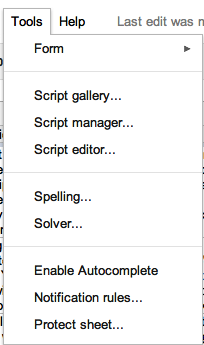
In your Spreadsheet, click the Tools menu, then select Script editor, see Figure 1-1.
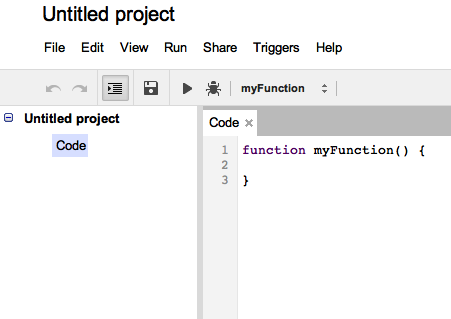
The Google Script editor will open as a new window, see Figure 1-2.
Looking Around the Editor
Before writing your first script, let’s take a look at some of the features in the Google Script editor. First off you will notice that it looks much like what you already know from Google Documents. Under the File menu are the typical Save, Delete, Rename, Open, Create New File or Project, etc. Also like many of the other Google Apps services, there is a Revisions feature that will allow you to turn back the clock to a point when your code was working. (Not that we ever need such features...) Seriously, we often go down the wrong road during development, and revisions can save you hours of trying to get back to a known good point. When launched, a pop-up Revisions box will show what the code looked like in the version you selected.
In the File menu, there are two very important options: “Properties” and “Build a User Interface.” Properties makes it possible to store a limited amount of information in Key:Value pairs for use by your script at runtime. Properties can be edited in the box that pops up after clicking the “Properties” option in the File menu, or by using the Properties Service right in your code. Many of the apps in this book will need to sign into non-Google services, and Script Properties is a great place to store something like a password. The Build a User Interface, or the GUI Builder, is one of the tools we will use to create a user interface. This will be covered throughout the book, so just note that this is where you launch it.
Nothing very exciting in the Edit menu, other than “Find Selection,” which also incorporates Replace, a good way to globally change the name of a variable. Moving onto the View menu, there are some important points: Execution Transcript and Logs. When a script is run from the editor, the Execution Transcript will list each command as it is run. Using the Execution Transcript, you can see the order that the code is executed, which is helpful in debugging. “Logs” is used along with the Logger Service and allows the writing of information and other notes as a way to track information. This was very useful before the debugger was added and can still be a big help when testing code. I want to reiterate that these features only work from the Editor and will not be of much use debugging in the UiApp when it is run from the browser. Don’t worry, there is a whole section to help you debug like a pro.
A quick example of using the Logger:
function myFunction(){
  Logger.log('A test of the Log');
}
Click Run, and then check in the Log under the View menu.
The Share menu is where access to the script is set and where you will find the Publish option that makes displaying a UI possible. The publishing feature is covered later in the chapter.
Triggers are the automation component that have the ability to run a script at specified times or in certain events, like the submission of a form or when the spreadsheet is edited. Triggers are very useful for tasks such as backing up information at 1 A.M. so you get credit for working hard while fast asleep.
That’s about it for the menu. Figure 1-3 shows a few buttons that explain themselves and make for easier access to the most common features.
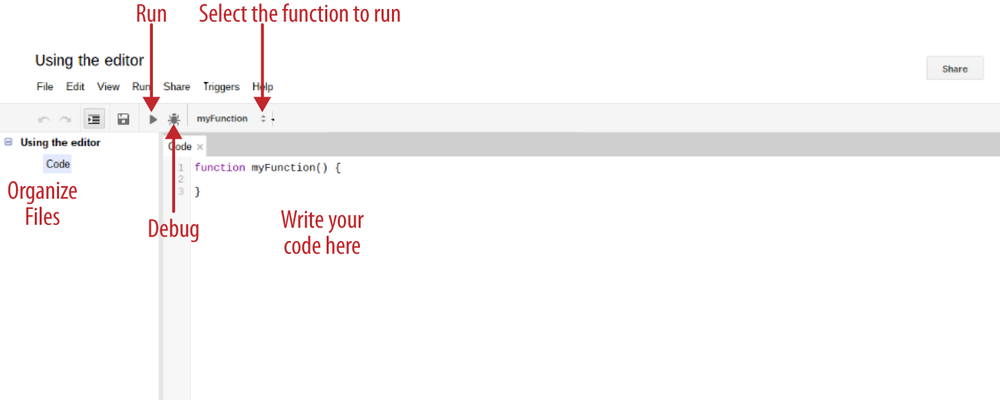
The Debug option next to Run will bring up a window at the bottom of the code window and show the values of your code as it is executed. It has features for setting break points, stepping in and over parts of code, and will make developing non-UI parts of your code much easier. The user documentation on the Google Script website goes into detail on usage of the debugger.
Three Ways to Create a UI
There are three ways to create and display a user interface (UI) in Google Script. The first way is in a spreadsheet as a pop-up window; the second, as a web page; and the third as a gadget in a Google sites page.
As you work through this chapter, please note that some of the code in each type of UI is the same and will only be described once as it is first introduced. It would be a good idea to go through all the different UI types to avoid confusion about a certain topic and to gain an understanding of when and why a certain UI type would work better for your application.
Hello UiApp Spreadsheet Integrated
Now that you know your way around the Editor, it is time to write your first script. Keep in mind that all Google Scripts are written entirely in JavaScript and there is no HTML needed to generate the UI. The first type of UI is called “Integrated” because it is going to display as a pop-up window in our spreadsheet. The term “integrated” comes from requiring a spreadsheet to display the UI, but this does not mean that any certain type of UI is more or less integrated than another. It is simply to give you a reference of what we are discussing because the code to display each type differs slightly.
Open the Editor, click File, and select New. In the new script, delete all of the example code, and add the following code:
function helloWorld() {
var mydoc = SpreadsheetApp.getActiveSpreadsheet();
var application = UiApp.createApplication().setTitle('Your Title');
//TODO add your code here
mydoc.show(application);
}Click Save, and name your script “Hello World Integrated”. Now click Run. Switch your browser window to the Spreadsheet view, and you will see an empty UI window with the title “Hello World” at the top.
Note
The core of all Integrated UiApps and the components to make the UI display:
UiApp.createApplication();
show(application);
Diving into the code
All Google Scripts start with a function; when using the integrated UI, you can name your function almost anything you like:
function <name>()Warning
The function names doGet,
doPost, onEdit,
onInstall, and onOpen are
special reserved functions and should not be used as names for
custom functions you create that are not performing these specific
operations.
Here we use the Google Script Spreadsheets Service to create an object called “mydoc” that represents the current spreadsheet:
var mydoc = SpreadsheetApp.getActiveSpreadsheet();
The following line creates the UiApp object, which contains all the methods for creating UIs:
var app = UiApp.createApplication();
When using a spreadsheet, you need to insert the script into it
by using the show method:
mydoc.show(application);
Time to get something for you to look at. Find the line starting
with //TODO and replace it with the
following code block:
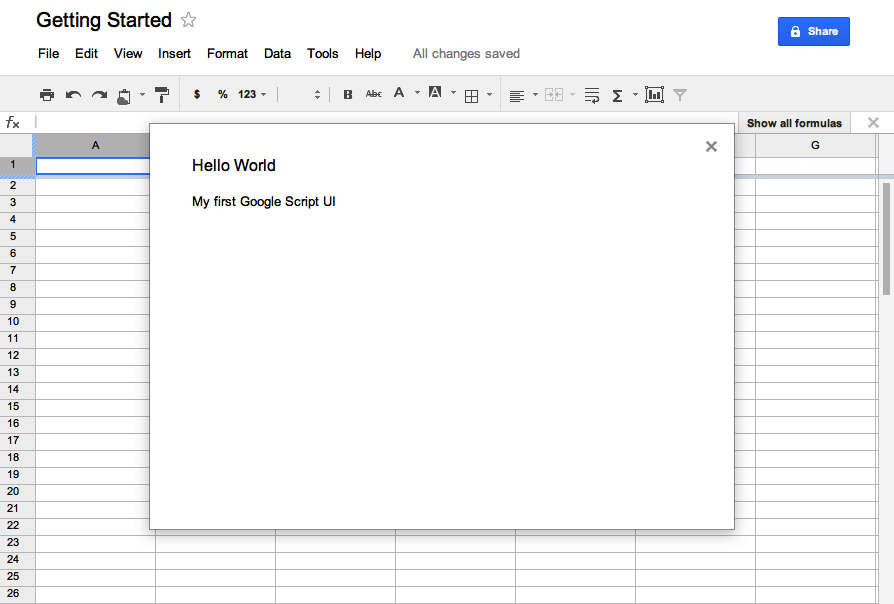
  var helloWorldLabel = app.createLabel('My first Google Script UI');
  app.add(helloWorldLabel);
To display information on the UI, you will need a widget. In
this case, a simple label will be created, which is a widget that only
takes text in its argument and shows inline. Labels can be styled with
CSS to give you all sorts of creative options. To make the Label
widget appear in the UI, it needs to be added to the UiApp object by
calling the add method and using
the variable name in the methods argument.
Run the script and switch your browser to the window containing the spreadsheet. Figure 1-4 shows the UI displayed in a spreadsheet. There are endless possibilities for why you might want to pop up an interface for the user: data entry, choosing information from another service like Contacts, or running a script requesting additional information are just a few examples.
Integrated Versus Standalone
One of the most exciting features of the UI Service is that it can run all by itself without the need to open a spreadsheet. This is accomplished by publishing the script, which creates an access point through a special Google URL. There are several options when publishing, such as restricting access to anyone but you or opening up the UI so that anyone visiting the URL can run it. Publishing does not, however, allow visitor access to your code; that is controlled by the sharing in the spreadsheet or site. This means you can create your application and the code will stay safely secured.
Warning
One important thing to remember is that a script running as a published web service will always run under the creator’s account and will have access to the services to which he has granted access. Therefore, if your script lists all the emails in your Inbox and you make it public, anyone visiting the URL will see your Inbox not rather than his own.
Running the script as your account can be a benefit because you can set the spreadsheet sharing to limit access and then control what a UI viewer sees about the data while still allowing input into the spreadsheet. There will be more on this concept later when we start putting together real-world apps in Part II.
One limitation to having the script run as you, the creator, is that you will not be able to directly access a user’s account from the built-in classes. For example, if your application needs to access the user’s Contacts service, it will not work that way. You don’t have that user to user access in Google Apps, so it does not work in Google Script either. Later in the book we will cover how to handle this problem using two-legged OAuth.
Note
In the Integrated UI spreadsheet version of a Google Script, your users have the same access as the spreadsheet, so unlike the standalone UI, where a script runs under your account, the Integrated UI will run as the user’s account.
While I present these differences of the two UiApp styles as hurdles, there are some very good reasons to have access restricted in this way. Fortunately, these security features don’t limit us in building apps, but they add certain complexities that need to be considered.
Creating a Standalone UI
The second type of UI application is referred to as standalone because the UI is accessed from a special URL hosted on Google’s cloud. There is no need for a spreadsheet to use the standalone UI but you can build this type of UI in a spreadsheet or in any of the Google services where the script editor is available. The URL can be made public allowing DNS mapping to your domain. For example, http://Your_Great_App.domain.com.
Open the script editor, select File➝New. Replace the myFunction code with:
function doGet(e) {
  var application = UiApp.createApplication();
  //Your Code
  return application;
}
Note
The standalone UiApp will be the most commonly used style in this book because it has the ability to run as a gadget in a Sites page or as its own independent page.
The first difference from the Integrated UI version is that we
must have a doGet function for the
UiApp window manager to grab when the standalone URL is loaded in a
browser. This is analogous to the entry point you might use in GWT.
doGet is the starting point for
loading visible elements in the standalone UI.
The visual part of the UI is created using the UiApp class that will create an object for display. You don’t need to have a widget to present visual information to the user if your script’s purpose is to simply perform a task when the URL is loaded. This is accomplished by passing values in the URL parameters and will be covered in Chapter 8. Even if you are only collecting information and don’t have content to display, it is good practice to put a message of some kind on the page for the user:
var application = UiApp.createApplication()
To get the UI to display a widget on the page you must return the UiApp instance:
return application;
Think of it this way, when you load the UiApp’s URL, a Google
server hosting your code looks for and runs the doGet function. If there is no return value
for doGet, you will not see anything
on the page. If you have not yet guessed, all Google Scripts run on the
server side and the interaction you see is accomplished through remote
procedure calls (RPC).
To display some text on the page, create a label and add it to the
application object in the same way
you did for the Integrated UI type:
  var label = app.createLabel('Nothing but Web');
  app.add(label);
That is all there is to making a basic UI page. Click Save, and
name your script Stand-alone Web
Service.
Publishing a script
To make the UI available, it will need to be published to the Web. This is Google’s way of saying that a special URL has been created and the UI will be served from there. It is not public unless you make it so.
Click the Share menu and select “Publish as service...” as shown in Figure 1-5.
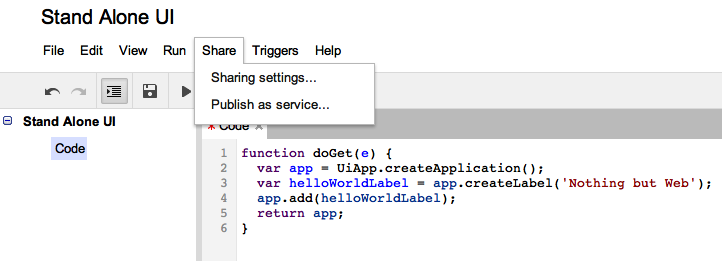
Figure 1-6 shows the “Publish as service...” option where you can choose the level of access you would like visitors to have. The options differ depending on whether you are using a Google or Google Apps account. The last setting—“Allow anyone to invoke the service”—will give access to any visitor that has a Google account. When you check this option, an additional choice will appear allowing you to select “Anonymous access,” meaning the script is fully open to the Web and no sign-in is required.
Warning
The “yada yada” Google refers to is a serious warning. When you build a standalone application, it will run as you and it will have access to anything you have given it permission to see. For example, be careful not to publish the contents of your email Inbox to everyone on the Web.
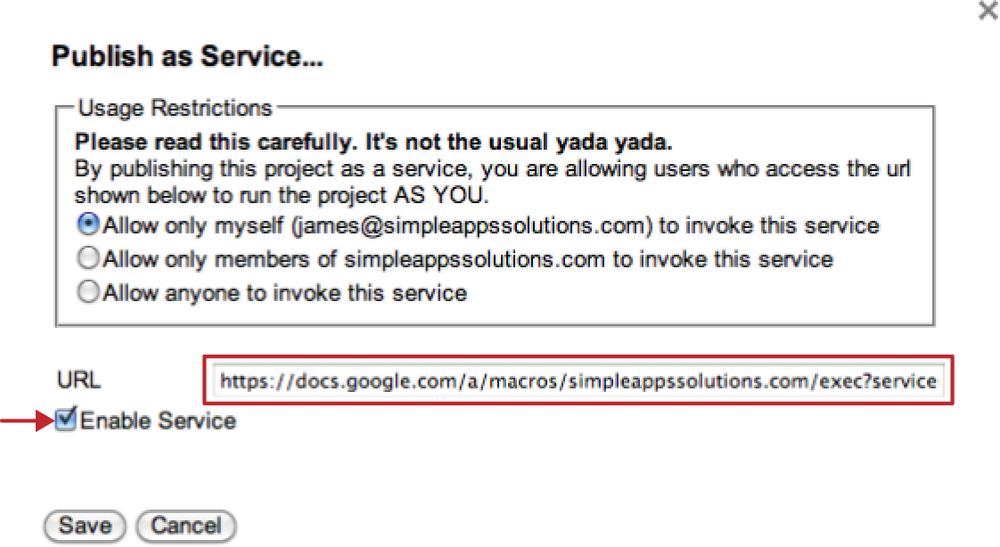
Once you have chosen the level of access, check the Enable Service box and copy the URL in the box. This is the special URL for the page where this UI is being hosted. If you forget it, simply open this dialog and copy again. Click Save and open a new tab in your browser. Paste the URL in the address bar and load the page. You should now see your UI displaying the text from the label created earlier.
Congratulations! You have just created your first Google Script UI Web Service. Not much of a “service” yet, but as you can see, it takes very little effort to get an application pushed out to a web interface. What you might have missed is everything that is going on here, which can be a good thing. For one, you did not need to create an HTML page, or figure out how to FTP to a web server somewhere to upload files. To that extent, you also didn’t need to purchase and install a web server or buy a domain. Google Script gives you the ability to write your application entirely in JavaScript and then takes care of the rest of the details. I don’t want to say it gets easier from here, but this is the foundation; after this, the functionality of providing a service has more to do with adding widgets and filling them with data. There is no more that needs to be done to create the UI service or web page. Maintenance, access, and version tracking is integrated, which means you can focus on the code.
Making Google Sites Interactive
To this point, Google Documents has been used to work with the Script Editor and create UIs. However, the Editor is also available in the Google Sites service, allowing UI scripts to be inserted as gadgets appearing on the pages in your sites. This is tremendously exciting for Google Sites users because it means having the ability to create complex interactions that would normally require code hosted on a server somewhere else. For example, a business could feature products with color options that the user can change to see a different look, an HR department application might allow training sign up pages that bring back live calendar results or a school could host an educational game for students. These are just a few examples, but the options are virtually limitless.
Using the GUI Builder
In this section, you will learn how to open the Script Editor from a Google Site, create a UI using the GUI Builder, and place the script as a gadget in a Sites page. Time to load up a Google Site and do some more scripting.
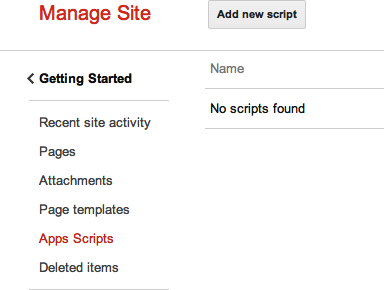
From a Sites page, click the “More actions” menu on the
upper-right. Select “Manage site,” then, on the left, select “Apps
Scripts.” Figure 1-7 shows the Script Manager that
will list all of your scripts. Well, there are no scripts yet so let’s
do something about that. Click “Add new script” to launch the Script
Editor. Look familiar? This is the same Script Editor we used in the
spreadsheet, only the script storage location has changed to Google
Sites. Click Save and name your script GUI
Builder.
There is not a concept of an integrated application for a site like in a spreadsheet, so use the Creating a Standalone UI style of UI any time you write scripts for a site. In the last two examples, you have handwritten the code that created a label widget to display on the page. It is important you have this skill as your apps grow in complexity, but in some cases you just need to quickly arrange text boxes and buttons on the page. Let me now introduce you to the GUI Builder, Figure 1-8, which gives you a way to build a UI without writing any code. You invoke it by clicking “File” and selecting “Build a User Interface.”
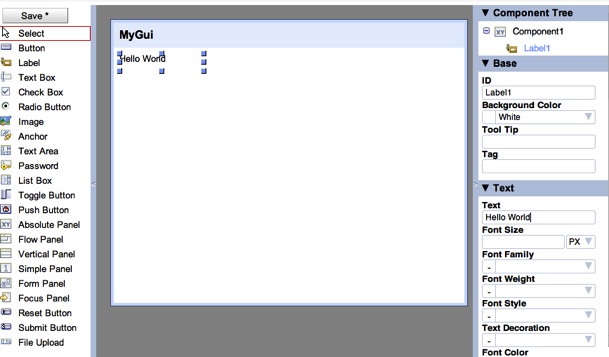
The GUI Builder is a WYSIWYG (What You See Is What You Get) editing tool that will let you create your interface by simply dragging elements into the MyGUI window.
Continuing on our theme, drag a label widget from the left into
the compose window and position it near the top-left. Once you drop the
label, you will see its attributes appear on the right. In the box below
the word Text, change Label1 to Hello World. You will see that the label in
the compose window has updated its text as you type.
Click Save, name your GUI MyGui, and return to the Script
Editor.
To load the GUI you just created, use app.loadComponent("MyGui") and add it to the
UiApp instance. The code looks like this:
function doGet(e) {
  var application = UiApp.createApplication();
  app.add(app.loadComponent("MyGui")); // name of the saved Gui
  return application;
}
Save your script and head back to the page on your site where you would like to display your new UI. In Page Edit mode, click Insert, as shown in Figure 1-9, and select Apps Script Gadget.

Choose your script and click Select. Now you are presented with a panel with options that control the sharing and the look of the gadget. We will cover these options in detail later; for now, click Save. Click Save again to close the Page Editor, and you will see your gadget live on the page.
Up and Walking
Here we are at the end of Chapter 1, and a lot of ground has been covered. Starting with a description of where to find the Google Script Editor and what one might use it for, then progressing on to creating a new script. After that, you learned how to make your UI appear integrated in a Google Spreadsheet and then as an independent web page. Lastly, you accessed the Script Editor from a Google Site and learned about the easy-to-use WYSIWYG GUI Builder that allowed you to make a gadget without writing much code, then used the UI as a gadget on a Google Sites page. You should now have your feet under you and be able to find your way around the Google Script service.
In Chapter 2, you will continue mastering Google Script by learning about helpful ways to arrange your development environment and how to debug UI code.
Get Google Script: Enterprise Application Essentials now with the O’Reilly learning platform.
O’Reilly members experience books, live events, courses curated by job role, and more from O’Reilly and nearly 200 top publishers.

