As with anything in Dreamweaver, styles are easy enough to edit, delete, or duplicate; all you need is a map of the terrain.
While building a website, you almost always continually refine your designs. That chartreuse color you assigned to the background of your pages may have looked great at 2 a.m., but it loses something in the light of day.
Fortunately, one of CSS’s greatest selling points is how easy it is to update a website’s formatting.
Note
Although this section focuses mainly on how to style your text, you also use CSS styles to add background colors, background images, borders, and to accurately position elements on a page. The next few chapters show you how to style links, images, tables, forms, and other page elements with CSS.
Dreamweaver provides many ways to edit styles:
In the CSS Styles panel, select a style (Figure 4-2) and then click the Edit Style button to open the Rule Definition window (Figure 4-3; this is the same window you used to create the style). Make your changes, and then click OK to return to the document window. Dreamweaver reformats the page to reflect your changes.
Double-clicking the name of a style in the CSS panel also opens the Rule Definition window. Actually, depending on a preference setting—or a setting someone else may have tweaked while using your computer—double-clicking a style in the CSS panel may display the—eeck!—raw CSS code in Code view. To change this behavior, open the Preferences window (Ctrl+U [⌘U]), click the CSS Styles category, and then select the “Edit using CSS dialog” button.
In the CSS Styles panel, right-click (Control-click) the name of a style, and then, from the shortcut menu, choose Edit, which also opens the Rule Definition window. Make your changes to the style and then click OK to return to the document window.
Tip
The properties pane in the CSS Styles panel offers yet another, faster way to edit a style. This advanced technique requires a bit of CSS savvy and is discussed on Fast Style Editing With the Properties Pane.
At some point, you may find you created a style that you don’t need after all. Maybe you redefined the HTML <code> tag and realized that you never use it. You don’t need to keep it around, taking up precious space in the style sheet.
To delete a style, make sure you have the CSS Styles panel open (Window→CSS Styles), and the All button highlighted (see Figure 4-1). Click the name of the style you wish to delete, and then press your keyboard’s Delete key (you can also click the Trash can icon at the bottom of the panel). You can remove all the styles in an internal style sheet (as well as the style sheet itself) by selecting the style sheet—indicated by “<style>” in the CSS Styles panel (see Figure 4-1)—and pressing Delete (or clicking the Trash can icon). If you “trash” an external style sheet, however, you merely unlink it from the current document without actually deleting the .css file.
Unfortunately, deleting a class style doesn’t delete any references to the style in your site’s pages. For example, if you created a style called .company and applied it throughout your site, and you then delete that style from the style sheet, Dreamweaver doesn’t remove the <span> tags or class properties that refer to the style. Your pages are still littered with orphaned code like this—<span class="company">CosmoFarmer</span>—even though the text loses its styling. (See how to solve this problem using Dreamweaver’s powerful Find and Replace tool on page 801.)
You can rename any style by selecting it in the CSS Styles panel, pausing a second, and then clicking the name again. This makes the name editable, at which point you can type a new name in its place. Of course, if you change a style named p to a style named h1, you’ve essentially removed the style for the <p> tag and added an <h1> style to the style sheet—in other words, all the paragraphs in your pages would lose their formatting, and all <h1> tags would suddenly change appearance. Alternatively, you could open the .css file in Code view and then edit the name. However, when it comes to class styles, just changing the name doesn’t do much good if you’ve already applied the style throughout your site. The old class name still appears in the HTML everywhere you used it.
What you really need to do is rename the class style, and then perform a find-and-replace operation to change the name wherever it appears in your site. Dreamweaver includes a handy tool to simplify this process.
To rename a class style:
In the Property inspector, choose Rename in the Class menu (Figure 4-5).
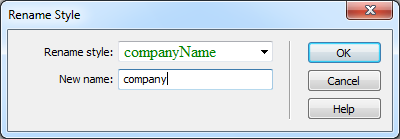
The Rename Style window appears (Figure 4-8).
From the top menu, choose the name of the style you wish to rename.
This menu lists all the class styles in the page’s stylesheets, both internal and external.
In the “New name” box, type the new style name.
You must follow the same rules for naming class styles as described on Phase 1: Set Up the CSS Type. But, just as when creating a new class, you don’t need to precede the name with a period—Dreamweaver takes care of that.
Click OK.
If the style whose name you’re changing is an internal style, Dreamweaver makes the change. Your job is complete.
If the style belongs to an external style sheet, however, Dreamweaver warns you that other pages on the site may also use this style. To successfully rename the style, you have to use Dreamweaver’s Find and Replace tool to search the site and update all the pages that use the old style name. In that case, continue to step 5.
If you get cold feet, click Cancel to call off the name change, or click Yes to open the Find and Replace window, where you should click Replace All.
One last warning appears, reminding you that you can’t undo the find-and-replace.
Click Yes.
Dreamweaver goes through each page of your site, dutifully updating the name of the style everywhere it appears.
Dreamweaver makes it easy to duplicate a CSS style, which is handy when you’ve created, say, an HTML tag style, and then decide you’d rather make it a class style. Or you may want to use the formatting options from one style as a starting-off point for a new style. Either way, you start by duplicating an existing style.
You can do so two ways. The easiest is to open the CSS Styles panel (Window→CSS Styles), right-click (Control-click) the name of the style you want to duplicate, and then, from the shortcut menu, choose Duplicate.
The Duplicate CSS Rule window appears (Figure 4-9), where you can give the duplicated style a new name, reassign its Type setting, use the “Define in” menu to move it from an internal to an external style sheet, and so on.
When you click OK, Dreamweaver adds the duplicate style to the page or external style sheet. You can then edit the new style just as you would any other, as described on Manipulating Styles.
Get Dreamweaver CS5: The Missing Manual now with the O’Reilly learning platform.
O’Reilly members experience books, live events, courses curated by job role, and more from O’Reilly and nearly 200 top publishers.

