Dreamweaver gives you several ways to create CSS styles. For text, you can use the Property inspector’s CSS mode to apply a font, font size, font color, font weight, and alignment to selected text. To create styles for elements other than text (like images or tables), or to tap into the dozens of other CSS properties not listed in the Property inspector, use the CSS Styles panel (see Figure 4-1). To get a complete overview of the style creation process, you’ll look at both methods—starting with the more versatile CSS Styles panel, and then moving onto the Property inspector.
Dreamweaver gives you many ways to create a new style: On the CSS Styles panel, click the new style button (which Dreamweaver calls the New CSS Rule button; see Figure 4-1); right-click anywhere in the CSS Styles panel, and then, from the menu that appears, select New; or choose Format→CSS Styles→New. The New CSS Rule dialog box appears (Figure 4-2), where you begin creating your new style. (In the technical language of CSS, a style is actually called a rule, but for simplicity’s sake this book uses the term style. After all, Cascading Rule Sheets doesn’t have much of a ring to it.)
Here’s a quick tour of your choices:
Selector Type. From the Selector Type menu, choose the kind of style you want to create. Class creates a style that you manually apply to page elements, ID creates a style that you can use only once on the page, and Tag creates an HTML style that Dreamweaver automatically applies to each occurrence of the tag). See the previous section for a discussion of these three types.
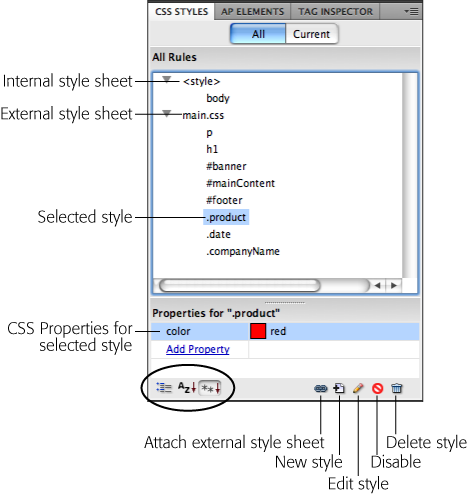
Figure 4-1. With the “All” button selected, the CSS Styles panel lists the names of all the styles the current page uses, including those in both external and internal style sheets. Here, one external style sheet—main.css—contains five styles. The first two are tag styles (notice that the names match various HTML tags), while the next three are ID styles (note the # at the beginning of the name), and the last three are class styles (note the period before the name). You also see one tag style defined in an internal style sheet—the one listed below “<style>”. Click the minus (_) icon (arrow on Mac) to the left of the style sheet to collapse the list of styles, hiding them from view. The “Properties” list in the bottom half of the panel lets you edit a style (see page 304); the three buttons at the bottom left of the panel (circled) control how Dreamweaver displays the Properties list.
You’ll want to use the fourth type of style, Compound, to create more advanced style types, such as pseudo-classes, attribute selectors, and descendent selectors. You’ll learn about these styles in various parts of the book; you can find a detailed discussion starting on Compound Selectors.
In addition, if you’ve selected something on a page (such as a paragraph, an image, or a headline), Dreamweaver highlights the Compound option and, in the Selector Name field, suggests what’s called a descendent selector. You’ll learn more about descendent selectors on Descendent Selectors, but basically, they’re a type of style that applies formatting to nested page elements, that is, to page elements within other HTML tags. For example, "div p" is a descendent selector that formats any paragraph (that’s where the p comes) that appears within a <div> tag. So in cases where you want a descendent selector, choose Compound selector.
Selector Name. If you selected Class or ID from the Selector Type menu, enter a name for the new style. According to the rules of CSS, you have to start class style names with a period—.copyright, for example—and ID style names with a # symbol—#banner, for example. Dreamweaver automatically adds the proper symbol if you forget.
Another class or ID style name rule: A letter must follow the period or # symbol. After that, you can use any combination of letters and numbers, but avoid unusual characters and spaces. For example, .logo, #main_content, #column2 all work fine. Dreamweaver lets you know if you use any invalid characters.
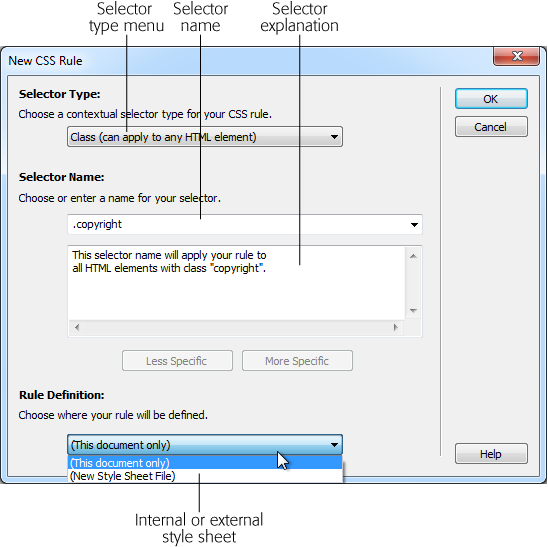
Figure 4-2. In the New CSS Rule dialog box, you choose a type of style, give it a name, and decide whether to put the style in an internal or external style sheet. You use the two dimmed buttons, labeled Less Specific and More Specific, when you type a special type of CSS selector called a descendent selector (see page 298).
If you chose the Tag style instead, choose the HTML tag you want to redefine from the Selector Type pop-up menu.
Note
If you’re an HTML guru, you may find it faster to skip the Selector Name pop-up menu and just type the tag (minus the brackets) in the text box. For example, if you want to create a style for all unordered (bulleted) lists, type ul.
If you select the Compound option, Dreamweaver lets you type any valid CSS selector type in the Selector field (you’ll learn about more selectors on Compound Selectors). You use this feature for some advanced CSS tricks, but you can also use it just to create a tag or class style.
Note that when you add a class, ID, tag, or other selector to the Selector Name field, Dreamweaver briefly explains to which HTML elements it will apply the selector. For example, Figure 4-1 displays the New CSS Rule dialog box in the process of creating a new class style named .copyright. The dialog box explains that Dreamweaver will apply this rule to all the HTML elements to which you assigned the class property copyright (in other words, to all the text and tags you applied the class copyright, as described on Using Styles). For simple styles like class and tag styles, this explanation is pretty much like “Uh, yeah. Tell me something I don’t know, Dreamweaver.” But for complex selectors such as the descendent selectors you’ll learn about on Descendent Selectors, this explanation box helps clarify which page element an otherwise confusing selector name will apply to.
Rule Definition. The Rule Definition menu at the bottom of the dialog box lets you specify where you want to put the CSS code for the style you’re about to create. Choose “This document only” if you want to use the style only on the current web page (creating an internal style sheet, as described on Internal vs. External Style Sheets). To create a new external style sheet, choose New Style Sheet File from the Rule Definition pop-up menu. This option not only creates a new external CSS file (which you can save anywhere in your site folder), but also adds the necessary code in the current document to link it to that file.
If you previously linked an external style sheet to this document, then that style sheet’s name appears in the pop-up menu, indicating that Dreamweaver will add the new style to this style sheet file.
Tip
If you create a bunch of internal styles on a particular page, and later realize you’d like to turn them into an external style sheet that you can use in other pages, you’re in luck. Dreamweaver includes many tools for managing your style sheets. You’ll learn how to use them starting on Moving and Managing Styles.
If you indicate that you want to create an external style sheet, clicking OK brings up a Save Style Sheet As dialog box. Navigate to your site’s folder, and then type in a name for the new external CSS file. Just as HTML files end in .html, so CSS files end in .css.
Note
If you’ll be using this style sheet for all your site’s pages, you may want to save it in your site’s root folder, or in a folder specifically dedicated to style sheets, and give it a general name like site_styles.css, main.css or global.css. (You don’t have to type the .css file name extension, by the way. In this case, Dreamweaver adds it.)
No matter what Selector Type option you select (Class, ID, Tag, or Compound), clicking OK brings you to the CSS Rule Definition window.
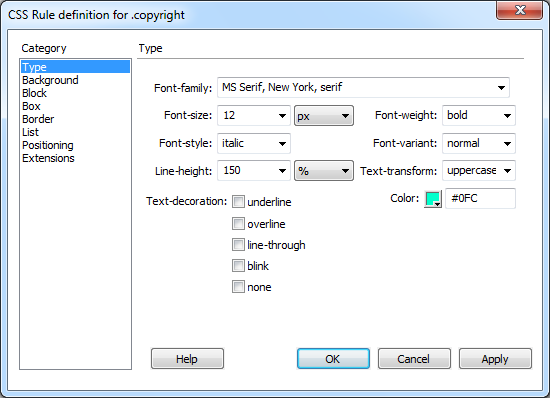
The CSS Rule Definition window provides access to all the available formatting for styling text, graphics, tables, and other HTML tags (see Figure 4-3). You’ll learn about each of the properties throughout this book.
When you finish defining a style, click OK at the bottom of the Rule Definition window. Dreamweaver adds the style to the specified style sheet, and displays it in the CSS Styles panel (Figure 4-1).
The real trick to defining a style is mastering all the properties available, such as borders, margins, and background colors, and then learning how to use them reliably in different browsers. You’ll learn about different CSS properties starting on Duplicating a Style.
The Property inspector’s CSS mode lets you quickly create (or modify) styles, such as choosing a font or a font size (see Figure 4-4), for text you select. In CSS mode, the Property inspector looks a lot like a formatting bar in a word processing program: dedicated buttons let you make text bold or italic, control alignment, and set font type, size, and color. All these controls use CSS properties to achieve their effects.
To use the CSS mode, select some text on the page. For example, drag your cursor to select a portion of text, double-click to select a word, or triple-click to select an entire paragraph or headline. Then, from the Property inspector, select an option—for example, choose a selection of fonts from the font menu. If you don’t have a style currently applied to the selection, you see <New CSS Rule> in the Targeted Rule menu on the Property inspector (see Figure 4-4, top), and when you apply a format, Dreamweaver opens the New CSS Rule dialog box (Figure 4-1).
Now it’s up to you to pick the type of style, name it, and decide where to store it; just follow the same steps you used to create a new style using the CSS Styles panel, as described on Creating Styles. You’re free to create a class, tag, ID, or other style. After you create the new style, you return to the Property inspector (you skip the Rule Definition window). The Property inspector then lists the new style name in the Targeted Rule menu and displays the formatting you selected (for example, the font you choose appears in the Font menu).
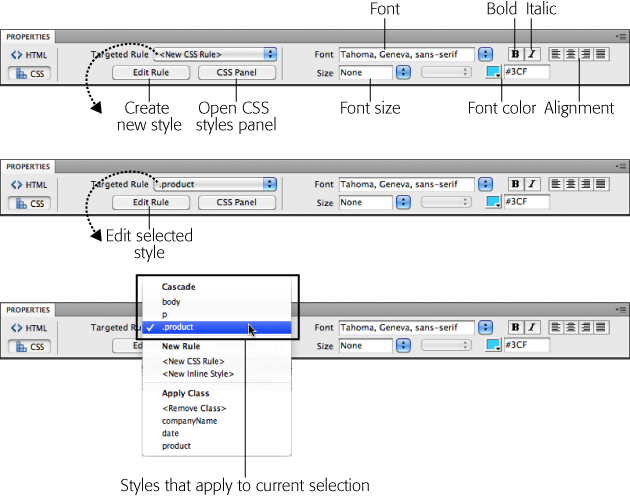
Figure 4-4. The Property inspector’s CSS mode either creates a new style when you select a formatting option like font size (top) or it adds the formatting property to an already existing style (middle). You can tell which action Dreamweaver will take by looking at the Targeted Rule menu—if it says <New CSS Rule>, Dreamweaver lets you create a brand new class, tag, ID, or other style. However, if a style name (like p or .copyright in the middle image) appears in that menu, you’re editing an already existing style. If you want to create a new style, select <New CSS Rule> from the menu before you select a formatting option. Normally you want to avoid the <New Inline Style>, since this adds CSS directly to an HTML tag, making the web page’s file size larger and the file slower to load and harder to update. However, inline styles come in handy when you need to create HTML emails, since that’s the most reliable way to add CSS to an email message.
Let’s look at a basic example. Suppose you wanted to format a copyright notice at the bottom of the page in a way that’s different from other text on the page. You would first triple-click the copyright paragraph to select the text, and then choose whatever formatting options you want from the CSS mode of the Property inspector—for example, select 12 from the Size menu to create small, 12-pixel type.
At this point, Dreamweaver opens the New CSS Rule dialog box and, from the Selector Type menu, you select Class, and then, in the Selector Name field, type .copyright. You could then store the file in either an external or internal style sheet as described on Phase 2: Defining the Style. When you close the New CSS Rule window, Dreamweaver applies a new class style named copyright to the paragraph and the Size box in the Property inspector displays “12” to denote the text’s pixel size.
The Property inspector’s CSS Mode behaves differently, however, if you already have a style applied to the selected text. In that case, the style appears in the Targeted Rule menu. For example, in Figure 4-3 (bottom), you already applied the class style product to the selected text, so you see “.product” listed in that menu. At this point, choosing another formatting option from the Property inspector—for instance, clicking the bold button, or selecting a font from the font menu—doesn’t create a new style, it simply adds the new format to the existing style.
For example, say you create a .copyright class style with a font size of 12 pixels. If you select that copyright text again and then select a font color, Dreamweaver updates the .copyright class style—it adds the CSS color property to the style. Making additional formatting choices also updates the style.
Get Dreamweaver CS5: The Missing Manual now with the O’Reilly learning platform.
O’Reilly members experience books, live events, courses curated by job role, and more from O’Reilly and nearly 200 top publishers.

