With some amount of patience, you should now have a development version of your app that is installed on your device and the devices of your beta testers. Installing the app was not an end unto itself, but rather the beginning of testing, refining, and improving the app.
Depending on the size of your team and the resources you have available, you might have one or more persons dedicated to performing quality assurance (QA). Regardless of whether that is the case (and it probably won’t be for many of you reading this book), I want to challenge you to really own the responsibility of having the right features that work properly. This means you should be the most ardent beta tester of your app, discovering obvious bugs before others do and influencing how best to improve features from your actual use of it. That’s the same way your beta testers should be experiencing the app—in conditions that reflect the real-world environment of your App Store customers.
I’m emphasizing this point so strongly because you won’t discover issues by just seeing the app in the iPhone Simulator or through formal QA by testing the app through a series of predefined steps. What makes developing for the iOS unique is that hardware heavily influences the testing process. In addition, aside from device-related features and iOS versions, these devices also have various states for network connectivity. For instance, it’s possible to have no cellular network, an EDGE or 3G connection, or WiFi present at various signal strengths. You should test, for example, the process of opening your app in Airplane Mode—available in your device’s Settings app—where no network connectivity is present and see if it works.
Many apps crash because these types of scenarios are not initially accounted for during development. To precisely state the larger takeaway, everyday conditions are hard to simulate in a formal QA process (which you should still use) and often will only be encountered by using the app outside of a testing environment. Even Apple tests its devices and apps this way, requiring its engineers to experience them in regular use outside of the Apple campus.
Through whatever channels you are using, keep the lines of communication open with your beta testers. When you provide them the latest development version of your app, be sure they know if you want them to test anything specific, and let them know of any changes that have been made since the last time they tested the app by including a changelog or release notes outlining what is new, updated, fixed, or outstanding. Also, remind them how to properly install the new app (refer back to Figure 6-7).
Note
You may want to take advantage of the open source framework known as Hockey, which allows you to update your beta app remotely. Using it will remove the need to send out the latest development version. Instead, the beta app will update automatically, when a new version is available. See http://github.com/TheRealKerni/Hockey and http://buzzworks.de/blog/announcing-developer-framework-hockey for more details. Note that you should rely on Hockey for updating the app only. You still should stay in touch with your beta testers and distribute release notes and related materials.
Here is the information I included in the release notes for Tweeb:
Tweeb Release Notes
For this version of the app, please check out the new retweet features located in the “Buzz” tab. The following are the items that have changed since the last version you tested:
Fix
Special characters in passwords
Issues with counters showing “0’s” when device uses non-U.S. region format
Summary screen counter not showing lost/gained followers
Update
Better performance when multiple accounts loaded
Be aggressive about getting feedback from your beta testers. If possible, meet with your testers and watch them use the app. Request to record their usage of the app, ask them questions, listen, and absorb as much as possible. Although you want to find bugs throughout this process, it’s more important to understand how your customers are using your app.
You should provide guidance regarding what you need from your testers when they submit bugs. A statement that reads “It crashed when I pressed a button” won’t help you much. When customers send you bugs via email during testing, they should include what device and OS they have, what type of network connection was present, what tab or screen they were on, and what specific steps caused the issue. If applicable, also ask for a screenshot.
Sometimes your developer won’t be able to reproduce a bug found by you or one of your beta testers. Thankfully, there are a couple of Apple and third-party tools that can help with this situation by retrieving crash logs and other diagnostics data to help resolve these types of bugs.
An extremely handy piece of software that your beta testers can use is a third-party tool called the iPhone/iPod touch Backup Extractor (found at the uniquely named domain http://supercrazyawesome.com/).
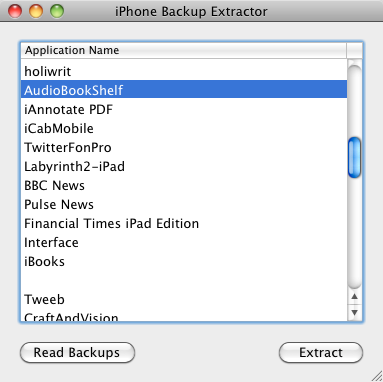
This app runs only on the Mac, but it is one of the easiest tools to use to get all the relevant files to your developer. The iPhone Backup Extractor (see Figure 6-8) will interact with your tester’s device backup files. If your tester uses it, she’ll need to first sync her device so that the appropriate files will be present in the backup.
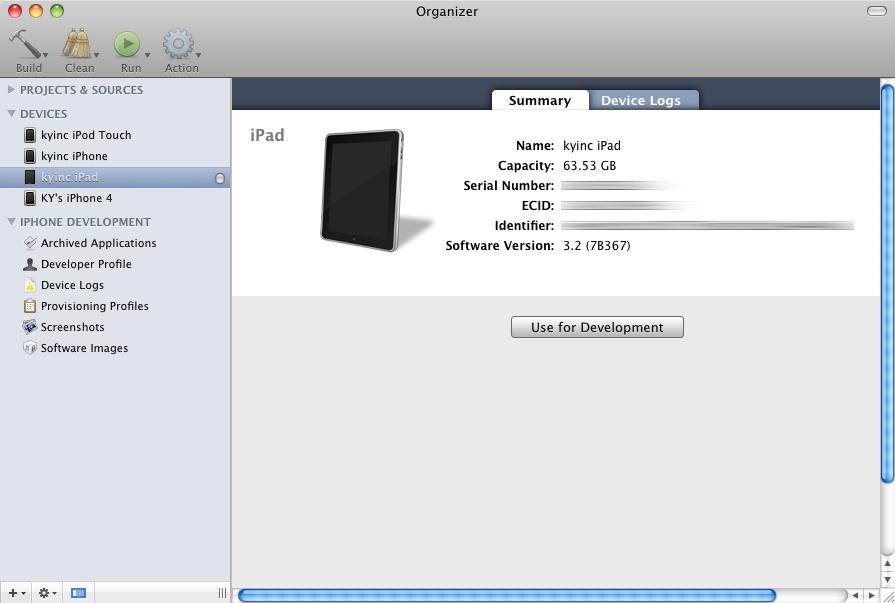
Apple’s Xcode, which is bundled with the iOS SDK (see the Tools section in this book’s Appendix), has a tool that you will come to not only appreciate, but also use regularly: Organizer. As an aside, Organizer is another place you can grab the UDID for your device.
Once Xcode is open, you can access Organizer via the Window✓Organizer menu item. Connect your device and you’ll see it appear in the Devices area of Organizer. In the main screen, click the Use for Development button (see Figure 6-9) and you’ll see the indicator change from gray to yellow to green, and two new tabs will appear, one of which is the Device Logs tab.
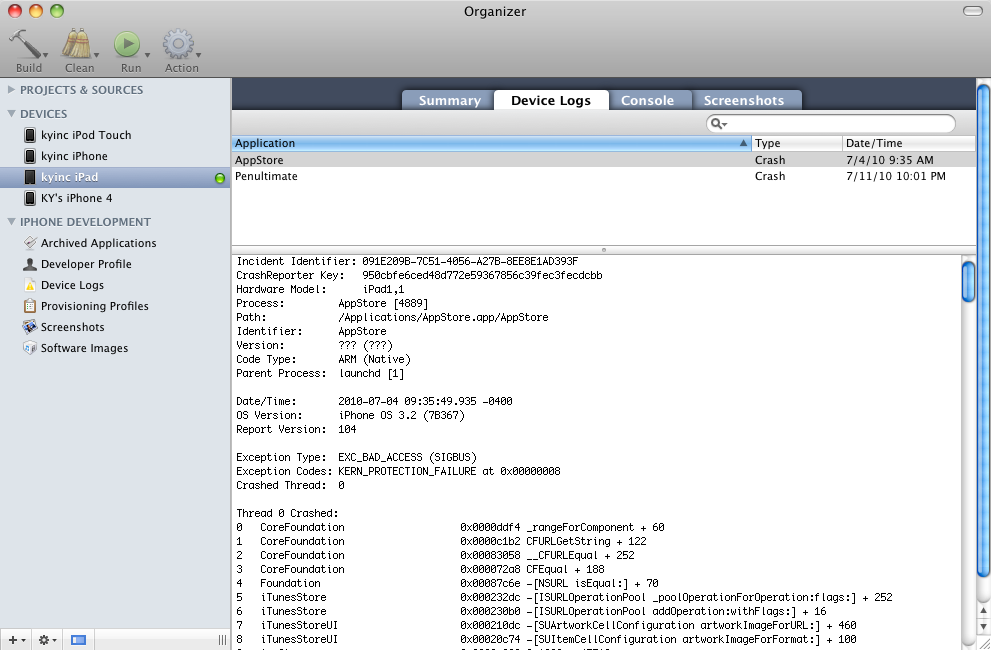
The Device Logs tab (see Figure 6-10) will allow you to search for your app and then pull some critical diagnostics data for your developer to use. Most of these logs will be listed as “Crash” in the Type column. You can drag and drop any of these files, which will end in .crash, from Organizer to your computer, but look for the latest based on the Date/Time column.
Note
Another file type—a .plist file—can be useful to your developer. A majority of the time the information in the crash log will suffice to identify and resolve the issue. The next section explains where to find a .plist file.
Another time-saving function of Organizer is the ability to take screenshots that you can immediately drag to your computer. An annoyance with using your device to accomplish this task is that email, iTunes sync, or an app is required to transfer the screenshots. With Organizer, visit the Screenshots tab, have the screen you want captured open on your device, click the Capture button, and then drag the screenshot to your computer.
A device’s diagnostics data (.crash and .plist files) can also be directly accessed from a computer. The prerequisite to accessing it, or at least to having the latest data, is to sync the device with iTunes.
Here are the locations where you can access these files on several operating systems. Once you navigate to the location, look for the filenames that resemble your app name.
- Mac
- Windows Vista/Windows 7
C:\Users\<Windows username>\AppData\Roaming\Apple computer\Logs\CrashReporter\MobileDevice\<device name>
- Windows XP
C:\Documents and Settings\<Windows username>\Application Data\Apple computer\Logs\CrashReporter\MobileDevice\<device name>
Use whatever tools you implemented in Chapter 5 to track all of the feedback, bugs, screenshots, and diagnostics files collected during your beta testing. Input, prioritize, track, and resolve both feedback and bugs. If your tool provides for it, give your beta testers direct access to log their feedback and bugs and then prioritize those items internally in order of importance.
Get App Savvy now with the O’Reilly learning platform.
O’Reilly members experience books, live events, courses curated by job role, and more from O’Reilly and nearly 200 top publishers.

