Chapter 15. Page Architecture
THE “PAGE ARCHITECTURE” PATTERNS ARE A VARIETY OF INTERACTION STYLES AND STRATEGIES FOR structuring content. In many cases, it is the possibility of web remoting that makes these patterns worth using.
Drag-And-Drop has been a fixture on the desktop for a couple of decades but is only now gaining currency in the browser. One situation in which it’s used is with the Sprite pattern. A Sprite is a little icon that lives “in front of” the main document and can move around freely like a character in a video game. The next pattern, Popup, uses the same overlay technique, but for larger, dialog-style content.
Malleable Content is content that appears to be read-only but becomes editable upon a gesture such as a mouse rollover, a fairly new idiom because it relies on web remoting. Similarly, a Microlink is a link that uses remoting to conjure up content for insertion in the page.
A Portlet is a small component of the page that acts like a mini-application, capable of conducting a conversation with the server independent of the main page flow. A Status Area provides information about current and past activity and is relevant to Page Architecture because it helps reduce the space occupied by each individual element. Update Control allows the user to control information flow on the page. The final pattern, Virtual Workspace, lets the user explore a large server-side structure, yet it makes the remoting transparent, creating the illusion that everything’s happening in the browser.
Drag-And-Drop
⊙⊙ Drag, Move, Pull, Rearrange
Goal Story
Stuart is purchasing books online. Each time he wants to buy one, he drags the book icon into a shopping cart.
Problem
How can users rearrange objects on the page?
Forces
Object relationships are important and the user’s task often involves changing those relationships.
Ajax Apps often represent object relationships visually.
Rearranging the visual structure from a separate form is messy—i.e., trying to map between the form and the visual structure is confusing and error-prone. It’s easiest if users can directly manipulate the visual structure.
Solution
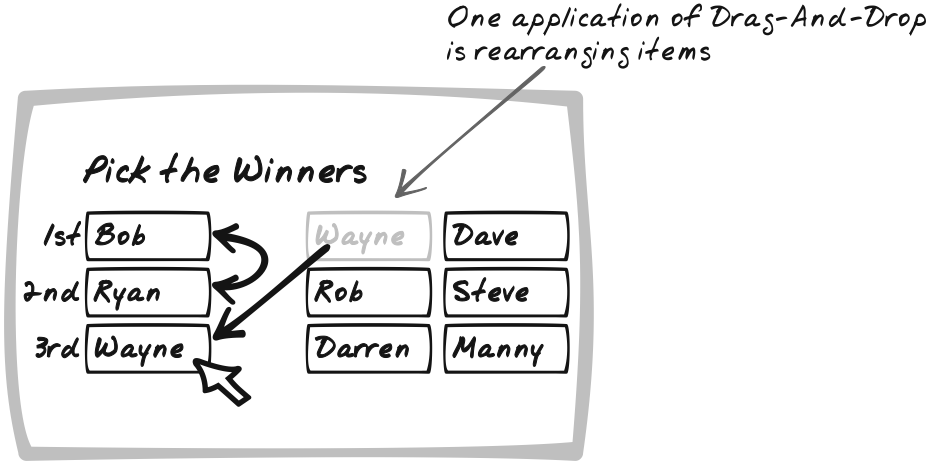
Provide a Drag-And-Drop mechanism to let users directly rearrange elements on the page. Drag-And-Drop has proven itself to be a powerful control mechanism in conventional desktop applications; it is certainly achievable using standard web technologies. The basics are straightforward: the user holds down the mouse button while the mouse hovers over a page element, then moves the mouse with the button still depressed. The element follows the mouse around until the user finally releases it.
Constraints are sometimes applied to the extent of movement. For example, an element may only be able to move in one direction, or within a bounding box. Also, the element might move permanently when the mouse is released, or flip back to its original position. Another variable is exactly which part of the element must be dragged. Sometimes it’s better to define a “handle” region—a specified place where the element can be “picked up” for dragging. The main benefit to this is that it allows the user to click elsewhere in this region.
The following are among the applications:
- Rearranging lists
This simple task can be ridiculously tedious on the Web. Some web sites require an entire page reload each time you move an object up or down. Others have implemented the buttons in JavaScript, but you still have to click Up or Down repeatedly just to place a single item. Drag-And-Drop is a natural fit—just pick up the list items and drop them where you want them.
- Rearranging items in a geometric space
This is also a natural application: pick up the objects and drag them where you want them to go.
- Operating on a geometric space
This might include dragging a magnifying glass or an eraser through an image.
- Building up a collection
One example of collections building is dragging products into a shopping cart.
- Expressing an action
Perhaps the most famous use of Drag-And-Drop was Apple’s original deletion mechanism, where you delete something by dragging it into the trash can. The basic idea is to represent a command visually as an icon and let the user drag items into it for processing.
There are a few ways to implement Drag-And-Drop:
Reuse an existing library. Libraries are becoming increasingly powerful and portable, and it’s likely that those available will do the job for you.
Leverage built-in Drag-And-Drop. Unfortunately, this isn’t much of an option because only Windows IE supports Drag-And-Drop explicitly.
Roll your own Drag-And-Drop. This is not recommended due to portability issues.
Here are a few Drag-And-Drop libraries, all of which have good cross-browser support and online demos:
- Scriptaculous(http://script.aculo.us)
Provides, among other things, a general-purpose, portable Drag-And-Drop library
- wzDragDrop (http://www.walterzorn.com/dragdrop/dragdrop_e.htm)
A Drag-And-Drop library that also includes resize capability
- DOM-Dra (http://www.youngpup.net/2001/domdrag/tutorial)
A lightweight Drag-And-Drop library
- Tim Taylor’s Drag-And-Drop Sortable Lists (http://tool-man.org/examples/sorting.html)
A library designed specifically for list manipulation, supporting Drag-And-Drop-based reordering
The basic approach used for Drag-And-Drop is as follows:
Event handlers inspect the incoming event to determine which element is being dragged.
An
onmousedownhandler saves the starting coordinates, sets thezIndexso that the element appears in front during the drag, and changes some other style settings to indicate a drag has begun.A
mousemovehandler inspects the mouse’s coordinates and moves the element accordingly using positioning style properties (usuallyleftandtop). Here’s where cross-browser support gets nasty—mouse coordinates in the event object are seriously platform-specific.An
onmouseuphandler restores normal style settings and performs any other cleaning up.
Decisions
What constraints will apply to the drag operation?
You will need to decide directions in which the element can move and how far it can move. Generally, this should be fairly obvious from the visual representation being manipulated; often, there is a container in which similar objects live. This should be the bounding box for dragging operations.
Real-World Examples
Magnetic Poetry
Magnetic Poetry (http://www.broken-notebook.com/magnetic) is a fun application that simulates dragging magnetic tiles around a fridge.
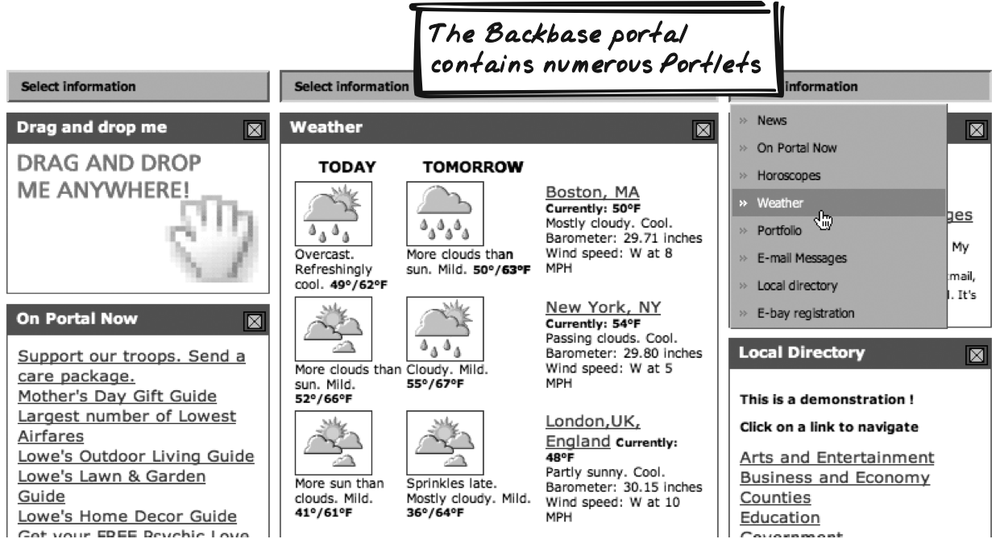
Backbase Portal
Backbase Portal (http://projects.backbase.com/RUI/portal.html) shows various Portlets in a three-column structure. Users can easily rearrange the Portlets to suit their own taste using a Drag-And-Drop mechanism. Google’s portal (http://www.google.com/ig) and Microsoft’s Start.com (http://www.start.com/3/) follow a similar approach.
A9 Maps
A9 Maps (http://maps.a9.com) offers photographs of map locations. A draggable magnifying glass appears on the map, and you can move it to different regions of the map to see what the area looks like in real life.
Code Example: Magnetic Poetry
Magnetic Poetry uses the DOM-Drag library (http://www.youngpup.net/2001/domdrag/tutorial)
to support dragging. On initialization, each tile is passed
successively to Drag.init. The
tiles may only be dragged within the board region, so the
container’s dimensions are passed in during the initialization
sequence:
  for(i=1; i<=numWords; i++){
    var currentTile = document.getElementById("word_" + i);
    var x1 = parseInt(document.getElementById("board").style.left);
    var x2 =   parseInt(document.getElementById("board").style.width)
              - parseInt(currentTile.style.width) - 6;
    var y1 = parseInt(document.getElementById("board").style.top);
    var y2 =   parseInt(document.getElementById("board").style.height)
              - parseInt(currentTile.style.height) - 6;
    the last 4 args restrict the area that the tile can be dragged in
    Drag.init(currentTile, null, x1, x2, y1, y2);
  }
The initialization is all you need to support dragging. With
the preceding code, the tiles can now be happily moved around the
board space. However, the application does a little more than that:
it tracks the currently dragged tile, and it saves the position once
dragging is finished using an XMLHttpRequest
Call. To that end, onDragStart and onDragEnd handlers are registered on each
of the tiles:[*]
  echo 'document.getElementById("word_' . $i . '").onDragStart =
    function(x, y) { dragStart("word_' . $i . '", x, y); };';
  echo 'document.getElementById("word_' . $i . '").onDragEnd =
    function(x, y) { dragEnd("word_' . $i . '", x, y); };';
Alternatives
Separate Editing Interface
The conventional solution has been to provide a visual representation in one region and controls in another. This is often cumbersome and error-prone.
Related Patterns
Slider
A Slider (Chapter 14) is a special case of Drag-And-Drop, where the value indicator is dragged along the slider axis.
Sprite
⊙⊙ Bitmap, Buffer, Character, Layer, Overlay, Shape, Sprite, Z-Index

Goal Story
Not for the first time, Pam is negotiating to eliminate a stack of requirements from the project goals. Having successfully convinced the client that “Security Features” was never really worthwhile, she drags a “Magic Eraser” Sprite from the Tool Palette to the “Security Features” requirement, jiggles the mouse a couple of times, and the eraser is animated for a second as the requirement fades away.
Problem
How can you ensure that visual content is flexible?
Forces
Rich visual displays are often the most effective way to present information.
Information frequently changes as the user interacts with and new data is received from the server; hence, the visual display needs to update frequently.
It’s expensive to continuously download new visual content.
Solution
Augment the display with
Sprites—i.e., small, flexible, icon-like blocks of
content. Typically, the Sprites are images, but they may
also be div elements containing
text or images or a combination of both. The name refers to the
Sprites used in traditional graphics programming, particularly
gamin—those little graphics representing players, enemies, and other
objects capable of moving around a scene and animating themselves to
reflect current activity. The entire scene does not need to be
recomputed each time, only the Sprites. DOM elements are not (yet)
capable of more advanced features such as arbitrary rotation, but
many aspects of Sprites can actually be translated to a web
context.
Google Maps is a case in point. If you search for “museum new york,” a set of thumbtack Sprites will appear on the map, one for each museum. Then, if you click on a thumbtack, a new speech balloon Sprite will show up with the precise address. Using Sprites, Google spares itself the burden of preparing images for every possible configuration, and from generating images on the fly. All it needs to do is ensure that there’s a basic display of the map in question, then overlay the thumbtacks and speech balloons.
Sprites are often implemented as div elements or simply as images. They usually appear “in front of”
the rest of the document and are sometimes partially transparent.
Following are the relevant CSS properties (also see Page
Rearrangement [Chapter 5]):
zIndexDetermines how elements are stacked. Sprites usually have a high value in order to appear in front of other elements.
left, right, top, andbottomOften used to position a Sprite.
positioncan also be set to influence how the browser interprets these settings.opacityOften used to make the Sprite partially transparent. (IE requires the alpha filter workaround; see http://www.domedia.org/oveklykken/css-transparency.php.)
backgroundImageUsed to select a background image when the Sprite is a
div. As long as there is no foreground content, the background image is shown. The image doesn’t need to be rectangular because a transparent GIF file can be used to show any arbitrary shape.
You can also animate the Sprite by rapidly changing its
appearance. Unfortunately, JavaScript cannot easily control animated
GIFs, so that’s not a viable option. However, animation is easy
enough with some Scheduling (Chapter 7). One simple technique is to
set up a recurring changeImage( )
action, in which the element’s backgroundImage is continuously run
through a cycle of different images. Ideally, you should preload the
images to avoid a slow cycle the first time round. Several tricks
are available for preloading, the most common being set an invisible
image’s source to point to the new image. An alternative animation
technique is outlined in the section "Code Example: DHTML
Lemmings,” later in this chapter.
Decisions
What file format will the Sprite image be?
Sprites are usually images, but what file format should you use—JPEG, GIF, or PNG? There are several considerations:
Portability
Image quality
File size
Transparency
JPEG may be the most common format on the Web, but it is ruled out for most Sprites. It doesn’t support transparent pixels, so the Sprite must be rectangular, and it is not actually very effective at storing the kinds of images typically used for Sprites: small, cartoonish line drawings. So JPEG is only a consideration in the rare case that you have a fairly large, rectangular, photo-like Sprite.
This leaves GIF and PNG as the most common choices. An intellectual property cloud used to hang over GIF, but the patent expired in 2003 (http://en.wikipedia.org/wiki/Gif), so it’s no longer a valid reason to avoid GIF. PNG does have some technical advantages over GIF, particularly variable transparency, but unfortunately that has not been correctly implemented in IE6 and earlier. So to support older IE editions, you’ll need to manipulate opacity if you want to achieve transparency, regardless of the format. Also, even older versions of IE don’t support PNG at all (http://www.libpng.org/pub/png/pngapbr.html).
In summary, GIF should be the default choice; only use JPEG or PNG if there is a specific reason for doing so.
Will the Sprite be animated?
Ongoing animation can be distracting, but a quick animation is an effective way to convey what’s happening. Consider how the “one-second” visual effects might be used:
One-Second Spotlight (Chapter 16): You might Materialise a Sprite when it first appears or Fade In the Sprite when it’s subject to an action.
One-Second Mutation (Chapter 16): You might Form a Sprite when it first appears, or rapidly Metamorphise it in a cycle in order to provide the illusion of continuous change.
Real-World Examples
DHTML Lemmings
DHTML Lemmings (http://www.oldgames.dk/freeflashgames/arcadegames/playlemmings.php) by Tino Zijdel (“Crisp”) is a game that uses Sprites in their traditional gaming sense. Lemmings are shown performing different actions, and the characters change shape as they move around the game space. The entire thing is orchestrated with DOM and CSS scripting.
Google Maps
As discussed earlier in the Solution, Google Maps (http://maps.google.com) overlays the basic map with thumbtacks to highlight certain locations. As an interesting variant, look at how thumbtacks are used by Housing Maps (http://housingmaps.com/), the Maps-Craigslist mashup overviewed in Cross-Domain Proxy (Chapter 10).
Quek
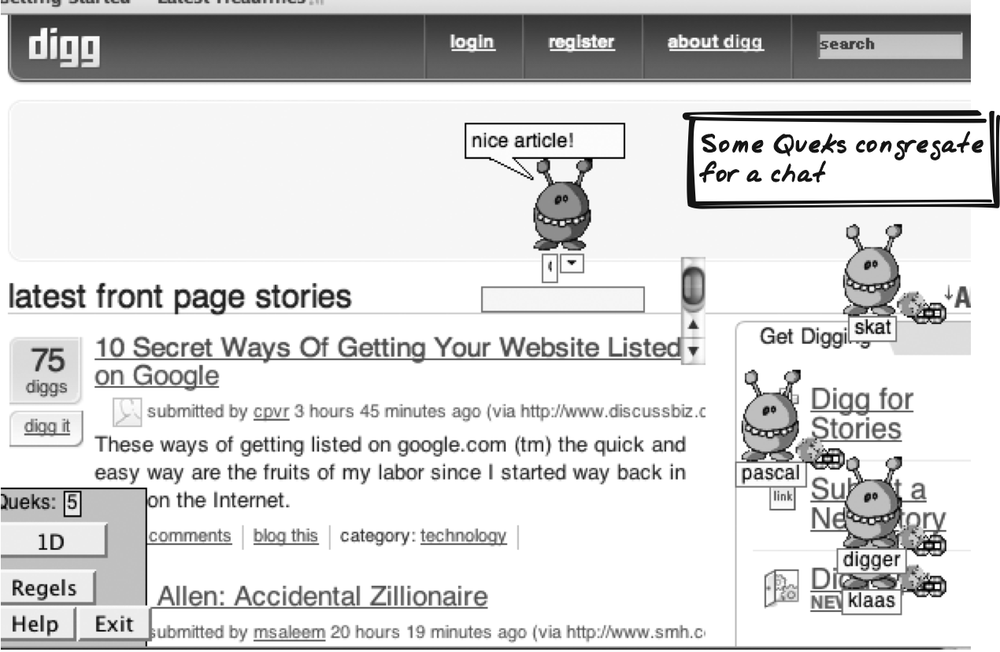
Quek (http://www.quek.nl) is a fun use of
Sprites as chat avatars (Figure 15-3). The application
is a “chat-and-surf” program, meaning that Quek users can chat
about a web site they’re visiting at the same time. Traditionally,
such applications have involved Richer
Plugins (Chapter
8), but Quek avoids any of that. It works by rendering the
entire target web site, so you’re always actually on a Quek page,
but the page looks the same as the target site. Each user that
logs into Quek is assigned a unique Sprite consisting of an image,
a text ID underneath the image, and an input box (visible only on
the user’s own Sprite). Typing in the input box animates the
Sprite image, and clicking Enter submits the message for all to
see. Because the user is free to drag the Sprites around the page,
the appearance is of several Sprites moving around and talking to
each other, with the web page as a backdrop.
Code Example: DHTML Lemmings
DHTML Lemmings involves the most sophisticated use of Sprites I know of. The analysis here is only a rough summary of what’s achieved. Note that the code uses some special handling for IE, which the author, Tino, explained to me is due to a bug where IE (at least some versions) bypasses the cache upon any background style change. To keep it simple, the following discussion skims overt IE-specific handling.
In DHTML Lemmings, each lemming is represented by a Lemming object, which is initialized with
a number to identify the lemming and an initial position
corresponding to the place where the lemming first appears on this
particular level. Various other state information is also
tracked:
  function Lemming(i,top,left) {
    ...
    this.top = top;
    this.left = left;
    ...
    this.number = i;
    ...
}Lemmings themselves are
regular JavaScript objects and are not visible in the browser. To
visually depict the lemming, a div element is created and made an
attribute of the lemming, simply known as l. Thus, we might say the Lemming model “wraps” a Sprite as a means
of separating semantic content from visual content. Each of these
Sprites resides in the playground, an area representing the game
space where the lemmings roam around. Both the playground and the
Sprites are rendered with absolute positioning. Once the Sprite
element has been created, event handlers are also added to support
the gameplay:
  function Lemming(i,top,left) {
    ...
    var l = document.createElement('div');
    l.number = i;
    l.className = 'lemming';
    l.style.top = top+'px';
    l.style.left = left+'px';
    ...
    l.onmouseover = lemming_target_on;
    l.onmouseout = lemming_target_off;
    l.onmousedown = lemming_target_sel;
    ..
  }
At any moment, each lemming is performing a single action,
such as walking or climbing, and the action is tracked by a property
of Lemming, ani. When the game
begins, the lemming falls from a trapdoor, so ani is always initialized to fall:
  function Lemming(i,top,left) {
    this.ani = 'fall';
    ...
  }
Each type of action requires unique animation and movement. A
periodic timer ticks every 60 milliseconds and updates the game’s
state, including each lemming’s appearance and positioning. Here’s
how the animation works. Each action is associated with a collection
of 32 × 32-pixel icons. The icons are strung together horizontally
and retained in a single image. The lemming’s backgroundImage style is always set to the
entire image associated with its current action (Figure 15-4). Because the
lemming image is set to 32 pixels, with overflow hidden, you will
only ever see one of the icons. To select the appropriate icon, the
backgroundPosition property is
set. Thus, the backgroundImage
remains fixed while the lemming is performing an action, but the
backgroundPosition flows rapidly
through each of the icons, beginning at zero and decrementing by 32
pixels each time until it reaches the full width of the image (as a
negative value), at which point it becomes zero again.
Whenever the action changes, the script sets the image and initializes the position. Then, for each “tick” of the timer, the icon is advanced by altering the position of the reference image:
  Lemming.prototype.changeAnimation = function(ani) {
    ...
    this.pos.backgroundImage = lem[ani][this.dir];
    this.pos.backgroundPosition = '0px';
    ...
  }

  function lemming_animate(i) {
    if (l.curleft == l.maxleft) l.curleft = 0;
    else l.curleft -= 32;
    if (ie) l.imgpos.left = l.curleft+'px';
    else l.pos.backgroundPosition = l.curleft+'px';
  }
Why is the appearance changed using backgroundPosition? Wouldn’t it be simpler
to just run through a sequence of separate image files and alter the
backgroundImage instead? Tino
explains that the reason is performance: The image is held in
memory, whereas image-swapping would require images to be retrieved
from the cache.
As for motion, each “tick” delegates to a Strategy function
(Gamma et al., 1995) for the action taking place. The Strategy
function then directly manipulates the Sprite’s position. So to
model a lemming falling vertically, the div’s top increases with each tick:
  function lemming_fall_ani(l) {
      ...
      l.top += 4;
      ...
  }
Likewise, a walking action involves making a change to the
left property:
  function lemming_walk_ani(l) {
      l.left += l.dx;
  }
Alternatives
Tiling
Tiling is a technique in which a big image is built up from small tiles. Google Maps works this way; each map image is actually a grid of smaller image files. The benefit is that the browser will cache each tile in memory. So if you pan a little in one direction, only the new tiles need to be downloaded. Like Sprites, tiling is a technique you can use to change visual content without extracting everything from the server. And Google Maps shows that the two techniques combine effectively.
Related Patterns
Popup
Popup (see the next pattern)
is a close cousin of Sprite. Both share the appearance of being “in front of”
the rest of the document (this is typically implemented with the
zIndex style), but they differ
semantically. The Sprite pattern is intended to cover small
objects, which are often draggable, animated, and icon-like.
Often, Sprites are a standard fixture of the application, have a
sense of unique identity, and remain present throughout the
application. Popup is more about a transient, informational block
of content that appears in order to show something or accept some
input, then vanishes again. Popups tend to be larger and more
text-based and are often dynamic in content.
Drag-And-Drop
Sprites can often be dragged around a space.
Metaphor
Think of a 20th century cartoonist creating a sequence in which a mouse walks onto a series of transparent “cel” sheets that will eventually be overlayed on a background scene.
Want to Know More?
PNG File Format (http://www.libpng.org/pub/png/pngintro.html)
Acknowledgments
Thanks go to Tino “Crisp” Zijdel, author of DHTML Lemmings, for clarifying the analysis in this pattern.
Popup
⊙⊙ Balloon, Dialog, Hover, Popup, Transparent, Tooltip
Goal Story
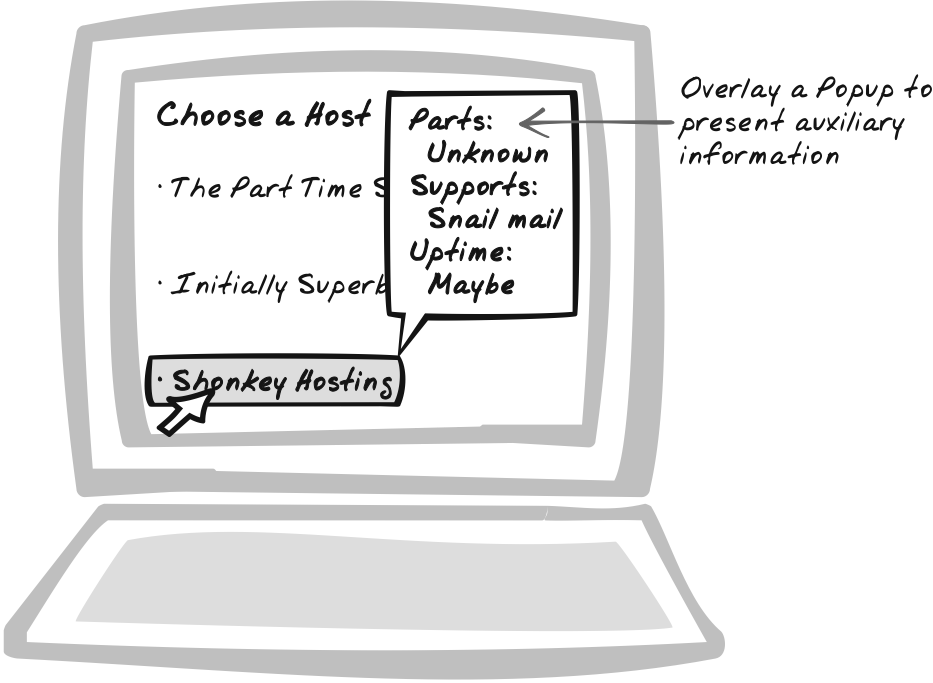
Frank is monitoring the factory equipment online and notices the T1000 machine is acting a little funny. He clicks on the icon, holds the mouse button down for a second, and up pops an information sheet about the T1000 model. The sheet is partially transparent and overlayed on top of a region of the plant diagram.
Problem
How can the user perform a quick task without distracting from the main flow?
Forces
Users often need to make a quick change, which requires that they have some extra controls with which to interact.
Users often need to perform a quick lookup, get further details about an object in the application, or just find some general information. This requires that extra information appear.
Screen real estate is limited, and minor, quick changes don’t warrant a major change to the user interface.
Solution
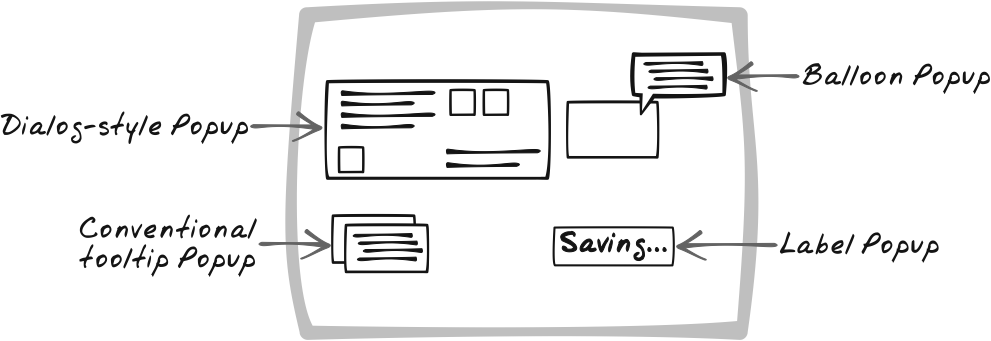
Support quick tasks and lookups with transient Popups, blocks of content that appear “in front of” the standard content. Usually, the content is partially transparent, is about the size of a standard dialog, and hovers above the page until the user explicitly closes it. A more subtle variant is the tooltip, a solid block usually containing content between one word and a paragraph in length. The tooltip itself has a trendy new variant, a cartoonish balloon. For Progress Indicators (Chapter 14), a popular idiom is to use a small label in the corner with a message like “Saving . . . .” Figure 15-6 illustrates several popular styles.
Popup is suitable for particular situations:
- You expect the task to be quick
The Popup is limited in space and its transparent appearance makes it difficult to work with for a long time.
- You expect the user to perform the task immediately
The rest of the document is partially blocked, making it difficult to work with while the Popup is around.
Often, a Popup has no permanent state; it becomes visible, and then is destroyed upon close. With many Popups, there can be only one of its kind at any given time.
Popups are usually divs. To
ensure that only one Popup of a particular kind can appear, you can
ensure that Popups are always created at the time they are required
and deleted on close. On opening, you just need to check whether the
Popup already exists on the page. Alternatively, you can simply
create the Popup on startup and toggle between showing and hiding
it—show it when the user needs a Popup and hide it afterwards. The
only catch here is that the state won’t be cleared, and often it’s
more effective to treat each Popup as a new entity.
The following CSS styles are often useful for creating a Popup.
opacity(alpha filter in IE)Used to produce a transparent feel.
zIndexUsed to place a Popup “in front of” the rest of the document. A solid (opacity=1) element will completely occlude everything that its
zIndexis higher than.visibilityUsed to toggle whether the Popup is being shown.
Once the Popup is styled and is popping up at the right times,
interaction proceeds as with any div element—the Popup just happens to look
different that most content. Often, the interaction is similar to
that of a Portlet (see later in this
chapter)—i.e., each user action leads to an XMLHttpRequest
Call (Chapter 6),
with responses morphing the Popup.
Decisions
How will the Popup look?
The Popup’s appearance is a compromise that allows you to present some different content without losing the original content. There’s a tension between ease of Popup interaction and ease of comprehension and interaction with the rest of the page. Opacity and size will improve interaction with the Popup, but at the expense of the rest of the display. Different colors will also have an impact, and which color is the best depends on the content behind the Popup.
Here are some things to consider:
Does the user need to see other page information while the Popup is present? If so, ensure that the Popup doesn’t block it.
How long will the Popup be present? If it will be a long time, consider making it less intrusive.
How will the user open and close the Popup?
There are two common approaches to opening the Popup:
Clicking a button or an object related to the Popup content.
Hovering over something for a while. Because this can happen quite often, it’s more appropriate for a small, tooltip-style Popup.
There are several approaches to closing the Popup:
Explicitly closing it with a button. Some Popups appear as desktop-like Popups, with an “X” on the top border of the window.
Closing it when the interaction has come to a natural conclusion—e.g., a user submitting a form. In an Ajax App, the results of submitting it will soon be visible anyway, so there’s still ample feedback.
If the Popup was initiated with a hover event, closing it when the cursor hovers away from the underlying object.
Closing it upon a timeout. This can be frustrating as it reduces user control. It also requires you to determine whether the user is in the middle of interacting with the Popup. If you use a timeout, consider providing a way to explicitly close it, too.
Real-World Examples
JSCalc
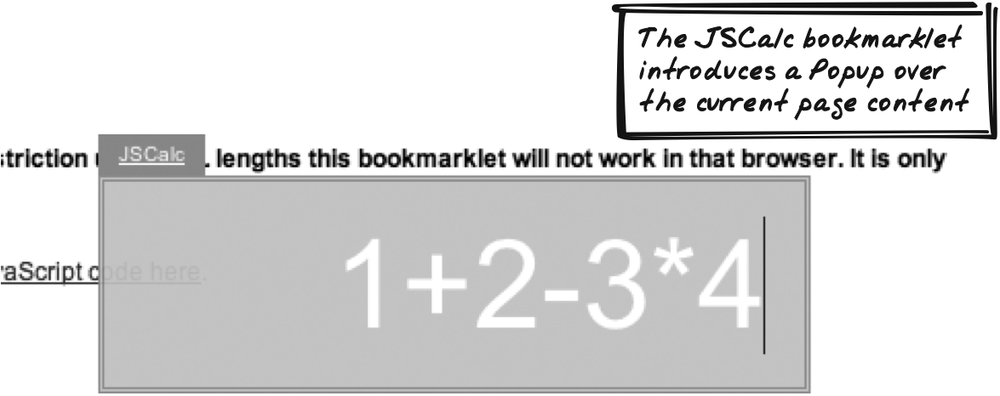
Cameron Adams’ JSCalc (http://www.themaninblue.com/experiment/JSCalc/) provides a Popup calculator (Figure 15-7). You can use it while surfing on any site, because the calculator is actually a “bookmarklet”—a small JavaScript program which you add as a bookmark and then run by selecting it like a regular bookmark. The calculator appears as a grey, partially transparent display centered in front of the current page. You can type in equations, and when you eventually click on the rest of the page, the display fades away.
Flickr
Flickr (http://flickr.com) lets registered users add “notes” to anyone’s photographs (Figure 15-8). A note initially appears as just a square outline over a region of the photo. When you hover over the note, its full text appears underneath. Creating a new note also uses a Popup effect to show a text field in which you can enter the note.

Netflix
The Netflix Top 100 (http://www.netflix.com/Top100) ranks films by all-time popularity (Mystic River is first right now, in case you’re wondering). When you hover the mouse over a title, a speech balloon appears with a photo and summary. The effect is achieved with an XMLHttpRequest Call (Chapter 6). When you move the mouse away, the balloon disappears.
Hoversearch
HoverSearch (or “HoverSmack”) (http://www.forgetfoo.com/?blogid=3436) is a Popup search. When you click on a hyperlink connected to an appropriate script, a transparent Popup appears and starts searching for a term. The results soon populate the Popup. The framework is capable of searching through different engines, including images, which are then shown in the Popup.
Code Example: JSCalc
Being a bookmarklet, JSCalc is compressed into one
line and has been reformatted in the following example. A div holds most of the calculator display
and is appended to the page body. Since all pages have a body, the
bookmarklet will work on any web page.
  function JSC( ){
    var d=document
    var b=d.getElementsByTagName('body')[0]
    var dv=d.createElement('div')
    ...
    b.appendChild(dv)
    ...
  }
The calculator is positioned in the center of the document and has a slightly transparent opacity.
  dvs.position='absolute'
  dvs.top='50%'
  dvs.left='50%'
  dvs.width='300px'
  dvs.height='60px'
  ...
  dvs.opacity='0.95'
  dvs.backgroundColor='#CCC'
Inside the div is a
standard text input, also
absolutely positioned on the page. It’s given initial focus and
registered with an onkeypress
handler to track the calculation.
  var inp=d.createElement('input')
  ...
  inp.focus( )
  inp.onkeypress=function(e){
    ...
  }
The Popup finishes when the user clicks anywhere outside of it.
An onblur event is therefore
registered. The Popup then fades out and is eventually destroyed in
a One-Second Spotlight-style (Chapter 16) effect.
  inp.onblur=function(e){ op(this.parentNode) }
  function op(t){
    //(Fades out and removes the calculator elements)
  }
Alternatives
Portlet
Portlet (see later) is another way to set up a parallel conversation. It differs from Popup in two ways: it’s usually permanent or present for a long period of time, and it’s usually not transparent. Because of their different characteristics, a Popup is more like a short detour, whereas a Portlet is like a completely parallel track.
Related Patterns
Sprite
Sprite (see earlier) and Popup both appear “in front of” the rest of the document, but as the section "Related Patterns" in Sprite points out, their intent is different.
Drag-And-Drop
A Drag-And-Drop (see earlier) mechanism is a good thing for most Popups because it helps users reveal content that is underneath.
Slider
How transparent should the Popup be? The optimal value depends on the user’s taste and the task he’s working on. Thus, tie a Popup’s opacity factor to a Slider (Chapter 14)—ranging from “invisible” to “solid”—for maximum flexibility.
Metaphor
Think of Terminator-style augmented reality, with a heads-up display helping you explore the world as you move through it.
Malleable Content
⊙⊙⊙ Affordance, Collaborate, Edit, Hint, Input, Microcontent, Mutable, Outline, P2P, Selection
Goal Story
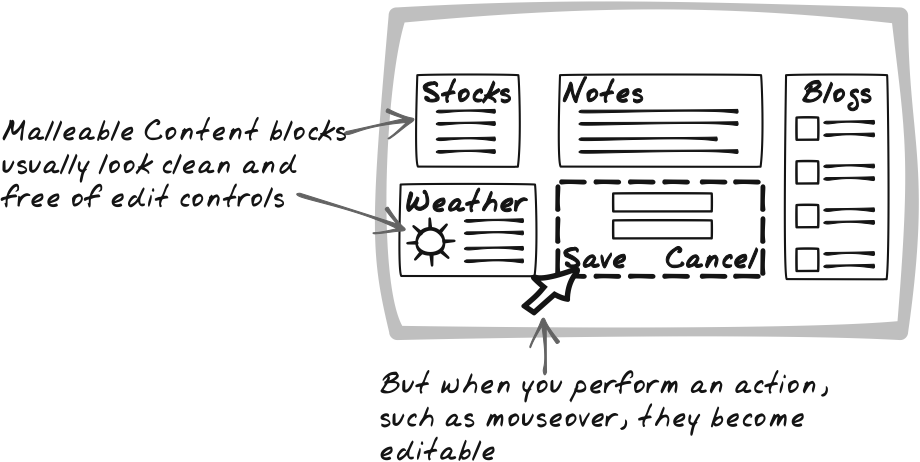
Reta is logged in and is revamping the catalogue web site. It looks clean, a replica of the read-only page that public users will see. But as she runs the mouse down the screen, she sees that many regions can be edited.
Problem
How can you let users change content?
Forces
The Web is not just about consuming information. Administrators, and increasingly everyday users, spend a lot of time adding and editing content.
All users, no matter what their roles are, need to know what they’re allowed to change.
To encourage contributions and improve user experience, editing should be simple and free of barriers.
Editable content pages are often ugly, with an overload of form controls, labels, and buttons. Worse, they create a divide between the contributors and the readers; while editing content, it’s often difficult to imagine how a reader will see it.
Solution
Compose the page of Malleable Content blocks—small chunks of content that can be edited in page. The page is structured in chunks of small “microcontent,” each editable in isolation. There might be a way to edit the whole page too, but the usual style of editing is to view the read-only display and carve up little pieces as you see fit.
The reload problem is one reason why conventional web sites must present large forms in which everything can be set at once. It’s often the only practical way to edit content. However, users have difficulty relating the editing interface to the readable interface. Worse, it discourages editing; users are subjected to a sequence of at least two-page reloads in order to change a single character.
Ajax technologies lead to a smoother editing process. Display Manipulation (Chapter 5) and Dynamic Behavior (Chapter 7) help the user locate and open up editable Malleable Content. Display Manipulation also shows you how to conjure up a new editable area, or morph read-only Malleable Content into an editable form. Once the user has made the edit, you can seamlessly upload the response, as described in Web Remoting (Chapter 6), at which point the content can revert to read-only again.
In most cases, each block of Malleable Content is a div or textarea element. It can become editable
in one of several ways:
The display of the original element is adjusted and augmented with editing controls.
A new
divortextareais created in its place.The original element becomes hidden and a hidden
divortextareais revealed.
Is that the sound of your inner usability critic banging his fists on the table and exclaiming “this defies everything that users have come to know about the Web”? Fair point. The forms are gone, so where’s the affordance to let the user know what can be edited? Affordances can indeed be provided, as discussed in the following section.
Even if sufficient affordance can be provided, you might object that the whole thing is a complete departure from the usual forms-based approach. You’ve got me there. It certainly is a departure, but it’s a departure from a ten-year-old approach that’s remained frustrating since day one. Consistency is certainly an admirable goal—one that shouldn’t be neglected because you have a few “one-percenter” improvements—but Ajax represents a new approach, and the benefits of in-page editing are just too big to ignore in the name of consistency. Better to adopt the approach and use sensible design to guide users through it. In any event, Malleable Content is likely to take off and will become familiar to users in the not-too-distant future.
Decisions
How will users locate Malleable Content and open it up for editing?
A read-only page will contain several editable Malleable Content blocks and various other regions that cannot be edited. Some of those regions are program-generated; others might be Malleable Content that this user is not permissioned to edit. So the user needs to know what can be edited. The static appearance should provide some cues, and events like mouse rollovers can refine that information.
The static appearance should make the location of the Malleable Content apparent. There are a few techniques to consider, some which are based on the Highlight pattern:
When there are multiple Malleable Content blocks, increase spacing or alternate fonts between them to keep them distinct.
Present the Malleable Content with a distinct background.
Apply an explicit border around the Malleable Content.
Expose the edit controls (e.g., Undo button), or the controls which initialize the edit (e.g., Edit button), but faded out.
Add a label and auxiliary information beside each Malleable Content block. (See the following.)
These provide enough information for the user to detect that
Malleable Content is present. However, too many of these cues will
defeat the purpose of this pattern by making the whole thing hard
to read. So you might use only a few subtle cues, or even none at
all, and rely instead on dynamic behavior. Mouse movement is the
most important activity to monitor; fields can be morphed to
advertise their editability as the mouse rolls over them. Here,
onmouseover sets up the cue and
onmouseout takes it away. You
can write a generic event handler and inspect the incoming event
to see which piece of Malleable Content was altered. Then, apply
(or unapply) the effect generically to that element.
All of the preceding static cues qualify as suitable dynamic
cues, too. For example, change the background color as the mouse
rolls over a particular block of Malleable Content, or make the
label and edit controls visible only during that time. In
addition, the cursor can also be varied using the cursor property. These dynamic cues,
combined with just one or two static cues, are an effective way
for users to pinpoint blocks of editable Malleable Content.
Will the Malleable Content be labelled? What auxiliary information will be included?
Many times, the Malleable Content has some form of identity, so you may wish to explicitly associate a name with it. The name might be shown above it as a heading or summary, on the side as an annotation, or as a tooltip.
The following auxiliary information, which can be automatically gathered by the server, might also be shown:
The user who created the content
The user who last edited the content
The number of edits
The creation date
The last edit date
What content will be marked as Malleable Content? How big will the Malleable Content be?
Any editable information is a good candidate for inclusion as editable Malleable Content. One reason against making an item editable is that item’s interaction with other data on the page. If there are certain combinations of data that are invalid, you may prefer to force the user to edit everything at once.
Malleable Content should be big enough to form a coherent unit of content, but small enough to be comfortably edited without scrolling and with enough room for some surrounding context. Of course, it’s the users who will determine the exact size, and enforcing limits often achieves nothing but frustration. You can, however, influence the size of Malleable Content in several ways:
Provide guidelines.
Illustrate the guidelines and establish norms by restructuring existing content.
Where the Malleable Content represents a data structure rather than just free text, ensure that the data structure is a suitable size. If it’s too big, split it. If it’s too small, aggregate it.
How will the user stop editing content?
Now you’ve decided how the user will open up content for editing, but how will she complete the edit? Here are the typical options:
As soon as focus is blurred—e.g., when the user clicks on an external object—the content is saved and becomes read-only. This is good for power users who might wish to tab through content fields.
Explicit controls, such as Save and Cancel, are added during editing. This may involve rearranging items on the page.
Is it okay to have several Malleable Content blocks open for editing at one time?
Because Malleable Content is an Ajax App, the user might not reload for a while, so he’ll need to close each block manually in order to see the page become read-only again. You might enforce a rule that one field can be open at a time. This could be achieved by closing any existing block when a new one is opened, or by refusing to open a second block.
Real-World Examples
Flickr
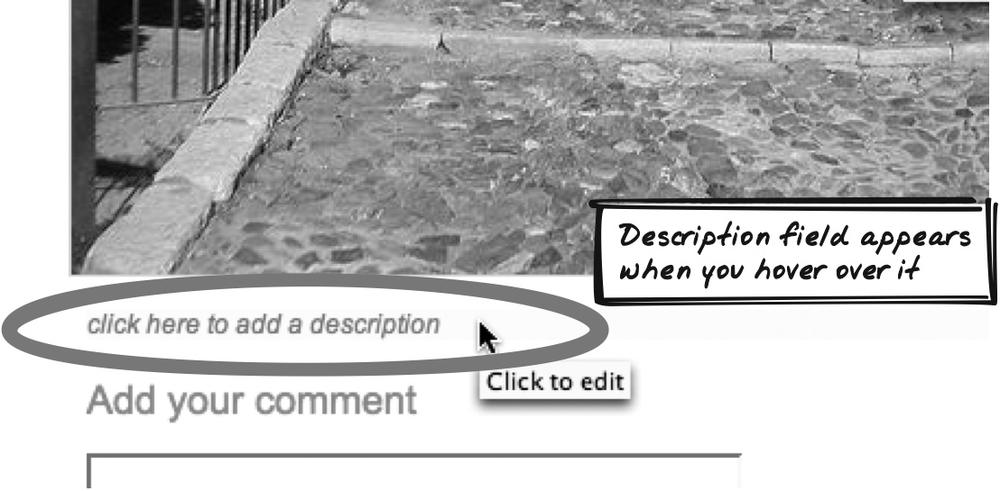
When you manage one of your photos with Flickr (http://flickr.com), you’ll see a title above the picture and a caption below it (Figure 15-10). Both are rendered in black-on-white and appear as ordinary read-only text, so there’s actually no static cue. But it’s easy enough to discover it, especially given that most users are aware that these items can be edited. Hover over these fields and the background will switch to a light tan color. Then, click the button, and the field becomes editable, as shown in Figure 15-10.
Several things happen here:
A border appears, outlining the field and suggesting that it’s editable.
The entire text is initially selected, an additional cue that you’re now editing the field and a useful time saver as typing a new entry automatically deletes the existing text.
Save and Cancel buttons are inserted onto the page, slightly displacing the content below. Clicking on Save or Cancel reverts the content back to read-only; otherwise, the field remains open and multiple fields can be open at once.
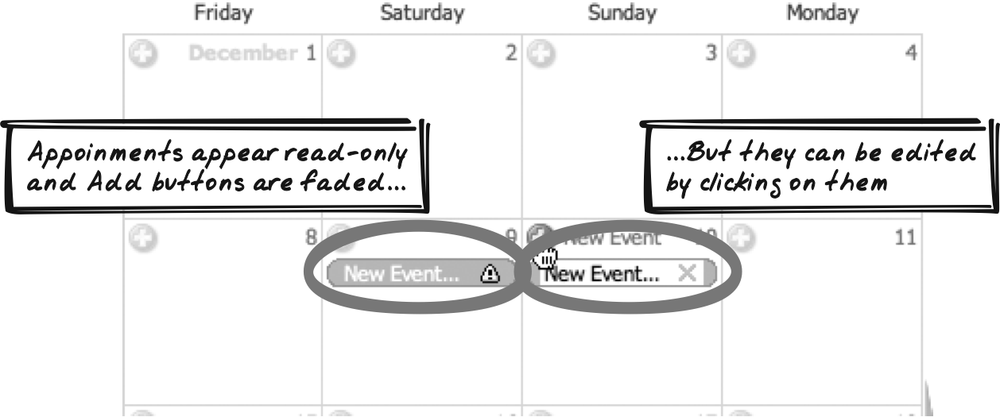
Monket Calendar
The Monket Calendar (http://www.monket.net/cal/) lets you add
events to a shared Ajax calendar (Figure 15-11). Each
appointment is rendered as an orange-background rectangle with
curves on either side. As the mouse hovers over a field, the field
remains as is, but the cursor changes to a pointer style, suggesting that the field
can be clicked. Once you click on the field, the rounded edges
remain, but the central, horizontal component changes to white,
the existing text is selected in full and becomes editable, and an
“X” appears that lets you easily remove the appointment.
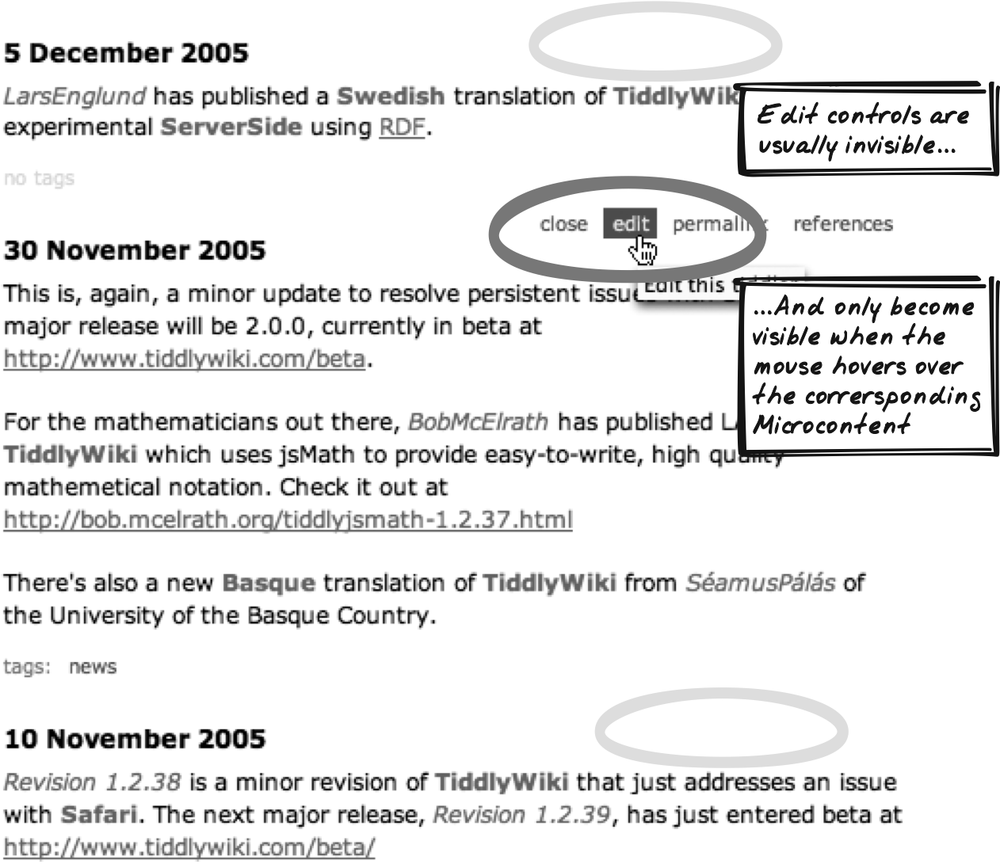
Tiddlywiki
With Tiddlywiki (http://tiddlywiki.com), controls appear as
you roll the mouse over the Malleable Content (Figure 15-12). They are
actually always present but are usually invisible, which means
that surrounding fields don’t move when you mouse around—the
fields just toggle in their visibility status. One of these
controls lets you edit: it switches the field into a textarea with an input field for the title. As you hover
over the textarea, new controls
appear, allowing you to save, cancel, or delete the item. It’s
possible to have more than one Malleable Content open at
once.
Thomas Baekdal’s Business Card Creator
Thomas Baekdal’s Business Card Creator (http://www.baekdal.com/articles/Usability/usable-XMLHttpRequest/) contains a business card with mostly black content on a white background. As you hover over a field, the border changes, and when you edit, the background color also changes. This interaction style was the basis of the following wiki demo.
Code Example: AjaxPatterns Wiki
The Wiki Demo (http://ajaxify.com/run/wiki) breaks page
content into a few Malleable Content blocks. A single div is declared in the initial HTML to
hold these blocks:
<div id="messages"></div>
At periodic intervals, the incoming XML is parsed to extract
each message into its own block of Malleable Content. Each message
is actually a textarea but is
rendered to appear read-only until it’s edited. The CSS class, which
initially corresponds to a grey background with no border, is set to
show the text in read-only mode. Handlers are registered to provide
dynamic cues that the Malleable Content can be edited and to handle
the editing process:
  function onMessagesLoaded(xml, callingContext) {

    for (var i=0; i<wikiMessages.length; i++) {
      ...
      var messageArea = document.createElement("textarea");
      messageArea.className = "messageArea";
      messageArea.id = serverMessage.id;
      messageArea.serverMessage = serverMessage;
      messageArea.rows = 3;
      messageArea.cols = 80;
      messageArea.value = serverMessage.content;
      messageArea.onmouseout = onMessageMouseOut;
      messageArea.onmouseover = onMessageMouseOver;
      messageArea.onfocus = onMessageFocus;
      messageArea.onblur = onMessageBlur;
      ...
      }
    ...
  }
We can examine each event handler to see how the editing cycle occurs. First, the user rolls over a message block. We’ll outline the message with a dotted border to hint that it’s in the twilight zone between read-only (no border) and editable (full border). We wouldn’t want this to happen if the user was already editing the content, so we make an explicit check for that condition. Incidentally, you’ll notice that the event handlers also manipulate colors here. That shouldn’t be necessary; it is a workaround for the fact that some browsers unfortunately resize the border when it changes style. Without the workaround, the other content blocks would undergo slight movement each time one block changes.
  function onMessageMouseOver(event) {
    var message = getMessage(event);
    if (!message.hasFocus) {
      message.style.borderStyle="dotted";
      message.style.borderColor="black";
    }
  }
And when the user rolls off this message block, the appearance is reset:
  function onMessageMouseOut(event) {
    var message = getMessage(event);
    if (!message.hasFocus) {
      message.style.borderStyle="solid";
      message.style.borderColor="white";
    }
  }
Okay, our user has just rolled over a message block and now
clicks on it to begin the edit. In the previous handler, we
performed a check based on a hasFocus field to see whether the message
was being edited. That’s not built into the DOM, so we have to set
it manually when the edit begins. During editing, the background is
white and the border solid black. Finally, we ensure that no
synchronization occurs while the user is editing (which is not
always advisable):
  function onMessageFocus(event) {
    var message = getMessage(event);
    message.hasFocus=true;
    message.style.borderStyle="solid";
    message.style.borderColor="black";
    message.style.backgroundColor="white";
    stopPeriodicSync( );
  }
The user signals end of edit by clicking elsewhere on the
page, causing a blur event to
occur. The message returns to its original read-only form. Or, if a
change has occurred, the message is highlighted and will eventually
be reset once the change has reached the server. Also, a resize function adjusts the height
according to the new content. Finally, synchronization can begin
again:
  function onMessageBlur(event) {
    var message = getMessage(event);
    message.hasFocus=false;
    message.style.borderStyle="solid";
    message.style.borderColor="white";
    message.style.backgroundColor="#cccccc";
    resize(message);

    var initialMessageContent = message.serverMessage.content;

    if (message.value != initialMessageContent) {
      pendingMessages[message.id] = true;
      message.style.backgroundColor = "#ffcc33";
    }

    startPeriodicSync( );

  }
Alternatives
Compound Edit
It’s possible to edit the whole page content at once—the typical approach in conventional web apps. As explained earlier in this section, there are problems with the approach, but users may prefer it for long editing sessions. Ideally, both styles should be provided.
Related Patterns
Live Form
Upon becoming editable, a Malleable Content block might become a Live Form (Chapter 14).
Rich Text Editor
One way to edit Malleable Content is with a Rich Text Editor (Chapter 14).
Microlink
Malleable Content can be summoned onto the page using a Microlink (see the next pattern)—the approach used by TiddlyWiki (http://tiddlywiki.com).
One-Second Spotlight, One-Second Motion, and One-Second Mutation
The “One-Second” visual effects (Chapter 16) are a good way to
support editing. It’s becoming common to Fade In recently saved content as a
means of hinting that it has been acknowledged. Mutations such as
Blow Up and Disappear imply that Malleable Content
is being deleted.
Metaphor
Applications using Malleable Content are like a communal whiteboard.
Microlink
⊙⊙⊙ Appear, Conjure, Emerge, Hyperlink, Insert, Introduce, In-Page

Goal Story
Frustrated with a developer’s productivity, Pam logs into the version control system and sees a “Project Committers” table. Each row includes a developer’s name and photo, and Pam immediately clicks on one of the names. The row expands out to reveal a mini-summary of the developer’s project activity, and a bunch of links to further content.
Problem
How can the user quickly navigate through content?
Forces
Ajax Apps often respond to user requests by providing new content.
To encourage interaction with the system, content should be shown quickly and without distraction.
Page reloads slow down interaction, break concentration, and obscure the nature of whatever changes have occurred.
Solution
Provide Microlinks that open up new content on the existing page rather than loading a new page.Microlink is an Ajaxian upgrade of the traditional hyperlink. Most often, it entails fetching content from the server with an XMLHttpRequest Call and inserting it onto the page. The content is usually a tightly scoped block of Microcontent, though it need not be—a Microlink could be used to open a whole page of content, for example.
The term Microlink should not be taken here as a literal translation of textual hyperlinks. It’s used to represent any form of content being inserted into the page. The trigger might be something as subtle as a form field focus event.
Microlinks can be used in many contexts:
They can open a Popup (earlier in this chapter) to augment a particular word or phrase. Some conventional web sites provide glossary lookups in a pop-up window. A Microlink could instead be used to place a small explanation directly next to the term.
They can be used to drill down by expanding out successively deeper levels of content. You could show all teams in a football league, each expanding to a list of players, in turn expanding to a list of games, and so on.
They can let the user switch content around on the page, which is useful if the Microlinks are included in a Drilldown (Chapter 14).
The name "Microlink" refers to the
subtle effect it has on interaction flow. Microlink carries several
benefits over the full-blown page refresh caused by a standard
hyperlink:
- Content appears faster
There is much less to transfer because only the new content is loaded rather than the whole page. Also, the browser needs only to make a few changes to the DOM as opposed to rerendering the whole page.
- Application flow is smoother
To the user, a page reload is distracting. Microlink avoids this distraction.
- Changes are more salient
The user is able to watch as an element appears on the page. Visual effects can be used to further improve change detection.
- Internal state is maintained
The browser-side application’s state—as held in the DOM—is retained, whereas a page reload destroys it. This is a technical benefit.
Microlink usually involves an XMLHttpRequest
Call (Chapter 6)
followed by a Page Rearrangement (Chapter 5). Often, a new div is created and appended to a container
element. As a variant, sometimes the Microlink refers to something
already on the page, so the Microlink causes the script to make it
visible or to scroll toward it (using document.scrollto).
Decisions
What will happen to other content?
A Microlink inserts new content into the existing page, and you obviously can’t keep piling on content forever. Furthermore, you need to remove the clutter so that new content is more salient. At some point, you’ll have to clean up existing content, and you’ll need to decide how that should happen. Typical strategies include those described in the list that follows.
The new content simply replaces the old content. The old content is overwritten, or the new content is added and the old content replaced.
A fixed-capacity content queue is set up, such that newer content displaces older content, which eventually disappears.
The user must explicitly close all content.
How will Microlink be presented visually?
Microlink presentation is tricky because you want to leverage existing knowledge about hyperlinks, but do it without causing confusion. Many interfaces will combine Microlinks and hyperlinks (e.g., links to company homepages or external web sites), and you don’t want a situation where the user can’t distinguish between them. Also keep in mind that Microlinks don’t have to be words or phrases—they can, for example, be buttons or imagemaps.
You need to ensure that users know Microlinks are clickable. You also need to have some ability to predict what they’ll see when that happens. To provide affordances that an element is clickable, consider doing the following:
Change the cursor icon as the user hovers over the element; control this with the
cursorstyle property.Leveraging the conventions of hyperlinks, namely blue text (
colorstyle) and underlining (textDecorationstyle), but be beware that this may cause confusion as well.Make the clickable region apparent visually using cues like borders and different background colors.
Real-World Examples
TiddlyWiki
TiddlyWiki (http://tiddlywiki.com/) is a wiki based on Malleable Content blocks. At any point in time, you’re looking at a list of Malleable Content blocks. Each block contains text including hyperlinks to other Malleable Content as well as to external sites. The external links are distinguished using a bold font. When you click on a Microlink and the corresponding context doesn’t yet exist, the context is inserted just below the block containing the Microlink. If it does exist, the window scrolls to show the content. For more on this, see the section "Real-World Examples" in Malleable Content earlier in this chapter, and the section One-Second Mutation (Chapter 16).
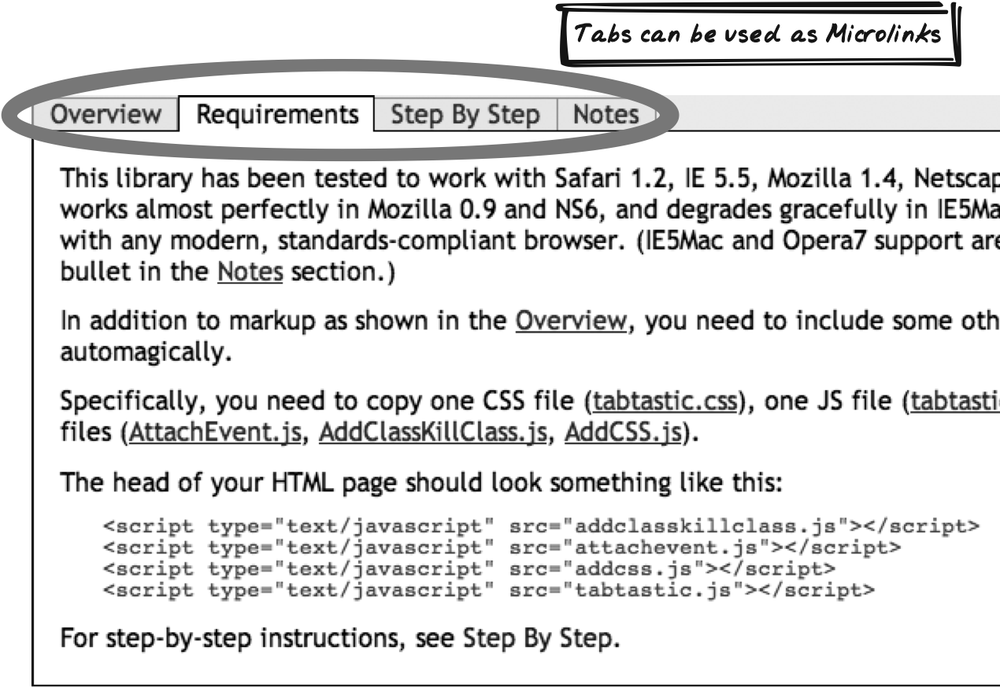
Tabtastic library
A great application for Microlinks is the tabbed content metaphor, in which different blocks of content are shown as tabs. The technique was popularized by Amazon in the late 1990s, and Ajax allows for the content in another tab to be downloaded without a page refresh. Tabtastic (http://phrogz.net/JS/Tabtastic/index.html) is a JavaScript toolkit you can use to incorporate tabs into your application—Microlink style. The web site demonstrates how it’s done (Figure 15-14).
Rpad
Rpad (http://www.rpad.org/Rpad/) provides an assortment of numerical analysis applications. Here, the linked content is not stored but dynamically generated. Click on Calculate within the General Demo (http://www.rpad.org/Rpad/Example1.Rpad) and you’ll see several tables and graphs appear, freshly generated from the server.
Gmail
Gmail (http://gmail.com/) uses Microlinks to repeatedly switch main content around. There are Microlinks for all of your mailboxes, your contacts, for composing a new email, and so on.
The appearance is structured like most web sites—fixed-size blocks on the top and left containing links and search and the main content on the bottom right. However, most conventional web sites achieve this fixed structure by continuously reloading the entire structure, even if only the main content has changed. Gmail, however, is an Ajax App and only has to morph the main content area as each Microlink is clicked.
Code Example: TiddlyWiki
In TiddlyWiki, Microlinks are created as anchor elements with a custom CSS class,
button. There’s a general-purpose
function used to create buttons, and the link creator delegates to
it. It passes in display information as well as a function, onClickTiddlerLink, to handle what happens
when the user clicks.
var btn = createTiddlyButton(place,text,subTitle,onClickTiddlerLink,theClass);
Buttons are anchor elements
rendered with a special CSS class, which provides a different
appearance while being hovered over or activated:
  .tiddler .button {
    padding: 0.2em 0.4em 0.2em 0.4em;
    color: #993300;
  }
  .tiddler .button:hover {
    text-decoration: none;
      color: #ccff66;
      background-color: #993300;
  }
  .tiddler .button:active {
    color: #ffffff;
    background-color: #cc9900;
  }
When the link is clicked, the handler function inspects the event to determine the desired content:
  function onClickTiddlerLink(e)
  {
    if (!e) var e = window.event;
    var theTarget = resolveTarget(e);
    var theLink = theTarget;
    ...
  }
The new Malleable Content can then be
inserted. An algorithm determines where it will be placed and the
createTiddler( ) function creates
a new div to host the content. If
animation is turned on, the new content block will appear to “leap
out” from the hyperlink into its own region of the page, as detailed
in One-Second Motion (Chapter 16). Otherwise, the window
performs a straightforward scroll to show the new content:
  function displayTiddler(src,title,state,highlightText,
      highlightCaseSensitive,animate,slowly) {
    var place = document.getElementById("tiddlerDisplay");
    var after = findContainingTiddler(src);
      // Which tiddler this one will be positioned after
    ...
    var theTiddler = createTiddler(place,before,title,state,highlightText,
                                    highlightCaseSensitive);
    if(src)
    {
      if(config.options.chkAnimate && (animate == undefined || animate == true))
      anim.startAnimating(new Zoomer(title,src,theTiddler,slowly),
                          new Scroller(theTiddler,slowly));
      else
        window.scrollTo(0,ensureVisible(theTiddler));
    }
  }
Related Patterns
Malleable Content
Malleable Content (see earlier) is a companion pattern, because Microlinks are often used to conjure up Malleable Content blocks. however, a Microlink can also produce a more complex structure, too, such as the Gmail links that switch all of the main page content.
“One-Second” visual effects
The visual effects (One-Second Spotlight, One-Second Mutation, and One-Second Motion; see Chapter 16) help the user comprehend what’s going on when a Microlink is clicked, as TiddlyWiki demonstrates.
Drilldown
The categories in a Drilldown (Chapter 14) are a kind of Microlink, as they cause the Drilldown content to change without a page reload.
Live Form
A Live Form (Chapter 14) can include Microlinks to more advanced controls and to content that supports the user’s decision making.
Portlet
⊙⊙ Block, Conversation, Dialogue, Gadget, Independent, Parallel, Portal, Portlet, Widget
Goal Story
The sidebar of Tracy’s stock trading system contains a few independent blocks down the side: a currency Portlet, a calculator, and a miniature chart generator. Right now, she is checking on the USD/EUR exchange rate in one of those blocks. She types “USDEUR” into the text field, and the block updates a moment later to show the rate. Everything else on the page remains the same.
Problem
How can the user conduct rich conversations in parallel?
Forces
A complex application contains a range of loosely related functionality. The user often needs to work on these things in parallel, gathering knowledge about one thing and using it to influence another.
It isn’t just different functionality, but different data that users need to work with in parallel.
These conversations need to be “rich.” They require conversational state to keep track of what’s occurred so far and what can happen next, and they require interaction with the server.
It’s important to retain the state of each conversation between the user and the application. You don’t want to invalidate one activity just because the user chose to initiate another.
Solution
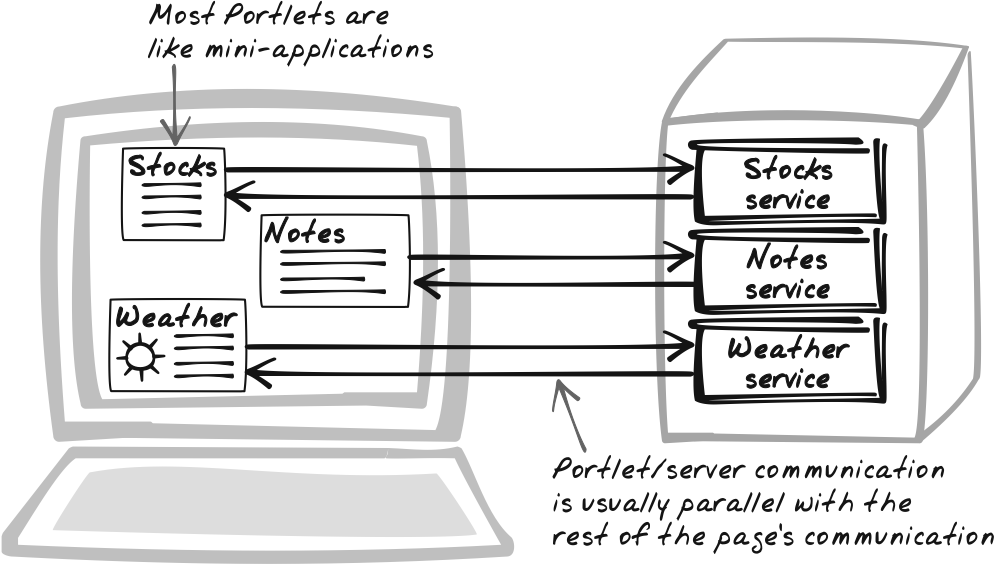
Introduce Portlets—isolated blocks of content with independent conversational state. A Portlet is like a mini-application inside a regular application. It presents a little bit of information and usually some controls. The user can communicate via the controls, which causes the Portlet to update.
Usually, the Portlet state is completely independent of the rest of the application. For example, a travel web site can include a weather Portlet. Users are able to search for locations and drill down from a result to an extended forecast. The conversation can be as rich and stateful as the display allows. However, the conversation has no effect on the rest of the application. If the main site is in the middle of a booking transaction, it will stay that way while users spend a few minutes checking the weather. Browser/server communication will take place, but it won’t affect the conversational state of the booking transaction, nor will it affect the state of any other Portlets.
In some cases though, actions on the Portlet can affect the general application state, and vice versa. A search Portlet can allow a user to locate content in the application. While locating the content, the user conducts a rich conversation alone with the Portlet, but once located, the user can click on the search result to open it up in the main content area.
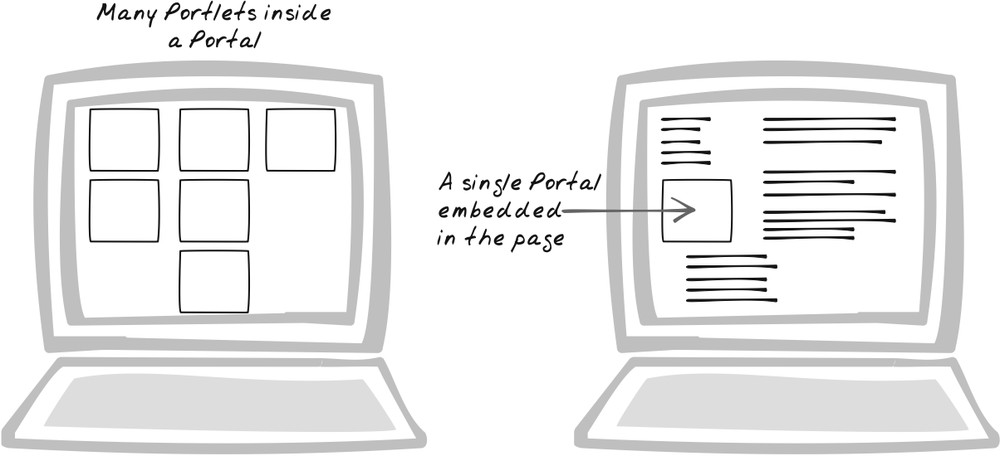
If you aggregate Portlets together on the same page, you will end up with a Portals. A news Portal for example, contains a Portlet for each news category. But Portlets need not reside in Portals. A single Portlet can also be embedded in a regular web app (Figure 15-16), as the preceding example illustrates.
Portlets have been around for a long time, and Portals were once touted as the next big thing after search engines. However, they’ve never really taken off, and the interface is part of the problem. Chapter 1 explains in detail the problems with traditional portals and how much they gain from Ajax. The various Ajax Patterns help in different ways:
XMLHttpRequest Calls alleviate the need to reload the entire page on each interaction. The response is minimal, and the state of everything else is effortlessly retained—a truly parallel conversation.
Display Morphing lets you change the portal’s appearance in response to user events and server responses.
Periodic Refresh allows you to auto-update Portlets based on external changes and activity from other users.
Drag-And-Drop lets you pick up Portlets and drag them around, a great improvement over the contrived page rearrangement interfaces used in the past.
An interesting variant is the “Cross-Domain Portlet,” a mixture of Cross-Domain Proxy and Portlet. The idea is to let the user have a complete conversation with an external web site. Consider how this might impact Tim O’Reilly’s proposal of “Advertising as Conversation” (http://radar.oreilly.com/archives/2005/05/advertising_as.html), where he suggested that web ads can work more as interactive conversations between user and advertiser rather than simply being mindless branding imagery. A Portlet can be used to mediate a complete conversation between advertiser and user. The preceding weather Portlet example could actually come from an external service provider. The travel site could even contain a booking Portlet. While viewing online discussions about a destination, a user can conduct a parallel conversation with an airline company to check flight availability.
Decisions
Will users be able to move Portlets around?
Drag-And-Drop provides a nice way to rearrange Portlets on the page, but do you really want to? Generally, Portal-style applications support this activity, but for regular applications with one or two Portlets, you need to decide if it’s worthwhile. Often, you can support some constrained movement—for example, let the user move Portlets up and down a side column.
Real-World Examples
Claude Hussenet’s Portal
Claude Hussenet’s portal is a demo informational portal (http://claudehussenet.com). Information from different news sources, as well as customizable stock quotes and quick links (bookmarks), are available in independent Portals. Each can be refreshed independently, and all editing occurs in the Portlet and without reloading the entire page. A checkbox lets you show and hide each Portlet individually.
Google Homepage
Google Homepage (http://www.google.com/ig) is a portal with three columns of Portlets. Registered users can click on “Add content” to keep adding Portlets. Most of the Portlets, like news, RSS feeds, and Word of the Day, contain recent updates. There are also some more interactive Portlets: Search shows personal search history, Bookmarks lets you accumulate bookmarks in a Portlet, Gmail summarizes recent mail messages. All Portals’ existing Portlets can be dragged around the page and edited. Editing morphs the Portal into a form. At present, unfortunately, the form is submitted as a regular form, causing a page refresh.
Backbase
The Backbase Portal Demo (http://projects.backbase.com/RUI/portal.html) contains several independent Portlets, each with its own state (Figure 15-17). This is only a demo, but it’s a good demonstration of the independent nature of Portlets.
Dobrado
Dobrado (http://dobrado.sourceforge.net), an open source project, is different from the preceding information portals in a couple of ways. First, the Portlets are free-flowing—they can be dragged anywhere on the page as opposed being restricted to the more common style of docking a Portlet into one of three columns. Second, Dobrado is not actually an information Portal per se, but rather a web site authoring application; for novices, it’s easy to create a page by conjuring new Portlets, arranging them on the page, and typing in some content.
Code Example: Claude Hussenet’s Portal
Claude Hussenet’s portal (http://claudehussenet.com/) delegates server calls to the Direct Web Remoting (DWR) framework (http://www.getahead.ltd.uk/dwr/). Let’s focus on the “Quick Links” Portlet, which allows you to maintain a collection of bookmarks. (Some of the following code here has been reformatted.)
The initial HTML represents Quick Links as a table. There’s a span for the links and another span for input:
  <TABLE border="0" cellPadding="0" border="0" cellSpacing=0 width="100%" >
    <tr><td height="2" colspan="2" bgcolor=#FF6633><img height=
"1" src="/images/pixel.gif"></td></tr>
    <TR>
      <TD  valign="top" nowrap><B>Quick Links</B></TD>
      <TD width=1% align=right> <input type="checkbox"
id='buttonMinimizedPortletQuickLinks'

      value="Min" onclick="refreshPortletQuickLinks
      (document.getElementById('portletQuickLinks'));"></TD>
    </TR>
    <TR>
      <TD>
        <span id="portletQuickLinks" ><B>Loading Content</B></span>
      </TD>
    </TR>
    <TR>
    <TD>
        <span id="inputLinksPortletQuickLinks" ></span>
    </TD>
    </TR>
  </TABLE>
A call is made on startup to get content from an HTML Message on the server. This delegates to a DWR function, and the server call finally morphs the links:
  QUICKLinks.getContent(writePortletPortletQuickLinks,
    {timeout:3500,
      errorHandler:'sayHello2('+"'portletQuickLinks'"+')'});
  ...
  function QUICKLinks( ) { }
    QUICKLinks.getContent = function(callback) {
        DWREngine._execute('/portal/dwr', 'QUICKLinks', 'getContent', callback);
    }
    ...
  function writePortletPortletQuickLinks(data) {
    if (data!=null)document.getElementById("portletQuickLinks").innerHTML = data;
  }
The input for new links has a Submit button, and when the user submits, a JavaScript function is invoked. It causes the new link details to be posted to the server. Because the server is keeping track of the session, it is able to send the HTML back for all links. The callback function is the same as before:
function addQuickLinksPortletQuickLinks(elem) {
  var name = document.getElementById("linkname").value;
  var link =document.getElementById("url").value;
  ...
  QUICKLinks.addLink(writePortletPortletQuickLinks,name,link);
}
Alternatives
Tabbed Browsing
Tabbed browsing is a workaround users resort to in order to conduct multiple conversations with the same web site.
Related Patterns
Periodic Refresh
Portlets often use Periodic Refresh (Chapter 10) to stay up to date.
Distributed Events
Using Distributed Events (Chapter 10) is a good way to keep the Portlet updated. This is particularly important when one Portlet is dependent on another: instead of tying them directly, use events to add a layer of indirection.
Drilldown
A dynamic Drilldown (Chapter 14) is an effective way to conserve space within a Portlet.
Live Form
Live Forms (Chapter 14) appear in many Portlets because they are a good way to conduct a rich conversation with the server in a manner that avoids any page refresh.
Metaphor
A portal full of Portlets is like having a 21st century dashboard as depicted in a 20th century sci-fi movie—a conversation with the president on one screen, a little navigation through the stars on another screen, and a looping fast-food ad in the middle.
Acknowledgments
Tony Hill of Thomson Consulting gave me the idea for the pattern diagram.
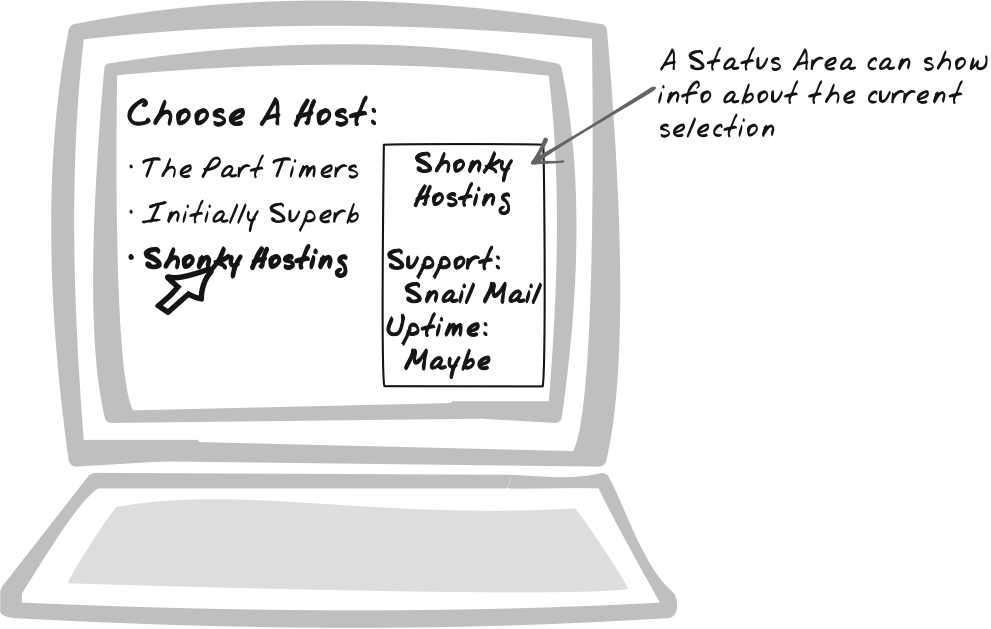
Status Area
⊙ Console, Log, Message, Status
Goal Story
Pam wants to revise the list of project issues. As she begins checking off those that are now resolved, she notices the Status Area below update, which is showing the number of issues resolved and the number still outstanding.
Problem
How can you show auxiliary information?
Forces
The same data can be represented in different ways.
Users often benefit from redundant summary information.
Screen real estate is limited; you can’t augment each field with its own summary information.
Solution
Include a read-only Status Area to report on current and past activity. The Status Area is usually auto-generated text based on some aspect of system state. The main purpose is to save space by occupying a region with information from different sources. This is done by dynamically altering the information according to current context.
Applications of the Status Area include the following:
Summarizing information about elements the mouse is hovering over.
Summarizing information about the element being edited.
Summarizing information about the overall application state.
Capturing past events in a log.
Offering a preview.
Often, there’s no server-side processing involved—the browser has enough information to maintain the Status content itself. For example, the browser can easily show a count of selected elements or a log of past data that’s been retained. A Status Area can be particularly valuable for monitoring the state of dynamic objects. For example, an e-commerce system can use Periodic Refresh (Chapter 10) to continuously update the state of an order within a user’s profile (“Submitted,” “Credit Card Verified,” “Stock Available,” and so on).
The Status Area is usually a div element, with changes triggered by
events such as mouse rollovers and form editing.
Note that this pattern is mostly speculative and is based on analogies from conventional desktop systems (where Status Areas are indeed commonplace).
Decisions
How will you size the Status Area? What if it overflows?
The Status Area is usually a relatively small element—sometimes just one row of text. You need to perform some analysis to determine the worst-case situation, i.e., what’s the most content the Status Area can hold, and how will you deal with overflow. Strategies for dealing with this include:
Compressing the text somehow—e.g., by trimming the message or extracting a summary.
Introducing scrollbars. This is reasonable for a console-like Status Area that retains a history.
Dynamically resizing the Status Area (which is not very common).
Real-World Examples
BetFair
Betfair (http://betfair.com) includes a Live Form (Chapter 14) for creating new bets (see "Real-World Examples" in Live Form). A Status Area tracks your total liability, which is dynamically updated as you change the stake.
Lace Chat
Brett Stimmerman’s Lace Chat (http://www.socket7.net/lace/) is an Ajax chat app. A Status Area contains a live preview of your message. As you type, a preview of the output, including any markup, is shown.
Code Refactoring: AjaxPatterns Status Wiki
The Basic Wiki Demo (http://ajaxify.com/run/wiki/) is refactored in the Status Wiki Demo to include a Status Area (http://ajaxify.com/run/wiki/status). While the focus is on a message, there’s a Status Area below maintaining the word count, row count, and character count (Figure 15-19).
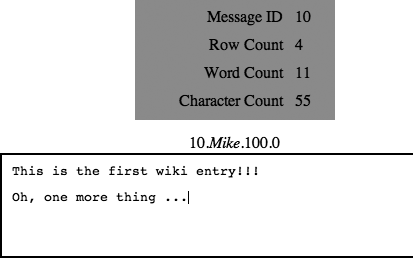
The static HTML has been refactored to include a Status Area with a table for all the values. This means the script need only set the actual count values rather than perform HTML manipulation:
<div id="status">
<table id="statusTable">
<tr>
<td class="label">Message ID</td>
<td class="value" id="messageId"></td>
</tr>
<tr>
<td class="label">Row Count</td>
<td class="value" id="rowCount"></td>
</tr>
<tr>
<td class="label">Word Count</td>
<td class="value" id="wordCount"></td>
</tr>
<tr>
<td class="label">Character Count</td>
<td class="value" id="characterCount"></td>
</tr>
</table>
</div>The CSS stylesheet makes the status initially hidden:
  #status {
    visibility: hidden;
    text-align: center;
  }
When the message gains focus, it makes the status visible and
calls showStatus( ) to set its
values according to the message’s initial state. The Status Area
remains until the message is blurred. To update on each change,
showStatus is called on keyup:
  function onMessageFocus(event) {
    ...
    $("status").style.visibility = "visible";
    showStatus(message);
  }
  function onMessageBlur(event) {
    ...
    $("status").style.visibility = "hidden";
    ...
  }
  function onMessageKeyUp(event) {
    var message = getMessage(event);
    showStatus(message);
  }
The showStatus message
analyzes the message and posts its results to the status-table
cells:
  function showStatus(message) {
    $("messageId").innerHTML = message.id;
    $("characterCount").innerHTML = message.value.length;
    $("rowCount").innerHTML = message.value.split('\n').length + 1;
    var messageCopy = message.value.replace("\n", " ");
    messageCopy = message.value.replace(/^ */, "");
    messageCopy = messageCopy.replace(/ *$/, "");
    $("wordCount").innerHTML = messageCopy.match(/^ *$/) ? 0:messageCopy.split(/\s+/g)
.length;
  }
Alternatives
Popup
A Popup (see earlier) is another way to show auxiliary information without dedicating a permanent space on the page for it. A Status Area is less intrusive but at the expense of some screen real estate.
Browser Status Bar
Most browsers contain a status bar at the bottom,
which you can access with the window.status object. That’s an okay
place to include status information, but it has drawbacks. First,
it’s a very rudimentary interface with no support for structured
content, styling, and animation. Second, users expect URLs to
appear there when they hover over hyperlinks, and you might be
breaking that model. Finally, there are cross-browser issues.
Firefox, for instance, disables scripting the status line by
default due to security concerns (malicious web sites can fake the
URL you’re heading to).
Related Patterns
Periodic Refresh
Where the Status Area shows server-related status, use a Periodic Refresh (Chapter 10) to keep it up to date.
Metaphor
A Status Area is like a time-share property; both reduce real estate costs by letting multiple participants occupy the same area at different times.
Update Control
⊙ Backwards, FastForward, Forwards, Freeze, Pause, Push, Refresh, Rewind, Reverse, Speed, Sticky, Update
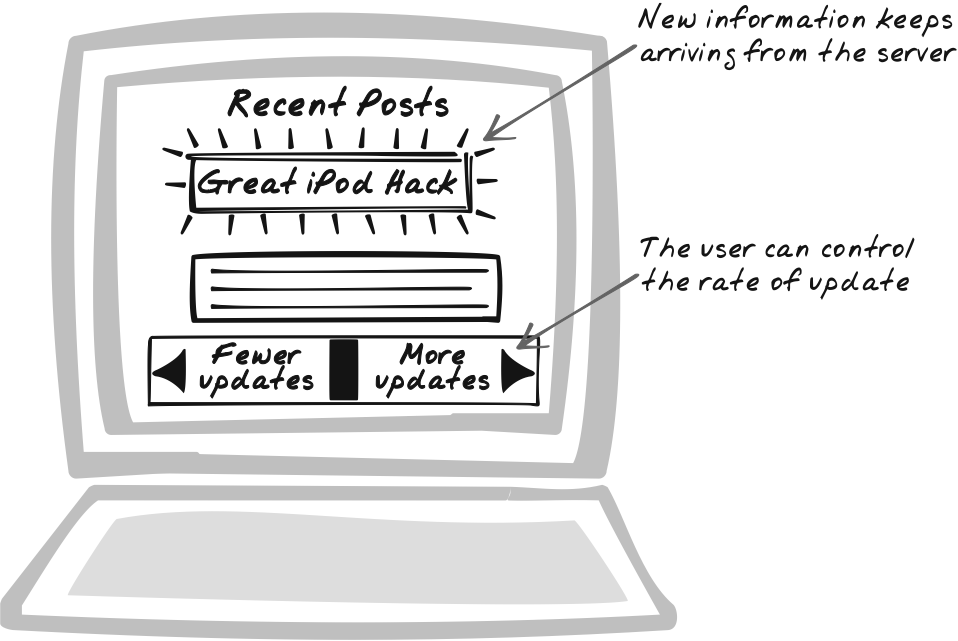
Goal Story
Sasha is entranced by a world map that continuously updates with events from around the world. She plays around with the velocity controls, first speeding it up so there’s a new event every second (no matter how trivial), then backtracking through previous events, and finally pausing on something that catches her eye.
Problem
How can the user deal with continuous information entering the browser and updating the page?
Forces
Many Ajax Apps continuously grab data from the server and place it on the page.
The web page has a limited area, so you’ll need to remove or relegate older content.
The optimum speed of updating depends on the user and his task. It should be fairly quick if the user is actively monitoring, for example, and probably quite slow if the content is a bit of eye candy at the edge of a page.
Solution
Let the user control the rate and criteria of updates. When using patterns such as HTTP Streaming (Chapter 6) and Periodic Refresh (Chapter 10), it’s possible to keep grabbing fresh content from the server, so you can show news updates, system events, and more. The trend is increasing, with photo slideshows, news updates, and so on, and it can easily lead to information overload. This pattern is about giving the user control over the incoming stream of information. It takes several forms.
First, the user can control the rate of change, by pausing, rewinding, and fast-forwarding. Pausing is important for several reasons: it gives the user an ability to reflect on the content, it lets him keep the content open while perform work related to it, and it lets him interact with the content in the case that it contains links or other forms of control. This is a serious issue in interfaces like Digg Spy (http://digg.com/spy) that stream new links every second or so. Go to click a link and—BAM!—it’s already been replaced by a new link by the time your mouse pointer gets there.
Rewinding is useful too, because it lets users see things they didn’t catch the first time, or lets them revisit something in the light of new information.
Fast-forwarding is another form of Update Control. More generally, this relates to setting the speed of updates to be faster or slower than the application’s default. With this tool, users can tailor update behavior to their own needs and the task they’re performing. Different users will have different mental processing capabilities and preferences—some are hungry for a torrent of incoming data, whereas others prefer a more casual pace. Furthermore, consider how is the information being used. In one case, the user, perhaps a trader monitoring company news, might be actively watching the information. In another case, the user might be trying to find an interesting story to read while viewing a list of new RSS items. Instead of second-guessing how the user’s using all of this content, the advice in this pattern is to set a suitable default rate and give her the power to change it.
In theory, you only need a single “speed control” to allow for Update Control. A negative speed corresponds to rewind, zero to pause, one to default speed, and a high number for fast-forward. This could be set with a Slider (Chapter 14) or an input field or both. However, you can probably do a better job than that. The media player metaphor is particularly compelling given how closely it relates to this problem as well as how universal the concepts are. You may also opt to control the speed by adapting to the user’s behavior. If the mouse is hovering near some content, that’s probably a good clue to pause it, especially if the content is interactive.
You can also let the user choose what kind of content will be shown, which is an indirect way of influencing the rate. For example, a user might select between “Critical”, “Informational,” and “All.” Or the criteria may be more domain-specific, as with Digg Spy, which provides checkboxes for the kinds of things you want to monitor—new stories, new comments, and so on.
Real-World Examples
Digg Spy
Digg Spy (http://digg.com/spy) shows new stories and events such as user moderation as they happen (see Figure 5-5). The information can change so quickly that it’s difficult to click on a link, but fortunately a pause button is present. In addition, you can indirectly control how fast the content appears by tweaking the filtering options, so, for example, you can ask Digg to show only you new story submissions.
Slide
Slide (http://Slide.com) shows a stream of visual content from Flickr, EBay, and elsewhere (Figure 15-21). A minus (-) button moves content to the left, a pause button pauses it, and a plus (+) button speeds it up. It will also pause when you hover the mouse over it. The rolling slideshow is implemented with Flash, but the idea is equally applicable to pure Ajax.
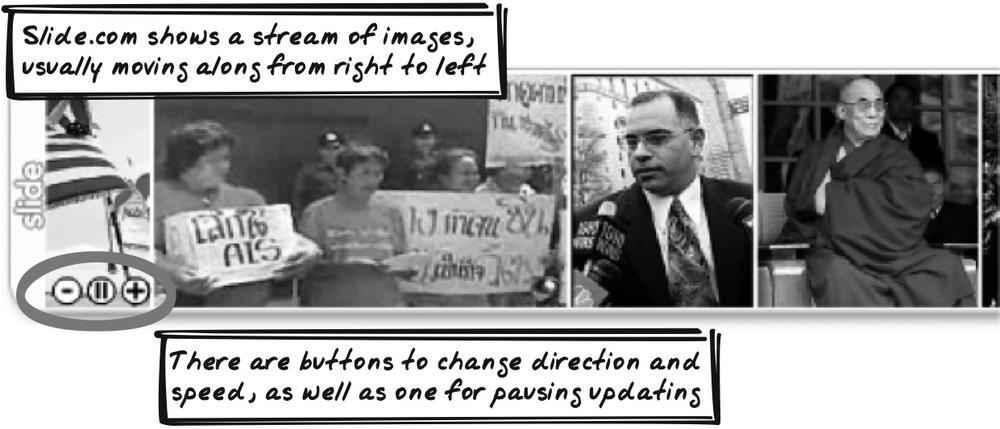
WBIR
WBIR (http://wbir.com/), a regional news provider, sometimes shows “slideshow images” (Figure 15-22). Like animated GIFs, these are a sequence of several images—shown one at a time—in the same container. But unlike animated GIFs, you can click to pause a single image.

Code Example: Digg Spy
Digg Spy (http://digg.com/spy) includes a pause and a
play button in the initial HTML. At any point in time, exactly one
of these buttons is active and will respond to a click, which is
registered to notify the togglePause(
) function. togglePause(
) doesn’t actually check which button the event originated
from, because it instead tracks the pause mode with an explicit
pause variable. Thus, the first
task of togglePause( ) is to
toggle the state of the pause
variable.
  function togglepause( ) {
    pause = !pause;
    ...
  }
If we’ve just entered pause mode, togglepause( ) cancels the timers used to
make the updates. Otherwise, it does the exact opposite, i.e.,
schedules the updates, as well as making an initial update.
  function togglepause( ) {
    ...
    if (pause == 1) {
      clearInterval(timer);
      clearTimeout(timer2);
      ...
    } else {
      update( );
      timer = setInterval('addaline(true)', scrollDelay);
      timer2 = setTimeout('update( )', updateDelay);
    }
    ...
  }
The last thing togglepause(
) does is call write_pause, which updates the container
(play-pause-toggle) containing
both buttons. The HTML is mostly the same in both cases, but the
hyperlink to togglepause( )
changes location according to which button should be active.
  function write_pause( ) {
    if (pause == 0) {
      document.getElementById('pause-play-toggle').innerHTML = '<span class=
"spy-play"><strong>Play</strong></span><a href="#" onclick=
"togglepause( )" class="spy-pause">Pause</a></span>';
    } else {
      document.getElementById('pause-play-toggle').innerHTML = '<a href=
"#" class="spy-play" onclick="togglepause( )"><strong>Play</strong>
</a><span
class="spy-pause"><strong title="Pause the display of new items.">Pause
</strong></span>';
    }
  }
Related Patterns
Periodic Refresh
Periodic Refresh (Chapter 10) is one means of keeping page content fresh—hence, a situation in which you might use Update Control.
HTTP Streaming
Like Periodic Refresh (Chapter 10), HTTP Streaming (Chapter 6) is a pattern that keeps page content fresh, the same situation in which Update Control applies.
Metaphor
Think of the navigation controls on a DVD player; conceptually, Update Control is very similar.
Acknowledgments
Thanks to Christopher Kruslicky for suggesting a pattern based around pausing, which ultimately led to this pattern.
Virtual Workspace
⊙⊙ Camera, Desktop, Illusion, Infinite, InfiniteScrollbar, Lens, Move, Pan, Portal, Scroll, Solipsism, Viewport, Virtual, Visible, Window, Zoom
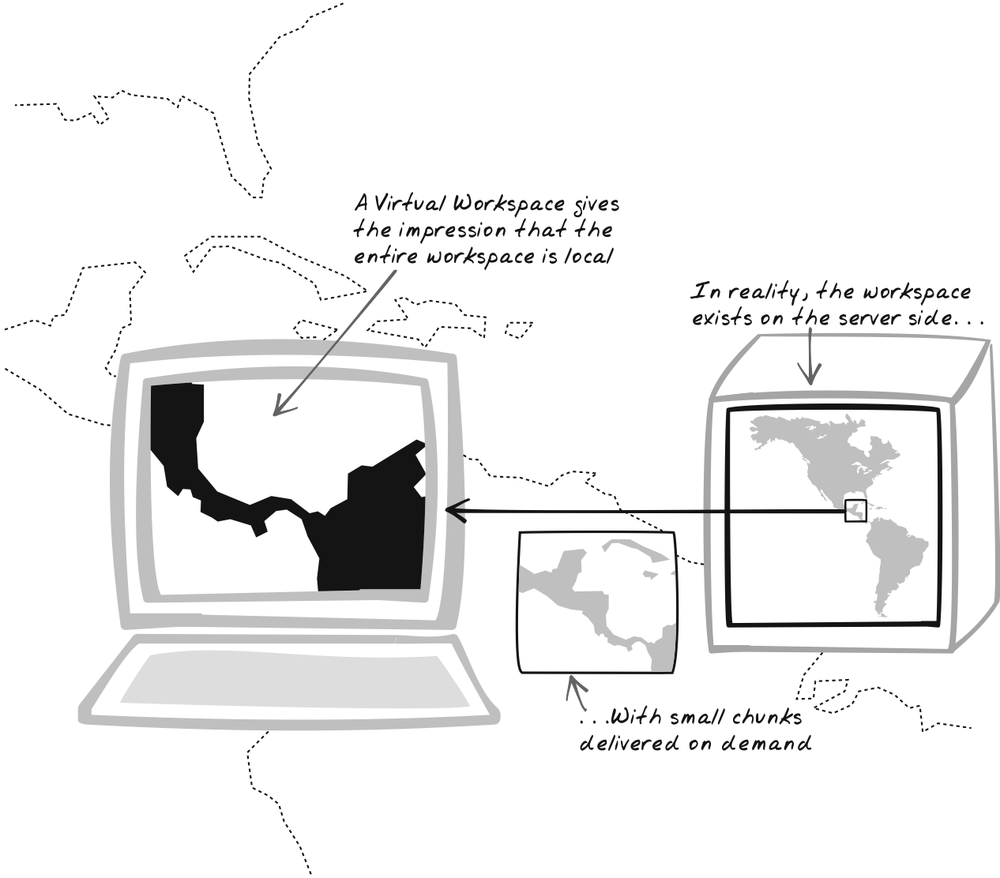
Goal Story
Bill is using a meta-search engine to receive insurance quotes. The browser can’t retrieve all 500 results at once, but Bill sees a table containing what looks like all the results. He can scroll up and down as if it were a regular table, and the newly appearing rows are populated on demand.
Forces
Ajax Apps often require data from the server.
On the server side, data storage is virtually unlimited—search engines, for example, store billions of web pages. Even on corporate intranets, query results are often huge; try searching for every retail transaction on a given day.
The application should respond to data requests as quickly as possible.
Bandwidth constraints mean it’s not feasible for an interactive application to download the entire search result. Yet users should be free to explore the whole thing.
Solution
Provide a browser-side view into a server-side workspace, allowing users to navigate the entire workspace as if it were held locally. The illusion is that the entire workspace is already in the browser, but the reality is that the server actually provides content on demand. At any time, the user is looking at an “opening” or “portal” into the entire workspace. He can pan across, jump to a different region, and zoom in and out. Each of these actions requires a view change, so the browser transparently fetches the data for the new portion of the workspace and renders it accordingly.
Here are some examples of navigable workspaces:
- Lists
These include search results and user preferences.
- Tables
These include Data Grids and spreadsheets.
- Physical images
These include diagrams, photos and maps.
- Documents
These include web content.
- 3D Models
These include computer-rendered landscapes and visualizations of virtual models such as chemical molecules.
- Time-dependent artifacts
These include any artifact that changes with time—world population, for instance—and can be “navigated” by moving across time.
Users move through the space in different ways. Often they use a combination of the tools described next.
- Scrollbars
Users can make the content scroll incrementally or jump to a completely different region.
- Dragging tool
Gives the user the impression of dragging the document around while keeping the view fixed.
- Keyboard shortcuts
Users can scroll incrementally using directional keys. Page Up and Page Down are often used to completely replenish the current view with an adjacent region. Home and End are often used to jump to the start and end.
- Direct command
Users can use a separate control to specify an exact region—for example, typing in the dimensions they want to view. Or, for an image, placing a bounding box on a thumbnail view of the entire document.
There are also different zooming techniques:
- Zoom slider
This is an adjustable Slider that represents the current zoom level.
- Keyboard shortcuts
A common choice for zooming in and out is
-and+(or=, since+usually requires pressing Shift-=).- Selecting a region
This is used to zoom further into a region within the current view.
Depending on the mechanisms you’re supporting, you’ll need to
add different types of event handlers. So, for keyboard shortcuts,
watch for events like keydown;
for dragging and selecting a region, watch for mousedown, mousemove, and mouseup. In some cases, you’ll need a
control separate from the view itself, as is the case with a zoom
slider or a thumbnail sketch of the entire workspace.
Whatever the event mechanism, the upshot is that the browser script will sometimes receive notifications that there is a new desired region or zoom level, if that’s applicable. At that point, a Web Remoting (Chapter 6) call must occur, passing the server the details of the new region. Upon reply, the old data is either replaced or shifted along and the new data is rendered.
This pattern is often very bandwidth-intensive, considering that the entire workspace can be massive and the interaction complex. For that reason, there are several important performance optimizations—for more details, see "Related Patterns" later in this chapter.
Decisions
How will you handle panning?
Panning, as opposed to jumping straight from one position to another, provides some unique design challenges. Unlike a complete jump, the user will expect a smooth transition from one position to another. Fortunately though, you already have most of the workspace loaded. Thus, a Browser-Side Cache (Chapter 13) is very important if you wish to achieve smooth scrolling. With this, you need only to load the new portion of the workspace instead of the whole thing. This leads to a few more specific questions:
How much of the workspace will you cache? A standard caching trade-off between memory and speed.
How will you track changes? Again, this should be the responsibility of the cache. At one level, the script will ask for the whole workspace, but the cache will decide which portion of that actually requires server content.
How will the view appear initially?
There has to be a default view position and zoom level within the overall workspace. A typical choice for the view is at the logical start or center. Zoom level should usually be quite high to let the user quickly drill down from the starting point.
What do you display while a region is being repopulated?
Most of the time, users are navigating to areas that are partly or completely unpopulated, requiring a result from the server to render them. What do you show in the interim? Here are a few options:
Whatever was there previously, possibly with a change of appearance.
Nothing—clear it while waiting.
A Progress Indicator (Chapter 14).
A Popup (see earlier in this chapter)—perhaps with just a single word—indicating what content will be placed there.
A Guesstimate (Chapter 13) of the content, perhaps made by extrapolating neighboring data held in the cache.
How will you handle changes to the existing view?
Sometimes the workspace changes while the user is watching it. For example, a user might introduce a filter to a result set. A change to the workspace means the view must change too. The easiest approach is to abandon the previous view location and revert to the default. However, there is often a more logical solution. Following are some examples:
You could keep the proportions the same as before—e.g., if the user was looking at rows one-third of the way down a table, then show the new rows that appear one-third of the way down the reduced table.
You could fix on certain content—e.g., keep the top row in the same spot and show the remaining rows that are now directly below it. If the top row no longer exists, continue working downward until one of the rows does exist.
Real-World Examples
map.search.ch
http://map.search.ch is a Swiss Ajax map. Like Google Maps (http://maps.google.com) (which it predates) and similar products, the map constitutes a huge Virtual Workspace, and the user only views a tiny portion of it at any point in time. The map can be panned by dragging the workspace, clicking on arrow icons just outside its boundaries, and pressing the arrow keys. Zooming is controlled by clicking on a horizontal imagemap, clicking on Zoom In and Zoom Out buttons, or pressing Page Up and Page Down.
OpenRico Search Demo
The OpenRico Search Demo (http://openrico.org/rico/yahooSearch.page) is a Cross-Domain Proxy (Chapter 10) providing an Ajax interface to Yahoo! Search (Figure 15-24). Its philosophy was best summed up by OpenRico developer Bill Scott as “Death to Paging!” (http://looksgoodworkswell.blogspot.com/2005/06/death-to-paging-rico-livegrid-released.html). Instead of wading through a sequence of pages, you’re presented with a single table containing all results. The results are a Virtual Workspace, and the table is a view into that space. Each time you navigate within the table, new results are pulled down from the server.
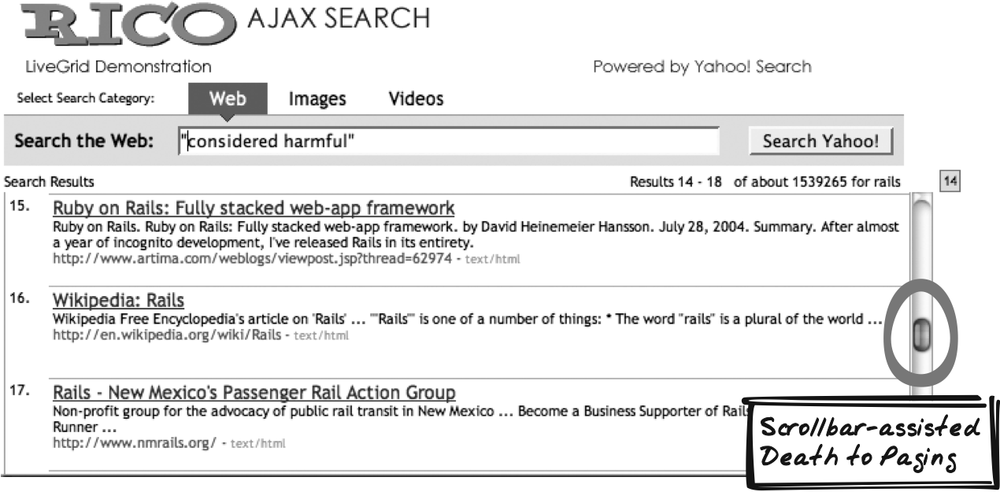
Giant-Ass Image Viewer (GSV) library
Michael Magurski’s GSV (http://mike.teczno.com/giant/pan/) is a library that lets web developers show an image of any size and allow the user to pan and zoom within it. The homepage contains a working demo.
Dunstan Orchard’s blog
Dunstan Orchard’s blog (http://www.1976design.com/blog/colophon) presents a slick panoramic, cartoonish view from his home. When the mouse rolls anywhere on the image, a couple of transparent Popups (see earlier in this chapter) appear on each side of the panorama. Rolling onto either of those and keeping the mouse there causes the banner to pan in that direction. Note that this is a different form of Virtual Workspace, since the whole workspace is local.
Code Refactoring: AjaxPatterns OpenRico Search
The OpenRico Search Demo is based on the OpenRico’s LiveGrid API. In Data Grid (Chapter 14), the code example shows how to use the API. This example covers some of the API internals, specifically regarding the inclusion of a Virtual Workspace. Note that OpenRico uses Prototype (http://prototype.conio.net/) to allow for a more object-oriented coding style.
In OpenRico, the user’s view is a GridViewPort object, which has a fixed row
height and also tracks the view’s starting position, i.e., the index
that the top row of the GridViewPort corresponds to.
  Rico.GridViewPort.prototype = {

    initialize: function(table, rowHeight, visibleRows, buffer, liveGrid) {
      ...
      this.rowHeight = rowHeight;
      this.div.style.height = this.rowHeight * visibleRows;
      ...
      this.startPos = 0;
    },
The results might include thousands of virtual rows, but the
table itself is only about 20 rows (as determined by visibleRows). How, then, is the scrollbar
created to make it appear as if there were thousands of rows?
OpenRico creates a custom scrollbar. The trick is to create a
1-pixel-wide div whose height
matches the height of the Virtual Workspace. The virtual height can
be calculated since the scrollbar has access to the visible table
height (visibleHeight), the
number of virtual rows (metaData.getTotalRows( )), and the number
of rows in the view (metaData.getPageSize(
)). The scrollbar div’s
height is set to this virtual height, so the browser will render a
scrollbar that appears to scroll across the entire virtual
table:
    createScrollBar: function( ) {
      var visibleHeight = this.liveGrid.viewPort.visibleHeight( );
      // create the outer div...
      this.scrollerDiv  = document.createElement("div");
      ...
      // create the inner div...
      this.heightDiv = document.createElement("div");
      this.heightDiv.style.width  = "1px";
      this.heightDiv.style.height = parseInt(visibleHeight *
          this.metaData.getTotalRows()/this.metaData.getPageSize( )) + "px" ;
      this.scrollerDiv.appendChild(this.heightDiv);
      this.scrollerDiv.onscroll = this.handleScroll.bindAsEventListener(this);
      var table = this.liveGrid.table;
      table.parentNode.parentNode.insertBefore(
        this.scrollerDiv, table.parentNode.nextSibling);
    },
Events on the scrollbar are dispatched to handleScroll. After any scrolling behavior
has occurred, this function calculates the portion of virtual space
being viewed. The algorithm determines the new virtual row that
should appear on top of the viewport. For instance, if the row
height is 10 pixels, and the user has scrolled to 50 pixels from the
top, then the virtual row is 5; the viewport will need to be
refreshed such that the new top row is the fifth virtual row.
  handleScroll: function( ) {
    ...
    var contentOffset = parseInt(this.scrollerDiv.scrollTop /
this.viewPort.rowHeight);
    this.liveGrid.requestContentRefresh(contentOffset);
    this.viewPort.scrollTo(this.scrollerDiv.scrollTop);
    ...
  },
requestContentRefresh
fetches the required content into a Browser-Side
Cache known as Buffer.
With the buffer in place, you can smoothly scroll back to previously
seen results without any call required:
  fetchBuffer: function(offset) {
    ...
    var bufferStartPos = this.buffer.getFetchOffset(offset);
    this.processingRequest = new Rico.LiveGridRequest(offset);
    this.processingRequest.bufferOffset = bufferStartPos;
    ...
    callParms.push('id='        + this.tableId);
    callParms.push('page_size=' + fetchSize);
    callParms.push('offset='    + bufferStartPos);
    ...
    ajaxEngine.sendRequest.apply( ajaxEngine, callParms );
    ...
  },
Eventually, the viewport table is populated with the new set of rows:
  refreshContents: function(startPos) {
      ...
      for (var i=0; i < rows.length; i++) {//initialize what we have
        this.populateRow(this.table.rows[i + contentOffset], rows[i]);
      }
      ...
  },
Alternatives
Virtual Magnifying Glass
Instead of showing a partial view, you could present the entire thing in low detail and offer a “Virtual Magnifying Glass” or “Virtual Fish-Eye Lens” to zoom in on the detail. This might sound like it could only be applied to an image, but it is also applicable to tables and other interfaces.
Related Patterns
Browser-Side Cache
Browser-Side Cache (Chapter 13) is very important with respect to the Virtual Workspace —if the user moves 1 percent down, you don’t want to download the entire view again.
Predictive Fetch
It’s useful to perform a Predictive Fetch (Chapter 13) on regions of the Virtual Workspace that the user is likely to navigate to next. Panning is a common task, so it’s worthwhile caching the regions neighboring the current view. You might also cache at the next and previous zoom levels.
Guesstimate
Sometimes you might be able to quickly satisfy a navigation action with a Guesstimate (Chapter 13) while waiting for the real data to return.
Multi-Stage Download
If the response is large, break it into more than one part; download the most important information first, then follow up with more refined content.
Drag-And-Drop
Drag-And-Drop (see earlier) is often used to let the user pan by enabling her to drag the entire workspace across the view.
Slider
The zoom control is often a Slider (Chapter 14).
Unique URLs
Views need to be associated with Unique URLs (Chapter 17) so that the user can highlight a particular part of the workspace rather than the entire thing. That way, the user can easily bookmark the view or mail it to a friend.
Metaphor
Did you see The Truman Show (http://www.imdb.com/title/tt0120382/)? It’s the story of a man who has no idea his whole world is fake, completely architected for the purposes of a reality TV show. As he walks around town, props are adjusted and the “townspeople” are directed a few seconds ahead of his arrival. There’s a similar type of perception management going in Virtual Workspace; the illusion is that there’s a whole world of content beyond the view, but the reality is that it’s all constructed on demand.
Want to Know More?
Death to Paging—Bill Scott’s LiveGrid Announcement (http://looksgoodworkswell.blogspot.com/2005/06/death-to-paging-rico-livegrid-released.html).
Acknowledgments
Thanks to Bill Scott for pointing out this example and keeping me updated on the progress of OpenRico and the LiveGrid functionality. Bill and fellow OpenRico developer Richard Cowin helped explain some of the implementation.
Get Ajax Design Patterns now with the O’Reilly learning platform.
O’Reilly members experience books, live events, courses curated by job role, and more from O’Reilly and nearly 200 top publishers.

