Chapter 16. Visual Effects
ARICH INTERFACE IS MORE THAN STATIC WIDGETS; THERE’S A DYNAMIC COMPONENT THAT HAS A BIG impact on usability. Used carefully, visual effects can guide the user’s attention and help him understand what the application is doing. And don’t underestimate the aesthetic benefits. It might be eye candy, but good eye candy (not just “how good am I” hacks) makes passionate users.[*]
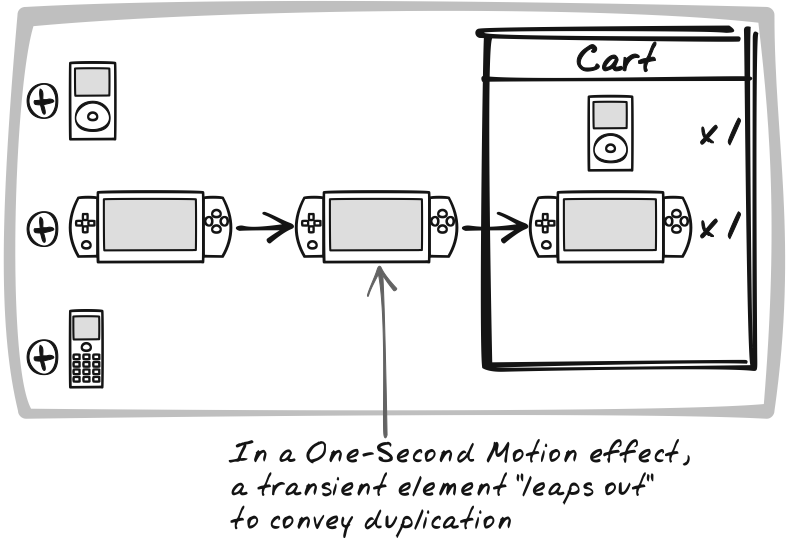
The “One-Second” effects are fleeting effects that sometimes convey a permanent transition from one state to another, and other times are used just to highlight something. One-Second Spotlight is a more general version of the popular “Yellow Fading Technique” and involves changes to brightness and color. In One-Second Mutation, the element changes shape, and in One-Second Motion, the element moves around.
Highlight is a more permanent effect where one or more elements are highlighted, typically because the user has selected them.
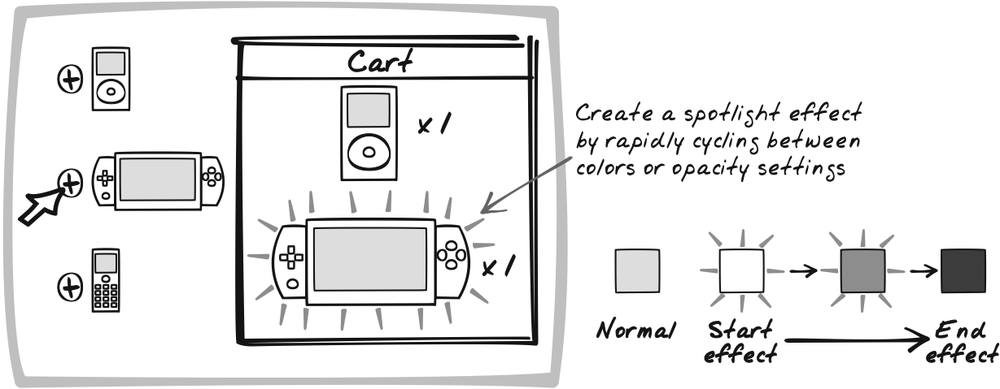
One-Second Spotlight
⊙⊙⊙ Attention, Effect, EyeCandy, Fade, Fading, Graphics, Refresh, Update, YellowFadeTechnique
Goal Story
Tracy is checking out her portfolio, which shows each stock in its own row. Suddenly, “Neverland Mining Co.” stock plummets, and its row lights up to reflect the change. Tracy’s attention is drawn instantly to this visual effect, and she immediately begins to offload her stake in the company.
Problem
How can you direct the user’s attention to spots on the page?
Forces
To ensure that the user is working with current data, the browser display must be frequently updated.
With Ajax, it’s possible to update only the portion of the screen that has changed, and if nothing has changed, the display will remain exactly as is.
The screen can get cluttered with a lot of information, much of which might change at any time.
While human vision is good at spotting changes, it’s easy to miss a sudden change, especially if it’s a subtle one.
Solution
When a display element undergoes a value change—or any other significant change—dynamically increase its brightness for about a second. As a device for communicating system activity, the One-Second Spotlight accomplishes several things:
It highlights changes so the user doesn’t have to actively monitor for changes and try to remember what—if anything—has changed.
Because the spotlight lasts for a few seconds, the user has enough time to redirect attention to that item and study the details of the event—e.g., looking at an item’s new value. In contrast, a standard transition would afford her no time whatsoever—if the user happened to blink, she could easily miss the change.
When the animation technique follows certain conventions or mimics real-world phenomena, it can provide hints to the user about the nature of the event.
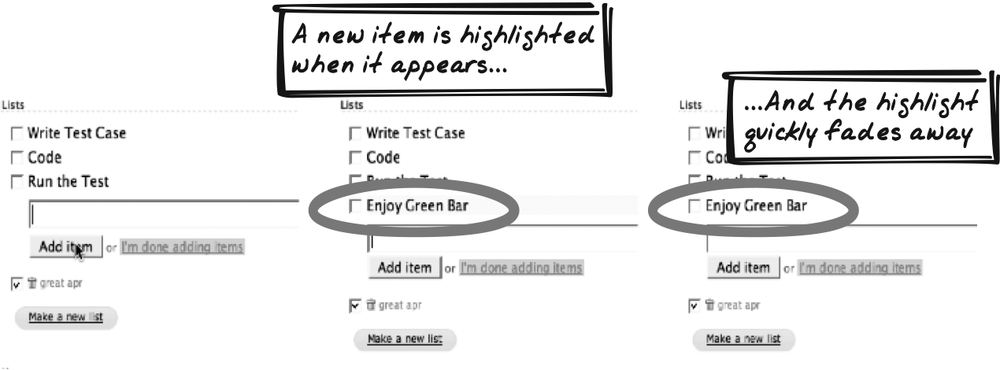
This pattern is a generalization of the technique 37signals introduced as the Yellow Fade Technique (http://www.37signals.com/svn/archives/000558.php). With that, an item lights up for a second after the user has edited it, and the lighting quickly fades away. Unlike a conventional application, in which a page refresh would occur, it’s often unclear when an XMLHttpRequest Call has occurred. So a quick visual effect is almost essential for the user to understand what’s happening.
From a technical perspective, the Yellow Fade Technique is usually achieved by suddenly switching the element’s background-color style from white to yellow, then using Scheduling to run through a continuous spectrum of background colors, starting with yellow and ending with white.
In more general terms, One-Second Spotlight encompasses several types of animation. One or more of the following CSS styles are affected during the spotlight period:
colorUsually, the element’s background changes, but font color is also a possibility. Though commonly assigned with Red-Green-Blue hex codes such as
#ff00ff, animation algorithms can benefit from the percentage form, e.g.,(100%, 0%, 100%). Often, the algorithm cycles through one or more of the Red, Green, and Blue components, e.g., gradually raising Red from 50 percent to 100 percent and lowering it back to 50 percent while holding blue and green constant. You might also prefer to represent the color as a combination of Hue-Saturation-Value (HSV) and cycle through one or more of those components. In this case, calculate the HSV values and convert them to RGB for display.opacityThis style determines how transparent the element is; an opacity of zero means the item is solid, and an opacity of 50 percent means the browser background—or any items underneath the element—will be partially visible.
visibilityThis style determines whether the element can be seen. Visibility does not affect page layout, so the element still occupies the same space on the page.
The possibilities are endless, but there are a few common effects. Firstly, there are straightforward transitions from one style setting to another:
- Fade Out
An element suddenly brightens and then fades back to its original appearance. This is useful for general highlighting and may also indicate that the element has been “sucked into” the server, i.e., the data is now safely stored server side. Since many pages use a white background, fading the background out to white is a natural choice for general attention grabbing.
- Fade In
An element is suddenly dimmed and then brightens up to its original appearance. This is useful for general highlighting and may also indicate that the element has been “pushed out” of the server.
- Fade Away
An element fades further and further out until it disappears altogether. If the element is already somewhat dim, it may be helpful to brighten it at the start of the animation. This effect often indicates that the element (or its value) has been suspended or destroyed.
- Materialize
From nothing, an element fades into its regular appearance. If its regular appearance is somewhat dim, it may be helpful to fade it in to a higher level, then fade back out a bit. This can indicate that the element has been created or retrieved.
- Switch
An element gradually switches its appearance from one setting to another. Instead of fading or brightening, though, an element might shift from red to blue. This effect is usually used to indicate a state change.
The other category of effects involves rapid oscillation and includes the following:
- Total Flash
In rapid succession, an element completely disappears and then reappears. The transition to and from a state of disappearance can be achieved by continuous fading, or by simply toggling the
visibilitystyle. This effect is useful as a general attention grabber, although it brings back memories of the dreaded<blink>tag; be sparing in your use of flashing elements.- Shifting Flash
An element’s appearance shifts several times from one setting to another. This can also be used as a general attention grabber if the element returns back to its original appearance. If the element permanently shifts from one setting to another, this effect will grab attention more effectively than Switch, which is a more subtle transition.
One typical implementation combines Display Morphing with Scheduling. To fade an item out, for instance, the following algorithm may be used:
Remember the element’s current setting.
Set
element.style.colorto a bright setting.Every 100 milliseconds:
Fade the element a bit. More precisely, drop
colorby 10 percent (of the bright setting). This applies individually to eachcolorcomponent (R, G, B).Check if 1,000 milliseconds has already passed. If so, set the element back to its original setting (it should already be about that anyway).
The algorithm is based on interpolation. In moving from color A to color B, there are a number of discrete transitions that occur, say, once every 100 milliseconds. At each stage, the algorithm decides where on the spectrum from A to B the color should be. Since a color consists of three components—R, G, and B—the calculation occurs separately for each component.
So, let’s say you’re shifting from #ffffff to #000044. First, it’s useful to represent
these as decimal percentage settings: (100%, 100%, 100%) moving to (0%, 0%, 25%). And assume we’re going to
make 10 transitions. The red and green components will shift down 10
percent each step, and the blue component will shift down 7.5
percent each time. So it’s just a matter of dropping the value for
each color component at each transition, rounding off, and
redisplaying the element.
If you want to make a transition to the background of the
element, you can shift opacity
instead of color. (Be aware that
there are portability issues with opacity [http://www.quirksmode.org/css/opacity.html].)
The algorithm assumes a linear interpolation, where each transition drops by the same amount. You could also experiment with other transitions. An exponentially increasing interval, for example, would give an effect of an initially slow transition, leading to a quick burst at the end. A similar phenomenon is quite common with flash effects, where the flashing starts off slowly and speeds up at the end.
You probably won’t have to hand code many of these effects because libraries like Scriptaculous (http://script.aculo.us; discussed below) are quite flexible and easy to incorporate.
Decisions
What events will trigger a spotlight?
An Ajax App undergoes multiple events; which warrant a spotlight? A spotlight can serve any of the following purposes:
To draw the user’s attention to a change
To suggest that the user needs to do something
To inform the user that a browser-server interaction has taken place
To inform the user that another user has done something
Here are some examples:
The user has just changed something. A Fade Out effect suggests that the change has been sent to the server.
On the server, a new item has been created. A Materialize effect suggests that the item has just appeared.
The user has forgotten to enter a form field. The field undergoes a Shifting Flash as its background shifts from white to red.
An item has just changed value. A Fade Out effect suggests that the change was just picked up by the browser.
What color will be used?
Yellow, popularized by 37signals, is becoming something of a standard for fading effects. In general, though, the color has to take into consideration which element is affected, as well as surrounding elements and the page appearance in general.
Additionally, multiple colors can be used to good effect. For instance, each color can be used to represent a different type of event. In a multiuser context, JotSpot Live (http://jotlive.com) illustrates how each user can be associated with a different color so that their recent edits appear as distinctly-colored fade effects.
How long should the spotlight last? How long will each transition be?
Asking how long the spotlight should last might seem a bit ridiculous for a pattern named "One-Second Spotlight.” But the name, of course, only hints at one reasonable value. You’ll have to decide on the precise duration of the overall effect and also on how many transitions will take place in that time.
Here are some considerations:
A longer duration will have a greater window of time to be noticed.
A longer duration will appear less dramatic, so it might be interpreted as a less critical event.
A longer duration increases the likelihood of multiple spotlights occurring simultaneously, which might be confusing, especially if they are flash effects.
A longer duration increases the likelihood of a second spotlight effect occurring on the same element while the first effect is in progress. That’s not necessarily a problem in itself, but it does lead to an implementation issue; it’s worth ensuring that an element is undergoing only one effect at a time to prevent any nasty issues, like flickering.
As far as transitions go, the trade-off is fairly clear: faster transitions look smoother but slow down the application. Is the user likely to leave your application in a background tab and only check it once an hour? If so, avoid slowing down the whole browser with high-granularity effects. Likewise if the application is already process-intensive.
This is an area where different browsers will act differently. For instance, what’s the lowest possible transition time you can set? That will depend on the user’s system and the browser in question. You can experiment with different parameters on the Time Spotlight Demo (http://ajaxify.com/run/time/periodicRefresh/spotlightCustom/).
Real-World Examples
37signals Backpack
37signals Backpack (http://www.backpackit.com/) maintains items in a list (Figure 16-2). When you click the Edit button, the read-only item morphs into a textarea. On saving, it becomes read-only again and is accompanied by a yellow Fade Out effect. All quite fitting for the company that coined the term, “Yellow Fade Technique.”
chat.app
chat.app (http://gamma.nic.fi/~jmp/chat/app.html) shows text messages as you or others enter them. Each new message is highlighted with a yellow Fade Out.
Digg Spy
Digg Spy (http://digg.com/spy) shows new stories as they appear on the Web. Each time a block of new stories appears, it appears with a Fade Out effect—the background shifting from grey to white.
Coloir
Coloir (http://www.couloir.org) is a slideshow application. Each time you click next, an animated “loading” icon appears and a new photo fades in.
Odeo
Odeo (http://odeo.com) is a podcast subscription service. You can force Odeo to grab the latest feed for a podcast; during the delay, the entire document fades. An effect like this can be achieved with a partially transparent Popup element covering the whole document. It feels similar to the way Windows fades the entire screen when you’re about to log out.
Scriptaculous library
Scriptaculous (http://script.aculo.us) is an excellent JavaScript library supporting many Ajax UI patterns. Its visual effects library is based on four fundamental effects:
Altering opacity
Altering scale
Altering position
“Parallel” effects—i.e., multiple effects at the same time
Combining these leads to any number of animation sequences, and many of the useful sequences are prepackaged.
The visual effects demo (http://script.aculo.us/visual-effects) provides many spotlight effects.
Fade Anything Technique (FAT) library
FAT (http://www.axentric.com/posts/default/7) is a library allowing easy scripting of a transition from one color to another.
Code Refactoring: AjaxPatterns Spotlight Time
The Time Periodic Refresh demo (http://www.ajaxpatterns.org/run/time/periodicRefresh/) shows the server time, which is updated every few seconds. It’s not clear exactly when the time has changed, however, so this refactoring adds a spotlight effect each time a new result arrives from the server. There are actually a couple of refactorings here: one is hand-built and the other illustrates reuse of the Scriptaculous library.
Hand-built shift effect
The Time Spotlight Demo (http://www.ajaxpatterns.org/run/time/periodicRefresh/spotlightCustom)
lets the user set a few parameters and applies the corresponding
effect (Figure 16-3). A
fader object encapsulates the
fading logic. The fade duration and transition interval are
modifiable attributes:
  fader.durationTime = parseInt($("fadeDuration").value);
  fader.transitionInterval = parseInt($("transitionInterval").value);
The application asks fader to fade the div as soon as it’s been
modified:
  function showCustomTime(text) {
    var customTimeLabel = $("customTimeLabel");
    customTimeLabel.innerHTML = text + "." + callingContext;
    fader.fade(customTimeLabel, $("startColor").value,
$("endColor").value);
  }
fader then kicks off the
first transition, passing in a timeSoFar parameter of zero. The
function is simpler using an array of percentage color values, but hex is more common, so
a simple conversion takes place:
  fade: function(element, startRGB, endRGB) {
    this.nextTransition(
      element, this.rgbToPercents(startRGB), this.rgbToPercents(endRGB),0);
  }
Each transition involves deciding how far along the fade it
is and calculating the corresponding color style using a linear interpolation
(as explained in the Solution for this pattern):
nextTransition: function(element, startColor, endColor, timeSoFar) {
  ...
  var currentColor = "rgb(";
  for (component=0; component<3; component++) {
    var currentComponent = Math.round(startColor[component] +
        proportionSoFar * (endColor[component] - startColor[component]));
    currentColor+=currentComponent + "%" + (component<2 ? "," : ")");
  }
  element.style.backgroundColor = currentColor;
  ...
}
Then it increments timeSoFar and finishes the fade if fade
time has expired:
  timeSoFar+=this.transitionInterval;
  if (timeSoFar>=this.durationTime) {
    this.durationTime+ "\n";
    element.style.backgroundColor =
      "rgb("+endColor[0]+"%,"+endColor[1]+"%,"+endColor[2]+"%)";
    return;
  }
  var nextCall = function( ) {
    fader.nextTransition(element, startColor, endColor, timeSoFar);
  }
  setTimeout(nextCall, this.transitionInterval);
fader is coded for
simplicity, and it is possible to make a couple of improvements.
First, the repeated color
calculation would be more effective if it worked on the
pretransition delta instead of calculating the absolute color each time. Also, the timing could
be adjusted to take into account the time taken to run the
function itself.
Fading with Scriptaculous
The Time Scriptaculous Demo (http://www.ajaxpatterns.org/run/time/periodicRefresh/spotlightScriptaculous)
shows how easy it is to reuse an existing effects library. Here,
the time displays show a Materialize effect when a new result
appears. They transition from completely invisible (showing only
the document background color) to the appearance determined by
their class’s style.
The refactoring is trivial. Include the Scriptaculous
effects library, effects.js,
and prototype.js, a
general-purpose JavaScript utility used by Scriptaculous:
  <script type="text/javascript" src="prototype.js"></script>
  <script type="text/javascript" src="effects.js"></script>
Then, as with the hand-built fader presented earlier, invoking the
effect is a one-liner:
new Effect.Appear("defaultTimeLabel");Alternatives
One-Second Mutation and One-Second Motion
One-Second Mutation and One-Second Motion (see both later in this chapter) are also used to draw attention to a significant event. One-Second Spotlight can be used as both a general attention-getting device as well as to hint at a specific type of event, whereas those two patterns tend to be slightly more about depicting specific events. The effects can also be combined, e.g., shrinking an object as it fades away.
Related Patterns
Periodic Refresh
A change arising from a Periodic Refresh (Chapter 10) is often marked with aOne-Second Spotlight.
Timeout
A Timeout (Chapter 17) event, and any prior warnings, can be marked with a One-Second Spotlight. In community sites that show details about other users, the effect can also be used to mark changes to users’ online status.
Metaphor
The pattern’s name is the key here: a spotlight can be used to direct audience attention.
Acknowledgments
37signals introduced the Yellow Fade Technique into its products, and its Yellow Fade Technique article (http://www.37signals.com/svn/archives/000558.php) helped spread the meme.
One-Second Mutation
⊙⊙⊙ Auto-Update, Sync, Sychronize, Real-Time
Goal Story
Doc monitors a patient’s condition, watching some histograms shrink and grow to reflect changes in the patient’s body.
Problem
There’s a lot of activity in an Ajax App; how can you help the user digest it all?
Forces
To ensure that the user is working with current data, the browser display must be frequently updated.
With Ajax, it’s possible to update only the portion of the screen that has changed; if nothing has changed, the display remains exactly as is.
The screen can get cluttered with a lot of information, much of which could change at any time.
While human vision is good at spotting changes, it’s easy to miss a sudden change, especially if the change is a subtle one.
There are different types of changes, and those differences are important to users.
Solution
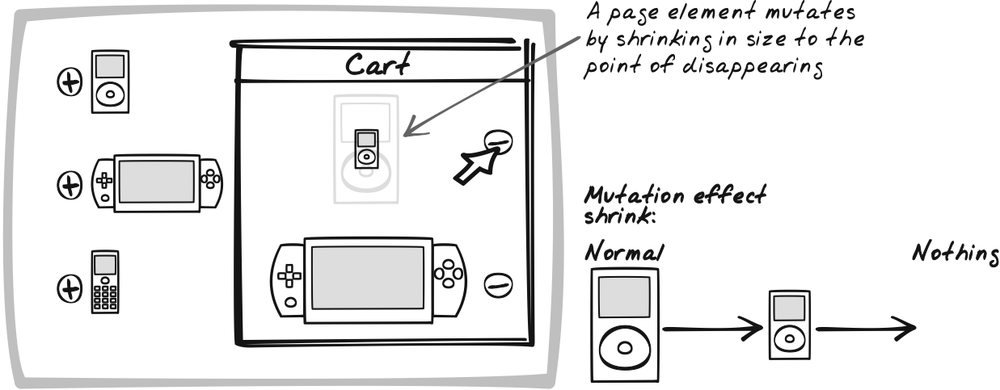
When a page element undergoes a value change or some other significant event, dynamically mutate its shape for about a second. In most cases, the mutation is used to reflect a permanent change. Instead of flipping from one form to another, the element gradually transitions into another form. The effect serves a few purposes:
The mutation and the extended transition time make it likely that the user will notice that something has happened.
The type of mutation hints at what sort of action has taken place.
The gradual shift in appearance feels more natural than an instant transformation.
Mutation combines Display Morphing with Scheduling. A loop runs while the second of mutation progresses, with each transition occurring perhaps once every 50 milliseconds. Each transition will likely involve a change to at least one of the following CSS properties:
widthAn object can be thinned or fattened by changing its
widthvalue.heightAn object can be heightened or shortened by changing its
heightproperty.backgroundImageInstead of just resizing the element, it’s possible to swap in a completely different image. Just like a movie, the DOM element quickly flips through various images to give the illusion of mutation. See the DHTML Lemmings walkthough in Sprite (Chapter 15) for more details.
positionManipulating position with
position, left, right, top, andbottomis possible for certain mutation effects.overflowOverflow can be set to
hiddento enable the entire element to be present on the page while showing only a certain portion of it.
The first category of mutation involves making an object appear. The following are effective ways to communicate that the object has just been created or retrieved from the server.
- Form
An item “forms” from nothingness into its standard appearance—typically, by incremental, outward growth. It might grow from the center of the object, a corner, or some other position entirely. Typically, width and height increase at the same time.
- Slide Out
An item slides out. If the item slides in from the side, it appears to be pushed out like a sliding door. If the item comes in from the top, it appears like a garage door closing. If coming in from the bottom, the item appears to rise from the ground. Usually, either width or height is fixed, while the other dimension gradually increases. The item’s position changes simultaneously.
- Reveal
An item is gradually revealed. It appears that the item has been there all along, and that a cover is gradually being lifted off. Here, one or both of width and height incrementally increases, while
overflowis set to hidden so that part of the element is covered.
The next category of mutation involves some common disappearing acts—the opposite of the effects above—and a special effect for disappearing:
- Disappear
An item changes from its standard appearance to nothingness.
- Slide In
An item slides in from the top, side, or bottom.
- Cover Up
An item is gradually covered up in one or both dimensions.
- Blow Up
An item expands outward from its current side and simultaneously fades to nothingness.
There are also a few mutations that involve changing from one thing to another:
- Grow
An item grows from one size to another. Height or width (or both) increases.
- Shrink
An item shrinks from one size to another. Height or width (or both) decreases.
- Metamorphise
An item shifts from one appearance to another. This is typically achieved with a change in background image. See Sprite (Chapter 15) for more details.
Most of these effects can be combined with One-Second Spotlight to give a 3-D effect. For example, an item can Materialize and Form at the same time. The human visual system uses both ambience and size as cues for distance, so the effect is that the item is reaching outward from behind the screen toward the user.
Note that you probably won’t have to hand code effects, because libraries like Scriptaculous (discussed in the following "Real-World Examples“) are quite flexible and are usually easy to incorporate into typical scripts.
Decisions
Most of the decisions in One-Second Spotlight are relevant here too. As with One-Second Spotlight, the “One-Second” part of the name is only a guideline.
Real-World Examples
TiddlyWiki
Jeremy Ruston’s TiddlyWiki (http://tiddlywiki.com),
like many of its spin-offs, uses a Grow effect to introduce new content
when you click on a Microlink (Chapter 15). The Microlink itself
is the starting point. The new content block appears to leap out
and, as it flows outward, grows into a full Malleable
Content (Chapter 15)
block (Figure 16-5).
Actually, there are a few visual effects at work here:
One-Second Spotlight (see earlier in this chapter) is used to fade in the Malleable Content being opened, in parallel to the element leaping out.
One-Second Mutation is used to grow the transition element from its initial state as a small piece of link text into a full block of Malleable Content.
One-Second Motion (see later in this chapter) is used to move the element from the Microlink position into the Malleable Content below.
There are a few possible variations depending on whether the content is already open and where it’s placed.

Scriptaculous library
As mentioned in One-Second Spotlight, Scriptaculous is a general-purpose JavaScript library. Its visual effects demo (http://script.aculo.us/visual-effects) provides many of the mutation effects described here.
DHTML Lemmings
DHTML Lemmings is a full-featured implementation of the Lemmings PC game, which uses DOM manipulation to show the lemming creatures performing typical lemming-like activities, such as walking, digging, and clutching an umbrella to make a safe descent from the top of a cliff. As the characters move about, their appearance is animated using quick mutations. While the usage is somewhat different from the usual type of mutation, which tends to focus on highlighting particular pieces of information, it is still of particular interest because it involves manipulation of images instead of just CSS style. See the code walkthrough in Sprite (Chapter 15) for more details.
Code Example: TiddlyWiki
Let’s look at how TiddlyWiki shows the Grow effect discussed earlier. In doing
so, we’ll see how its generic animation engine works.
TiddlyWiki delegates animation to an Animator, which is
capable of animating according to a list of Strategy (Gamma et al.,
1995) objects, or animations.
Each encapsulates the strategy for a particular animation. At this
time, there are just a couple of animation objects: a Zoomer and a Slider.
  var anim = new Animator( );

  function Animator( )
  {
    ...
    this.animations = []; // List of animations in progress
    return this;
  }
When a Microlink is clicked, the Animator
is passed a Zoomer strategy,
which is injected with the Microlink DOM object from which the
content will leap out (src), a
string title of the Malleable Content
(title), the
Malleable Content element in which the content will end up (theTiddler), and a flag indicating if the
animation should be slow or not (I assume this is for debugging, and
you can activate it by holding down Shift or Alt as you click on the
link):
anim.startAnimating(new Zoomer(title,src,theTiddler,slowly));
startAnimating( )
pushes the new animation onto the list of running
animations. If it’s not already running, it sets up an animation
loop:
  Animator.prototype.startAnimating = function(animation)
  {
    this.animations.push(animation);
    if(this.running++ == 0)
      {
      var me = this;
      this.timerID = window.setInterval(function( ) {me.doAnimate(me);},25);
      }
  }
The loop runs every 25 milliseconds. It calls a tick( ) function on each running
animation. By analyzing Zoomer’s
tick( ), you can see how the
One-Second Mutation is achieved. Upon construction, Zoomer has already set up a bunch of
variables to support this function, as well as an element (element) to be shown during the
transition. The variables hold position information about the start
and end elements. tick( ), then,
is left with the task of interpolation: “if the item starts at point
A and ends at point B, how should it look at a particular point in
the journey?” The Animator provides a value f between 0 and 1 to define how far along
the animation the object is, which makes things much easier. So, if
the value is 0.5, the item’s width will be halfway between the
original width and the item’s final width (Figure 16-6). The same idea
applies for height and position:
  this.element.style.left =
    this.startLeft + (this.targetLeft-this.startLeft) * f + "px";
  this.element.style.top =
    this.startTop + (this.targetTop-this.startTop) * f + "px";
  this.element.style.width =
    this.startWidth + (this.targetWidth-this.startWidth) * f + "px";
  this.element.style.height =
    this.startHeight + (this.targetHeight-this.startHeight) * f + "px";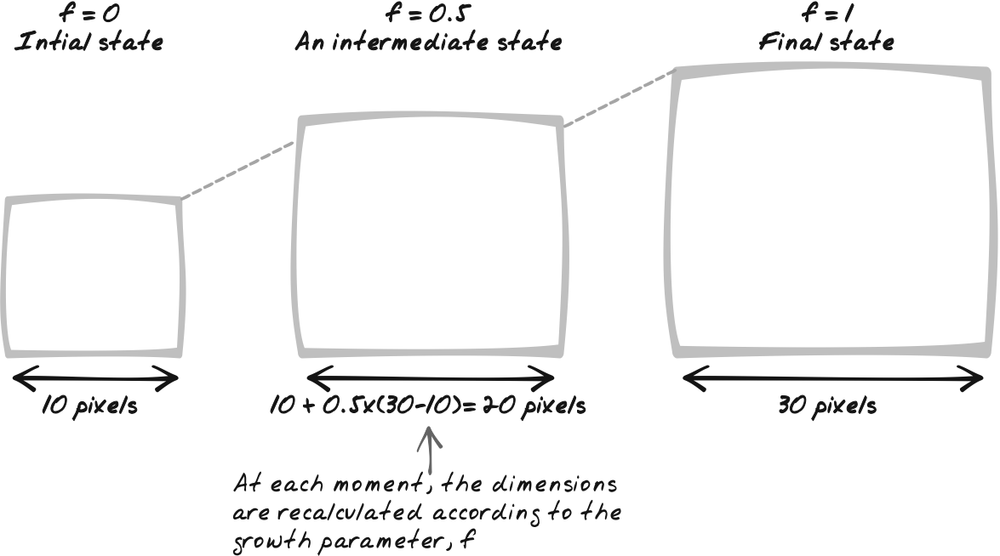
A One-Second Spotlight effect is also
used here. The target object—the place the object is “leaping”
toward—gradually fades in by way of the opacity property (and filter, for compatibility). Finally, the
window is scrolled to show the target object:
  this.targetElement.style.opacity = this.progress;
  this.targetElement.style.filter = "alpha(opacity:" + this.progress * 100 + ")";
  window.scrollTo(0,this.startScroll + (this.targetScroll-this.startScroll) * f);
The purpose of mutations is generally to provide a smooth
transition from one state to another. Therefore, the final state
should generally be reached simply by running the animation for the
right period. No special handling needs to take place at the end,
right? Well, in practice, there are rounding errors and
approximations that make it good practice to explicitly set the
final state. Thus, the Zoomer
completes the animation by ensuring that the precise opacity is
precisely 1 (in fact, the filter
should ideally be set here too as a further security against
rounding errors). The function also deletes the transient element it
created to leap from source to target:
  Zoomer.prototype.stop = function( )
  {
    this.element.parentNode.removeChild(this.element);
    this.targetElement.style.opacity = 1;
    window.scrollTo(0,this.targetScroll);
  }
Alternatives
One-Second Spotlight and One-Second Motion
One-Second Spotlight (see earlier) and One-Second Motion (see the next pattern) are also used to draw attention to a significant event. One-Second Mutation is particularly suited for indicating that certain types of changes, such as object creation and removal, have occurred. It is not as well suited for general-purpose attention grabbing.
Related Patterns
Sprite
Sprites (Chapter 15) are often changed in rapid succession to give the impression of a smooth transition.
Metaphor
Many of the individual effects have their own metaphors—that’s
why they’re used! Slide Out looks like a physical object sliding
outward, Grow looks like an
object growing, and so on.
Acknowledgments
Many of the effects discussed in the preceding Solution are based on an analysis of the Scriptaculous implementation (http://script.aculo.us). Jeremy Ruston’s TiddlyWiki code was also instructive, and Jeremy helped clarify part of the code.
One-Second Motion
⊙ Copy, Displace, Duplicate, Jump, Leap, Move, Movement, Motion, Rearrange, Transfer
Goal Story
Bill is adding a new monthly bank order. The existing orders are shown in the usual way—as a table with one row per order, sorted by cost. Once he is verified the new order form, it morphs to become a table row, then slowly drifts down the table. It soon reaches its rightful place in the sorted table, which is ordered by amount, and comes to rest after bouncing up and down a little due to reverberation.
Problem
How can you communicate that an element is shifting from one position to another?
Forces
An element’s location is important, as it can provide cues about its prominence and its relationship to other elements.
An element sometimes needs to move from one place to another.
Similarly, a new element sometimes needs to be created and then move from where it was created to another location.
When an element changes position, the user often needs to know about it.
Solution
Incrementally move an element from one location to another, or temporarily move it, to communicate that an event has occurred. In most cases, the motion of the element involves a permanent change in its position. It can also be used to show a temporary displacement or gesture, such as a vibration effect.
There are several benefits of showing the motion explicitly:
The motion and the extended transition time make it likely that the user will notice that something has happened.
The motion will highlight the place where the element is moving to (it won’t get lost on the page).
The motion will feel more natural than an abrupt change.
The effect combines Page Rearrangement
(Chapter 5) with
Scheduling (Chapter 7). A
loop runs for the duration of progresses, with each transition
occurring perhaps once every 50 milliseconds. Each transition will
likely involve a gradual change to the positioning style settings,
usually to top and left. The position style can be set as absolute or relative, depending on the overall
application design.
When an element has to move from point A to point B, in most
cases it’s logical for the trajectory to be the shortest distance
from A to B, i.e., for the element to move as the crow flies. The
algorithm in this case uses interpolation—for example, one-quarter
of the time into the effect, an element will be one-quarter of the
way between A and B—so, when moving from left to right, the left style of the element will be
(0.25*x(A) + 0.75*x(B)), where x( ) represents the source and
destinations’ horizontal coordinate.
This assumes a linear interpolation. You can also experiment with other algorithms, e.g., you might like to accelerate the element as it proceeds, which is often a more realistic model.
Note that you probably won’t have to hand code motion, because libraries like Scriptaculous (discussed in the "Real-World Examples“) are quite flexible and usually easy to incorporate into typical scripts.
Decisions
What events will trigger a motion effect?
One-Second Motion is not very common (yet), but there are several potential applications. First, a permanent movement can show any of the following:
A straightforward change from one place to another.
One element being spawned from another, and then jumping out to a new location.
An element being introduced into a space. Instead of making the element just appear, or fade in, you could make it arrive from a logical starting point. For example, a new data point in a chart can “fly in” from the corner.
A temporary movement has its own applications:
- Attention-grabbing
For general attention grabbing, motion is a killer app—humans are wired for sensitive motion detection as a means of survival. We’ve all seen enough annoying banner ads to know that. Extreme cases involve rapid vibration and rapid circuitous movement, such as tracing out a square 10 times a second. Of course, these extremes are rarely justified, and you can often use more subtle approaches to get the same effect (while causing a lot less annoyance).
- Aesthetic effect
People expect objects to move in certain ways based on their experiences in the physical world as well as learned expectations from conventions in movies, cartoons, and video games. For example, when a small object bumps into a big object, you expect the small object to fly off in the other direction and the big object to shake a little.
- Gesture
Some forms of motion rely on anthropomorphization—endowing the element with human-like characteristics—something users are surprisingly prone to do (“The computer doesn’t like me today!”). In the Scriptaculous demo (discussed in this pattern’s Code Example), the search form (http://script.aculo.us/visual-effects) shakes left and right when a validation error occurs, similar to a person shaking her head from side to side. Another effect would be to depict desire by showing an element temporarily “reaching” in a certain direction and pulling back again. This could be used as a hint to the novice user that he needs to drag the element in that direction.
Since motion can be distracting, you will likely want to limit its usage to the following situations:
When the event is important enough that the user would probably appreciate having her attention diverted to it.
When the user is likely to be focused on the motion already. Here, the motion is not used to attract attention, but rather to convey what’s happening to the element.
When visualization and motion are central to the application style; for example, if the application was tracking a car’s movement every few seconds, it would probably be worthwhile to animate the move between sample points.
Also consider whether you should use motion at all. The conventional wisdom is that motion is more natural as a transition because it’s based on the physical world. But how about the massive population that grew up with computers and might be perfectly comfortable with the sudden jumps that are only possible in a digital realm? Maybe not everyone will appreciate motion effects.
Real-World Examples
Scriptaculous library
As mentioned in One-Second Spotlight (see earlier in this chapter), Scriptaculous is a general-purpose JavaScript library. The visual effects demo (http://script.aculo.us/visual-effects) supports motion-based effects.
TiddlyWiki
As detailed in One-Second Mutation (see earlier in this chapter), clicking on a TiddlyWiki Microlink (Chapter 15; see http://tiddlywiki.com) causes the entire content to “leap out” from the link and form in a new position.
Backbase Portal
The Backbase Portal Demo (http://projects.backbase.com/RUI/portal.html) contains a page full of Portlets (Chapter 15) arranged in three columns, each with its own menu. The menu contains all of the Portlets on the page, and choosing a Portlet causes it to move over to the top of the column. One-Second Motion is used to animate the Portlet’s movement, allowing users to see that thePortlet has “flown in” to the top of a column from elsewhere on the page.
DHTML Lemmings
As detailed in Sprite (Chapter 15), DHTML Lemmings involves the movement of Lemming creatures through a game space. Each Lemming is represented as a DOM element.
MS-Windows
MS-Windows uses a form of One-Second Motion. When minimizing a window, the whole window appears to leap downward to its handle in the taskbar, like a large object being packed into a small container. The reverse process occurs upon activating the window. This is not an Ajax App, but is still significant, as it’s frequently cited as a rationale for the kind of animation this pattern details.
Code Example: Scriptaculous Effects
Motion is one of the effects offered by the Scriptaculous effects library (http://script.aculo.us/visual-effects). Examining its implementation gives us an opportunity to look at the overall Scriptaculous effects engine, which also provides One-Second Spotlight- and One-Second Mutation-style effects.[*]
The generic engine component controls the flow by continuously delegating to an individual effect object to perform an incremental animation. This is an example of the Strategy pattern (Gamma et al., 1995). The initialization sequence clears the frame count, computes the total effect time, and kicks off the loop:
  start: function(options) {
    ...
    this.currentFrame = 0;
    this.startOn      = new Date().getTime( );
    this.finishOn     = this.startOn + (this.options.duration*1000);
    ...
    if(!this.options.sync) this.loop( );
  }
The loop runs until the predicted finish time, at which point
the animation cleans up and terminates. The most important thing
here is the pos calculation,
which determines how far along the animation is. The calculation is
essentially timeSoFar/timeRemaining. So, one-quarter of the way
through the animation, it will be 0.25. Next, a calculation takes
place to support the fps option,
which lets the caller state the maximum number of animation frames
per second. If an animation is indeed required, the engine’s
render( ) function is called:
  loop: function( ) {
    var timePos = new Date().getTime( );
    if(timePos >= this.finishOn) {
      this.render(1.0);
      ...
      return;
    }
    var pos   = (timePos - this.startOn) / (this.finishOn - this.startOn);
    frame = Math.round(pos * this.options.fps *
this.options.duration);
    if(frame > this.currentFrame) {
      this.render(pos);
      this.currentFrame = frame;
    }
    this.timeout = setTimeout(this.loop.bind(this), 10);
  },
The main purpose of render(
) is to delegate to the effect strategy to perform the
update. The strategy will receive a value between 0 and 1 to tell it
how far the animation has proceeded.
The MoveBy effect takes a
DOM element and tracks its start and end positions. The element’s
style is set to relative using a
call to the effect engine’s makePositioned(
) function. Because positioning is relative, you construct
a MoveBy effect with relative
arguments. To move an object 5 right and 10 down, you’d pass in 5
and 10 as parameters. The effect is to increase left by 5 and top by 10:
  initialize: function(element, toTop, toLeft) {
    this.originalTop  = parseFloat(this.element.style.top || '0');
    this.originalLeft = parseFloat(this.element.style.left || '0');
    this.toTop        = toTop;
    this.toLeft       = toLeft;
    Element.makePositioned(this.element);
    ...
  }
Remember that the effects engine delegates to update( ) for effect-specific behavior,
passing in a progress ratio between 0 and 1. In the case of MoveBy, the algorithm performs the
necessary interpolation calculation to see how far along the object
should be (topd and leftd). Having made the calculation, all
that remains is to update the DOM element’s style:
  update: function(position) {
    topd  = this.toTop  * position + this.originalTop;
    leftd = this.toLeft * position + this.originalLeft;
    this.setPosition(topd, leftd);
  },
  setPosition: function(topd, leftd) {
    this.element.style.top  = topd  + "px";
    this.element.style.left = leftd + "px";
  }
The MoveBy effect in itself
is useful for getting an object from A to B. But you can build on it
to create effects such as motion displacements. One such effect,
included in the Scriptaculous library, is Shake( ), which swings an element left and
right a few times. With the framework in place, the effect is easily
defined as a sequence of moves:
  Effect.Shake = function(element) {
    return new Effect.MoveBy(element, 0, 20,
      { duration: 0.05, afterFinish: function(effect) {
    new Effect.MoveBy(effect.element, 0, -40,
      { duration: 0.1, afterFinish: function(effect) {
    new Effect.MoveBy(effect.element, 0, 40,
      { duration: 0.1, afterFinish: function(effect) {
    ...
  }
Alternatives
One-Second Spotlight and One-Second Mutation
One-Second Spotlight and One-Second Mutation (see both earlier in this chapter) are also used to draw attention to a significant event. One-Second Motion is suited for indicating that an object’s state has changed in the case where there is some geometric mapping to each object’s state. When used as a temporary displacement effect, One-Second Motion is sometimes an alternative to these other patterns.
Related Patterns
Sprite
A Sprite (Chapter 15) often undergoes motion similar to One-Second Motion and can make use of similar interpolation calculations.
Guesstimate
In some cases, the motion is a form of Guesstimate (Chapter 13). When an object is moving around according to state information, the motion effect is effectively an estimate of what’s happening between positions.
Metaphor
Until “Beam Me Up” teleportation technology hits the markets, every visible movement in the physical world is an illustration of this pattern.
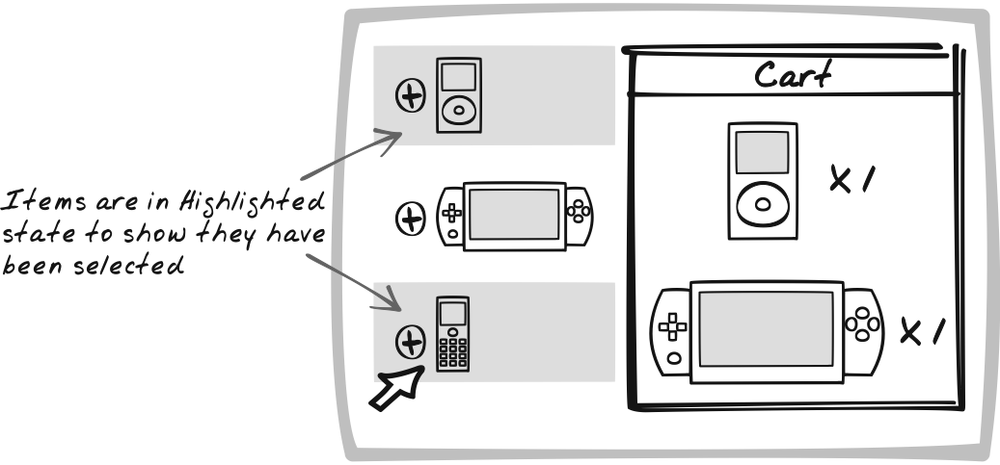
Highlight
⊙⊙⊙ Auto-Update, Sync, Sychronize, Real-Time
Goal Story
Sasha notices that a few spam comments have appeared on an old blog posting. When she clicks on the comments, they are successively Highlighted—the background color switches from white to yellow. Because she’s already logged in, there’s a Delete Spam button below the comments, which she clicks to send them where they belong.
Problem
How can you make elements stand out?
Forces
An Ajax App can enable a lot of information to be shown at once—often information with many with different states.
There is usually one element which the user is working on or about to activate.
In addition, the user often needs to group several elements together to perform a common function. These elements must stand out from the crowd.
Solution
Highlight elements by rendering them in a consistent, attention-grabbing format. This pattern has been applied to dynamic web sites prior to Ajax but is particularly important in the context of rich displays and interaction.
Consistency is important here; when items are selected, they
should look the same. One straightforward way to achieve this is
with selected and deselected CSS classes. By dynamically
switching the element’s className
property, you can easily Highlight and de-Highlight.
Highlighting is useful in the following ways:
To show which particular element has input focus.
To show which elements are selected.
When the user rolls over an element, to indicate its boundaries and hint that some action will occur by clicking on it.
To indicate that an element is particularly important.
To indicate that an element is undergoing change.
To prompt the user to perform some kind of work on the element.
Decisions
How will the Highlight look?
You want the Highlight to be noticeable but not distracting. Here are some guidelines for deciding how the Highlight should look:
Tone down the Highlight if it’s likely to occupy a large proportion of the page. This would happen if there are quite a few Highlighted elements or if each element is relatively large.
Users often need to read and edit Highlighted elements, so ensure that the display is usable whether or not the element is Highlighted.
Avoid Highlighting techniques that displace other elements on the page. For instance, increasing font size might increase the element’s size, in turn pushing away other elements. The Highlight should ideally appear as an on-off toggle, only affecting the element in question.
How will the Highlight appear and disappear?
The most obvious thing to do is make Highlight state binary—an element is either Highlighted or it’s not. But consider using visual effects to make the transition smoother and support visual pattern recognition (see the following "Teacher!" example).
Real-World Examples
Gmail
Gmail presents a list of mail messages one row at a time. You select messages by clicking on the checkbox, which causes the entire row to change to a light tan background color. The appearance of various tan-colored rows makes it easy to spot selected items, and the checkboxes also provide a clue.
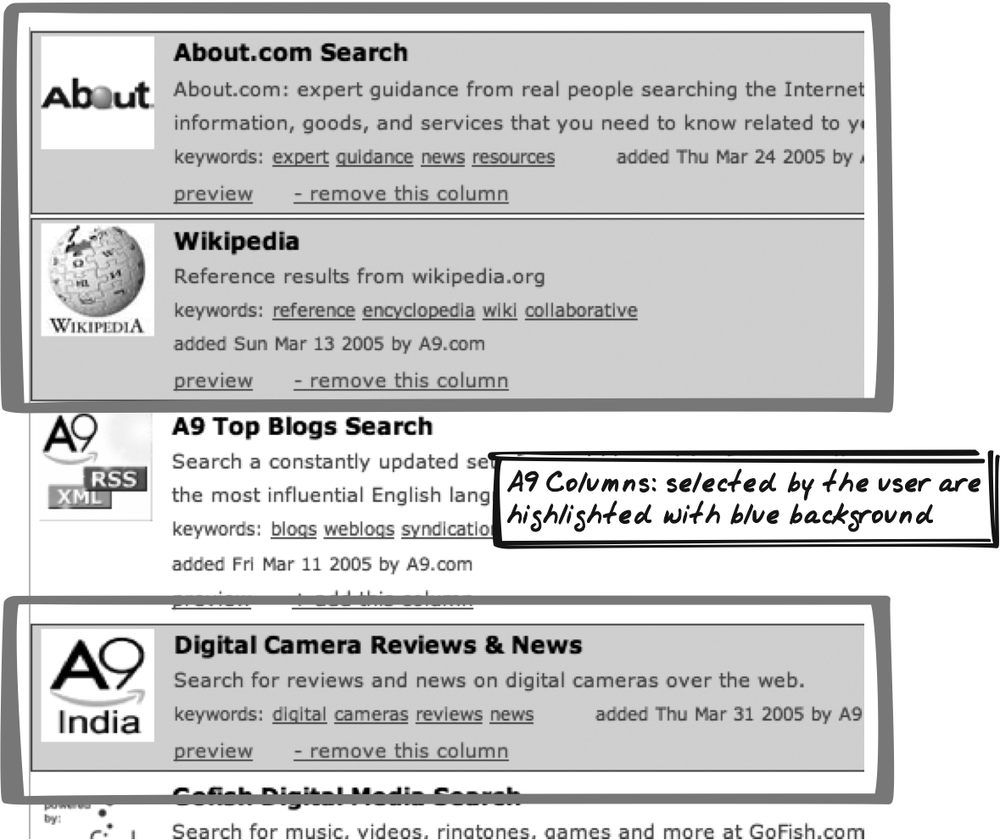
A9
A9 provides search results in different “Columns.” Visit the Preferences page, then request to add more Columns. If you have an account, you’re allowed to choose multiple Columns at once. Each Column is shown as a horizontal block in the Preferences page, and when you click the Add button, the block Highlights to confirm your choice. The interface uses Highlighting effectively, but it would be even more helpful if all added elements remained Highlighted instead of just the most recent one.
Teacher!
Teacher! (http://teacherly.com/) shows a table of student grades and Highlights whichever row your mouse is hovering over. What’s novel here is that when you move to another row, the Highlight doesn’t just disappear, but slowly fades away (One-Second Spotlight). An AjaxPatterns demo replicates the effect (http://ajaxify.com/run/time/periodicRefresh/spotlightCustom/highlight/).
Whitespace
Whitespace (http9rules.com/whitespace/) prominently Highlights links on the side menu as you roll the mouse over them. This is a common technique used on many web sites and can be achieved entirely by using CSS styling to modify the anchor tag, absent of any JavaScript.
Code Example: AjaxPatterns Wiki
The Wiki demo (http://ajaxify.com/run/wiki) uses Highlighting in a couple of ways:
As the user rolls the mouse over a message and then clicks on it, the message is Highlighted to indicate its current status (Figure 16-9).
When the message has changed and is being buffered for submission, the background color changes. Once it has been submitted, the color returns to normal.
The first example is detailed in Malleable Content (Chapter 15), in which I explain the buffering Highlight. When you click outside the message area, the application checks whether you changed any text from the version originally downloaded, and if so, that text is Highlighted and prepared for uploading:
function onMessageBlur(event) {
  ...
  var initialMessageContent = message.serverMessage.content;
  if (message.value != initialMessageContent) {
    pendingMessages[message.id] = true;
    message.style.backgroundColor = "#ffcc33";
  }
  startPeriodicSync( );
}
The sync is started again, so the item will soon be uploaded. If any further edits begin in the next few seconds, the upload will be placed on hold and the second message alteration will also be Highlighted. At any point in time, then, all of the buffered messages are Highlighted. When the messages are eventually uploaded, they revert to their normal, readonly color:
  for (messageId in pendingMessages) {
    ...
    $(messageId).style.backgroundColor = "#cccccc";
  }
Related Patterns
Status Area
The Status Area (Chapter 15) is a convenient place to explain why an element is Highlighted.
Metaphor
A fluorescent marker is used to highlight text.
[*] Donald Norman, traditional defender of “serious” usability principles, has more recently argued that emotions like fun and excitement do make a big impact and should be considered by designers (Norman, 2003). “Passionate Users” is a reference to the excellent Creating Passionate Users blog at http://headrush.typepad.com/creating_passionate_users/.
[*] Note that the engine code looks a little different to most JavaScript applications because it uses Prototype (http://prototype.conio.net/) to allow for a more object-oriented coding style.
Get Ajax Design Patterns now with the O’Reilly learning platform.
O’Reilly members experience books, live events, courses curated by job role, and more from O’Reilly and nearly 200 top publishers.

