Chapter 4. Advanced X.org Configuration
Multi-Screen Configuration
Some people just can’t get enough—at least when it applies to screen space. Many users can productively benefit from more screen space than a single monitor can provide.
It’s fairly easy to configure the X.org server to support multiple screens on one display, if you have the hardware. In fact, if you get the X server to configure itself, it will do a reasonable job of setting up a multi-screen configuration if it detects multiple video cards and monitors.
To configure or tune a multi-screen setup by hand, take the following steps:
Create two (or more) normal
Screensections and the correspondingDeviceandMonitorsections in the xorg.conf file. Ensure that each screen has a unique identifier; in the following example, I’ve used the identifiers ScreenA, ScreenB, and ScreenC.Add both screen sections to the
ServerLayoutsection, numbering the screens starting at 0:
	Section "ServerLayout"
	        Identifier     "Multiscreen layout"
	        Screen      0  "ScreenA" 0 0
	        Screen      1  "ScreenB" Below     "ScreenA"
	        Screen      2  "ScreenC" RightOf   "ScreenA"
	        InputDevice    "Mouse0"            "CorePointer"
	        InputDevice    "Keyboard0"         "CoreKeyboard"
	EndSection
Notice that Screen0 is positioned to 0 0, but Screen1 and Screen2 are positioned relative to Screen0. The positioning keywords available are Above, Below, RightOf, and LeftOf; the keyword is followed by the quoted name of one of the other screens. (There are also other ways of positioning screens; see Section 4.4.)
When you start the X server, you will be able to move the mouse pointer between screens according to the layout given. In this example, the mouse pointer will start in the middle of screen 0. Moving it to the right will cause it to appear on screen 2; moving it back to the left will return it to screen 0, and moving it further to the left will make it appear on screen 1.
In this type of multi-screen configuration, a window can appear only on one screen and cannot be moved from screen to screen. These limitations can be overcome using a Xinerama configuration (Section 4.2) instead of a multi-screen configuration.
One advantage of multi-screen mode is that, since the screen number can be specified in a displayspec, you can easily cause new clients to appear on a particular screen. If the screen number is not specified for a new window, it will appear on screen 0.
If the preceding configuration was used on the host blue.example.com display :0, you could specify that a window should open on the righthand screen by using the displayspec:
blue.example.com:0.1
Or, for local clients:
:0.1
Xinerama Configuration
Xinerama mode is similar to multiscreen mode, but it merges several video cards and monitors into one big screen. This permits you to move windows between monitors and even span monitors. Xinerama is the most common multiple-monitor configuration and the most useful for many applications.
The X.org server won’t configure Xinerama automatically, but it’s fairly easy to convert a working multi-screen configuration:
Ensure that all of the screens have the same color depth. Each
Screensection of the configuration file should contain aDefaultDepthentry with the same depth value (typically 24 bits per pixel):DefaultDepth 24
Add this line to the
ServerFlagsorServerLayoutsections of the configuration file:Option "Xinerama"
You can configure any number of screens into a Xinerama display, as long as you can physically fit the video cards into the system (without shorting them out, overloading the power supply, or overheating). If you want to configure a display that has more screens than you have video card slots, you can use DMX to combine displays on multiple computers into a single, virtual Xinerama display.
Thin-bezel LCD screens, which have a minimal border surrounding the active LCD area, are ideal for creating monitor arrays for use with Xinerama. They can be physically positioned close together, and their light weight, low-power consumption, and low-heat output make dense placement easier.
For a graphics artist who may prefer a CRT display, it may be better to use a large flat-screen CRT for image preview and editing flanked by LCDs or smaller CRTs for menus, tool palettes, and office productivity software such as email.
Warning
The meaning of screen becomes a bit cloudy when dealing with Xinerama. Each monitor and video card is a called a screen in the configuration file, but the merged image area that spans all of the monitors is called a screen in the displayspec and the X protocol. Wherever there might be confusion, I’ll use the term hardware screen to denote a monitor and video card, and the term Xinerama screen to mean the merged image area.
Differences Between Multi-Screen and Xinerama Modes
There are advantages and disadvantages to both Xinerama and multi-screen modes.
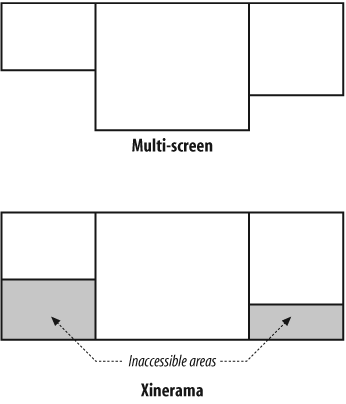
When using a multi-screen configuration, each screen stands on its own, and the only relationship between the screens is that one window manager, mouse, and keyboard is used with all three. But when using Xinerama, the hardware screens are merged into one logical Xinerama screen; a single, rectangular Xinerama screen is created that is large enough to contain all of the areas displayed the hardware screens.
If the monitors are different sizes, then there will be portions of this rectangle that are inaccessible—part of the Xinerama screen, but not part of any hardware screen, as shown in Figure 4-1.
Since these areas will not be displayed on any monitor, it is possible to temporarily lose your mouse pointer (or entire windows) in them. You can’t do that on a multi-screen configuration, because multi-screen mode doesn’t have inaccessible areas—the mouse pointer position is warped so that it’s always visible on one of the screens.
The behavior of window managers and desktops also varies significantly between the Xinerama and multi-screen modes, as shown in Table 4-1.
|
Desktop or window manager |
Xinerama mode |
Multi-screen mode |
|
Gnome (using Metacity) |
Xinerama-aware: maximizing a window causes it to fill one monitor only, and dialogs are centered on the monitor. Wallpapers can be scaled or tiled to fill the whole screen (across all of the monitors). One menu and panel bar appears, on screen 0. |
Panel bars appear on screen 0 only. Wallpaper images are repeated on all screens. |
|
KDE (using kwm) |
Ximerama-aware, same as Gnome. |
Panel bars and K-menus repeated on each screen. Wallpaper images appear on screen 0 only; selected background colors or gradients appear on other screens. |
|
MWM (Lesstif version) |
Unaware that the screen is not physically one large display. Maximizing a window causes it to span all monitors, and centered dialogs are centered in the whole Xinerama screen (which may cause them to span monitors or even appear in an inaccessible area), instead of being centered on a monitor. |
Client windows opened using the root menus open in the correct screen. Maximizing a window causes it to fill one screen only. |
|
twm |
Manages whole screen as though it were one physical display. |
Manages only screen 0. |
Xinerama is probably the best bet if you’re using multiple screens just to get more real estate—for example, if you have multiple monitors side-by-side on a desk or arranged with monitor arms or frames in a rectangular array.
Multi-screen operation is a good choice when the screens serve different purposes, such as when one screen is connected to a projector and the other is used for display management, or one screen is used for a customer-facing point-of-sale display and the other is used for a staff-facing display.
Positioning Screens
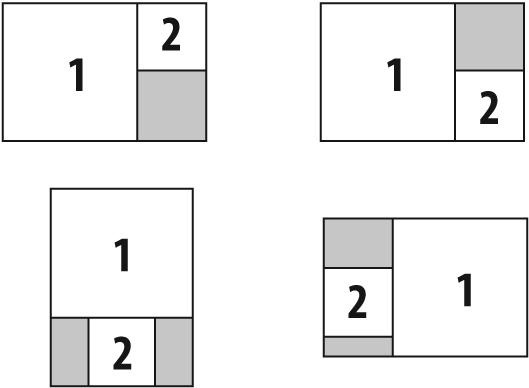
If you have two or more monitors, you can place them one above the other, side by side, or diagonally. Even a simple side-by-side arrangement can take different forms, especially when the monitors are different sizes: do the tops of the monitors line up, or the bottoms? Or is the side of the smaller monitor centered at the side of the larger monitor?
Figure 4-2 illustrates a few of the many possibilities for two monitors of different sizes.
You can use three different methods to describe position information in Screen entries within a ServerLayout section:
You can use an absolute X-Y pixel position within the Xinerama screen. Increasing X values go to the right, and increasing Y values go down.
	# Three 1024x768 video projectors. ProjectorA is at the top, ProjectorB
	# is below that, and ProjectorC is at the bottom. Each projector
	# and is aligned on the left side. Note that the Absolute keyword
	# is optional (and not supported by old versions of the server).
	Screen 0 "ProjectorA" 0 0
	Screen 1 "ProjectorB" Absolute 0 768
	Screen 2 "ProjectorC" Absolute 0 1536
You can use the
Above, Below, LeftOf, orRightOfkeywords. This will cause thetop or left side of the screens to be aligned. For example:# ProjectorB is to the right of ProjectorA. The tops of all # projectors are aligned. Note that we don't need to know the # resolution of the projectors - the the positions are # calculated by the X server. Screen 0 "ProjectorA" 0 0 Screen 1 "ProjectorB" RightOf "ProjectorA" Screen 2 "ProjectorC" LeftOf "ProjectorA"
You can use the Relative keyword and specify a position relative to the upper-leftcorner of another screen using X-Y pixel coordinates:
	# ProjectorB is directly above ProjectorC on the left.
	# ProjectorA is centered between them on the right.
	Screen 0 "ProjectorA" 0 0
	Screen 1 "ProjectorB" Relative "ProjectorA" -1024 -384
	Screen 2 "ProjectorC" Relative "ProjectorA" -1024 384
When using Xinerama, screen position affects how windows that span screens will be presented, where inaccessible areas are located, and where the cursor appears when you move from one screen to another.
When using a multi-screen configuration, screen position affects only how the mouse cursor moves from screen to screen.
Overlapping Xinerama
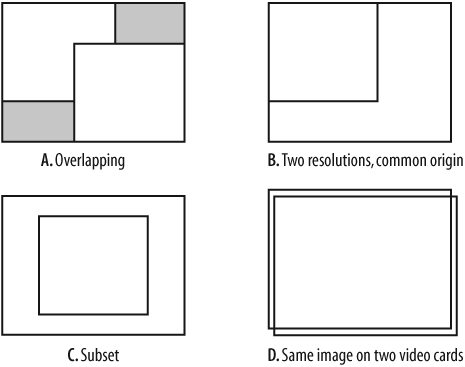
Hardware screens in a Xinerama configuration are usually set up to be adjacent—but they don’t have to be. The screens can overlap, as shown in Figure 4-3.
One of the simplest uses of overlapping layouts is to drive two monitors with the same image without using a video splitter. The ServerLayoutfor this configuration looks like this:
	Section "ServerLayout"
	        Identifier     "layout0"
	        Screen      0  "Screen0" 0 0
	        Screen      1  "Screen1" 0 0 # Same origin as screen 0
	        InputDevice    "Mouse0"  "CorePointer"
	        InputDevice    "Keyboard0" "CoreKeyboard"
	        Option         "SingleCard" "true"
	EndSection
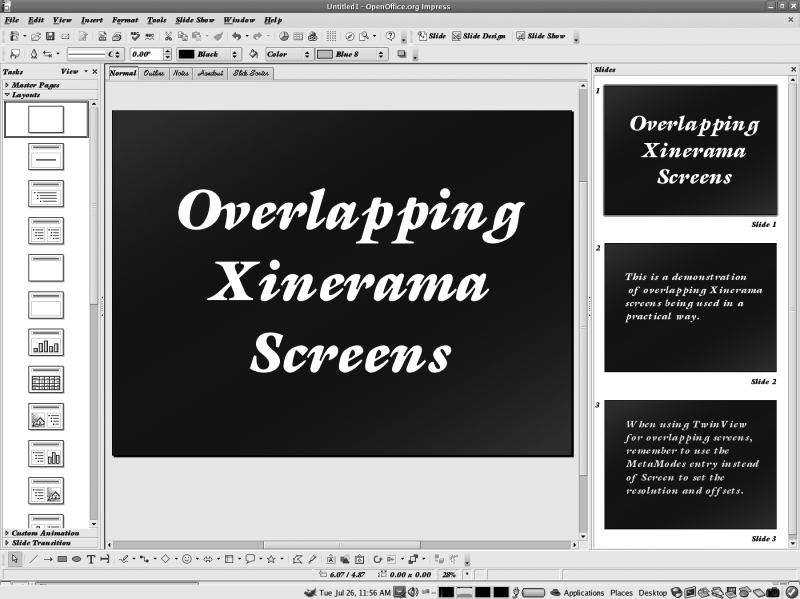
Overlapping layouts can also be used to creatively solve some tricky display problems. For example, the presentation program OpenOffice.org Impress does not have a dualscreen display feature (as of version 2.0). This missing feature is vital for certain live presentations, because it permits an operator to preview and select the next slide to appear using a control screen that is not visible to the audience. This is used in churches to handle unexpected changes in the flow of the service—;such as a songleader deciding to repeat a chorus—;and it is used in business meetings to jump directly to appropriate slides during Q&A sessions.
Until this feature is added to Impress, overlapping Xinerama windows provide a partial solution. When operating with the default user interface layout, Impress provides a display with three panes: a slide preview, an enlarged image of the current slide, and a task plane with layouts that can be applied to slides.
By configuring the X server to display the control screen at high resolution (such as 1440x1050 or 1280x1024) and the projector screen at a lower resolution (800x600), with the projector screen positioned as a subset of the control screen, it is possible to simulate two-screen operation. Figure 4-4 shows the contents of the control screen, and Figure 4-5 shows the contents of the projector screen using this configuration. The presentation operator can preview the next slide to be displayed using the Impress slide pane without disturbing the projected image.
To configure this operation, set the resolution of the two screens, and then offset the projector within the control screen. In this ServerLayout section, I placed the projector screen 200 pixels below and to the right of the upper-left corner of the control screen:
	Section "ServerLayout"
	        Identifier "layout0"
	        Screen      0  "Screen0"   0 0
	        # Screen 1 is 200 pixels down and to the right
	        Screen      1  "Screen1"   200 200
	        InputDevice    "Mouse0"    "CorePointer"
	        InputDevice    "Keyboard0" "CoreKeyboard"
	EndSection
This configuration assumes multiple video cards. However, some video cards with multiple outputs—;including laptops—;can be configured for Xinerama operation using driver-specific options.
Scrolling Virtual Screens and Xinerama
The virtual screen facility permits a screen to exceed the size of a physical display, which results in a physical display that scrolls around the virtual screen. It is possible to combine this with Xinerama, but the results are pretty strange.
Figure 4-6 shows the relationship between virtual screens, physical screens, and the Xinerama screen. In this example, the virtual size of screen 0 is the same as the physical size of screen 1, but the resolution of the physical screen 0 is lower.
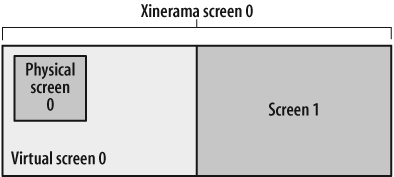
The mouse pointer will still cause the screen 0 to scroll until the right edge of the virtual screen is encountered, at which point the mouse will move onto the adjacent screen 1.
I find the visual effect disorienting, and it’s even worse if more than one screen is configured to scroll. I can’t think of a good use for this configuration!
However, it might be useful to configure two Xinerama screens of the same size, where one screen is completely displayed on a monitor and the other screen is a virtual screen with a smaller physical screen, as shown in Figure 4-7.
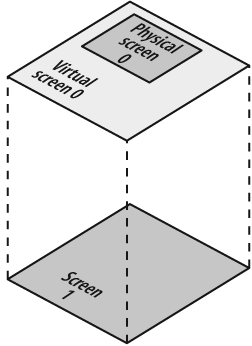
In this configuration, the monitor on screen 1 will show the entire screen, while the monitor on screen 0 will show a scrolling enlargement of one portion of the display—;potentially useful for people with visual impairment. Unfortunately, Xin-erama will only display the mouse cursor on one monitor at a time, and unless the cursor is on the scrolling screen, there is no way to scroll it. Since the mouse cursor will appear on the lowest-numbered screen, the scrolling screen must be configured as screen 0.
Tip
Some of the drivers that permit the simultaneous use of two video out-puts from one video card (Section 4.7) enable the mouse pointer to appear on both monitors simultaneously when using an overlapping configuration.
The Screen and ServerLayout sections for this configuration look like this:
	Section "ServerLayout"
	        Identifier     "XFree86 Configured"
	        Screen      0  "Screen0" 0 0
	        Screen      1  "Screen1" 0 0
	        InputDevice    "Mouse0" "CorePointer"
	        InputDevice    "Keyboard0" "CoreKeyboard"
	        Option         "Xinerama"
	EndSection

	Section "Screen"            # Scrolling, magnified display
	        Identifier "Screen1"

	        Device     "Card1"
	        Monitor    "Monitor1"
	        DefaultDepth    24
	        SubSection "Display"
	                Depth     24
	                Virtual 1280 1024       # Virtual size to scroll around
	                # Do not specify a viewport -- center around the cursor
	                Modes   "640x480"
	        EndSubSection
	EndSection

	Section "Screen"            # Full-screen display
	        Identifier "Screen0"
	        Device     "Card0"
	        Monitor    "Monitor0"
	        DefaultDepth    24
	        SubSection "Display"
	                Depth     24
	                Modes  "1280x1024"
	        EndSubSection
	EndSection
Using Multiple Outputs from One Video Card
Many current video cards support multiple video outputs: dual VGA, DVI and VGA, VGA and TV-out, and laptop panel and VGA are all common combinations. Some of the X.org drivers support the simultaneous use of both outputs; this works by allocating a large framebuffer and then positioning the rectangles that will be output to each video connection within that framebuffer.
This sounds a lot like Xinerama, because it is! However, there are a few differences between using multiple outputs on one card and using multiple video cards, as out-lined in Table 4-2.
|
Multiple outputs on one video card |
Xinerama with multiple video cards | |
|
Mouse cursor |
Appears on both monitors if overlapping |
Appears on one monitor at a time |
|
Configuration file |
One |
Two |
|
3D capabilities |
Available on both monitors (if supported at all) |
Dependent on the combination of cards and drivers; many configurations will not support all features on all cards. |
This capability is available in a number of drivers: the NVIDIA closed-source driver NVIDIA, the ATI open source driver radeon, and the ATI closed-source driver fglrx . All of these drivers have some limitations; for example, the NVIDIA driver, when used on a laptop, will always configure an external monitor as primary (screen 0), and the ATI drivers permit only general monitor positioning (you can specify that one monitor is to the right of another, but you can’t indicate a difference in their vertical alignment).
Tip
xrandr 1.2 can reconfigure and add outputs on-the-fly, enabling full Xinerama configuration while the server is running. This feature is not yet supported by many of the drivers or desktop environments, but it promises incredible flexibility—;for example, new monitors could automatically work as soon as they are plugged in. You can experiment with this dynamic reconfiguration capability using the xrandr utility.
Although the configuration process is similar for each card, the option names vary. Here is a description the process for the options that you will need in the Device section:
Enable the driver:
NVIDIA
Option “TwinView”
radeon
Option “MergedFB”
fglrx
Option "DesktopSetup" "0x00000200"if connector 1 is connected to the monitor on the left, orOption "DesktopSetup" "0x00000201"if connector 1 is connected to the monitor on the rightSet the second monitor’s horizontal synchronization and vertical refresh rates (the first monitor’s rates are set with the normal HSync and VRefresh entries):
NVIDIA
Option "SecondMonitorHorizSync""range"Option "SecondMonitorVertRefresh""range"radeon
Option "CRT2HSync""range"Option "CRT2VRefresh""range"fglrx
Option "HSync2""range"Option "VRefresh2""range"Set the relative CRT positions:
NVIDIA
Option "TwinViewOrientation""position" wherepositionisAbove, Below, LeftOf, orRightOf; or use theMetaModesoption (see step 4)radeon
Option "CRT2Position""position" wherepositionisAbove, Below, LeftOf, orRightOffglrx
Controlled by the
DesktopSetupoptionSet the CRT modes to be used on each monitor:
Choose whether or not to enable hints through the Xinerama extension.
hints are enabled, clients can get information about the monitors from the X server, which will in most cases result in more intelligent operation of the window managers—for example, maximized windows will fill one monitor instead of both, and dialogs will be centered in one monitor instead of being centered in the virtual screen (which may cause them to span monitors, or—in rare cases— end up in an inaccessible area). You should not enable both this option and the X server’s normal Xinerama handling at the same time.
NVIDIA
Option "TwinViewXineramaInfo" "bool"whereboolisOnorOff. This option is enabled by default.radeon
Option "MergedXinerama""bool"whereboolisOnorOff. This option is enabled by default.fglrx
Xinerama extensions are not available.
You can find specific configuration information for the radeon driver from manradeon, and for the NVIDIA closed-source driver from /usr/share/doc/NVIDIA_GLX-1.0/ README.txt.
Parallel Pointing Devices
It’s often convenient to have multiple pointing devices that work in parallel—;such as a TouchPad and a mouse. This gives the user the flexibility to use whichever device is most convenient for the task at hand; perhaps input is easier with a keyboardmounted TouchPad, but surfing is easier with a mouse.
If youre using Linux, there is a very simple way to configure multiple mice: simply specify /dev/input/mice as the pointer input device. This will merge input from the PS/2 and all USB mice.
However, if you’re not using Linux, have serial mice, or wish to configure each device separately (for example, to enable the special features of a Synaptics Touch-Pad), you will need to create multiple InputDevice sections, then reference each of them through an InputDevice entry in the ServerLayout.
The first, primary InputDevice entry must have the argument CorePointer . Other devices must have the argument SendCoreEvents (or the synonym, AlwaysCore):
	Section "ServerLayout"
	        Identifier     "XFree86 Configured"
	        Screen      0  "Screen0" 0 0
	        InputDevice "Mouse0" "CorePointer" # Main pointer
	        InputDevice "Synaptics" "SendCoreEvents" # Secondary pointer
	        InputDevice "Keyboard0" "CoreKeyboard"
	EndSection
	Section "InputDevice"
	        Identifier  "Mouse0"
	        Driver      "mouse"
	        Option      "Device" "/dev/input/mouse0"
	EndSection
	Section "InputDevice"
	        Identifier  "Synaptics"
	        Driver      "synaptics"
	        # Device will be discovered automatically
	EndSection
Alternately, the CorePointer and SendCoreEvents values can be moved from the ServerLayout section to the InputDevice section; this syntax is used in configuration files generated by the automatic configuration tools on Debian systems:
Section "ServerLayout" Identifier "XFree86 Configured" Screen 0 "Screen0" 0 0 InputDevice "Mouse0" InputDevice "Synaptics" InputDevice "Keyboard0" "CoreKeyboard" EndSection Section "InputDevice" Identifier "Mouse0" Driver "mouse" Option "Device" "/dev/input/mouse0"Option "CorePointer" # Main pointerEndSection Section "InputDevice" Identifier "Synaptics" Driver "synaptics"Option "SendCoreEvents" # Secondary pointer# Device will be discovered automatically EndSection
The X server will fail if no pointer device can be opened. You can override this behavior with an AllowMouseOpenFail option entry in the ServerFlags (or ServerLayout) section:
	Section "ServerFlags"
	    Option "AllowMouseOpenFail" "Yes"
	EndSection
You can also specify the option -allowMouseOpenFail on the X server command line.
Parallel Keyboards
The X server normally gets keyboard input from the VT on which it is running. On some systems, including Linux and some versions of Solaris, the input from multiple keyboard devices is merged by the kernel (with help from the hotplug subsystem). Therefore, no configuration is required to set up additional parallel keyboards.
Instead of relying on this default behavior, you can specify a specific device in the keyboard InputDevice section. This is potentially useful if you want input from only one of several attached keyboards, if you wish to use different layouts for different keyboards, or if you’re using a system that does not merge keyboard input. How-ever, the keyboard device interfaces don’t present data in the same form as the VT interfaces, so they can’t be used with the X server’s normal keyboard driver.
The solution? Use the endev keyboard driver.
To use a keyboard with this patch, you need to identify the keyboard either by name or by physical connection. You can get the name and physical connection values for current devices by examining /proc/bus/input/devices. The keyboard entries in this file will look like this:
	I: Bus=0011 Vendor=0001 Product=0001 Version=ab41
	N: Name="AT Translated Set 2 keyboard"
	P: Phys=isa0060/serio0/input0
	H: Handlers=kbd event0
	B: EV=120013
	B: KEY=4 2000000 3802078 f840d001 f2ffffdf ffefffff ffffffff fffffffe
	B: MSC=10
	B: LED=7

	I: Bus=0003 Vendor=0566 Product=2802 Version=0211
	N: Name="MONTEREY USB K/B WITH ACPI"
	P: Phys=usb-0000:00:1d.1-1/input0
	H: Handlers=kbd event4
	B: EV=12000b
	B: KEY=ff 10000 7 ff87207a c14057ff febeffdf ffefffff ffffffff fffffffe
	B: ABS=100 0
	B: LED=7

	I: Bus=0003 Vendor=0566 Product=2802 Version=0211
	N: Name="MONTEREY USB K/B WITH ACPI"
	P: Phys=usb-0000:00:1d.1-1/input1
	H: Handlers=kbd event5
	B: EV=3
	B: KEY=1f0000 0 0 c000 100000 0 0 0
This system has a standard PS/2 keyboard attached, as shown in the first block, plus a USB keyboard, shown in the last two blocks. The USB keyboard is shown twice because it presents two keyboard interfaces to the system: the first one for standard keys, and the second one for additional multimedia keys, such as volume control, mute, scroll, and dedicated application buttons.
In each case, the device name is specified on the N: line, after Name=, and the physical connection is specified on the P: line, after Phys=.
The physical connection of a USB device will change every time the USB arrangement is disturbed—;for example, when the keyboard is unplugged and moved to a different USB port, or a hub is added between the keyboard and the system. If you have just one keyboard of a particular type, it’s best to identify it by device name, so that it can be found regardless of which port you plug it into. However, if you need to specify one keyboard out of several identical ones, you have no choice but to use the physical connection name.
Here is an InputDevice section configured to accept input only from a USB keyboard (taken from the /proc/bus/input/devices output above), specifying the evdev protocol and using the DevPhys option to specify the physical connection:
	Section "InputDevice"
	    Identifier    "USB Keyboard"
	    Driver        "kbd"
	    Option        "Protocol"     "evdev"
	    Option        "DevPhys"      "usb-0000:00:1d.1-1/input0"
	EndSection
To specify a keyboard by name, use the DevName option:
	Section "InputDevice"
	    Identifier    "USB Keyboard"
	    Driver        "kbd"
	    Option        "Protocol"     "evdev"
	    Option        "DevName"      "MONETEREY USB K/B WITH ACPI"
	EndSection
Both the DevName and DevPhys options accept wildcards:
* Matches zero or more characters
? Matches any one character
This permits you to specify device names such as *KEYBOARD* or physical connections such as usb-*/input0 for maximum flexibility with hot-plugged devices.
Once you have the InputDevice sections set up, you can include references to them in the ServerLayout section. Similar to parallel mice (Section 4.8), the primary key-board must be identified as a CoreKeyboard in the ServerLayout or InputDevice sections; secondary keyboards must have the SendCoreEvents option:
	Section "ServerLayout"
	        Identifier     "XFree86 Configured"
	        Screen      0  "Screen0" 0 0
	        InputDevice    "Mouse0"
	        InputDevice    "Synaptics"
	        InputDevice    "AT Keyboard"    "CoreKeyboard"
	        InputDevice    "USB Keyboard0"    "SendCoreEvents"
	EndSection
Using X with GPM or MOUSED
Both Linux and FreeBSD provide daemons that permit a mouse to be used on text consoles. The X server mouse configuration may need to be changed if you are using these daemons.
GPM Under Linux
The General Purpose Mouse (GPM) daemon on Linux automatically detects the mode of current VT; when it is in a graphic mode, it stops processing mouse events. When the VT returns to text mode, GPM resumes processing.
For serial, PS/2, and USB mice, this works well. A few very old mice use a separate adapter, either on a standalone ISA/PCI card or built into the video card. The kernel drivers for these bus mice cannot be opened by more than one program at a time, so if GPM is in use, the X server won’t be able to get input from the mouse.
GPM provides a solution: for these types of mice, it can repeat all of the mouse data on a different device interface whenever the VT is in graphic mode. This permits the X server to get the mouse input without opening the mouse device a second time.
To use GPM in this mode, configure the X server to use the mouse device /dev/ gpmdata in the pointer InputDevice section:
	Section "InputDevice"
	        Identifier  "Mouse0"
	        Driver      "mouse"
	        Option      "Device" "/dev/gpmdata"
	EndSection
You must ensure that the gpm command is invoked with the -R (repeat) option:
$ gpm -R
If GPM is started at boot time by your system’s init scripts, you may be able to add this option by editing a configuration file. For example, on Fedora systems, you can add the -R to the OPTIONS setting in /etc/sysconfig/mouse; on older Red Hat systems, adjust the OPTIONS setting in /etc/sysconfig/gpm; and on SUSE systems, edit the GPM_ PARAM setting in /etc/sysconfig/mouse.
Only one copy of GPM should be run at a time. To use GPM with multiple mice, use the -M option. If you use -M and -R together, GPM will repeat the data from both mice on /dev/gpmdata, so you do not need to mention the second mouse in the X server configuration file.
MOUSED Under FreeBSD
The FreeBSD MOUSED daemon provides mouse capabilities for textmode VTs. It always reads the mouse device, regardless of whether the VT is in text mode or graphic mode, and it repeats the mouse data on /dev/sysmouse.
To use MOUSED with X, configure the pointer InputDevice section of the X configuration file to read from /dev/sysmouse:
	Section "InputDevice"
	        Identifier "Mouse0"
	        Driver "mouse"
	        Option "Device" "/dev/sysmouse"
	EndSection
The sysmouse data protocol is automatically detected by the X mouse driver and does not need to be specified.
To use multiple mice on FreeBSD, start multiple instances of the MOUSED daemon, one for each mouse you wish to use; the data from all of the daemons will be merged and presented on /dev/sysmouse.
Get X Power Tools now with the O’Reilly learning platform.
O’Reilly members experience books, live events, courses curated by job role, and more from O’Reilly and nearly 200 top publishers.

