Name
Format → Borders and Shading
Synopsis
Borders and shading can give a document visual impact, setting apart important information from the rest of the document. Formatting applied using the Borders and Shading dialog box (or the toolbar equivalents) can also be made part of a style, and therefore becomes easier to apply repeatedly in your open document.
The Borders and Shading dialog is composed of three tabs: Borders, Page Border, and Shading.
The Borders Tab
Use the Borders tab (Figure 8-8) to add or change borders for a selection. The Borders tab settings are as follows:
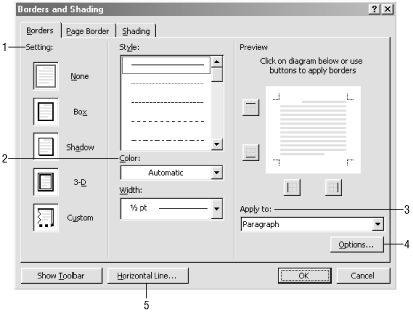
Figure 8-8. Applying borders to a selection
Setting. Choose the type of border to apply. Select Custom to add borders only to specific sides of the selection using the border buttons in the Preview pane. Clicking any of the border buttons automatically selects the Custom setting. When formatting borders for a table, buttons for borders between cells and for diagonal borders are added to the Preview pane.
Color. Select the color for the border. The Automatic color setting applies the default window text color as specified in the Windows Control Panel. To change this default setting, go to Start → Settings → Control Panel → Display → Appearance → Item → Window and change the Font color. You can apply a different style, color, and width to each border. Choose a Custom setting. Select a style, color, and width ...
Get Word 2000 in a Nutshell now with the O’Reilly learning platform.
O’Reilly members experience books, live events, courses curated by job role, and more from O’Reilly and nearly 200 top publishers.

