The Network Setup Wizard
Once you’ve set up the networking equipment, you have to inform Windows XP Pro about what you’ve been up to. You also have to configure your computers to share their files, folders, printers, modems, Internet connections, and so on. Fortunately, the Network Setup Wizard handles this duty for you. (You must have an Administrator account to run this wizard.)
To launch the wizard, choose Start→Control Panel, and then open Network Connections. In the task pane at the left side of the window (Figure 18-2), click the link that says, “Set up a home or small office network.”
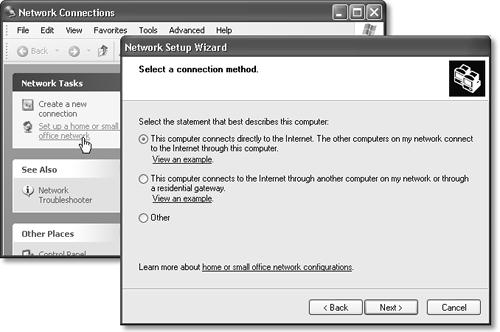
Figure 18-2. Left: Start the Network Setup Wizard by clicking this link. Right: Select the option that best describes this computer’s relationship to the Internet. If the PC will be the gateway to the Internet for other PCs on the network, choose the first option. Otherwise, just choose Other to tell the wizard as much.
Tip
If you’ve chosen to hide your task pane, you can choose Start→All Programs→Accessories→Communications→Network Setup Wizard instead.
A welcome message appears; click Next. The remaining screens of the wizard are as follows.
“Before you continue”
The screen contains a link called “checklist for creating a network.” If you click it, you see a help page that guides you through the steps of setting up a network. It incorporates much of the information you’ve read so far in this chapter. ...
Get Windows XP Professional: The Missing Manual now with the O’Reilly learning platform.
O’Reilly members experience books, live events, courses curated by job role, and more from O’Reilly and nearly 200 top publishers.

