The most important part of software design is the interface. The interface is the only link we humans have with the machines we useâthe better the interface, the better the link, and the more useful the machine will be. Because the Windows XP software has already been designed and written, the most we can hope to do is to tinker with it so that it works more like we think it should.
The first thing I do when I hit a roadblock or find a "feature" in Windows is jump into the Registry and try to fix it. The more I hack away at Windows's flaws, the easier it gets, and the leaner, cleaner, and less annoying Windows becomes. The solutions in this chapter illustrate this point.
The unfortunate methodology behind the design of the Windows interface is that it's supposed to be usable by the lowest common denominator: the person who has never seen Windows before. Don't get me wrong, one of the most important interface design considerations is its ability to be used by the uninitiated. But there are three main problems with this approach if not done correctly. One, such an interface can be inherently condescending. Two, no user is a beginner forever. Three, users are not all the same.
Many people don't realize that it is possible to have an elegant, simple interface that is easy and comfortable for beginners to use, yet is not limited in its usefulness as users gain experience. A dumbed-down interface is not the answer.
One of Windows's strong points is its flexibility. For example, the fact that you can reprogram almost any system object on the desktop to serve a different function, and this is one of the main reasons that Windows enjoys such a large market share. Although the variety of solutions presented here is a testament to the power and flexibility of Windows XP, I'd also like to note the need for such solutions in the first place.
This chapter takes advantage of the basic topics covered in Chapter 2âsuch as shortcuts, system objects, and some of Windows's more obscure settingsâas well as usage of Registry, discussed in Chapter 3, to customize Windows beyond Microsoft's intentions. We'll start by clearing some of the clutter caused by the installation of Windows and move on to customizing whatever is left over to suit your needs.
Although most of these solutions target specific annoyances in the operating system, each one is used to illustrate broader concepts and methodology.
Now, we certainly don't expect every user to feel compelled to take all the advice in this book: not everyone is going to want to turn off Windows's built-in support for ZIP files nor disable the Windows Picture and Fax Viewer application. However, by excavating the Registry and many of the more obscure dialog boxes, you'll discover other things along the way that will assist you in resolving your own annoyances.
If you haven't reviewed Chapter 3, I suggest you do so at this point. It covers the Windows Registry and the Registry Editor, which are used extensively in many of the solutions in this and subsequent chapters.
Tip
Registry patches, discussed in Chapter 3, are great for backing up portions of the Registry and can be used to undo any changes you may decide to make here. Furthermore, once you've made a change you like, you can back it up with a Registry patch of its own, making it easy to restore it should it be overwritten by an application installer or Windows Update.
The default configuration of Windows XPâincluding the way the desktop and Start Menu are configured and which optional Windows components are installedâwas decided by a committee at Microsoft. The motivation was not so much ease of use as it was how to best showcase the features included in the new operating system. This criterion may be great for the marketing department at Microsoft, but it doesn't make for a very pleasant experience for the user.
The best place to start when customizing an interface is to throw out all the stuff you don't want, which will make much more room for the stuff you actually use. By not being forced to wade through dozens of icons or menu items to find the one you want, you can complete your work more easily and with less aggravation.
Not only does Windows XP sport fewer icons on the desktop, by default, than any preceding version of Windows, but the icons that have remained are actually easy to remove. The removal process, however, depends on the type of object you're trying to remove.
There are two types of icons that appear on the desktop (not including the taskbar or Start Menu). Those objects that are physical files or shortcuts to files are simply stored in your desktop folder (typically \Documents and Settings\{username}\Desktop); these items can be deleted, moved, renamed, etc. as easily as any other file on your hard disk. The Desktop Cleanup Wizard, an interactive program designed to help the truly lazy among us remove less frequently used file and shortcut desktop icons, can be found in Control Panel â Display â Desktop tab â Customize Desktop (shown in Figure 4-1).
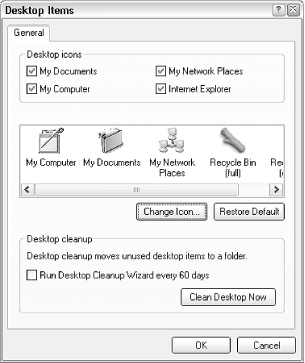
Figure 4-1. The Desktop Items window allows you to show or hide a few prominent desktop objects, as well as customize their icons
Other icons, such as the Recycle Bin and My Computer are virtual objects , in that they don't represent physical files on the hard disk, but rather are internal components of the Explorer.exe application. These icons are referenced in the Registry and can be removed by deleting the corresponding Registry keys (details can be found later in this section); the only exception is the Recycle Bin, which is discussed subsequently. The Internet Explorer and My Documents icons are also virtual objects, despite the fact that they appear to be functionally identical to shortcuts to the Internet Explorer application and My Documents folder.
You can remove or reinstate the My Documents, My Computer, My Network Places, and Internet Explorer icons by going to Control Panel â Display â Desktop tab â Customize Desktop. This displays the Desktop Items window, shown in Figure 4-1, where you can also change the icons for these objects. Additionally, you can rename any of these items (except for the Recycle Bin) as you would any ordinary file: by selecting and pressing F2, by right-clicking and selecting Rename, or by clicking twice (slowly) on the icon caption.
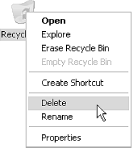
Having the Recycle Bin icon on your desktop can be convenient, but because there are several other ways to delete an object (such as right-clicking and selecting Delete or highlighting an item and pressing the Del key), it really isn't necessary. Furthermore, there's a Recycler folder on every drive, which works just like the Recycle Bin desktop icon.
The Recycler folder, found on every hard disk and some removable volumes, is actually where the Recycle Bin stores files before they're actually deleted. Dragging items into these folders has the same effect as dragging them into the Recycle Bin icon. If you don't see it, you'll need to configure Explorer to show hidden files and folders (Control Panel â Folder Options â View tab).
The following solution allows you to modify the Registry data for the Recycle Bin object, making it easy to rename or delete it, as shown in Figure 4-2:
Open the Registry Editor (discussed in Chapter 3).
Expand the branches to
HKEY_CLASSES_ROOT\CLSID\{645FF040-5081-101B-9F08-00AA002F954E}\ShellFolder\. You know you have the right Class ID key if its(Default)value is set toRecycle Bin. It may be easier to locate this key by searching for the first few characters of the Class ID or for the textRecycle Bin.Double-click the
Attributesvalue, and replace the contents with70 0100 20. If you only want to add the Rename context menu item (without Delete), type50010020instead.Note that this is a binary value, and the input box may not behave like a normal text box; if you mess up, just click Cancel and try again.
Close the Registry Editorâthe change should take effect immediately.
You now have the option of deleting the Recycle Bin at any time by right-clicking on it and selecting Delete, or renaming it just as you'd rename any ordinary file.
To restore your Recycle Bin to its default, removing the
Rename and Delete options from its context menu, repeat
the above process but instead enter an Attributes value of 40 01
00 20. Note that this won't restore the
Recycle Bin's original name, nor will it put it back on the desktop
if it has been deleted (see the following topic for a
solution).
If you delete the Recycle Bin, it's still possible to delete files and subsequently retrieve them. Any file or folder can always be deleted by right-clicking and selecting Delete, or by selecting and pressing the Del key. If you have the Recycle Bin configured to store recently deleted files, you can retrieve them by opening Explorer and navigating to c:\Recycler.[1] In that folder will be a folder for each user on the system, signified by a long numeric code (described in Section 4.2.1, later in this chapter); in most cases, there will be only one such folder here. Open the folder to view recently deleted files.
Once in a while, you'll encounter an icon on your desktop, most likely installed by an older application from Microsoft or another manufacturer, that you just can't get rid of using the solutions in the proceeding sections.
The easiest way to hide (or show) these icons is to use Microsoft's TweakUI (see Appendix A): just select the Desktop category and uncheck any desktop item you'd like to hide. If you don't have access to TweakUI, or just don't want to take the time to download and install it, the following procedure will do the same thing:
Open the Registry Editor (discussed in Chapter 3).
Expand the branches to:
HKEY_LOCAL_MACHINE\SOFTWARE\Micro-soft\Windows\CurrentVersion\explorer\ Desktop\NameSpace\.The key itself will most likely be devoid of values, but it should have a few subkeys, which will be named something like
{645FF040-5081-101B-9F08-00AA002F954E}. These codes are called Class IDs and point to other parts of the Registry that contain more information about them. Class IDs are stored in theHKEY_CLASSES_ROOT\CLSIDbranch and are discussed in Appendix D.Start by clicking on a key and looking at the
(Default)value to the right. It should contain a description of the item. If it doesn't, you can still find out what it is by right-clicking on the key name in the left pane, selecting Rename, then right-clicking on the text itself, and selecting Copy. This will copy the key name to the Clipboard. Then move to the top of the Registry tree (select My Computer at the root), and select Find from the Edit menu. Right-click on the Find What field, and select Paste. Click Find Next to search through the Registry for that key. When you find it, do a little digging in that key and its subkeys to find out what it's really for.If one of the keys under the
...Namespacebranch turns out to match the item you're trying to get rid of, you can go ahead and delete the key.Now, deleting an item here is a little like deleting a shortcut in Explorer: it doesn't actually delete functionality from your system, it only removes the pointer to the information from the desktop namespace key. If you're worried that you might want it back some day, highlight the key, select Export Registry File from the Registry menu to back it up. See Chapter 3 for more information on Registry patches.
When you're done making changes, close the Registry Editor and refresh the desktop. See Section 2.3.4 for more information.
To achieve a truly clean UI, you may wish to hide desktop icons altogether. This solution will disable the display of all icons on the desktop, including any files in your Desktop folder, as well as the virtual icons discussed in the previous sections. It doesn't involve the actual deletion of any data; it merely instructs Windows to leave the desktop blank. A benefit of this solution is that, unlike the previous solutions in this section, it has no effect on the desktop contents when viewed in Explorer:
Right-click an empty area of the desktop.
Select Arrange Icons and then turn off the Show Desktop Icons option.
If the Show Desktop Icons entry doesn't appear in your right-click menu (possible if you've upgraded a computer on which the "Active Desktop" feature found in some earlier versions of Windows was disabled on your system), here's an alternate solution:
Open the Registry Editor (discussed in Chapter 3).
Expand the branches to:
HKEY_CURRENT_USER\Software\Microsoft\Windows\CurrentVersion\Policies\ Explorer.Double-click the
NoDesktopvalue. If it's not there, select New from the Edit menu, and then select Binary Value; typeNoDesktopfor the name of the new value.Replace the contents with
01000000. If at any time you wish to restore the desktop icons, just delete theNoDesktopvalue or replace its contents with00000000.Note that this is a binary value, and the input box may not behave like a normal text box; if you mess up, just choose Cancel and try again.
Click OK and close the Registry Editor. You'll have to log out and then log back in for the change to take effect.
The My Computer and My Documents icons on the desktop, as well as the respective windows they open, are both gateways to the files, folders, and drives in your computer. Both their appearance and behavior can be customized, as illustrated by the following solutions. Likewise, My Network Places is a gateway to the resources available on your network (discussed in Chapter 7) and can be similarly customized.
As described earlier in this chapter, you can rename any of these items with the same technique you'd use to rename any other object: by selecting and pressing F2, by right-clicking and selecting Rename, or by clicking twice (slowly) on the icon caption.
Note that any new name you choose for either of these icons will also be used elsewhere in Windows where these objects are referenced. The exception is the folder to which the My Documents icon points; its name on your hard disk will not change when the icon is renamed.
You can choose new desktop icons for these system objects by going to Control Panel â Display â Desktop tab â Customize Desktop (shown in Figure 4-1). See Section 4.4.1, later in this chapter, for more solutions.
The My Computer window, by default, contains links to all your drives, shortcuts to your My Documents and Shared Documents folders, icons for any installed scanners, and, optionally, an icon for Control Panel.[2] To add more system objects to the My Computer window and, consequently, to Explorer, follow these steps:
Open the Registry Editor (discussed in Chapter 3).
Expand the branches to
              HKEY_LOCAL_MACHINE\Software\Microsoft\Windows\CurrentVersion\
              explorer\MyComputer\NameSpace
. Hint: create a Registry patch of this branch before continuing, in the event that you need to restore the default setup.Under this branch, you should see one or more keysâeach named for a different Class ID. For help in identifying unlabeled keys, see the "Special Case: Really stubborn icons" section.
To add a new key, select New from the Edit menu, and then select Key. You can then enter any Class ID for the name of the key, and the corresponding system object will be added to the My Computer folder. See Appendix D for a table of Class IDs, or copy and paste a Class ID from elsewhere in the Registry.
Refresh the My Computer window to see your changes by pressing the F5 key.
This solution does not work as you might expect for all system objects. For example, the My Network Places icon will behave erratically if placed in My Computer. You'll have to use a little trial and error to get the desired results.
You can remove any icon added in this way by deleting the corresponding Registry keys. You can also use TweakUI (see Appendix A); just expand the My Computer category and select Drives, and uncheck any drives you want hidden.
You can add items (shortcuts, folders, etc.) to the My Network Places window by simply adding Windows Shortcuts to the \Documents and Settings\{username}\Nethood folder. For example, place shortcuts to frequently accessed network folders here. The process is similar to the way custom items are added to the Start Menu and the Send To menu.
All of My Computer's default resources are also available in Explorer and the Start Menu, so you may prefer to connect another program to the My Computer desktop icon. For example, if you simply prefer Explorer's hierarchical tree view to My Computer's Macintosh-style, single-folder navigation, you can configure My Computer to launch Explorer:
Open the Registry Editor (discussed in Chapter 3).
Expand the Registry branches to:
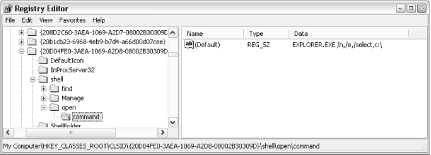
HKEY_CLASSES_ROOT\CLSID\{20D04FE03AEA-1069-A2D8-08002B30309D}\shell. You know you have the right Class ID key if its(Default)value is set toMy Computer.You'll see an existing key already in this branch named
find, representing the Search command in the My Computer icon's context menu. Select New from the Edit menu, and then select Key. TypeOpenfor the name of the new key, and press Enter.Right-click the new
Openkey, select New again and then Key. TypeCommandfor the name of this new key, and press Enter.Click once on the new
Commandkey, double-click the(Default)value in the right pane, typeexplorer.exein the box, and press Enter. Your Registry Editor window should resemble Figure 4-3, except that I've also included some optional command-line parameters (discussed in Section 2.1.2). You can, of course, replaceexplorer.exewith the full path and filename of any other program you'd rather use.Next, navigate to
HKEY_CLASSES_ROOT\CLSID\{20D04FE0-3AEA-1069-A2D8-08002B30309D}\shell, double-click the(default)value, and typeopenfor its contents.Close the Registry Editor when you're finished. Click on an empty area of the desktop, and press F5 to refresh the desktop so that this change will take effect. Double-click the My Computer icon at any time to start the specified application.
Using this method, you can also add additional entries to My Computer's context menu; see Section 4.3.1, later in this chapter for details.
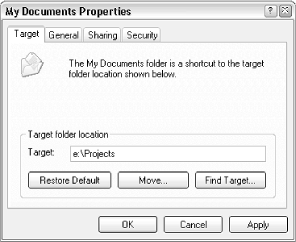
Right-click the My Documents icon on your Desktop and select Properties. The Target tab, shown in Figure 4-4, allows you to choose any folder to be opened when the My Documents icon is double-clicked. You can also click Move to relocate the "official" My Documents folder, regardless of whether the My Documents icon points there or not.
The following procedure will remove the Shared Documents folder that shows up in Explorer and My Computer:
Open the Registry Editor (discussed in Chapter 3).
Expand the branches to:
HKEY_LOCAL_MACHINE\SOFTWARE\Microsoft\Windows\CurrentVersion\Explorer\ MyComputer\NameSpace\DelegateFolders.Under this branch, you should see several subkeys, each named for a different Class ID. Delete the one named
{59031a47-3f72-44a7-89c5-5595fe6b30ee}.One of the other branches here,
{E211B736-43FD-11D1-9EFB-0000F8757FCD}, is responsible for adding folders for each of your installed scanners and cameras to My Computer and Explorer. It can also be deleted, if desired.Close the Registry Editor when you're done. The change will take effect immediately, but you may have to close and reopen any Explorer windows to force them to recognize the change.
[1] If you don't see the Recycler folder, go to Control Panel â Folder Options â View tab, and make sure the Show hidden files and folders option is selected, and the Hide protected operating system files option is turned off.
[2] To enable or disable the Control Panel icon in the My Computer folder, go to Control Panel â Folder Options â View tab.
Get Windows XP Annoyances for Geeks, 2nd Edition now with the O’Reilly learning platform.
O’Reilly members experience books, live events, courses curated by job role, and more from O’Reilly and nearly 200 top publishers.

