Chapter 1. A Crash Course in the Basics
The following brief sections tell you what’s new in Windows Vista, illustrate the layout of the Windows Vista interface, and identify the important concepts and components. Continue to Chapter 2 for tips and shortcuts for working with files, windows, and applications.
What’s New in Windows Vista
Windows Vista is a significant rework of Windows, and although the basics of Windows are the same, much has changed. Here are the most significant additions and changes in Windows Vista compared to Windows XP:
- Windows Aero interface
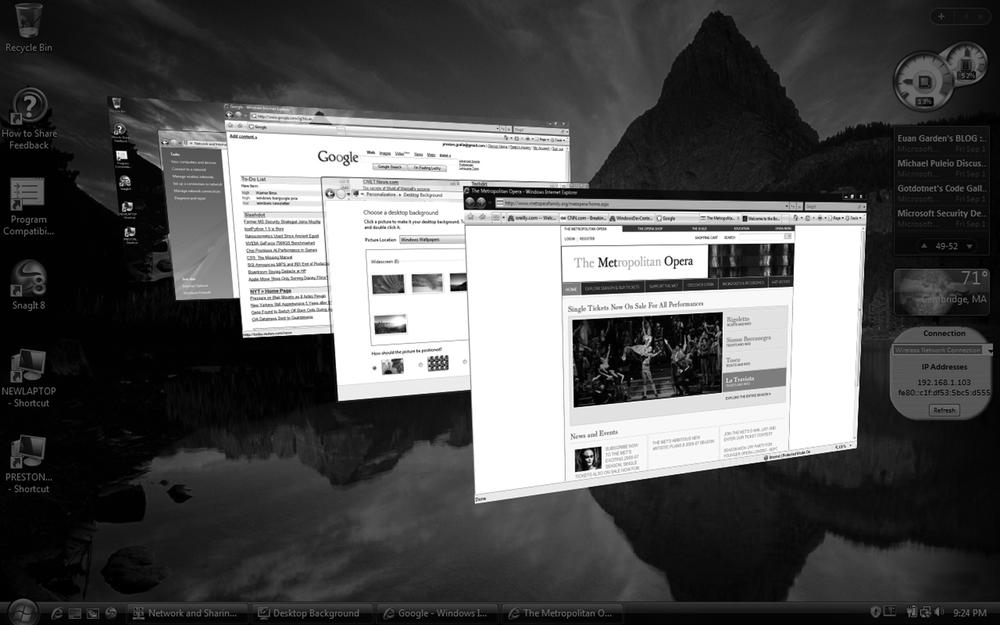
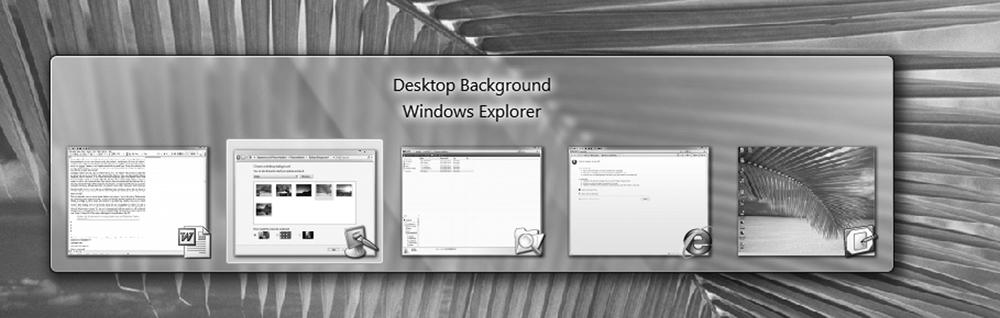
The new interface is the first thing people will notice when they see Windows Vista on a Vista Premium-ready system. It sports customizable, translucent windows (called Aero Glass); live Taskbar thumbnails that show a live preview of an underlying window when a mouse is held over the tile; and Windows Flip and Windows Flip 3D, which show thumbnails of open windows as you flip through them. As the name implies, Windows Flip 3D, shown in Figure 1-1, shows the thumbnails in three dimensions. Note that Windows Aero is not available on the least expensive versions of Windows Vista, and that it has special hardware requirements. There are three other levels of the interface that are less sophisticated than Windows Aero: Windows Classic, Basic, and Standard.
- Security
Security has been enhanced at every level of the operating system, in both visible and invisible ways. Windows Defender protects against spyware, and the Windows Firewall now includes outbound as well as inbound protection. (By default, though, outbound protection is turned off.) Internet Explorer runs by default in Protected Mode, which protects the operating system from assault via the browser, and it includes a phishing filter. Windows Service Hardening stops background Windows services from being used by malware to damage the filesystem, Registry, or network to which the PC is connected. Windows Vista also gives network administrators more control over network and PC security, such as the ability to restrict access to removable storage devices such as Universal Serial Bus (USB) flash drives. Parental Controls allow parents to determine how their children can use the computer and what content they can access. BitLocker Drive Encryption, when used with compatible hardware, locks down a hard disk so that it cannot be accessed if the computer is stolen. Windows Vista also includes User Account Control (UAC), which pops up warnings and asks for passwords when certain setup or customization screens or features are accessed. This enhances security, but it can also mean that you will have to type in a password or click an approval button before you can change certain system features.
- Revised Internet Explorer
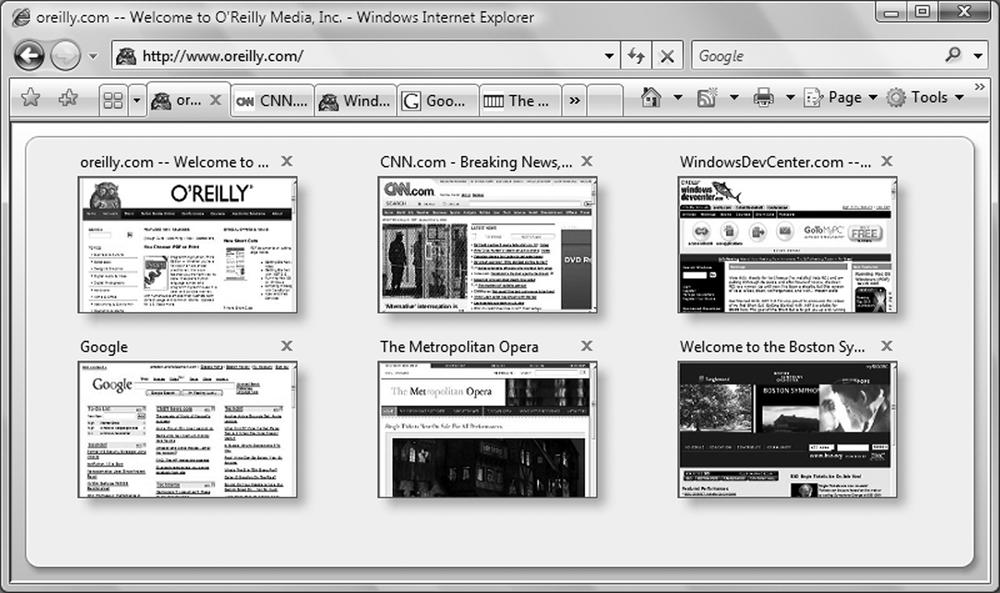
Internet Explorer, shown in Figure 1-2, has been given its most significant overhaul in years, with the addition of tabs, a redesigned menu system, increased security, Instant Search via an integrated search bar, page zoom, and better printing.
- RSS support
Really Simple Syndication (RSS) allows for the delivery of live feeds of web content, news, and web logs. Internet Explorer includes a built-in RSS reader that lets you subscribe to and read RSS feeds.
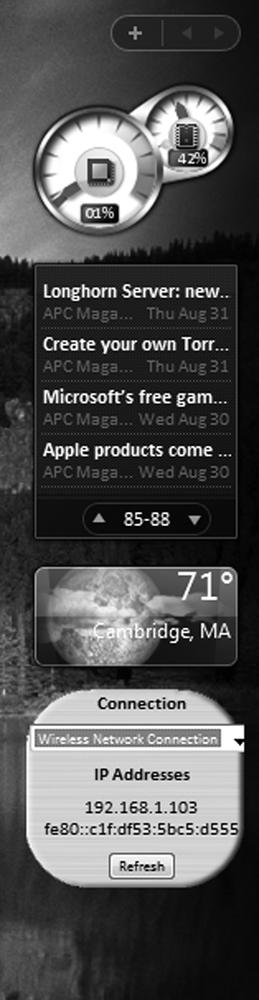
- Windows Sidebar and Gadgets
The new Windows Sidebar, shown in Figure 1-3, puts information and frequently used tasks directly on the desktop. Gadgets that live on the Sidebar perform tasks such as fetching RSS feeds, displaying system information, and showing up-to-date stock information.
- Better search
Search speed has been significantly increased, integrated throughout the operating system, and enhanced with more ways to find files, programs, email, and web information. The Instant Search feature, in Windows Explorer and on the Search menu, finds information the instant you start typing. Instant Search is context-sensitive, so when a search is performed from within a folder, it will search that folder. A new Search Pane adds simple ways to fine-tune and filter searches. In addition, you can create Virtual Folders that are based on search criteria—for example, you can create a Virtual Folder that constantly updates itself and that will display all .doc files over a certain size, created after a certain date, and containing certain words.
- New “Centers”
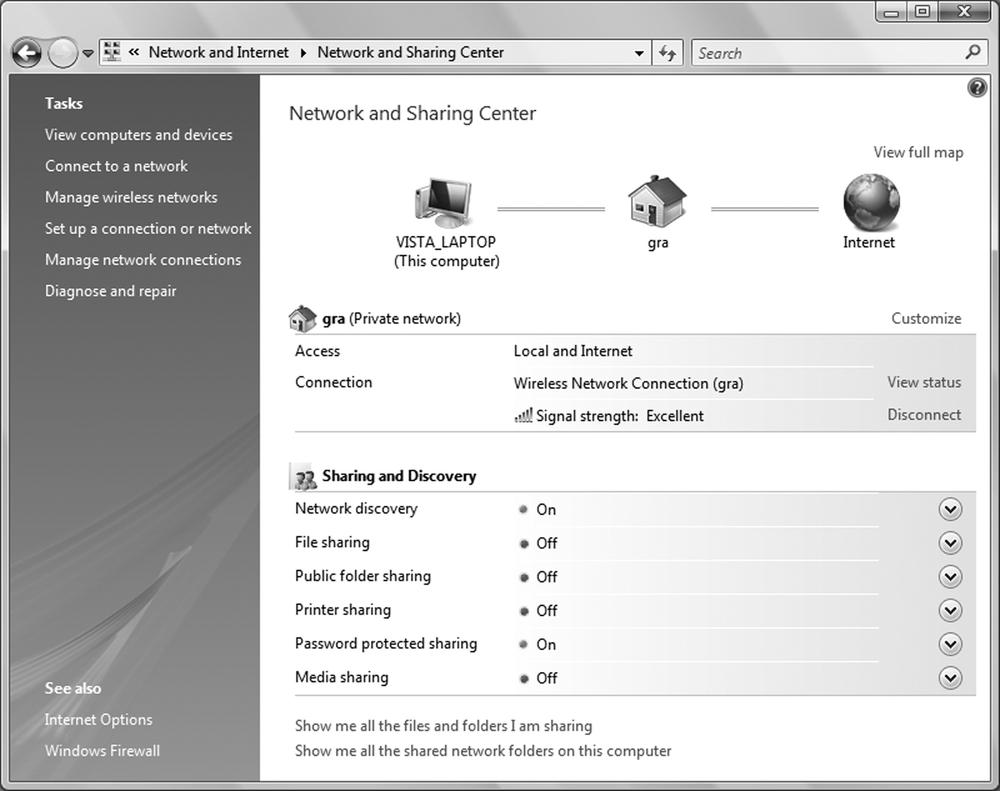
Windows Vista organizes common tasks and features into Centers, which contain all the information and settings related to the task or feature. For example, the Network and Sharing Center, shown in Figure 1-4, allows you to view information about your current network and connection, see a complete network map, connect to new networks, customize your connections, turn file sharing on or off, change security settings, and so on. Similarly, the Windows Mobility Center includes settings and information related to mobile computing. And the Backup and Restore Center makes it easy for you to back up and restore data as well as the current state of your computer.
- New networking features
Collaboration tools make it easy for people to find others with whom to have live meetings over a network. Wireless networking includes support for the WPA2/802.11i security standards. Windows Vista also supports the new IPv6 Transmission Control Protocol/Internet Protocol (TCP/IP) architecture, which expands the number of available IP addresses.
- Improved multimedia
Windows Media Center has been overhauled. If a PC has a TV tuner, it will be able to record, watch, and pause live television feeds. Browsing, searching for, and organizing digital media such as photos and music have been improved. See the upcoming "Windows Vista Editions" section of this chapter for details on which versions of Vista support these functions. In addition, Windows Media Player 11 features plenty of improvements.
- Faster startup and resume
Whenever Windows Vista starts up, it has to run a variety of scripts and services, just as earlier versions of Windows had to do. But with Vista, startup doesn’t wait for those scripts and services; instead, it moves ahead and starts, and the scripts run in the background, leading to faster startup. To make Windows Vista start even faster, you can put it into Sleep Mode rather than shutting it down. In Sleep Mode, all your open documents, windows, and programs are saved, but the computer shuts down most of its functions. When you wake it from Sleep Mode, the documents, windows, and programs are restored in exactly the state they were in when your computer went to sleep. Waking from Sleep Mode happens within seconds—faster than it takes for a computer to start up from a shutdown.
- SuperFetch
This new technology can improve your PC’s performance by watching the programs and data you often use, and then fetching them before you actually need them. That way, the programs and data load and run much faster when you open them. SuperFetch really comes into its own when combined with ReadyBoost, which allows your PC to use a high-speed flash drive for a SuperFetch cache. Flash drives are much less expensive than RAM, so this is an inexpensive way to boost your PC’s performance. In addition, some systems, such as laptops, may have limited RAM capacity, so a flash drive is a way to boost those systems’ performance.
- Restart Manager
Under earlier versions of Windows, you frequently had to reboot your PC whenever you installed a patch to a program because Windows was unable to shut down all the processes associated with that program. With Windows Vista, you will have to reboot far less frequently when applying a patch because Restart Manager can more effectively close down and restart the required processes. (Note that Restart Manager is not an application that you use directly; instead, it’s a kind of internal plumbing that works without your intervention.)
- Improved stability
Windows Vista includes a variety of new features under the hood to make it more reliable and less prone to crashes than previous versions of Windows. The Startup Repair Tool automatically fixes common startup problems, and all Windows services now have recovery policies that allow Vista to automatically restart a service that has crashed, as well as restart associated services.
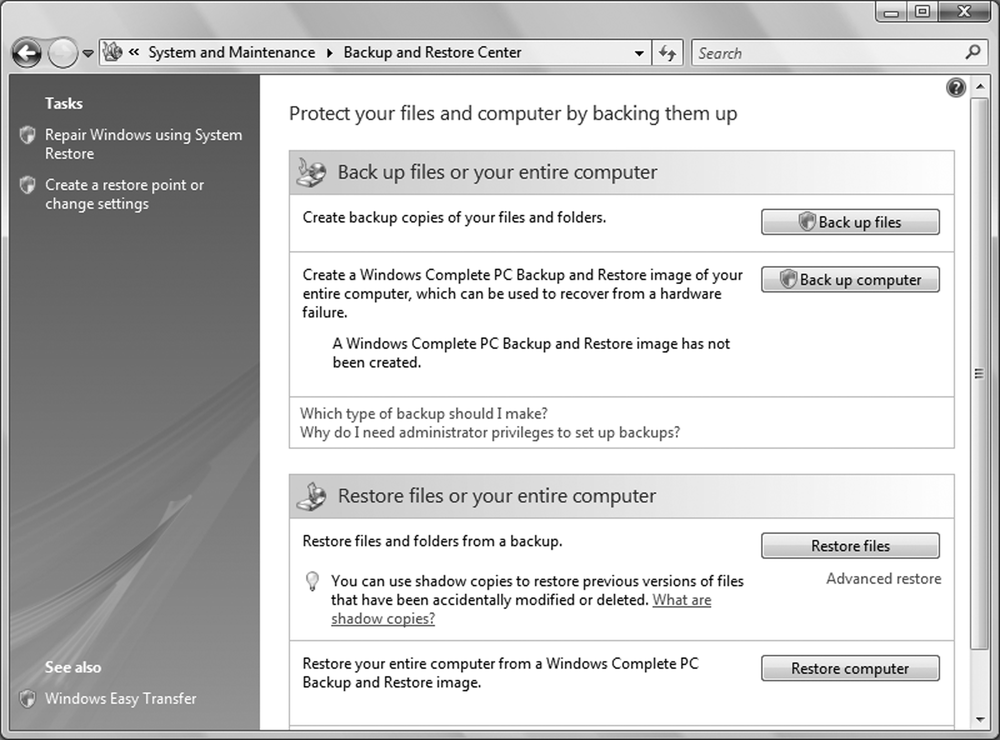
- Better backup
It’s no secret that the backup programs built into Windows XP Home and Professional left much to be desired, and because of that, they were rarely used. Windows Vista’s new backup program, Windows Backup, is actually useful and lets you back up to writable discs, USB flash drives, and other removable media, as well as across a network. Backups can be completely automated, and you can also back up an entire system image (what Windows Vista calls a Complete PC backup) that saves the current state of your PC so that it can be easily restored in the case of a system failure, or if your PC is stolen. There’s also a Backup and Restore Center, shown in Figure 1-5, which provides a central location for all backup and restoration chores.
Windows Vista Editions
Those who were slightly confused by the two different versions of Windows XP—the Home Edition and the Professional Edition—will be flummoxed by the dizzying array of different Windows Vista versions. There are five different core Vista versions, for everyone from users with bare-bones PCs, to home users interested in multimedia, to users who work in large enterprises. As a practical matter, though, most home users will end up with Windows Vista Home Premium; those in many businesses will end up with Windows Vista Business; and those in very large corporations will run Windows Vista Enterprise Edition. Here’s the rundown on the five core versions and how they differ:
- Windows Vista Home Basic
As the name implies, this edition offers only bare-bones features. It’s designed to run on entry-level PCs and doesn’t have the Windows Aero interface, doesn’t support creating video DVDs, and lacks Media Center features. It is missing more as well, such as mobility features, and it doesn’t support Tablet PCs. Most likely, few people will opt for this version of Windows Vista.
- Windows Vista Business
This version is aimed at users in small to medium-size businesses. It includes Windows Aero, supports Tablet PCs, and has most other Vista features. But it doesn’t have a variety of multimedia features, such as the capability to create and burn video DVDs. It does, though, have a variety of features aimed at IT staff, such as wireless network provisioning capabilities, Remote Desktop connections, image-based backup, and other network administration features.
- Windows Vista Home Premium
This has Aero and supports all of the multimedia Vista features, such as creating video DVDs, slide show creation, and the Windows Media Center. It supports basic networking and wireless networking, but it doesn’t have network administration tools, wireless network provisioning, or the capability to connect to a domain. It also doesn’t have the Encrypting File System (EFS) or image-based backup.
- Windows Vista Enterprise Edition
This one is for large enterprises, and only businesses that have Microsoft Software Assurance or a Microsoft Enterprise Agreement get this version. It offers everything that Windows Vista Business does, and it includes hardware-based encryption, called BitLocker Drive Encryption, which employs a physical hardware key and a passcode to secure volumes. This version also comes as a single image that enterprises can deploy from a central location.
- Windows Vista Ultimate
Like the name says, this is the Mother of All Vistas. It has all the features and tools in every other version of Vista—the networking and administrative tools of the various business editions, and the multimedia features of the home editions.
Note that there are actually eight Vista versions. The remaining three versions will be sold only outside the United States. The Windows Vista Starter edition will be sold only on low-end PCs in emerging markets, and two “N” versions of Vista are required to be sold in the European Union. The N versions lack some media-related features.
Table 1-1 provides more detailed information about the different Vista versions, as well as where to turn to learn more.
|
Feature |
Home Basic |
Home Premium |
Business |
Enterprise Edition |
Ultimate |
|
Windows Aero |
No |
Yes |
Yes |
Yes |
Yes |
|
Parental Controls |
Yes |
Yes |
No |
No |
Yes |
|
Windows DVD Maker |
No |
Yes |
No |
No |
Yes |
|
Tablet PC features |
No |
Yes |
Yes |
Yes |
Yes |
|
Remote Desktop |
Client only |
Client only |
Host and client |
Host and client |
Host and client |
|
Automated backup |
No |
Yes |
Yes |
Yes |
Yes |
|
Back up to a network device or folder |
No |
Yes |
Yes |
Yes |
Yes |
|
Create images of desktops for easy backup and recovery |
No |
No |
Yes |
Yes |
Yes |
|
Windows Shadow Copy (automatically backs up files for easy restore) |
No |
No |
Yes |
Yes |
Yes |
|
Fax and scan |
No |
No |
Yes |
Yes |
Yes |
|
Windows Media Center |
No |
Yes |
No |
No |
Yes |
|
BitLocker Drive Encryption |
No |
No |
No |
Yes |
Yes |
|
Capability to create themed slide shows |
No |
Yes |
No |
No |
Yes |
|
Windows Movie Maker |
Yes |
Yes |
No |
No |
Yes |
|
Wireless network provisioning (allows administrators to set network-side security settings) |
No |
No |
Yes |
Yes |
Yes |
|
Encrypting File System |
No |
No |
Yes |
Yes |
Yes |
|
Network Access Protection (stops nonsecure PCs from connecting to a network) |
No |
No |
Yes |
Yes |
Yes |
|
Windows Anytime Upgrade (automated online upgrades to Windows Vista) |
Yes |
Yes |
Yes |
No |
No |
|
Network projection (allows connecting to network projectors wirelessly) |
No |
Yes |
Yes |
Yes |
Yes |
|
Windows Meeting Space (allows collaboration over networks) |
Can view meetings only |
Yes |
Yes |
Yes |
Yes |
|
Domain support (allows a PC to join a corporate domain) |
No |
No |
Yes |
Yes |
Yes |
|
Group Policy support (for administrators to set corporate-wide configuration) |
No |
No |
Yes |
Yes |
Yes |
|
Offline files and folders (allows users to automatically sync network files and folders) |
No |
No |
Yes |
Yes |
Yes |
Hardware Requirements
Windows Vista requires considerable hardware—significantly more than previous versions of Windows. It needs a lot of graphics horsepower to support the full Aero interface, but it is possible to run Windows Vista without running Aero.
Because there are so many different versions of Windows Vista, and because it is possible to run Windows Vista without the Windows Aero interface, the exact hardware requirements are somewhat confusing. To help make things a little less confusing, Microsoft has set two levels of hardware: Windows Vista Capable and Windows Vista Premium Ready. A Windows Vista Capable PC will not be able to run all of the Windows Vista features, notably Windows Aero.
A Windows Vista Capable PC has these minimum hardware requirements:
An 800 MHz 32-bit (x86) or 64-bit (x64) processor
512 MB of RAM
DirectX 9-capable graphics processor (Windows Display Driver Model [WDDM] driver support recommended) with a minimum of 64 MB of memory, preferably 128 MB
20 GB hard disk, with at least 15 GB free
A Windows Vista Premium Ready PC has these minimum hardware requirements:
A 1 GHz 32-bit (x86) or 64-bit (x64) processor
1 GB of RAM
DirectX 9-capable graphics processor that supports WDDM driver support, Pixel Shader 2.0, 32 bits per pixel, and a minimum of 128 MB of memory
40 GB hard disk, with at least 15 GB free
DVD-ROM drive
Obviously, more is better, so it’s a good idea to exceed these requirements when possible.
Windows System Performance Rating
Windows Vista includes a performance rating system, which may puzzle you at first. After all, your hardware can clearly support Windows Vista if you’re able to run the tool, so what is its purpose?
In fact, it’s not designed to tell you how well your PC runs Vista, but rather how well it can run other software. The idea is that software makers will assign their software a certain level, and you’ll buy only the software that the performance rating system says you can run. The higher the number is, the better the performance.
In theory, that’s fine. But it’s not clear how well it will work in practice, because software makers, including Microsoft, have yet to rate their software according to this system. And it’s also quite mysterious how the performance rating system calculates its ratings. As you can see in Figure 1-6, the individual components of this PC rate relatively high, from a 5 (the top rating) to a 3.7. So why is the overall system rating a 3.7? Windows Vista automatically takes the lowest component rating and uses that as the overall system rating.
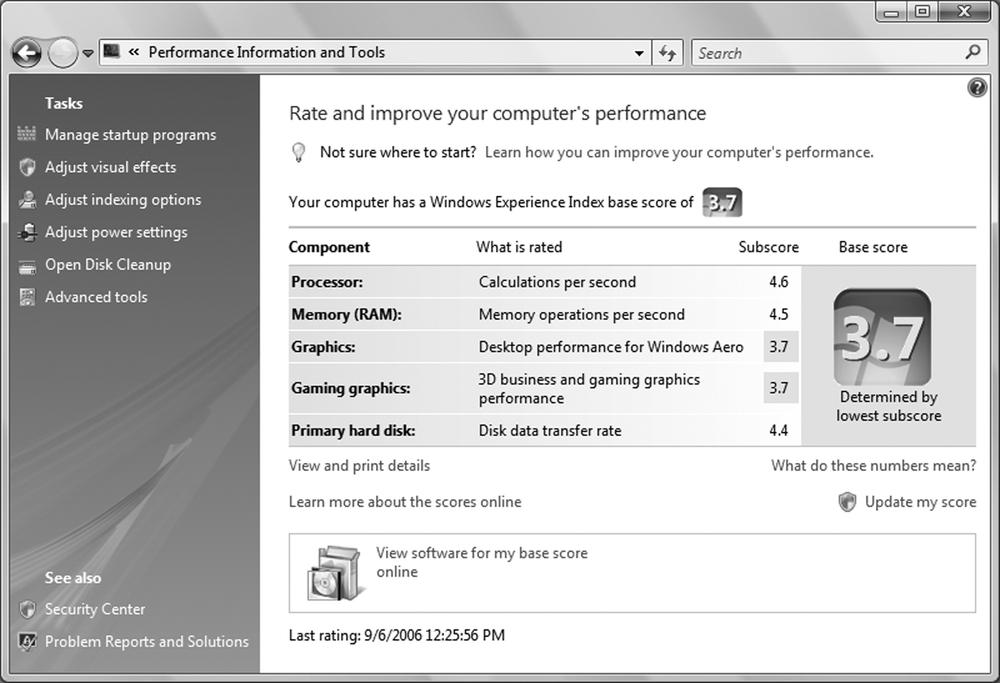
Useful or not, you might want to see how Windows Vista rates your hardware. Choose Control Panel → System and Maintenance → Performance Information and Tools.
The Desktop
Like most modern operating systems that use graphical user interfaces or GUIs (such as Mac OS X, Unix, and earlier versions of Windows), Windows Vista uses the metaphor of a Desktop with windows and file folders laid out on it. A program called Windows Explorer (explorer.exe) provides this Desktop metaphor.
Figure 1-7 shows the main features of the Windows Vista Desktop. The callouts in the figure highlight some of the special-purpose icons and buttons that may appear.
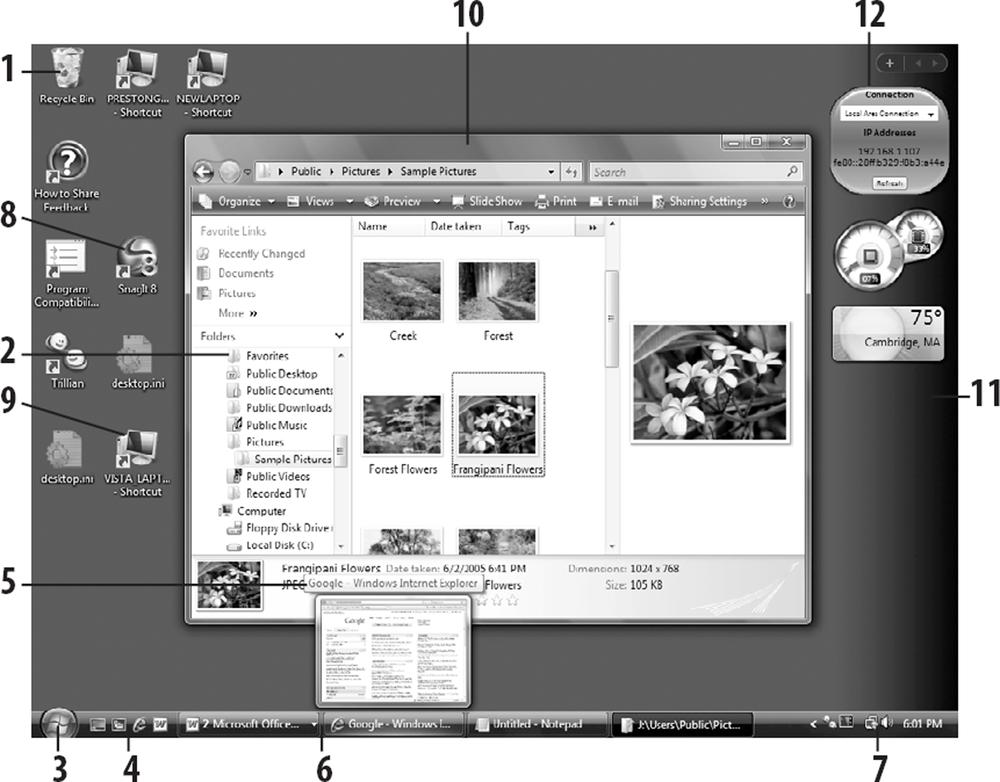
Drag files to the Recycle Bin to delete them. Open the bin and rummage through it to recover deleted files.
A folder lets you organize your files.
The Start button gives you access to commands and applications on your system.
The Quick Launch toolbar gives you fast access to frequently used applications.
Hover your mouse over a taskbar window icon, and you will see a live thumbnail of its content.
The Taskbar contains icons for each running application, plus toolbars and the notification area.
The System Tray (also called the notification area) contains the clock and useful status indicators about programs and services currently running.
A shortcut links to a file, folder, or program somewhere else on the system. You can differentiate between shortcuts and regular icons because shortcuts have a curved arrow on them.
You can have shortcuts to other computers on your network.
An open folder shows its contents in a window.
The Sidebar is used to display Gadgets.
Gadgets are mini-applications that can display changing content, such as stock prices or RSS feeds.
Point-and-Click Operations
Windows Vista offers several settings that affect the way the interface responds to mouse clicks. The default setting (the way it works when you first install Windows Vista) will also be familiar to most users, as it is consistent with the way most operating systems work.
If you modify certain settings using the Folder Options dialog (Control Panel → Appearance and Personalization → Folder Options), however, Windows may respond differently.
If you are a new computer user who hasn’t used a GUI before, here are some things you need to know:
PCs usually come with a two- or three-button mouse, although there are a variety of alternatives, such as touchpads (common on laptops), trackballs, and styluses. Many mice also include a scroll wheel which, as its name implies, you use to scroll through pages and screens.
To click an object means to move the pointer to the desired screen object and press and release the left mouse button.
Double-click means to click twice in rapid succession with the button on the left. (Clicking twice slowly doesn’t accomplish the same thing.)
Right-click means to click with the button on the right.
If your pointing device has three or more buttons, you should use just the primary buttons on the left and the right, and read the documentation that comes with your pointing device to find out what you can do with the others. (You can often configure the middle button to take over functions such as double-clicking, cut and paste, inserting inflammatory language into emails, and so on.)
Windows and Menus
Any open window contains a frame with a series of standard decorations and tools, as shown in Figure 1-8. To move a window from one place to another, click on the title bar and drag. The exact tools and functions available in any window vary according to the application or tool that launches it. Figure 1-8 shows a folder window, which is perhaps the most complicated window in Windows Vista.
Most types of windows are resizable, meaning that you can stretch them horizontally and vertically to make them smaller or larger. Just grab an edge or a corner and start dragging. There are two shortcuts that come in quite handy: maximize and minimize. If you click the maximize button (the middle button in the cluster in the upper right of most windows), the window will be resized to fill the screen. You can’t move or resize maximized windows. If you minimize a window (the leftmost button in the cluster), it is shrunk out of sight and appears only as a button on the Taskbar. Minimizing is handy to get windows out of the way without closing them.
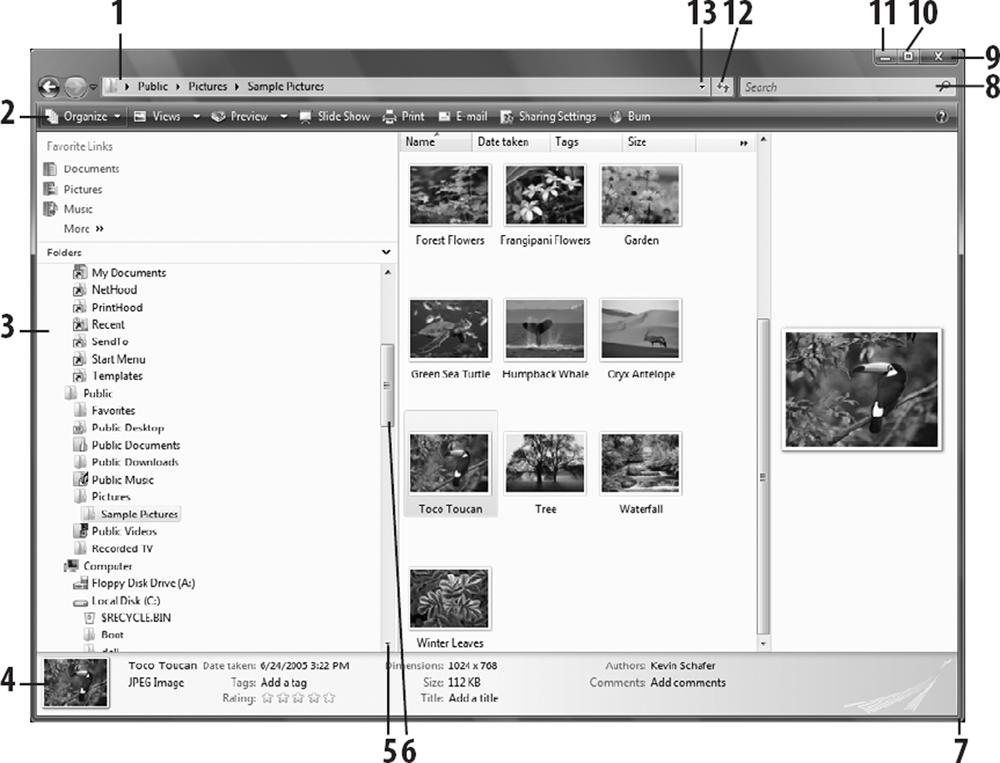
The Address Bar (shows the current folder in Windows Explorer).
Application-specific toolbar.
Navigation pane (Windows Explorer only).
Details pane (Windows Explorer only). In many applications, this area is taken up by a status bar that gives information about the content of the window.
The scroll bar. Click here to move down one line, or scroll by keeping the mouse button depressed.
Drag this to jump scroll to a corresponding point in the document.
Drag here to resize window.
The search bar. It is available in some applications, such as Windows Explorer and Internet Explorer, but not others.
Click here to close the window.
Click here to maximize the window (make it full screen).
Click here to minimize the window (make it into a button on the Taskbar).
Refresh the current window. This icon is available in some applications, such as Windows Explorer and Internet Explorer, but not others.
Show the history of the current window, such as displaying other folders you’ve visited recently in Windows Explorer. This icon is available in some applications, such as Windows Explorer and Internet Explorer, but not others.
Under certain circumstances, one or two scroll bars might appear along the bottom and far right of a window. These allow you to move the window’s view so that you can see all of its contents. This behavior can be counterintuitive for new users because moving the scroll bar in one direction will cause the window’s contents to move in the opposite direction. Look at it this way: the scroll bar doesn’t move the contents; it moves the viewport. Imagine a very long document with very small type. Moving the scroll bars is like moving a magnifying glass—if you move the glass down the document and look through the magnifier, it looks like the document is moving upward.
If multiple windows are open, only one window has the focus. The window with the focus is usually (but not always) the one on top of all the other windows. The Windows Vista Aero Glass interface features transparent edges to windows, so you will be able to see through the edges of the focused window to windows beneath it. It can be difficult in Windows Vista to know which window has focus if several are side by side, because the Aero Glass interface doesn’t necessarily make the border and title of the active windows obviously different from the other windows. The window with the focus is the one that responds to keystrokes, although any window will respond to mouse clicks. To give any window the focus, just click on any visible portion of it, and it will pop to the front. Be careful where you click on the intended window, however, as the click may go further than simply activating it (if you click on a button on a window that doesn’t have the focus, for example, it will not only activate the window, but press the button as well).
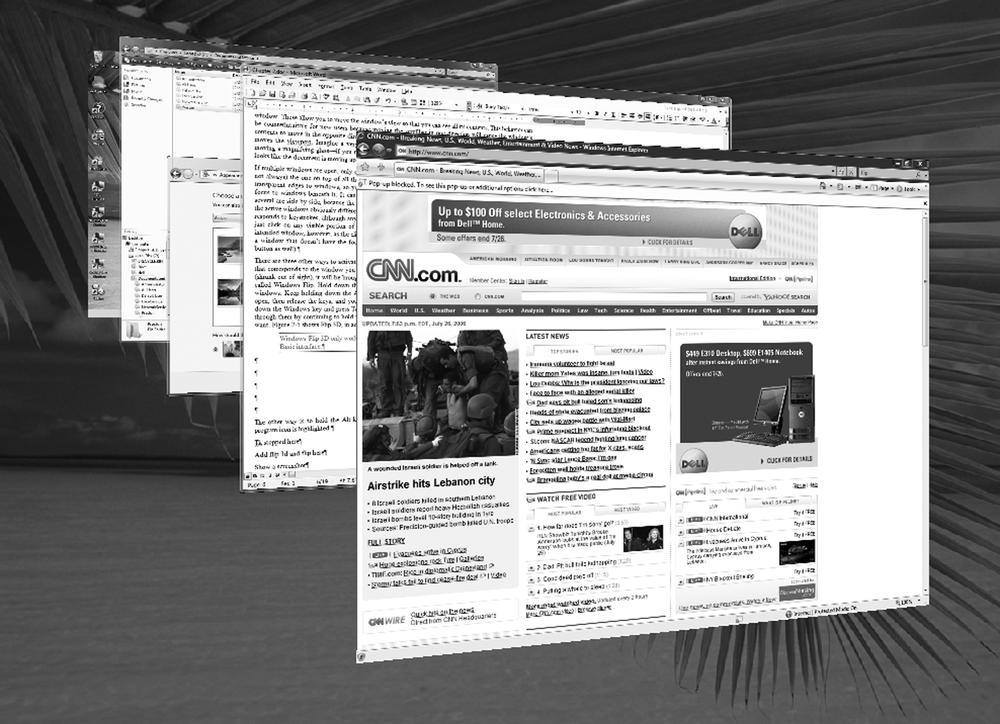
There are three other ways to activate (assign the focus to) a window. You can click on the Taskbar button that corresponds to the window you want to activate, and it will be brought to the front. If it is minimized (shrunk out of sight), it will be brought back (restored) to its original size. Another way is to use a feature called Windows Flip. Hold down the Alt key and press Tab, and you’ll see thumbnails of all your open windows. Keep holding down the Alt key and pressing Tab until you highlight the window you want to open, then release the keys, and you’ll be sent to that window. Similarly, to use Windows Flip 3D, hold down the Windows logo key and press Tab, and you’ll see thumbnails of all your windows in a 3D stack. Scroll through them by continuing to hold the Windows logo key and pressing Tab until you get to the window you want. Figure 1-9 shows Windows Flip in action, and Figure 1-10 shows Windows Flip 3D.
Just as only one window can have the focus at any given time, only one control (text field, button, checkbox, etc.) can have the focus at any given time. Different controls show focus in different ways: pushbuttons and checkboxes have a dotted rectangle, for instance. A text field (edit box) that has the focus will not be visually distinguished from the rest, but it will be the only one with a blinking text cursor (insertion point). To assign the focus to a different control, just click on it or use the Tab key (use Shift-Tab to go backward).
Often, new and veteran users are confused and frustrated when they try to type into a window and nothing happens—this is caused by nothing more than the wrong window having the focus. (I’ve seen skilled touch-typists complete an entire sentence without looking, only to realize that they forgot to click first.) Even if the desired window is in front, the wrong control (or even the menu) may have the focus.
You can configure some windows to be “always on top.” This means that they will appear on top of other windows, even if they don’t have the focus. Floating toolbars, the Taskbar, and some help screens are common examples. If you have two windows that are “always on top,” they behave the same as normal windows, because one can cover the other if it is activated, but both will always appear in their own “layer” on top of all the normal windows.
The Desktop is also a special case. Although it can have the focus, it will never appear on top of any other window. To access something on the Desktop, you have two choices: minimize all open windows by holding the Windows logo key and pressing the D key, or press the Show Desktop button on the Quick Launch Toolbar to temporarily hide all running applications. You can also minimize your current window, although in some instances, that only leads you to the next open window you need to minimize, and so on, until you reach the Desktop.
Many windows have a menu bar, commonly containing standard menu items such as File, Edit, View, and Help, as well as application-specific menus. Click on the menu title to drop it down, and then click on an item in the menu to execute it. Any menu item with a small black arrow that points to the right leads to a secondary, cascading menu with more options. Generally, menus drop down and cascading menus open to the right; if there isn’t room, Windows pops them up in the opposite direction. If you want to cancel a menu, simply click anywhere outside of the menu bar.
Those who are used to previous versions of Windows may be somewhat confused by the absence of menus—which have now been replaced by new toolbars—in Internet Explorer and Windows Explorer. New toolbars take the place of menus in them. However, if you’re a fan of the old menus, you can still find them; press the Alt or F10 key and they’ll magically appear.
Each window also has a Control menu hidden behind the upper-left corner of the title bar (the bar at the top of the window that contains the filename). You can open the menu by clicking on the upper-left corner, by pressing Alt-space, or by right-clicking on a button on the Taskbar. The Control menu duplicates the function of the maximize, minimize, and close buttons at the right end of the title bar, as well as the resizing and moving you can do with the mouse. Using this menu lets you move or resize the window without the mouse. The command line (which you can get to by typing command at the Search box and pressing Enter to open a Command Prompt window) also has a Control menu, which you can access by right-clicking anywhere in the Command Prompt window. It provides access to the Clipboard for cut, copy, and paste actions, as well as settings for the font size and toolbar (if applicable). However, if you have enabled the Command Prompt’s QuickEdit Mode, right-clicking will paste the contents of the Clipboard into whatever program happens to be running in the Command Prompt.
Files, Folders, and Disks
Files are the basic unit of long-term storage on a computer. Files are organized into folders, which are stored on disks. (In DOS, Unix, and earlier versions of Windows, folders were more often referred to as directories, but both terms are still used.) This section reviews fundamental filesystem concepts, including file- and disk-naming conventions and file types.
Disk Names
Like every version of Windows that preceded it, Windows Vista retains the basic DOS disk-naming conventions. Drives are differentiated by a single letter of the alphabet followed by a colon:
- A:
Represents the first “floppy” (usually 3.5-inch) disk drive on the system
- B:
Represents the second floppy disk drive, if present
- C:
Represents the first hard disk drive or the first partition of the first hard disk drive
- D:
Often represents a DVD-ROM or CD-ROM drive, but can represent an additional hard disk drive or other removable drive
- E: through Z:
Represent additional hard disk drives, DVD-ROM or CD-ROM drives, Universal Serial Bus (USB) flash drives, removable cartridges such as ZIP or Jaz drives, or mapped network drives
By default, drive letters are assigned consecutively, but it’s possible to change the drive letters for most drives so that you can have a drive N: without having a drive M:.
Pathnames
Folders, which contain files, are stored hierarchically on a disk and can be nested to any arbitrary level.
The filesystem on any disk begins with the root (top-level) directory, represented as a backslash. Thus, C:\ represents the root directory on the C: drive. Each additional nested directory is simply listed after its “parent,” with backslashes used to separate each one. C:\Windows\System\Color means that the Color folder is in the System folder in the Windows folder on the C: drive. Thus, you can express a path to any given folder as a single string of folder names.
A path can be absolute (always starting with a drive letter) or relative (referenced with respect to the current directory). The concept of a current directory is somewhat obsolete in Windows Vista, as it was in Windows NT, Windows 2000, and Windows XP, with the exception of commands issued from the Command Prompt. Each Command Prompt window has an active folder associated with it, to which each command is directed. For example, if the current directory is C:\windows, and you type DIR (the directory listing command), you would get a listing of the files in that folder. If you then type CD cursors, the current directory would become C:\windows\cursors.
The fact that the entire absolute path was not needed after the CD command is an example of the use of a relative path.
A special type of relative path is made up of one or more dots. The names . and .. refer to the current directory and the parent of that directory, respectively (C:\windows is the parent folder of C:\windows\cursors, for example). Type CD .. while in C:\windows, and the current directory becomes simply C:\. Use of additional dots (such as ...) in some previous versions of Windows is not supported in Windows XP or Vista. The graphical equivalent of .. is the yellow folder icon with the curved arrow, found in common file dialogs.
The left pane (Navigation Pane) in Windows Explorer (by default) contains a hierarchical tree-structured view of the filesystem. The tree structure makes it easier to navigate through all the folders on your system because it provides a graphical overview of the structure.
Paths to Network Resources
You can refer to files on any shared network via a Universal Naming Convention (UNC) pathname, which is very similar to a path (described in the preceding section). The first element of a UNC pathname is the name of the computer or device that contains the file, prefixed by a double backslash. The second element is the device’s share name. What follows is the string of folders leading to the target folder or file.
For example, the UNC path \\shoebox\o\hemp\adriana.txt refers to a file named adriana.txt, located in the hemp folder, located on drive O: (which has been shared as o), located on a computer named shoebox.
Short Names and Long Names
DOS and Windows 3.1, the Microsoft operating systems that preceded Windows 95 and Windows NT, only supported filenames with a maximum of eight characters, plus a three-character file type extension (e.g., myfile.txt). The maximum length of any path was 80 characters (see "Pathnames,” earlier in this chapter, for more information on paths). Legal characters included any combination of letters and numbers, extended ASCII characters with values greater than 127, and the following punctuation characters:
$ % ^ ' ` - _ @ ~ ! ( ) # &
Spaces were not allowed.
Windows Vista supports long filenames (up to 260 characters), which can include spaces as well as these punctuation characters:
$ % ^ ' ` - _ @ ~ ! ( ) # & + , ; = [ ] .
For example, a file could be named Picture of my Niece.jpg and could be located in a folder named Family Photos. Furthermore, extensions are no longer limited to three characters; for example, .html is perfectly valid (and distinctly different from .htm). For more information on file types and extensions, see the discussions in the next section.
The maximum length of any path in Windows Vista depends on the filesystem you’re using (NTFS, FAT32, etc.).
File Types and Extensions
Most files have a filename extension, the (usually three) letters that appear after the last dot in any file’s name. Here are some common file extensions:
- .xls
An Excel spreadsheet
- .txt
A text file (to be opened with Notepad)
- .html
A HyperText Markup Language (HTML) file, commonly known as a web page
- .jpg
A JPEG image file, used to store photos
Although each of these files holds very different types of data, the only way Windows differentiates them is by their filename extensions. How Windows is able to determine a given file’s type is important for several reasons, especially because it is the basis for the associations that link documents with the applications that created them. For example, when you double-click on a file named donkey.html, Windows looks up the extension in the Registry and then, by default, opens the file in your web browser. Rename the file to donkey.jpg, and the association changes as well.
The lesson here is that filename extensions are not a reliable guide to a file’s type, despite how heavily Windows Vista relies on them. What can make it even more frustrating is that, by default, known filename extensions are hidden by Windows Vista, but unfamiliar extensions are shown. Rename donkey.xyz (an unassociated extension) to donkey.txt, and the extension simply disappears in Windows Explorer. Or, try to differentiate donkey.txt from donkey.doc when the extensions are hidden. To instruct Windows to show all extensions, go to Control Panel → Appearance and Personalization → Folder Options → View, and turn off the “Hide file extensions for known file types” option.
To see all of the configured file extensions on your system, go to Start → Default Programs → Associate a file type or protocol with a program. You’ll see a list of all your file types, along with the programs with which they are associated. To change the default program for any file type, highlight the file type, click “Change program,” and then select the new program with which the file should be associated.
Get Windows Vista Pocket Reference now with the O’Reilly learning platform.
O’Reilly members experience books, live events, courses curated by job role, and more from O’Reilly and nearly 200 top publishers.

